How to integrate user authentication via Xsolla ID
How it works
You can add user authentication with Xsolla ID — the shared identity platform, providing seamless access across Xsolla products.
You can implement one of the following user scenarios:
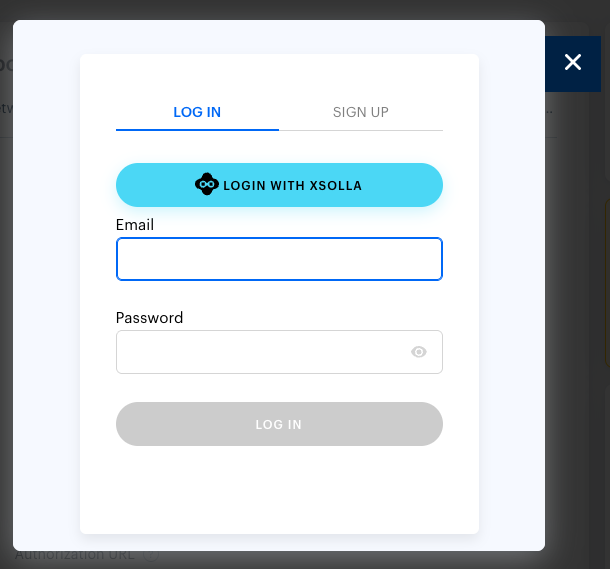
Opening the Xsolla ID authentication page in a modal window by clicking the Log in with Xsolla button in the login widget:
- The user clicks the Log in with Xsolla button in the login widget.
- The user is redirected to the Xsolla ID authentication page that opens in a modal window.
- The user completes the authentication process on the Xsolla ID authentication page.
- The user is redirected to the URL specified in the Callback URL field in Publisher Account.
Redirecting to the Xsolla ID authentication page by clicking the Log in with Xsolla button in the login widget:
- The user clicks the Log in with Xsolla button in the login widget.
- The user is redirected to the Xsolla ID authentication screen that opens in the same window.
- The user completes the authentication process on Xsolla ID.
- The user is redirected to the page whose URL is specified in the Callback URL field in Publisher Account.
Redirecting to the Xsolla ID authentication page in a pop-up window by clicking a button on your website:
- The user clicks a button on your website.
- The user is redirected to the Xsolla ID authentication page that opens in a pop-up window.
- The user completes the authentication process on the Xsolla ID authentication page.
- The user is redirected to the page whose URL is specified in the Callback URL field in Publisher Account.
How to get it
To integrate social login via Xsolla ID:
- Integrate the login widget.
- Enable Xsolla as a social network.
- Implement the retrieval of the user authorization token.
Integration of login widget
Add the Xsolla Login widget to your application — it provides a ready-made user authentication interface.
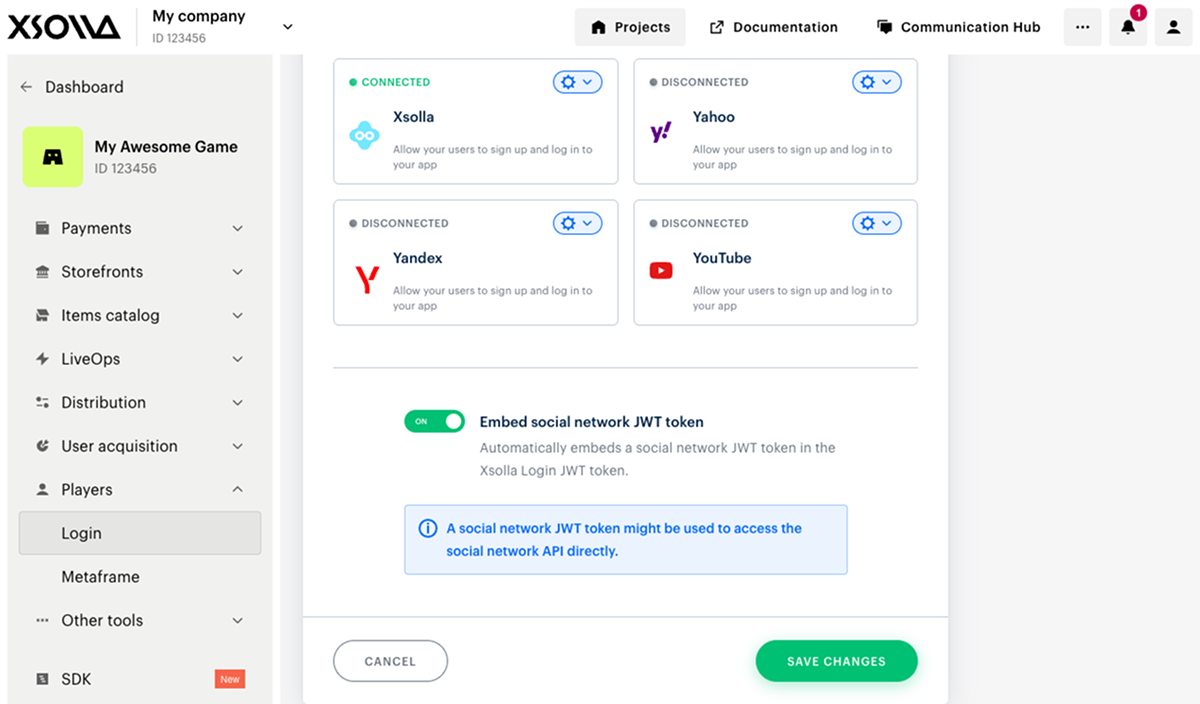
Enable Xsolla as social network
In your project in Publisher Account go to the Players > Login section.
Click Configure in the pane of a Login project.
Go to the Authentication block and select Social login.
Select Xsolla from the list of social networks.

Click the ⚙ icon and select Connect.
Set up one of the user scenarios:
Same-window authentication
To redirect the user to the Xsolla ID authentication page after they click the Log in with Xsolla button in the login widget:
- Go to the Authentication section and click Callback URLs.
- In the Callback URL field, enter the URL to redirect the user to after authentication.
- In the
callbackUrlparameter of the login widget’s code, pass the URL to redirect the user to after authentication.
Widget code example:
- javascript
1import { Widget } from '@xsolla/login-sdk';
2const xl = new Widget({
3  projectId: '[Login ID]',
4  preferredLocale: 'en_US',
5  callbackUrl: '[Your Callback URL]',
6});
Pop-up window authentication
To redirect the user to the Xsolla ID authentication page in a pop-up window after they click a button on your website:
- On the navigation page, go to the Authentication section and click Callback URLs.
- Make sure that the following URL is added in the Callback URL section:
https://login.xsolla.com/api/social/oauth2/callback. - In the login widget code pass the
truevalue in thebabkaLoginPopupparameter, and pass the URL to redirect the user to after authentication in thecallbackUrlparameter.
Widget code example:
- javascript
1import { Widget } from '@xsolla/login-sdk';
2const xl = new Widget({
3  projectId: '[Login ID]',
4  preferredLocale: 'en_US',
5  babkaLoginPopup: true,
6  callbackUrl: '[Your Callback URL]',
7});
- Add the button opening the Xsolla ID authentication page to your website.
Log in with Xsolla button code example:
- html
1<div id="xl_auth"></div>
2<button onclick="xl.open()">Log in with Xsolla</button>
Modal window authentication
To redirect the user to the Xsolla ID authentication page in a modal window after they click the Log in with Xsolla button in the login widget:
- Go to the Authentication section and click Callback URLs.
- In the Callback URL field, enter the URL to redirect the user to after authentication.
- In the login widget’s code, pass the
popupvalue in thebabkaLoginFlowparameter, and pass the URL to redirect the user to after authentication in thecallbackUrlparameter.
Widget code example:
- javascript
1import { Widget } from '@xsolla/login-sdk';
2const xl = new Widget({
3  projectId: '[Login ID]',
4  preferredLocale: 'en_US',
5  babkaLoginFlow: "popup",
6  callbackUrl: '[Your Callback URL]',
7});
Getting user authorization token
After authorization on the Xsolla ID side, the user will be redirected to the URL specified in the callbackUrl parameter. The user authorization token is passed in the token parameter.
To embed Xsolla ID OAuth JWT token in Xsolla Login JWT token:
- In your project in Publisher Account go to the Players > Login section.
- Click Configure in the pane of a Login project.
- Go to the Authentication block and select Social login.
- Turn on the Embed social network JWT token toggle.
- Click Save changes.
Found a typo or other text error? Select the text and press Ctrl+Enter.
