Create item
Virtual currency is virtual money that is used for purchasing and selling in-game items. Depending on its purpose, a virtual currency affects the game economy balance or is connected to the monetization of the application. You can also create hard currency — a virtual currency that is linked to the platform of purchase and can be purchased only for real money.
To set up virtual currency:
- In your project in Publisher Account, go to the LiveOps > Canvas section.
- Start creating virtual currency using one of the following options:
- Option 1:
- In the toolbar, click the
icon. - In the Groups area, select a group (optional).
- In the item list area, click the + icon and select Create manually.
- In the toolbar, click the
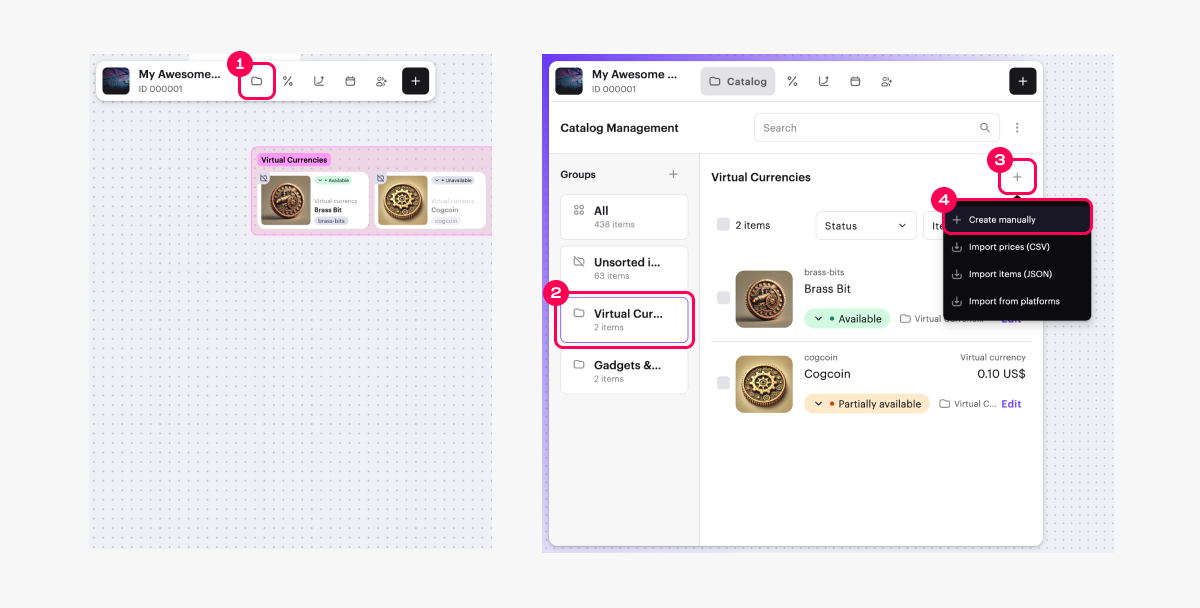
- Select Virtual currency and click Create.
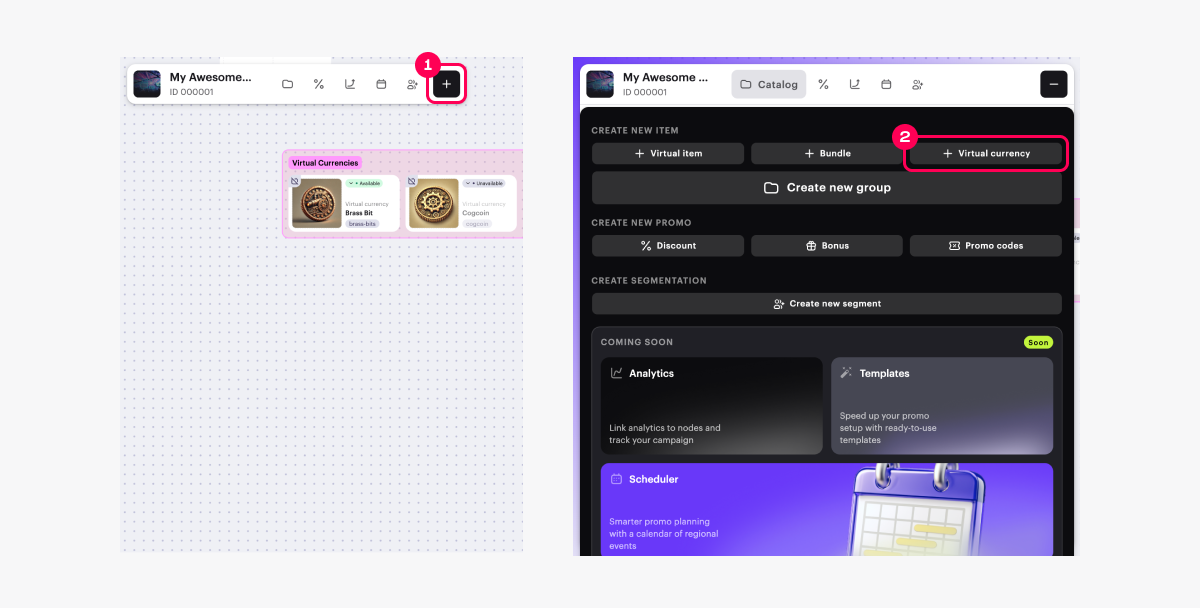
- Option 2: In the toolbar, click the + icon and select Virtual currency.
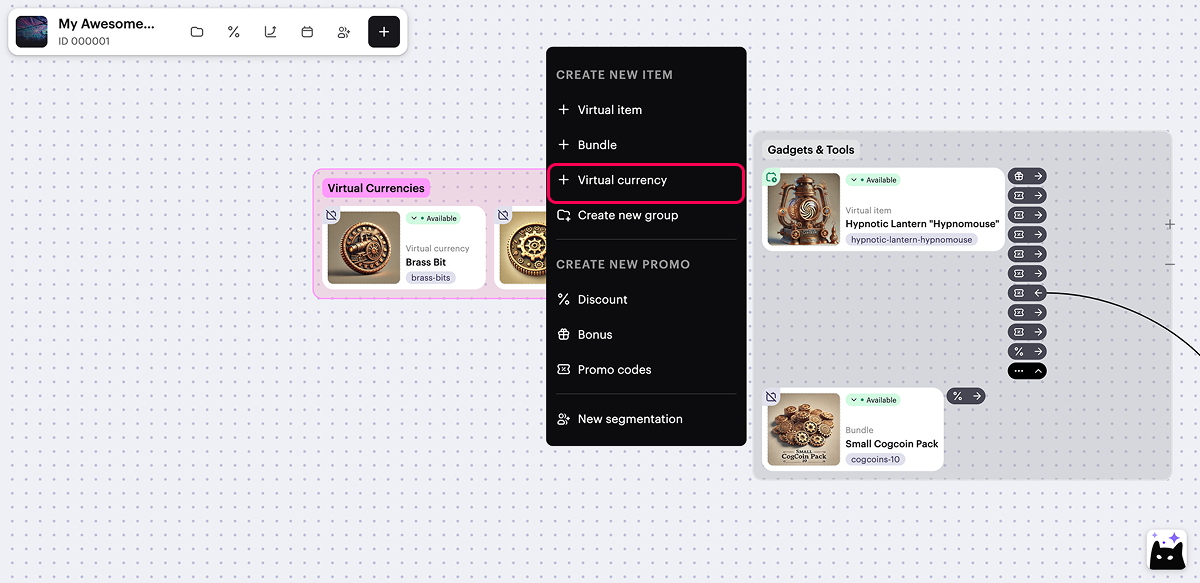
- Option 3: Open the context menu anywhere on the canvas and select Virtual currency.
- Specify the basic settings:
- image (optional)
- SKU — unique currency ID
- virtual currency name
- virtual currency description
- Click Next.
- To store hard currency separately by platforms (optional), set the Hard virtual currency toggle to active.
- Configure pricing for the virtual currency:
- To create a free virtual currency, select Free virtual currency.
- To create a paid virtual currency:
- Select Paid virtual currency.
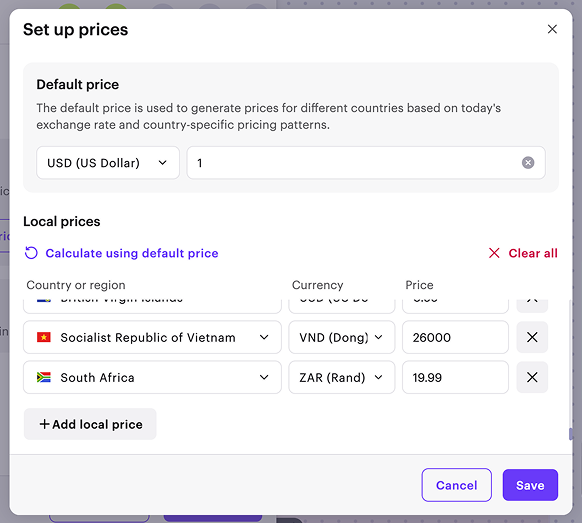
- Click Set up prices.
- In the Default currency block, change the currency (optional) and set the price.
- Set local prices (optional):
- To set prices automatically, click Calculate using default price. A list of countries will be generated in alphabetical order, and the price in the regional currency will be calculated for each country based on exchange rates and taxes. You can edit or remove these prices.
- To set prices manually, fill in the Country or region, Currency, Price fields. To add more local prices, click Add local price and add prices line by line.
- Click Save.
Catalog item price is determined based on the user’s country. At checkout, the user sees the item price, converted to their local currency, and any applicable taxes. If local prices are not configured, the basic price applies to all countries.
For more details about how the user’s country is determined and how prices are displayed in the item catalog, refer to Local prices.
- Click Next.
- Add additional item attributes — item characteristics that provide extra information to the user (optional):
- To upload attributes in JSON format:
- Set the Use JSON to add attributes toggle to active.
- In the text area, add the list of attributes and their values in JSON format.
- To add an attribute from previously added ones in the project:
- Set the Select existing attributes or create new ones toggle to active.
- In the Attribute field, select the ID of the desired item attribute.
- In the Value field, select the ID of the desired attribute value.
- Click Next.
- Review the settings and click Save.
- Set the virtual currency availability in the catalog by choosing one of the statuses:
- Unavailable (default) — the virtual currency is not available for purchase in the catalog, can’t be included in a bundle, or used as a bonus for another item purchase.
- Available — the virtual currency is available for purchase in the catalog and can be included in a bundle or used as a bonus for another item purchase.
- Partially available — the virtual currency is not available for purchase from the catalog but can still be added to a bundle or used as a bonus for another item purchase.
You can change the virtual currency’s availability status later.
- Click Create.
Virtual items are in-game items that users can purchase with real or virtual currency or receive as a bonus. These items have no physical form and are used exclusively within the game.
To create a virtual item:
- In your project in Publisher Account, go to the LiveOps > Canvas section.
- Start creating a virtual item using one of the following options:
- Option 1:
- In the toolbar, click the
icon. - In the Groups area, select a group (optional).
- In the item list area, click the + icon and select Create manually.
- In the toolbar, click the

- Select Virtual item and click Create.
- Option 2: In the toolbar, click the + icon and select Virtual item.
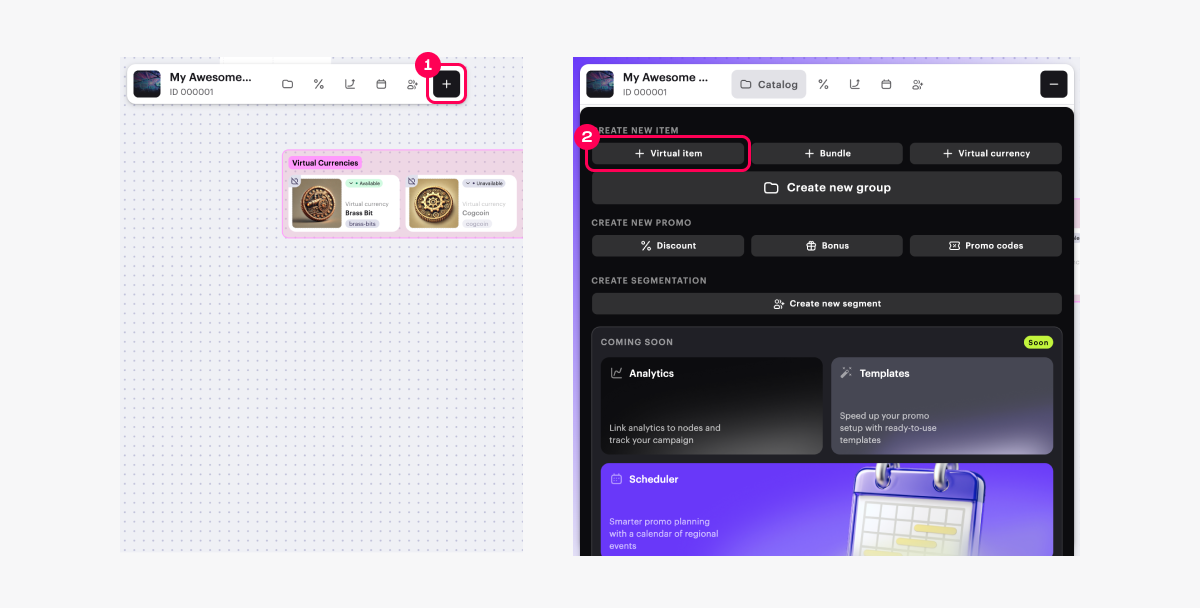
- Option 3: Open the context menu anywhere on the canvas and select Virtual item.
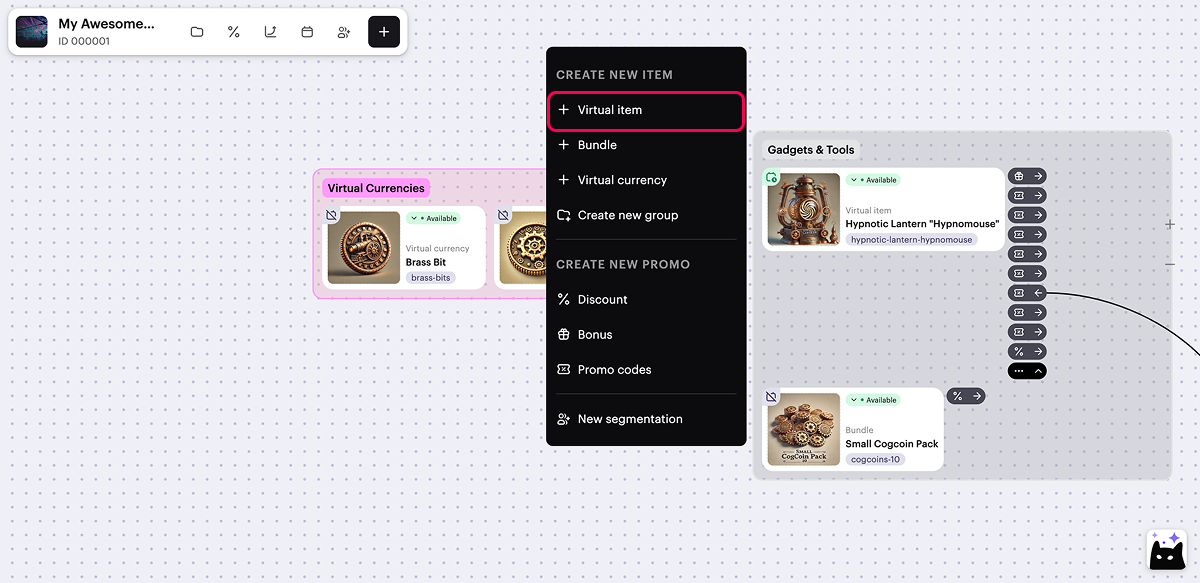
- Specify the basic settings:
- image (optional).
- SKU — unique item ID
- group the item belongs to (optional).
- item name
- item description
- Click Next.
- To create a free virtual item, select Free virtual item.
- To create a paid virtual item, select Paid virtual item and specify the price:
- To set price in real currency:
- Set the Pricing in real currency toggle to active.
- Click Set up prices.
- In the Default currency block, change the currency (optional) and set the price.
- Set local prices (optional):
- To set prices automatically, click Calculate using default price. A list of countries will be generated in alphabetical order, and the price in the regional currency will be calculated for each country based on exchange rates and taxes. You can edit or remove these prices.
- To set prices manually, fill in the Country or region, Currency, Price fields. To add more local prices, click Add local price and add prices line by line.
- Click Save.
- To set price in real currency:

Catalog item price is determined based on the user’s country. At checkout, the user sees the item price, converted to their local currency, and any applicable taxes. If local prices are not configured, the basic price applies to all countries.
For more details about how the user’s country is determined and how prices are displayed in the item catalog, refer to Local prices.
- To set the price in virtual currency:
- Set the Pricing in virtual currency toggle to active.
- In the Price in virtual currency field, specify the virtual currency and price.
- To add a price in another currency, click Add pricing and fill in the displayed fields.
- Fill in the Default currency field.
- Click Next.
- Limit the number of virtual items available for purchase (optional). To do that:
- Set the Limit for item purchase per user toggle to active and specify the quantity available per user.
- Configure the refresh rate for the limit:
- If you don’t want to refresh limits, select No regular refresh.
- If you want limits to refresh regularly, select the refresh rate and specify when the limit should be refreshed.
- Set the display duration for the virtual item in the store (optional). In the Show item in store field, select Set duration and specify the time zone, start, and end dates.
- Click Next.
- Add additional item attributes — item characteristics that provide extra information to the user (optional):
- To upload attributes in JSON format:
- Set the Use JSON to add attributes toggle to active.
- In the text area, add the list of attributes and their values in JSON format.
- To add an attribute from previously added ones in the project:
- Set the Select existing attributes or create new ones toggle to active.
- In the Attribute field, select the ID of the desired item attribute.
- In the Value field, select the ID of the desired attribute value.
- Click Next.
- Review the settings and click Save.
- Set the virtual item availability in the catalog by choosing one of the statuses:
- Unavailable (default) — the item is not available for purchase in the catalog, can’t be included in a bundle, or used as a bonus for another item purchase.
- Available — the virtual item is available for purchase in the catalog and can be included in a bundle or used as a bonus for another item purchase.
- Partially available — the virtual item is not available for purchase from the catalog but can still be added to a bundle or used as a bonus for another item purchase.
You can change the virtual item’s availability status later.
- Click Create.
A bundle is a set of several items that are sold as a single unit.
To create a bundle:
- In your project in Publisher Account, go to the LiveOps > Canvas section.
- Start creating a virtual item using one of the following options:
- Option 1:
- In the toolbar, click the
icon. - In the Groups area, select a group (optional).
- In the item list area, click the + icon and select Create manually.
- In the toolbar, click the

- Select Bundle and click Create.
- Option 2: In the toolbar, click the + icon and select Bundle.
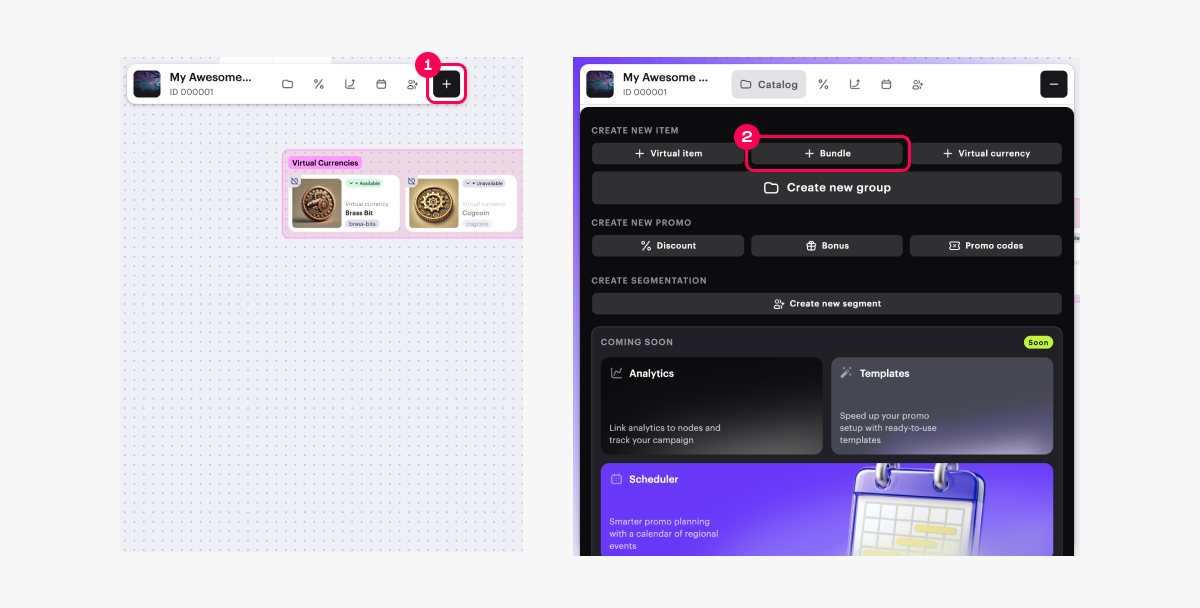
- Option 3: Open the context menu anywhere on the canvas and select Bundle.
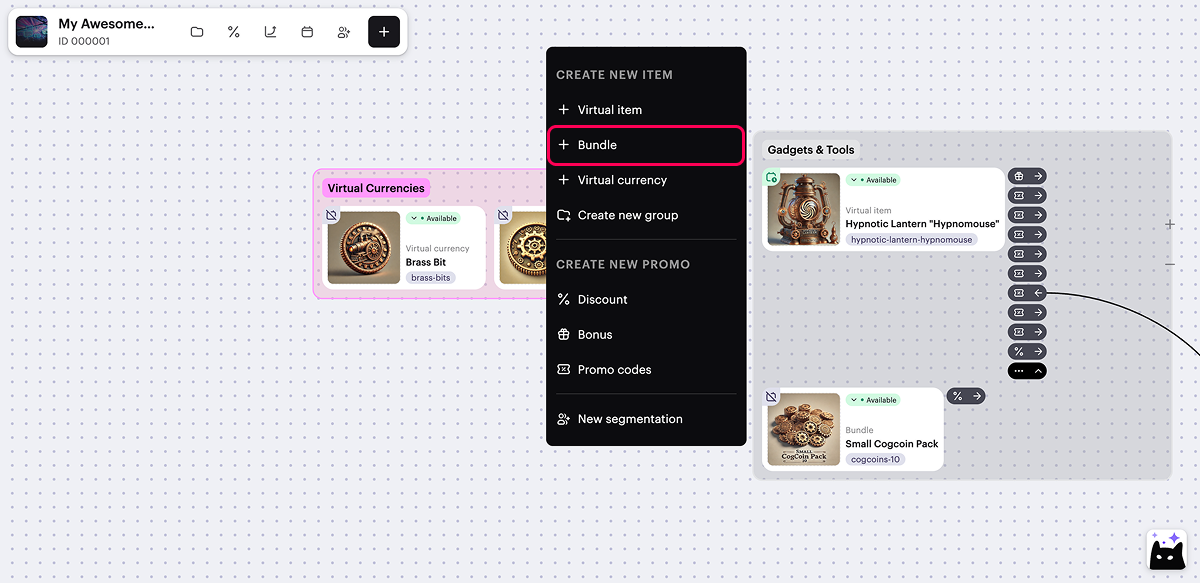
- Specify the basic settings:
- image (optional)
- SKU — unique bundle ID
- group the bundle belongs to (optional)
- bundle name
- bundle description
- Click Next.
- Add items to the bundle:
- In the Bundle items area, click Select items.
- In the window that opens, check the boxes next to the required items and specify their quantity.
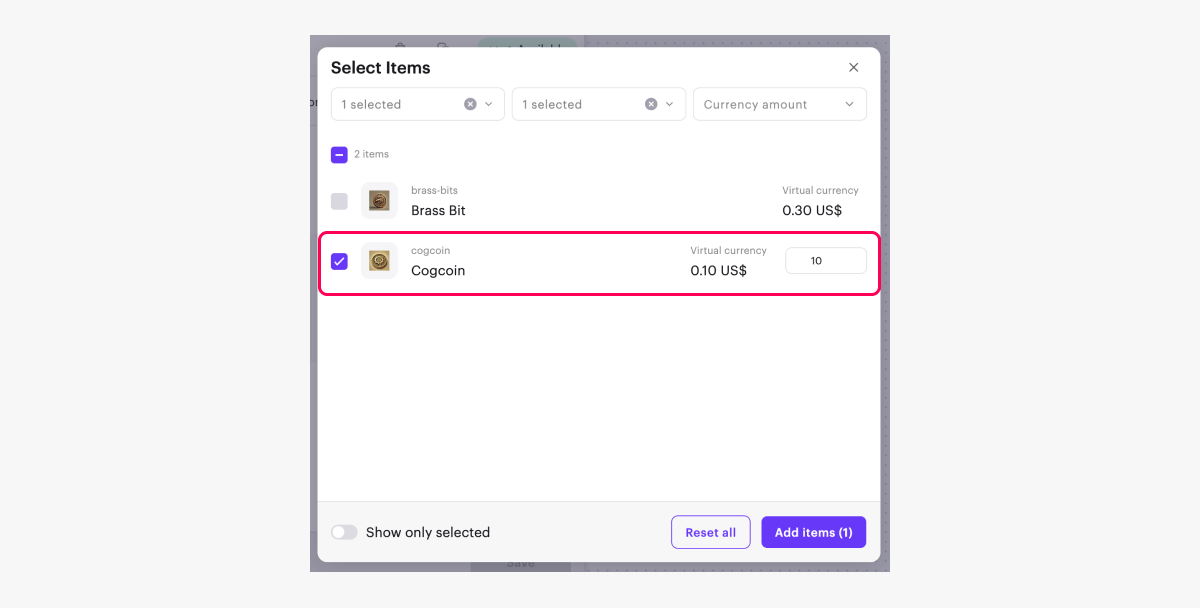
- Click Add items.
- To create a free bundle, select Free bundle.
- To create a paid bundle, select Paid bundle and specify the price:
- To set price in real currency:
- Set the Pricing in real currency toggle to active.
- Click Set up prices.
- In the Default currency block, change the currency (optional) and set the price.
- Set local prices (optional):
- To set prices automatically, click Calculate using default price. A list of countries will be generated in alphabetical order, and the price in the regional currency will be calculated for each country based on exchange rates and taxes. You can edit or remove these prices.
- To set prices manually, fill in the Country or region, Currency, Price fields. To add more local prices, click Add local price and add prices line by line.
- Click Save.
- To set price in real currency:

Catalog item price is determined based on the user’s country. At checkout, the user sees the item price, converted to their local currency, and any applicable taxes. If local prices are not configured, the basic price applies to all countries.
For more details about how the user’s country is determined and how prices are displayed in the item catalog, refer to Local prices.
- To set the price in virtual currency:
- Set the Pricing in virtual currency toggle to active.
- In the Price in virtual currency field, specify the virtual currency and price.
- To add a price in another currency, click Add pricing and fill in the displayed fields.
- Fill in the Default currency field.
- Click Next.
- Limit the number of bundles available for purchase (optional). To do that:
- Set the Limit for item purchase per user toggle to active and specify the quantity available per user.
- Configure the refresh rate for the limit:
- If you don’t want to refresh limits, select No regular refresh.
- If you want limits to refresh regularly, select the refresh rate and specify when the limit should be refreshed.
- Set the display duration for the bundle in the store (optional). In the Show item in store field, select Set duration and specify the time zone, start, and end dates.
- Click Next.
- Add additional item attributes — bundle characteristics that provide extra information to the user (optional):
- To upload attributes in JSON format:
- Set the Use JSON to add attributes toggle to active.
- In the text area, add the list of attributes and their values in JSON format.
- To add an attribute from previously added ones in the project:
- Set the Select existing attributes or create new ones toggle to active.
- In the Attribute field, select the ID of the desired item attribute.
- In the Value field, select the ID of the desired attribute value.
- To upload attributes in JSON format:
- Click Next.
- Review the settings and click Save.
- Set the bundle availability in the catalog by choosing one of the statuses:
- Unavailable (default) — the bundle is not available for purchase in the catalog, can’t be included in another bundle, or used as a bonus for another item purchase.
- Available — the bundle is available for purchase in the catalog and can be included in another bundle or used as a bonus for another item purchase.
- Partially available — the bundle is not available for purchase from the catalog but can still be added to a bundle or used as a bonus for another item purchase.
You can change the bundle’s availability status later.
- Click Create.
Haben Sie einen Tippfehler oder einen anderen Textfehler gefunden? Wählen Sie den Text aus und drücken Sie Strg+Eingabe.
