
Gestión de compras
This tutorial shows how to use the SDK methods to display the following items in an in-game store:
- virtual items
- groups of virtual items
- bundles
- packages of virtual currency
Before you start, configure items in Publisher Account:
- Configure virtual items and groups of virtual items.
- Configure packages of virtual currencies.
- Configure bundles.
This tutorial describes the implementation of the following logic:

The logics and interface in the examples are less complicated than they will be in your application. A possible item catalog in an in-game store implementation option is described in the demo project.
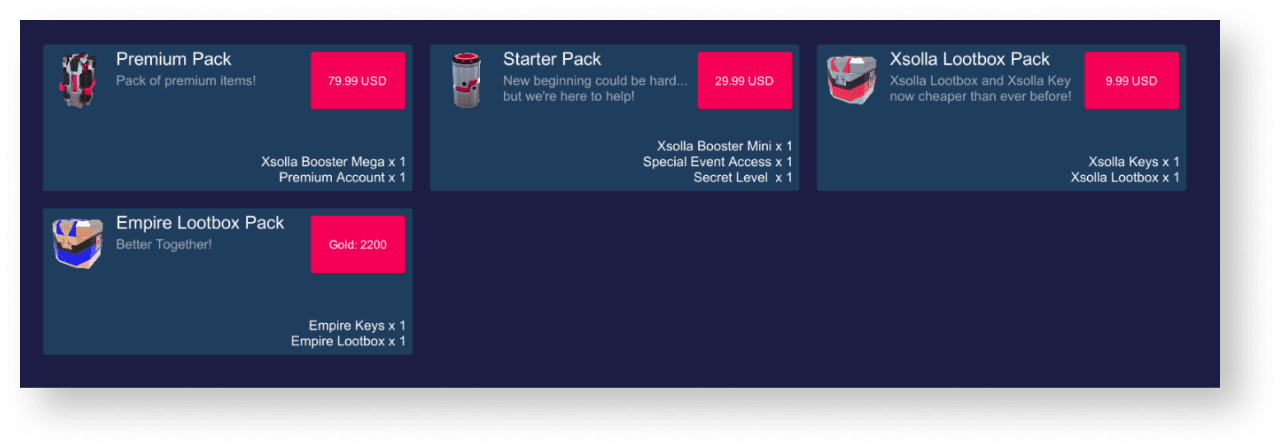
The example of every item in a catalog shows:
- item name
- item description
- item price
- image
You can also show other information about the item if this information is stored in an in-game store.
Implementar la visualización de artículos virtuales
Crear widget de artículo
- Create an empty game object. To do this, go to the main menu and select
GameObject > Create Empty . - Convert the created game object in a prefab by dragging a game object from a
Hierarchy panel to aProject panel. - Select a created prefab and click
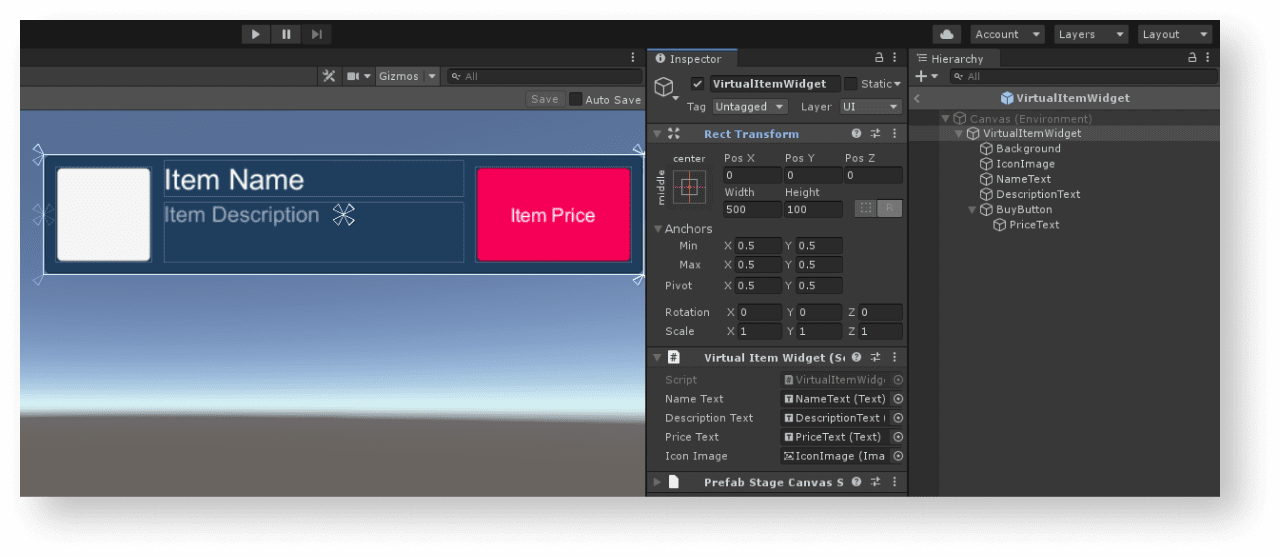
Open Prefab in theInspector panel. - Add the following UI elements as prefab child objects and configure their visuals:
- item background image
- item name
- item description
- item price
- item image
The following picture shows an example of the widget structure.
Crear script de widget de artículo
- Create a script
VirtualItemWidgetinherited from the MonoBehaviour base class. - Declare variables for the item widget interface elements and set values for them in the
Inspector panel.
Example of the widget script:
- C#
 1using UnityEngine;
 2using UnityEngine.UI;
 3
 4namespace Recipes
 5{
 6	public class VirtualItemWidget : MonoBehaviour
 7	{
 8		// Declaration of variables for UI elements
 9
10		public Text NameText;
11
12		public Text DescriptionText;
13
14		public Text PriceText;
15
16		public Image IconImage;
17	}
18}
Crear página para mostrar lista de artículos
- On the scene, create an empty game object. To do this, go to the main menu and select
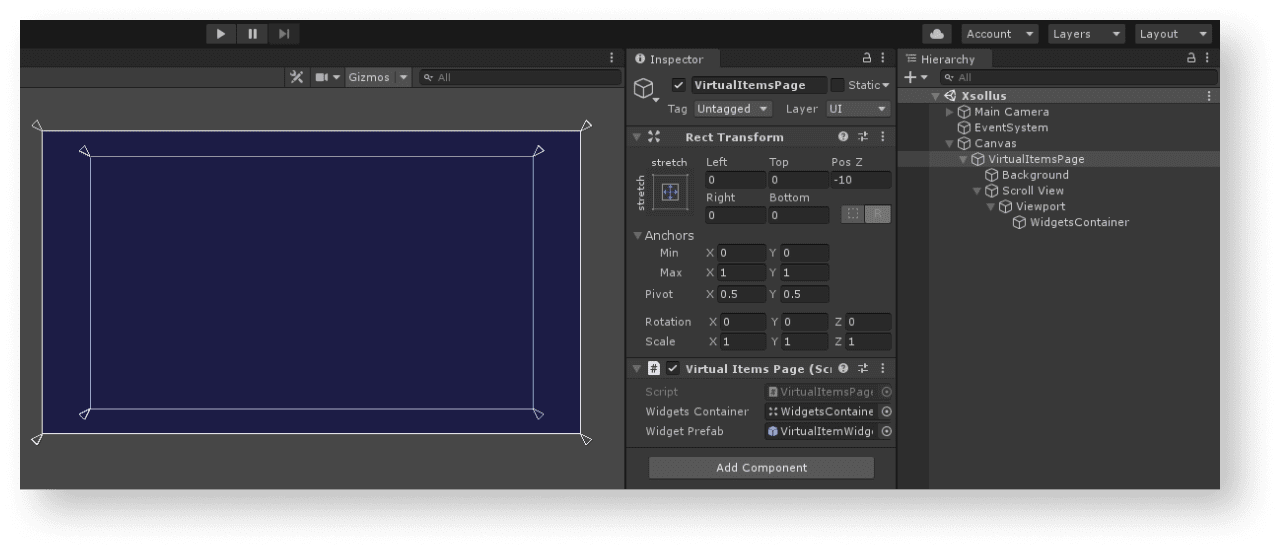
GameObject > Create Empty . - Add the following UI elements as prefab child objects and configure their visuals:
- page background image
- item widgets display area
The following picture shows an example of the page structure.
Crear controlador de página
- Create a script
VirtualItemsPageinherited from theMonoBehaviourbase class. - Declare the following variables:
WidgetsContainer— container for widgetsWidgetPrefab— item widget prefab
- Attach a script to a page game object:
- Select an object in a
Hierarchy panel. - In the
Inspector panel, clickAdd Component and select aVirtualItemsPagescript.
- Select an object in a
- Set values for variables in the
Inspector panel.
- Add login logics by calling an
XsollaLogin.Instance.SignInSDK method in theStartmethod and pass to it:- a username or email address in the
usernameparameter - a user password in the
passwordparameter
- a username or email address in the
xsolla, password: xsolla).- a flag in the
rememberUserparameter for remembering an account - the
OnAuthenticationSuccesscallback method for successful user login - the
OnErrorcallback method for an error
- a flag in the
- Add logics for getting the list of items. In the
OnAuthenticationSuccessmethod call theXsollaStore.Instance.GetCatalogSDK method and pass to it:- a Project ID in the
projectIdparameter
- a Project ID in the
- the
OnItemsRequestSuccessfor successful operation of getting a list of items - the
OnErrorcallback method for an error - an offset based on the first item in the list in the
offsetparameter - the number of loaded items in the
limitparameter
- the
offset and limit parameters are not required. Use them to implement pagination — a page-by-page display of items in the catalog. The maximum number of items on the page is 50. If the catalog has more than 50 items, pagination is necessary.- In the
OnItemsRequestSuccessmethod, add logics for creating a widget for every received item:- Instantiate a prefab of item widget as a container child object.
- Attach the received
VirtualItemWidgetcomponent to awidgetvariable.
- Pass the following data to the item widget:
- Pass the
storeItem.namevariable value to the element with the item name. - Pass the
storeItem.descriptionvariable value to the element with the item description. - Implement the following logics to display the item price:
- If the value of the
storeItem.pricevariable doesn’t equalnull, the item is sold for real currency. Specify the price in the{amount} {currency}format and pass it to the widget element. - If the value of the
storeItem.virtual_pricesvariable doesn’t equalnull, the item is sold for virtual currency. Specify the price in the{name}: {amount}format and pass it to the widget element.
- If the value of the
- Pass the
storeItem.virtual_prices variable is an array of prices for the same item in different currencies. The example shows a price specified by default in the item settings in Store > Virtual items in Publisher Account.- To display an item image, use the
ImageLoader.Instance.GetImageAsyncutility method and pass to it:- Image URL.
- An anonymous function as a callback. In this function, add a received sprite as an item image.
- To display an item image, use the
Example of a page controller script:
- C#
 1uusing System.Linq;
 2using UnityEngine;
 3using Xsolla.Core;
 4using Xsolla.Login;
 5using Xsolla.Store;
 6
 7namespace Recipes
 8{
 9	public class VirtualItemsPage : MonoBehaviour
10	{
11		// Declaration of variables for containers and widget prefabs
12
13		public Transform WidgetsContainer;
14
15		public GameObject WidgetPrefab;
16
17		private void Start()
18		{
19			// Starting the authentication process
20
21			XsollaLogin.Instance.SignIn("xsolla", "xsolla", true, null, OnAuthenticationSuccess, OnError);
22		}
23
24		private void OnAuthenticationSuccess(string token)
25		{
26			// After successful authentication starting the request for catalog from store
27
28			XsollaStore.Instance.GetCatalog(XsollaSettings.StoreProjectId, OnItemsRequestSuccess, OnError, offset: 0, limit: 50);
29		}
30
31		private void OnItemsRequestSuccess(StoreItems storeItems)
32		{
33			// Iterating the items collection and assign values for appropriate ui elements
34
35			foreach (var storeItem in storeItems.items)
36			{
37				var widgetGo = Instantiate(WidgetPrefab, WidgetsContainer, false);
38				var widget = widgetGo.GetComponent<VirtualItemWidget>();
39
40				widget.NameText.text = storeItem.name;
41				widget.DescriptionText.text = storeItem.description;
42
43				if (storeItem.price != null)
44				{
45					var realMoneyPrice = storeItem.price;
46					widget.PriceText.text = $"{realMoneyPrice.amount} {realMoneyPrice.currency}";
47				}
48				else if (storeItem.virtual_prices != null)
49				{
50					var virtualCurrencyPrice = storeItem.virtual_prices.First(x => x.is_default);
51					widget.PriceText.text = $"{virtualCurrencyPrice.name}: {virtualCurrencyPrice.amount}";
52				}
53
54				ImageLoader.Instance.GetImageAsync(storeItem.image_url, (url, sprite) => widget.IconImage.sprite = sprite);
55			}
56		}
57
58		private void OnError(Error error)
59		{
60			UnityEngine.Debug.LogError($"Error message: {error.errorMessage}");
61		}
62	}
63}
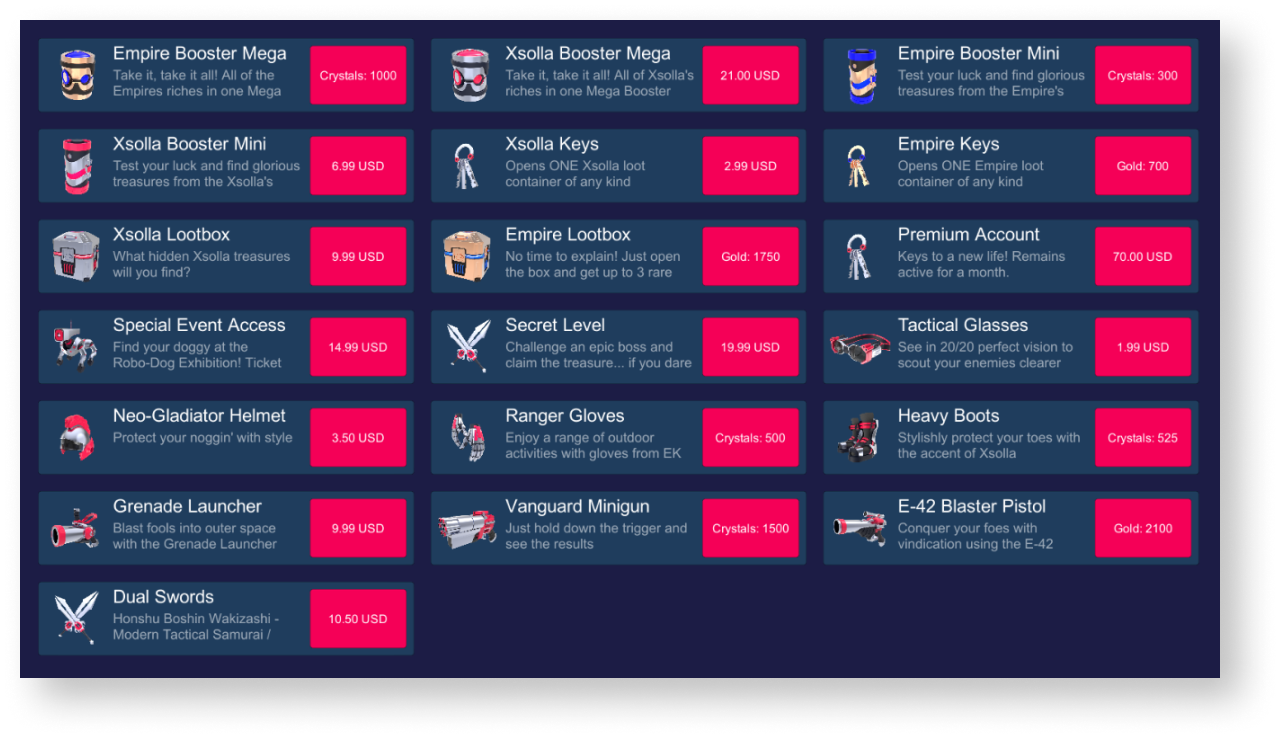
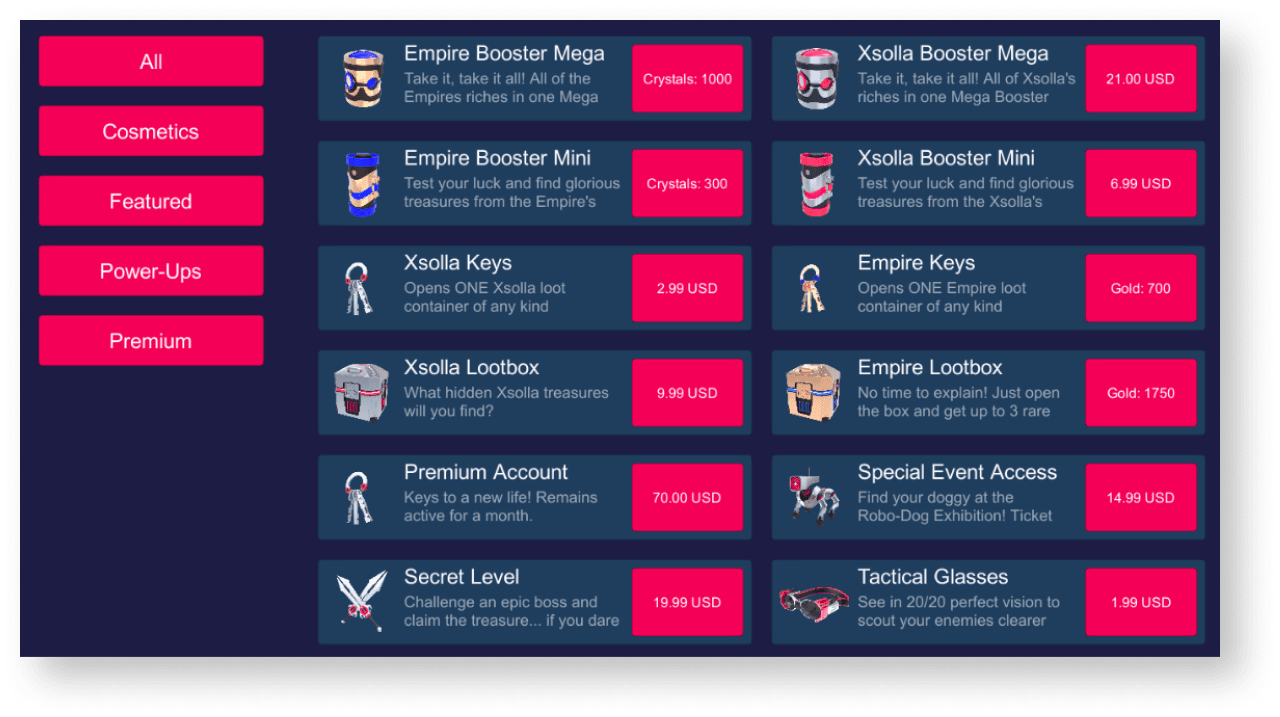
The following picture shows the result of the script’s work.
Implementar la visualización de grupos de artículos virtuales
Crear widget de artículo
- Create an empty game object. To do this, go to the main menu and select
GameObject > Create Empty . - Convert the created game object in a prefab by dragging a game object from a
Hierarchy panel to aProject panel. - Select a created prefab and click
Open Prefab in theInspector panel. - Add the following UI elements as prefab child objects and configure their visuals:
- item background image
- item name
- item description
- item price
- item image
The following picture shows an example of the widget structure.
Crear script de widget de artículo
- Create a script
VirtualItemWidgetinherited from the MonoBehaviour base class. - Declare variables for the item widget interface elements and set values for them in the
Inspector panel.
Example of the widget script:
- C#
 1using UnityEngine;
 2using UnityEngine.UI;
 3
 4namespace Recipes
 5{
 6	public class VirtualItemWidget : MonoBehaviour
 7	{
 8		// Declaration of variables for UI elements
 9
10		public Text NameText;
11
12		public Text DescriptionText;
13
14		public Text PriceText;
15
16		public Image IconImage;
17	}
18}
Crear widget para el botón que abre grupos de artículos
- Create an empty game object. To do this, go to the main menu and select
GameObject > Create Empty . - Convert the created game object in a prefab by dragging a game object from a
Hierarchy panel to aProject panel. - Select a created prefab and click
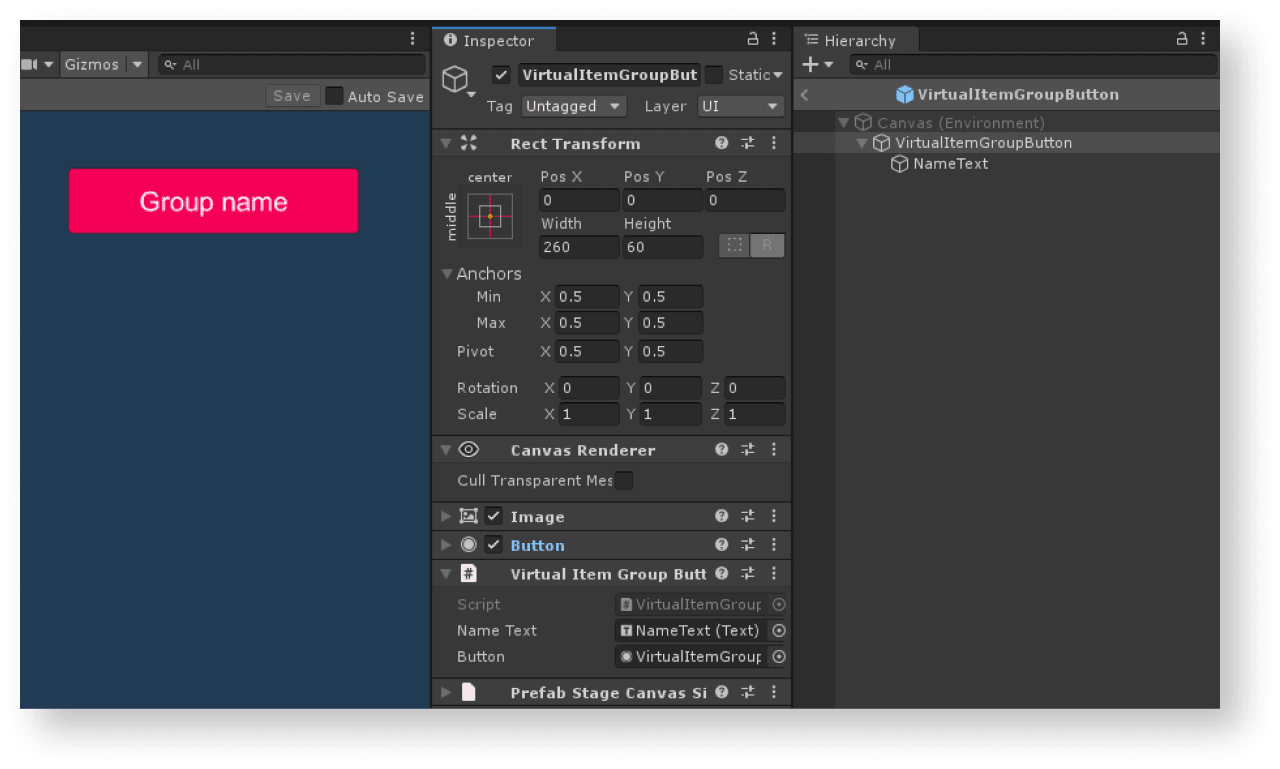
Open Prefab in theInspector panel. - Add the button that allows displaying of the group of items as a child object for a prefab and configure its visuals.
The following picture shows an example of the widget structure.
Crear script para el botón que abre grupos de artículos
- Create the
VirtualItemGroupButtonscript inherited from theMonoBehaviourbase class. - Declare variables for the button that opens the group of items and set values for the variables in the
Inspector panel. - Add a script to the root object of a prefab:
- Select an object in the
Hierarchy panel. - In the
Inspector panel, clickAdd Component and select aVirtualItemGroupButtonscript.
- Select an object in the
Example of the widget script:
- C#
 1using UnityEngine;
 2using UnityEngine.UI;
 3
 4namespace Recipes
 5{
 6	public class VirtualItemGroupButton : MonoBehaviour
 7	{
 8		// Declaration of variables for UI elements
 9		public Text NameText;
10
11		public Button Button;
12	}
13}
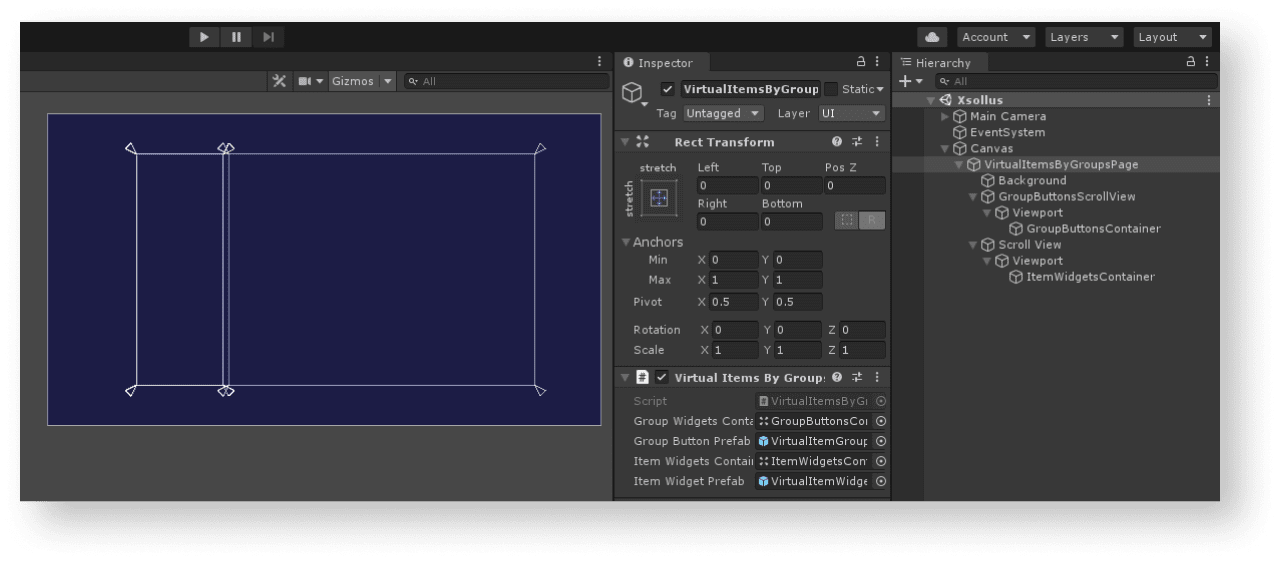
Crear página para mostrar lista de artículos
- On the scene, create an empty game object. To do this, go to the main menu and select
GameObject > Create Empty . - Add the following UI elements as prefab child objects and configure their visuals:
- page background image
- item groups buttons display area
- item widgets display area
The following picture shows an example of the page structure.
Crear controlador de página
- Create the
VirtualItemsByGroupsPagescript inherited from theMonoBehaviourbase class. - Declare variables:
GroupButtonsContainer— container for group buttonsGroupButtonPrefab— button prefabItemWidgetsContainer— container for item widgetsWidgetPrefab— item widget prefab
- Attach a script to a page game object:
- Select an object in a
Hierarchy panel. - In the
Inspector panel, clickAdd Component and select aVirtualItemsByGroupsPagescript.
- Select an object in a
- Set values for variables in the
Inspector panel. - Add login logics by calling an
XsollaLogin.Instance.SignInSDK method in theStartmethod and pass to it:- a username or email address in the
usernameparameter - a user password in the
passwordparameter
- a username or email address in the
xsolla, password: xsolla).- a flag in the
rememberUserparameter for remembering an account - the
OnAuthenticationSuccesscallback method for successful user login - the
OnErrorcallback method for an error
- a flag in the
- Add logics for getting the list of items. In the
OnAuthenticationSuccessmethod call theXsollaStore.Instance.GetCatalogSDK method and pass to it:- a Project ID in the
projectIdparameter
- a Project ID in the
- the
OnItemsRequestSuccessfor successful operation of getting a list of items - the
OnErrorcallback method for an error - an offset based on the first item in the list in the
offsetparameter - the number of loaded items in the
limitparameter
- the
offset and limit parameters are not required. Use them to implement pagination — a page-by-page display of items in the catalog. The maximum number of items on the page is 50. If the catalog has more than 50 items, pagination is necessary.- In the
OnItemsRequestSuccessmethod, add logics for forming a list of item groups:- Get the list of unique groups from a received item list. Add to it the
Allelement that will show all items not dependent on their category. - Clear the buttons container by deleting all child objects. To do this, call the
DeleteAllChildrenmethod and pass a container object to it. - For every item group:
- Get the list of unique groups from a received item list. Add to it the
- Instantiate a prefab of item widget as a container child object.
- Set the received
VirtualItemGroupButtoncomponent to thegroupButtonvariable. - Pass the
groupNamevariable value to the element with a group name. - Add an anonymous method to the action of clicking the button. In this method, call the
OnGroupSelectedmethod and pass the name of the item group and the list of items as parameters.
- To display all items call the
OnGroupSelectedmethod and passAllas a group name.
- To display all items call the
- In the
OnGroupSelectedmethod, add logics for initial display of items:- Create the
itemsForDisplayvariable and assign all received items to it if the name of the item group hasAll. Otherwise, link items that the group name matches with thegroupNamevariable to theitemsForDisplayvariable. - Clear the buttons container by deleting all child objects. To do this, call the
DeleteAllChildrenmethod and pass a container object to it.
- Create the
- Add logics for creating a widget for every received item:
- Instantiate a prefab of item widget as a container child object.
- Attach the received
VirtualItemWidgetcomponent to awidgetvariable.
- Pass the following data to the item widget:
- Pass the
storeItem.namevariable value to the element with the item name. - Pass the
storeItem.descriptionvariable value to the element with the item description. - Implement the following logics to display item price:
- Pass the
- If the value of the
storeItem.pricevariable doesn’t equalnull, the item is sold for real currency. Specify the price in the{amount} {currency}format and pass it to the widget element. - If the value of the
storeItem.virtual_pricesvariable doesn’t equalnull, the item is sold for virtual currency. Specify the price in the{name}: {amount}format and pass it to the widget element.
- If the value of the
storeItem.virtual_prices variable is an array of prices for the same item in different currencies. The example shows a price specified by default in the item settings in Store > Virtual items in Publisher Account.- To display an item image, use the
ImageLoader.Instance.GetImageAsyncutility method and pass to it:- Image URL.
- An anonymous function as a callback. In this function, add a received sprite as an item image.
- To display an item image, use the
- C#
  1using System.Collections.Generic;
  2using System.Linq;
  3using UnityEngine;
  4using Xsolla.Core;
  5using Xsolla.Login;
  6using Xsolla.Store;
  7
  8namespace Recipes
  9{
 10	public class VirtualItemsByGroupsPage : MonoBehaviour
 11	{
 12		// Declaration of variables for containers and widget prefabs
 13		public Transform GroupButtonsContainer;
 14
 15		public GameObject GroupButtonPrefab;
 16
 17		public Transform ItemWidgetsContainer;
 18
 19		public GameObject ItemWidgetPrefab;
 20
 21		private void Start()
 22		{
 23			// Starting the authentication process
 24			XsollaLogin.Instance.SignIn("xsolla", "xsolla", true, null, onSuccess: OnAuthenticationSuccess, onError: OnError);
 25		}
 26
 27		private void OnAuthenticationSuccess(string token)
 28		{
 29			// After successful authentication starting the request for catalog from store
 30			XsollaStore.Instance.GetCatalog(XsollaSettings.StoreProjectId, OnItemsRequestSuccess, OnError, offset: 0, limit: 50);
 31		}
 32
 33		private void OnItemsRequestSuccess(StoreItems storeItems)
 34		{
 35			// Selecting the group’s name from items and order them alphabetical
 36			var groupNames = storeItems.items
 37				.SelectMany(x => x.groups)
 38				.GroupBy(x => x.name)
 39				.Select(x => x.First())
 40				.OrderBy(x => x.name)
 41				.Select(x => x.name)
 42				.ToList();
 43
 44			// Add group name for “all groups”, which will mean show all items regardless of group affiliation
 45			groupNames.Insert(0, "All");
 46
 47			// Clear container
 48			DeleteAllChildren(GroupButtonsContainer);
 49
 50			// Iterating the group names and creating ui-button for each
 51			foreach (var groupName in groupNames)
 52			{
 53				var buttonObj = Instantiate(GroupButtonPrefab, GroupButtonsContainer, false);
 54				var groupButton = buttonObj.GetComponent<VirtualItemGroupButton>();
 55
 56				groupButton.NameText.text = groupName;
 57				groupButton.Button.onClick.AddListener(() => OnGroupSelected(groupName, storeItems));
 58			}
 59
 60			// Calling method for redraw page
 61			OnGroupSelected("All", storeItems);
 62		}
 63
 64		private void OnGroupSelected(string groupName, StoreItems storeItems)
 65		{
 66			// Declaring variable for items which will display on page
 67			IEnumerable<StoreItem> itemsForDisplay;
 68			if (groupName == "All")
 69			{
 70				itemsForDisplay = storeItems.items;
 71			}
 72			else
 73			{
 74				itemsForDisplay = storeItems.items.Where(item => item.groups.Any(group => group.name == groupName));
 75			}
 76
 77			// Clear container
 78			DeleteAllChildren(ItemWidgetsContainer);
 79
 80			// Iterating the items collection and assign values for appropriate ui elements
 81			foreach (var storeItem in itemsForDisplay)
 82			{
 83				var widgetGo = Instantiate(ItemWidgetPrefab, ItemWidgetsContainer, false);
 84				var widget = widgetGo.GetComponent<VirtualItemWidget>();
 85
 86				widget.NameText.text = storeItem.name;
 87				widget.DescriptionText.text = storeItem.description;
 88
 89				if (storeItem.price != null)
 90				{
 91					var realMoneyPrice = storeItem.price;
 92					widget.PriceText.text = $"{realMoneyPrice.amount} {realMoneyPrice.currency}";
 93				}
 94				else if (storeItem.virtual_prices != null)
 95				{
 96					var virtualCurrencyPrice = storeItem.virtual_prices.First(x => x.is_default);
 97					widget.PriceText.text = $"{virtualCurrencyPrice.name}: {virtualCurrencyPrice.amount}";
 98				}
 99
100				ImageLoader.Instance.GetImageAsync(storeItem.image_url, (url, sprite) => widget.IconImage.sprite = sprite);
101			}
102		}
103
104		// Utility method for delete all children of container
105		private static void DeleteAllChildren(Transform parent)
106		{
107			var childList = parent.Cast<Transform>().ToList();
108			foreach (var childTransform in childList)
109			{
110				Destroy(childTransform.gameObject);
111			}
112		}
113
114		private void OnError(Error error)
115		{
116			UnityEngine.Debug.LogError($"Error message: {error.errorMessage}");
117		}
118	}
119}
Example of a page controller script:
Implementar la visualización de lotes
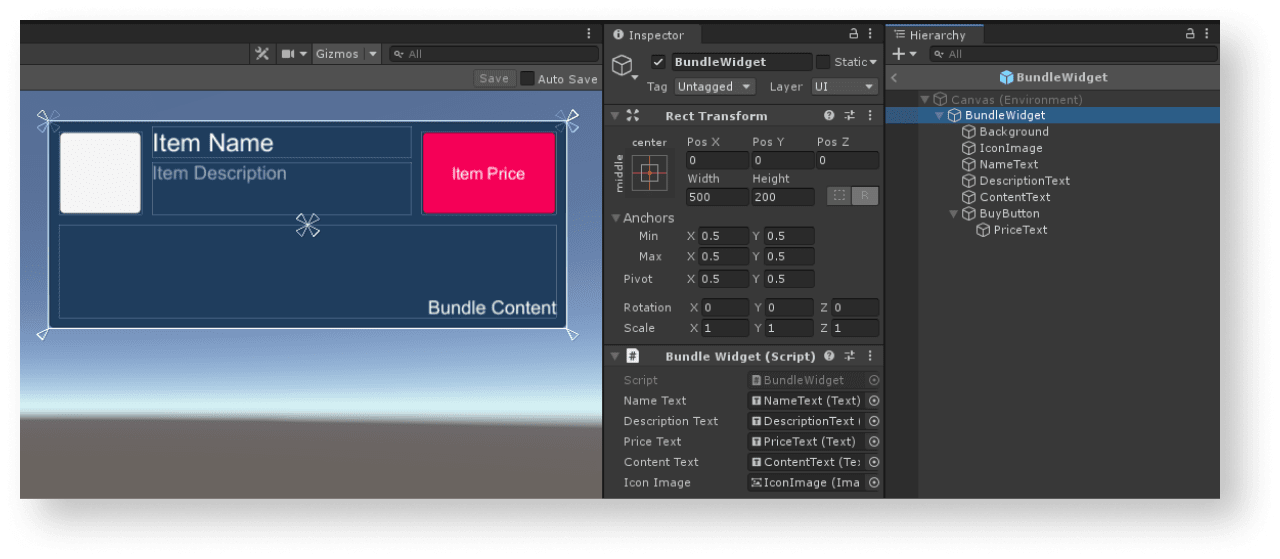
Crear widget del lote
- Create an empty game object. To do this, go to the main menu and select
GameObject > Create Empty . - Convert the created game object in a prefab by dragging a game object from a
Hierarchy panel to aProject panel. - Select a created prefab and click
Open Prefab in theInspector panel. - Add the following UI elements as prefab child objects and configure their visuals:
- widget background image
- bundle name
- bundle description
- bundle price
- bundle content description (items and their quantity)
- bundle image
The following picture shows an example of the widget structure.
Crear script de widget
- Create a script
BundleWidgetinherited from the MonoBehaviour base class. - Declare variables for the item widget interface elements and set values for them in the
Inspector panel.
Example of the widget script:
- C#
 1using UnityEngine;
 2using UnityEngine.UI;
 3
 4namespace Recipes
 5{
 6	public class BundleWidget : MonoBehaviour
 7	{
 8		// Declaration of variables for UI elements
 9		public Text NameText;
10
11		public Text DescriptionText;
12
13		public Text PriceText;
14
15		public Text ContentText;
16
17		public Image IconImage;
18	}
19}
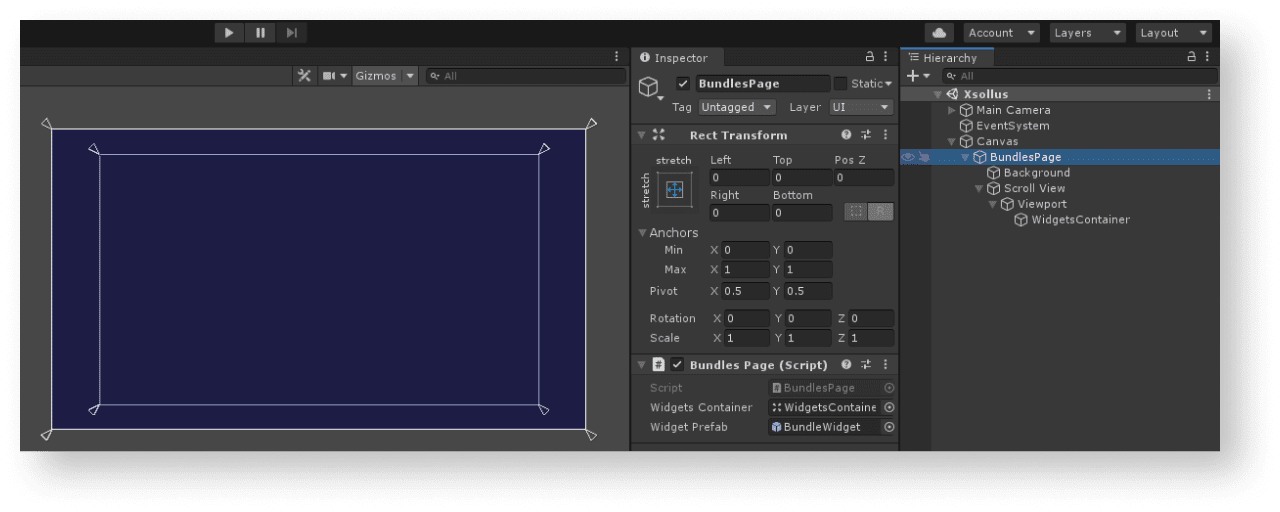
Crear página para mostrar lotes de artículos
- On the scene, create an empty game object. To do this, go to the main menu and select
GameObject > Create Empty . - Add the following UI elements as prefab child objects and configure their visuals:
- page background image
- bundle widgets display area
The following picture shows an example of the page structure.
Crear controlador de página
- Create the
BundlesPagescript inherited from theMonoBehaviourbase class. - Declare variables:
WidgetsContainer— container for widgetsWidgetPrefab— bundle widget prefab
- Attach a script to a page game object:
- Select an object in a
Hierarchy panel. - In the
Inspector panel, clickAdd Component and select aBundlesPagescript.
- Select an object in a
- Set values for variables in the
Inspector panel. - Add login logics by calling an
XsollaLogin.Instance.SignInSDK method in theStartmethod and pass to it:- a username or email address in the
usernameparameter - a user password in the
passwordparameter
- a username or email address in the
xsolla, password: xsolla).- a flag in the
rememberUserparameter for remembering an account - the
OnAuthenticationSuccesscallback method for successful user login - the
OnErrorcallback method for an error
- a flag in the
- Add logics for getting the list of bundles. In the
OnAuthenticationSuccessmethod call theXsollaStore.Instance.GetBundlesSDK method and pass to it:- a Project ID in the
projectIdparameter
- a Project ID in the
- the
OnItemsRequestSuccesscallback method for successful operation of getting a list of bundles - the
OnErrorcallback method for an error
- the
- In the
OnBundlesRequestSuccessmethod, add logics for creating a widget for every received bundles:- Instantiate a prefab of item widget as a container child object.
- Attach the received
BundleWidgetcomponent to awidgetvariable.
- Pass the following data to the bundle widget:
- Pass the
bundleItem.namevariable value to the element with the item name. - Pass the
bundleItem.descriptionvariable value to the element with the item description. - Implement the following logics to display bundle content:
- Use every item in a bundle to form a line that contains the item name and its quantity. The line should have a
{name} x {quantity}format. - Group these lines into one line by using a new line character as a separator.
- Pass the new line to the widget element.
- Use every item in a bundle to form a line that contains the item name and its quantity. The line should have a
- Pass the
- Implement the following logics to display bundle price:
- If the value of the
bundleItem.pricevariable doesn’t equalnull, the bundle is sold for real currency. Specify the price in the{amount} {currency}format and pass it to the widget element. - If the value of the
bundleItem.virtual_pricesvariable doesn’t equalnull, the bundle is sold for virtual currency. Specify the price in the{name}: {amount}format and pass it to the widget element.
- If the value of the
- Implement the following logics to display bundle price:
bundleItem.virtual_prices variable is an array of prices for the same bundle in different currencies. The example shows a price specified by default in the item settings in Store > Bundles in Publisher Account.- To display an item image, use the
ImageLoader.Instance.GetImageAsyncutility method and pass to it:- Image URL.
- An anonymous function as a callback. In this function, add a received sprite as a bundle image.
- To display an item image, use the
Example of a page controller script:
- C#
 1using System.Linq;
 2using UnityEngine;
 3using Xsolla.Core;
 4using Xsolla.Login;
 5using Xsolla.Store;
 6
 7namespace Recipes
 8{
 9	public class BundlesPage : MonoBehaviour
10	{
11		// Declaration of variables for containers and widget prefabs
12		public Transform WidgetsContainer;
13
14		public GameObject WidgetPrefab;
15
16		private void Start()
17		{
18			// Starting the authentication process
19			XsollaLogin.Instance.SignIn("xsolla", "xsolla", true, null, onSuccess: OnAuthenticationSuccess, onError: OnError);
20		}
21
22		private void OnAuthenticationSuccess(string token)
23		{
24			// After successful authentication starting the request for bundles from store
25			XsollaStore.Instance.GetBundles(XsollaSettings.StoreProjectId, OnBundlesRequestSuccess, OnError);
26		}
27
28		private void OnBundlesRequestSuccess(BundleItems bundleItems)
29		{
30			// Iterating the bundles collection and assign values for appropriate ui elements
31			foreach (var bundleItem in bundleItems.items)
32			{
33				var widgetGo = Instantiate(WidgetPrefab, WidgetsContainer, false);
34				var widget = widgetGo.GetComponent<BundleWidget>();
35
36				widget.NameText.text = bundleItem.name;
37				widget.DescriptionText.text = bundleItem.description;
38
39				var bundleContent = bundleItem.content.Select(x => $"{x.name} x {x.quantity}");
40				widget.ContentText.text = string.Join("\n", bundleContent);
41
42				if (bundleItem.price != null)
43				{
44					var realMoneyPrice = bundleItem.price;
45					widget.PriceText.text = $"{realMoneyPrice.amount} {realMoneyPrice.currency}";
46				}
47				else if (bundleItem.virtual_prices != null)
48				{
49					var virtualCurrencyPrice = bundleItem.virtual_prices.First(x => x.is_default);
50					widget.PriceText.text = $"{virtualCurrencyPrice.name}: {virtualCurrencyPrice.amount}";
51				}
52
53				ImageLoader.Instance.GetImageAsync(bundleItem.image_url, (url, sprite) => widget.IconImage.sprite = sprite);
54			}
55		}
56
57		private void OnError(Error error)
58		{
59			UnityEngine.Debug.LogError($"Error message: {error.errorMessage}");
60		}
61	}
62}
The following picture shows the result of the script’s work.
Implementar la visualización de paquetes de monedas virtuales
Crear un widget para el paquete de moneda virtual
- Create an empty game object. To do this, go to the main menu and select
GameObject > Create Empty . - Convert the created game object in a prefab by dragging a game object from a
Hierarchy panel to aProject panel. - Select a created prefab and click
Open Prefab in theInspector panel. - Add the following UI elements as prefab child objects and configure their visuals:
- widget background image
- package name
- package description
- package price
- package image
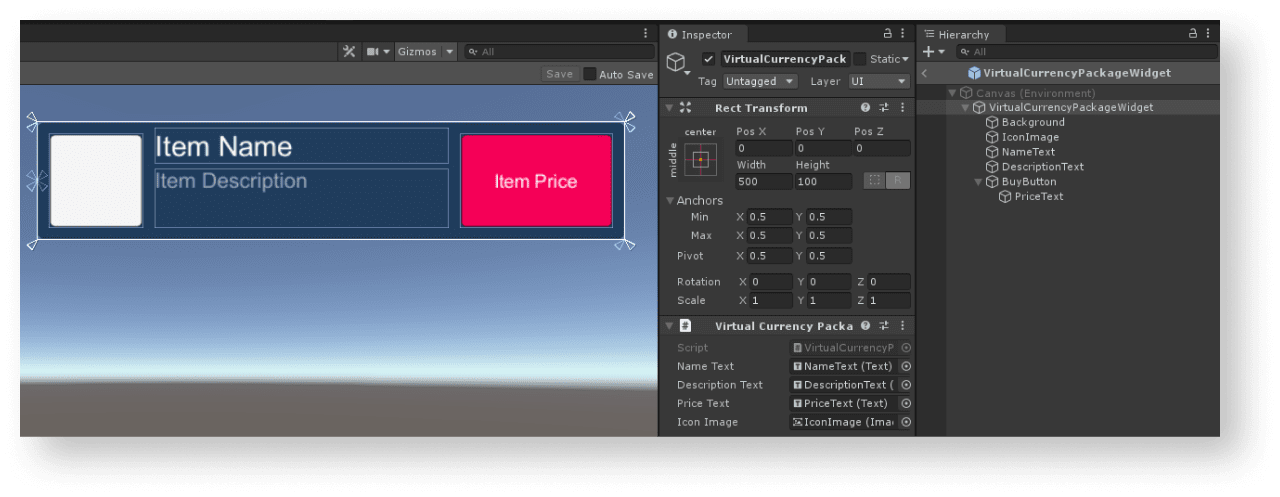
The following picture shows an example of the widget structure.
Crear script de widget
- Create a script
VirtualCurrencyPackageWidgetinherited from the MonoBehaviour base class. - Declare variables for the item widget interface elements and set values for them in the
Inspector panel.
Example of the widget script:
- C#
 1using UnityEngine;
 2using UnityEngine.UI;
 3
 4namespace Recipes
 5{
 6	public class VirtualCurrencyPackageWidget : MonoBehaviour
 7	{
 8		// Declaration of variables for UI elements
 9
10		public Text NameText;
11
12		public Text DescriptionText;
13
14		public Text PriceText;
15
16		public Image IconImage;
17	}
18}
Crear una página para mostrar la lista de paquetes de monedas virtuales
- On the scene, create an empty game object. To do this, go to the main menu and select
GameObject > Create Empty . - Add the following UI elements as prefab child objects and configure their visuals:
- page background image
- virtual currency package widgets display area
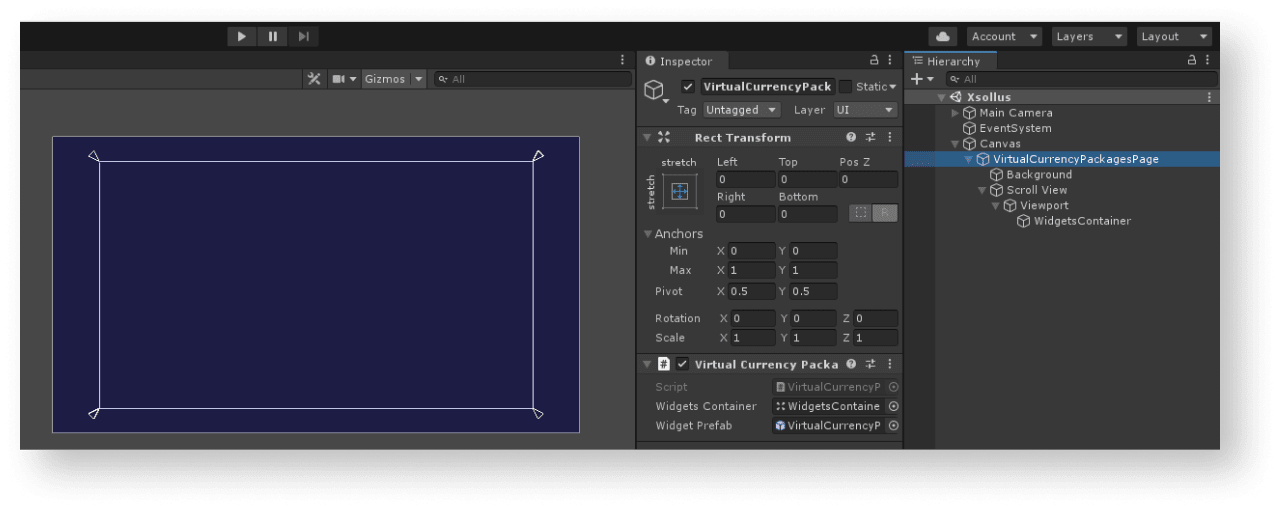
The following picture shows an example of the page structure.
Crear controlador de página
- Create the
VirtualCurrencyPackagesPagescript inherited from theMonoBehaviourbase class. - Declare variables:
WidgetsContainer— container for widgetsWidgetPrefab— virtual currency package prefab
- Attach a script to a page game object:
- Select an object in a
Hierarchy panel. - In the
Inspector panel, clickAdd Component and select aVirtualCurrencyPackagesPagescript.
- Select an object in a
- Set values for variables in the
Inspector panel. - Add login logics by calling an
XsollaLogin.Instance.SignInSDK method in theStartmethod and pass to it:
- username or email address in the
usernameparameter - user password in the
passwordparameter
- username or email address in the
xsolla, password: xsolla).- a flag in the
rememberUserparameter for remembering an account - the
OnAuthenticationSuccesscallback method for successful user login - the
OnErrorcallback method for an error
- a flag in the
- Add logics for getting the list of items. In the
OnAuthenticationSuccessmethod call theXsollaStore.Instance.GetVirtualCurrencyPackagesListSDK method and pass to it:- Project ID in the
projectIdparameter
- Project ID in the
- the
OnItemsRequestSuccessfor successful operation of getting a list of items - the
OnErrorcallback method for an error
- the
- In the
OnPackagesRequestSuccessmethod, add logics for creating a widget for every received package:- Instantiate a prefab of item widget as a container child object.
- Attach the received
VirtualCurrencyPackageWidgetcomponent to awidgetvariable.
- Pass the following data to the package widget:
- Pass the
packageItem.namevariable value to the element with the package name. - Pass the
packageItem.descriptionvariable value to the element with the package description. - Implement the following logics to display package price:
- Pass the
- If the value of the
packageItem.pricevariable doesn’t equalnull, the package is sold for real currency. Specify the price in the{amount} {currency}format and pass it to the widget element. - If the value of the
packageItem.virtual_pricesvariable doesn’t equalnull, the package is sold for virtual currency. Specify the price in the{name}: {amount}format and pass it to the widget element.
- If the value of the
packageItem.virtual_prices variable is an array of prices for the same package in different currencies. The example shows a price specified by default in the package settings in Store > Virtual currency > Packages in Publisher Account.- To display an item image, use the
ImageLoader.Instance.GetImageAsyncutility method and pass to it:- Image URL.
- An anonymous function as a callback. In this function, add a received sprite as an item image.
- To display an item image, use the
Example of a page controller script:
- C#
 1using System.Linq;
 2using UnityEngine;
 3using Xsolla.Core;
 4using Xsolla.Login;
 5using Xsolla.Store;
 6
 7namespace Recipes
 8{
 9	public class VirtualCurrencyPackagesPage : MonoBehaviour
10	{
11		// Declaration of variables for containers and widget prefabs
12		public Transform WidgetsContainer;
13
14		public GameObject WidgetPrefab;
15
16		private void Start()
17		{
18			// Starting the authentication process
19			XsollaLogin.Instance.SignIn("xsolla", "xsolla", true, null, onSuccess: OnAuthenticationSuccess, onError: OnError);
20		}
21
22		private void OnAuthenticationSuccess(string token)
23		{
24			// After successful authentication starting the request for packages from store
25			XsollaStore.Instance.GetVirtualCurrencyPackagesList(XsollaSettings.StoreProjectId, OnPackagesRequestSuccess, OnError);
26		}
27
28		private void OnPackagesRequestSuccess(VirtualCurrencyPackages packageItems)
29		{
30			// Iterating the packages collection and assign values for appropriate ui elements
31			foreach (var packageItem in packageItems.items)
32			{
33				var widgetGo = Instantiate(WidgetPrefab, WidgetsContainer, false);
34				var widget = widgetGo.GetComponent<VirtualCurrencyPackageWidget>();
35
36				widget.NameText.text = packageItem.name;
37				widget.DescriptionText.text = packageItem.description;
38
39				if (packageItem.price != null)
40				{
41					var realMoneyPrice = packageItem.price;
42					widget.PriceText.text = $"{realMoneyPrice.amount} {realMoneyPrice.currency}";
43				}
44				else if (packageItem.virtual_prices != null)
45				{
46					var virtualCurrencyPrice = packageItem.virtual_prices.First(x => x.is_default);
47					widget.PriceText.text = $"{virtualCurrencyPrice.name}: {virtualCurrencyPrice.amount}";
48				}
49
50				ImageLoader.Instance.GetImageAsync(packageItem.image_url, (url, sprite) => widget.IconImage.sprite = sprite);
51			}
52		}
53
54		private void OnError(Error error)
55		{
56			UnityEngine.Debug.LogError($"Error message: {error.errorMessage}");
57		}
58	}
59}
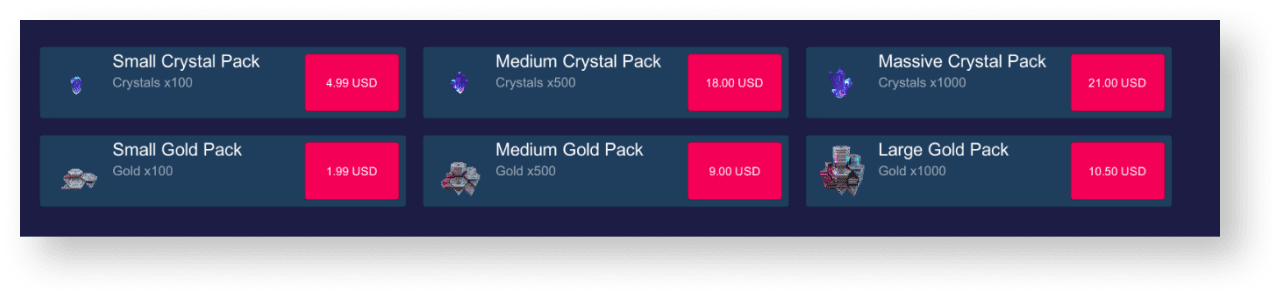
The following picture shows the result of the script’s work.
This instruction shows how to use the SDK methods to implement selling of virtual items for real currency.
Before you start, implement a display of virtual items in a catalog. In the following example, we describe how to implement purchasing of virtual items. Configuration for other item types is similar.
This tutorial describes the implementation of the following logic:

The logic and interface in the examples are less complicated than they will be in your application. A possible implementation option for selling items for real currency and displaying a catalog of items is described in the demo project.
Completar widget de artículos
Add a purchase button to the item widget and configure its visuals.
The following picture shows an example of the widget structure.
Script completo de widget de artículos
- Open the
VirtualItemWidgetscript. - Declare variables for the purchase button and set values for them in the
Inspector panel.
Example of the widget script:
- C#
 1using UnityEngine;
 2using UnityEngine.UI;
 3
 4namespace Recipes
 5{
 6	public class VirtualItemWidget : MonoBehaviour
 7	{
 8		// Declaration of variables for UI elements
 9
10		public Text NameText;
11
12		public Text DescriptionText;
13
14		public Text PriceText;
15
16		public Image IconImage;
17
18		public Button BuyButton;
19	}
20}
Controlador de página completo para mostrar la lista de artículos
- Open the
VirtualItemsPagescript. - In the
OnAuthenticationSuccessmethod, pass the authorization token to theXsollaStore.Instance.Tokenvariable.
- A JWT received during user authorization via the
XsollaLogin.Instance.SignInSDK method. - Pay Station access token received during user authorization via the
XsollaLogin.Instance.GetUserAccessTokenSDK method. Use this token if you have implemented your own authorization system.
- Add logic for processing clicking on the virtual item purchase button:
- In the
OnItemsRequestSuccessmethod, subscribe to the button-clicking event. - Add an anonymous method that is called after the button is clicked.
- In this method, call the
XsollaStore.Instance.ItemPurchaseSDK method to form an order and pass to it:
- In the
- a Project ID in the
projectIdparameter - an item identifier in the
itemSkuparameter - the
OnOrderCreateSuccessmethod to process a successful forming of the item purchase order - the
OnErrorcallback method for an error
- a Project ID in the
- Implement opening of a payment page. To do this, add the
OnOrderCreateSuccessmethod and call in it:- the
XsollaStore.Instance.OpenPurchaseUiSDK method, to open a payment page - the
TrackOrderStatuscoroutine, to track changes in the order status
- the
- In the
TrackOrderStatuscoroutine, implement getting the info about the order status one time per second. To do this, use theXsollaStore.Instance.CheckOrderStatusSDK method and pass to it:- a Project ID in the
projectIdparameter - an order number from payment details in the
orderIdparameter - an anonymous method for processing successful receiving of order status info
- an anonymous method for error processing
- a Project ID in the
- In the method for processing successful receiving of order status info, implement the callback of an
OnPurchaseSuccessmethod during the payment for the order (payment statusdoneorpaid). - In the
OnPurchaseSuccessmethod, implement the processing of a successful virtual item purchase.
In the script example, we call the Debug.Log base method if the item purchase is successful. You can add other actions like inventory display, etc.
Implementation of logic for adding purchased items to the inventory isn’t required — it’s done automatically.
- If you use a built-in browser for opening a payment page, close this browser.
Example of a script for a page:
- C#
 1using System.Collections;
 2using System.Linq;
 3using UnityEngine;
 4using Xsolla.Core;
 5using Xsolla.Login;
 6using Xsolla.Store;
 7
 8namespace Recipes
 9{
10	public class VirtualItemsPage : MonoBehaviour
11	{
12		// Declaration of variables for containers and widget prefabs
13
14		public Transform WidgetsContainer;
15
16		public GameObject WidgetPrefab;
17
18		private void Start()
19		{
20			// Starting the authentication process
21
22			XsollaLogin.Instance.SignIn("xsolla", "xsolla", true, null, onSuccess: OnAuthenticationSuccess, onError: OnError);
23		}
24
25		private void OnAuthenticationSuccess(string token)
26		{
27			// After successful authentication starting the request for catalog from store
28			Token.Instance = Token.Create(token);
29			XsollaStore.Instance.GetCatalog(XsollaSettings.StoreProjectId, OnItemsRequestSuccess, OnError, offset: 0, limit: 50);
30		}
31
32		private void OnItemsRequestSuccess(StoreItems storeItems)
33		{
34			// Iterating the items collection and assign values for appropriate ui elements
35
36			foreach (var storeItem in storeItems.items)
37			{
38				if (storeItem.price == null)
39					continue;
40
41				var widgetGo = Instantiate(WidgetPrefab, WidgetsContainer, false);
42				var widget = widgetGo.GetComponent<VirtualItemWidget>();
43
44				widget.NameText.text = storeItem.name;
45				widget.DescriptionText.text = storeItem.description;
46
47				var realMoneyPrice = storeItem.price;
48				widget.PriceText.text = $"{realMoneyPrice.amount} {realMoneyPrice.currency}";
49
50				ImageLoader.Instance.GetImageAsync(storeItem.image_url, (url, sprite) => widget.IconImage.sprite = sprite);
51
52				widget.BuyButton.onClick.AddListener(() => { XsollaStore.Instance.ItemPurchase(XsollaSettings.StoreProjectId, storeItem.sku, OnOrderCreateSuccess, OnError); });
53			}
54		}
55
56		private void OnOrderCreateSuccess(PurchaseData purchaseData)
57		{
58			XsollaStore.Instance.OpenPurchaseUi(purchaseData);
59			StartCoroutine(TrackOrderStatus(purchaseData));
60		}
61
62		private IEnumerator TrackOrderStatus(PurchaseData purchaseData)
63		{
64			var isDone = false;
65			while (!isDone)
66			{
67				XsollaStore.Instance.CheckOrderStatus
68				(
69					XsollaSettings.StoreProjectId,
70					purchaseData.order_id,
71					status =>
72					{
73						if (status.status == "paid" || status.status == "done")
74						{
75							isDone = true;
76							OnPurchaseSuccess();
77						}
78					},
79					error => { OnError(error); }
80				);
81
82				yield return new WaitForSeconds(1f);
83			}
84		}
85
86		private void OnPurchaseSuccess()
87		{
88			UnityEngine.Debug.Log($"Purchase successful");
89			BrowserHelper.Instance.Close();
90		}
91
92		private void OnError(Error error)
93		{
94			UnityEngine.Debug.LogError($"Error message: {error.errorMessage}");
95		}
96	}
97}
This instruction shows how to use the SDK methods to implement selling of virtual items for virtual currency.
Before you start, implement a display of virtual items in a catalog. In the following example, we describe how to implement purchasing of virtual items. Configuration for other item types is similar.
This tutorial describes the implementation of the following logic:

The logic and interface in the examples are less complicated than they will be in your application. A possible implementation option for selling items for real currency and displaying a catalog of items is described in the demo project.
Completar widget de artículos
Add a purchase button to the item widget and configure its visuals.
The following picture shows an example of the widget structure.
Script completo de widget de artículos
- Open the
VirtualItemWidgetscript. - Declare variables for the purchase button and set values for them in the
Inspector panel.
Example of the widget script:
- C#
 1using UnityEngine;
 2using UnityEngine.UI;
 3
 4namespace Recipes
 5{
 6	public class VirtualItemWidget : MonoBehaviour
 7	{
 8		// Declaration of variables for UI elements
 9
10		public Text NameText;
11
12		public Text DescriptionText;
13
14		public Text PriceText;
15
16		public Image IconImage;
17
18		public Button BuyButton;
19	}
20}
Controlador de página completo para mostrar la lista de artículos
- Open the
VirtualItemsPagescript. - In the
OnAuthenticationSuccessmethod, pass the authorization token to theXsollaStore.Instance.Tokenvariable.
- A JWT received during user authorization via the
XsollaLogin.Instance.SignInSDK method. - Pay Station access token received during user authorization via the
XsollaLogin.Instance.GetUserAccessTokenSDK method. Use this token if you have implemented your own authorization system
- Add logic for processing clicking on the virtual item purchase button:
- In the
OnItemsRequestSuccessmethod, subscribe to the button-clicking event. - Add an anonymous method that is called after the button is clicked.
- In this method, call the
XsollaStore.Instance.ItemPurchaseSDK method to form an order and pass to it:
- In the
- a Project ID in the
projectIdparameter - an item identifier in the
itemSkuparameter - the
OnOrderCreateSuccessmethod to process a successful forming of the item purchase order - the
OnErrorcallback method for an error
- a Project ID in the
- In the
OnOrderCreateSuccessmethod, implement the order status check process. To do this, use theXsollaStore.Instance.CheckOrderStatusSDK method and pass to it:- a Project ID in the
projectIdparameter - an order number from payment details in the
orderIdparameter - an anonymous method for processing successful receiving of order status info
- an anonymous method for error processing
- a Project ID in the
- In the method for processing successful receiving of order status info, implement the callback of an
OnPurchaseSuccessmethod during the payment for the order (payment statusdoneorpaid). - In the
OnPurchaseSuccessmethod, implement the processing of a successful virtual item purchase.
In the script example, we call the Debug.Log base method if the item purchase is successful. You can add other actions like inventory display, virtual currency balance change, etc.
Implementation of logic for adding purchased items to the inventory isn’t required — it’s done automatically.
Example of a script for a page:
- C#
 1using System.Linq;
 2using UnityEngine;
 3using Xsolla.Core;
 4using Xsolla.Login;
 5using Xsolla.Store;
 6
 7namespace Recipes
 8{
 9	public class VirtualItemsPage : MonoBehaviour
10	{
11		// Declaration of variables for containers and widget prefabs
12
13		public Transform WidgetsContainer;
14
15		public GameObject WidgetPrefab;
16
17		private void Start()
18		{
19			// Starting the authentication process
20
21			XsollaLogin.Instance.SignIn("xsolla", "xsolla", true, null, onSuccess: OnAuthenticationSuccess, onError: OnError);
22		}
23
24		private void OnAuthenticationSuccess(string token)
25		{
26			// After successful authentication starting the request for catalog from store
27			Token.Instance = Token.Create(token);
28			XsollaStore.Instance.GetCatalog(XsollaSettings.StoreProjectId, OnItemsRequestSuccess, OnError, offset: 0, limit: 50);
29		}
30
31		private void OnItemsRequestSuccess(StoreItems storeItems)
32		{
33			// Iterating the items collection and assign values for appropriate ui elements
34			foreach (var storeItem in storeItems.items)
35			{
36				if (storeItem.virtual_prices.Length == 0)
37					continue;
38
39				var widget = Instantiate(WidgetPrefab, WidgetsContainer, false).GetComponent<VirtualItemWidget>();
40
41				widget.NameText.text = storeItem.name;
42				widget.DescriptionText.text = storeItem.description;
43
44				var defaultPrice = storeItem.virtual_prices.First(x => x.is_default);
45				widget.PriceText.text = $"{defaultPrice.name}: {defaultPrice.amount}";
46
47				ImageLoader.Instance.GetImageAsync(storeItem.image_url, (url, sprite) => widget.IconImage.sprite = sprite);
48
49				widget.BuyButton.onClick.AddListener(() =>
50				{
51					var price = storeItem.virtual_prices.First(x => x.is_default);
52					XsollaStore.Instance.ItemPurchaseForVirtualCurrency(XsollaSettings.StoreProjectId, storeItem.sku, price.sku, OnOrderCreateSuccess, OnError);
53				});
54			}
55		}
56
57		private void OnOrderCreateSuccess(PurchaseData purchaseData)
58		{
59			XsollaStore.Instance.CheckOrderStatus
60			(
61				XsollaSettings.StoreProjectId,
62				purchaseData.order_id,
63				status =>
64				{
65					if (status.status == "paid" || status.status == "done")
66					{
67						OnPurchaseSuccess();
68					}
69				},
70				error =>
71				{
72					OnError(error);
73				}
74			);
75		}
76
77
78		private void OnPurchaseSuccess()
79		{
80			UnityEngine.Debug.Log($"Purchase successful");
81		}
82
83		private void OnError(Error error)
84		{
85			UnityEngine.Debug.LogError($"Error message: {error.errorMessage}");
86		}
87	}
88}
This tutorial shows how to use the SDK methods to display the balance of virtual currency in your app.
The logics and interface in the examples are less complicated than they will be in your application. A possible item catalog in an in-game store implementation option is described in the demo project.
Crear widget para la visualización del saldo
- Create an empty game object. To do this, go to the main menu and select
GameObject > Create Empty . - Convert the created game object in a prefab by dragging a game object from a
Hierarchy panel to aProject panel. - Select a created prefab and click
Open Prefab in theInspector panel. - Add the following UI elements as prefab child objects and configure their visuals:
- widget background image
- virtual currency name
- virtual currency quantity
- virtual currency image
The following picture shows an example of the widget structure.

Crear un script de widget para mostrar el saldo
- Create a script
VirtualCurrencyWidgetinherited from the MonoBehaviour base class. - Declare variables for the item widget interface elements and set values for them in the
Inspector panel.
Example of the widget script:
- C#
 1using UnityEngine;
 2using UnityEngine.UI;
 3
 4namespace Recipes
 5{
 6	public class VirtualCurrencyWidget : MonoBehaviour
 7	{
 8		// Declaration of variables for UI elements
 9
10		public Text NameText;
11
12		public Text AmountText;
13
14		public Image IconImage;
15	}
16}
Crear página con lista de monedas virtuales
- On the scene, create an empty game object. To do this, go to the main menu and select
GameObject > Create Empty . - Add the following UI elements as prefab child objects and configure their visuals:
- page background image
- widgets display area
The following picture shows an example of the page structure.

Crear controlador para la página con una lista de monedas virtuales
- Create a script
VirtualCurrenciesPageinherited from theMonoBehaviourbase class. - Declare the following variables:
WidgetsContainer— container for widgetsWidgetPrefab— balance display widget prefab
- Attach a script to a page game object:
- Select an object in a
Hierarchy panel. - In the
Inspector panel, clickAdd Component and select aVirtualCurrenciesPagescript.
- Select an object in a
- Set values for variables in the
Inspector panel. - Add login logics by calling an
XsollaLogin.Instance.SignInSDK method in theStartmethod and pass to it:- a username or email address in the
usernameparameter - a user password in the
passwordparameter
- a username or email address in the
xsolla, password: xsolla).- a flag in the
rememberUserparameter for remembering an account - the
OnAuthenticationSuccesscallback method for successful user login - the
OnErrorcallback method for an error
- a flag in the
- Add logics of getting a list of virtual currencies. To do this, in the
OnAuthenticationSuccessmethod:- Pass the authorization token to the
XsollaStore.Instance.Tokenvariable.
- Pass the authorization token to the
- A JWT received during user authorization via the
XsollaLogin.Instance.SignInSDK method. - Pay Station access token received during user authorization via the
XsollaLogin.Instance.GetUserAccessTokenSDK method. Use this token if you have implemented your own authorization system.
- Call the
XsollaStore.Instance.GetVirtualCurrencyBalanceSDK method and pass to it:- the Project ID in the
projectIdparameter
- the Project ID in the
- Call the
- the
OnBalanceRequestSuccessmethod for successful operation of getting a list of items - the
OnErrorcallback method for an error
- the
- In the
OnBalanceRequestSuccessmethod, add logics for creating a widget for every received virtual currency:- Instantiate a prefab of item widget as a container child object.
- Attach the received
VirtualCurrencyWidgetcomponent to awidgetvariable.
- Pass the following data to the balance widget:
- Pass the
balanceItem.namevariable value to the element with the virtual currency name. - Pass the
balanceItem.amount.ToString()variable value to the element with the quantity of the virtual currency. - Implement the following logics to display the item price. To show a virtual currency image, use the
ImageLoader.Instance.GetImageAsyncutility method, and pass to it:- The image URL.
- An anonymous callback function. In this function, set the received sprite as a virtual currency image.
- Pass the
Example of the page controller script:
- C#
 1using UnityEngine;
 2using Xsolla.Core;
 3using Xsolla.Login;
 4using Xsolla.Store;
 5
 6namespace Recipes
 7{
 8	public class VirtualCurrenciesPage : MonoBehaviour
 9	{
10		// Declaration of variables for containers and widget prefabs
11
12		public Transform WidgetsContainer;
13
14		public GameObject WidgetPrefab;
15
16		private void Start()
17		{
18			// Starting the authentication process
19
20			XsollaLogin.Instance.SignIn("xsolla", "xsolla", true, null, OnAuthenticationSuccess, OnError);
21		}
22
23		private void OnAuthenticationSuccess(string token)
24		{
25			// After successful authentication starting the request for virtual currencies
26
27			Token.Instance = Token.Create(token);
28			XsollaStore.Instance.GetVirtualCurrencyBalance(XsollaSettings.StoreProjectId, OnBalanceRequestSuccess, OnError);
29		}
30
31		private void OnBalanceRequestSuccess(VirtualCurrenciesBalance balance)
32		{
33			// Iterating the virtual currencies list and assign values for appropriate ui elements
34
35			foreach (var balanceItem in balance.items)
36			{
37				var widgetGo = Instantiate(WidgetPrefab, WidgetsContainer, false);
38				var widget = widgetGo.GetComponent<VirtualCurrencyWidget>();
39
40				widget.NameText.text = balanceItem.name;
41				widget.AmountText.text = balanceItem.amount.ToString();
42
43				ImageLoader.Instance.GetImageAsync(balanceItem.image_url, (url, sprite) => widget.IconImage.sprite = sprite);
44			}
45		}
46
47		private void OnError(Error error)
48		{
49			UnityEngine.Debug.LogError($"Error message: {error.errorMessage}");
50		}
51	}
52}
The following picture shows the result of the script’s work.
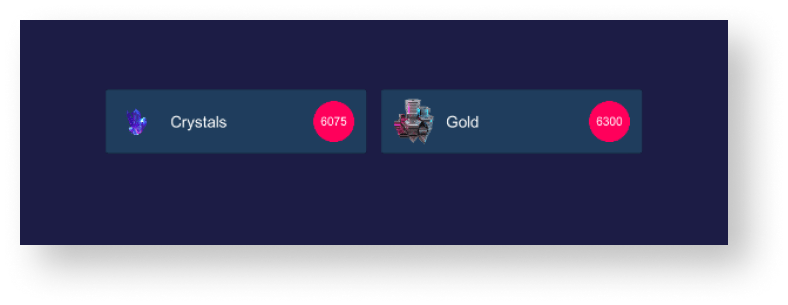
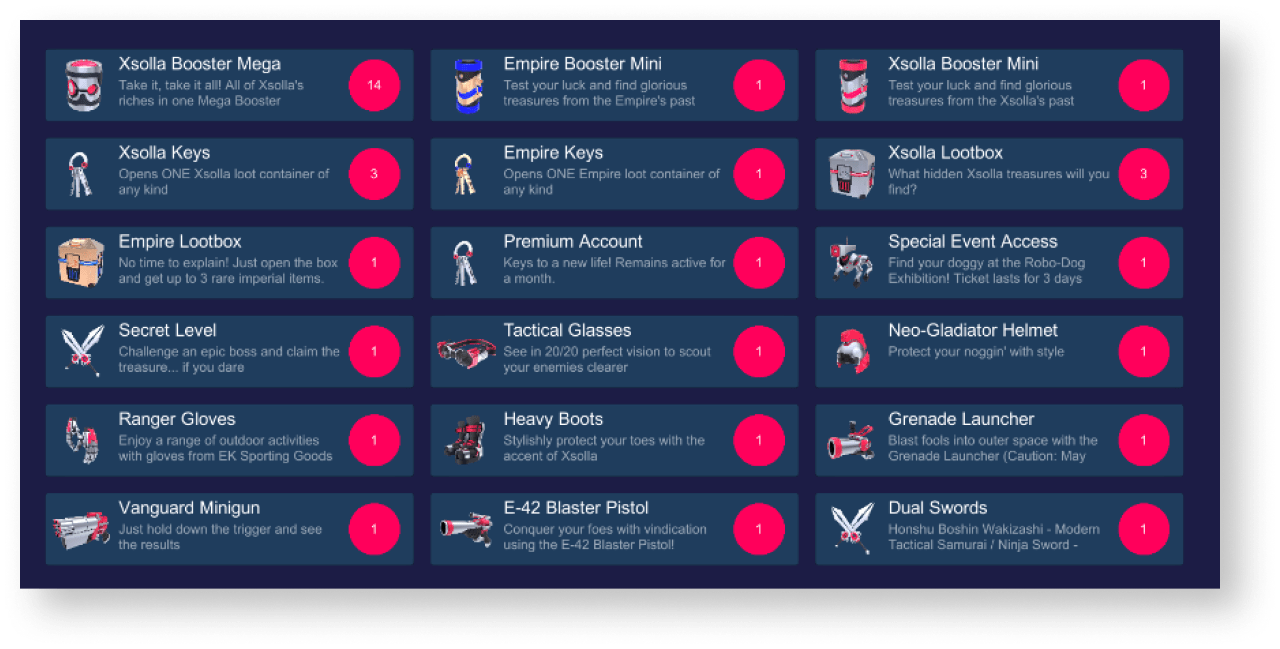
This tutorial shows how to use the SDK methods to display items in the user inventory.
The logics and interface in the examples are less complicated than they will be in your application. A possible inventory implementation option is described in the demo project.
Crear widget de artículo
- Create an empty game object. To do this, go to the main menu and select
GameObject > Create Empty . - Convert the created game object in a prefab by dragging a game object from a
Hierarchy panel to aProject panel. - Select a created prefab and click
Open Prefab in theInspector panel. - Add the following UI elements as prefab child objects and configure their visuals:
- item background image
- item name
- item description
- item quantity
- item image
The following picture shows an example of the widget structure.
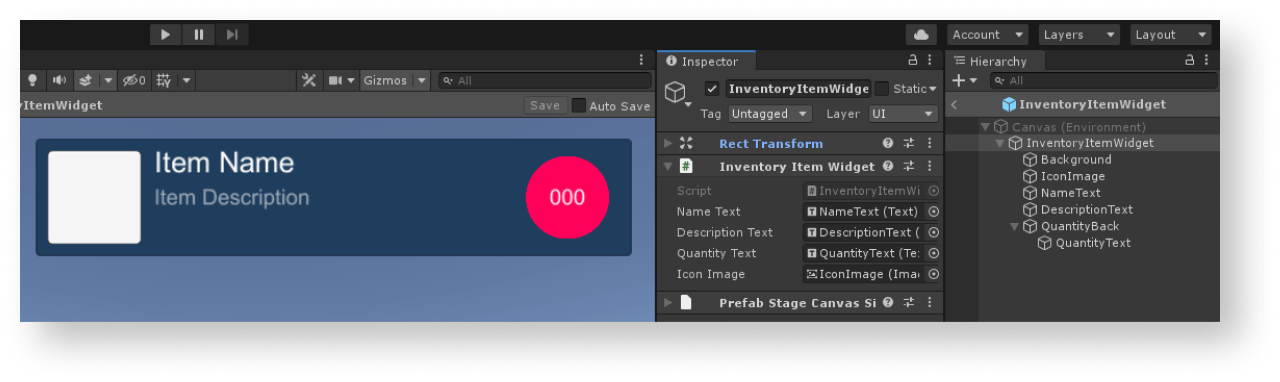
Crear script de widget de artículo
- Create a script
InventoryItemWidgetinherited from the MonoBehaviour base class. - Declare variables for the item widget interface elements and set values for them in the
Inspector panel.
Example of the widget script:
- C#
 1using UnityEngine;
 2using UnityEngine.UI;
 3
 4namespace Recipes
 5{
 6	public class InventoryItemWidget : MonoBehaviour
 7	{
 8		// Declaration of variables for UI elements
 9
10		public Text NameText;
11
12		public Text DescriptionText;
13
14		public Text QuantityText;
15
16		public Image IconImage;
17	}
18}
Crear página para mostrar el inventario
- On the scene, create an empty game object. To do this, go to the main menu and select
GameObject > Create Empty . - Add the following UI elements as prefab child objects and configure their visuals:
- page background image
- item widgets display area
The following picture shows an example of the page structure.
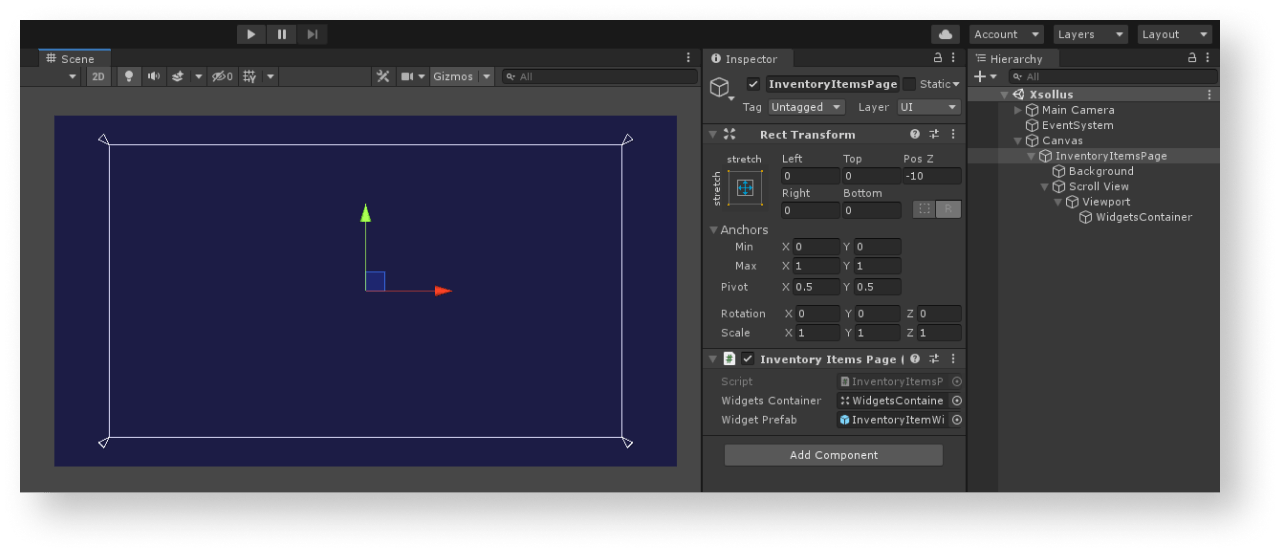
Crear controlador de página
- Create a script
InventoryItemsPageinherited from theMonoBehaviourbase class. - Declare the following variables:
WidgetsContainer— container for item widgetsWidgetPrefab— item widget prefab
- Attach a script to a page game object:
- Select an object in a
Hierarchy panel. - In the
Inspector panel, clickAdd Component and select anInventoryItemsPagescript.
- Select an object in a
- Set values for variables in the
Inspector panel. - Add login logics by calling an
XsollaLogin.Instance.SignInSDK method in theStartmethod and pass to it:- a username or email address in the
usernameparameter - a user password in the
passwordparameter
- a username or email address in the
xsolla, password: xsolla).- a flag in the
rememberUserparameter for remembering an account - the
OnAuthenticationSuccesscallback method for successful user login - the
OnErrorcallback method for an error
- a flag in the
- Add logic for getting the list of items in the inventory. To do this, in the
OnAuthenticationSuccessmethod:- Pass an authorization token to the
XsollaStore.Instance.Tokenvariable.
- Pass an authorization token to the
- A JWT received during user authorization via the
XsollaLogin.Instance.SignInSDK method. - Pay Station access token received during user authorization via the
XsollaLogin.Instance.GetUserAccessTokenSDK method. Use this token if you have implemented your own authorization system.
- Call the
XsollaStore.Instance.GetInventoryItemsSDK method and pass to it:- a Project ID in the
projectIdparameter
- a Project ID in the
- Call the
- the
OnItemsRequestSuccessfor successful operation of getting a list of items - the
OnErrorcallback method for an error
- the
- For every received item in the
OnItemsRequestSuccessmethod, add logic for creating a widget:- Use the
InventoryItem.IsVirtualCurrencymethod, to add a check to make sure a received item isn’t a virtual currency.
- Use the
- Instantiate a prefab of an item widget as a container child object.
- Attach the received
InventoryItemWidgetcomponent to awidgetvariable.
- Pass the following data to the item widget:
- Pass the
inventoryItem.namevariable value to the element with the item name. - Pass the
inventoryItem.descriptionvariable value to the element with the item description. - Pass the
inventoryItem.amount.ToString()to the element with the item quantity. - To display an item image, use the
ImageLoader.Instance.GetImageAsyncutility method and pass to it:- Image URL
- An anonymous function as a callback. In this function, add a received sprite as an item image.
- Pass the
Example of the page controller script:
- C#
 1using UnityEngine;
 2using Xsolla.Core;
 3using Xsolla.Login;
 4using Xsolla.Store;
 5
 6namespace Recipes
 7{
 8	public class InventoryItemsPage : MonoBehaviour
 9	{
10		// Declaration of variables for containers and widget prefabs
11		public Transform WidgetsContainer;
12
13		public GameObject WidgetPrefab;
14
15		private void Start()
16		{
17			// Starting the authentication process
18			XsollaLogin.Instance.SignIn("xsolla", "xsolla", true, null, OnAuthenticationSuccess, OnError);
19		}
20
21		private void OnAuthenticationSuccess(string token)
22		{
23			// After successful authentication starting the request for virtual currencies
24			Token.Instance = Token.Create(token);
25			XsollaStore.Instance.GetInventoryItems(XsollaSettings.StoreProjectId, OnItemsRequestSuccess, OnError);
26		}
27
28		private void OnItemsRequestSuccess(InventoryItems inventoryItems)
29		{
30			// Iterating the item list and assign values for appropriate ui elements
31
32			foreach (var inventoryItem in inventoryItems.items)
33			{
34				if (inventoryItem.IsVirtualCurrency())
35					continue;
36
37				var widgetGo = Instantiate(WidgetPrefab, WidgetsContainer, false);
38				var widget = widgetGo.GetComponent<InventoryItemWidget>();
39
40				widget.NameText.text = inventoryItem.name;
41				widget.DescriptionText.text = inventoryItem.description;
42				widget.QuantityText.text = inventoryItem.quantity.ToString();
43
44				ImageLoader.Instance.GetImageAsync(inventoryItem.image_url, (url, sprite) => widget.IconImage.sprite = sprite);
45			}
46		}
47
48		private void OnError(Error error)
49		{
50			UnityEngine.Debug.LogError($"Error message: {error.errorMessage}");
51		}
52	}
53}
The following picture shows the result of the script’s work.
¿Has encontrado una errata u otro error de texto? Selecciona el texto y pulsa Ctrl+Intro.
