Autenticación
OAuth 2.0 uses short-lived tokens with long-term authorization (refresh tokens) instead of long-lived tokens. A refresh token allows users to stay in your application for an extended period of time without needing to re-enter their username and password. This eliminates the risk of compromising user authentication data.
Set up OAuth 2.0 for authorization:
- via username or email and password
- via social networks
- via Steam
If the option is enabled, user registration and authentication is carried out by calling the FXsollaAuthToken structure, the refresh token is specified in the RefreshToken field.
To configure OAuth 2.0 authorization:
- Set up OAuth 2.0 authentication for Login project in your Publisher Account.
- Set up plug-in in your UE4 project.
Configure la autenticación OAuth 2.0 para el proyecto de Inicio de sesión (Login) en su Cuenta del editor
- Go to your Publisher Account.
- Click Login in the side menu.
- Click Configure in the Login project pane.
- Go to the Security block and select the OAuth 2.0 section.
- Click Add OAuth 2.0 client.
- Specify OAuth 2.0 redirect URIs and click Connect.
- Copy and save the Client ID.
Configurar el complemento en su proyecto de Unreal Engine
- Open your UE4 project in Unreal Editor.
- Go to
Settings > Project Settings > Plugins > Xsolla Login . - Enable
Use OAuth 2.0 option. - In the
Client ID field, specify Client ID received when setting up OAuth 2.0 in Publisher Account.
The following methods are implemented in Login & Account System plug-in to work with refresh tokens:
RefreshToken— refreshes the token if it has expired.ExchangeAuthenticationCodeToToken— exchanges the user’s authentication code for a valid JWT.
The State parameter found in the RegisterUser, GetSocialAuthenticationUrl, and AuthenticateWithSessionTicket methods is used for additional user verification during OAuth 2.0 authentication. This parameter is used to mitigate possible CSRF attacks.
Use this how-to when working only with the following plug-ins:
- Game Commerce
- Cross-Buy
The Cross-Buy plug-in will be deprecated in March 2022. You can continue to use it, but it will not be updated and supplemented with new features. It is recommended to switch to the Game Commerce plug-in. It contains all the classes and methods needed to work with Xsolla products.
You can integrate the SDK with your own authorization system. To do this, implement user identification by custom ID (user ID generated on your server) to open an in-game store, make a payment, and manage inventory.
The flow of interaction with Xsolla servers when using your own authorization system:
- Your client sends an authentication request to your server.
- Your server authorizes the user and sends a request to the Xsolla server to receive the user JSON Web Token (JWT), passing in the custom ID.
- Xsolla server returns the user JWT.
- Your server passes the user JWT to the client.
- SDK methods use the received user JWT instead of authorization token to open an in-game store, make a payment, and manage inventory.

To use your own authorization system with Xsolla products:
- Set up server OAuth 2.0 client in your Publisher Account.
- Implement getting the server JWT.
- Implement getting the user JWT.
- Implement the logic of working with the in-game store, purchases, and inventory using the user JWT.
Establecer el cliente de OAuth 2.0
- Open your project in Publisher Account and go to the Login section.
- Click Configure in the panel of a Login project.
- Go to the Security block and select the OAuth 2.0 section.
- Click Add OAuth 2.0 client.
- Specify OAuth 2.0 redirect URIs.
- Check the Confidential (recommended for server-to-server connection) box.
- Click Connect.
- Copy and save the client ID and secret key.
Obtener el JWT del servidor
On the back end of your application, implement a method to get the server JWT using the Generate JWT API call. The request must contain the following parameters:
grant_typeis the JWT type, pass theclient_credentialsvalue.client_secretis the secret key that is received when you set up the server OAuth 2.0 client.client_idis the client ID received when you set up the server OAuth 2.0 client.
Obtener el JWT de usuario
On the back end of your application, implement a method to get the user JWT using the Auth by custom ID API call. The request must contain the X-Server-Authorization: <server_JWT> header, where <server_JWT> is the server JWT obtained in the previous step.
Utilizar el JWT de usuario
Use the SDK methods to open the in-game store, make a payment, and manage inventory. While using the SDK methods, pass the user JWT instead of authorization token.
The following tutorials contain examples of using the token:
- Sell virtual items for real currency
- Sell virtual items for virtual currency
- Display of items in inventory
- Display of virtual currency balance
Implement the logic of receiving a new user JWT after its expiration. It is recommended that you get a new token in the background mode, so the user doesn’t have to log in to the application again.
Native authentication allows players to log in to your application via installed applications that use social network accounts. Currently, SDK has implemented native authentication via the following social networks:
- Game Commerce plug-in version 0.5.7 and higher for UE4
- Login & Account System plug-in version 0.3.0 and higher for UE4
- Cross-Buy plug-in version 0.3.0 and higher for UE4
To configure native authentication:
- Set up authentication via social networks on the Xsolla side:
- For Facebook and Google, set up social connections in Publisher Account.
- For WeChat and QQ, contact your Customer Success Manager or email to csm@xsolla.com.
- Set up the SDK for your Unreal Engine project.
- Implement authentication logic on the application side.
Establezca la página de la aplicación en su cuenta de desarrollador de Facebook
- Go to project settings in the Facebook developer account.
- Go to Settings > Basic.
- Click Add Platform and select Android.
- Specify the package name of your Android application in the Google Play Package Name field.
- Specify a fully qualified class name of the Activity in the Class Name field (default value is
com.epicgames.ue4.GameActivity). - Generate a hash key and specify it in the Key Hashes field.
- Click Save Changes.
For further native authentication configuration, you will need App ID and App Secret found in project settings in Settings > Basic section.
Configurar un proyecto en Google API Console
- Go to Google API Console.
- Click New Project.
- Specify Project name and Location and click Save.
- Go to the created project and click OAuth consent screen in the side menu.
- Select External option and click Create.
- Specify the necessary parameters and click Save.
- Click Credentials in the side menu.
- Create an OAuth 2.0 client for your Android app:
- Click Create credentials and select OAuth client ID.
- Specify Android in the Application type field.
- Specify Name.
- Specify package name of your Android application in the Package name field.
- Get the SHA-key.
- Specify SHA-key generated in the previous step SHA-key in the SHA-1 certificate fingerprint field.
- Click Create.
- Click OK.
- Create an OAuth 2.0 client for the web application:
- Click Create credentials and select OAuth client ID.
- Specify Web application in the Application type field.
- Specify Name.
- Click Add URI in the Authorized redirect URIs section and specify
https://login.xsolla.com/api/social/oauth2/callbackURI. - Click Create.
- Click OK.
For further native authentication configuration, you will need Client ID and Client Secret found in settings of the Client ID for the web application.
Establecer las conexiones de redes sociales para el proyecto de Login en Cuenta del editor de Xsolla
- Open your project in Publisher Account.
- Click Login in the side menu and go to Login projects > your Login project > Social connections.
- To set up authentication via Facebook:
- Click Edit in the Facebook panel and change status to Disconnected.
- Specify the App ID from the Facebook developer account in the Application ID field.
- Specify App Secret from the Facebook developer account in the Application Secret field.
- Click Connect.
- To set up authentication via Google:
- Click Edit in the Google panel and change status to Disconnected.
- Specify the Client ID for a web application from the Google API Console in the Application ID field.
- Specify the Client Secret for a web application from the Google API Console in the Application Secret field.
- Click Connect.
Configurar el SDK para un proyecto de Unreal Engine
- Go to your UE4 project.
- Go to
Settings > Project Settings > Plugins > Xsolla Login > Xsolla Login Android . - Check the
Allow Native Auth box. - Specify App ID from the Facebook developer in the
Facebook App Id field. - Specify the Client ID for a web application from the Google API Console in the
Google App Id field.
Native authentication allows players to enter your application via the installed Steam client. After setting up native authentication via Steam, you can also add payment via Steam to the application.
To set up native authentication:
- Set up silent authentication via Steam in Publisher Account.
- Configure your UE4 project.
- Configure the processing of events.
- Ensure authentication via Steam.
Configure su proyecto de Unreal Engine
- Go to the
Configcatalog of your UE4 project. - Add the lines below to the
DefaultEngine.inifile and specify your app ID in Steam for theSteamDevAppIdparameter.
 1[/Script/Engine.GameEngine]
 2+NetDriverDefinitions=(DefName="GameNetDriver",DriverClassName="OnlineSubsystemSteam.SteamNetDriver",DriverClassNameFallback="OnlineSubsystemUtils.IpNetDriver")
 3
 4[OnlineSubsystem]
 5DefaultPlatformService=Steam
 6
 7[OnlineSubsystemSteam]
 8bEnabled=true
 9SteamDevAppId=480
10
11[/Script/OnlineSubsystemSteam.SteamNetDriver]
12NetConnectionClassName="OnlineSubsystemSteam.SteamNetConnection"
- Open the project in the Unreal Editor.
- Go to
Settings > Plugins > Online Platform . - In the
Online Subsystem Steam module, check theEnabled box and click theRestart Now button to save settings and reload the Unreal Editor.
Configurar el procesamiento de los eventos
- The image below shows how to add nodes to the project:
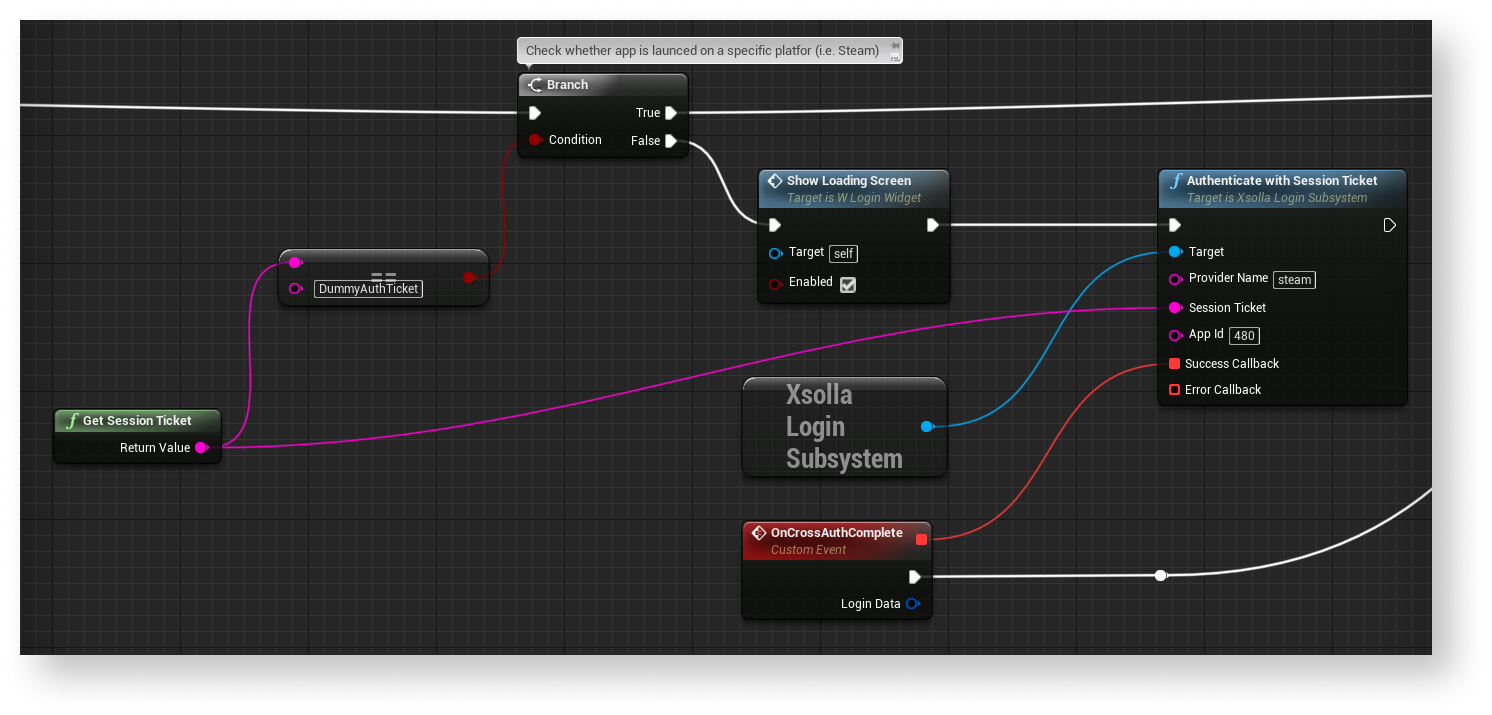
- To authenticate users via Steam, you should get a
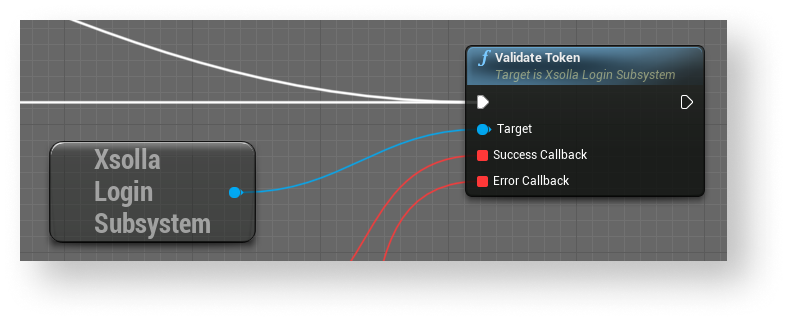
session ticket via the GetSessionTicket method. Pass the received value when calling the AuthenticateWithSessionTicket method. As a result, you get the token that is used when calling the API.- For additional token validation, add the
ValidateTokenmethod callback (optional).
Garantizar la autenticación a través de Steam
- Create the build of your UE4 project for a stand-alone platform.
- Launch Steam and log in.
- Launch your application. If everything is correct, the Steam pop-up window appears.
Token invalidation allows for improved security of user authentication data in your application. If the option is enabled, a new token replaces the old one that becomes invalid every time the user authenticates.
When using the SDK, invalidation of the existing token and generation of a new one is made by calling with_logout parameter has the 1 value.
To enable token invalidation in your UE4 project:
- Go to
Settings > Project Settings > Plugins > Xsolla Login . - Enable the
Invalidate Existing Sessions option.
You can use Xsolla Launcher to deliver your application to users and update it. The Launcher contains a built-in authorization tool. To avoid the need to re-enter username and password, set up authorization in your application via the Launcher.
Configurar el SDK y Launcher para que funcionen juntos
- Set up Launcher in your Publisher Account.
config.json file, it is enough to change the values for the following objects:launcher_project_id— specify Launcher ID found in Publisher Account > Launcher > General settings > General infologin_project_id— specify Login ID found in Publisher Account > Launcher > General settings > Authentication
- Implement the Launcher authorization logic in your application.
- Generate a launcher installation file and a build archive.
- Create an application build.
- Upload the application build to the Xsolla update server.
Implementar la lógica para la autorización mediante el Lanzador
The flow for authorization in the application via Launcher is as follows:
- The user is authorized in the Launcher.
- The user installs and runs the application.
- Launcher runs the application and passes user parameters via the command line. The authorization token is passed in the
xsolla-login-tokenparameter. - The application processes command line parameters and obtains a token.
- The application validates the received token.
- The application automatically authorizes the user without displaying an authorization page.
An example of the implementation of this logic is available in the W_LoginDemo blueprint of the demo project.

Crear una compilación de la aplicación
- Go to your UE4 project.
- In the
Content Browser , open the user authorization map where the token is being processed. - Go to
Edit > Project Settings in the main menu. - Go to
Project> Maps & Modes and in theGame Default Map field select the previously opened authorization map.
- Go to
Plugins > Xsolla Login . - In the
Project ID field, specify the Project ID found in Publisher Account > Project settings > Project ID. - In the
Login ID field, specify the Login ID found in Publisher Account > Launcher > General settings > Authentication. - Go to
File > Package Project > Windows (64 bit) or toFile > Package Project > Mac in the main menu, depending on the platform for which you are creating the build. - In the pop-up window, specify the path to the directory where the finished build will be placed.
Device ID authentication lets users start using the application on a mobile device without entering registration data. The first time a user logs in to the application using the device ID, a new account is created automatically, and the user doesn’t need to enter a username, email address, or other data.
With the device ID, you can implement user authentication on one or more mobile devices in the background mode. To use this function, the user should link the device ID to an existing account.
The SDK supports authentication via ID of mobile devices on Android and iOS.
Obtener ID de dispositivo
The device ID is generated by the platform and is available to applications installed on the mobile device. The SDK gets the ID value using the platform API and uses this value to perform various functions using the Xsolla API.
The iOS device ID is passed in the UIDevice.identifierForVendor property. The Android device ID is passed in the android.provider.Settings.Secure.ANDROID_ID constant. The standard UE4 Get Device Id method is used to determine the ID.
Métodos del SDK
The SDK implements methods for the following functions:
Autenticación
| SDK method name | Description |
|---|---|
AuthenticateViaDeviceId | Authenticates the user to the application using the current device ID. |
Actualización de cuenta
| SDK method name | Description |
|---|---|
LinkEmailAndPassword | Adds a username, email address, and password, that can be used for authentication, to the current account. |
LinkSocialNetworkToUserAccount | Links a social network, that can be used for authentication, to the current account. |
Administración de dispositivos
| SDK method name | Description |
|---|---|
UpdateUsersDevices | Returns a list of devices linked to the current user account. |
LinkDeviceToAccount | Links the specified device to the current user account. |
UnlinkDeviceFromAccount | Unlinks the specified device from the current user account. |
¿Has encontrado una errata u otro error de texto? Selecciona el texto y pulsa Ctrl+Intro.
