
Gestión de compras
- virtual items
- groups of virtual items
- bundles
- packages of virtual currency
Before you start, configure items in Publisher Account:
- Configure virtual items and groups of virtual items.
- Configure packages of virtual currencies.
- Configure bundles.
The logics and interface in the examples are less complicated than they will be in your application. A possible item catalog in an in-game store implementation option is described in the demo project.
The example of every item in a catalog shows:
- item name
- item price
You can also show other information about the item if this information is stored in an in-game store.
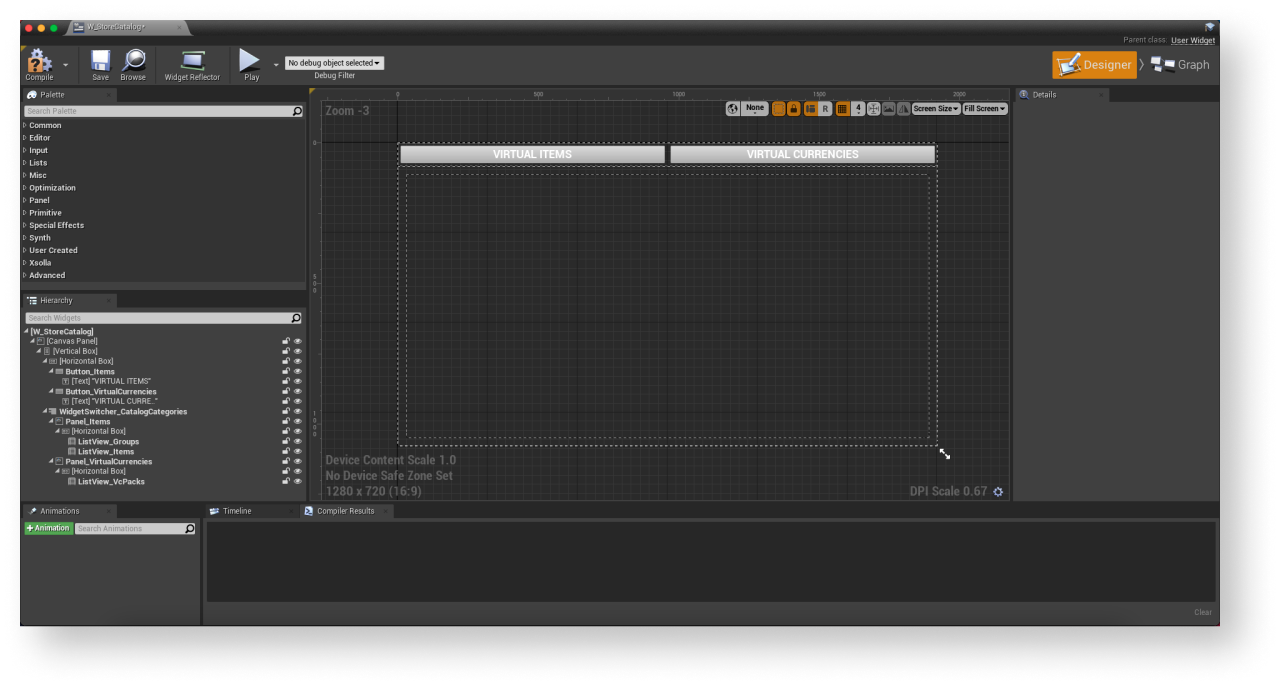
Crear widget para la página del catálogo
- Go to
Content Browser and create aUI directory. - In the contextual menu, go to
User Interface > Widget Blueprint . - In the widget blueprint, add the following UI elements:
- buttons for switching between displays of items and virtual currency packages
- a display area for groups of items
- a display area for the list of items
- a display area for the list of virtual currency packages
The following picture shows an example of the page structure.
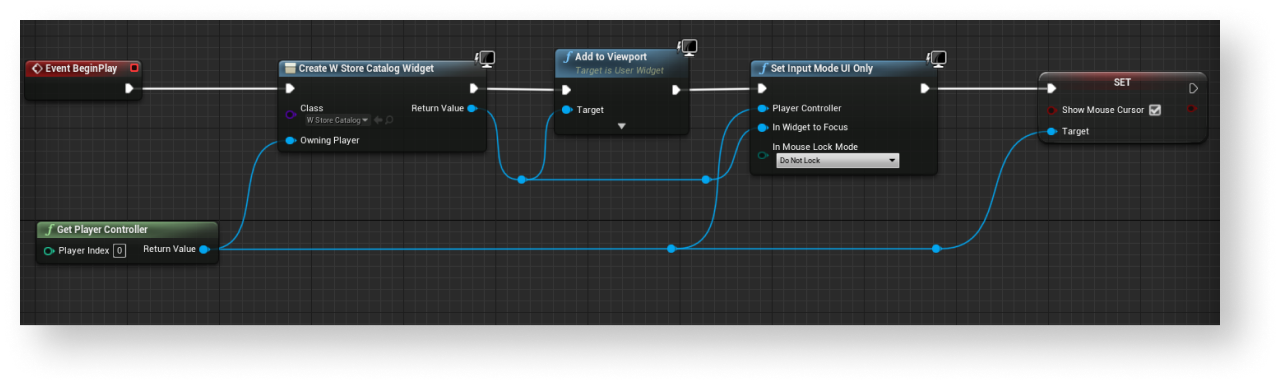
- Open a level blueprint:
- Choose a level in
Content Browser . - In the main menu, go to
Blueprints > Open Level Blueprint .
- Choose a level in
- Implement widget display when the level is started. To do this, add nodes as shown below. In the
CreateWidgetnode, specify the created widget.
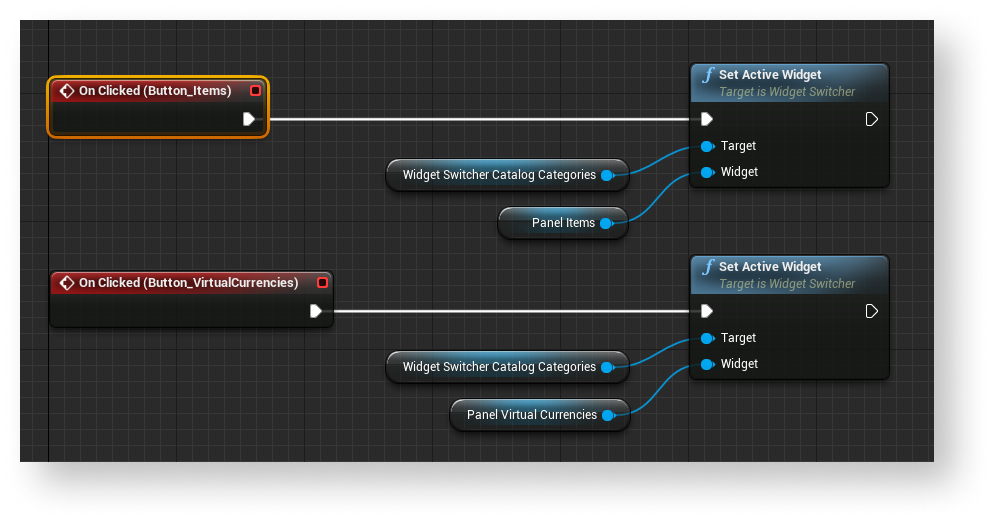
Añadir control de eventos de widget para la página de catálogo
- In the
Hierarchy panel, select a button for switching to the list of items. - In the
Details panel, click the + icon near theOn Clicked event.
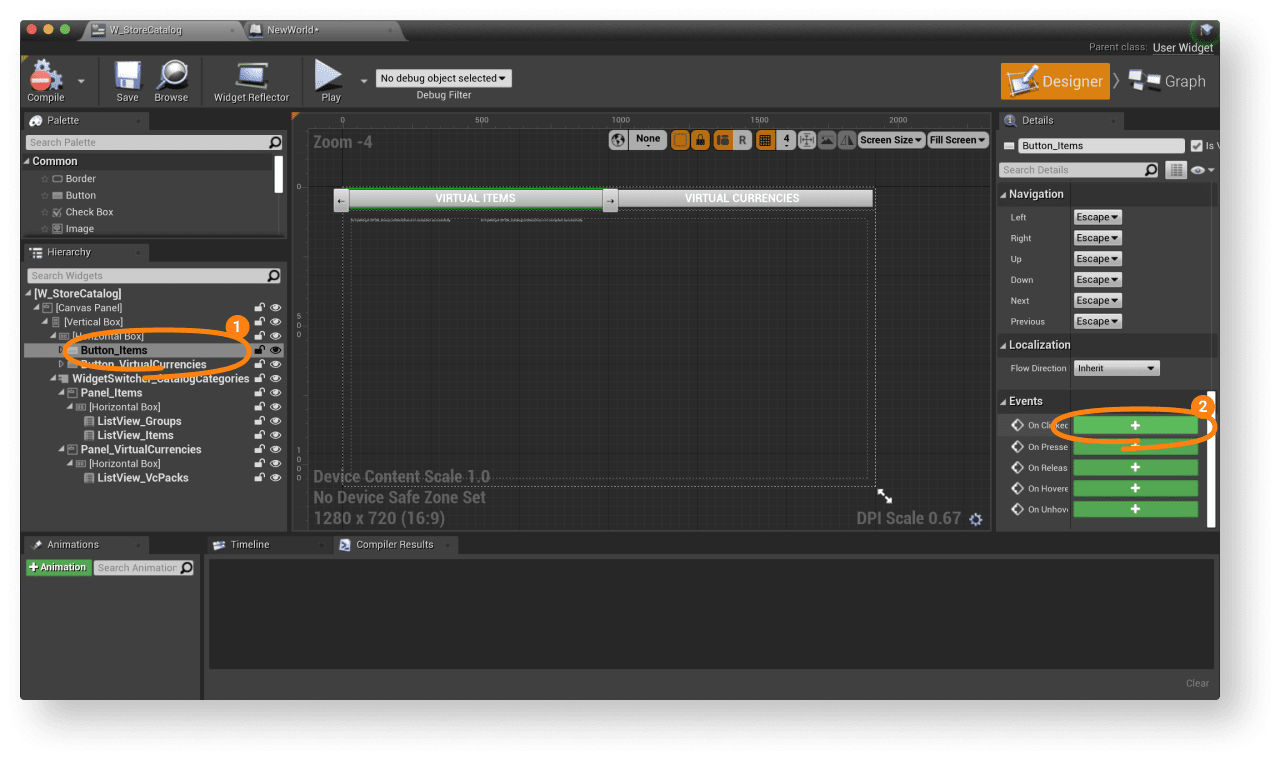
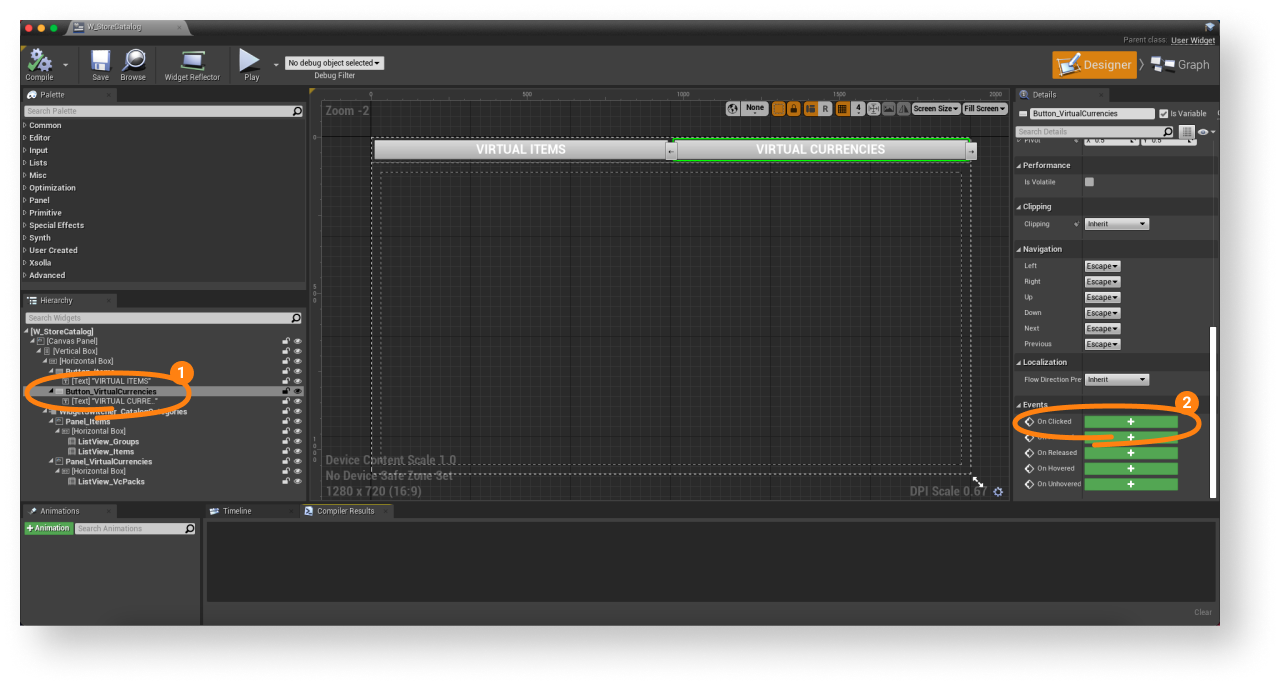
- In the
Hierarchy panel, select a button for switching to the list of virtual currency packages. - In the
Details panel, click the + icon near theOn Clicked event.
- Open a
Graph view. - Implement logic for switching between the lists. To do this, add the nodes as shown in the following picture.
Implementar la visualización de grupos de artículos virtuales
Crear clase para grupo de artículos
- Go to
Content Browser . There, in the contextual menu, clickBlueprint Class . - In the
All classes section, selectObject and clickSelect . - Use
BP_ItemGroupData as a class name. - Open a blueprint of a created class.
- In the
My Blueprint panel, clickAdd New and selectVariable . - In the
Details panel:
- Specify
GroupData in theVariable Name field. - Select
XsollaItemGroup in theVariable Type field. - Check
Instance Editable andExpose on Spawn boxes.
- Specify
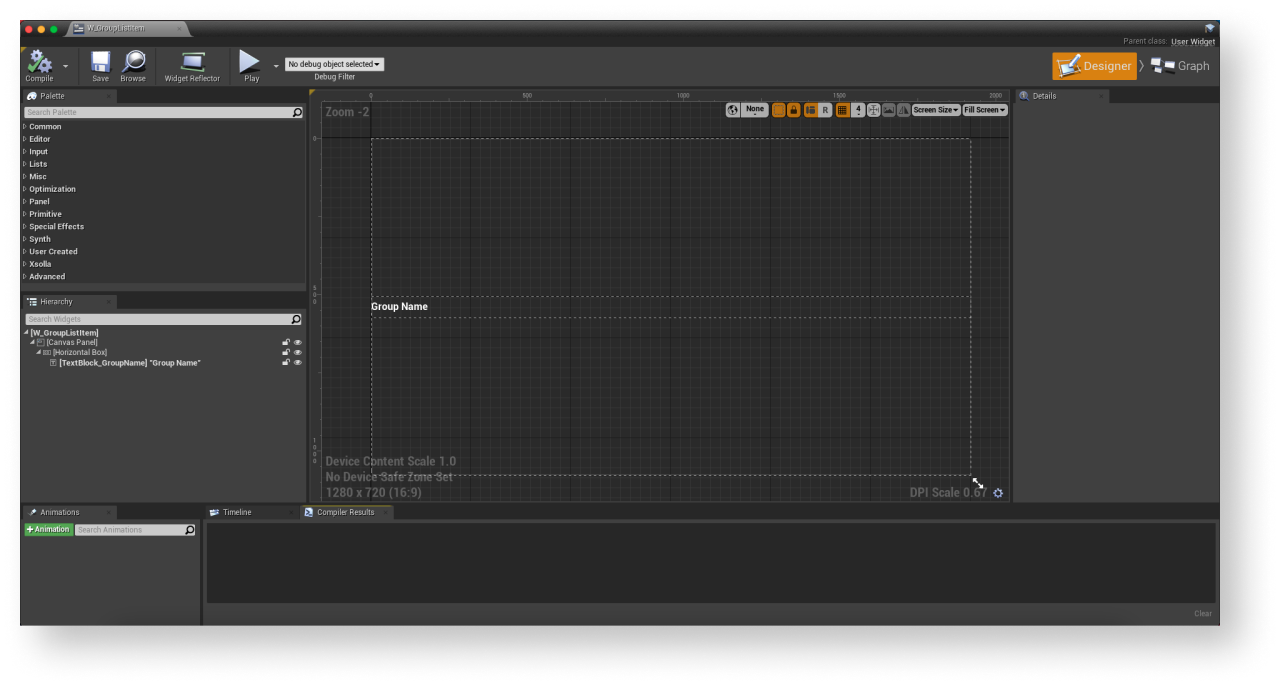
Crear widget para grupo de artículos
- Go to
Content Browser and create aUI directory and, in the contextual menu, go toUser Interface > Widget Blueprint . - In the widget blueprint, add an element for the name of the item group.
The following picture shows an example of the widget structure.
- Open a
Graph view. - Click
Class settings . - In the
Details panel, go toInterfaces > Implemented interfaces . - Click
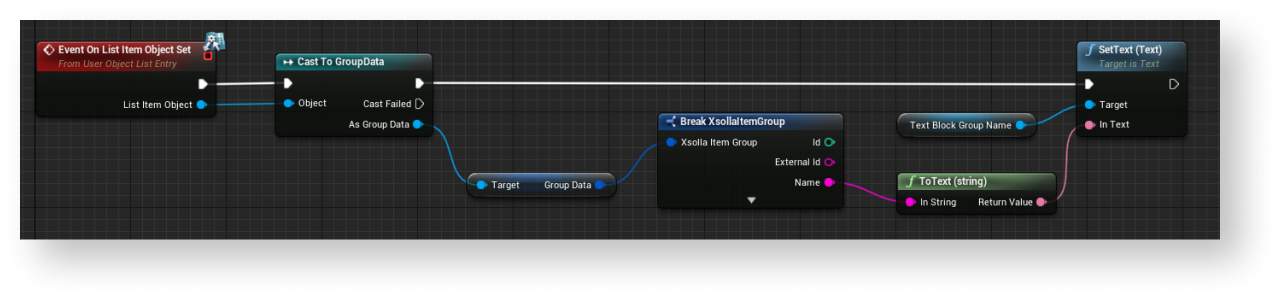
Add and selectUserObjectListEntry . This is a standard UE interface that allows the UI primitive to implement a behavior normal for the element of the list. - Implement logic for creating a group of items:
- Add the
EventOnListItemObjectSetnode to create an element of the list and initialize the widget. - Pass the value from the object that contains data about the group to the element with the name of the group. To do this, add nodes as shown in the following picture.
- Add the
- Implement logic for showing all items with the
All category. To do this, edit a blueprint as shown in the following picture.
- Implement logic for showing all items with the
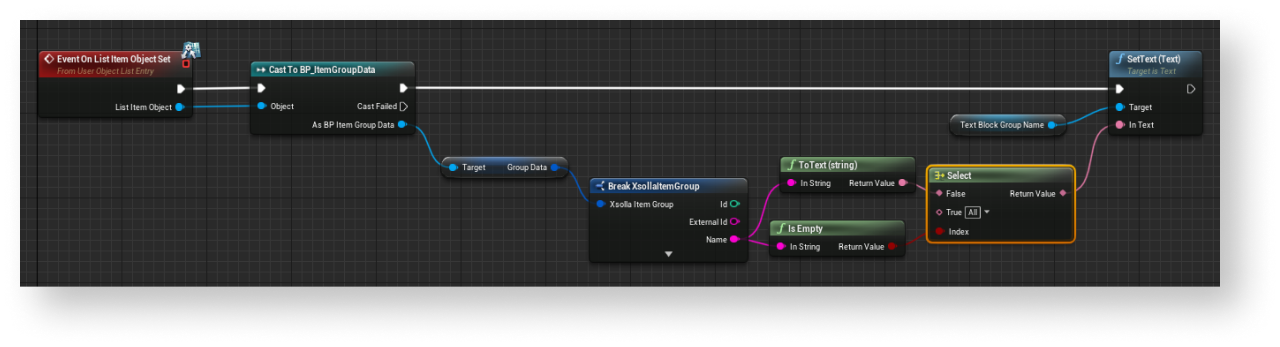
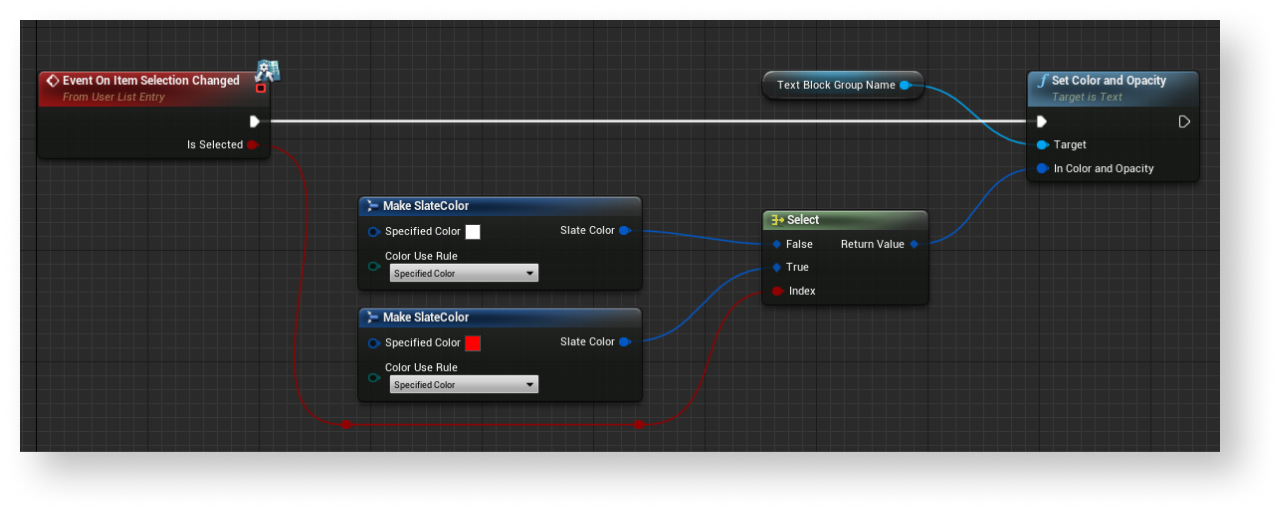
- Implement logic for highlighting a group of items that is selected in the list. To do this, add nodes as shown in the following picture.
Añadir lista de grupos de artículos a la página del catálogo
- Open the catalog page widget blueprint.
- Add the
List View element to the item groups display area. - In the
Details panel, select a previously created class for an item group in theEntry Widget Class field. - Implement logic for adding items to groups:
- Open a
Graph view. - Link an
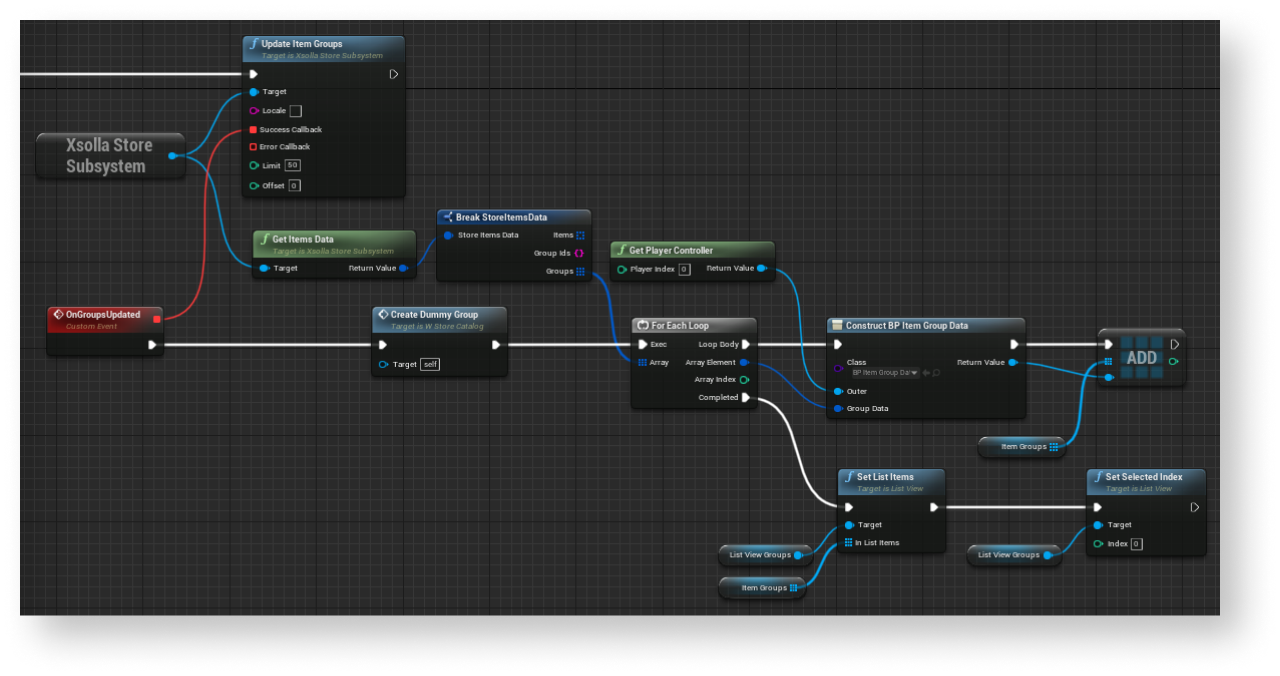
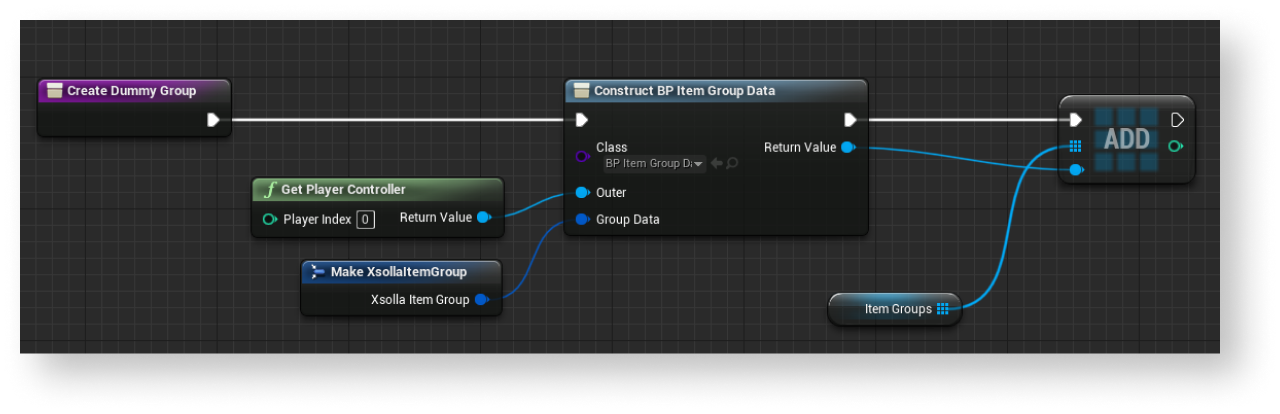
UpdateItemGroupsSDK method call connected with theXsollaLoginSubsystemobject to theEventConstructnode and add passing of data entered by users. - Implement logic for adding items to the group. The action should be done while processing a successful update of local cache of virtual item groups. To do this, add nodes as shown in the following picture.
- Open a
- Implement logic for showing all items with the
All category. To do this, edit a blueprint as shown in the following picture.
Implementar la visualización de artículos virtuales
Crear clase para un artículo
- Go to
Content Browser . There, in the contextual menu, clickBlueprint Class . - In the
All classes section, selectObject and clickSelect . - Use
BP_CatalogItemData as a class name. - Open a blueprint of a created class.
- In the
My Blueprint panel, clickAdd New and selectVariable . - In the
Details panel:
- Specify
CatalogItem in theVariable Name field. - Select
StoreItem in theVariable Type field. - Check
Instance Editable andExpose on Spawn boxes.
- Specify
Crear widget para un artículo
- Go to
Content Browser and create aUI directory. In the contextual menu, go toUser Interface > Widget Blueprint . - In the widget blueprint, add the following UI elements:
- item name
- item price
The following picture shows an example of the widget structure.

- Open a
Graph view. - Click
Class settings . - In the
Details panel, go toInterfaces > Implemented interfaces . - Click
Add and selectUserObjectListEntry . This is a standard UE interface that allows the UI primitive to implement a behavior normal for the element of the list. - Implement logic for creating a group of items:
- Add the
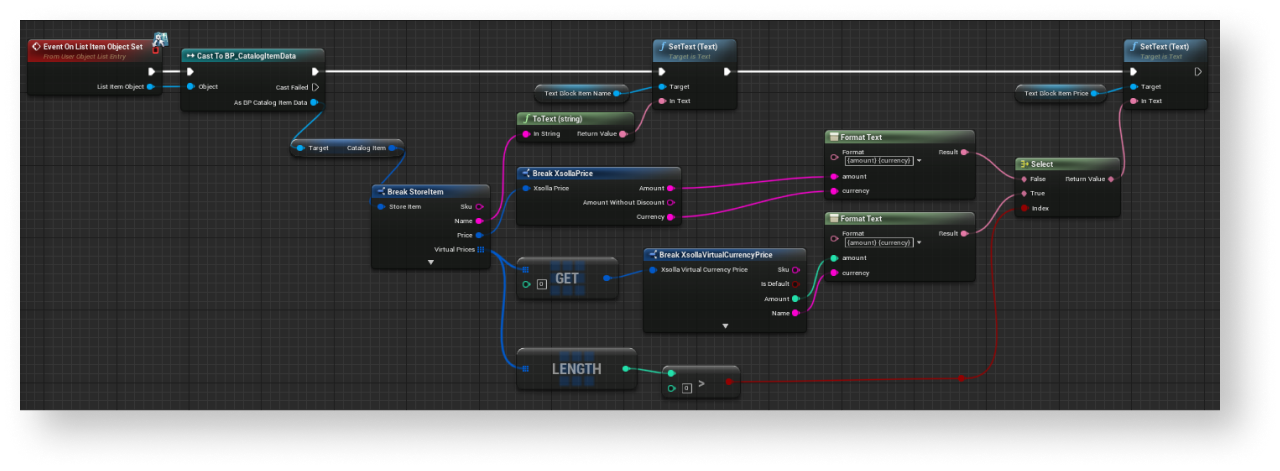
EventOnListItemObjectSetnode to create an element of the list and initialize the widget. - Pass the values from the object that contains data about the item to the elements with the name of the item and its price. To do this, add nodes as shown in the following picture.
- Add the
Añadir lista de artículos a la página del catálogo
- Open the catalog page widget blueprint.
- Add the
List View element to the items list display area. - In the
Details panel, select a previously created class for an item in theEntry Widget Class field. - Implement logic for adding items to groups:
- Open a
Graph view. - Link an
UpdateVirtualItemsSDK method call connected with theXsollaLoginSubsystemobject to theEventConstructnode and add passing of data entered by users. - Implement logic for adding items to the group. The action should be done while processing a successful update of local cache of virtual item groups. To do this, add nodes as shown in the following picture.
- Open a
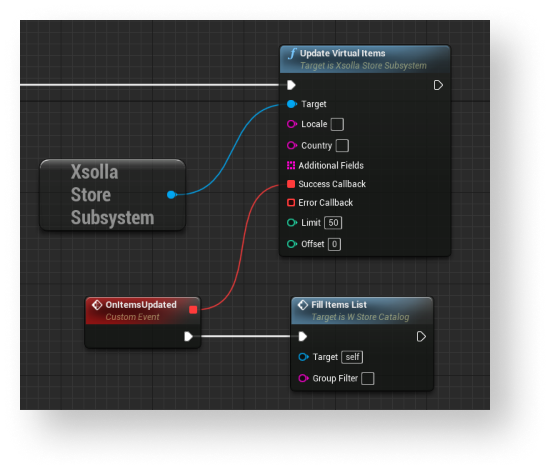
offset and limit parameters of the UpdateVirtualItems method are not required. Use them to implement pagination — a page-by-page display of items in the catalog. The maximum number of items on the page is 50. If the catalog has more than 50 items, pagination is necessary.- Implement logic for adding items to groups. To do this, add nodes as shown in the following picture.
Implementar la visualización de artículos virtuales por grupos
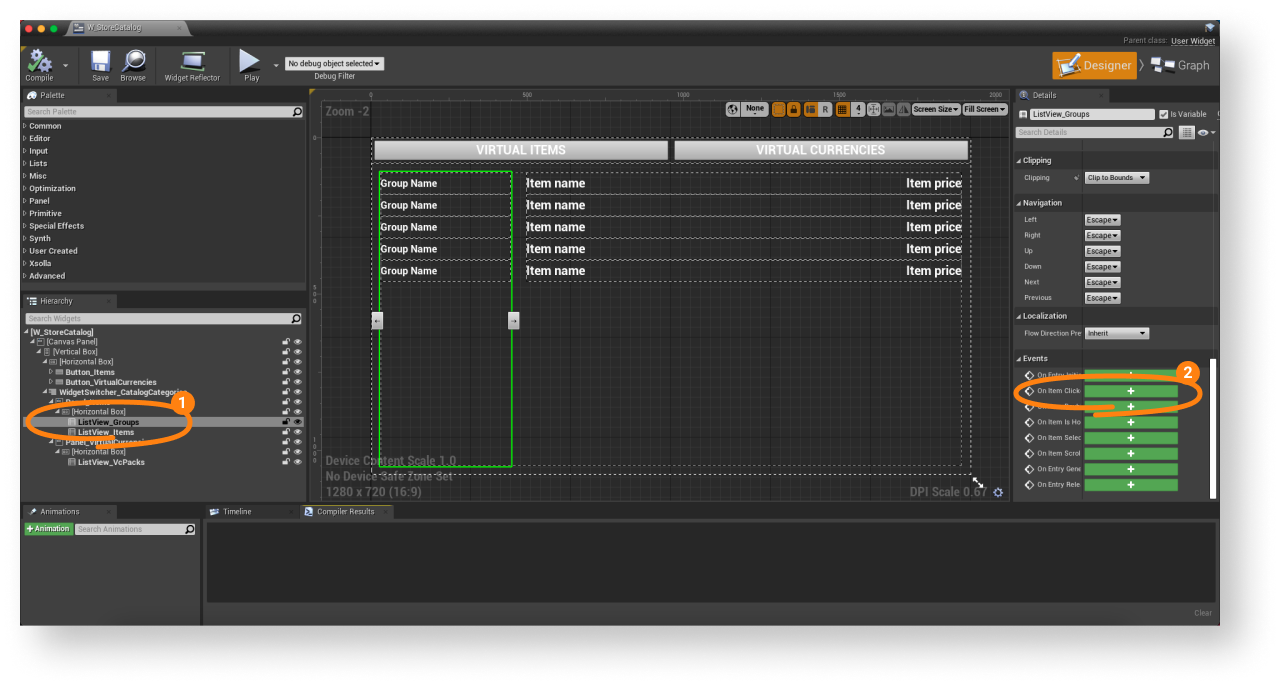
- Open the catalog page widget blueprint.
- In the
Hierarchy panel, select the list of item groups. - In the
Details panel, click the + icon near theOn Item Clicked event.
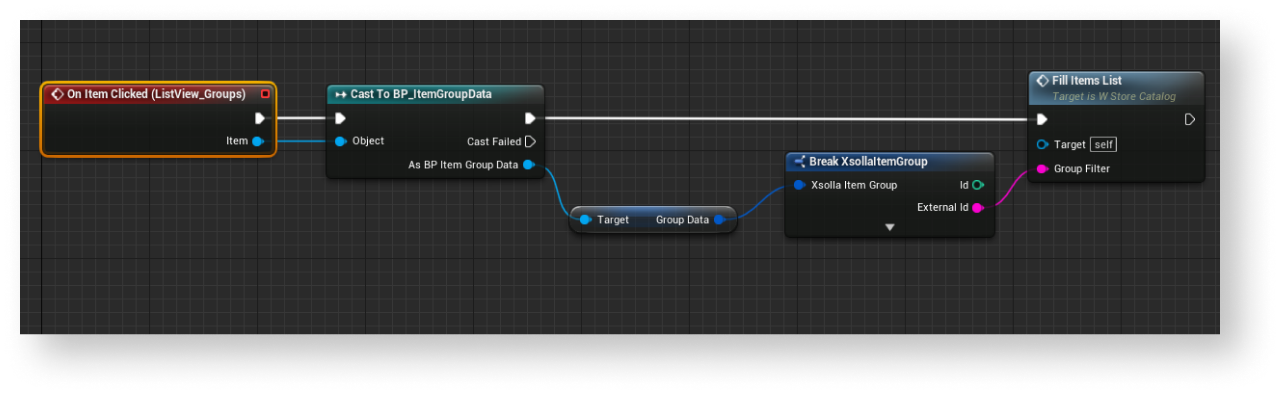
- Open a
Graph view. - Implement logic for filtering items by groups. To do this, add nodes as shown in the following picture.
Implementar la visualización de lotes
In this instruction, bundles and virtual items are shown in one list. Moreover, we use the same widget to display a single bundle or item.
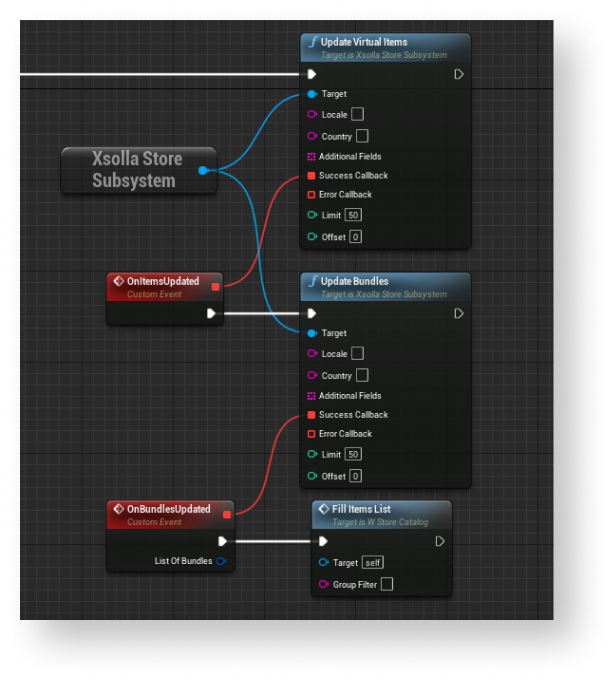
Añadir lista de lotes en la página del catálogo
- Open a catalog page blueprint.
- Open a
Graph view. - Complete logic for adding bundles to a list. Add the
UpdateBundlesSDK method callback alongside with theUpdateVirtualItemsmethod callback as shown in the following picture.
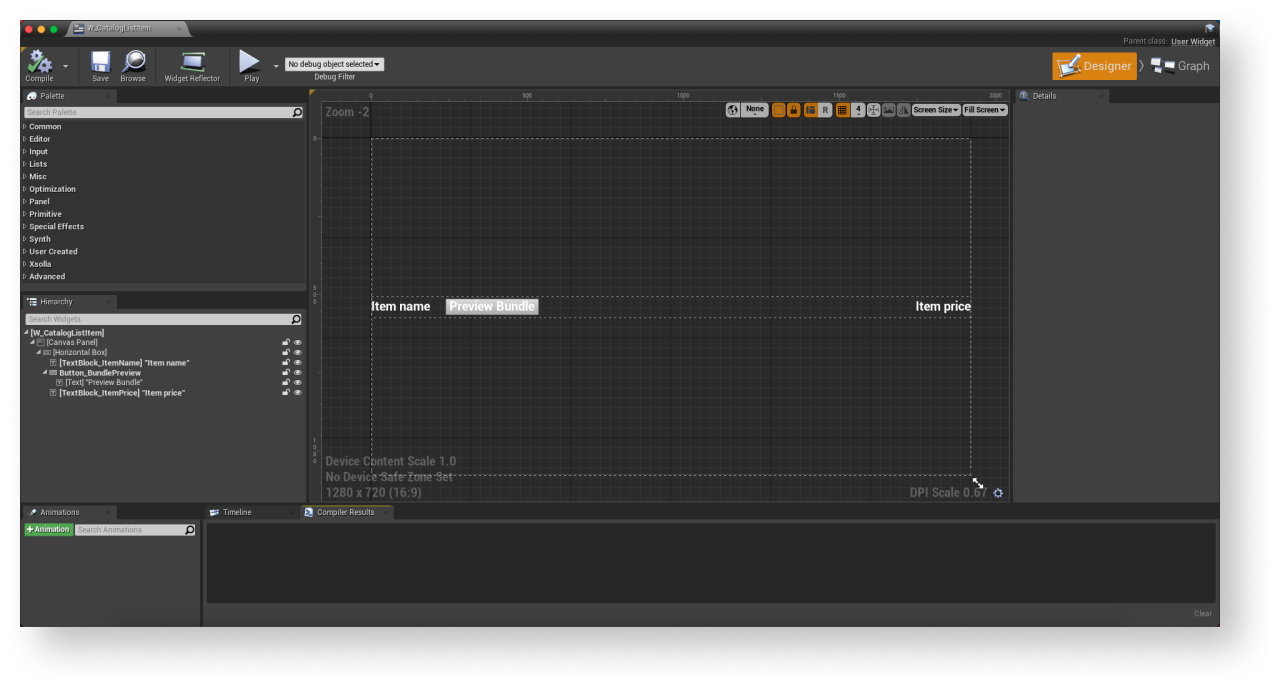
Completar un widget de artículos
- Open an item widget blueprint.
- Add a button for viewing bundle content near the item name.
The following picture shows an example of the widget structure.
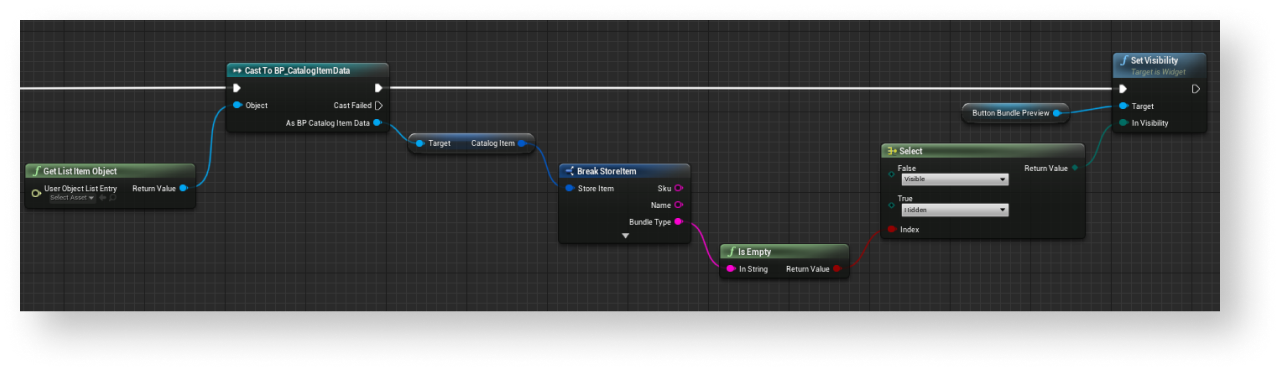
- Open a
Graph view. - Complete logic for creating an item by adding a display condition for a bundle content viewing button. The example is in the following picture.
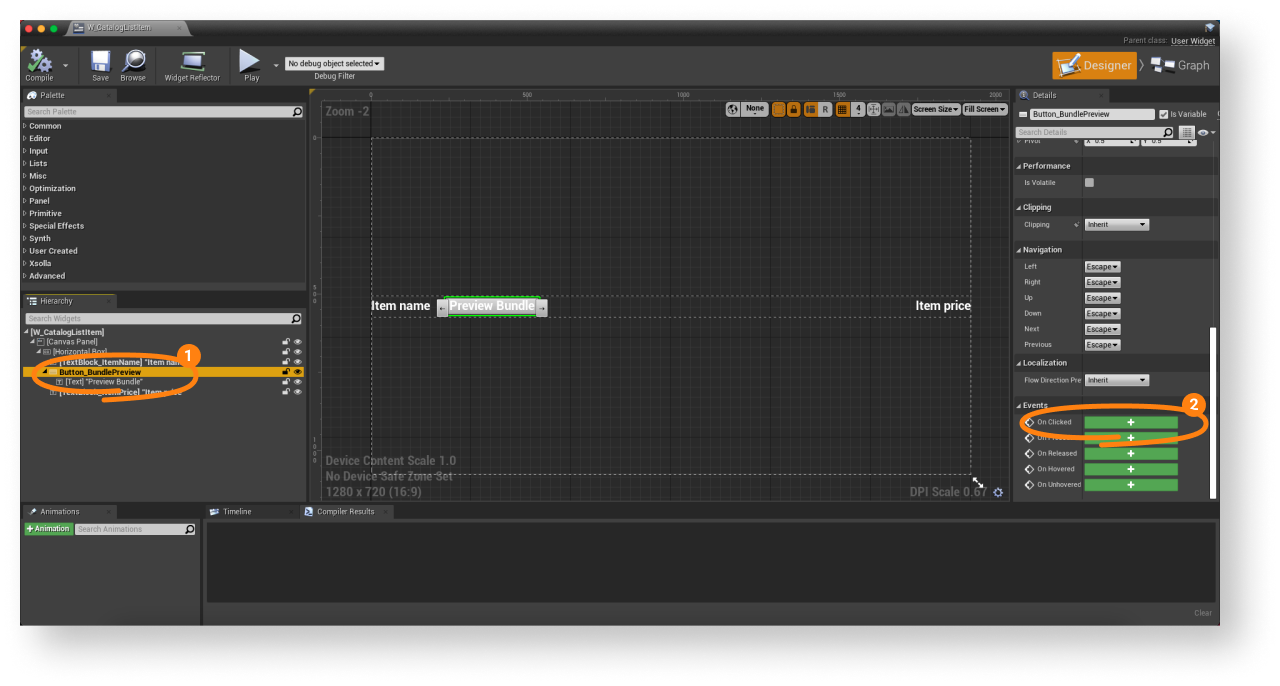
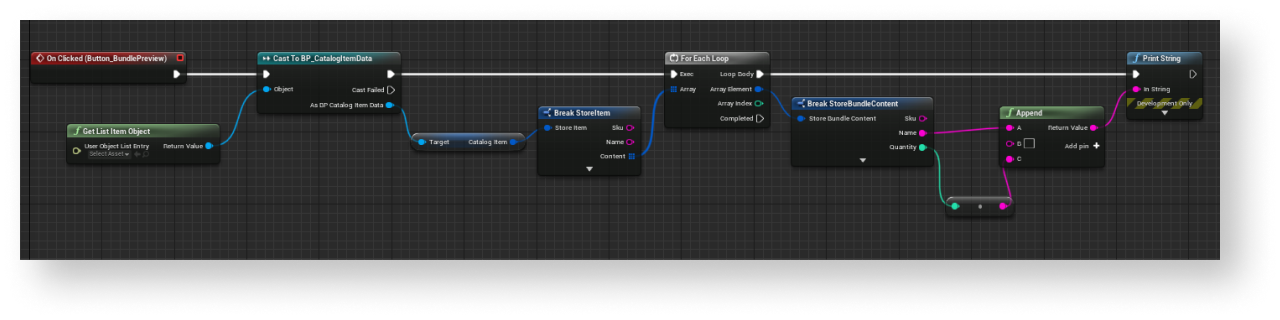
Añadir lógica para visualizar el contenido del lote
- In the blueprint for the item widget, open a
Designer view. - In the
Hierarchy panel, select a button for viewing bundle content. - In the
Details panel, click the + icon near theOn Clicked event.
- Open a
Graph view. - Implement logic for displaying bundle content (a list of items in the bundle and the quantity of every item in the bundle). To do this, add nodes as shown in the following picture.
Implementar la visualización de paquetes de monedas virtuales
Crear una clase para el paquete de moneda virtual
- Go to
Content Browser . There, in the contextual menu, clickBlueprint Class . - In the
All classes section, selectObject and clickSelect . - Use
BP_VcPackItemData as a class name. - Open a blueprint of a created class.
- In the
My Blueprint panel, clickAdd New and selectVariable . - In the
Details panel:
- Specify
PackItem in theVariable Name field. - Select
VirtualCurrencyPackage in theVariable Type field. - Check
Instance Editable andExpose on Spawn boxes.
- Specify
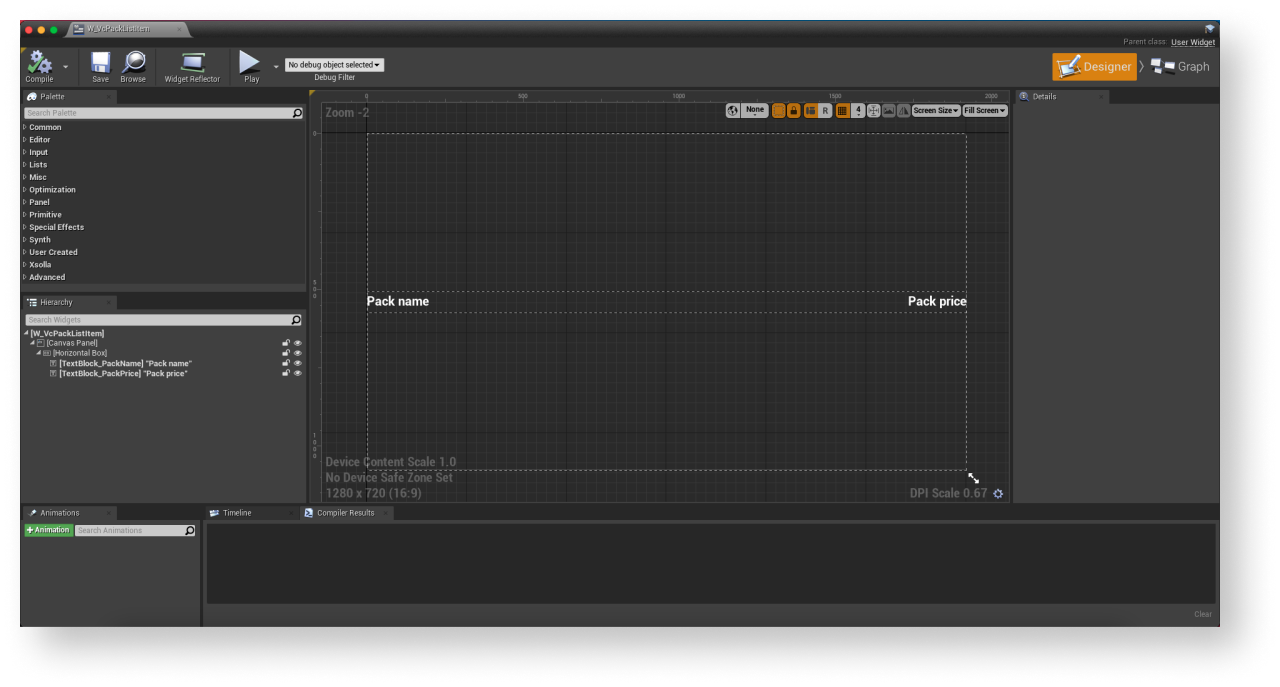
Crear widget de paquete de moneda virtual
- Go to
Content Browser and create aUI directory. In the contextual menu, go toUser Interface > Widget Blueprint . - In the widget blueprint, add the following UI elements:
- package name
- package price
The following picture shows an example of the widget structure.
- Open a
Graph view. - Click
Class settings . - In the
Details panel, go toInterfaces > Implemented interfaces . - Click
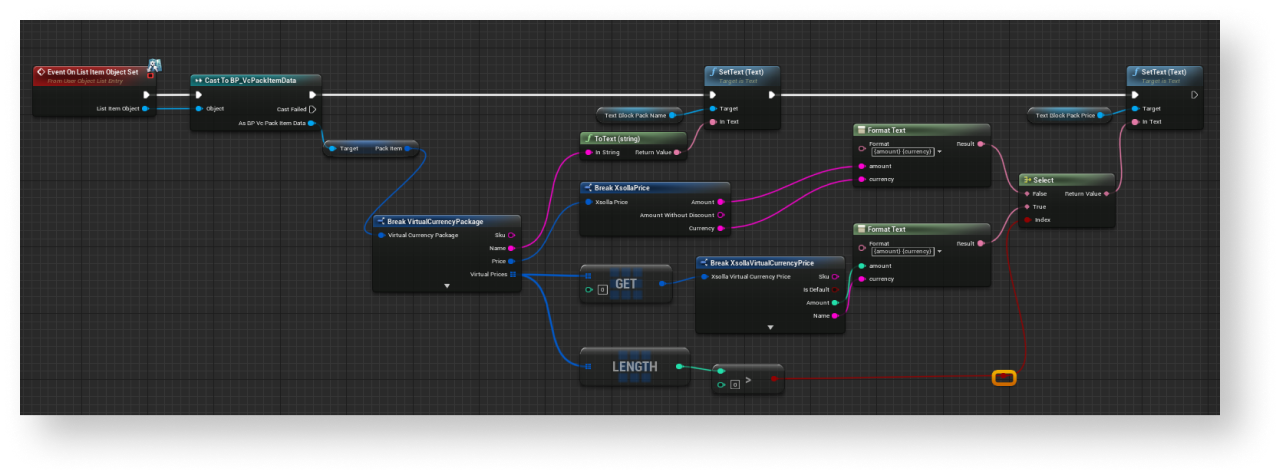
Add and selectUserObjectListEntry . This is a standard UE interface that allows the UI primitive to implement a behavior normal for the element of the list. - Implement logic for creating a group of items:
- Add the
EventOnListItemObjectSetnode to create an element of the list and initialize the widget. - Pass the value from the object that contains data about the package to the element with the name and a price of the package. To do this, add nodes as shown in the following picture.
- Add the
Agregar la lista de paquetes de moneda virtual a la página del catálogo
- Open the catalog page widget blueprint.
- Add the
List View element to the display area for the list of virtual currency packages. - In the
Details panel, select a previously created class for a virtual currency package in theEntry Widget Class field. - Implement logic for adding packages to the list:
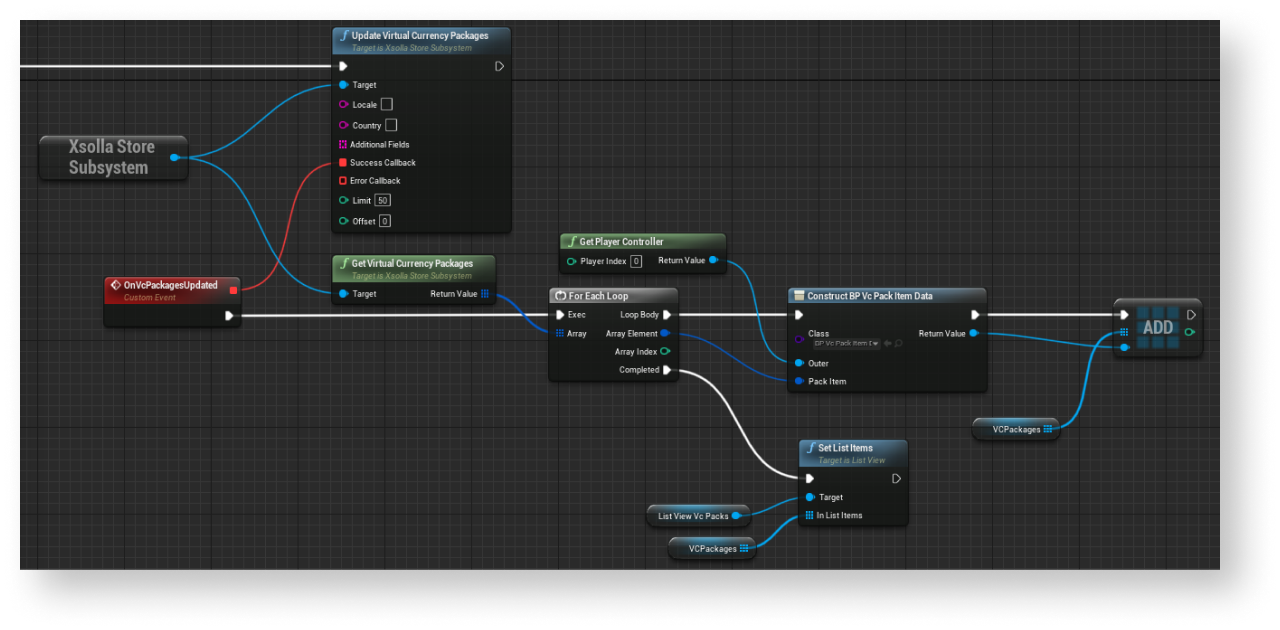
- Open a
Graph view. - Link an
UpdateVirtualCurrencyPackagemethod call connected with theXsollaStoreSubsystemobject to theEventConstructnode and add passing of data entered by users. - Implement logic for adding a package to the list. The action should be done while processing a successful update of local cache of virtual currency packages. To do this, add nodes as shown in the following picture.
- Open a
offset and limit parameters of the UpdateVirtualCurrencyPackage method are not required. Use them to implement pagination — a page-by-page display of items in the catalog. The maximum number of items on the page is 50. If the catalog has more than 50 items, pagination is necessary.This instruction shows how to use the SDK methods to implement selling of virtual items for real currency.
Before you start, implement a display of virtual items in a catalog. In the following example, we describe how to implement purchasing of virtual items. Configuration for other item types is similar.
The logic and interface in the examples are less complicated than they will be in your application. A possible implementation option for selling items for real currency and displaying a catalog of items is described in the demo project.
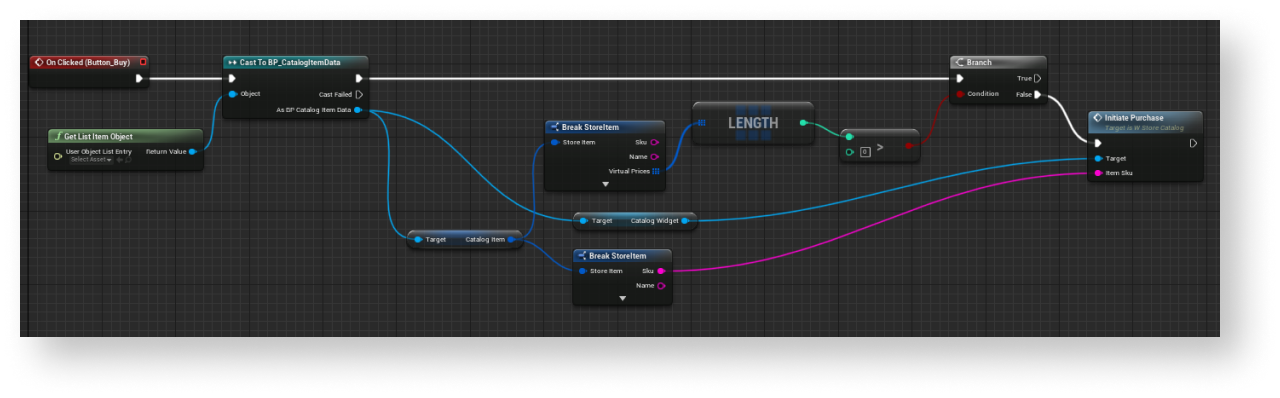
Completar widget de página del catálogo
- Open the catalog page widget.
- Open a
Graph view. - To open a payment page in a browser:
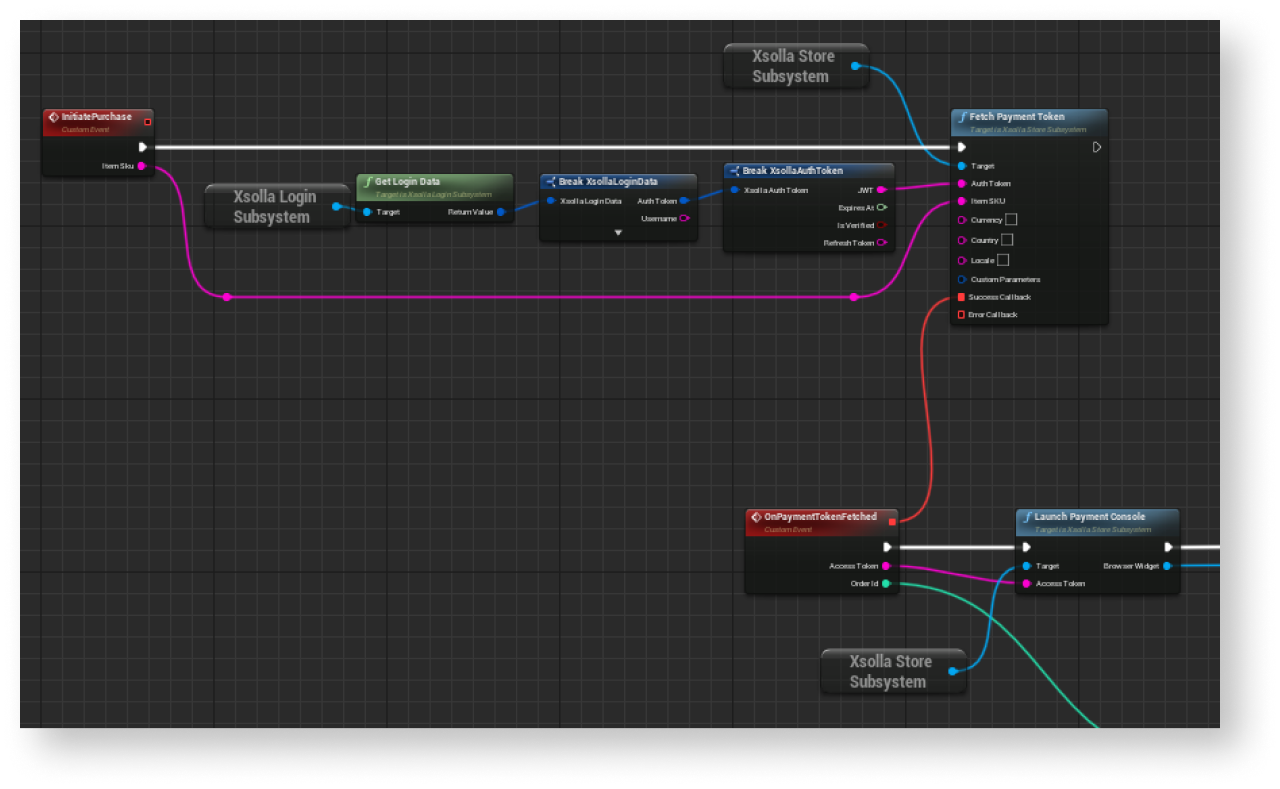
- Implement receiving of a payment token:
- Add the
InitiatePurchasenode and connect theFetchPaymenTokenSDK method call linked to theXsollaStoreSubsystemobject to the added node. - To the
FetchPaymenTokenmethod, pass the SKU of a purchased item and a user authorization token.
- Add the
- Implement receiving of a payment token:
- A JWT received during user authorization via the
AuthenticateUserSDK method. - A JWT, received on the back end of your application by custom ID (user ID generated on your server). Use this token if you implemented your own authorization system.
- Call the
LaunchPaymentConsoleSDK method linked to theXsollaStoreSubsystemobject and pass a payment token to it.
- Call the
Example of the payment page opening implementation:
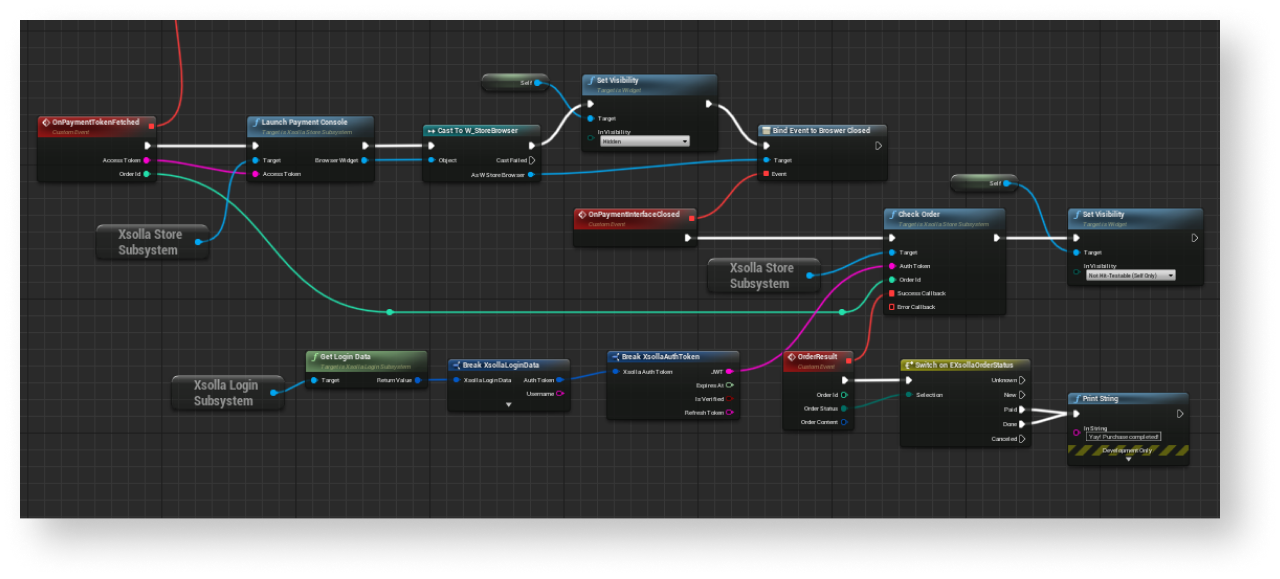
- Implement a purchase status check after closing the browser window:
- To track the browser closing event, subscribe to the
BrowserClosedevent. - To check the purchase status, call the
CheckOrderSDK method and pass an authorization token and order number to it.
- To track the browser closing event, subscribe to the
Example of a purchase status check implementation:
Mejorar la clase de datos del artículo
- Open the
BP_CatalogItemData blueprint. - In the
My Blueprint panel, clickAdd New and selectVariable . - In the
Details panel:
- Specify
CatalogWidget in theVariable Name field. - In the
Variable Type field, selectW_StoreCatalog . - Check the
Instance Editable andExpose on Spawn boxes.
- Specify
The result is that every element of the list will contain a link to a parent widget and will be able to call its methods.
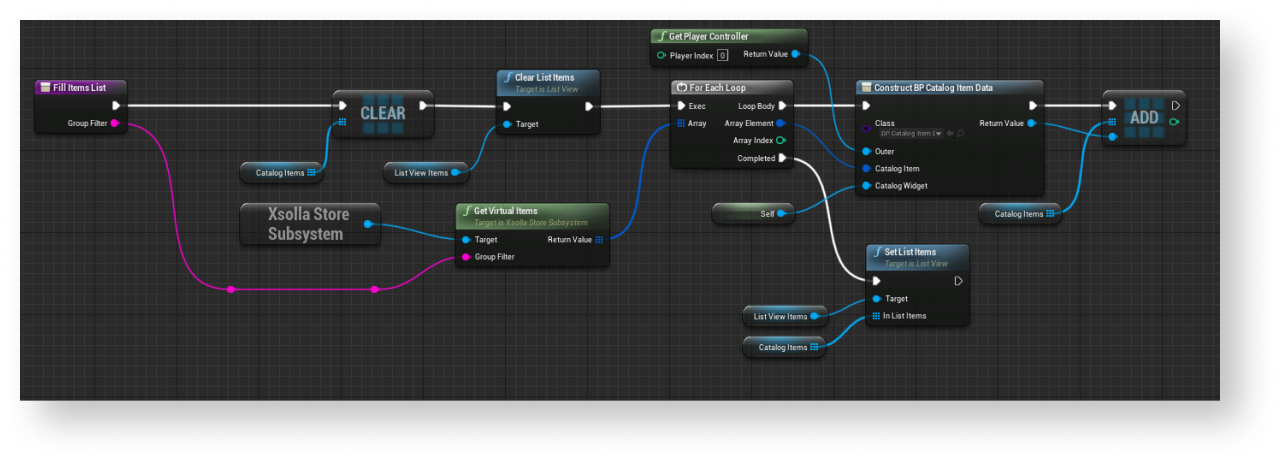
Realizar la adición de lista de artículos a la página del catálogo
- Open a blueprint of a catalog page widget.
- Open a
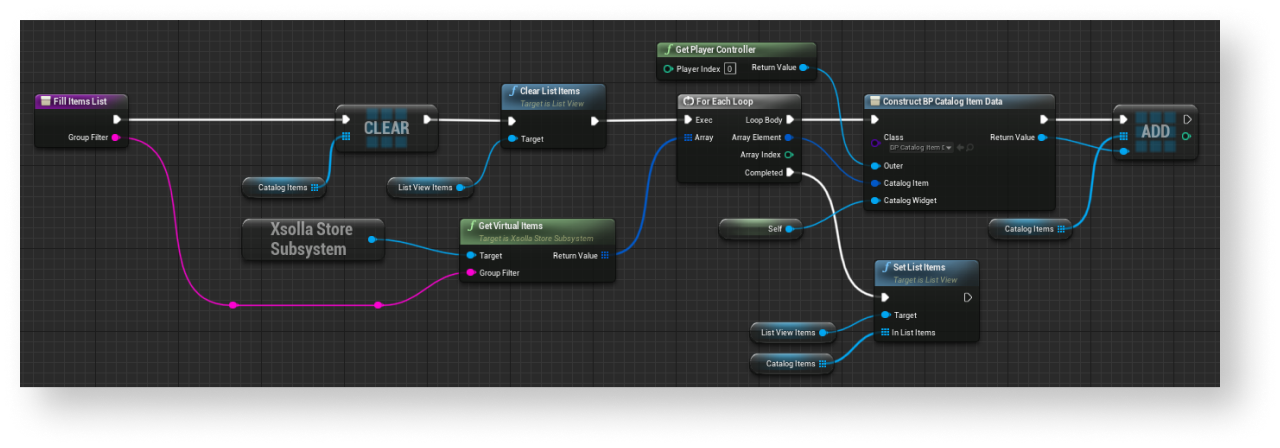
Graph view. - Edit the logic for filling out the list of items as shown in the following picture.
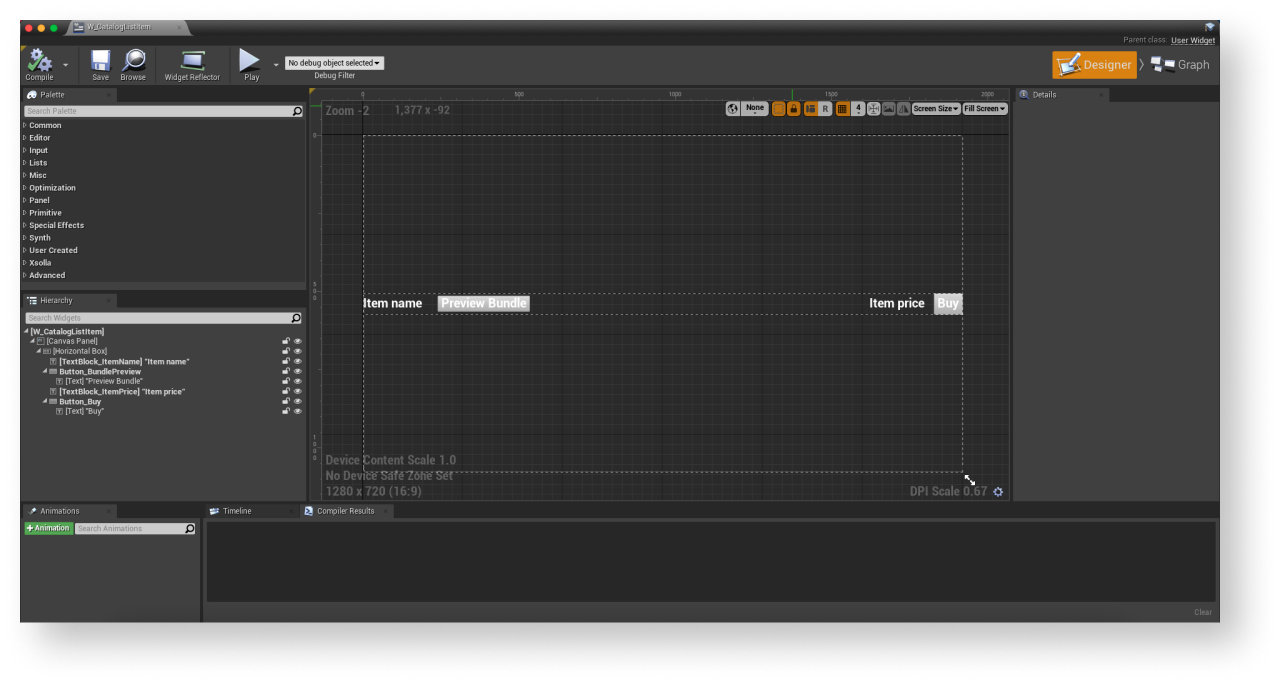
Completar widget para un artículo
- Open a widget blueprint for an item.
- Add a button for purchasing an item.
The following picture shows an example of the widget structure.
- In the
Hierarchy panel, select a button for purchasing an item. - In the
Details panel, click the + icon near theOn Clicked event.
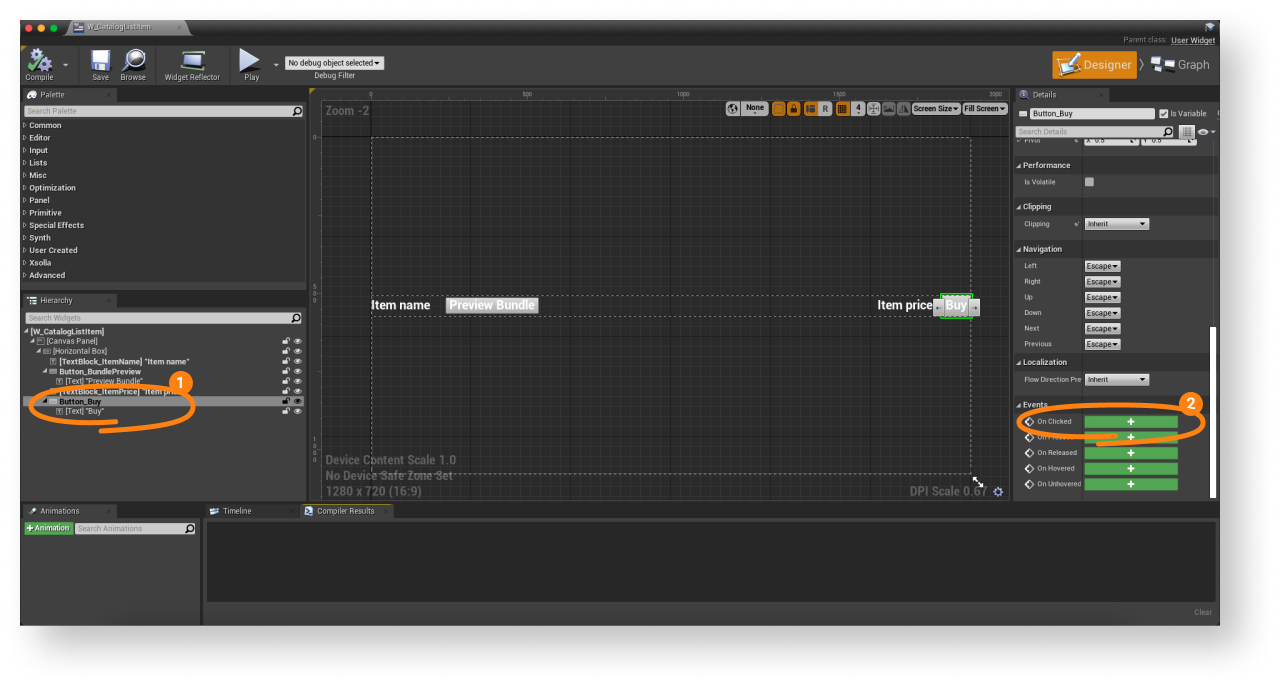
- Open the
Graph view. - Implement logic for clicking a button for purchasing an item. To do this, add the nodes as shown in the following picture.
As a result, when clicking the button for purchasing an item, a payment page opens in the browser according to the logic implemented in the catalog page widget.
This instruction shows how to use the SDK methods to implement selling of virtual items for virtual currency.
Before you start, implement a display of virtual items in a catalog.
The logic and interface in the examples are less complicated than they will be in your application. A possible implementation option for selling items for real currency and displaying a catalog of items is described in the demo project.
To implement selling of virtual items for virtual currency:
- Add logic for purchasing an item to the widget for the catalog page.
- Add a mechanism to an item class to initiate the logic for purchasing an item.
- Refine adding a list of items to the catalog page.
- Add a purchase button to the widget for an item.
- Add the logic of buying for virtual currency to the widget for an item:
- Open a blueprint of the widget for an item.
- Go to the
Graph view. - Add nodes as shown below.
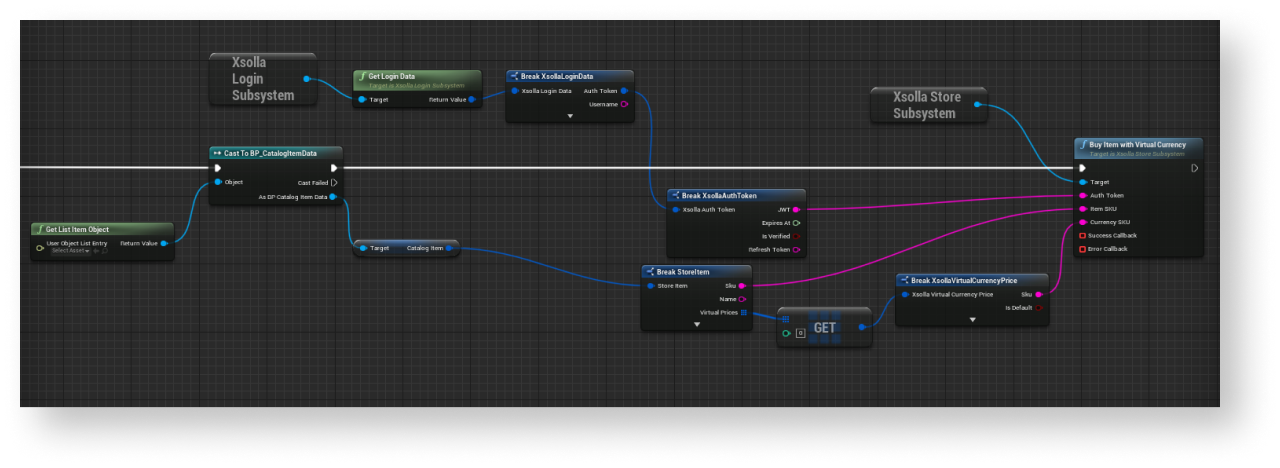
This will result in a virtual currency price that is specified for an item will display in the widget and is used to purchase the item. If an item is priced in multiple virtual currencies, the first virtual currency in the list will be used for display and purchase.
This tutorial shows how to use the SDK methods to display items in the user inventory.
The logics and interface in the examples are less complicated than they will be in your application. A possible item catalog in an in-game store implementation option is described in the demo project.
Crear widget para la página del inventario
- Go to
Content Browser and create aUI directory. - In the contextual menu, go to
User Interface > Widget Blueprint . - In the widget blueprint, add the display area for the list of items.
The following picture shows an example of the inventory structure.
- Open a level blueprint:
- Choose a level in
Content Browser . - In the main menu, go to
Blueprints > Open Level Blueprint .
- Choose a level in
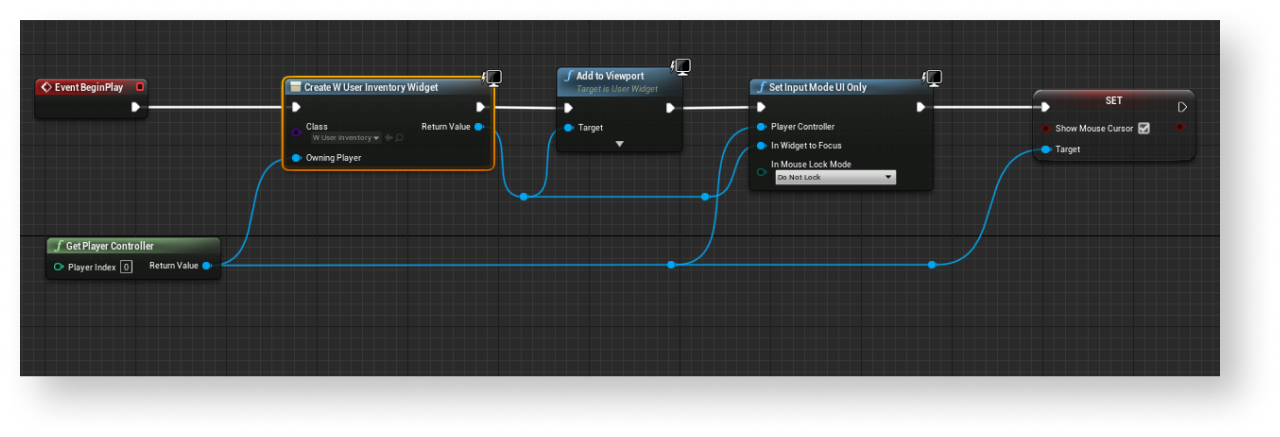
- Implement the widget display when the level is started. To do this, add nodes as shown below. In the
CreateWidgetnode, specify the created widget.
Crear clase para un artículo
- Go to
Content Browser . There, in the contextual menu, clickBlueprint Class . - In the
All classes section, selectObject and clickSelect . - Use
BP_UserInventoryItemData as a class name. - Open a blueprint of a created class.
- In the
My Blueprint panel, clickAdd New and selectVariable . - In the
Details panel:
- Specify
UserInventoryItem in theVariable Name field. - Select
InventoryItem in theVariable Type field. - Check
Instance Editable andExpose on Spawn boxes.
- Specify
Crear widget para un artículo
- Go to
Content Browser and create aUI directory and, in the contextual menu, go toUser Interface > Widget Blueprint . - In the widget blueprint, add the following UI elements:
- item name
- item feature:
- for subscriptions — subscription status (active or expired)
- for consumable items — quantity of items
- for nonconsumable items — no feature is displayed
The following picture shows an example of the widget structure.

- Open a
Graph view. - Click
Class settings . - In the
Details panel, go toInterfaces > Implemented interfaces . - Click
Add and selectUserObjectListEntry . This is a standard UE interface that allows the UI primitive to implement a behavior normal for the element of the list. - Implement logic for creating an item:
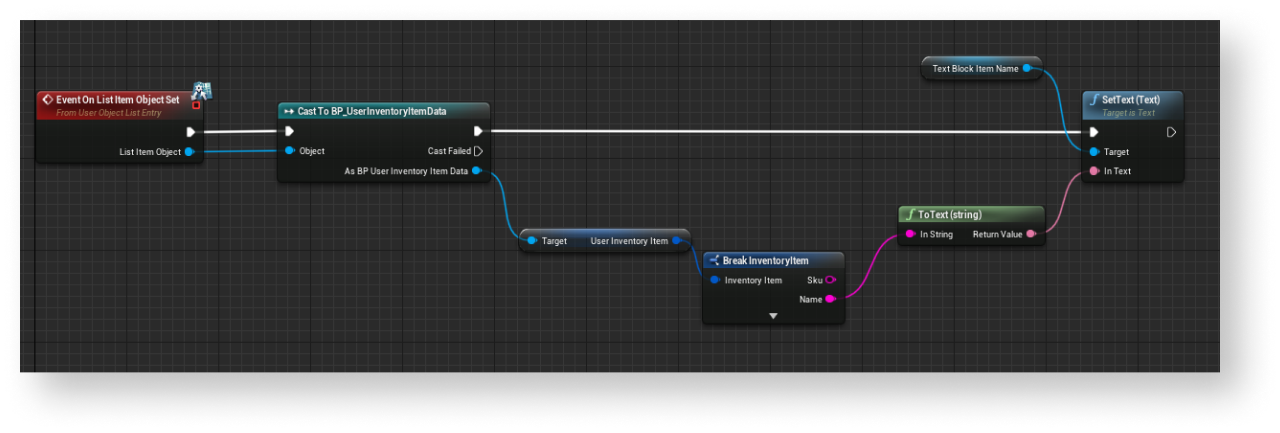
- Add the
OnListItemObjectSetnode to create an element of the list and initialize the widget. - Pass the value from the object that contains data about the item to the element with the name of the item. To do this, add nodes as shown in the following picture.
- Add the
- Implement logic for defining an item type by passing the data about the item according to its type to the element with the item features. To do this, add nodes as shown in the following picture.
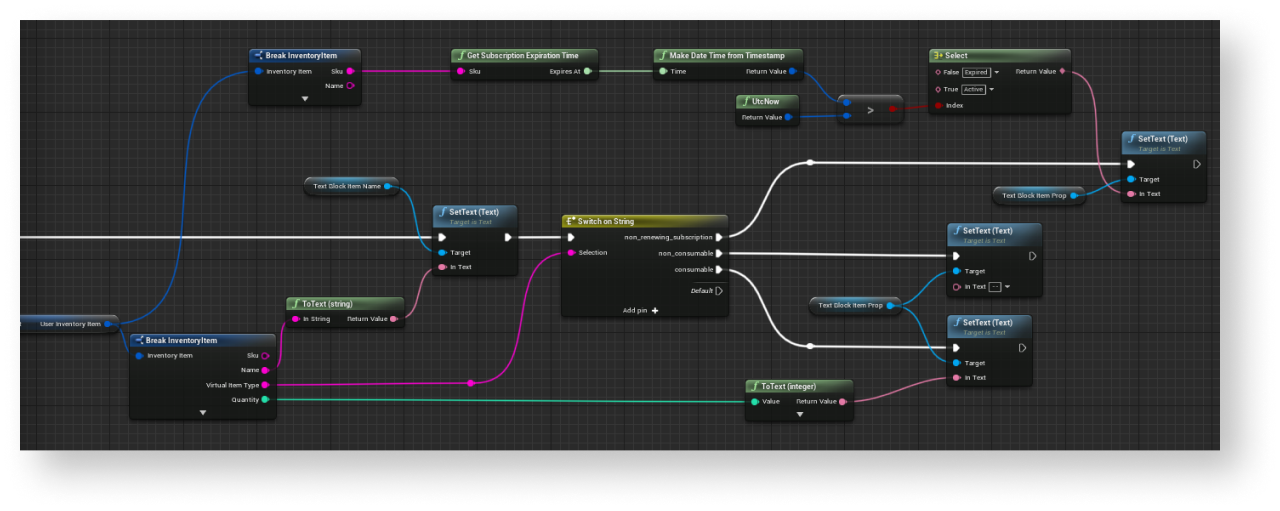
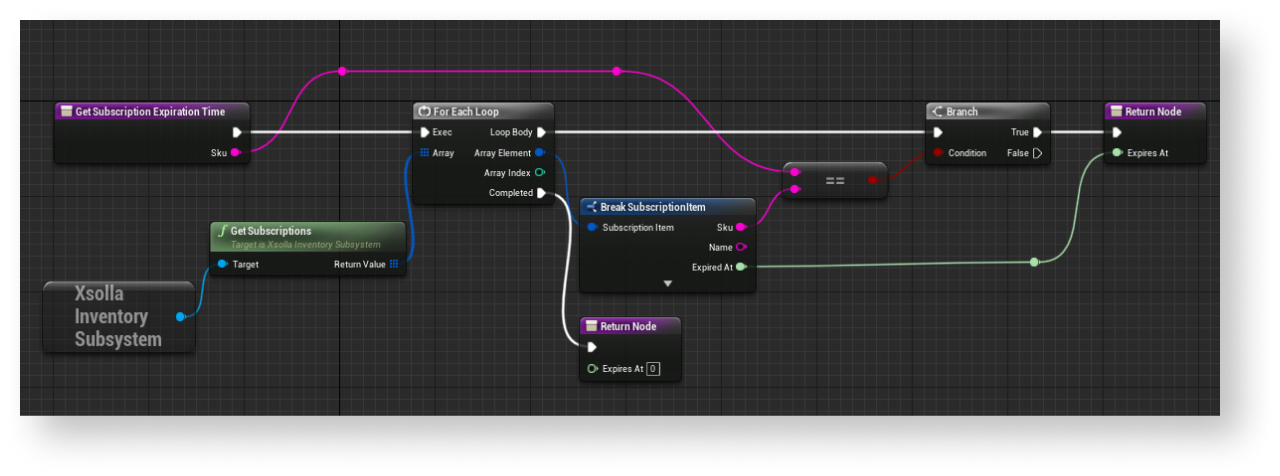
- Add logic for defining the subscription expiration time. To do this, add nodes as shown in the following picture.
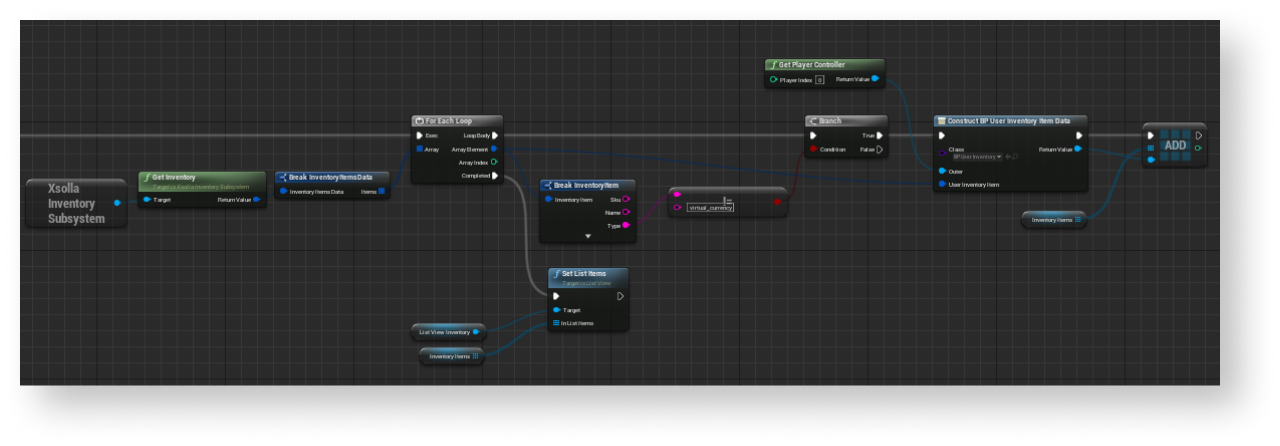
Añadir lista de artículos a la página del inventario
- Open the inventory page widget blueprint.
- Add the
List View element to the item list display area. - In the
Details panel, select a previously created class for an item group in theEntry Widget Class field. - Implement logic for adding items to groups:
- Open the
Graph view. - Link an
UpdateInventoryandUpdateSubscriptionsconsecutive SDK methods call connected with theXsollaInventorySubsystemobject to theEventConstructnode as shown in the following picture:
- Open the
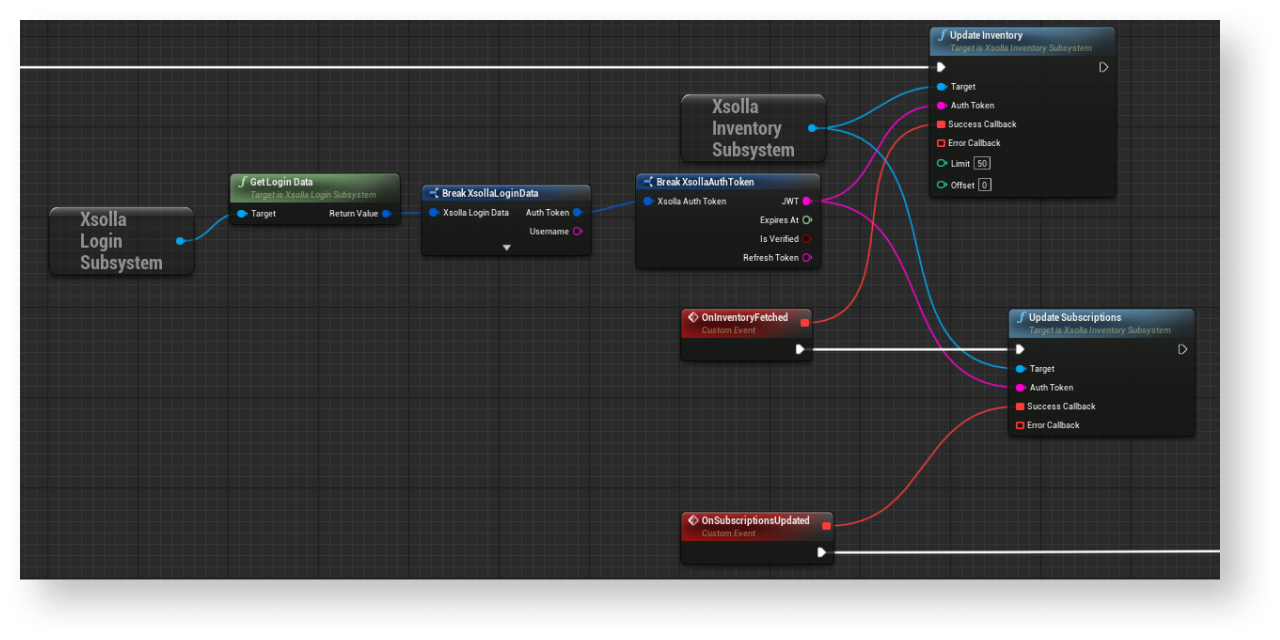
- Implement logic for filling out the list of items. To do this, add nodes as shown in the following picture.
This tutorial shows how to use the SDK methods to display the balance of virtual currency in your app.
In the example, we show virtual currencies and their balance in the user inventory. Therefore, you should implement display of items in the user inventory before you start.
The logics and interface in the examples are less complicated than they will be in your application. A possible item catalog in an in-game store implementation option is described in the demo project.
Crear clase para la visualización de saldo
- Go to
Content Browser . There, in the contextual menu, clickBlueprint Class . - In the
All classes section, selectObject and clickSelect . - Use
BP_VcBalanceItemData as a class name. - Open a blueprint of a created class.
- In the
My Blueprint panel, clickAdd New and selectVariable . - In the
Details panel:
- Specify
VcBalanceItem in theVariable Name field. - Select
VirtualCurrencyBalance in theVariable Type field. - Check
Instance Editable andExpose on Spawn boxes.
- Specify
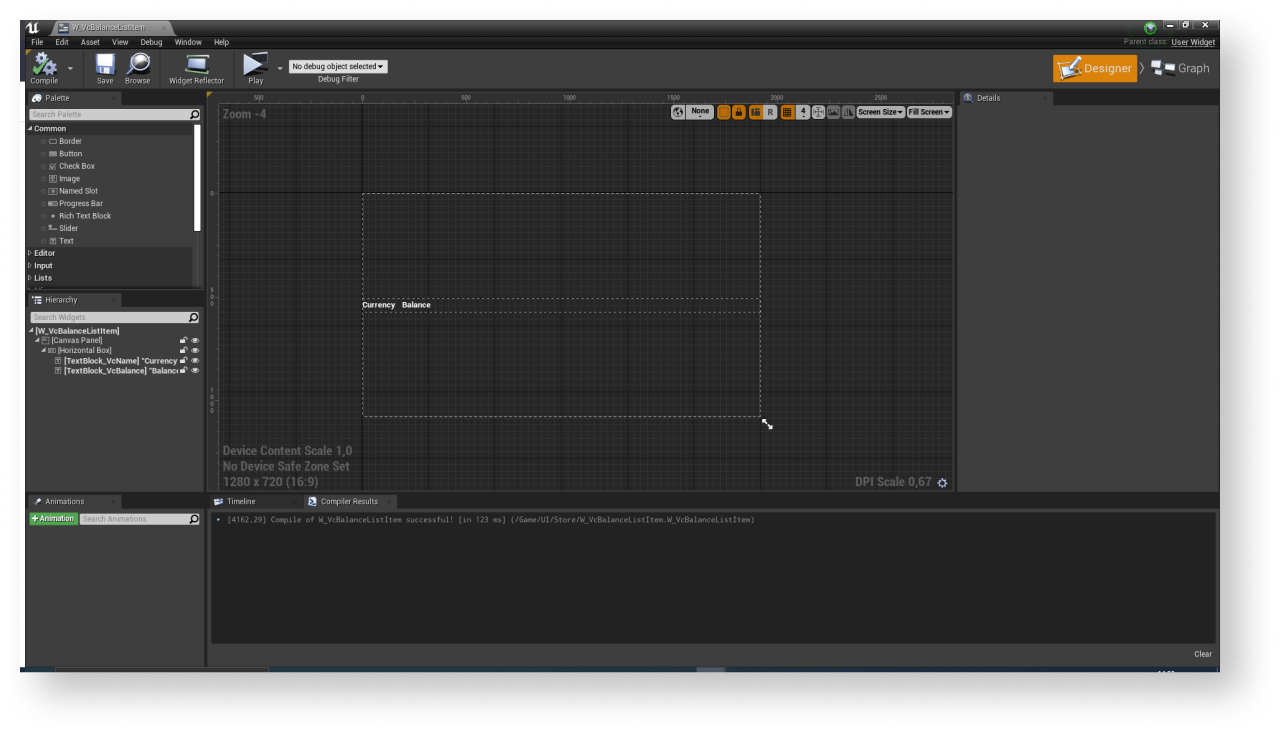
Crear widget para la visualización del saldo
- Go to
Content Browser and create aUI directory and, in the contextual menu, go toUser Interface > Widget Blueprint . - In the widget blueprint, add the following UI elements:
- virtual currency name
- virtual currency quantity
The following picture shows an example of the widget structure.
- Open a
Graph view. - Click
Class settings . - In the
Details panel, go toInterfaces > Implemented interfaces . - Click
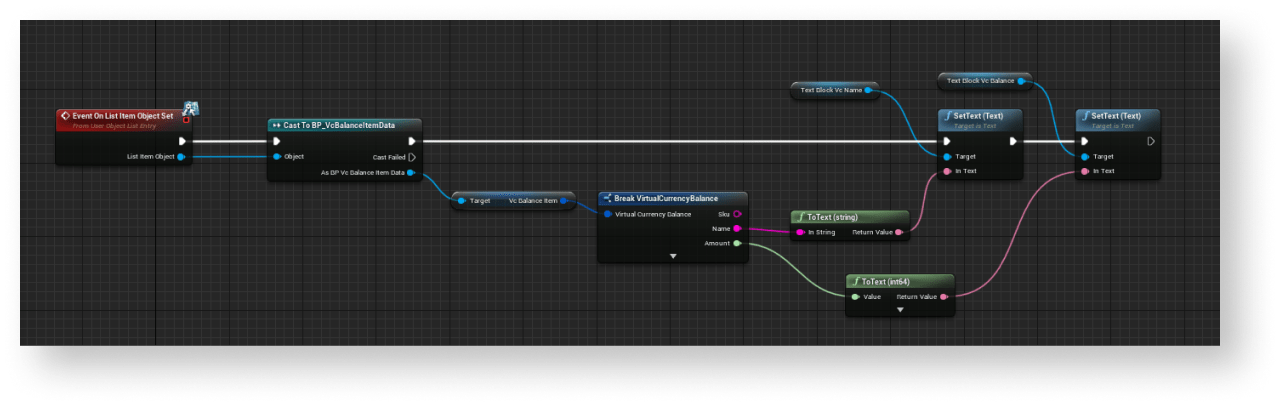
Add and selectUserObjectListEntry . This is a standard UE interface that allows the UI primitive to implement a behavior normal for the element of the list. - Implement logic for adding a virtual currency to the list:
- Add the
EventOnListItemObjectSetnode to create a list element and initialize the widget. - Pass the values from the object that contains data about the virtual currency to the elements with the name of the virtual currency and its quantity. To do this, add nodes as shown in the following picture.
- Add the
Completar widget para la visualización del inventario
- Open the inventory page widget blueprint.
- Add the
List View element to the virtual currency list display area. - In the
Details panel, select a previously created class for balance display in theEntry Widget Class field. - Implement logic for filling out the list of virtual currencies:
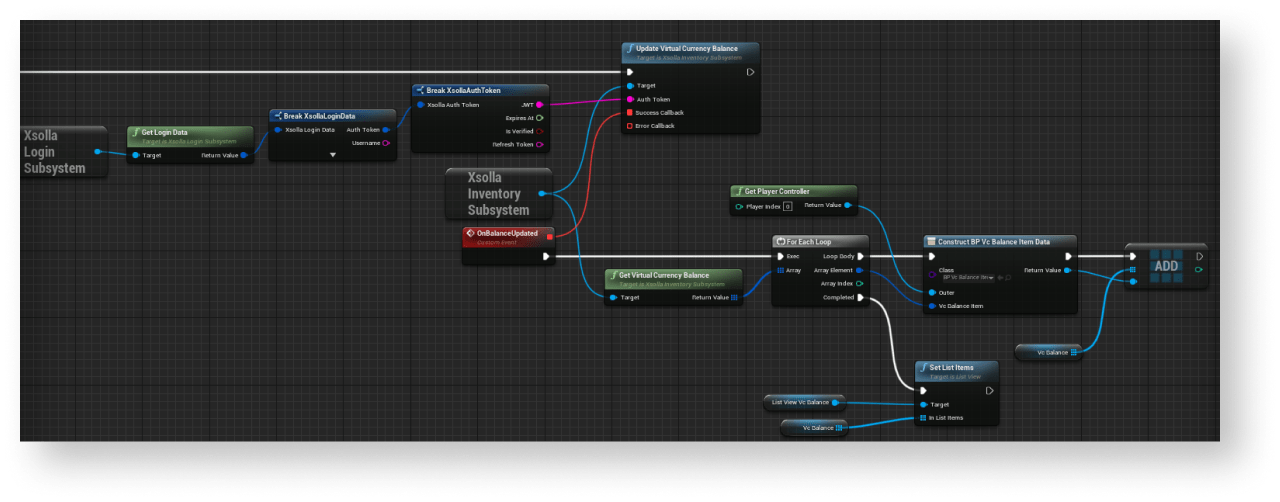
- Open a
Graph view. - Link an
UpdateVirtualCurrencyBalancemethod call connected with theXsollaInventorySubsystemobject to theEventConstructnode. - Implement logic for filling out the list of virtual currencies. The action should be done while processing a successful update of the local cache of the virtual currency balance. To do this, add nodes as shown in the following picture.
- Open a
¿Has encontrado una errata u otro error de texto? Selecciona el texto y pulsa Ctrl+Intro.
