Authentification
- user sign-up
- resend request for a sign-up confirmation email
- user login
- user password reset
You can authenticate users with their username or email address. In the following examples we authenticate users with their username, whereas the email address is used to confirm sign-up and to reset the password.
The logics and interface in the examples are less complicated than they will be in your application. A possible authentication system implementation option is described in the demo project.
Implémenter l'inscription utilisateur
Créer un widget
- Go to
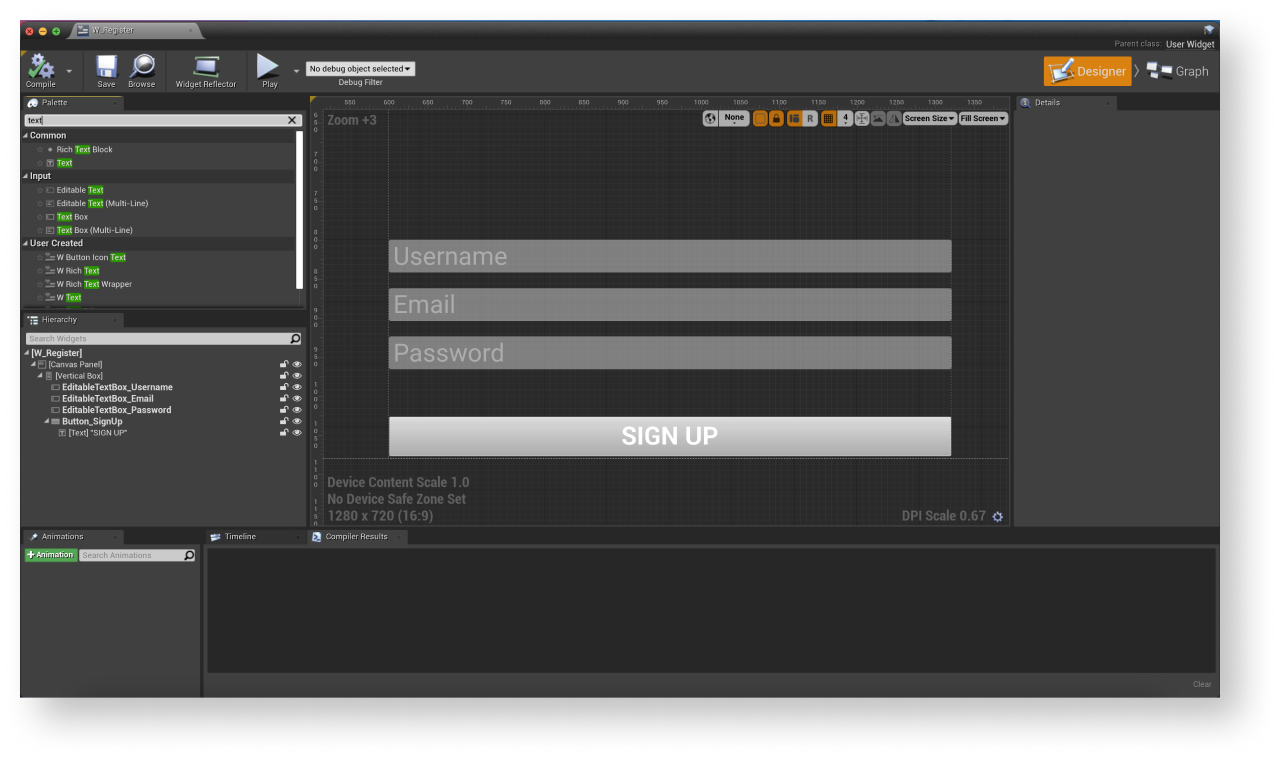
Content Browser and create aUI directory. In the contextual menu, go toUser Interface > Widget Blueprint . - In the widget blueprint, add the following interface elements:
- username field
- user email address field
- user password field
- sign-up button
The following picture shows an example of the page structure.
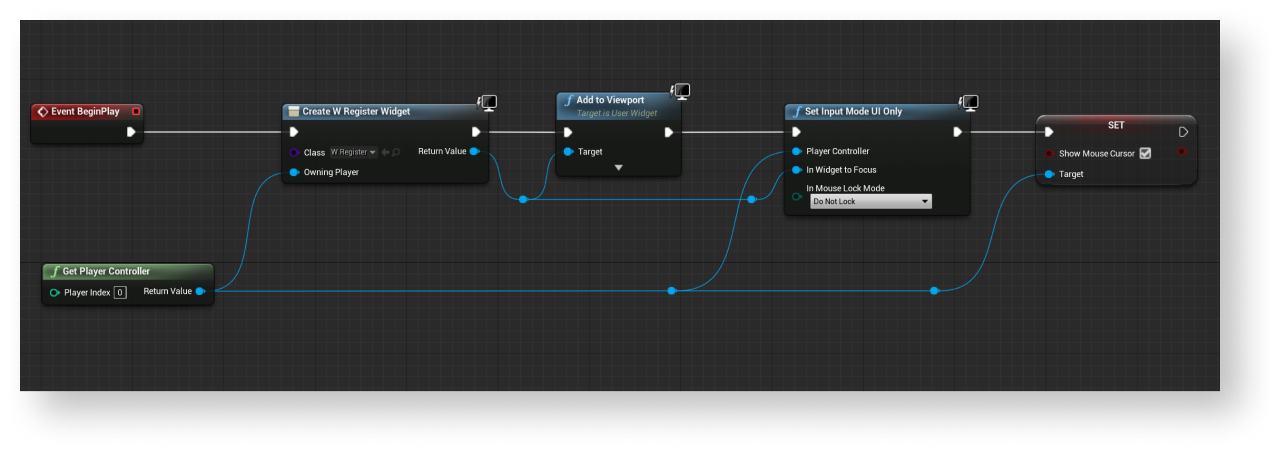
- Open a level blueprint:
- Choose a level in
Content Browser . - In the main menu, go to
Blueprints > Open Level Blueprint .
- Choose a level in
- Implement widget display when the level is started. To do this, add nodes as shown below. In the
CreateWidgetnode, specify the created widget.
Ajouter la gestion des événements
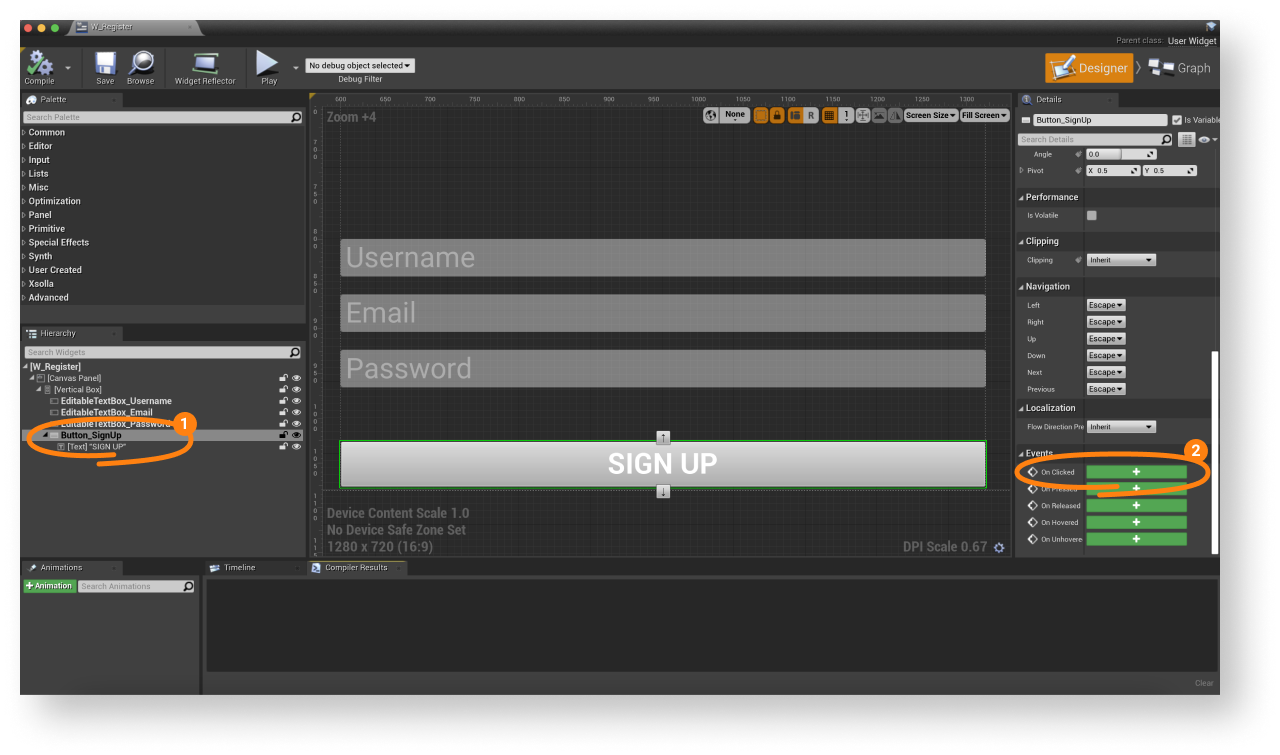
- In the
Hierarchy panel, select a sign-up button. - In the
Details panel, click the + icon near theOn Clicked event.
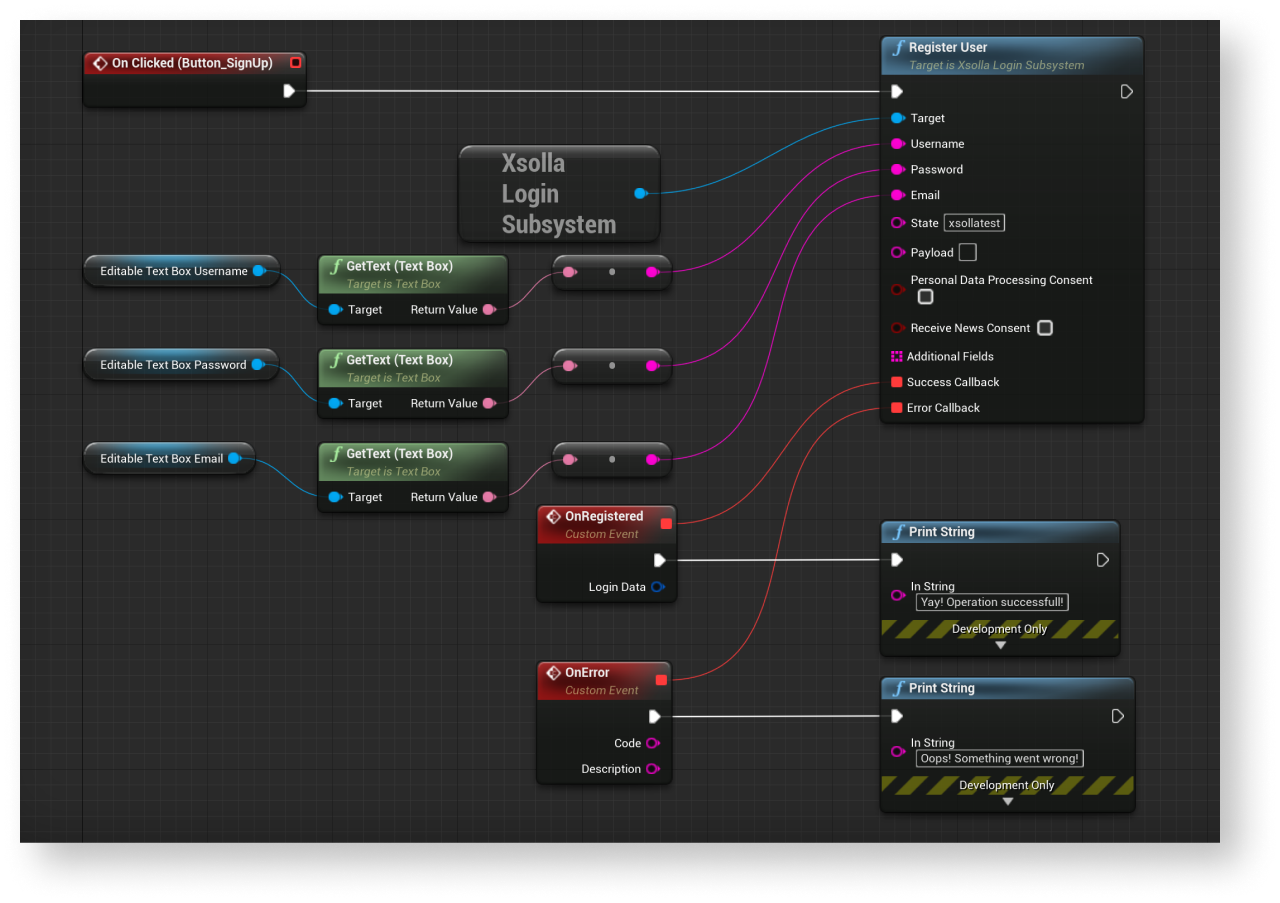
- Open a
Graph view. - Link a
RegisterUsermethod call on theXsollaLoginSubsystemobject to theOnClickednode and add passing of data entered by users. - Add callback functions:
OnRegistered— called if sign-up is successfulOnError— called if an error occurs
Code and Description parameters. You can add other actions. For example, open a confirmation email resend page after successful sign-up or a login page.- To start widget debugging, start a level.
Example of event handling implementation:
Configurer un e-mail de confirmation d'inscription
After successful sign-up, a user receives a sign-up confirmation email to a specified address. You can customize emails sent to users in Publisher Account.
If you are developing an Android application, set up deep links to return a user to an application after they confirm sign-up.
Implémenter la demande utilisateur de renvoi d'e-mail de confirmation d'inscription
Créer un widget
- Go to
Content Browser and open aUI directory. In the contextual menu, go toUser Interface > Widget Blueprint . - In the widget blueprint, add the following interface elements:
- username/email field
- resend email button
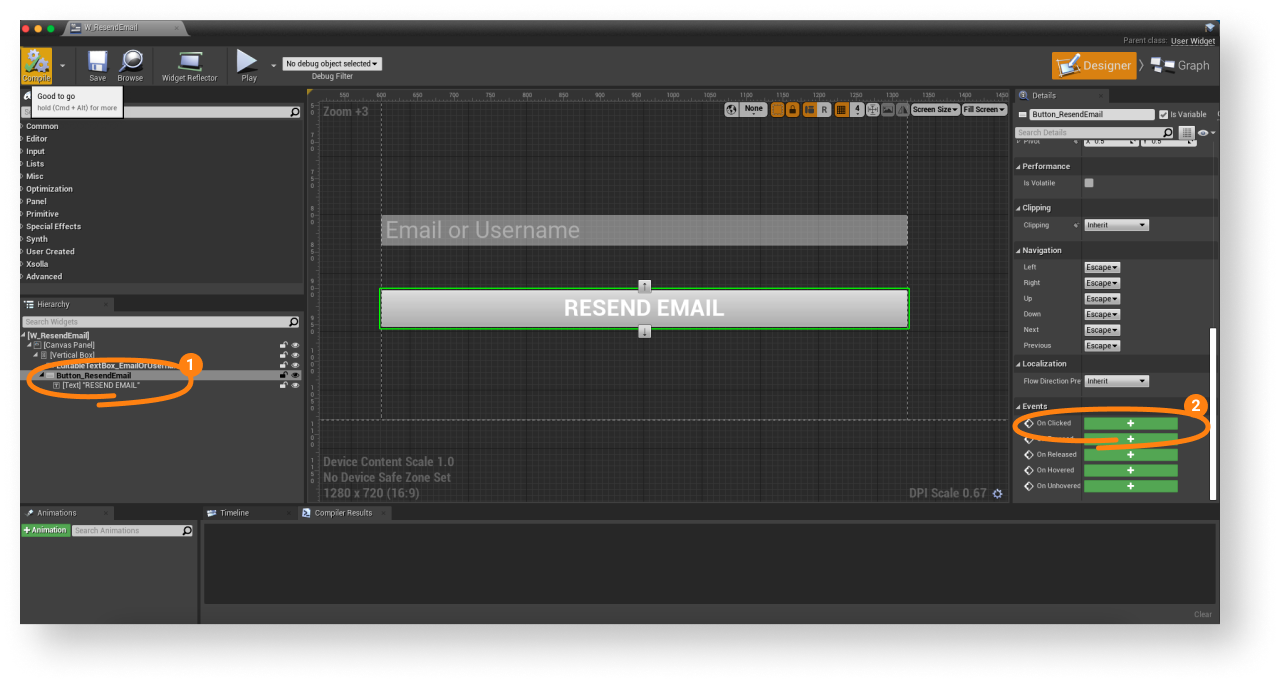
The following picture shows an example of the page structure.

- Open a level blueprint:
- Choose a level in
Content Browser . - In the main menu, go to
Blueprints > Open Level Blueprint .
- Choose a level in
CreateWidget node, specify the created widget.Ajouter la gestion des événements
- In the
Hierarchy panel, select a resend email button. - In the
Details panel, click the + icon near theOn Clicked event.
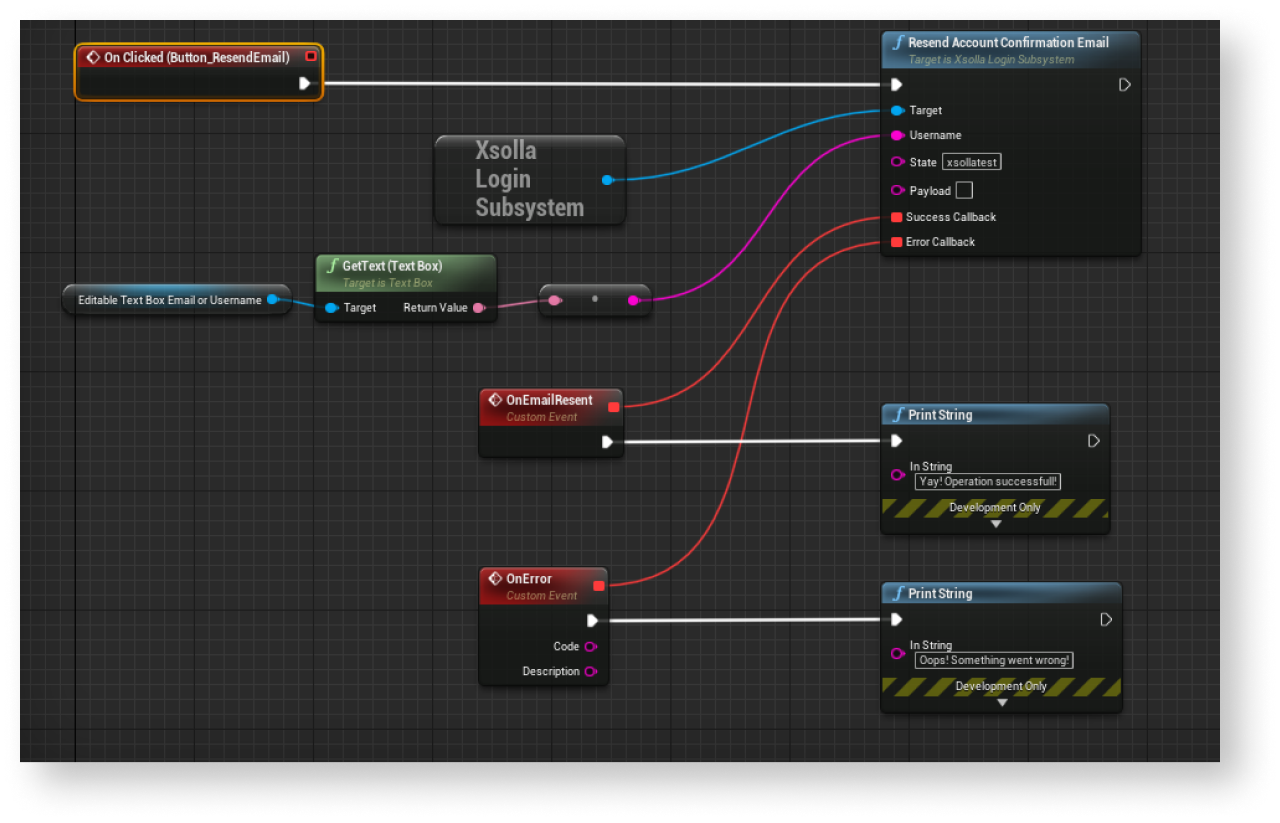
- Open a
Graph view. - Link a
ResendAccountConfirmationEmailmethod call on theXsollaLoginSubsystemobject to theOnClickednode and add passing of data entered by users. - Add the
OnEmailResentandOnErrorcallback functions. - To start widget debugging, start a level.
If the request is successful, the user receives a sign-up confirmation email to the email address specified during sign-up.
Example of event handling implementation:
Implémenter la connexion utilisateur
Créer un widget
- Go to
Content Browser and open aUI directory. In the contextual menu, go toUser Interface > Widget Blueprint . - In the widget blueprint, add the following interface elements:
- username field
- password field
- remember me checkbox
- login button
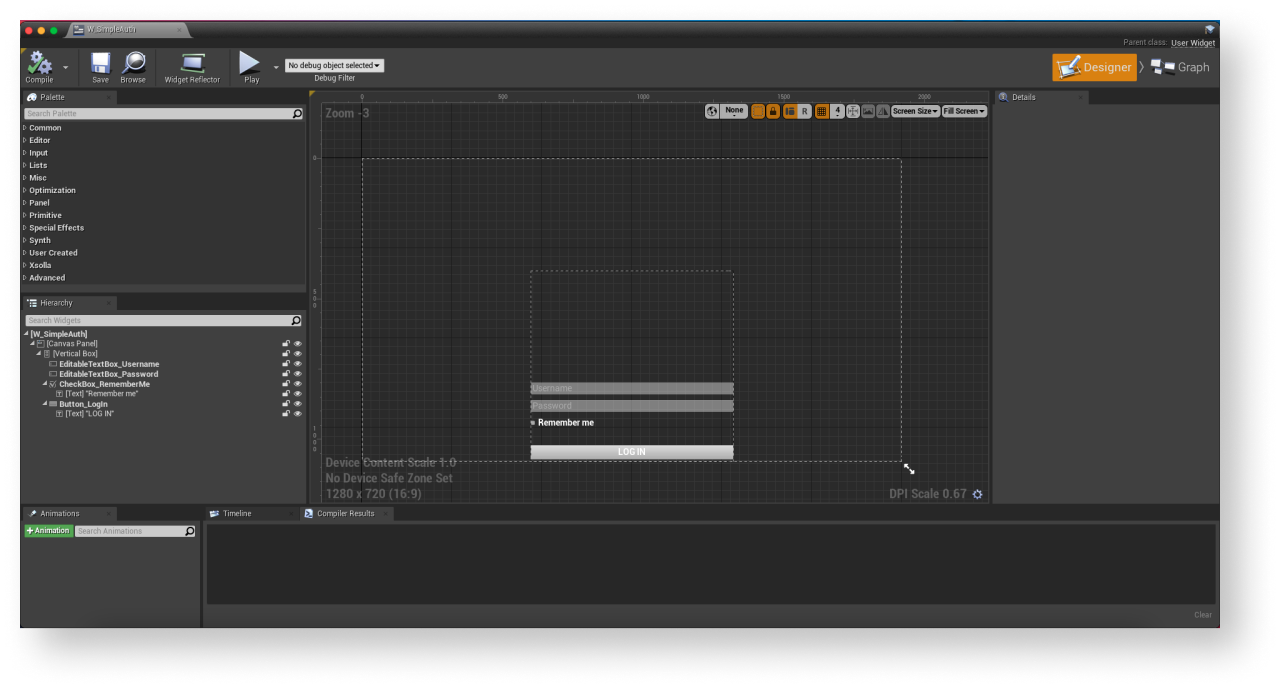
The following picture shows an example of the page structure.
- Open a level blueprint:
- Choose a level in
Content Browser . - In the main menu, go to
Blueprints > Open Level Blueprint .
- Choose a level in
- In the
CreateWidgetnode, specify the created widget.
Ajouter la gestion des événements
- In the
Hierarchy panel, select a login button. - In the
Details panel, click the + icon near theOn Clicked event.

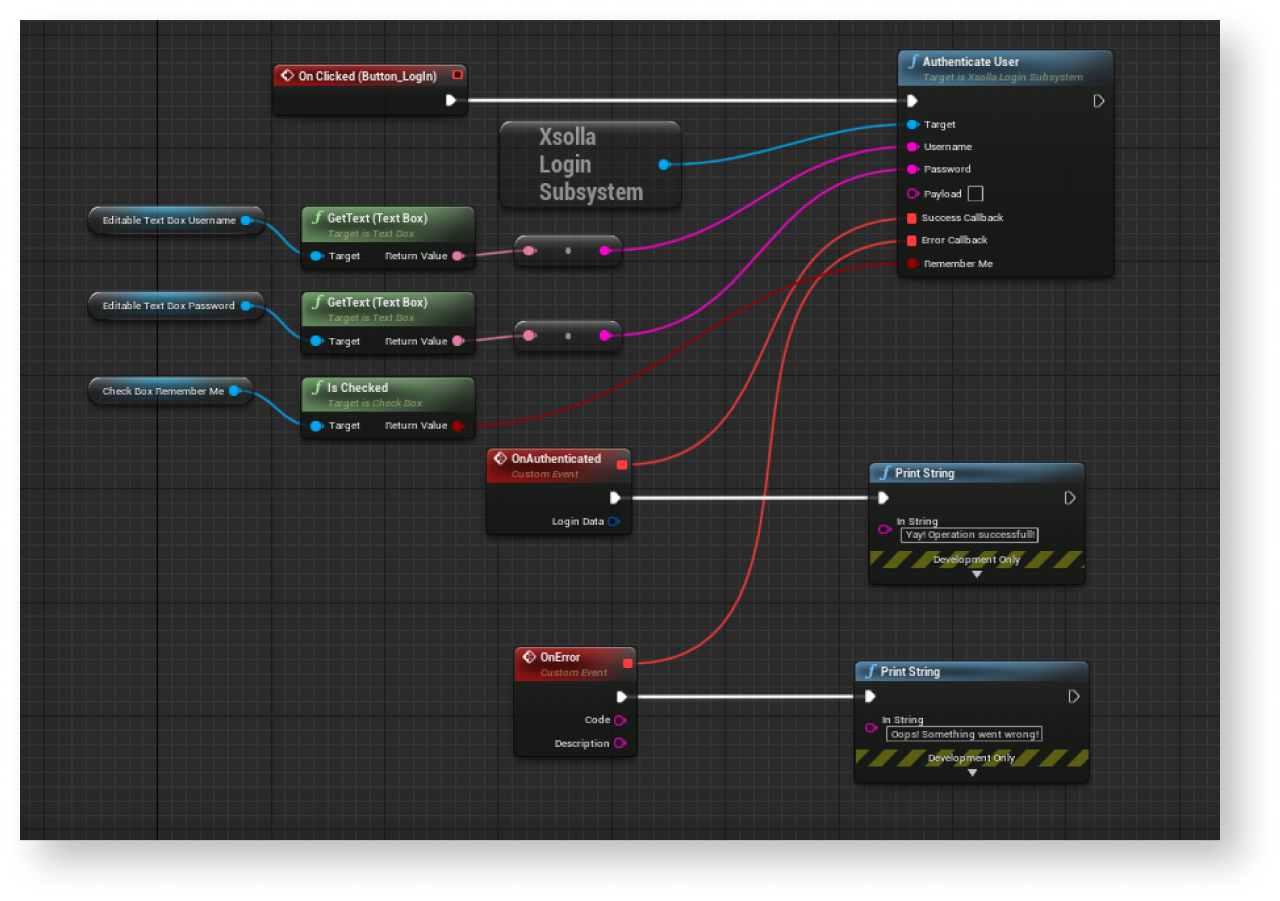
- Open a
Graph view. - Link an
AuthenticateUsermethod call on theXsollaLoginSubsystemobject to theOnClickednode and add passing of data entered by users. - Add the
OnAuthenticatedandOnErrorcallback functions.
LoginData parameter. The authorization token is used in requests to Xsolla servers.- To start widget debugging, start a level.
Example of event handling implementation:
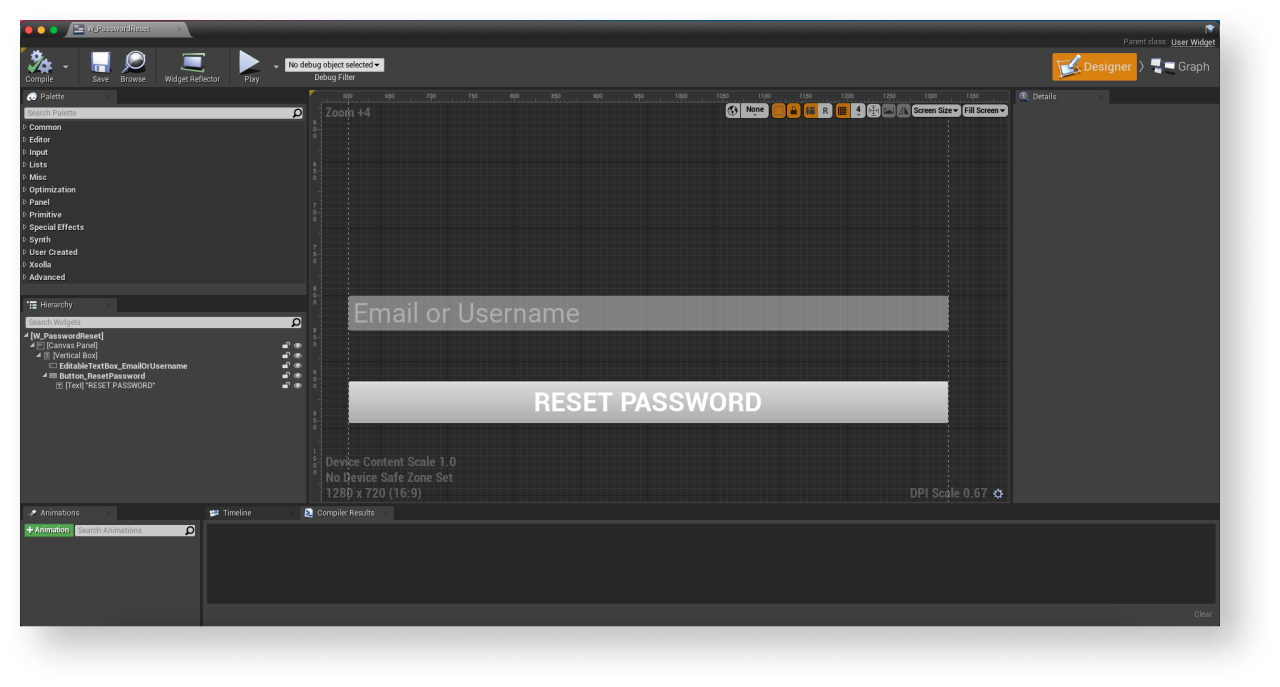
Implémenter la réinitialisation du mot de passe utilisateur
Créer un widget
- Go to
Content Browser and open aUI directory. In the contextual menu, go toUser Interface > Widget Blueprint . - In the widget blueprint, add the following interface elements:
- username/user email address field
- password reset button
The following picture shows an example of the page structure.
- Open a level blueprint:
- Choose a level in
Content Browser . - In the main menu, go to
Blueprints > Open Level Blueprint .
- Choose a level in
- In the
CreateWidgetnode, specify the created widget.
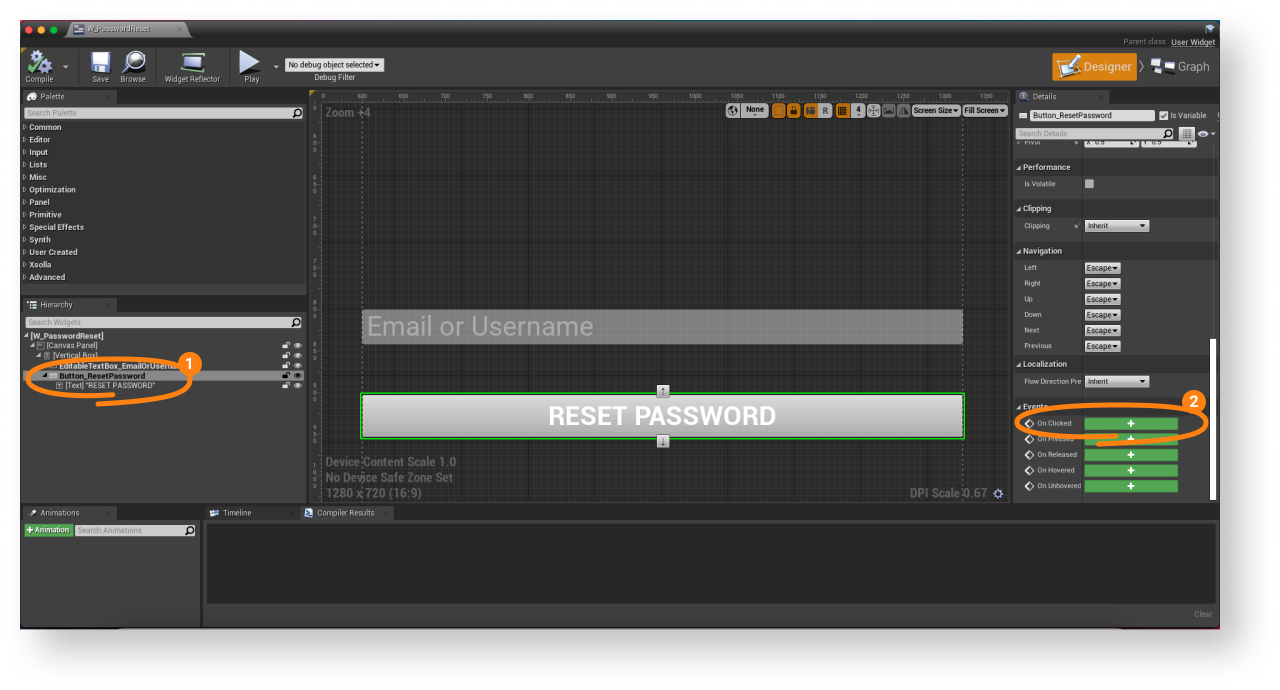
Ajouter la gestion des événements
- In the
Hierarchy panel, select a password reset button. - In the
Details panel, click the + icon near theOn Clicked event.
- Open a
Graph view. - Link a
ResetUserPasswordmethod call on theXsollaLoginSubsystemobject to theOnClickednode and add passing of data entered by users. - Add the
OnEmailSentandOnErrorcallback functions. - To start widget debugging, start a level.
Example of event handling implementation:
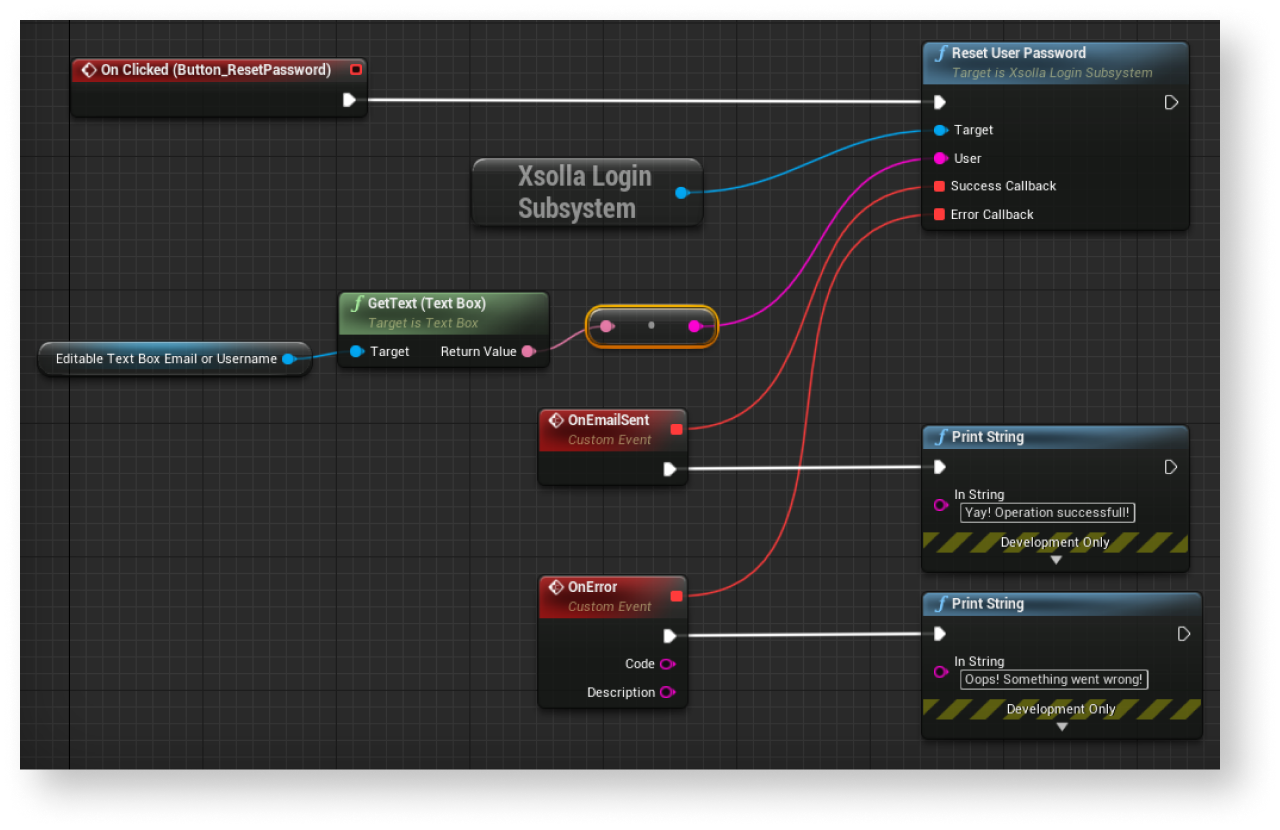
After successful password reset request, the user receives an email with a password reset link. In Publisher Account > your Login project > General settings > URL > Callback URL, you can configure a URL address or a path a user is redirected to after successful authentication, email confirmation, or password reset.
This guide shows how you can use SDK methods to implement user sign-up and login via their social network account.
Unlike for user authentication via username/user email address and password, you don’t have to implement separate logics for user sign-up. If the user’s first login is via a social network, a new account is created automatically.
If you have implemented social login in your application as an alternative authentication method, the social network account automatically links to an existing user account if the following conditions are met:
- A user who signed up with username/email address and password logged into your application via a social network account.
- A social network returns an email address.
- User email address in a social network is the same as the email address used for sign-up in your application.
LinkSocialNetworkToUserAccount SDK method.The examples show how to set up user login via a Twitter account. You can set up all social networks in the same way.
The logics and interface in the examples are less complicated than they will be in your application. A possible authentication system implementation option is described in the demo project.
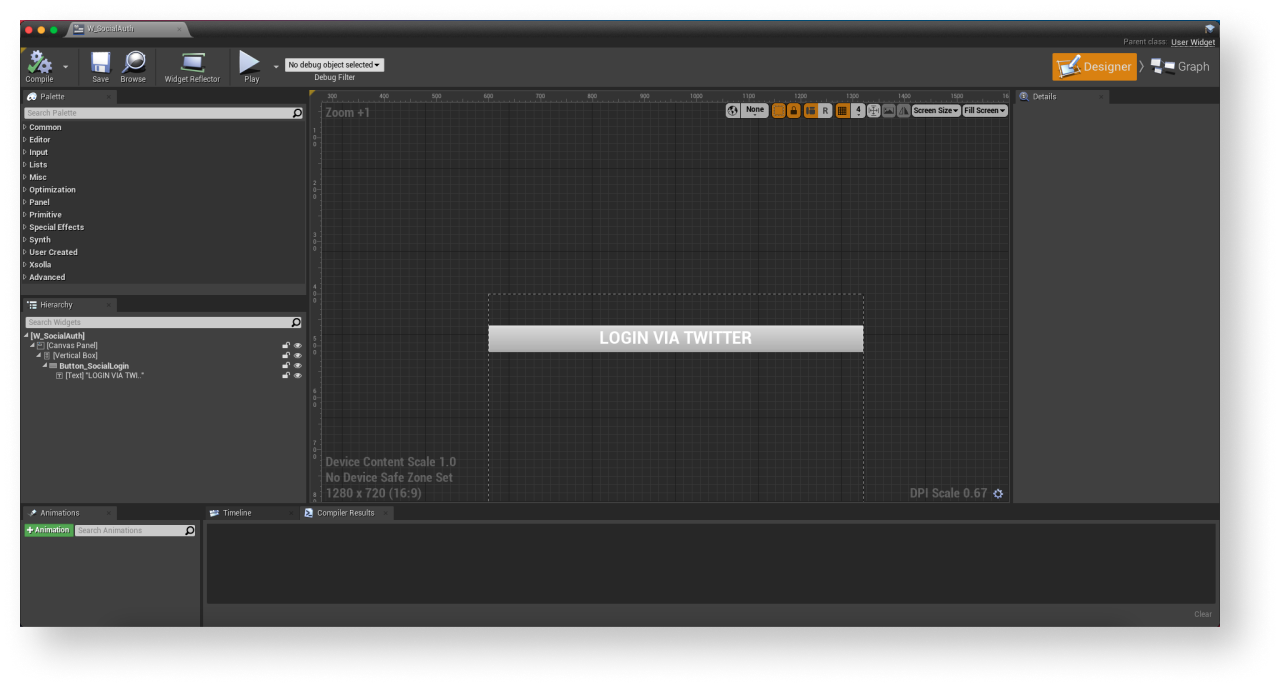
Créer un widget
- Go to
Content Browser and create aUI directory. - In the contextual menu, go to
User Interface > Widget Blueprint . - In the widget blueprint, add the social login button.
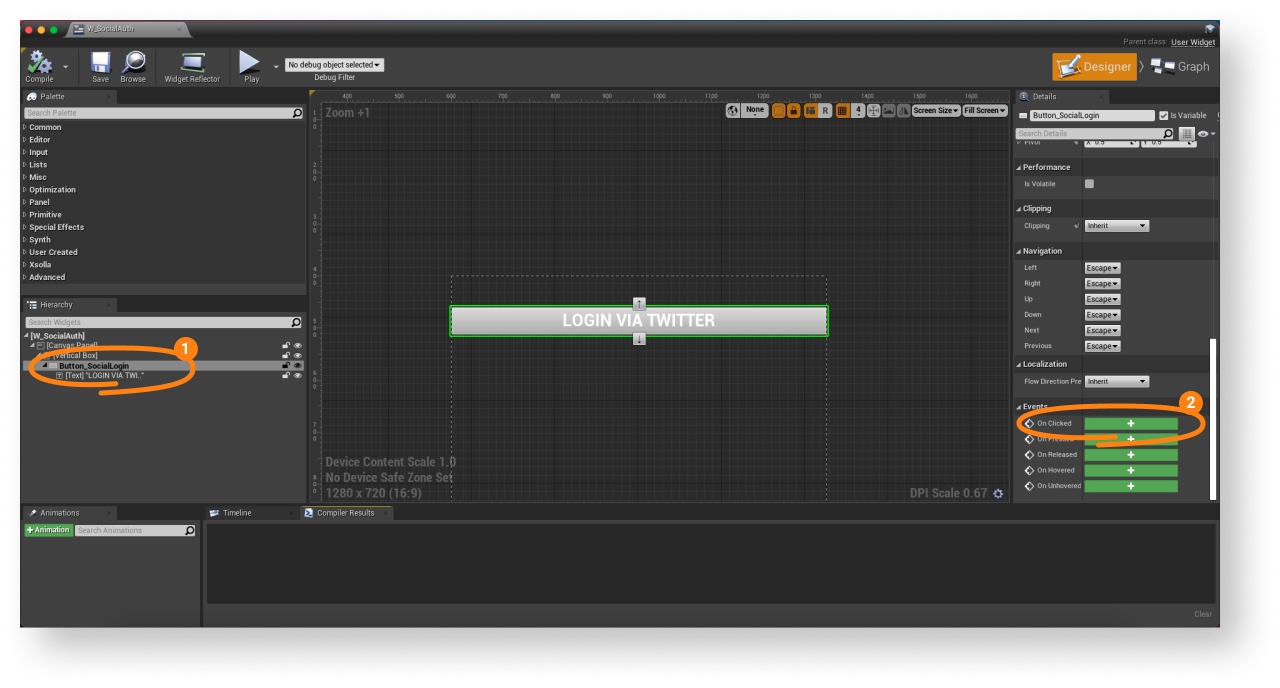
The following picture shows an example of the page structure.
- Open a level blueprint:
- Choose a level in
Content Browser . - In the main menu, go to
Blueprints > Open Level Blueprint .
- Choose a level in
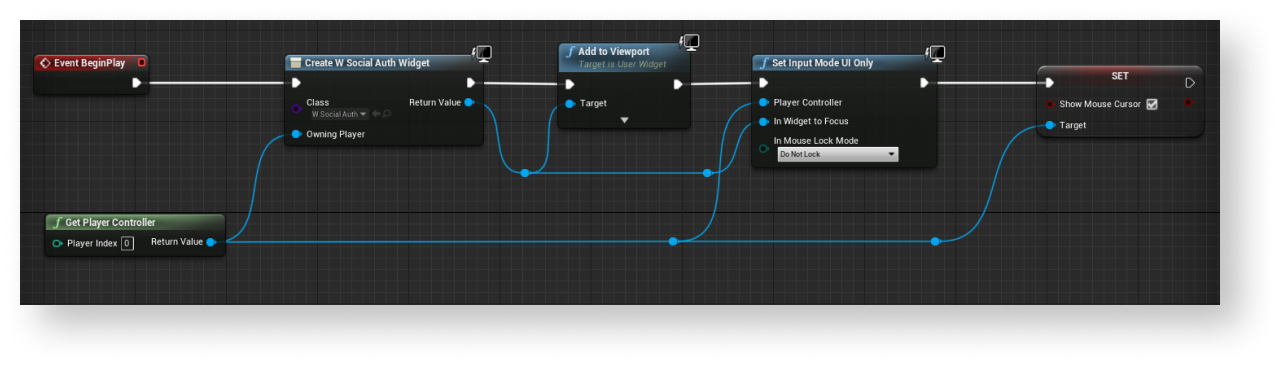
- Implement widget display when the level is started. To do this, add nodes as shown below. In the
CreateWidgetnode, specify the created widget.
Ajouter la gestion des événements
- In the
Hierarchy panel, select a login button. - In the
Details panel, click the + icon near theOn Clicked event.
- Open a
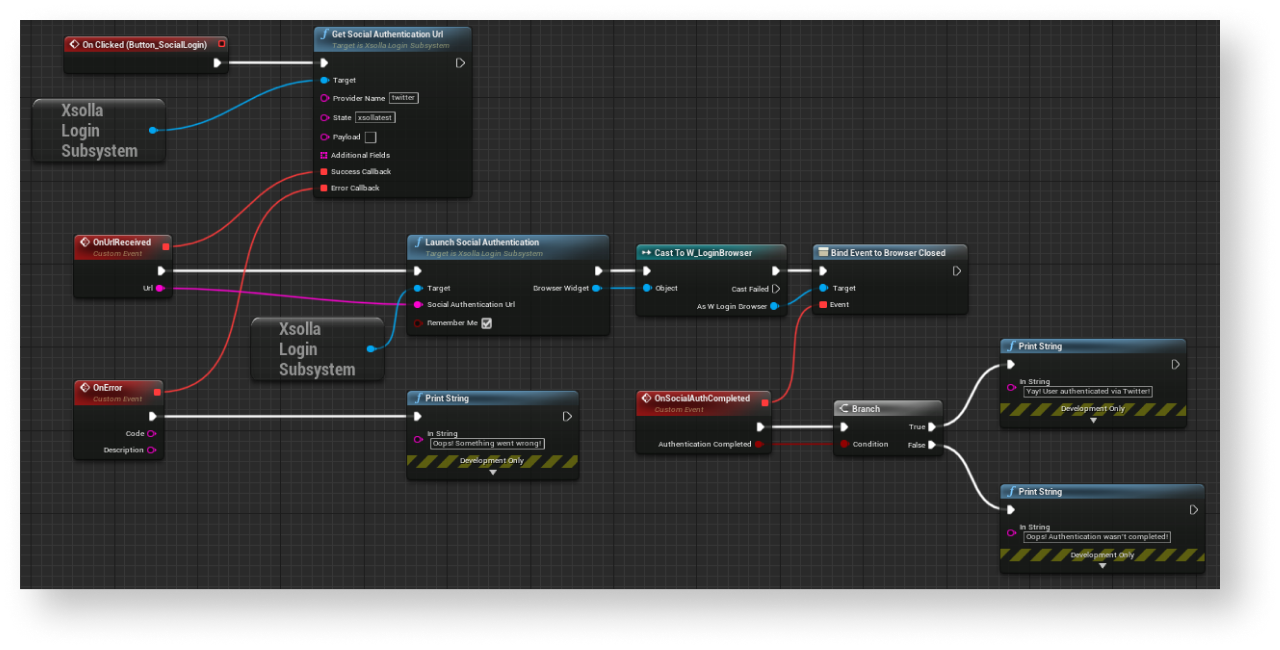
Graph view. - Implement a login page opening in a built-in browser:
- Link a
GetSocialAuthenticationUrlmethod call connected with theXsollaLoginSubsystemobject to theOnClickednode and add passing of data entered by users. Pass theTwittervalue to theProviderNameparameter. - Add the callback functions:
OnUrlReceived— called if you successfully receive a page URL. Received URL is passed in theUrlparameter.OnError— called if an error occurs.
- Link a
OnError function uses the PrintString class. A code and error description are passed in Code and Description parameters. You can add other actions.- Implement user login:
- Call the
LaunchSocialAuthenticationSDK methods linked to theXsollaLoginSubsystemobject. - Pass a login page URL.
- Call the
- To get a token, track a login page URL change after successful user login:
- Implement closing of a browser after successful login.
- Call the
OnSocialAuthCompletedmethod and subscribe to aBrowserClosedevent.
LoginData parameter. Use it in requests to Xsolla servers.Example of event handling implementation:
Faute de frappe ou autre erreur dans le texte ? Sélectionnez le texte concerné et appuyez sur Ctrl+Entrée.
