Local prices
You can set regional prices for all items in your catalog to increase sales in countries with low purchasing power. By default, prices are set in USD. Additionally, you can configure regional restrictions.
You can add, edit, and delete regional prices in the following ways:
- through Publisher Account when creating/editing an item
- by importing prices from a JSON file via Publisher Account or using the API call Import items via JSON file
- through your account when creating/editing an item
- by importing prices from a JSON file via your account or using the API call Import items via JSON file
- in your account when creating/editing an item
- by importing prices from a JSON file in your account or using the API call Import items via JSON file
How it works
The item price is determined when the catalog is requested, depending on the user’s country. During the purchase via Pay Station, the price of an item is converted into the currency of the user’s country and includes taxes, if applicable.
Country determination
The user’s country is determined at different stages of working with the catalog and payment, as follows:
When requesting the item catalog, the user’s country is passed in the
countryparameter of the methods in the Virtual items and currency or Game keys groups.If the country is not specified, it is determined based on the user’s IP address. Prices for the item catalog are selected based on the user’s country.
When purchasing an item:
If you use the client methods to obtain a payment token, use them on the client side, not the server side. The country and currency in client methods are determined by the user’s IP address. Using client methods on the server side may cause incorrect currency determination and affect payment methods in the payment UI.
If you use the Create payment token for purchase server method, pass the country in the
user.country.valueparameter in the request body or the user’s IPv4 address in theX-User-Ipheader. If both values are passed,user.country.valuetakes priority. IPv6 addresses are not supported: passing one may result in incorrect country and currency detection.
NoteYou can pass the currency in the settings.currency parameter. This value takes precedence over the country value and affects how the payment currency is displayed. The payment methods in the payment UI are still determined by the country value in theuser.country.valueparameter.
Principles of price display in the item catalog
Use the same list of currencies for all items in the catalog. Prices are processed according to the following logic:
- If at least one item has no price set for the selected country, prices for the entire item catalog in that country switch to the default currency.
- If items have different default currencies, prices are displayed in the default currency of the first item in the catalog. If one of the items has no price in that currency, the price value
nullis returned for it in the catalog request response. This results in an incorrect display of the item’s price and may affect the display of the catalog as a whole.
The way prices are displayed in the catalog depends on the integration format:
- If you use a site editor, add a Store block to the page — prices will be displayed based on your regional settings.
- If you retrieve the catalog via the API calls, each item’s price is returned in the price object, based on the
countryparameter or the user’s IP address.
Examples:
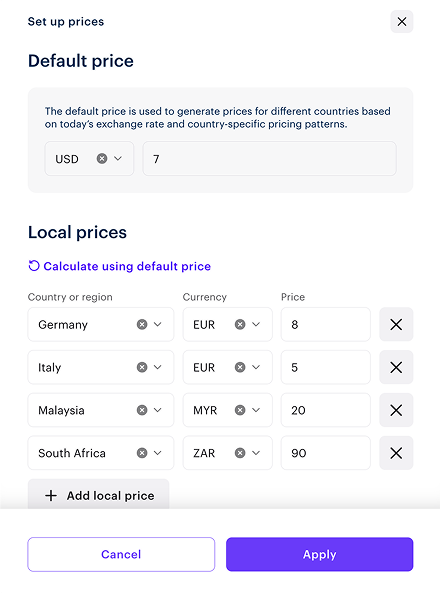
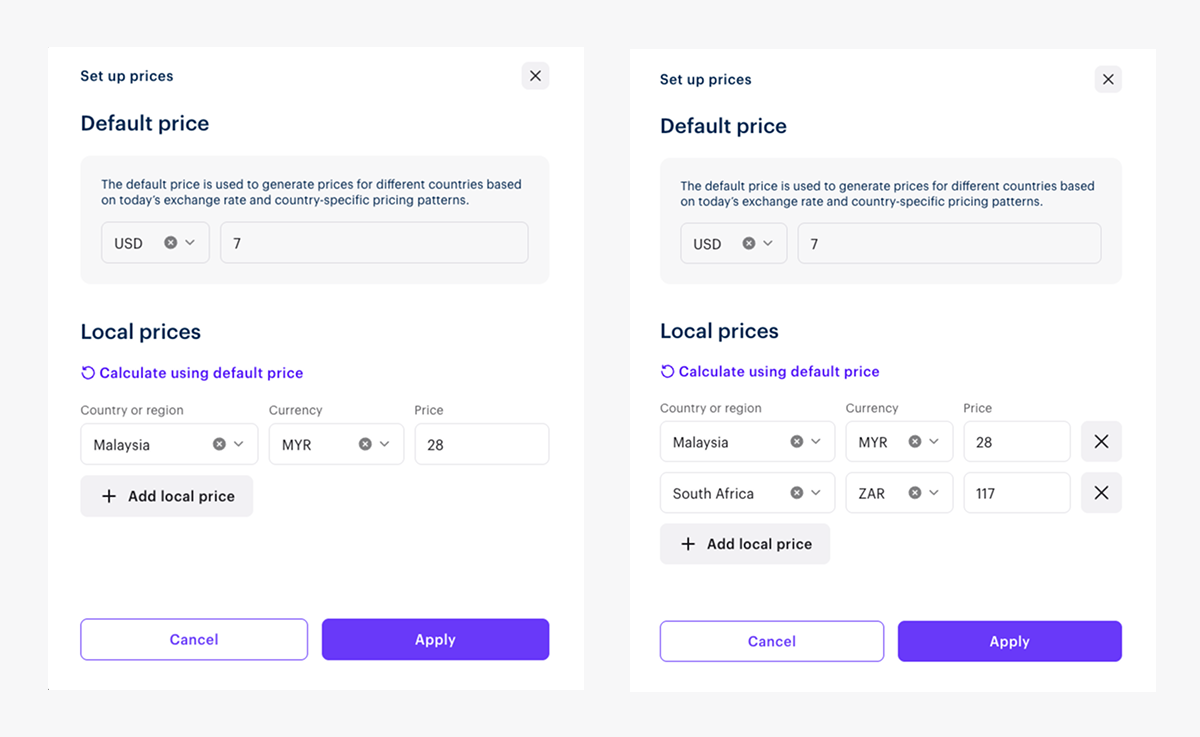
Set up through Publisher Account when creating and editing item
Set up in your account when creating and editing item
Set up in your account when creating and editing item
To create a virtual item with a regional price:
- In your project in Publisher Account, go to the Items catalog > All items section.
- In your project in the account, go to the Items catalog > All items section.
- In your project in the account, go to the Items catalog > All items section.
- In your project in the account, go to the Items catalog > All items section.
- In your project in the account, go to the Catalog section.
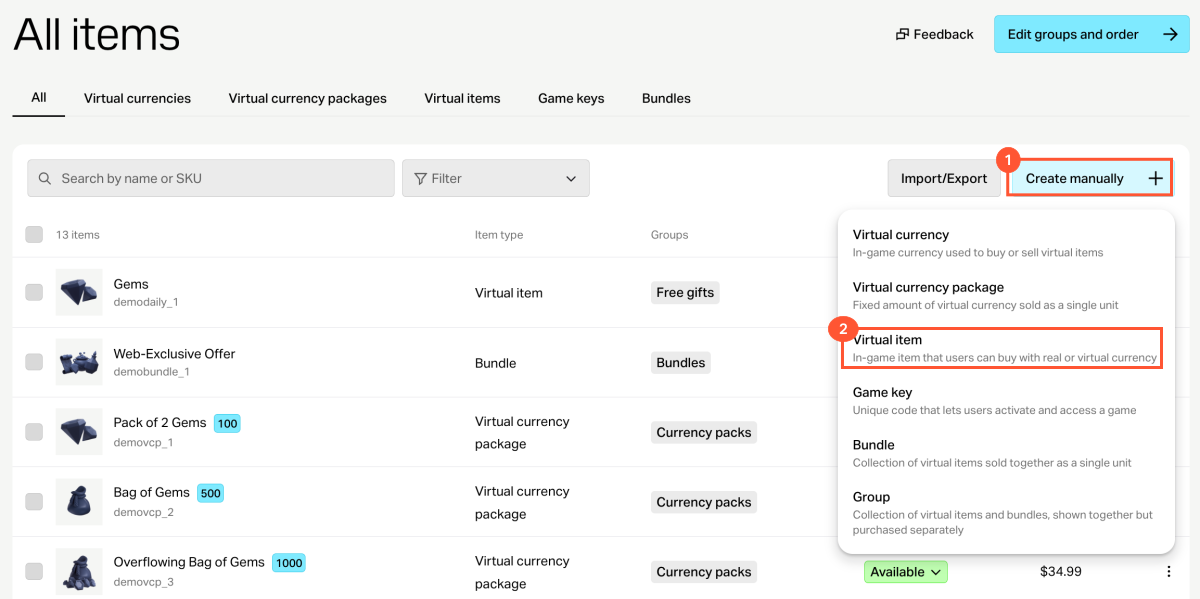
- Click Create manually and select Virtual item from the drop-down list.
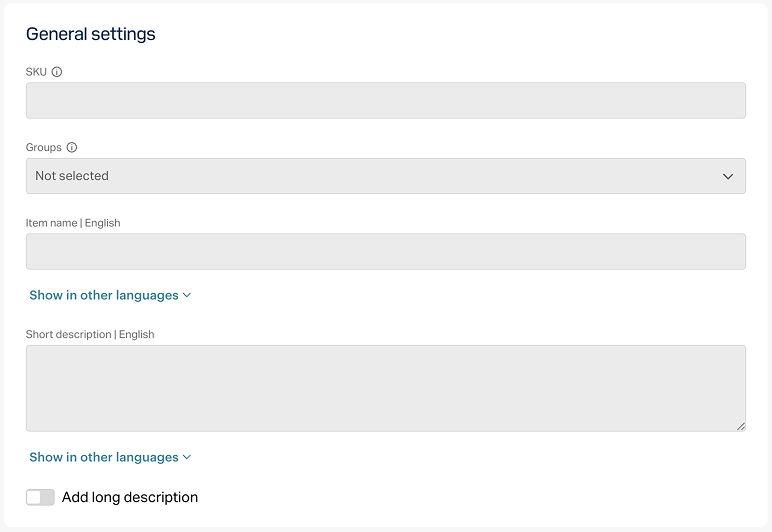
- In the General settings section, specify the following:
- SKU
- One or several groups the item should belong to (optional)
- Name
- Short description
- Extended description — to add it, turn on the corresponding toggle (optional)
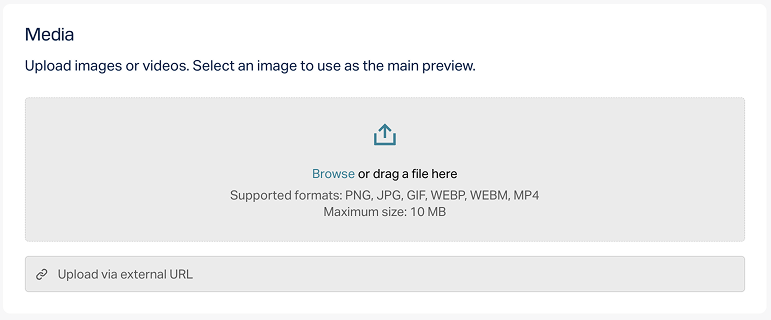
- In the Media section, upload one or more images or videos (optional) — from your device or via a link. In the store created with the Xsolla site editor, all item cards display the file marked as
Main , while the remaining files are available only in item cards with a media gallery. The file marked asMain is also returned in the responses of the catalog retrieval API calls.
- In the Price settings section, select Paid item.
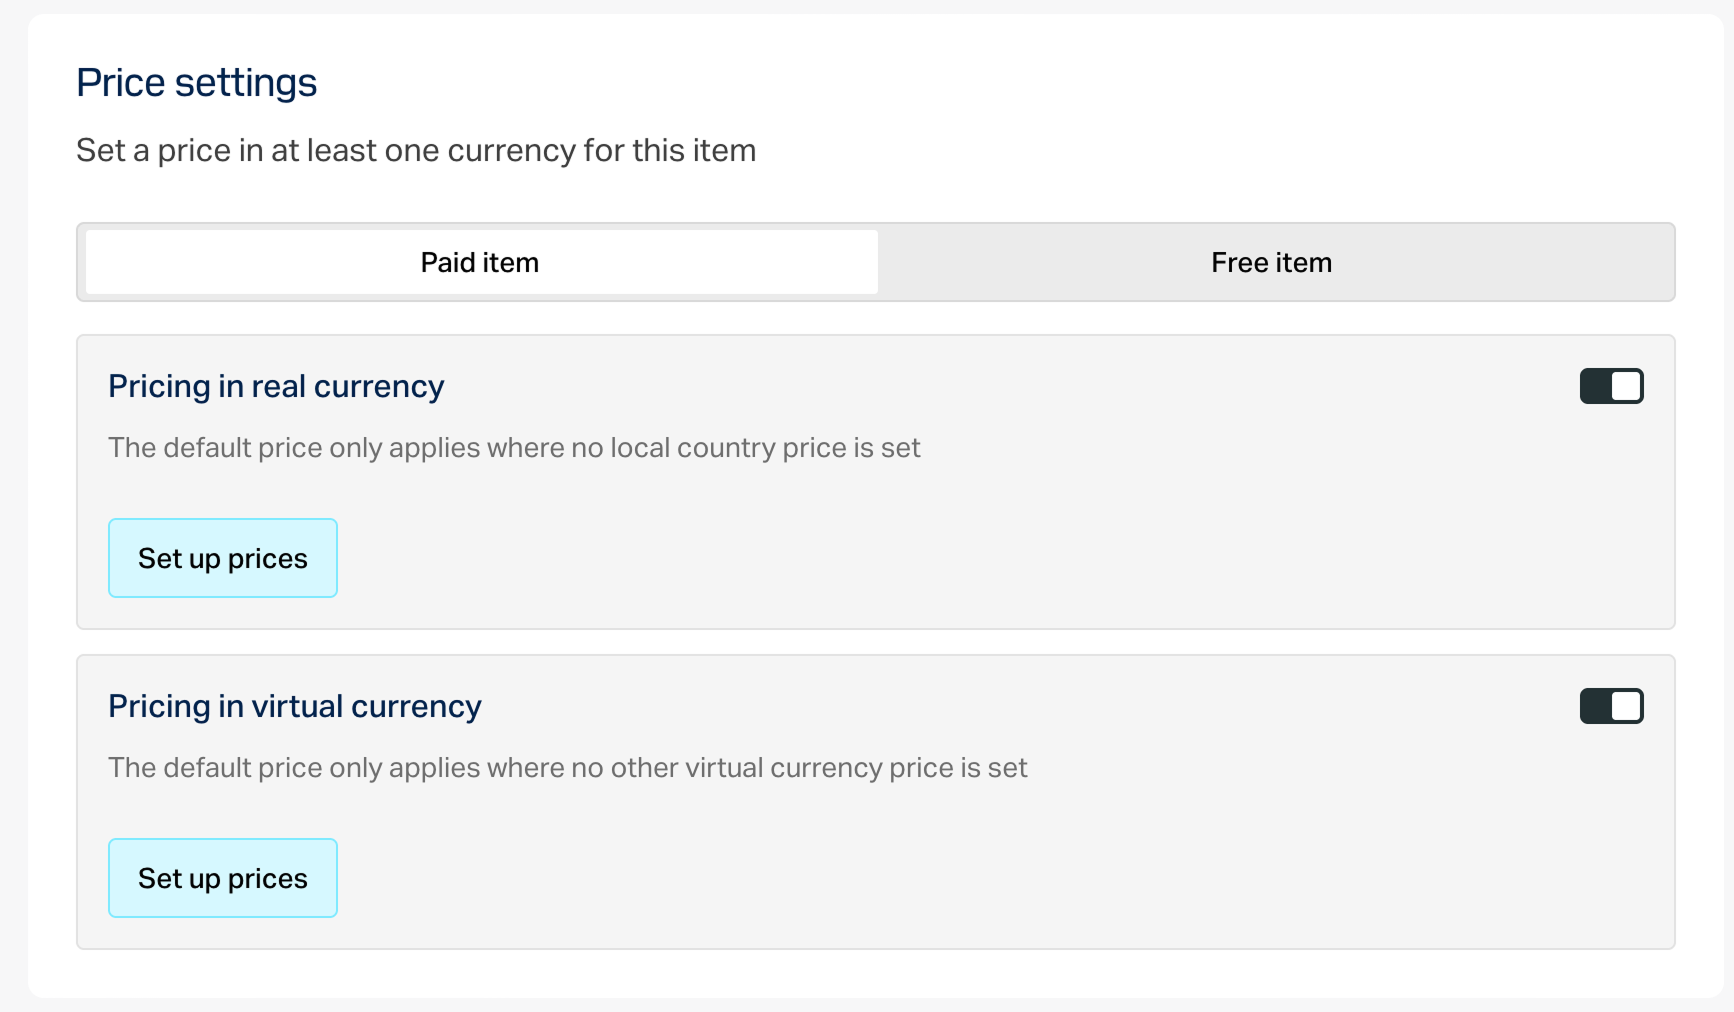
Turn on the Real currency prices toggle and click Set up prices.
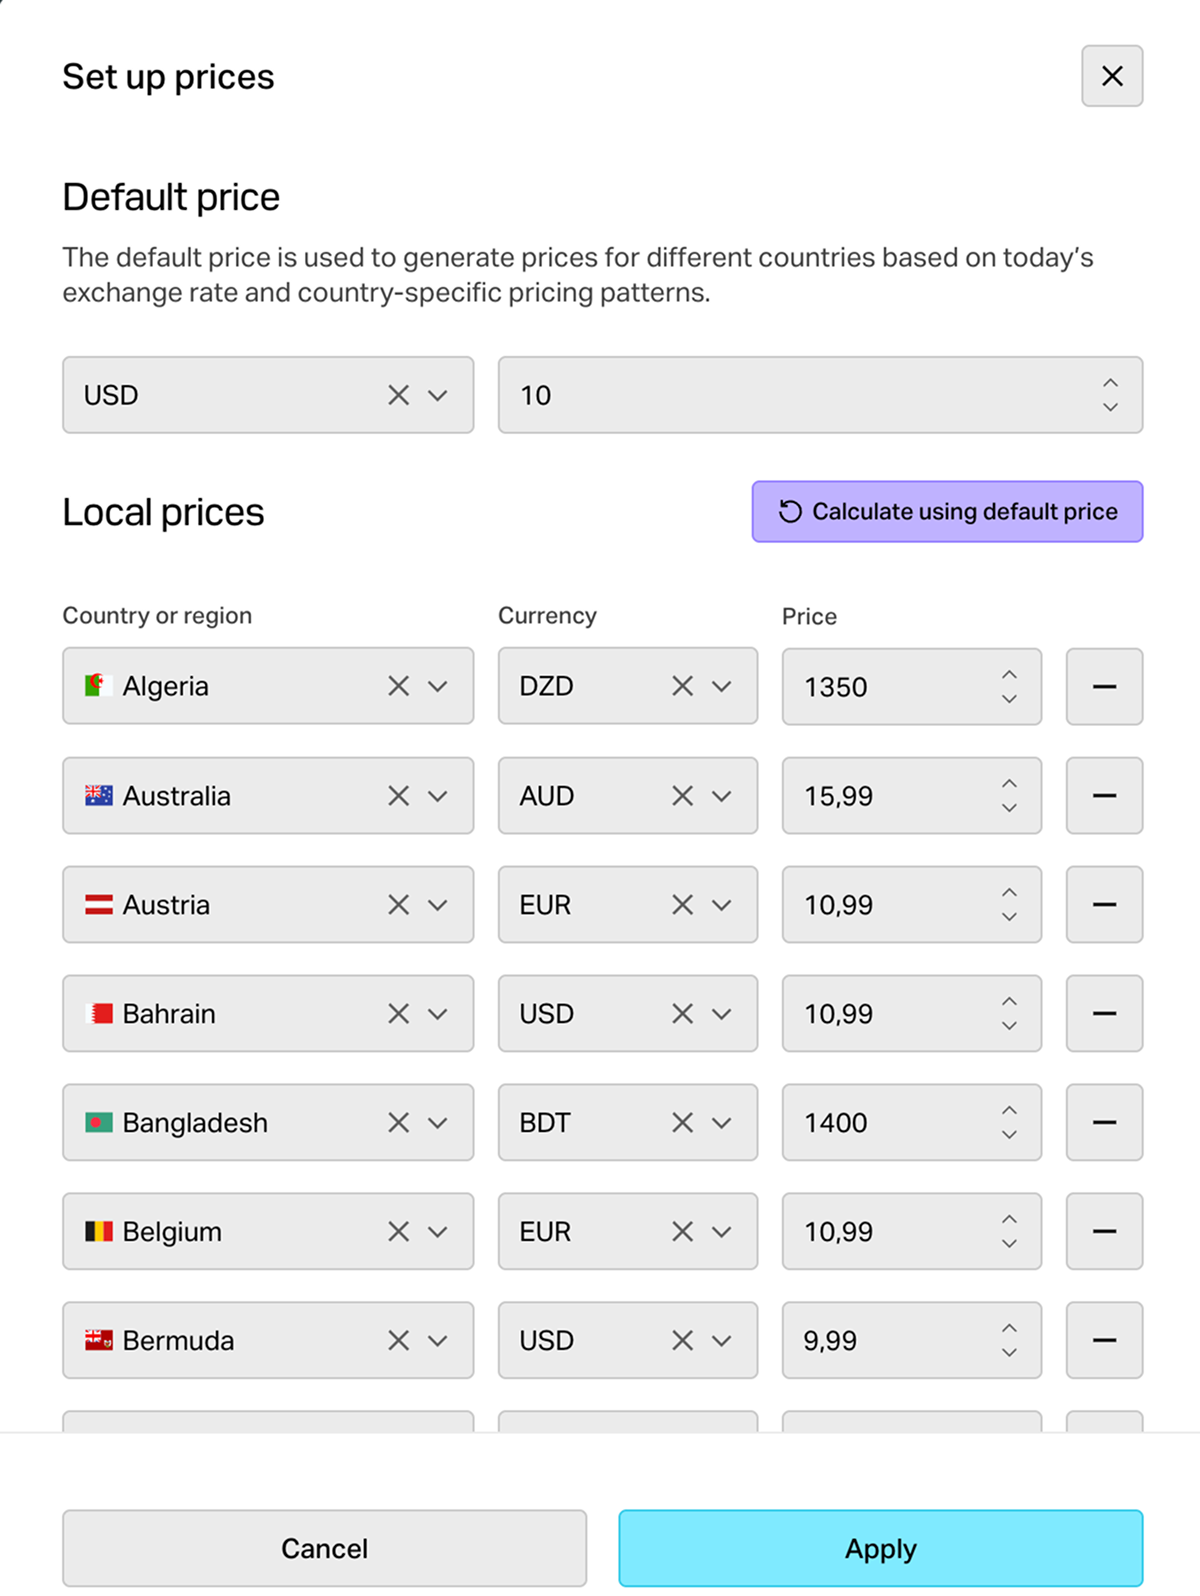
In the window that opens, specify the currency and default price. You can replace USD with another default currency.
Set up regional prices. You can do this in two ways, manually or automatically:
- To set prices manually:
- Click Add local price and add prices line by line.
- Click Apply.
- To set prices automatically:
- Click Calculate using default price. A list of countries will be generated in alphabetical order, and the price in the regional currency will be calculated for each country based on exchange rates and taxes.
- To remove countries for which you don’t need to set regional prices, click the minus icon to the right of the price.
- To modify an automatically calculated price, change the value in the corresponding row.
- Click Apply.
If you want to add a price in virtual currency, turn on the Virtual currency prices toggle and specify the values.
To limit the number of items available for purchase:
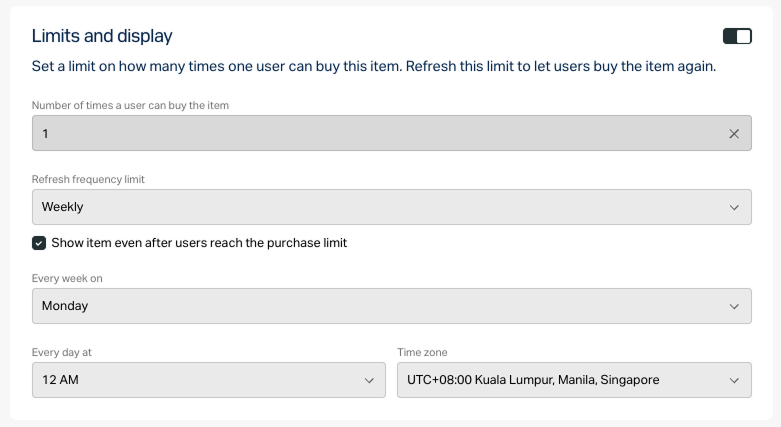
- Turn on the toggle in the Limits section and specify the quantity.
- Configure the limit reset frequency. To do this, select a period from the drop-down list:
- Daily.
- Weekly.
- Monthly.
- Custom interval. The interval is calculated from the item’s display start date in the store.
- No regular refresh.
- Set up the reset schedule by specifying the parameters that correspond to the selected period.
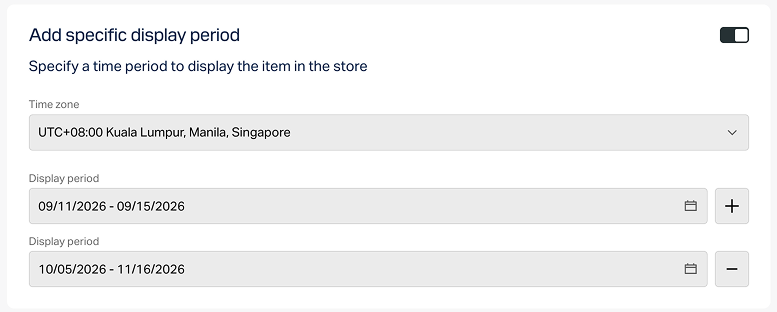
To configure a display time limit for the item (optional):
- Turn on the toggle in the Add specific display period section.
- Specify the time zone and the beginning and the end of the period.
To leave the end of the item’s display period unspecified, turn on the No end date toggle.
- Configure attributes using one of the following options (optional):
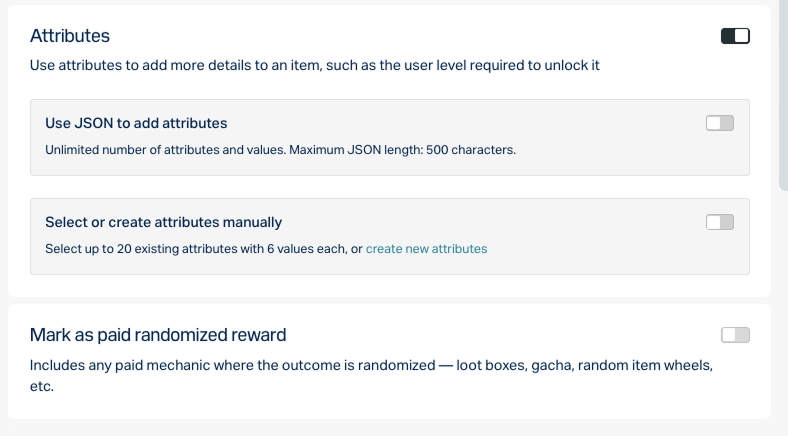
- If the paid item will be used in any mechanics with a random reward (e.g., loot boxes or gacha), enable the Mark as paid randomized reward toggle.
Click Create.
In the window that opens, select the item status and click Continue.
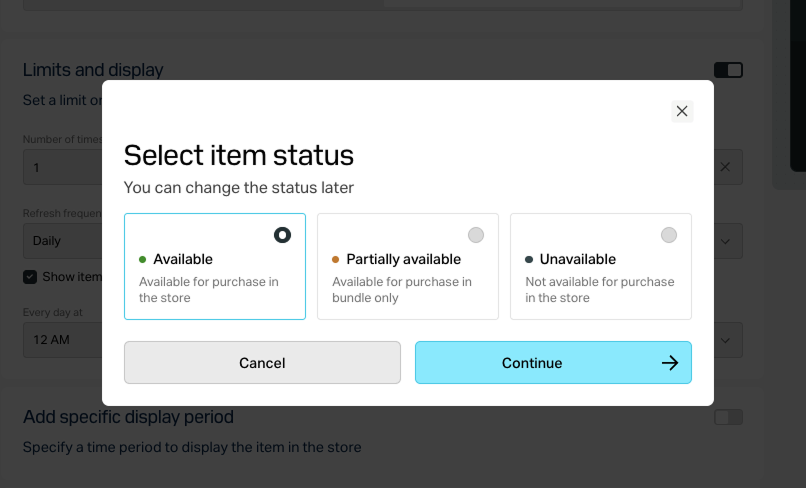
The created item will appear in the All items section.
To edit prices:
- Open your project in Publisher Account and go to Items catalog > All items > Virtual items.
- Open the project in your account and go to Items catalog > All items > Virtual items.
- Open the project in your account and go to Items catalog > All items > Virtual items.
- Open the project in your account and go to Items catalog > All items > Virtual items.
- Open your project in the account and go to Catalog > Virtual items.
Click ⋮ next to the desired item and select Edit from the drop-down list.
In the Price settings section, click the edit icon under the default price.
Setting up through Publisher Account when importing prices from file
Setting up in your account when importing prices from file
Setting up in your account when importing prices from file
You can import regional prices from a file for pre-created items.
Features:
- Upload or update regional prices for multiple items at once.
- Support for items of all types:
- virtual items
- virtual currency
- virtual currency packages
- bundles
- packages of game keys on a specific platform
- Validation of uploaded data. If the file’s structure or data format does not meet the requirements, you will see a list of errors during the import.
File structure
Required file columns:
SKU — the item SKU for which regional prices need to be set.Country — the country code in ISO 3166-1 alpha-2 format. Check the list of countries supported by Xsolla before uploading the CSV file. Filling in cells in this column is optional. You can see examples of price display if the country is not specified.Currency — the currency code is in ISO 4217 format.Amount — the price of the item. Use a period for decimal points.IsDefault — whether this is the default price. Specify:1— for the row with the default price. It is displayed in all countries with no regional prices.0— for all other rows. You can also leave the cell in the IsDefault column empty.
The price in the default currency must not be regional — leave the cell in the Country column empty.
EXAMPLE
Correctly filled file (several items, 3 currencies, regional prices are available).
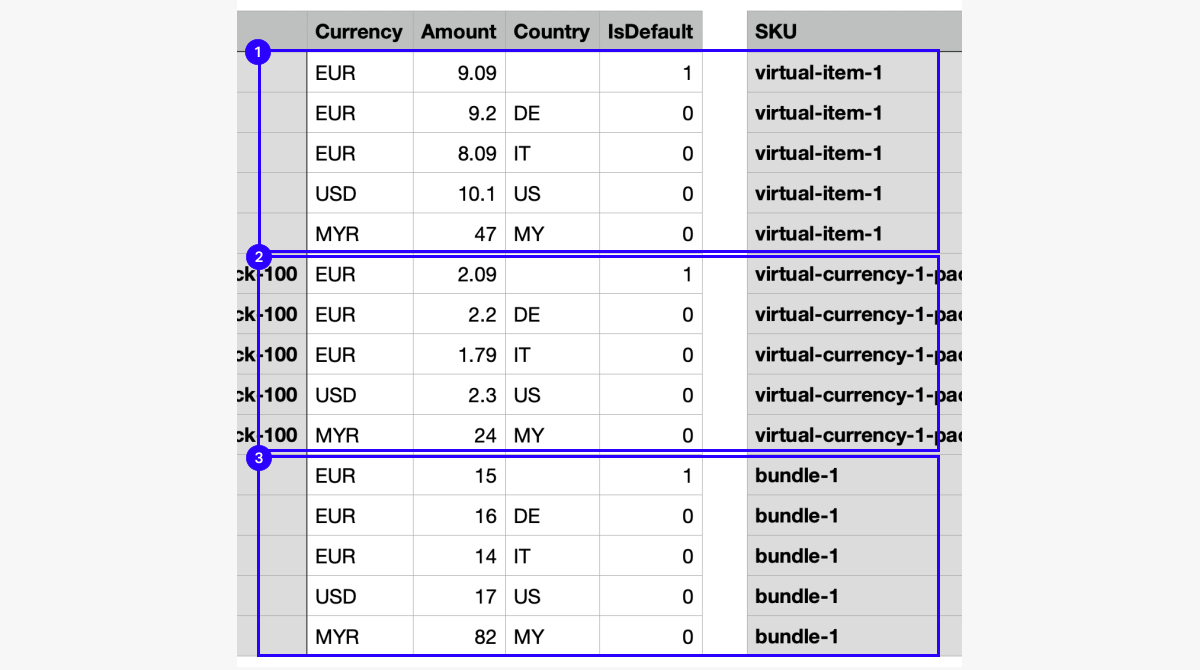
Incorrectly filled file (several items, 3 currencies, regional prices are available).
Error: In virtual-item-1 and bundle-1 the groups cells in the Country column aren’t empty.
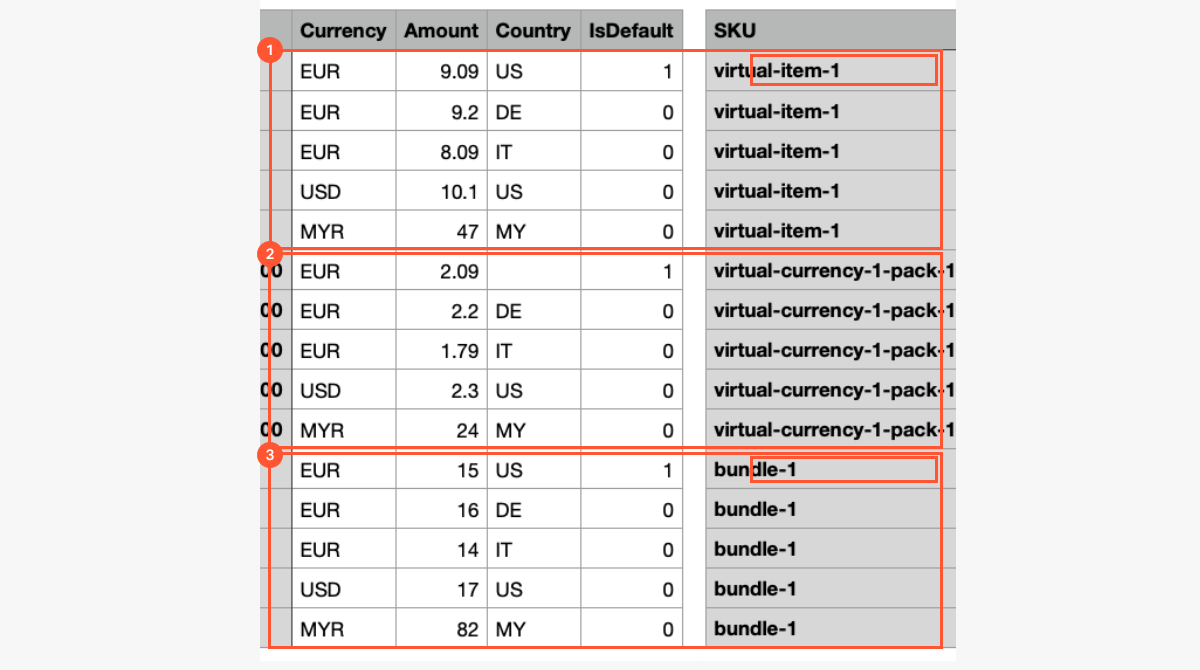
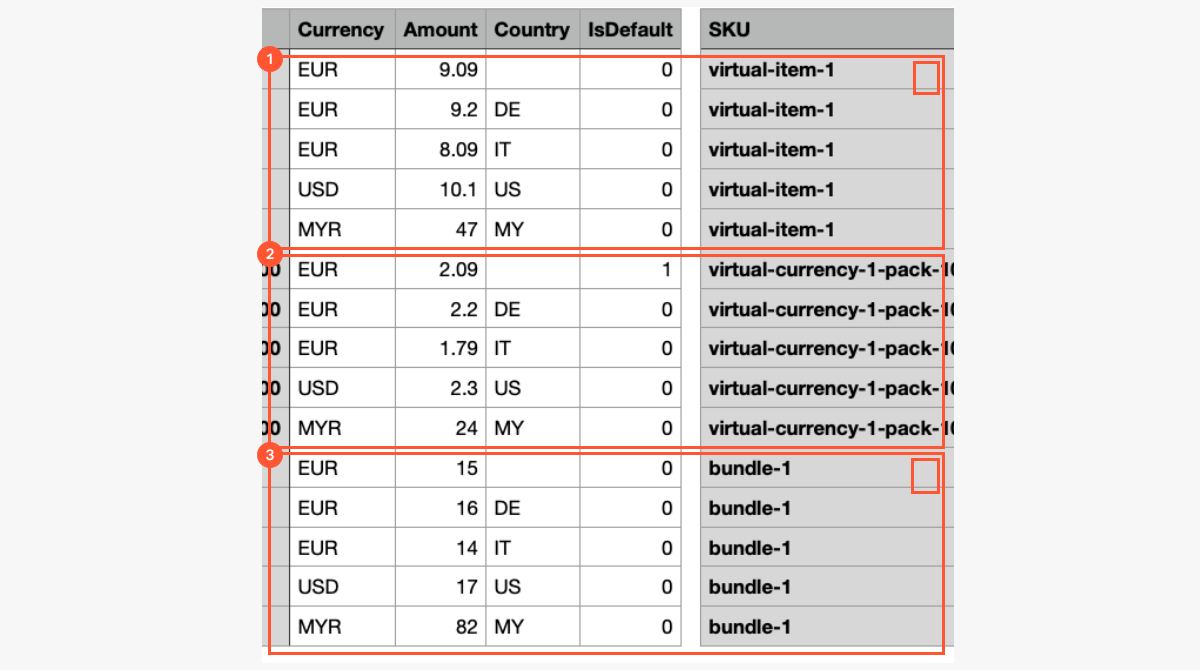
When adding each new item, you must set the price in the default currency. If not specified, an error will be displayed when importing the file.
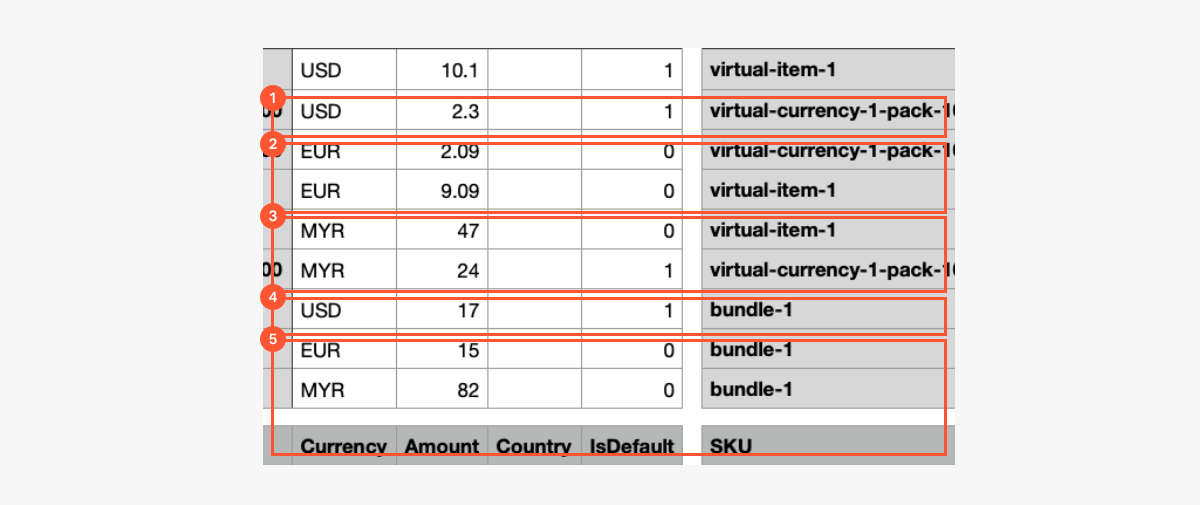
EXAMPLE
Correctly filled file (several items, 3 currencies, regional prices are available).
Incorrectly filled file (several items, 3 currencies, regional prices are available).
Error: There isn’t any default currency for virtual-item-1 and bundle-1 groups.
Platform — the platform SKU. It is used when setting regional prices for game keys but is not used for other items.
Available platforms.
Platform SKU Platform name steam Steam playstation PlayStation xbox Xbox uplay Uplay origin Origin drmfree DRM Free gog GOG epicgames Epic Games Store nintendo_eshop Nintendo Switch eShop discord_game_store Discord Game Store oculus Oculus viveport Viveport stadia Google Stadia
Game keys with the same SKU but different platforms are considered different entities. Each entity must have a price specified in the default currency.
EXAMPLE
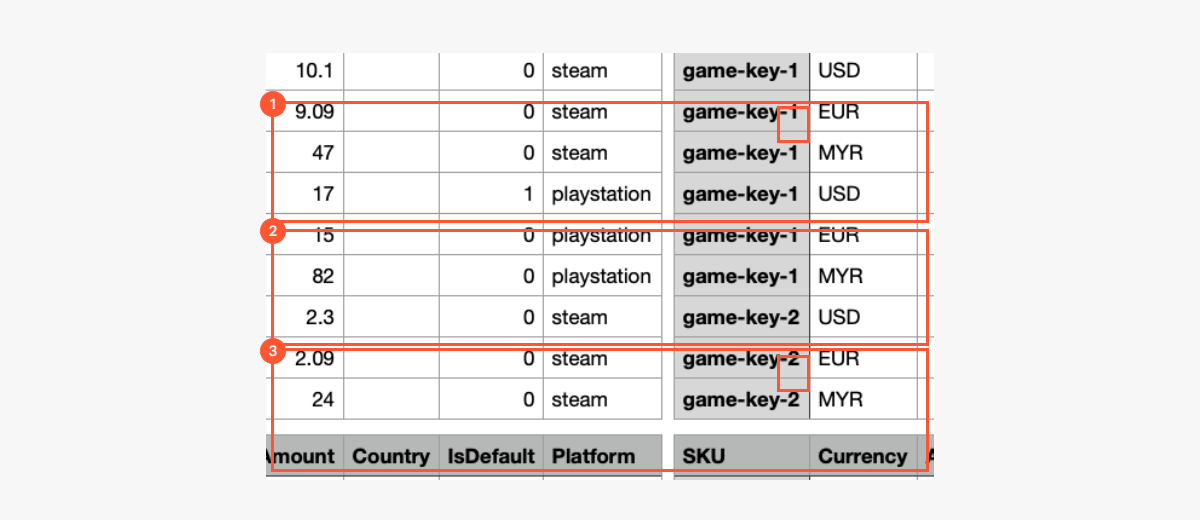
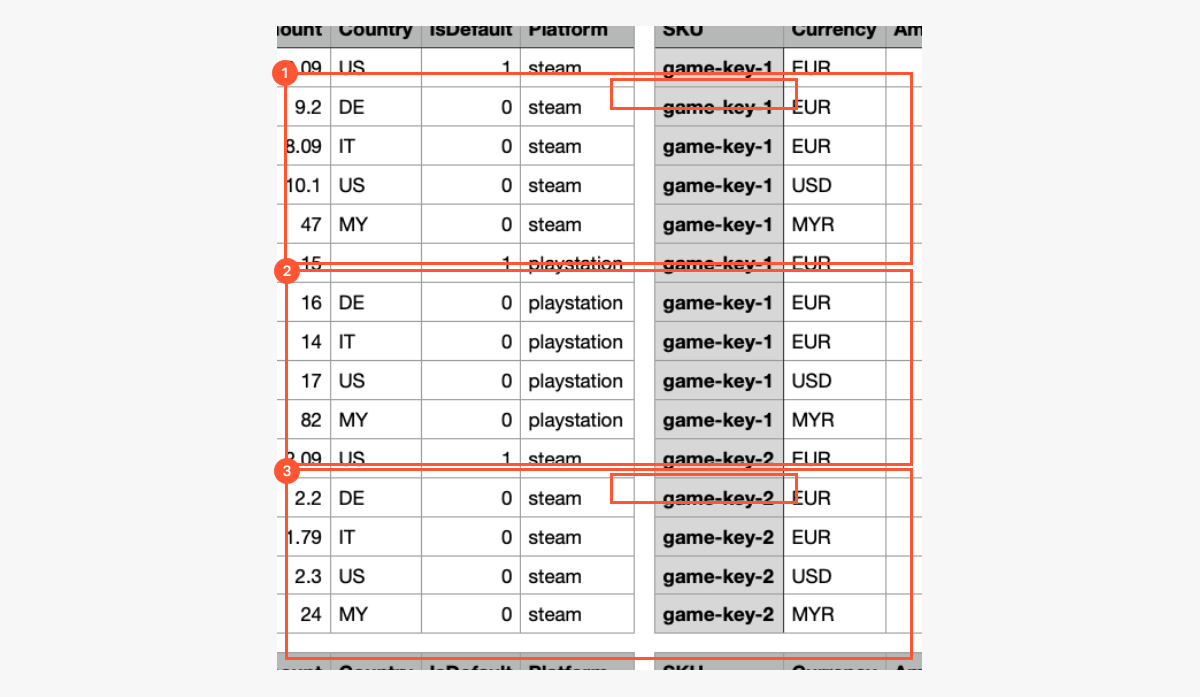
Correctly filled file (several game keys, 3 currencies, regional prices are available, 2 platforms).
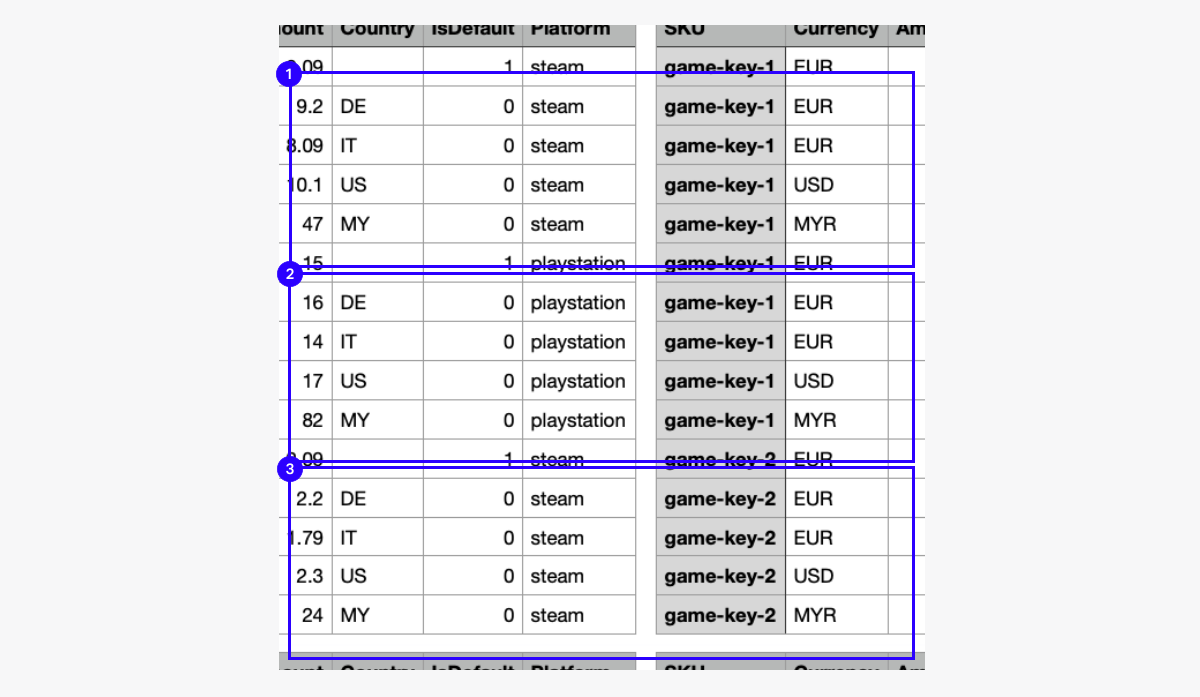
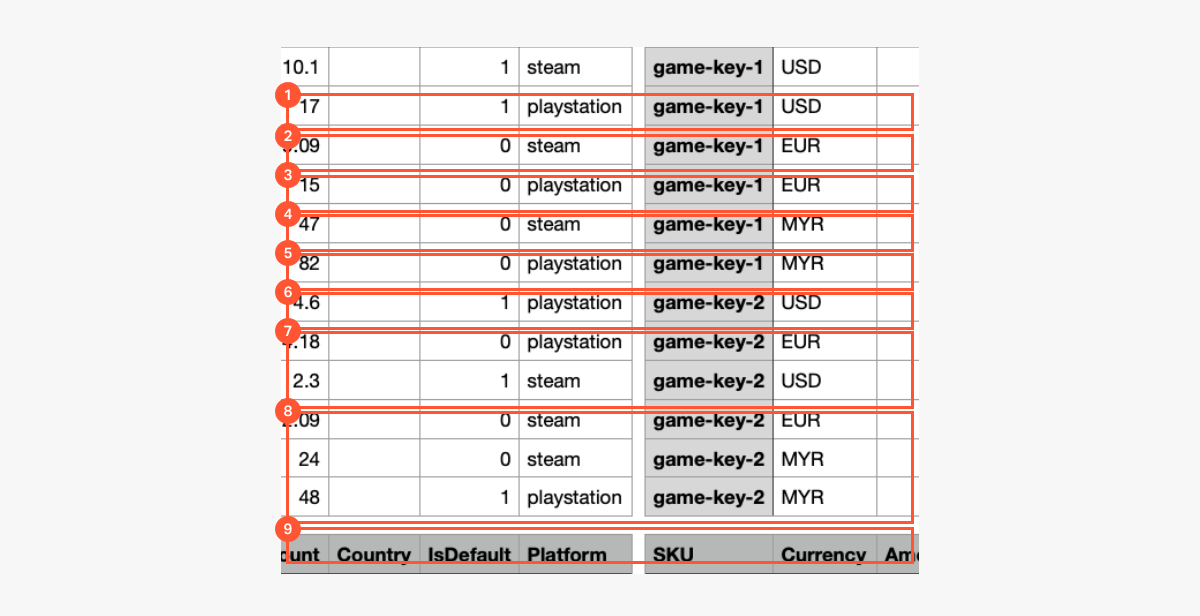
Incorrectly filled file (several game keys, 3 currencies, regional prices are available, 2 platforms).
Error 1: Incorrect grouping of game keys by SKU and Platform, resulting in nine entities being found instead of three.
Error 2: Groups 3, 4, 5, and 6 do not have a default price due to incorrect grouping.
Error 3: Group 9 will overwrite the data of group 7 because they have a full set of prices for the same entity. As a result, the game-key-2 for the playstation platform will only have a price in MYR after import.
Examples of file completion and possible errors
Examples of the correct filling of the CSV file for import:
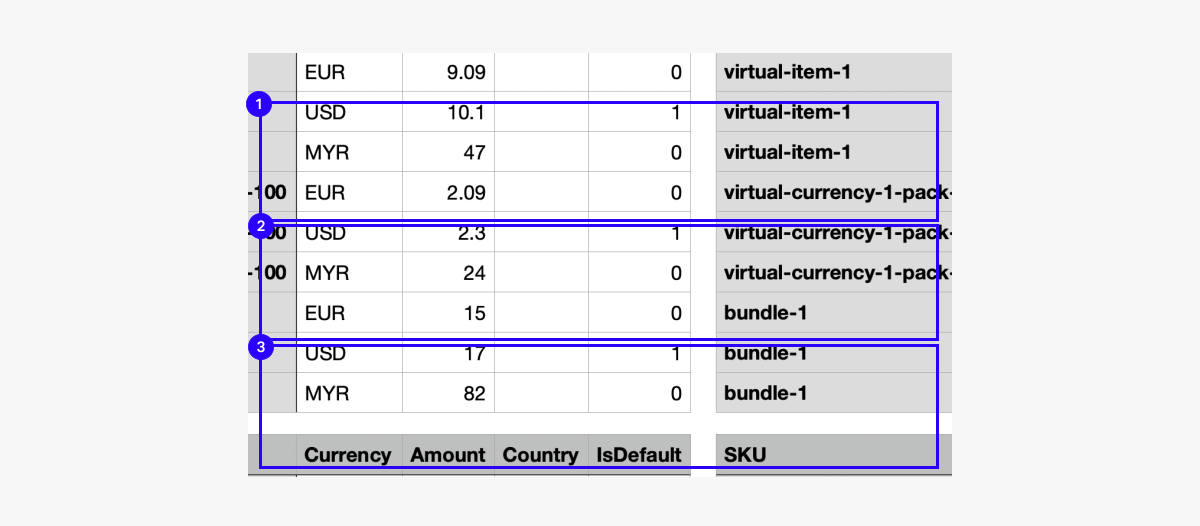
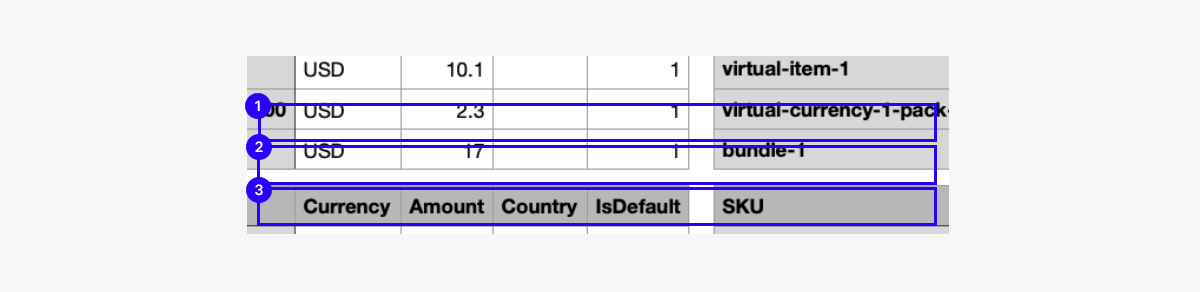
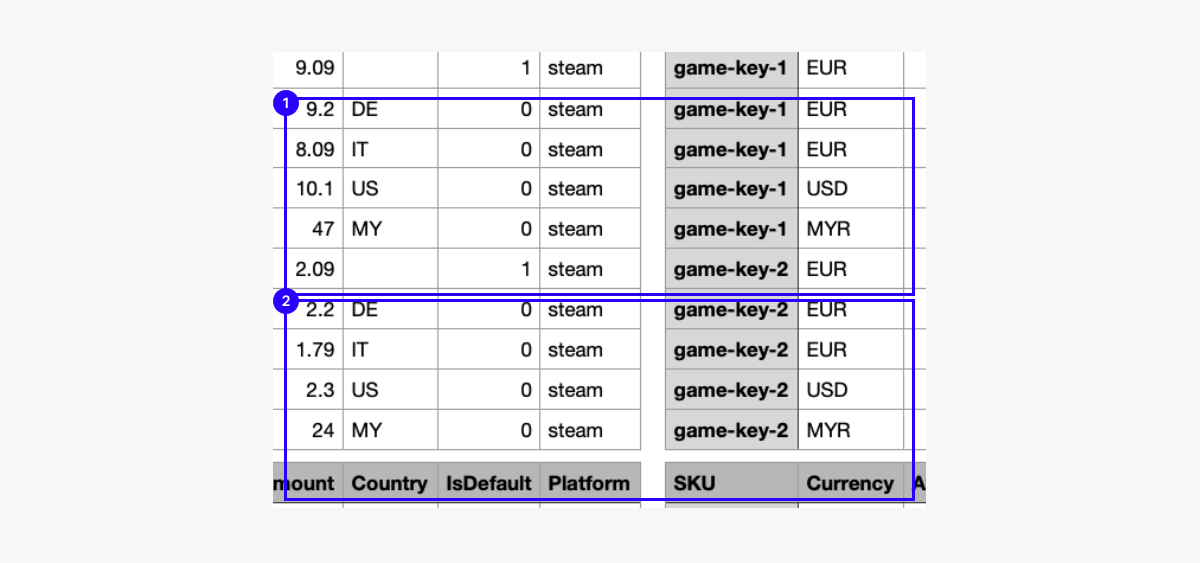
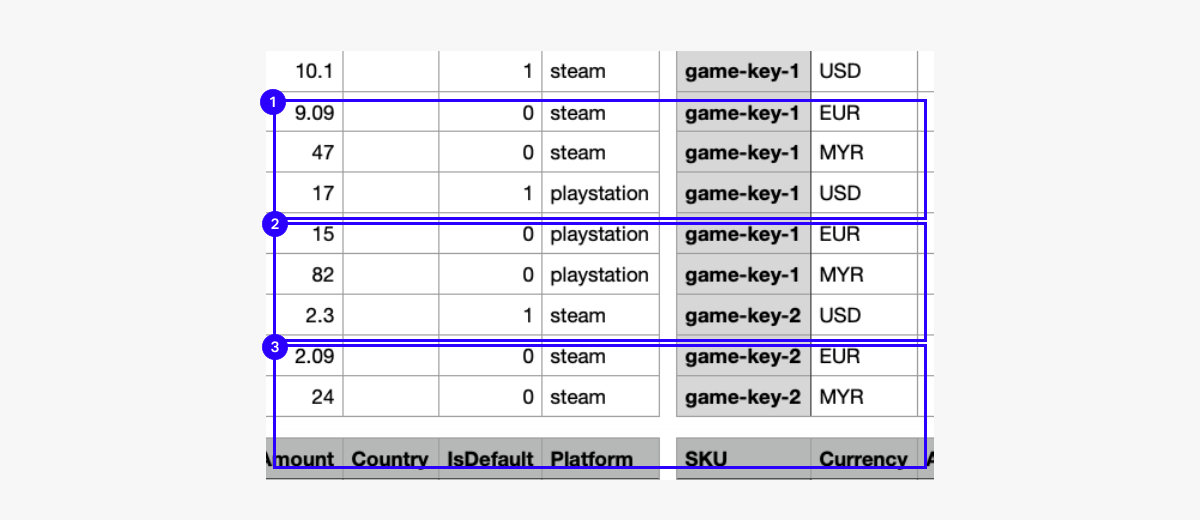
Examples of incorrect filling of the CSV file for import:
File import
To import prices from a file:
- Open your project in Publisher Account.
- Click Items catalog in the side menu.
- Open the project in your account.
- Click Items catalog in the side menu.
- Open the project in your account.
- Click Items catalog in the side menu.
- Open the project in your account.
- Click Items catalog in the side menu.
- Open your project in your account.
- Click Catalog in the side menu.
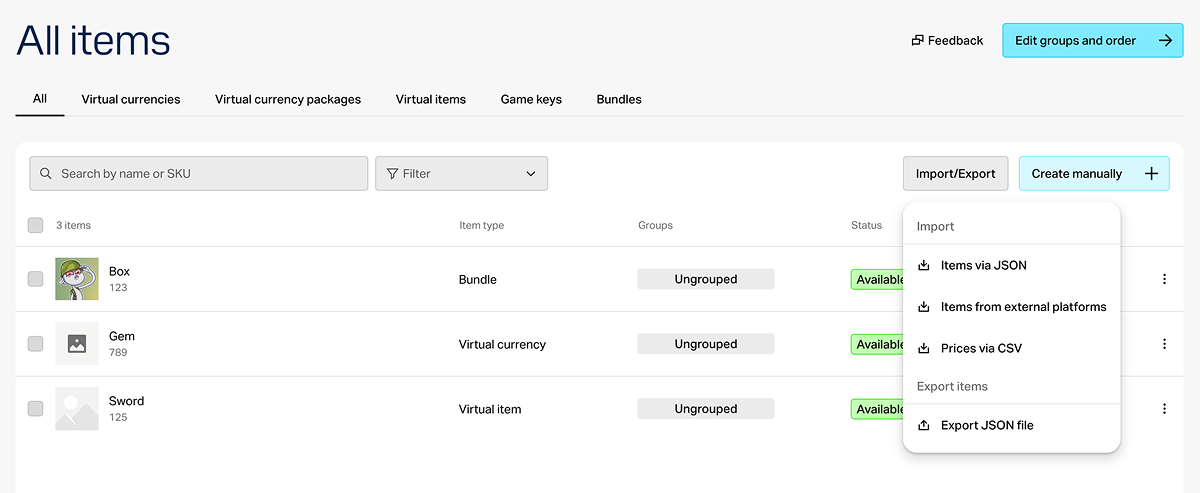
- Click Import/Export and in the drop-down list in the Import block, select Prices from CSV.
- Upload the file to the corresponding field in the import window.
After successful upload, regional prices for items with the specified SKUs will be updated according to the prices in the file. Previously specified prices will be deleted.
Example:
Additionally, you can set regional prices when importing items using the Import items via JSON file API call.
Setting up using API methods
To set up regional prices through API methods, pass an array of objects with price settings for countries:
- in the methods for creating and updating virtual items
- in the methods for creating and updating virtual currency
- in the methods for creating and updating virtual currency packages
- in the methods for creating and updating bundles
- in the methods for creating and updating game key packages
Example of the array:
- json
 1"prices": [
 2  {
 3    "amount": 100,
 4    "currency": "USD",
 5    "is_enabled": true,
 6    "is_default": true
 7  },
 8  {
 9    "amount": 200,
10    "currency": "CZK",
11    "country_iso": "CZ",
12    "is_enabled": false,
13    "is_default": false
14  }
15]
Found a typo or other text error? Select the text and press Ctrl+Enter.
