
Import catalog from external platforms
Overview
You can import items from external platforms and synchronize catalogs. If the import is unavailable, configure the item and subscriptions catalog in Publisher Account or using API calls.
After import, you can synchronize changes made to the item catalog in the import source and Xsolla in the following ways:
- reimport the catalog
- make changes to the catalog in Publisher Account manually
- make changes to the catalog using API call groups for managing bundles, virtual items, and currencies
Import catalog from Google Play
Configure in Google Play
Before you start importing:
- Check that Google Play Android Developer API is enabled in your project in Google Cloud. To do this, follow the URL address
https://console.developers.google.com/apis/api/androidpublisher.googleapis.com/overview?project={project_id}, whereproject_idis your project ID from Google Cloud Console. If this API is disabled, enable it. Applying the settings might take time.

- Create a private key used for authentication:
- Open your account in Google Cloud Console.
- Go to your service account that you use to work with Google Cloud API. If you don’t have this account, create one.
- Create a private key in JSON format by following the instructions.
- Add your service account as a new user to the Google Play Console account and grant it rights to view application information.
Configure in Publisher Account
- In your project in Publisher Account, go to the Items catalog > Catalog imports > Google Play section.
- In the Application ID field, specify your application ID from Google Play Console.

- Upload a JSON file containing the private key.
- Click Start import. Catalog import will automatically begin.

Once the import is completed, you can check items in the general list in Publisher Account.
Keep in mind the following details related to items imported from Google Play:
- Items are added to the Imported group. To sell them in a store created using Xsolla site builder, you need to move them to other groups you configured to sell items.
- To display item images, add them in Publisher Account or via API.
- For Bangladesh users, catalog prices will be displayed in the default currency (USD), rather than in BDT.
- An item SKU corresponds to
Product ID in the import source.

Import catalog from App Store
Glossary
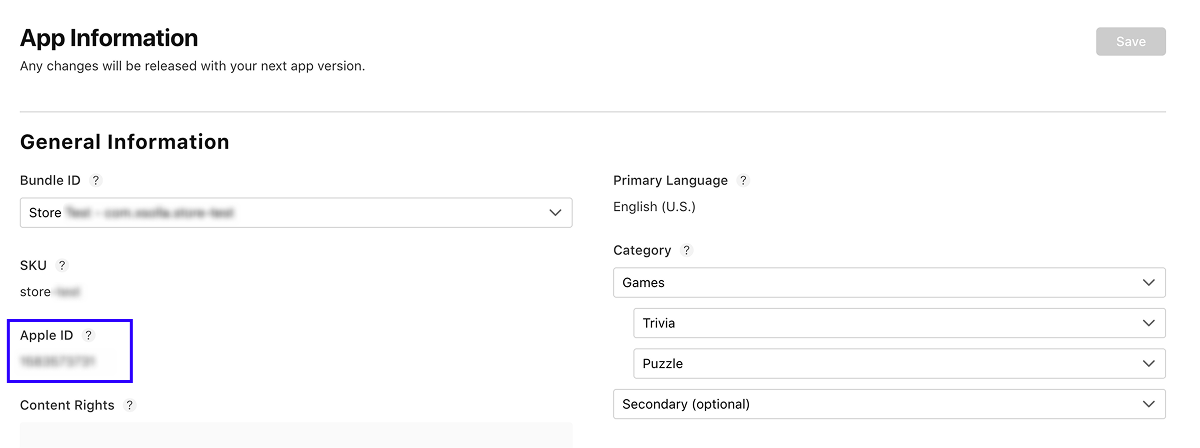
Application ID
Apple application ID. To find it:
- Go to App Store Connect.
- Go to the
Apps section. - Open the page of your application.
- Go to the
General Information > App Information section. - In the
General Information block, copy the application ID in theApple ID field.
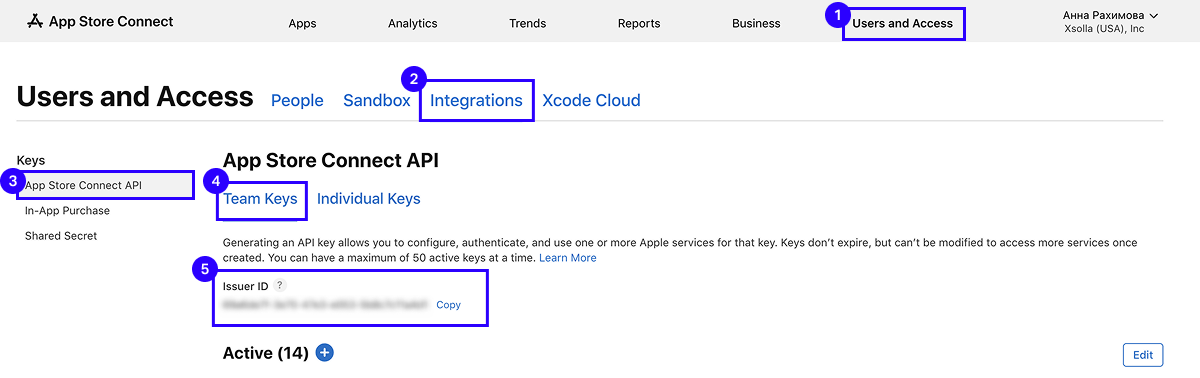
Issuer ID
ID used for interaction with Apple API, including the App Store Connect API. It is required to set up API keys to automate tasks such as application management, analytics data retrieval, and other operations in App Store Connect.
To find ID value in your account in App Store Connect:
- Go to the
Users and access section. - Open the
Integrations tab. - In the
Keys side menu, clickApp Store Connect API . - Go to the
Team keys tab.
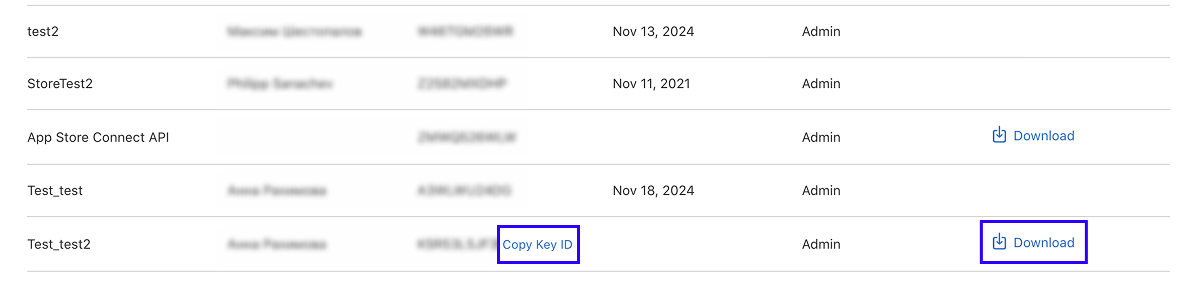
API key
A unique key used to authenticate API requests in the App Store Connect API and to ensure secure access to Apple Developer Account data and functionality. You can create it by following the instructions.
To import a catalog, you will need a key file in P8 format and its ID. You can find this data in your account in App Store Connect:
- Go to the
Users and access section. - Open the
Integrations tab. - In the
Keys side menu, clickApp Store Connect API . - Go to the
Team keys tab. - In the row of a required key, you can copy its ID and download the file.
Configure in Publisher Account
- In your project in Publisher Account, go to the Items catalog > Catalog imports > App Store section.
- Provide the following data:
- Click Start import. Catalog import will automatically begin.

Once the import is completed, you can check items in the general list in Publisher Account.
Keep in mind the following details related to items imported from App Store:
- Items are added to the Imported group. To sell them in a store created using Xsolla site builder, you need to move them to other groups you configured to sell items.
- To display item images, add them in Publisher Account or via API.
- The imported items will be displayed with the Partially available status. To make the items visible, change their status to Available.
- An item SKU corresponds to
Product ID in the import source.

Import catalog and synchronize with PlayFab inventory
Import rules
When importing items from PlayFab, the following logic applies:
- Durable goods from PlayFab are imported as virtual items (not virtual currency or bundles).
- All items, as well as virtual currency packages and items within a PlayFab bundle, are imported as consumable (parameter
consumable = trueor not specified). - Virtual currency is imported with Partly available status and without a specified price (API flags:
“is_show_in_store”: false,“is_enabled”: true,“is_free”: true). - A bundle containing only one type of virtual currency is imported as a package of virtual currency.
- A bundle containing multiple types of virtual currency is imported as separate virtual currency packages. For each unique combination of SKU and quantity, a free virtual currency package is created with Partly available status (API flags:
“is_show_in_store”: false,“is_enabled”: true,“is_free”: true). - A bundle containing different types of items is imported as a bundle.
- If the
Description field for an item is not specified in PlayFab, theName field is used as the item description; if there is noName , theSKU is used.
Import limitations
Xsolla limitations
- Containers and bundles containing containers are not imported.
- DropTables and bundles containing DropTables are not imported.
- Parameters specific to PlayFab, such as
isStackable,isTradable,UsageCount,UsagePeriod,UsagePeriodGroupare ignored. - Consumable items are created without considering the quantity (the item disappears from the inventory after the first use).
PlayFab limitations
- PlayFab does not store prices in real currencies. Only preconfigured virtual currency coded as RM (Real money) is used, equivalent to real currency—1 cent (100 RM = 1 USD). Therefore, item prices can only be set in virtual currency or RM.
- Items’ SKUs must be unique and consist of numbers, Latin letters, hyphens and underscores.
How to set it up
Configure in Publisher Account
Preliminary steps in PlayFab:
To import a catalog:
- In your project in Publisher Account, go to the Items catalog > Catalog imports > PlayFab section.
- In the Item import tab, specify:
- Title ID — a project ID in PlayFab.
- Secret key — a project key in PlayFab.
- Click Start import. Catalog import will automatically begin.

Once the import is completed, you can check items in the general list in Publisher Account.
Keep in mind the following details related to items imported from PlayFab:
- Items are added to the Imported group. To sell them in a store created using Xsolla site builder, you need to move them to other groups you configured to sell items.
- To display item images, add them in Publisher Account or via API.
- A virtual currency package is considered a bundle containing only one currency. PlayFab uses virtual currency RM (Real money) which is equivalent to real currency — 1 USD cent (100 RM = 1 USD). For example, if you import 400 RM from PlayFab, you see 4 USD in your Publisher Account.
- The imported items will be displayed with the Partially available status. To make the items visible, change their status to Available.
- An item SKU corresponds to
Item ID in the import source.

Add items to PlayFab inventory
You can set up the adding of the purchased items to your PlayFab inventory in the following ways:
- By synchronizing the Xsolla inventory with PlayFab.
- By integrating PlayFab storage with Xsolla Login. In this case, PlayFab user ID is specified in the token. When items are returned on the Xsolla side, a corresponding request is sent to PlayFab in the token.
To synchronize the Xsolla inventory with PlayFab:
- In your project in Publisher Account, go to the Items catalog > Catalog imports > PlayFab section.
- In the Inventory synchronization tab, specify:
- Title ID — a project ID in PlayFab.
- Secret key — a project key in PlayFab.
- Activate the Synchronize user inventory with PlayFab toggle. The setting will be automatically enabled.

Reimport catalog
When reimporting the catalog, you need to consider the following:
- Items that are already in the Items catalog will be updated.
- Items that are not available in the Items catalog will be added.
- Items that have already been removed from the import source will remain in the Items catalog. You can delete them in Publisher Account or via API.
Found a typo or other text error? Select the text and press Ctrl+Enter.
