Set up catalog manually
Virtual currency is virtual money that is used for purchasing and selling in-game items. Depending on its purpose, a virtual currency affects the game economy balance or is connected to the monetization of the app. You can also create hard currency — a virtual currency that is linked to the platform of purchase and can be purchased only for real money.
You can sell the virtual currency in predefined amounts. For a package, you can define a special price that doesn’t equal the amount of virtual currency in it.
See the Virtual currency section to learn more about virtual currency.
- Open your project in Publisher Account and go to the Items catalog > All items > Virtual currencies section.
- Open the project in your account and go to the Items catalog > All items > Virtual currencies section.
- Open the project in your account and go to the Items catalog > All items > Virtual currencies section.
- Open the project in your account and go to the Items catalog > All items > Virtual currencies section.
- Open your project in the account for mobile games and go to the Catalog section.
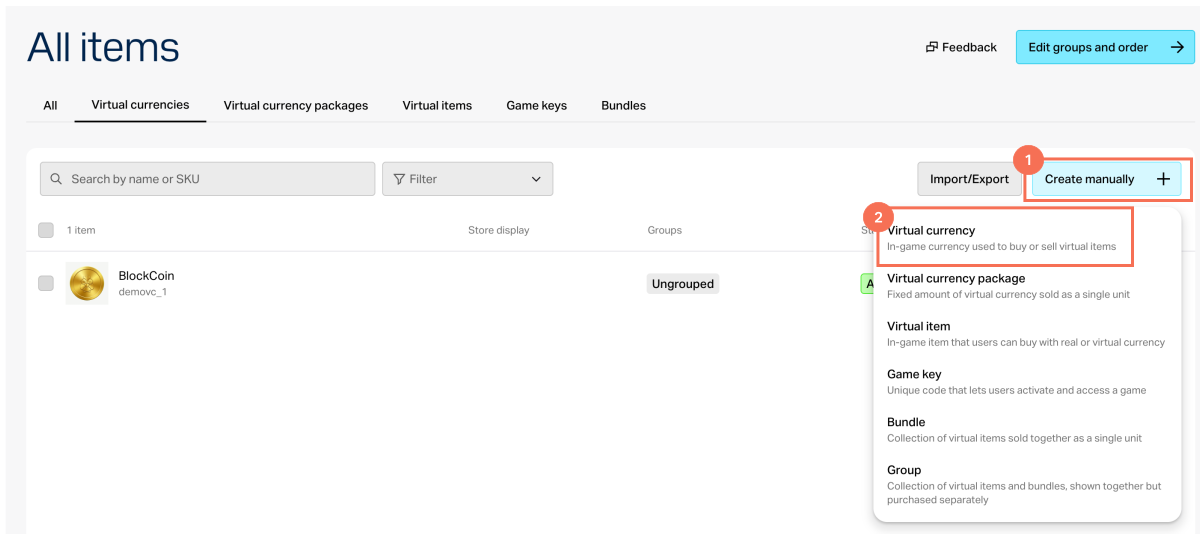
- Click Create manually and select Virtual currency from the drop-down list.
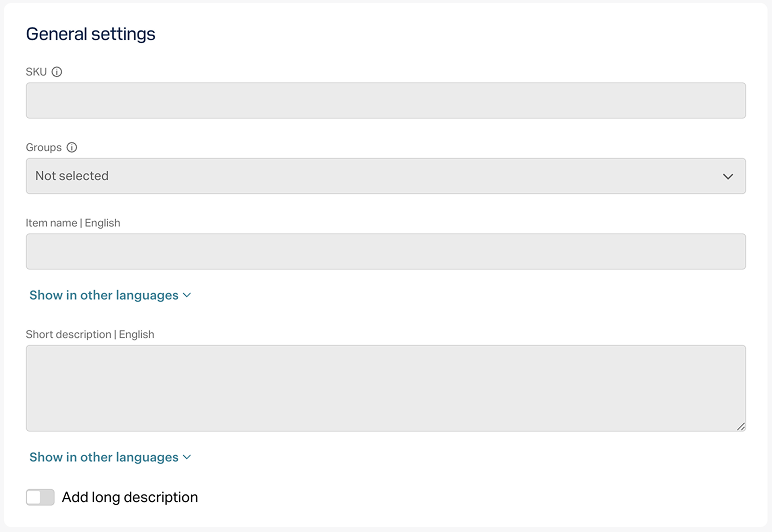
- In the General settings section, specify the following:
- SKU
- One or several groups the item should belong to (optional)
- Name
- Short description
- Extended description — to add it, turn on the corresponding toggle (optional)
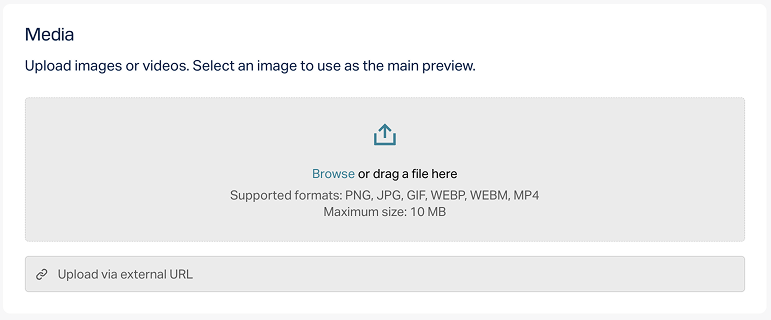
- In the Media section, upload one or more images or videos (optional) — from your device or via a link. In the store created with the Xsolla site editor, all item cards display the file marked as Main, while the remaining files are available only in item cards with a media gallery. The file marked as Main is also returned in the responses of the catalog retrieval API calls.
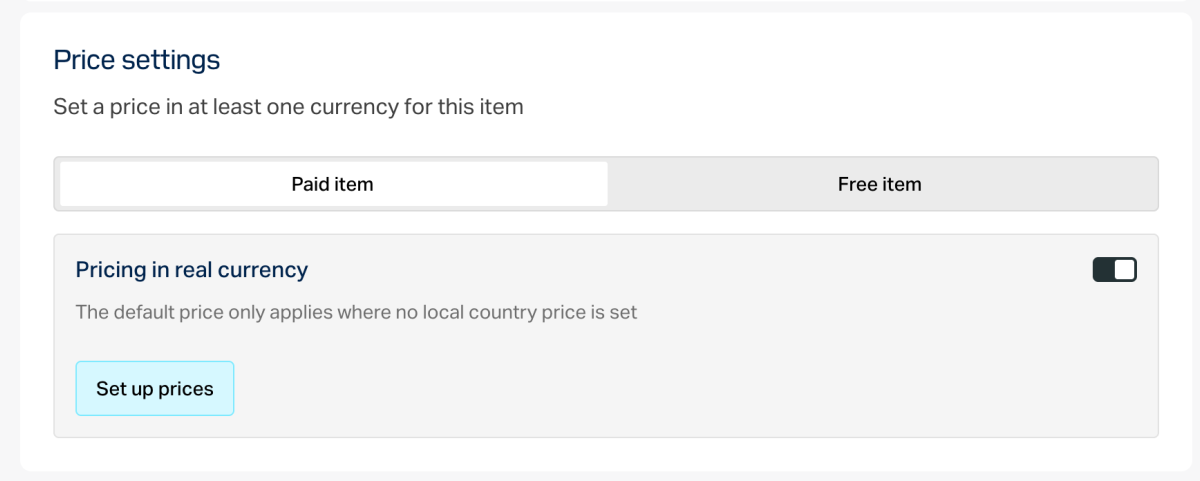
- In the Price settings section, set prices or create a free item:
- To set a price, select Paid item, turn on the Pricing in real currency toggle, and specify the price. If needed, configure regional prices.
- To create a free item, select Free item.
- To limit the number of items available for purchase:
- Turn on the toggle in the Limits section and specify the quantity.
- Configure the limit reset frequency. To do this, select a period from the drop-down list:
- Daily.
- Weekly.
- Monthly.
- Custom interval. The interval is calculated from the item’s display start date in the store.
- No regular refresh.
- Set up the reset schedule by specifying the parameters that correspond to the selected period.
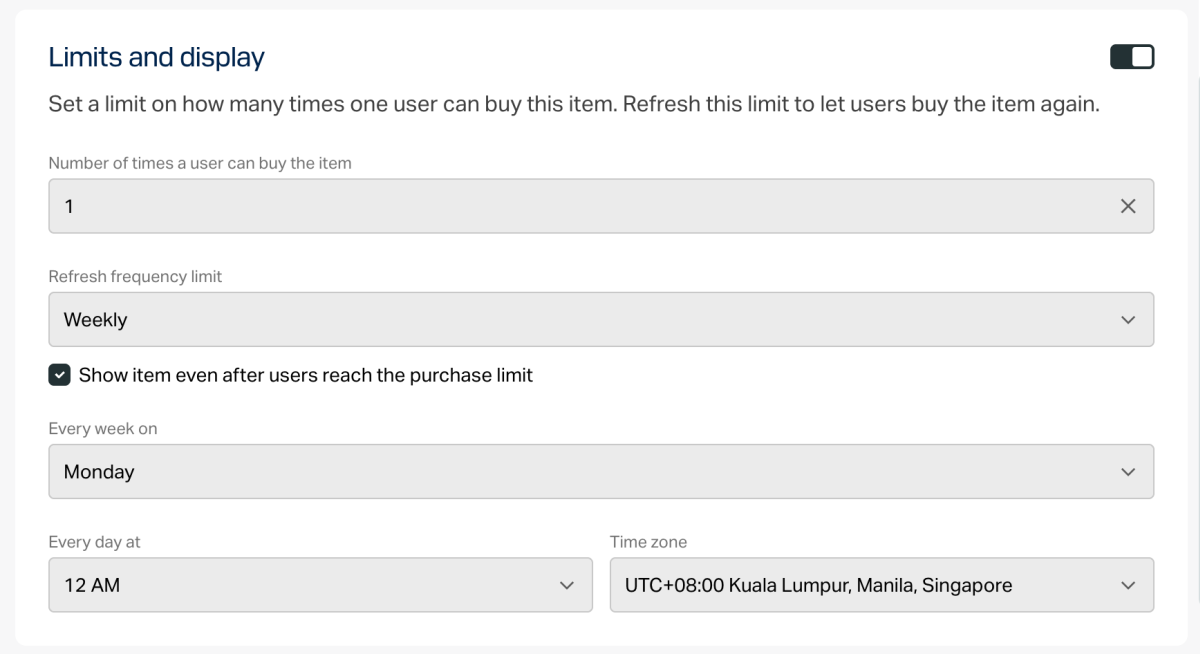
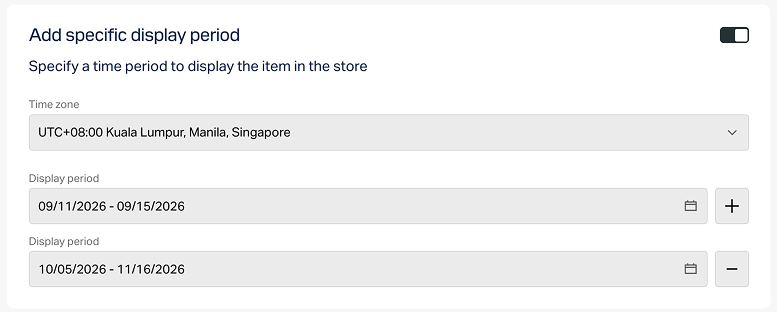
To configure a display time limit for the item (optional):
- Turn on the toggle in the Add specific display period section.
- Specify the time zone and the beginning and the end of the period.
To leave the end of the item’s display period unspecified, turn on the No end date toggle.
- Configure attributes using one of the following options (optional):
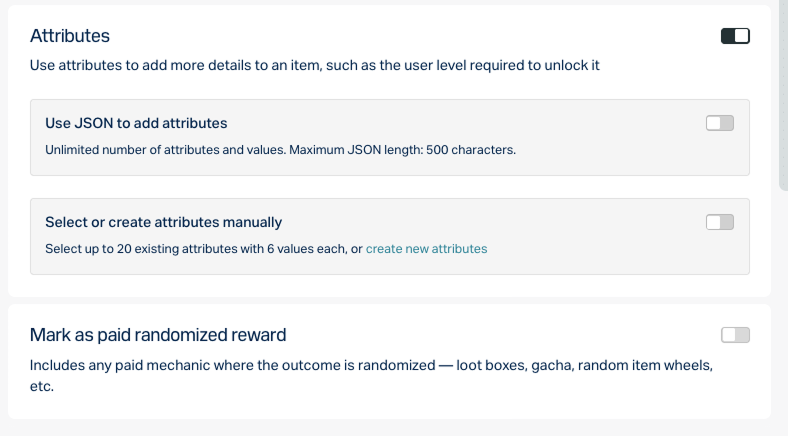
- If the paid item will be used in any mechanics with a random reward (e.g., loot boxes or gacha), enable the Mark as paid randomized reward toggle.
Click Create.
In the window that opens, select the item status and click Continue.
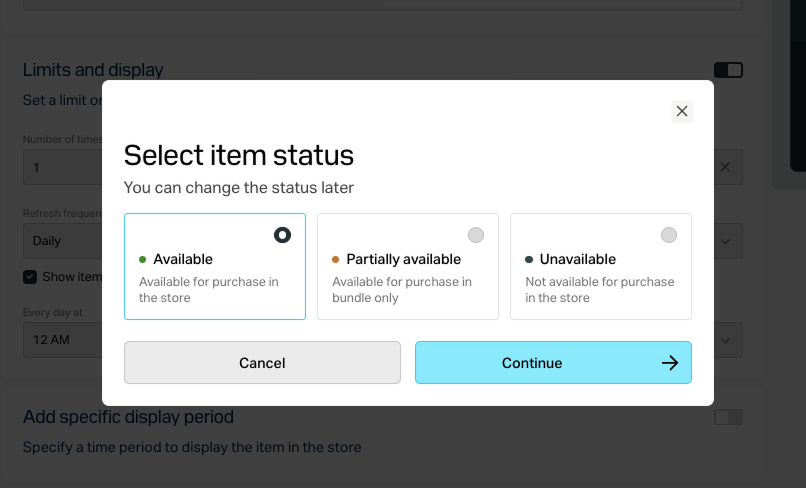
The created item will appear in the All items section.
- Open your project in Publisher Account and go to the Items catalog > All items > Virtual currency packages section.
- Open the project in your account and go to the Items catalog > All items > Virtual currency packages section.
- Open the project in your account and go to the Items catalog > All items > Virtual currency packages section.
- Open the project in your account and go to the Items catalog > All items > Virtual currency packages section.
- Open your project in the account for mobile games and go to the Catalog section.
- Click Create manually and select Virtual currency from the drop-down list.
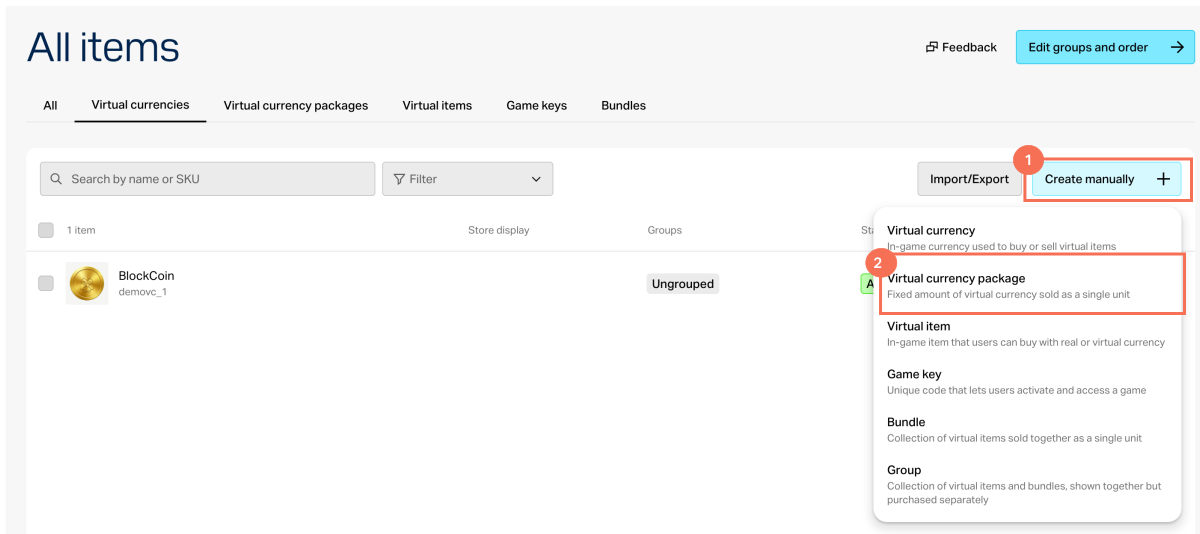
- In the General settings section, specify the following:
- SKU
- One or several groups the item should belong to (optional)
- Name
- Short description
- Extended description — to add it, turn on the corresponding toggle (optional)
- In the Media section, upload one or more images or videos (optional) — from your device or via a link. In the store created with the Xsolla site editor, all item cards display the file marked as Main, while the remaining files are available only in item cards with a media gallery. The file marked as Main is also returned in the responses of the catalog retrieval API calls.
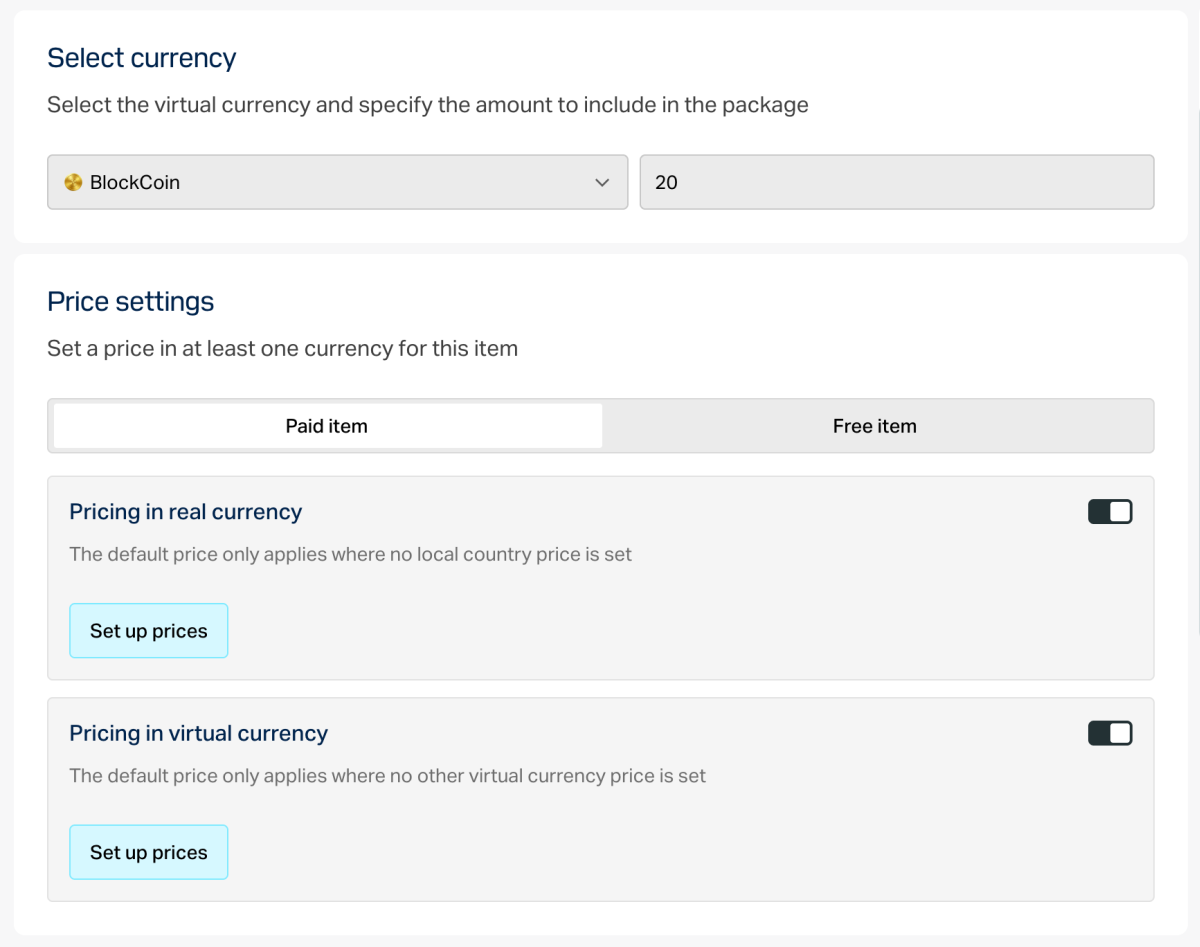
Specify the virtual currency included in the package and its amount.
In the Price settings section, set prices or create a free item:
- To set a price, select Paid item, turn on the Pricing in real currency and/or Pricing in virtual currency toggle, and specify the price. If needed, configure regional prices.
- To create a free item, select Free item.
An item can have prices in several real and virtual currencies. In this case, you must specify a default currency for each type — one among the real currencies and one among the virtual currencies.
You can specify a price in virtual currency only if the virtual currency has already been created in the project.
- To limit the number of items available for purchase:
- Turn on the toggle in the Limits section and specify the quantity.
- Configure the limit reset frequency. To do this, select a period from the drop-down list:
- Daily.
- Weekly.
- Monthly.
- Custom interval. The interval is calculated from the item’s display start date in the store.
- No regular refresh.
- Set up the reset schedule by specifying the parameters that correspond to the selected period.
To configure a display time limit for the item (optional):
- Turn on the toggle in the Add specific display period section.
- Specify the time zone and the beginning and the end of the period.
To leave the end of the item’s display period unspecified, turn on the No end date toggle.
- Configure attributes using one of the following options (optional):
- If the paid item will be used in any mechanics with a random reward (e.g., loot boxes or gacha), enable the Mark as paid randomized reward toggle.
Click Create.
In the window that opens, select the item status and click Continue.
The created item will appear in the All items section.
Virtual items are the in-game content that you can sell for real and virtual currency.
See the Virtual items section to learn more about virtual items.
- Open your project in Publisher Account and go to the Items catalog > All items > Virtual items section.
- Open the project in your account and go to the Items catalog > All items > Virtual items section.
- Open the project in your account and go to the Items catalog > All items > Virtual items section.
- Open the project in your account and go to the Items catalog > All items > Virtual items section.
- Open your project in the account for mobile games and go to the Catalog section.
- Click Create manually and select Virtual item from the drop-down list.
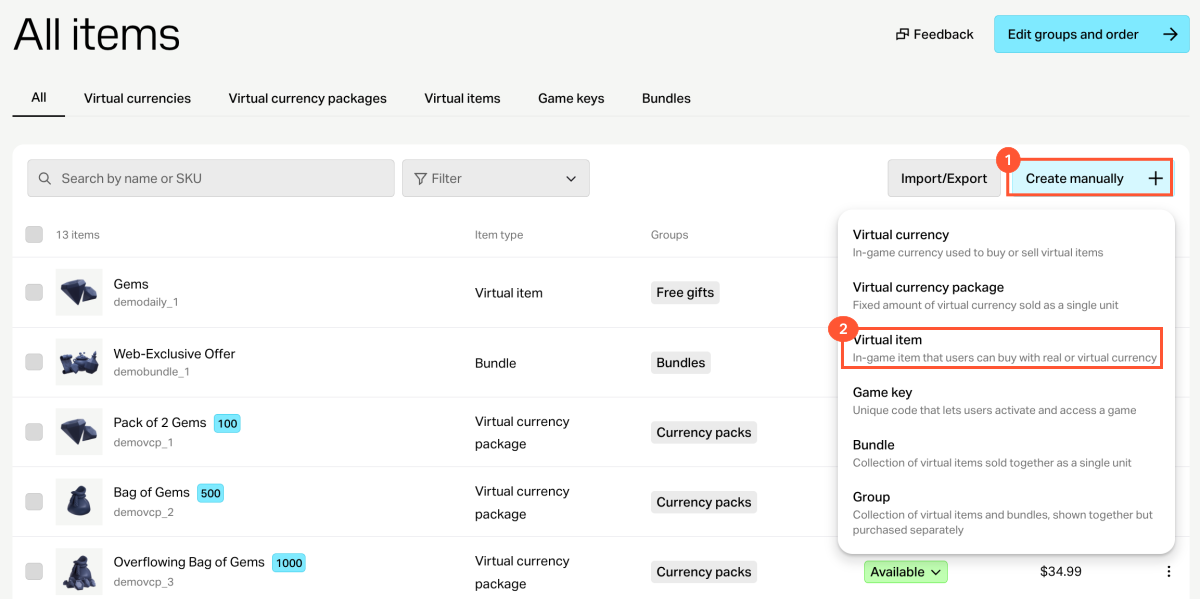
- In the General settings section, specify the following:
- SKU
- One or several groups the item should belong to (optional)
- Name
- Short description
- Extended description — to add it, turn on the corresponding toggle (optional)
- In the Media section, upload one or more images or videos (optional) — from your device or via a link. In the store created with the Xsolla site editor, all item cards display the file marked as Main, while the remaining files are available only in item cards with a media gallery. The file marked as Main is also returned in the responses of the catalog retrieval API calls.
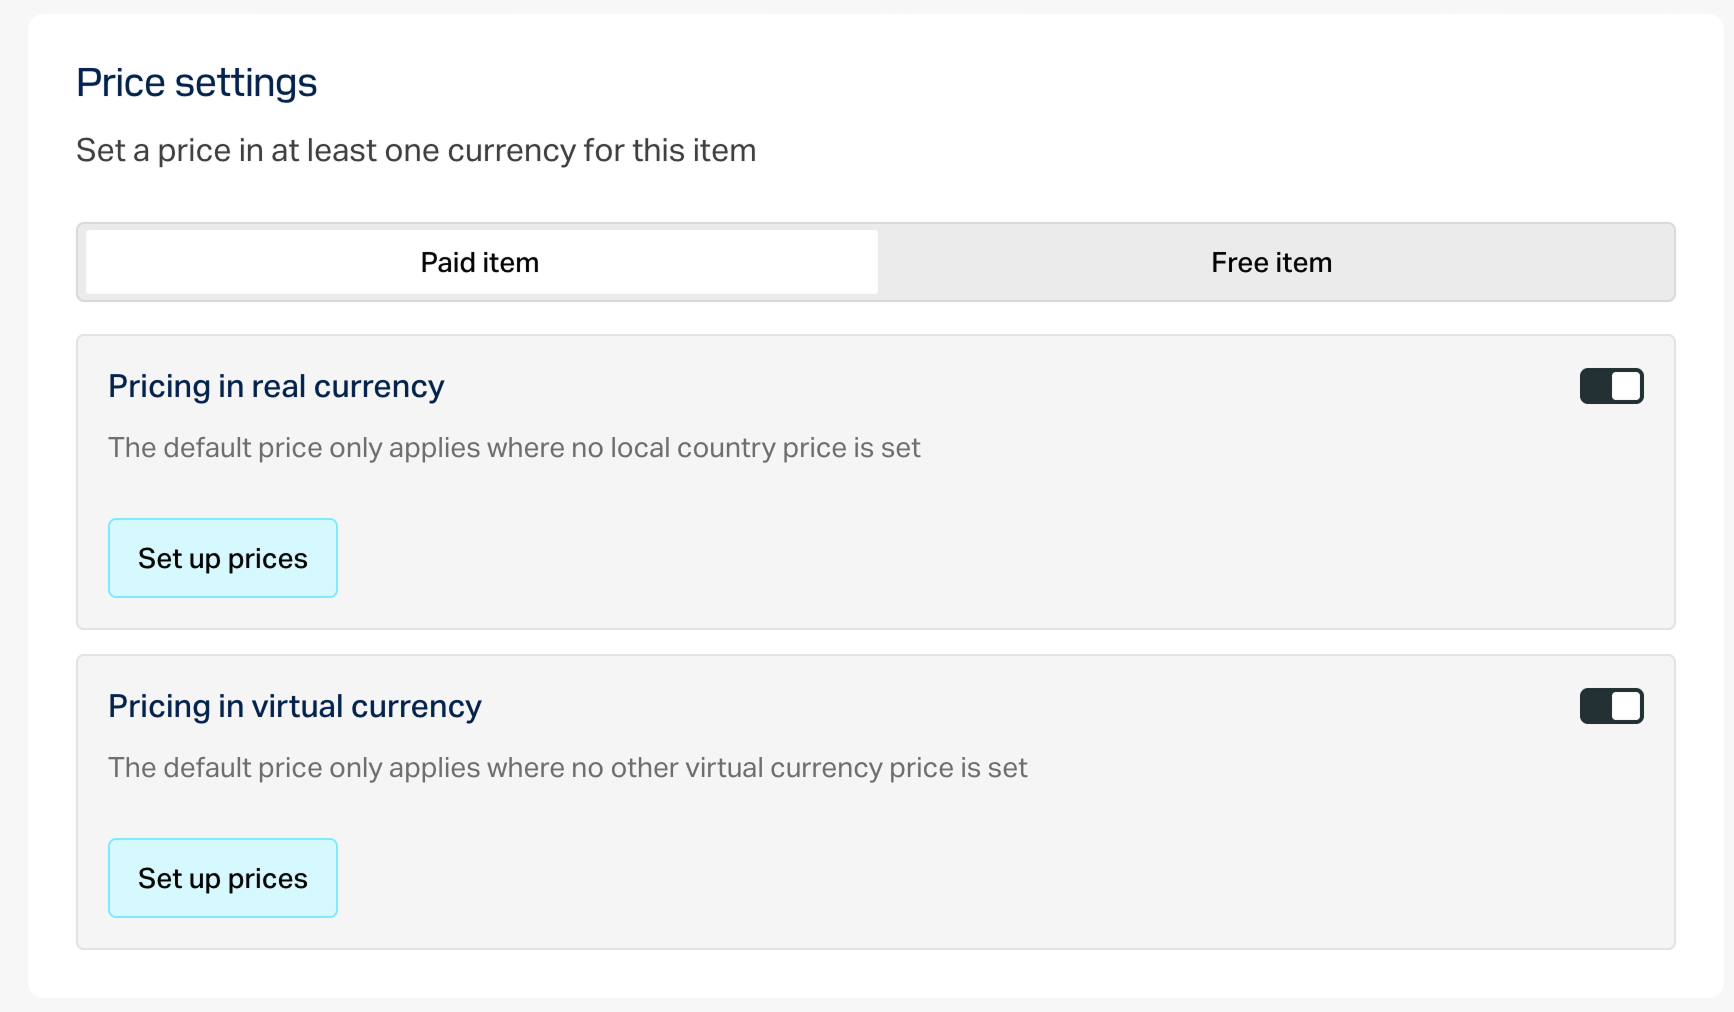
- In the Price settings section, set prices or create a free item:
- To set a price, select Paid item, turn on the Pricing in real currency and/or Pricing in virtual currency toggle, and specify the price. If needed, configure regional prices.
- To create a free item, select Free item.
An item can have prices in several real and virtual currencies. In this case, you must specify a default currency for each type — one among the real currencies and one among the virtual currencies.
You can specify a price in virtual currency only if the virtual currency has already been created in the project.
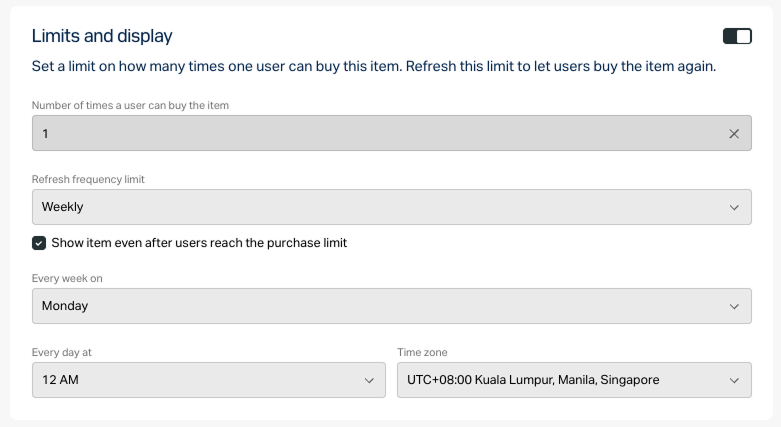
- To limit the number of items available for purchase:
- Turn on the toggle in the Limits section and specify the quantity.
- Configure the limit reset frequency. To do this, select a period from the drop-down list:
- Daily.
- Weekly.
- Monthly.
- Custom interval. The interval is calculated from the item’s display start date in the store.
- No regular refresh.
- Set up the reset schedule by specifying the parameters that correspond to the selected period.
To configure a display time limit for the item (optional):
- Turn on the toggle in the Add specific display period section.
- Specify the time zone and the beginning and the end of the period.
To leave the end of the item’s display period unspecified, turn on the No end date toggle.
- Configure attributes using one of the following options (optional):
- If the paid item will be used in any mechanics with a random reward (e.g., loot boxes or gacha), enable the Mark as paid randomized reward toggle.
Click Create.
In the window that opens, select the item status and click Continue.
The created item will appear in the All items section.
Bundle is a set of several items that are sold as a single unit. You can add items of different types to a bundle:
- Virtual currency.
- Package of virtual currency.
- Virtual items including time-limited items.
- Bundles.
See the Bundles section to learn more about bundles.
To create a bundle:
- Open your project in Publisher Account and go to the Items catalog > All items > Bundles section.
- Open the project in your account and go to the Items catalog > All items > Bundles section.
- Open the project in your account and go to the Items catalog > All items > Bundles section.
- Open the project in your account and go to the Items catalog > All items > Bundles section.
- Open your project in the account for mobile games and go to the Catalog section.
- Click Create manually and select Bundle from the drop-down list.
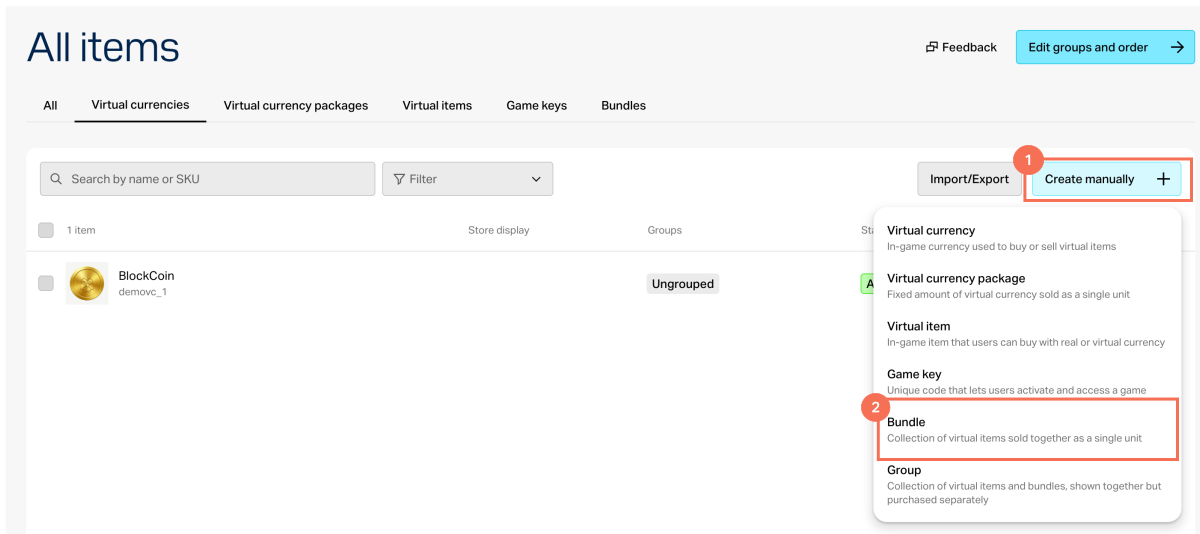
- In the General settings section, specify the following:
- SKU
- One or several groups the item should belong to (optional)
- Name
- Short description
- Extended description — to add it, turn on the corresponding toggle (optional)
- In the Media section, upload one or more images or videos (optional) — from your device or via a link. In the store created with the Xsolla site editor, all item cards display the file marked as Main, while the remaining files are available only in item cards with a media gallery. The file marked as Main is also returned in the responses of the catalog retrieval API calls.
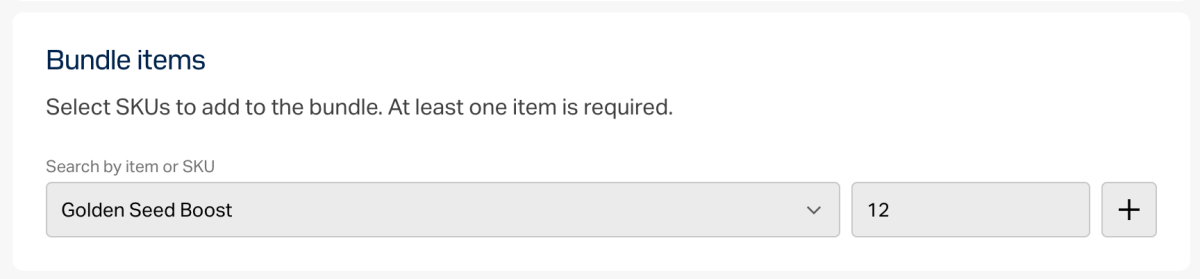
- In the Bundle items section, select SKUs to add to the bundle. At least one item is required.
- In the Price settings section, set prices or create a free item:
- To set a price, select Paid item, turn on the Pricing in real currency and/or Pricing in virtual currency toggle, and specify the price. If needed, configure regional prices.
- To create a free item, select Free item.
- To limit the number of items available for purchase:
- Turn on the toggle in the Limits section and specify the quantity.
- Configure the limit reset frequency. To do this, select a period from the drop-down list:
- Daily.
- Weekly.
- Monthly.
- Custom interval. The interval is calculated from the item’s display start date in the store.
- No regular refresh.
- Set up the reset schedule by specifying the parameters that correspond to the selected period.
To configure a display time limit for the item (optional):
- Turn on the toggle in the Add specific display period section.
- Specify the time zone and the beginning and the end of the period.
To leave the end of the item’s display period unspecified, turn on the No end date toggle.
- Configure attributes using one of the following options (optional):
- If the paid item will be used in any mechanics with a random reward (e.g., loot boxes or gacha), enable the Mark as paid randomized reward toggle.
Click Create.
In the window that opens, select the item status and click Continue.
The created item will appear in the All items section.
Game keys are unique, single-use alphanumeric codes that grant the user access to a game or DLC on gaming platforms such as Steam or other DRM services. For more information about game keys, see the Sell game keys section.
To create a game key package:
- Open your project in Publisher Account and go to the Items catalog > All items > Game keys section.
- Open the project in your account and go to the Items catalog > All items > Game keys section.
- Open the project in your account and go to the Items catalog > All items > Game keys section.
- Open the project in your account and go to the Items catalog > All items > Game keys section.
- Open your project in the account for mobile games and go to the Catalog section.
- Click Create manually and select Game key from the drop-down list.
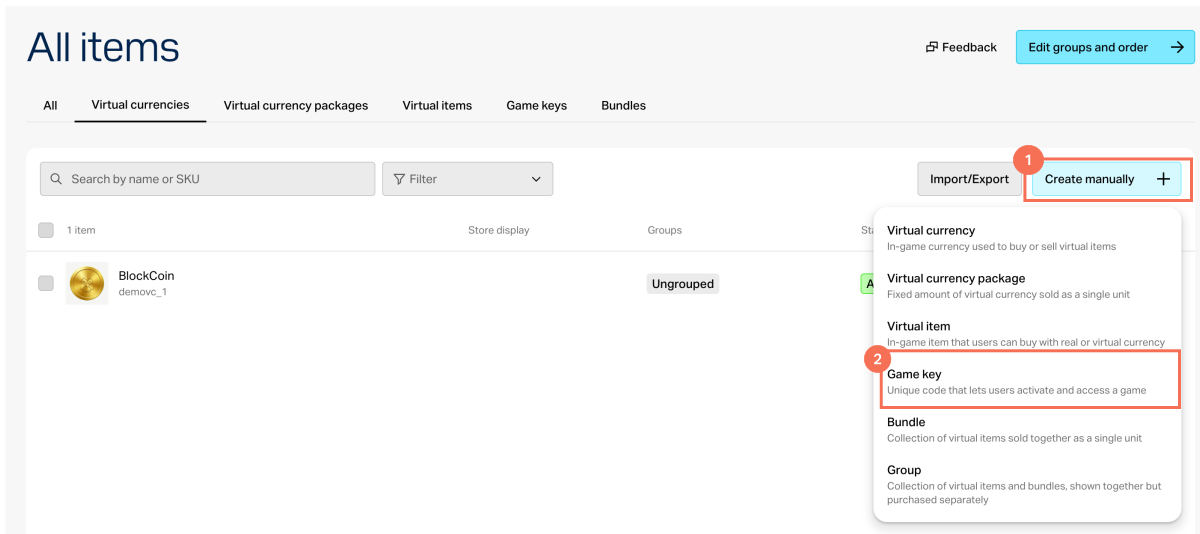
Add general information for game, including:
- Image (optional)
- SKU
- Game title
- Game description (optional)
Set up attributes for the game package in one of the following ways (optional):
Add a link to the game page (optional):
- Turn on the Add game page link toggle.
- If the game does not have a page, select Create new game page and specify Game page name.
- Add a link to the game site. If the site doesn’t exist yet, click Create site and fill in the Site name field.
Click Save and continue.
Select the game distribution platforms and upload a CSV or TXT file with keys. Each game key must be unique. Keys with an identical combination will not be uploaded.
If you want to sell the game before its official release, turn on the Pre-orders toggle. You can specify the release date when the keys will be delivered to users instantly when creating the keys or later.
Click Save and continue.
Set up pricing for the selected platforms. Define prices or create free keys:
- To create a free key package, in the Paid or free field, select Free game key.
- To set a price, in the Paid or free field, select Paid game key and specify the price in real or virtual currencies. If needed, configure regional prices.
To set a limit for purchasing a game key (optional). To do this, turn on the Limit for game key purchase per user toggle and specify the number of keys a user can purchase.
Click Save and continue.
After successfully creating a package of keys, a modal window will appear with game keys selling options. These options include selling keys via site, via widget, or via direct link. You can select one of the options: go to sales setup immediately or return at any time later.
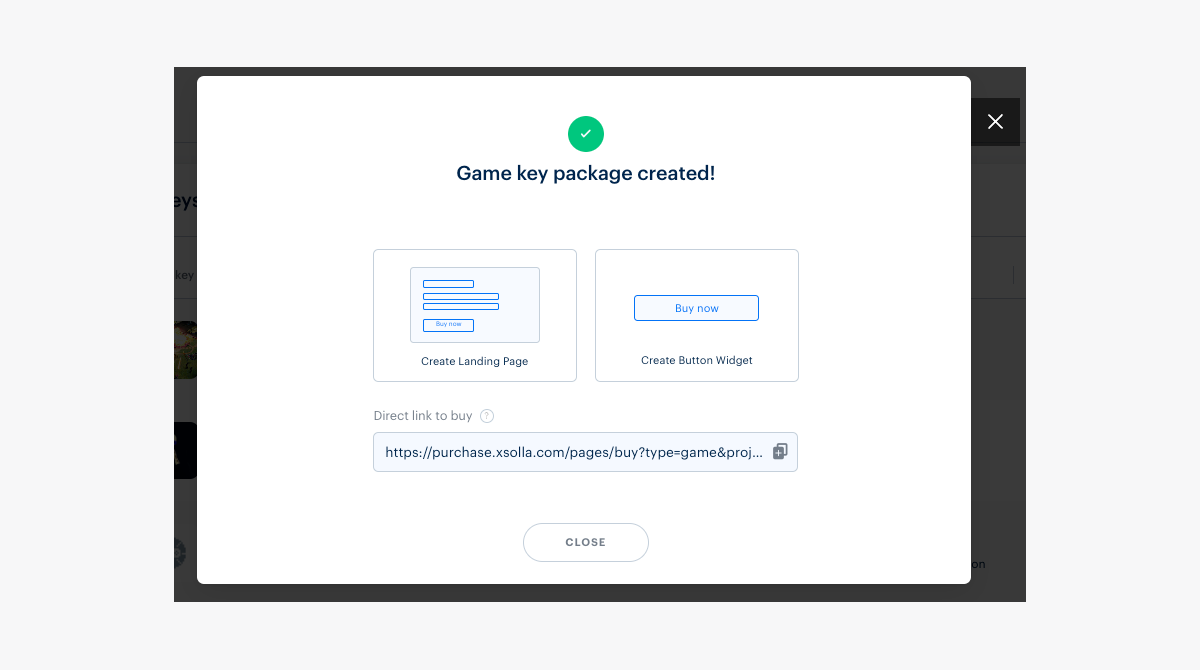
To make changes to the created game keys package, select the key on the Game keys tab, make changes, and save.
For users to be able to buy the game, the keys need to be uploaded. If the keys run out, additional keys must be uploaded.
You will receive an email notification when there are 25%, 10%, and 0% uploaded keys remaining in each package if you have one of the following roles in Publisher Account:
- developer
- owner
Only the project owner can change roles in Publisher Account in the Company settings > Users section.
For users to be able to buy the game, the keys need to be uploaded. If the keys run out, additional keys must be uploaded.
You will receive an email notification when there are 25%, 10%, and 0% uploaded keys remaining in each package if you have one of the following roles in your account:
- developer
- owner
Only the project owner can change roles in your account in the Settings > Members section.
For users to be able to buy the game, the keys need to be uploaded. If the keys run out, additional keys must be uploaded.
You will receive an email notification when there are 25%, 10%, and 0% uploaded keys remaining in each package if you have one of the following roles in your account:
- developer
- owner
Only the project owner can change roles in your account in the Settings > Members section.
For users to be able to buy the game, the keys need to be uploaded. If the keys run out, additional keys must be uploaded.
You will receive an email notification when there are 25%, 10%, and 0% uploaded keys remaining in each package if you have one of the following roles in your account:
- developer
- owner
Only the project owner can change roles in your account in the Settings > Members section.
- developer
- owner
Found a typo or other text error? Select the text and press Ctrl+Enter.
