Create campaign with LiveOps builder
LiveOps Builder is a tool for creating campaigns that run automatically. Use it to motivate users to make a purchase. For example, to bring back users who stopped paying, to offer more to users who already pay, and to remind users about an unfinished checkout.
To create a campaign, you select a group of users, set an action (e.g., send an email), and set when Xsolla performs this action. You can start from a ready-made template or create the campaign from scratch.
Limitations:
- At the moment, the LiveOps builder supports only email campaigns.
- Xsolla sends the email once, at the start date and time. Only users who are in the segment at that time receive the email.
- The sender address is
[email protected]and can’t be changed. - Emails are sent only to users who have consented to receive communications from Xsolla.
Create campaign from scratch
To create a campaign from scratch:
- In your project in Publisher Account, go to the LiveOps > Canvas section.
- In the project in your account, go to the Operations > LiveOps section.
- In the project in your account, go to the LiveOps > Canvas section.
- In the project in your account, go to the LiveOps > Canvas section.
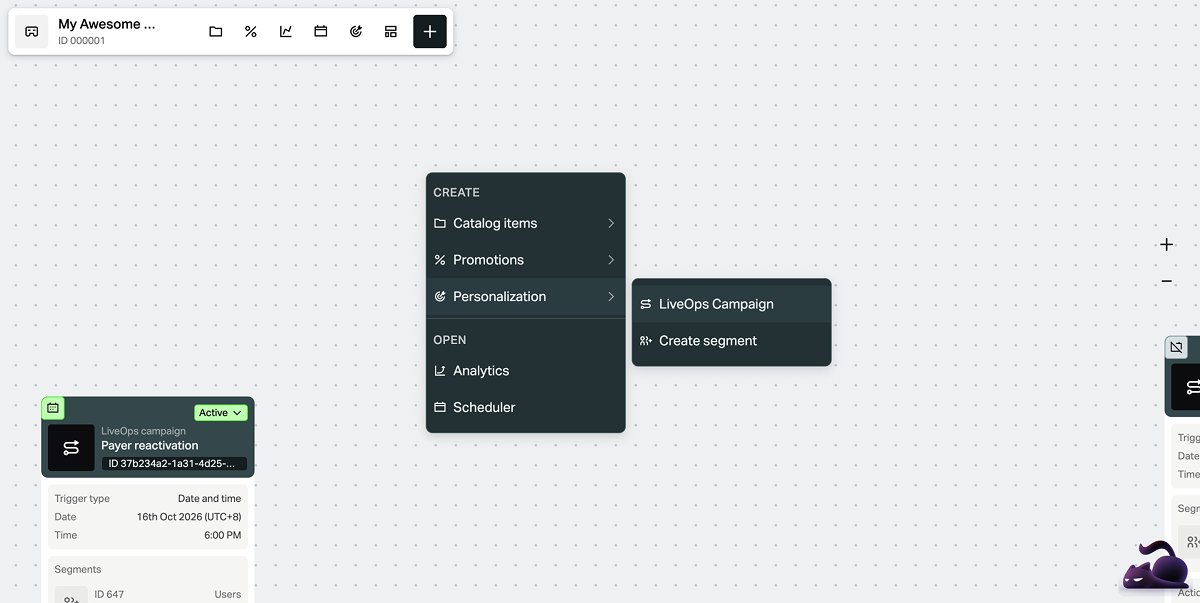
- Open the context menu anywhere on the canvas and select Personalization > LiveOps Campaign.
- Specify:
- Campaign title.
- Campaign description.
- Click Next.
- Set the trigger. Specify the start date, time zone, and time.
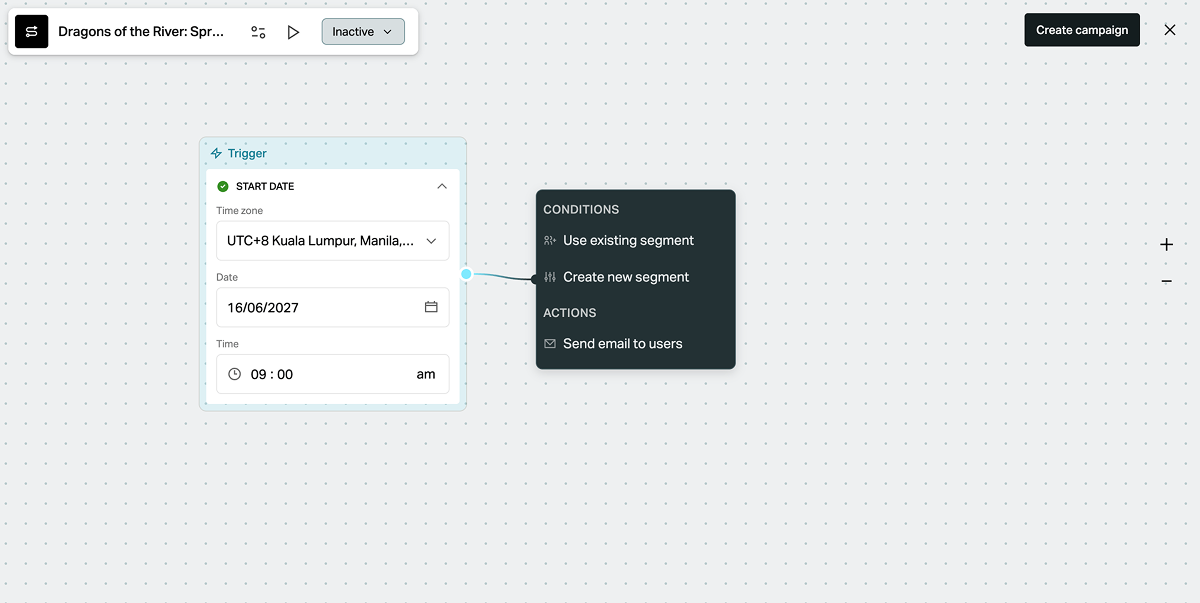
- Set the conditions. Hover over the dot on the right side of the Trigger node and click the + icon.
- To select an existing segment:
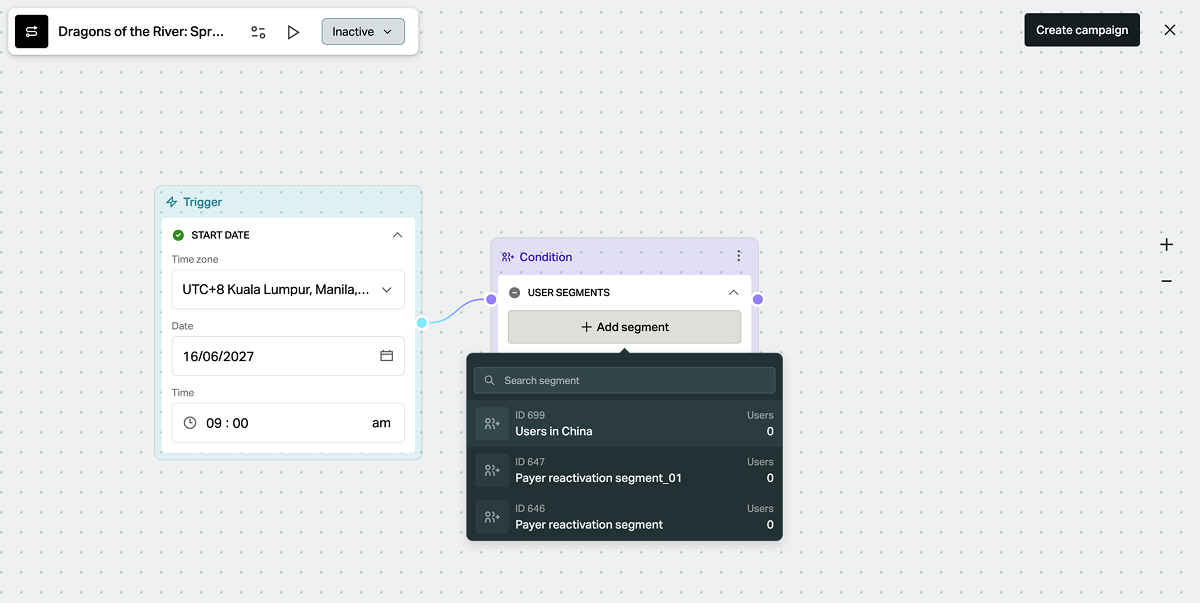
- In the context menu, select Use existing segment.
- In the condition node, click Add segment and select the segment from the drop-down list.
- To create a new segment:
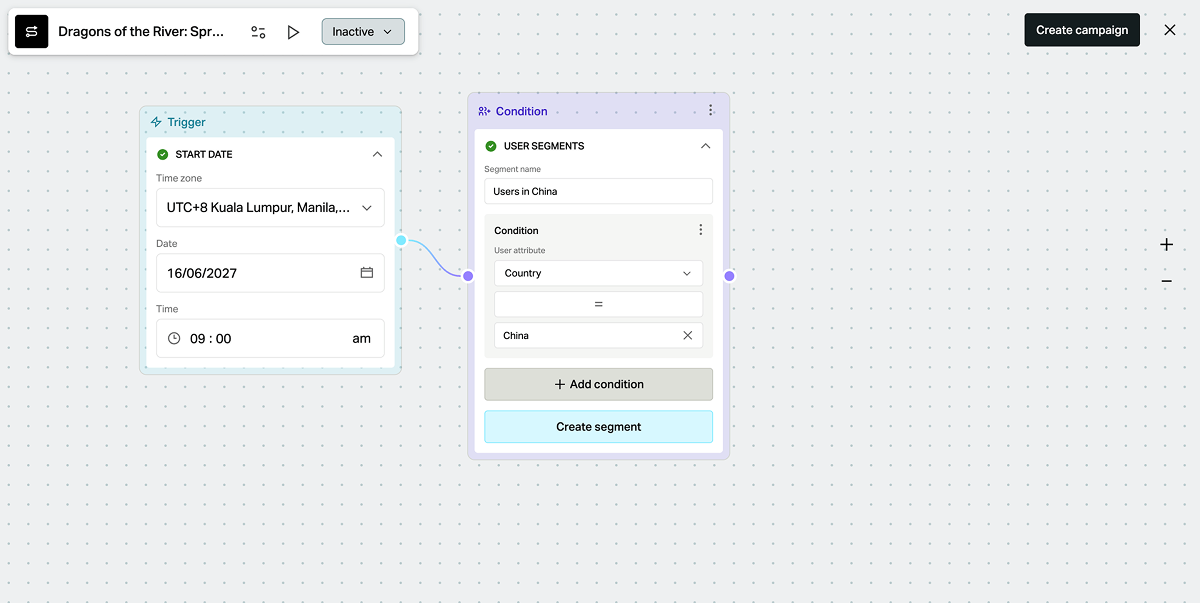
- In the context menu, select Create new segment.
- Specify the segment name.
- Specify the condition:
- Select the user attribute from the drop-down list.
- Select the comparison operator.
- Specify the user attribute value.
- To add more conditions, click Add condition and fill in the displayed fields (optional).
- Click Create segment.
- Set the action. Create the email layout:
- Hover over the dot on the right side of the Condition node and click the + icon.
- In the context menu, select Send email to users.
- Specify an email subject.
- Write the email body:
- In the Editor tab, enter the text. To use a ready-made email layout, click the + icon in the left corner of the email editor and select a template.
- In the Code tab, add HTML markup. You can also create the basic layout in the editor and add other features in the code. For example, add your own tracking elements, such as UTM parameters in links or a tracking pixel.
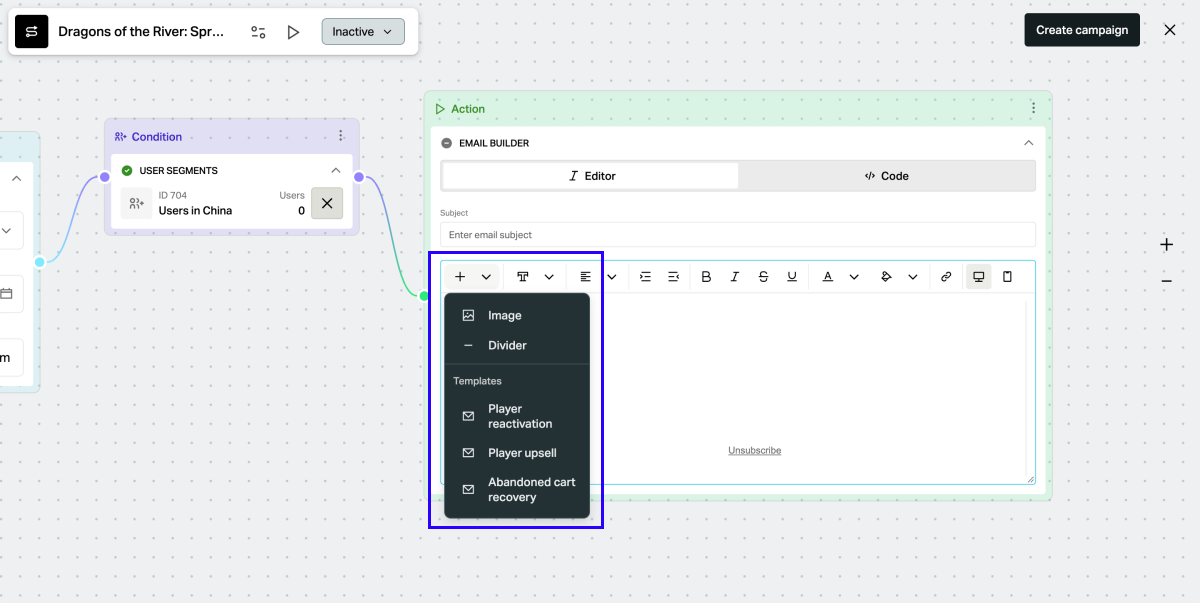
Email layout limitations:
- The email editor doesn’t support dynamic fields, e.g., the user name. Enter all values manually.
- The email includes a default header and footer. The footer has an Unsubscribe link. You can’t remove this link.
- Run a test to find any errors in the campaign conditions (optional). To do this click the

- Click Create campaign.
- In the modal window, click one of the following:
- Activate – to activate the campaign immediately.
- Save as inactive – to activate the campaign later.
When you save a campaign, a node appears on the canvas.
Create campaign from template
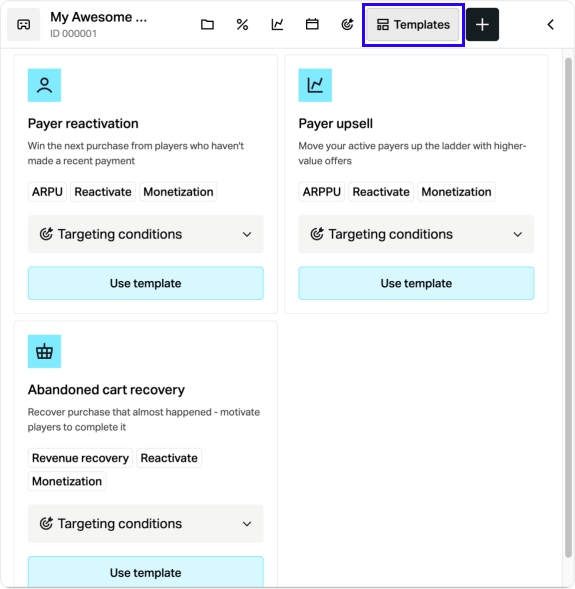
The canvas has a set of email campaign templates with preset conditions and email layout. You can change all values after you select a template.
| Template | Audience | Goal | Default targeting conditions |
|---|---|---|---|
| Payer reactivation | Users who stopped paying. | Encourage users who paid before, but not recently, to make a new purchase. | The last payment was made more than 30 days ago. The average check is 5–10 USD. |
| Payer upsell | Users who already pay. | Encourage active users to make a larger purchase. | The number of purchases in the last 30 days is 1 or more. The average check is 5–10 USD. |
| Abandoned cart recovery | Users who abandoned a cart. | Remind users to complete a purchase that they started. | The last cart was abandoned within the last day. |
Each template includes an email with a recommended offer idea:
- Payer reactivation: A limited Web Shop offer. Set the price slightly above the user’s average check. Include a bonus.
- Payer upsell: A special offer. Set the price at about two times the average check. Show a 30–50% discount or a bonus.
- Abandoned cart recovery: A reminder with a link that returns the user to checkout or to your Web Shop.
To create a campaign from the template:
- In your project in Publisher Account, go to the LiveOps > Canvas section.
- In the project in your account, go to the Operations > LiveOps section.
- In the project in your account, go to the LiveOps > Canvas section.
- In the project in your account, go to the LiveOps > Canvas section.
- In the toolbar, click the

- In the pane of the selected campaign, click Use template.
- Edit preset campaign title and description (optional).
- Click Next.
- In the Trigger node, specify the start date, time zone, and time.
- Create a segment. You can edit preset campaign conditions and save the changes or create a new segment.
- In the Action node, replace all placeholders in square brackets with your own values or images. For example, replace
[Partner logo],[Game Name],[item name], and[X]%.
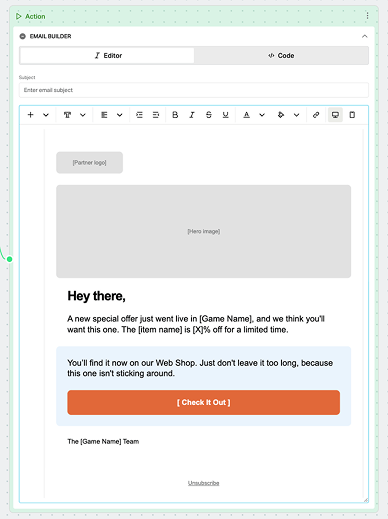
- Customize email layout (optional).
- Run a test to find any errors in the campaign conditions (optional). To do this click the
- Click Create campaign.
- In the modal window, click one of the following:
- Activate – to activate the campaign immediately.
- Save as inactive – to activate the campaign later.
Manage campaign
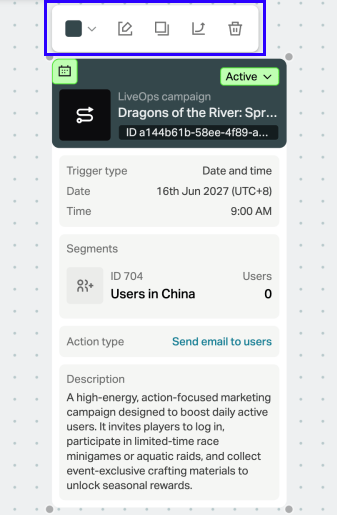
When you save a campaign, a node appears on the canvas. To manage the campaign, use the node toolbar:
- On the canvas, click the campaign node.
- In the toolbar, click the icon of the action that you need:
- Edit
- Duplicate
- Delete
- View campaign analytics
Activate or deactivate campaign
Xsolla doesn’t trigger the action (e.g., doesn’t send emails) for an inactive campaign. Activate the campaign before the start date and time.
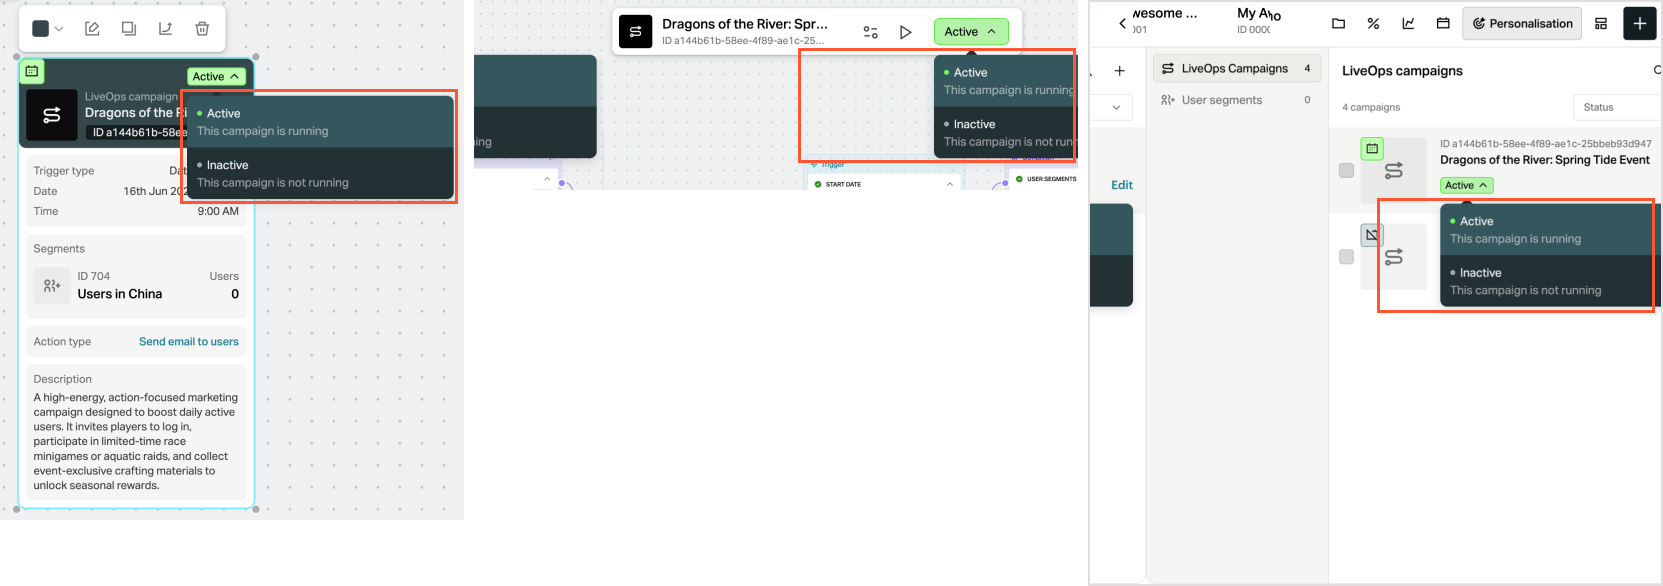
You can activate or deactivate the campaign in the following ways:
- from the campaign card
- while editing the campaign
- from the campaign list
View campaign analytics
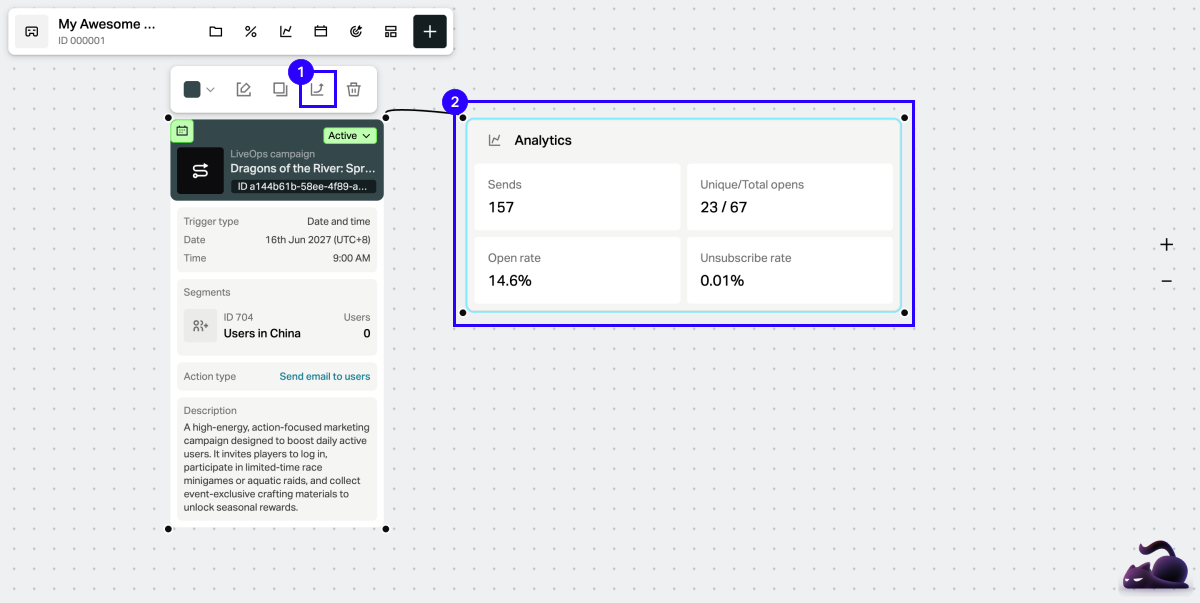
To see the results of a campaign, add an Analytics node to the campaign node.
- On the canvas, click the campaign node.
- In the toolbar above the node, click the

An Analytics node appears on the canvas and connects to the campaign node.
For email campaigns the node shows the following metrics:
| Metric | Description |
|---|---|
| Sends | Number of emails that Xsolla sent. |
| Unique/Total opens | Number of users who opened the email, and total number of opens. |
| Open rate | Share of users who opened the email. |
| Unsubscribe rate | Share of users who unsubscribed after the email. |
Found a typo or other text error? Select the text and press Ctrl+Enter.
