Create offer chain
How it works
Overview
An offer chain is a sequence of steps, each containing an item. Users receive this item for free or purchase it as part of an active offer, progressing through the chain step by step. The next step unlocks only after completing all the previous ones.
An offer chain can include exclusive items available only within the chain, as well as items at discounted prices compared to store prices. This encourages users to return to the game and complete the chain before it expires. Use this marketing tool to retain users and increase engagement.
The following items can be offered at chain steps:
- virtual currency packages
- virtual items
- bundles
Limitations:
- The following item settings are ignored in offer chains:
- personalization rules
- purchase limits
- scheduled availability (start/end date)
- promotions and discounts
- A maximum number of steps in one offer chain — 30.
- One step can contain only one item.
- Price of the paid offer chain step equals the price of the item on this step.
User flow
- The user goes to the store.
- The user sees an available offer chain and the offered items for each step.
- The user logs in.
- The user sees their current progress in the chain.
- The user completes the current step:
- If the step is free, the user claims the item.
- If the step is paid, the user makes a payment. The item is granted to the user the same way as when purchasing it.
- The user proceeds to the next step in the chain.
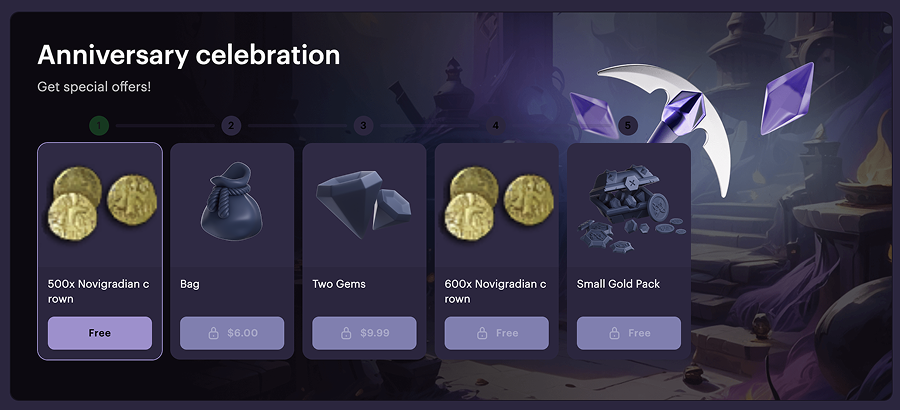
Offer chain visibility and behavior
The logic of the offer chain work is the following:
- The offer chain availability depends on the visibility and personalization settings configured for a particular chain.
- If the user has already claimed or purchased items within a chain, their current progress is displayed including completed steps and the next available one.
- If the user completes all steps, the chain is shown as completed.
- If the chain is renewable, the user’s progress is reset on schedule.
Refunded items
If a purchased item is refunded, the user’s progress in the offer chain changes. The step where the user received the refunded item is considered incomplete. To proceed further through the chain, the user has to purchase this item again. Free items claimed before the refund aren’t affected.
Example:
The user claimed and purchased items at steps 1, 2, and 3, then requested a refund for the item at step 2. Steps 1 and 3 remain completed, but step 4 is locked until the user completes step 2 again.
Set up offer chain
To create an offer chain, you need to configure the items first. Keep in mind:
- If you want an item to be available only through the chain, set its status to Partially available.
- If the user buys an item outside the offer chain, it doesn’t affect their progress in the chain.
To create items manually in your project in Publisher Account, go to the Items catalog > All items section. Detailed information about this and other methods for creating items is available in the Items catalog and Catalog management documentation sections.
To create an offer chain, you need to configure the items first. Keep in mind:
- If you want an item to be available only through the chain, set its status to Partially available.
- If the user buys an item outside the offer chain, it doesn’t affect their progress in the chain.
To create items manually in the project of your account for mobile games, go to the Catalog section. Detailed information about this and other methods for creating items is available in the Catalog and items documentation section.
To create an offer chain, you need to configure the items first. Keep in mind:
- If you want an item to be available only through the chain, set its status to Partially available.
- If the user buys an item outside the offer chain, it doesn’t affect their progress in the chain.
To create items manually in the project in your account, go to the Items catalog > All items section. Detailed information about this and other methods for creating items is available in the Items catalog and Catalog management documentation sections.
To create an offer chain, you need to configure the items first. Keep in mind:
- If you want an item to be available only through the chain, set its status to Partially available.
- If the user buys an item outside the offer chain, it doesn’t affect their progress in the chain.
To create items manually in the project in your account, go to the Items catalog > All items section. Detailed information about this and other methods for creating items is available in the Items catalog and Catalog management documentation sections.
To create an offer chain:
- In your project in Publisher Account, go to the LiveOps > Canvas section.
- In the project in your account for mobile games, go to the Operation > LiveOps section.
- In the project in your account, go to the LiveOps > Canvas section.
- In the project in your account, go to the LiveOps > More > Canvas section.
- Proceed to create an offer chain in one of the following ways:
- In the toolbar, click the + icon and select Offer chain.
- In the offer chains list area, click the + icon.
- Open the context menu anywhere on the canvas and select Offer chain.
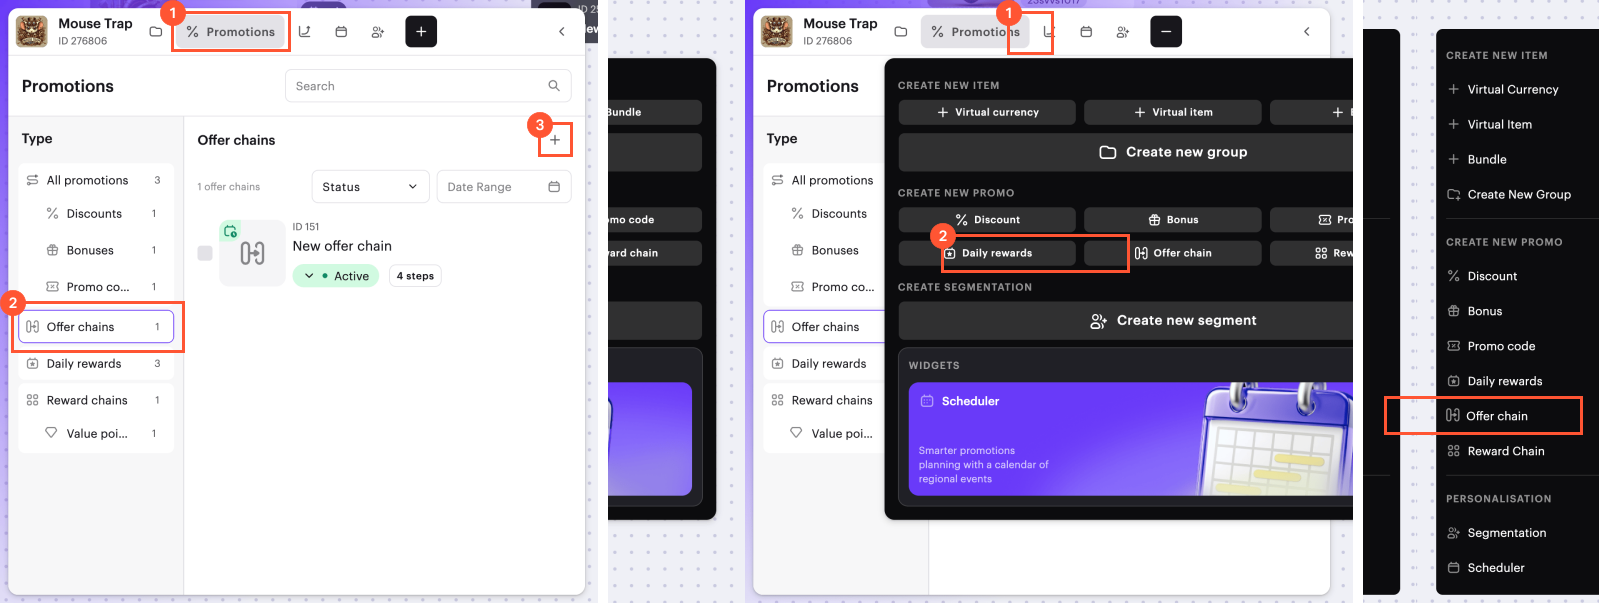
- Specify:
- Chain title.
- Chain description (optional).
- Click Next.
- Add an offer for each step of the chain. To add an item for a single step:
- Click Add step.
- Select an item.
- If you specified a price when creating the item but want to offer it for free, turn on the Give this item for free at this step toggle. For items created as free, this toggle is automatically turned on.
- Click Add step.
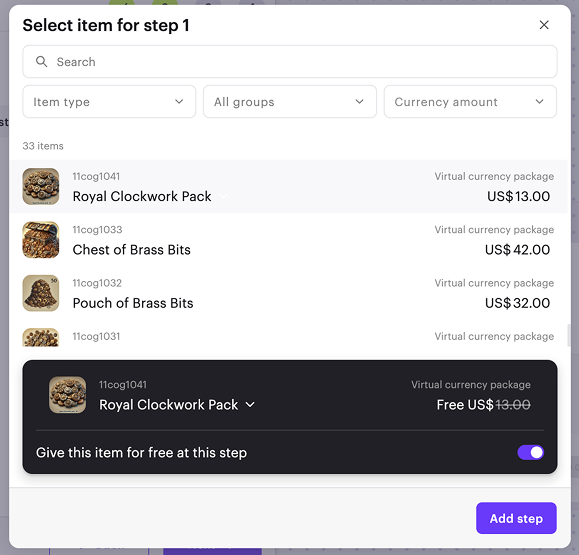
- To change the order of offers in the chain, drag the row to the desired position using the ☰ icon (optional).
- After you have added offers for each step, click Next.
- Specify the validity period of the offer chain: a time zone, start date, and end date. If you don’t want to indicate the end of the validity period, turn on the No end date toggle.
- If you want the offer chain to renew at a specific time, turn on the Make offer chain renewable toggle and specify the update schedule.
- If you want to personalize the offer chain:
- Turn on the Personalized offer chain toggle.
- Select one of the chain display options:
- Display to eligible users — in this case, the chain is displayed only to authorized users who meet the specified conditions.
- Display to ineligible users — for such a chain, you don’t need to specify the personalization conditions — it is applied by default. It means it is displayed to unauthorized users, as well as in cases when no matching personalized offer chain is found for the authorized user.
- If you select Display to eligible users option, specify the condition:
- Specify the user attribute type — string, number, or date.
- Select the user attribute from the drop-down list.
- Select the comparison operator.
- Specify the user attribute value.
- To add more conditions, click Add condition and fill in the displayed fields (optional).
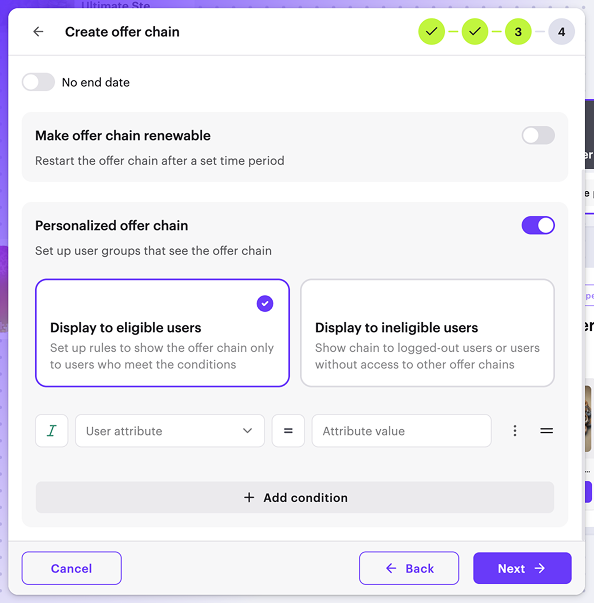
- Click Next.
- Check the chain.
- To activate the chain immediately (optional), turn on the Create in Active status toggle.
- Click Create.
- To add the created active offer chain to the site (optional):
- Open the site in the builder by clicking Open or Open in Site Builder on the banner in the editing form.
- Follow the instructions from the Display on website created with Xsolla section.
Active chains can’t be edited. To change an offer chain’s settings, first deactivate it.
You can activate or deactivate the chain in the following ways:
- from the offer chain card
- from the offer chain list
- while editing the chain
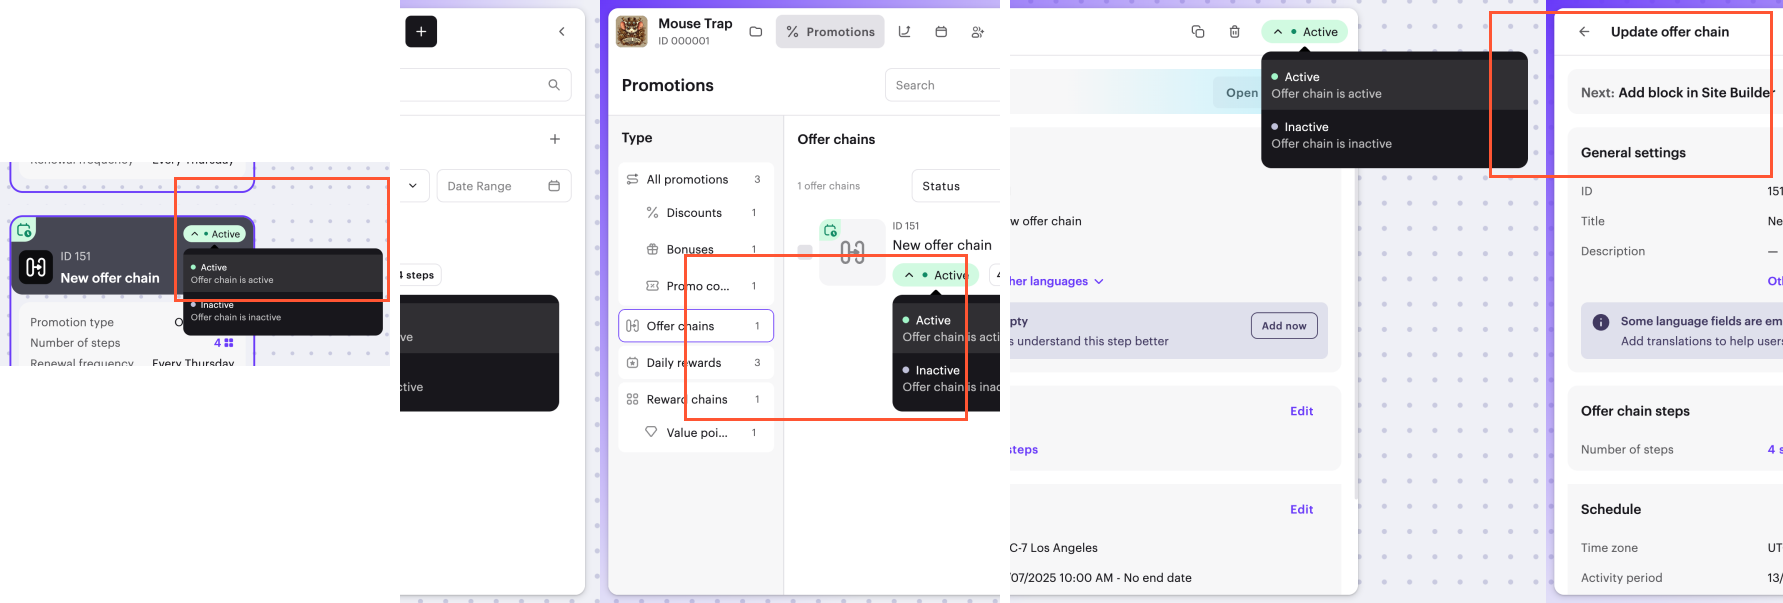
Display offer chain in store
Display on website created with Xsolla
To display an offer chain on your site:
Go to the builder for the site where you want to add the offer chain in one of the following ways:
- From the offer chain editing form in canvas — click Open or Open in Site Builder on the banner.
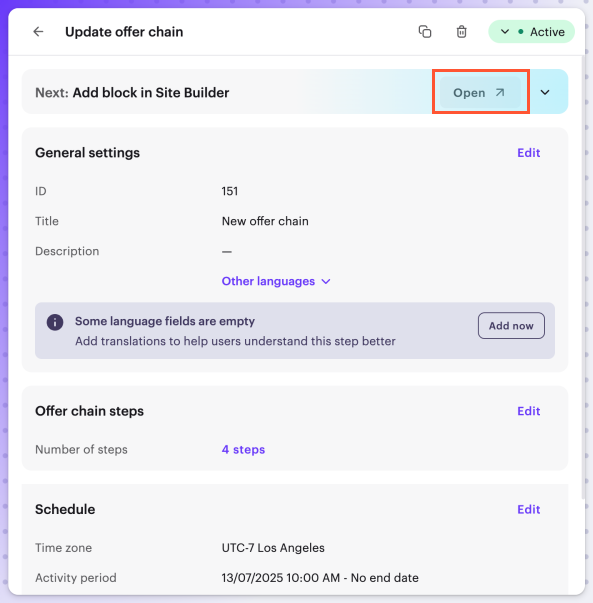
- From any page of Publisher Account:
- Go to the Storefronts > Websites section.
- Select your site and click Open Site Builder.
- From any page of Publisher Account:
- From any page of your account:
- Go to the Web Shop section.
- Click on the pane of your site.
- From any page of your account:
- From any page of your account:
- Go to the Web Shop section.
- Click on the pane of your site.
- From any page of your account:
- From any page of your account:
- Go to the Web Shop section.
- Click on the pane of your site.
- From any page of your account:
- From any page of your account:
- Go to the Web Shop section.
- Click on the pane of your site.
- From any page of your account:
- If your site includes multiple pages, select the one you need:
- Click the current page title at the top of the builder.
- Select the necessary page from the drop-down list.
- In the main area of the builder, choose a place where you want to add a new block and click Add block.
- Select the Offer chain block.
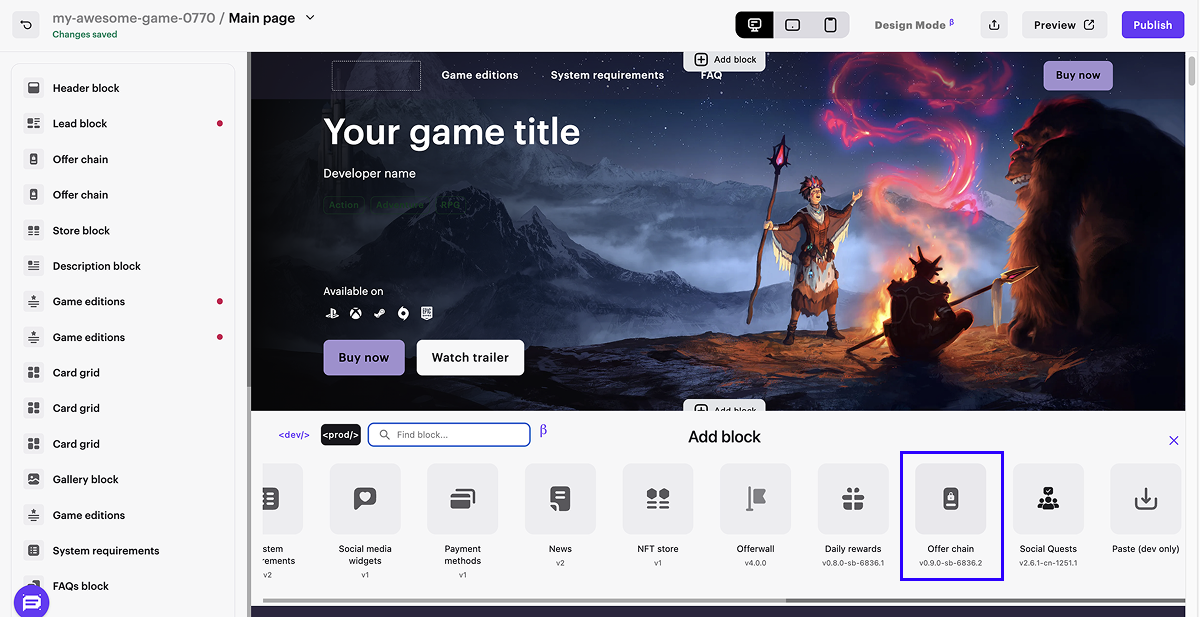
- In the side menu, go to the block settings.
- From the drop-down list, select an active offer chain.
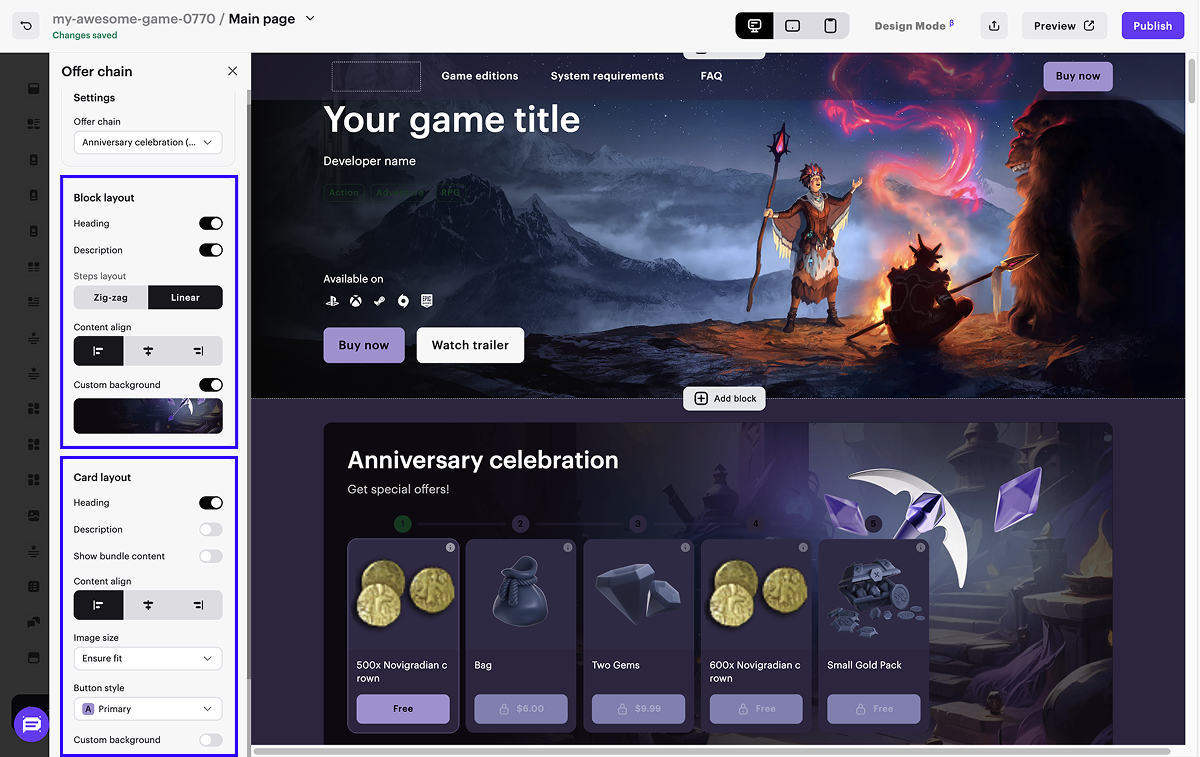
- Customize the block appearance (optional):
- Configure the chain appearance.
- Configure the steps' appearance.
- To check the chain, click Preview in the upper-right corner of the builder.
To apply changes, publish the website:
- In the upper-right corner of the site builder, click Publish.
- Check the boxes next to the pages you want to publish.
- Click Publish.
If site publication is not available, make sure all the conditions are met:
- There are no empty sections in the builder (marked with a red indicator).
- The licensing agreement with Xsolla has been signed.
- The main page is published or selected for publication. You can’t publish child pages before the main page.
Display in your own UI
- In your application UI, implement the elements to display offer chain steps.
- Implement the logic to work with chains using the following client-side API calls from the Offer chains group:
| Task | API call |
|---|---|
| Get the list of available chains. | Get current user’s offer chains. |
| Find out about user progress. | Get current user’s offer chain by ID. |
| Offer a free item to the user. | Claim free offer chain step. |
| Offer a paid item to the user. | Create order for paid offer chain step. |
- Ensure that items are correctly granted to the user.
Found a typo or other text error? Select the text and press Ctrl+Enter.
