Create reward chain
How it works
The reward system encourages users to make purchases in the store using real currency. For each purchase, they earn value points and progress through a reward chain. If users are part of clans, their purchases contribute value points to the entire clan.
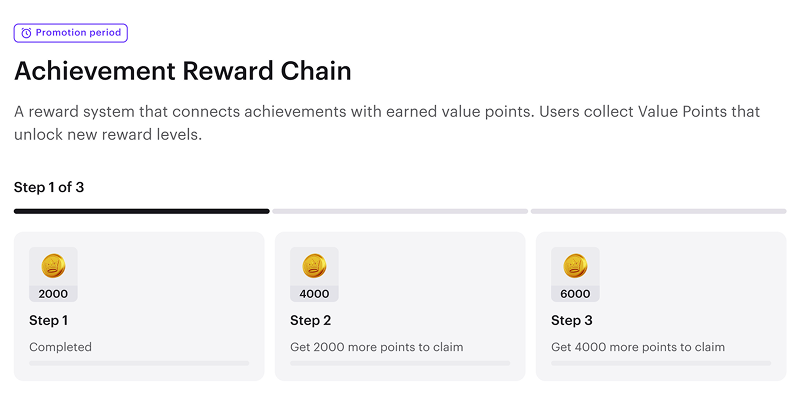
Example of a reward chain with value points earned per purchase:
Glossary
Reward chains
You can create individual and clan reward chains and grant users rewards for purchased items. The project can include multiple reward chains of any type. For each step, you define the number of value points required to receive a reward.
You can also create a personalized reward chain. Personalization allows you to display the chain only to a specific group of authorized users based on their attributes. A personalized reward chain can be designed for either an individual user or a clan.
Value points
User progress in a reward chain is determined by value points. There are two types of value points: individual and clan — corresponding to the reward chain types.
It is recommended to use different value points for different reward chains.
If you use the same value points for multiple reward chains, leave at least 15 minutes between one chain period ending and the next starting. Value points and step progress are reset by a background job that runs at :00, :15, :30, and :45 each hour (not at the exact period end). If the next period starts sooner than the next of those times, users may still have their previous balance. If you want to reset the step progress immediately, call the Reset reward chain API method.
The value points balance is associated with the value points themselves, not with a specific reward chain. If the same value points are used in multiple reward chains:
The points balance is shared across all chains, including newly created ones.
In a newly created chain, users retain their previously accumulated points.
Resetting the chain clears the points balance in all chains that share existing value points. Step progress is reset only in the specified chain.
The clan balance is calculated as the sum of its members’ balances. Therefore, after a reset, the clan balance is also cleared.
Rewards
Each step in the reward chain grants one or multiple rewards. In the case of clan reward chains, all clan members receive the corresponding rewards at each completed step.
You can reward users with the following item types:
virtual items
virtual currency
virtual currency packages
bundles
Prerequisites
Make sure your store contains items that users can purchase to earn value points.
Before creating a clan reward chain, set up user clans.
Create value points
To create value points:
- In your project in Publisher Account, go to the LiveOps > Canvas section.
- In the project in your account for mobile games, go to the Operation > LiveOps section.
- In the project in your account, go to the LiveOps > Canvas section.
- In the project in your account, go to the LiveOps > More > Canvas section.
- In the value points list area, click the + icon.
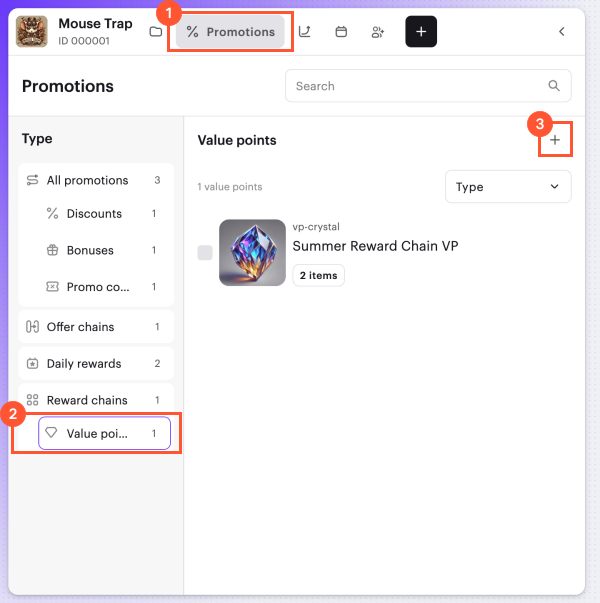
Choose a value point type —
Individual value points orClan value points . Value point type is defined at the creation step and can’t be changed afterward.Add an image (optional).
Enter a name.
Enter a unique value point SKU.
Click
Next .Assign value points:
Click
Add affected item .Select the items and specify how many value points users receive for purchasing each item.
Click
Select .
If your store doesn’t contain any items yet, you can save the current settings and return to this step later.
Click
Next .Check the value points settings.
Click
Create .
Create reward chain
Before launching a new chain that uses existing value points, reset the value points balance. Otherwise, users will start with their accumulated balance. Available reset methods:
- Using the Reset reward chain API call.
- By setting up automatic value points reset when the chain ends:
- When creating or editing a reward chain in canvas, by turning on the
Reset value points toggle in the chain validity period settings. - When creating or editing a reward chain in Publisher Account, by checking the
Refresh user progress after the chain ends box in the chain validity period settings.
- When creating or editing a reward chain in canvas, by turning on the
Before launching a new chain that uses existing value points, reset the value points balance. Otherwise, users will start with their accumulated balance. Available reset methods:
- Using the Reset reward chain API call.
- By setting up automatic value points reset when the chain ends. When creating or editing a reward chain in canvas, by turning on the
Reset value points toggle in the chain validity period settings.
To create a reward chain:
- In your project in Publisher Account, go to the LiveOps > Canvas section.
- In the project in your account for mobile games, go to the Operation > LiveOps section.
- In the project in your account, go to the LiveOps > Canvas section.
- In the project in your account, go to the LiveOps > More > Canvas section.
- Proceed to create rewards in one of the following ways:
- In the toolbar, click the + icon and select
Reward chain . - In the reward chains list area, click the + icon.
- Open the context menu anywhere on the canvas and select
Reward chain .
- In the toolbar, click the + icon and select
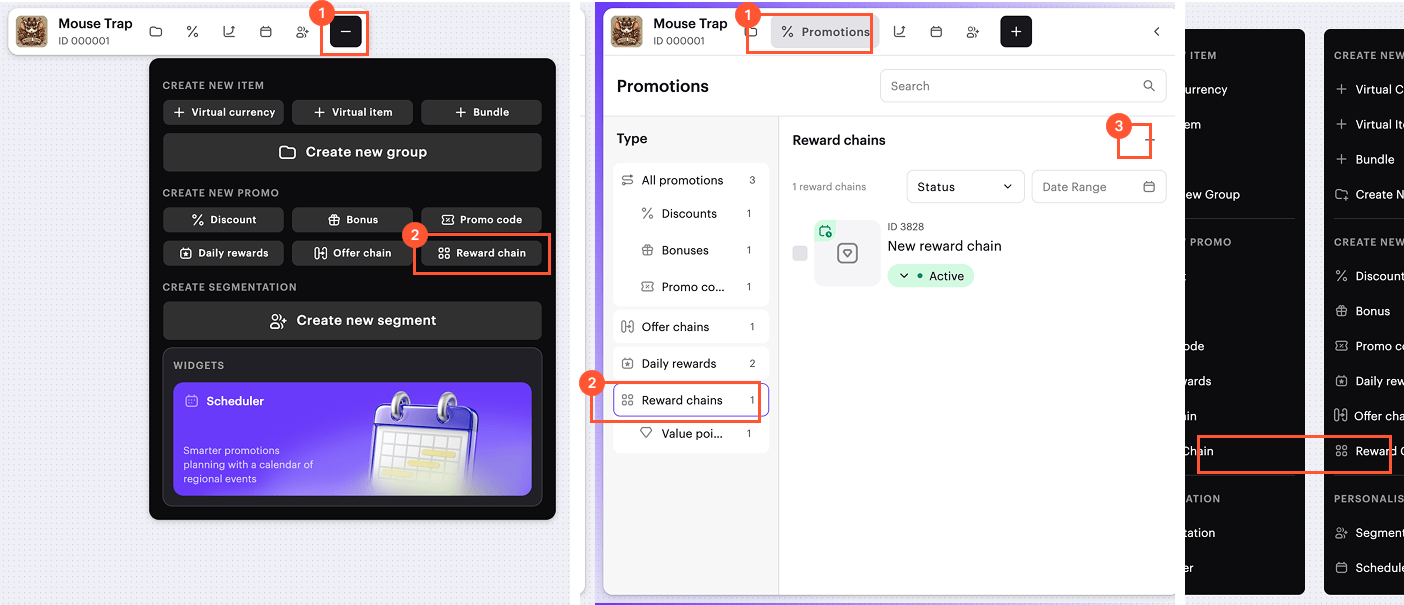
Choose a chain type —
Individual reward chain orClan reward chain . The reward chain type is defined at the creation step and can’t be changed afterward.Specify the basic chain parameters:
- If you choose an individual reward chain:
- Specify the reward chain name.
- Provide a description.
- If you choose a clan reward chain:
- In the
Clan type drop-down list, choose a type of a clan. - Specify the reward chain name.
- Provide a description.
- Specify a title for the reward chain pop-up heading.
- Specify the tooltip text (what users need to do to earn rewards for their clan).
- Add a reward pop-up image (optional).
- In the
Click
Next .Set up value points — create new value points or select from existing.
Only value points matching the created chain type — individual or clan — are available in the list.
When creating value points, you don’t need to specify a type; it is automatically set based on the reward chain type.
It is recommended to use different value points for different reward chains.
Click
Next .Add a reward for each step of the chain. To add a reward for a single step:
Click
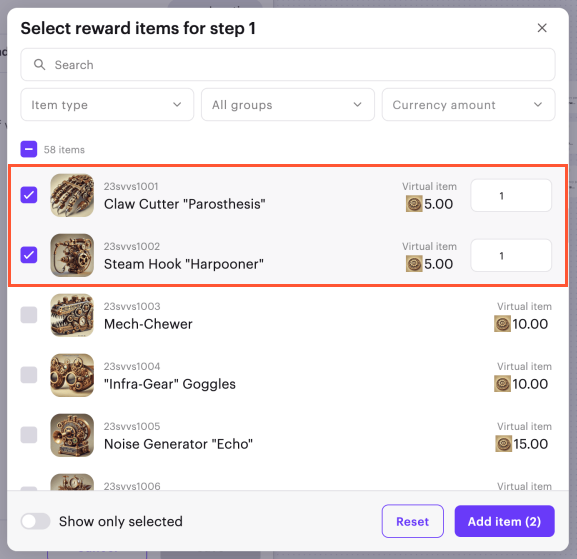
Add new step .Select items that users receive as a reward for this step and specify the quantity for each item.
Click
Add item .
- In the list of the steps, specify the required amount of value points to claim the reward. The value points allocated to each subsequent step must be higher than the previous one. The maximum limit is 100,000 value points per step.
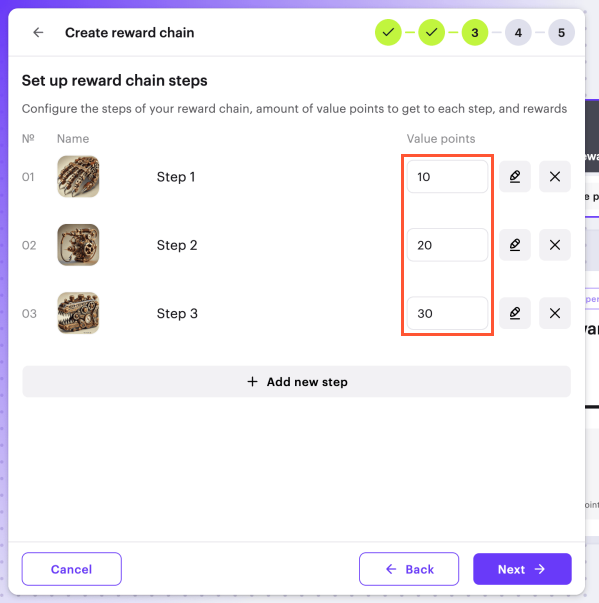
To change the order of rewards in the chain, drag the row to the desired position using the ☰ icon (optional).
After you have added rewards for each step, click
Next .Specify the validity period of the reward chain: a time zone, start date, and end date. If you don’t want to indicate the end of the validity period, check the
No end date box.
To add another reward chain validity period, click
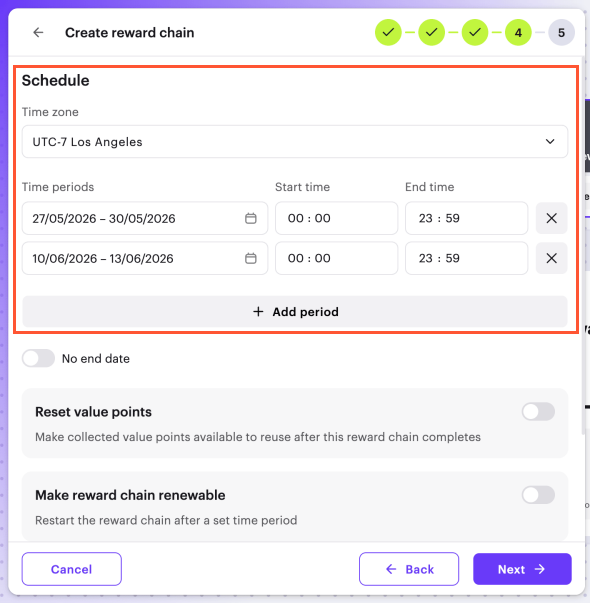
If you use the same value points for multiple reward chains, leave at least 15 minutes between one chain period ending and the next starting. Value points and step progress are reset by a background job that runs at :00, :15, :30, and :45 each hour (not at the exact period end). If the next period starts sooner than the next of those times, users may still have their previous balance. If you want to reset the step progress immediately, call the Reset reward chain API method.
- To automatically reset the progress in the reward chain, turn on the
Reset value points toggle.
If you want the reward chain to renew at a specific time, turn on the
Make reward chain renewable toggle and specify the update schedule.If you want to personalize the reward chain:
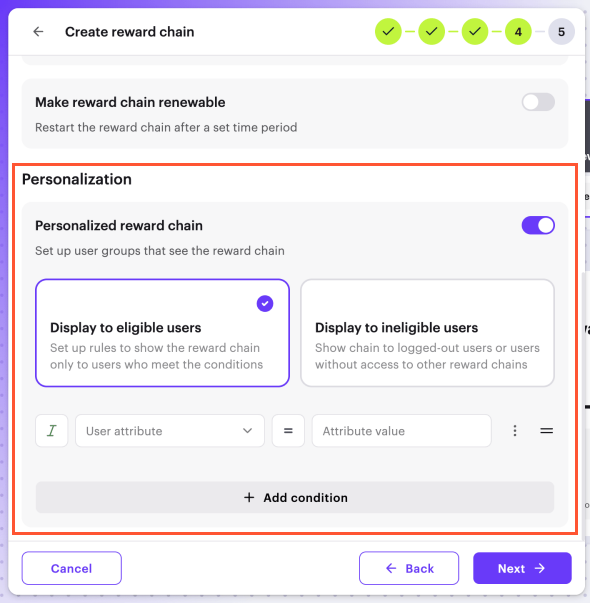
Turn on the
Personalized reward chain toggle.Select one of the chain display options:
Display to eligible users — in this case, the chain is displayed only to authorized users who meet the specified conditions.Display to ineligible users — for such a chain, you don’t need to specify the personalization conditions — it is applied by default. It means it is displayed to unauthorized users, as well as in cases when no matching personalized reward chain is found for the authorized user.
If you select
Display to eligible users option, specify the condition:Specify the user attribute type — string, number, or date.
Select the user attribute from the drop-down list.
Select the comparison operator.
Specify the user attribute value.
To add more conditions, click
Add condition and fill in the displayed fields (optional).
Click
Next .Check the chain.
To activate the chain immediately (optional), turn on the
Create in Active status toggle.Click
Create .To add the created reward chain to the site (optional):
- Open the site in the builder by clicking Open or Open in Site Builder on the banner in the editing form.
- Follow the instructions from the Display reward system section.
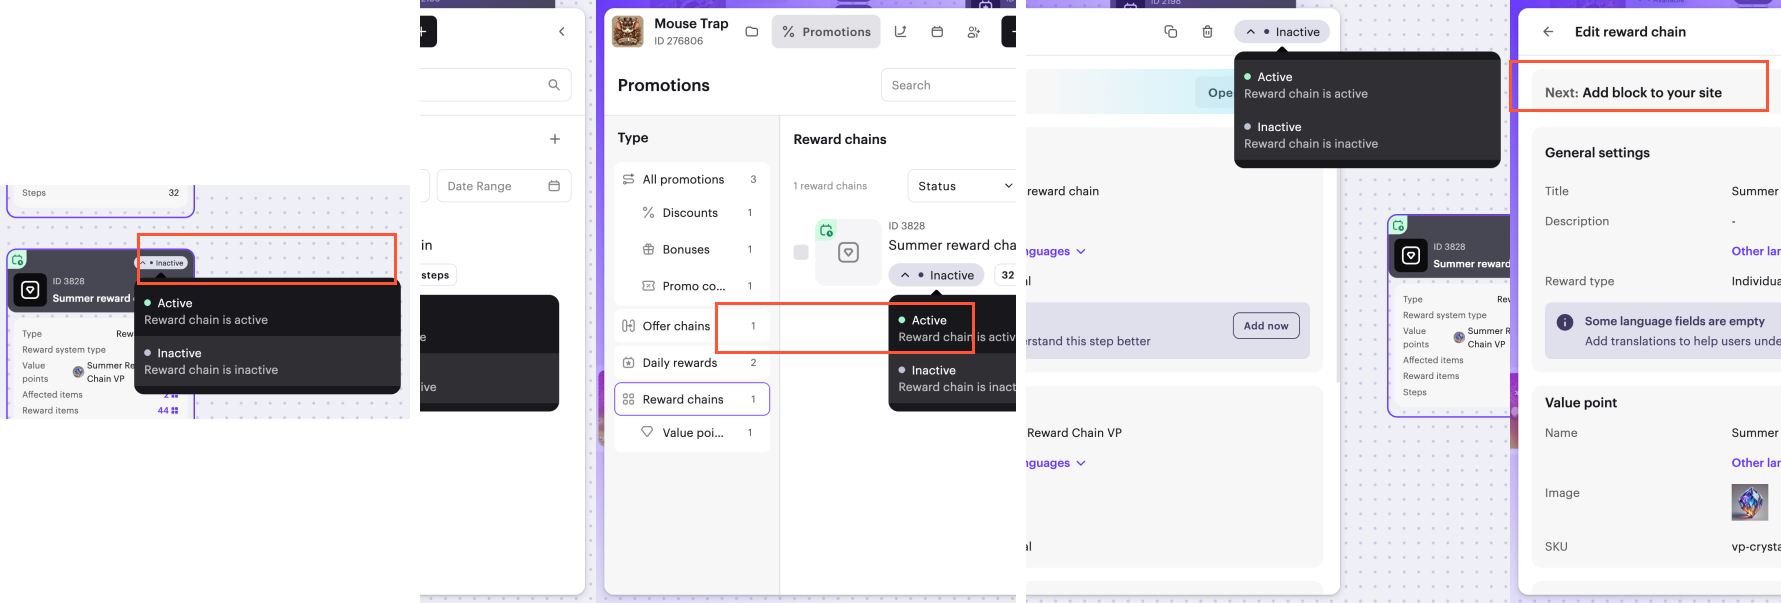
Active chains can’t be edited. To change a promotion’s settings, first deactivate it.
You can activate or deactivate the chain in the following ways:
- From the reward chain card
- From the reward chain list
- While editing the chain
Display reward system
Display via site editor
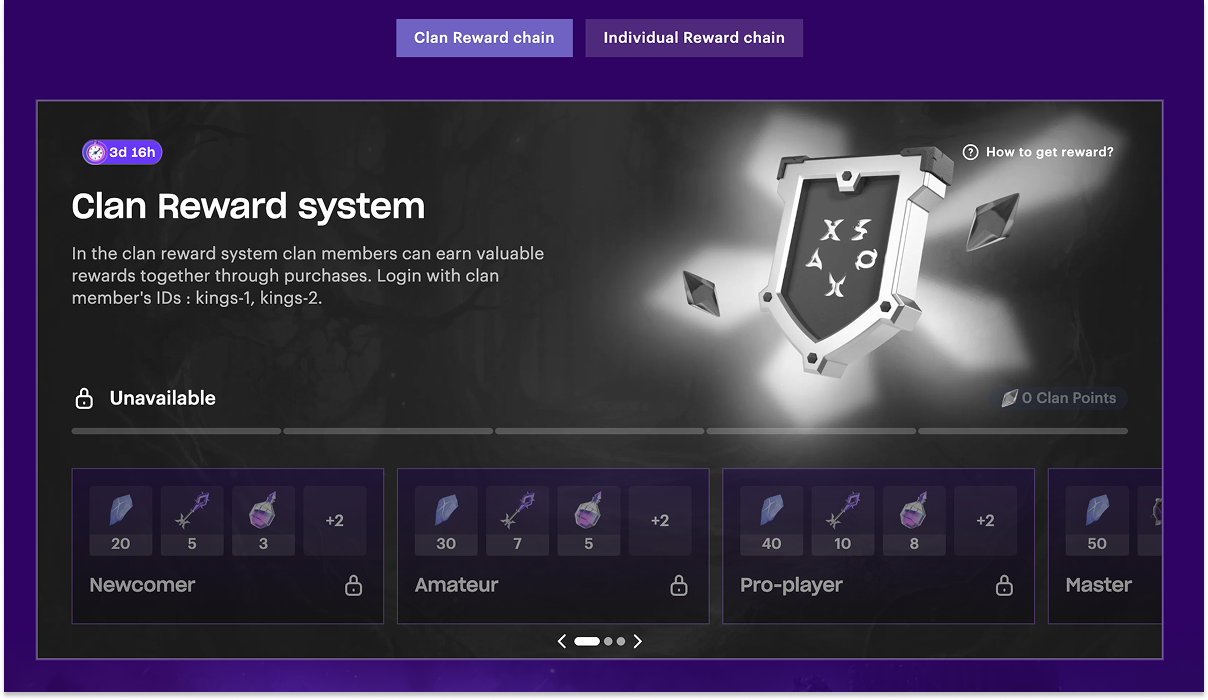
To ensure the reward system works correctly, user authentication must be configured. For unauthorized users, both individual and clan reward chains are displayed without progress.
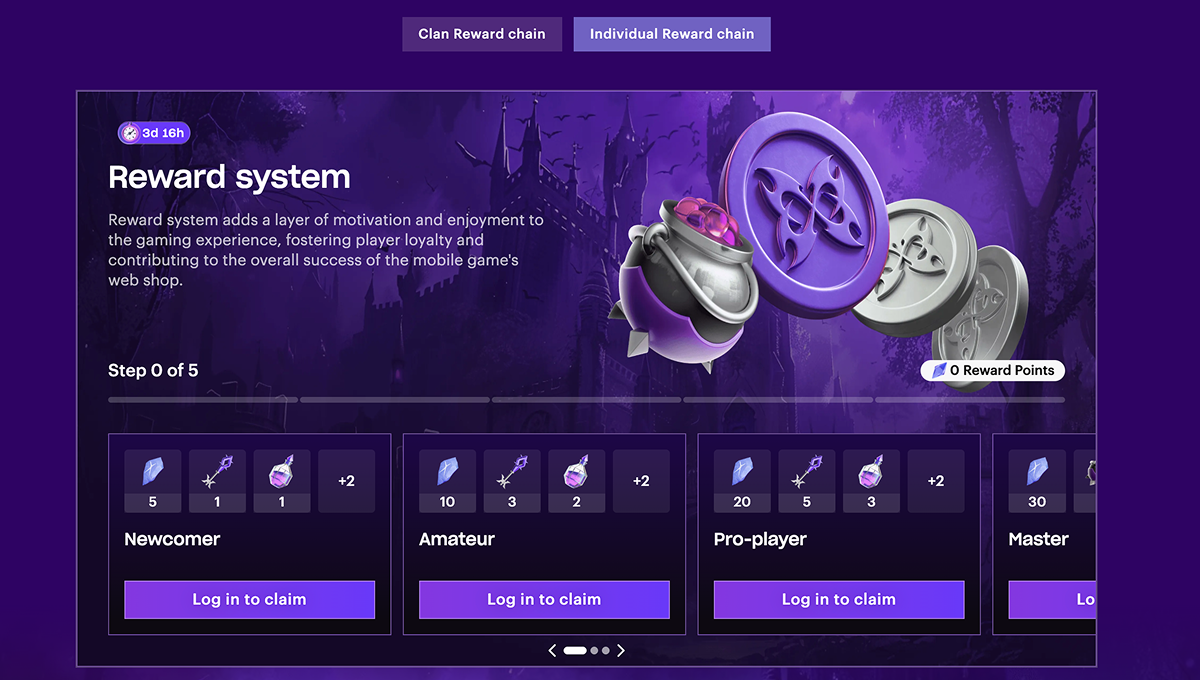
Authorized users who are not members of a clan see only their individual reward chain. Clan reward chains are displayed as unavailable.
To display reward chains on your site:
- In your project in Publisher Account, go to the Storefronts > Websites section.
- Select your site and click Open Site Builder.
- Open the project in your account and go to the Storefronts > Website section.
- Click the pane of your site.
- Open the project in your account and go to the Storefronts > Website section.
- Click the pane of your site.
- Open the project in your account and go to the Storefronts > Website section.
- Click the pane of your site.
- Open the project in your account and go to the Web Shop section.
- Click the pane of your site.
- If your site includes multiple pages, select the one you need:
- Click the current page title at the top of the builder.
- Select the necessary page from the drop-down list.
- In the main area of the builder, choose a place where you want to add a new block and click Add block.
- Select Reward system block.

- In the drop-down list, select a reward chain.
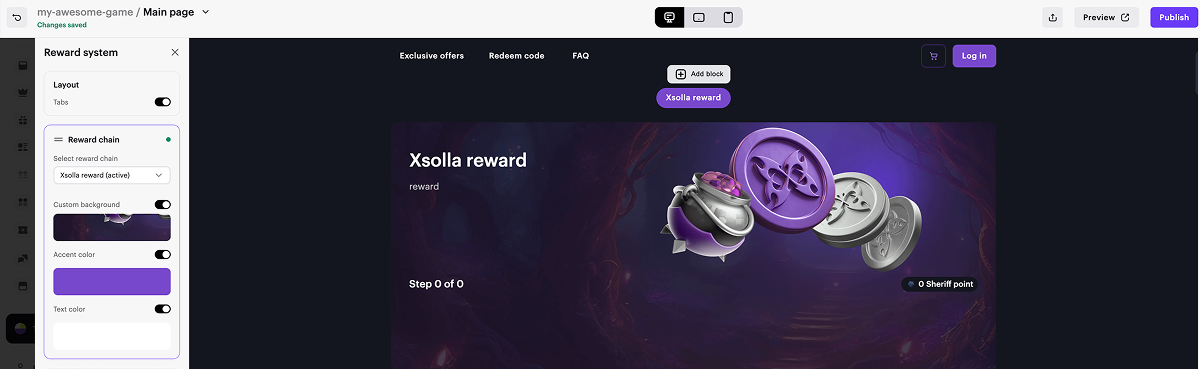
- Customize the button and text colors (optional).
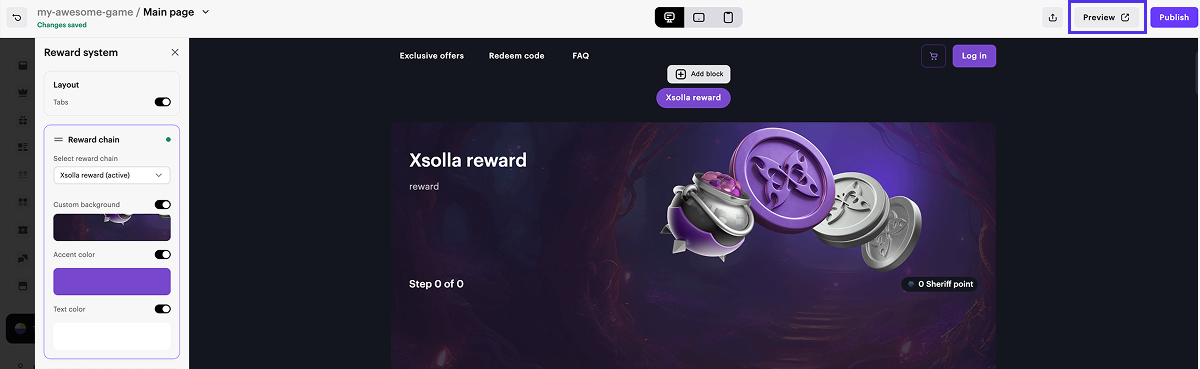
- To preview the chain, click Preview in the upper-right corner of the builder.
- To apply the changes, publish your site:
- In the upper-right corner of the site builder, click Publish.
- Check the boxes next to the pages you want to publish.
- Click Publish.
- There are no empty sections in the builder (marked with a red dot).
- The licensing agreement with Xsolla has been signed.
- The main page is published or selected for publication. You cannot publish child pages before the main page.
Value point display specifics in site editor
You can select multiple reward chains within a single block and choose how they are displayed — either one below the other or in tabs. You can customize the appearance of each reward chain individually.
Item cards display value points only for the reward chains that have been added to the site. However, when users purchase items, clan members receive value points for all active reward chains, regardless of whether they are displayed on the site.
Example:
You have 2 reward chains set up: one individual reward chain and one clan reward chain. The individual chain has a value point named
In the item catalog, there is an item named
When you add the Store block in the builder and select the type and group of items that contain the
- If no reward chain has been added to the site, the
Sword item will not display any value points. - If only an individual reward chain has been added and is active, the
Sword item will display 20Crystals only. - If only a clan reward chain has been added and is active, the
Sword item will display 40Magic Bubbles only. - If both an individual and a clan reward chain have been added and are active, the
Sword item will display both 20Crystals and 40Magic Bubbles .
For clan members, 40
For users without a clan, 40
Display reward chains via API
- In your application UI, implement the elements to display rewards chain steps.
- Implement the logic to work with chains using the following client-side API calls from the Reward chains & Value points group:
| Task | API call |
|---|---|
| Get the current user’s reward chains. | Get current user’s reward chains. |
| Get the current user’s value point balance. | Get current user’s value point balance. |
| Claim the current user’s step reward from a reward chain. | Claim step reward. |
| Update a current user’s clan via user attributes. | Update current user’s clan. Claims all rewards from reward chains that were not claimed for a previous clan and returns them in the response. |
| Get the list of top 10 contributors to the specific reward chain under the current user’s clan. | Get top 10 contributors to reward chain under clan. If a user doesn’t belong to a clan, the call returns an empty array. |
- Ensure that items are correctly granted to the user.
Set up user clan
If you are not using site builder, you need to pass the user’s clan in Xsolla Login the user attributes for the clan reward chain to function correctly. To do this:
Example of the attribute scheme in Login:- json
 1{
 2	"$schema": "https://json-schema.org/draft/2020-12/schema",
 3	"additionalProperties": false,
 4	"description": "JSON Schema example for user attributes. Not the actual schema.",
 5	"properties": {
 6
 7		"clan_id": {
 8			"description": "name of clan",
 9			"type": "string"
10		},
11		"custom-id": {
12			"description": "custom-id of a user.",
13			"type": "number"
14		},
15		"had_ban": {
16			"description": "Whether the user was banned.",
17			"type": "boolean"
18		},
19		"last_purchase": {
20			"description": "Date of user's last purchase.",
21			"type": "string"
22		},
23	},
24	"required": [],
25	"title": "Example",
26	"type": "object"
27}
- To add or update the
clan_idattribute, use the attribute update methods and pass theattributesarray containing objects with theclan_idattribute key.
- json
 1{
 2  "user": {
 3    "id": "1234567890",
 4    "picture": "https://example.com",
 5    "name": "test-name"
 6  },
 7  "attributes": [
 8    {
 9     "key": "clan_id",
10     "value": "beetles"
11    }
12  ]
13}
The clan_id attribute must be modified only on the server side, not on the client side. Therefore, when you update it by calling the Update user attributes from server API, make sure to pass attributes[].attr_type: “server”.
- json
 1{
 2    "attributes": [
 3      {
 4        "key": "clan_id",
 5        "value": "beetles",
 6        "attr_type": "server",
 7        "permission": "private"
 8      }
 9    ],
10    "publisher_id": 12345,
11    "publisher_project_id": 67890
12  }
Replace 12345 and 67890 with your actual merchant ID and project ID.
If you use authorization via Xsolla Login, use the Update current user’s clan API call to update the user’s clan. If the attributes contain a new clan, the user will receive any unclaimed rewards from the previous clan’s reward chain, and their clan affiliation will be updated. If the user was previously a member of a clan but is no longer part of one, their clan membership will be revoked. The response from this method includes the rewards that the user has already claimed.
Setup specifics for Web Shop
After configuring the attribute schema, implement passing the user’s clan data.
If you use authentication by user ID, pass the user’s clan data in the response to the User validation webhook in Web Shop webhook during authorization:
- To add or refresh the
clan_idattribute, pass an array ofattributesobjects with theclan_idattribute key.
Example of a webhook response:
- json
 1{
 2  "user": {
 3    "id": "1234567890",
 4    "picture": "https://example.com",
 5    "name": "test-name"
 6  },
 7  "attributes": [
 8    {
 9     "key": "clan_id",
10     "value": "beetles"
11    }
12  ]
13}
- If the user has left the clan and has not joined another, pass the
clan_idvalue in theremoving_keysfield.
Example of a webhook response:
- json
 1{
 2  "user": {
 3    "id": "1234567890",
 4    "picture": "https://example.com",
 5    "name": "test-name"
 6  },
 7  "removing_keys": [
 8    {
 9      "key": "clan_id"
10    }
11  ]
12}
Setup specifics via API
You can pass current attribute values directly during user authorization if you use the Auth by custom ID API call.
Found a typo or other text error? Select the text and press Ctrl+Enter.
