Set up SDK
- Open your Unity project.
- Click
Window > Xsolla > Edit Settings in the main menu. - Specify the main project parameters in the
Inspector panel in one of the following ways:
- Import settings from Publisher Account:
- Click
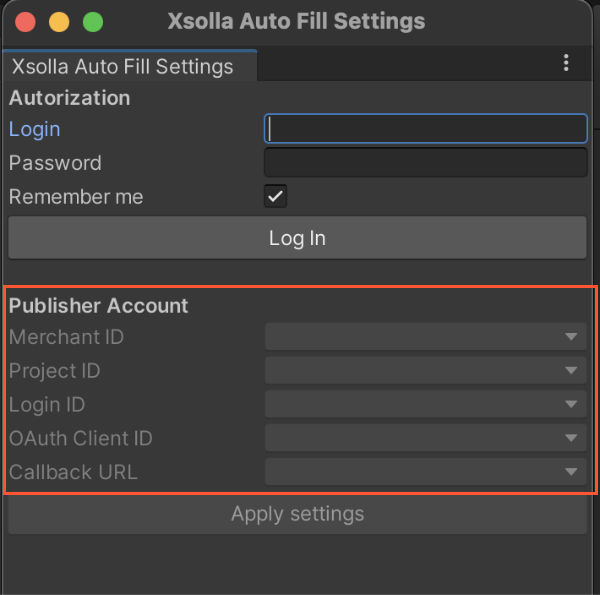
Fill settings by PA . - Specify Publisher Account authorization data in the
Login andPassword fields. - Click
Log In . - Fill in the fields in the
Publisher Account section.
- Click
- Import settings from Publisher Account:
- Import settings from your account:
- Click
Fill settings by PA . - Specify your authorization data in the
Login andPassword fields. - Click
Log In . - Fill in the fields in the
Publisher Account section.
- Click
- Import settings from your account:
- Click
Apply Settings .
- Click
Note
If you use a social network to register in Publisher Account, you need to add a password in one of the following ways to be able to import settings from your Publisher Account:
- On the sign-up/login page of Publisher Account, click Forgot your password? and follow the instructions.
- Specify a new password in Publisher Account in the Profile settings > Change password section (in the Current password field, enter an arbitrary value).
Note
If you use a social network to register in your account, you need to add a password in one of the following ways to be able to import settings from your account:
- On the sign-up/login page of your account, click Forgot your password? and follow the instructions.
- Specify a new password in your account in the Profile settings > Change password section (in the Current password field, enter an arbitrary value).
- Specify the parameters manually:
- In the
Project ID field, specify the project ID that can be found in Publisher Account next to the name of your project. - In the
Login ID field, specify the ID of the Login project. To get it, open Publisher Account, go to the Players > Login > Dashboard > your Login project section, and click Copy ID next to the name of the Login project. - In the
Callback URL field, specify the URL or path where users are redirected after they have been successfully authenticated, confirmed their email, or reset their password. The value must match the one specified in Publisher Account in the Players > Login > your Login project > Security > OAuth 2.0 section.
- In the
- Specify the parameters manually:
- Specify the parameters manually:
- In the
Project ID field, specify the project ID that can be found in your account next to the name of your project. - In the
Login ID field, specify the ID of the Login project. To get it, open your account, go to the Players > Login > Dashboard > your Login project section, and click Copy ID next to the name of the Login project. - In the
Callback URL field, specify the URL or path where users are redirected after they have been successfully authenticated, confirmed their email, or reset their password. The value must match the one specified in your account in the Players > Login > your Login project > Security > OAuth 2.0 section.
- In the
- Specify the parameters manually:
- Specify the parameters manually:
- In the
Project ID field, specify the project ID that can be found in your account for mobile games next to the name of your project. - In the
Login ID field, specify the ID of the Login project. To get it, open your account, go to the Other tools > Login > Dashboard > your Login project section, and click Copy ID next to the name of the Login project. - In the
Callback URL field, specify the URL or path where users are redirected after they have been successfully authenticated, confirmed their email, or reset their password. The value must match the one specified in your account in the Other tools > Login > your Login project > Security > OAuth 2.0 section.
- In the
- Specify the parameters manually:
- In the
OAuth Client ID field, specify client ID for OAuth 2.0 that can be found in Publisher Account in the Players > Login > your Login project > Security > OAuth 2.0 section.
- In the
- In the
OAuth Client ID field, specify client ID for OAuth 2.0 that can be found in your account in the Players > Login > your Login project > Security > OAuth 2.0 section.
- In the
- In the
OAuth Client ID field, specify client ID for OAuth 2.0 that can be found in your account for mobile games in the Other tools > Login > your Login project > Security > OAuth 2.0 section.
- In the
- Set other settings if necessary (e.g., display options for the payment UI in the
Pay Station UI section).
Was this article helpful?
Thank you for your feedback!
We’ll review your message and use it to help us improve your experience.Found a typo or other text error? Select the text and press Ctrl+Enter.
