How to use Pay Station in combination with Firebase authentication
If you have already implemented user authentication in your application using Firebase, you can generate a payment token on Firebase side and then pass it to the client side of the application to open the payment UI.
Using this integration option, you need to independently implement the logic for determining the user’s country and currency to pay for the purchase.
Integration flow:
- Sign up to Publisher Account and create a new project. You will need the ID of the created project in further steps.
- Set up a catalog:
- Create an item catalog on Xsolla side. You can add items manually or import them from Google Play or PlayFab.
- Implement getting and displaying the catalog on the client side of the application using the
Store library.
- Set up an item purchase:
- Create an order with user and item data on the client side of the application using the Firebase Cloud Function.
- Implement the opening of the payment UI on the client side of your application using the
Payments library.
To complete the integration and start accepting real payments, you need to sign a licensing agreement with Xsolla.
You can sign the agreement at any integration step, but keep in mind that the review process can take up to 3 business days.
Additional details:
- The 3-day period covers our initial response or a request for additional information. It doesn’t guarantee that the application will be fully approved within this timeframe.
- If any questions arise during the review, we will contact the person specified in the application.
- Once the review is complete and all requirements are met on Xsolla’s side, the status of your agreement will change to Signed.
Use the sample web application as an example to implement the combined use of Firebase authentication and Pay Station. The source code for the sample web application is available on GitHub.
Create project
Publisher Account is the main tool to configure Xsolla features, as well as to work with analytics and transactions.
The data about the company and your application specified during registration will be used to create a draft licensing agreement with Xsolla and to generate recommendations on solutions that are suitable for you. You can change the data later, but providing the correct data when you sign up will speed up the process of signing the licensing agreement.
To create a project:
- Sign up to Publisher Account.
Rules on the password generation
The password from Publisher Account can consist of Latin letters, numerals, and special characters and must include at least:
- 8 characters
- one digit
- one capital letter
- one lowercase letter
To ensure password security, we recommend:
- changing your password at least once every 90 days
- using a new password that does not match the last 4 passwords on your account
- using a unique password that does not match passwords used anywhere else
- not storing your password where it is easily accessible
- using password managers to store your password
Publisher Account uses two-factor authentication and sends a confirmation code with each authentication attempt.
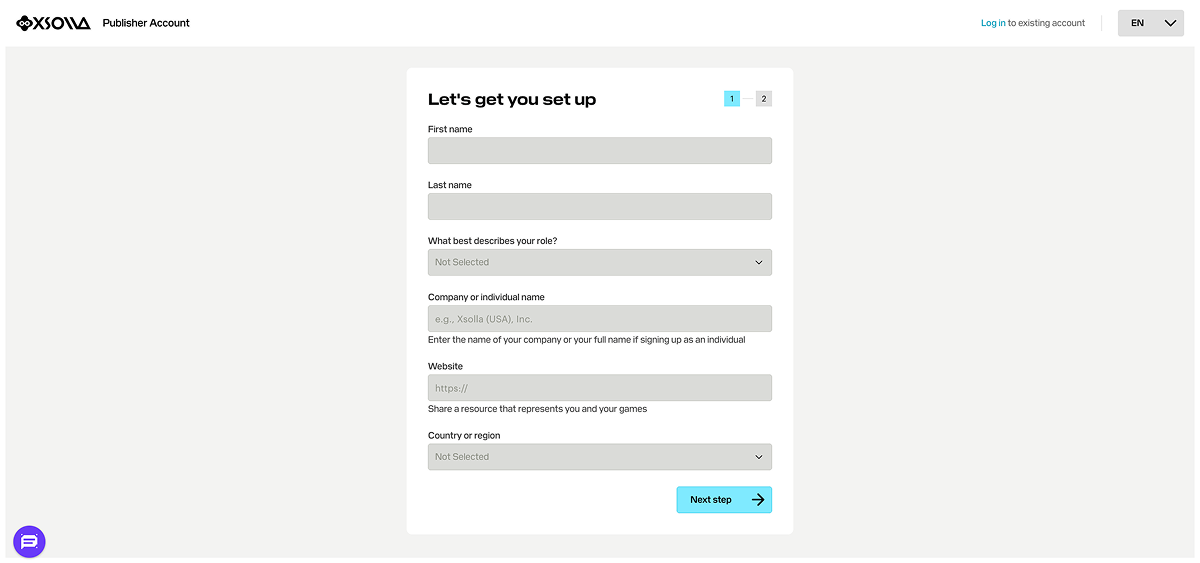
- Provide the following information to create your account:
- Your first and last name.
- Your role in the company.
- Company name. If you sign up as an individual, enter your full name.
- Link to detailed information about you and your game or product (optional).
- Your country or region.
- Click Next step.
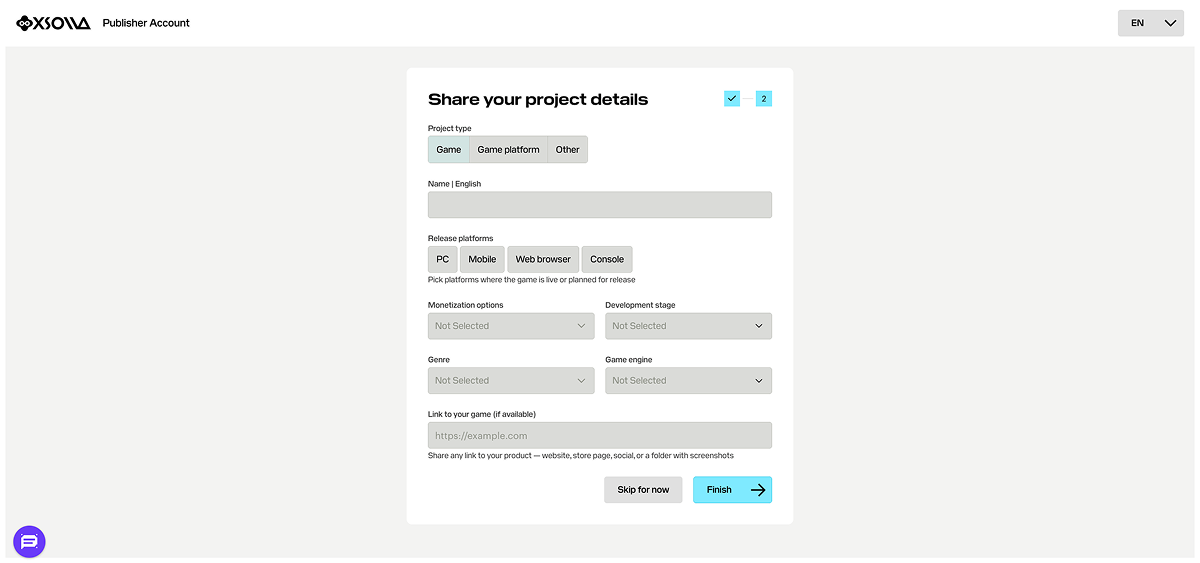
- To automatically create your first project, specify the main information about it:
- Choose a project type: Game, Game platform, or Other.
- Enter the project name in English.
- Choose one or several release platforms.
- Select monetization options you use or plan to use.
- Select a development stage.
- If your project type is Game, select its genre and game engine.
- Add a link to your game or product (optional).
- Click Finish.
Once the project is created, you will be redirected to the company page. The created project is displayed in the side menu:
- Click its name to start integrating Xsolla products and solutions.
- Go to the Project settings section to add additional languages and localized project names (optional).

If you have multiple games or products, create a separate project for each. To do this, on the company page, in the side menu, click Create project and specify the necessary information.

During the integration process, you need to provide the project ID that can be found in your Publisher Account next to the project name.

Set up catalog
Create items in Publisher Account
You need to create a catalog on Xsolla side. You can add items manually or import them from App Store, Google Play, or PlayFab. When importing from Google Play, you can import a maximum of 100 items at a time.
These instructions provide steps for basic setup of a virtual item. Later, you can add other items to your catalog (virtual currency, bundles, game keys), create item groups, set up promotional campaigns, regional prices, etc.
To add a virtual item with basic settings to the catalog:
- Open your project in Publisher Account and go to the Items catalog > All items section.
- Click Add and select Virtual items from the drop-down list.

- Set the basic settings of the item in the following fields:
- Image (optional)
- SKU (item unique ID)
- Item name
- Description (optional)
- Specify item price:
- Set the Price in real currency toggle to On.
- In the Default currency field, change the currency (optional) and specify the item price.
- If you changed the currency in the Default currency field, select the same currency in the Price in real currency field.
- Change the item status to Available.

- Click Create item.
Display catalog on client side of application
- Add the
Store library to your project. To do this, openbuild.gradleand add the following line to the dependencies section:
1implementation("com.xsolla.android:store:latest.release")
- On the client side of the application, add a UI to display the product catalog.
- Implement requesting for an item catalog from Xsolla servers.
XStore.getVirtualItems method to get a list of virtual items is used. You can also get information about catalog items using other Example (
- kotlin
 1package com.xsolla.androidsample
 2
 3import androidx.appcompat.app.AppCompatActivity
 4import android.os.Bundle
 5import android.widget.Toast
 6import androidx.recyclerview.widget.LinearLayoutManager
 7import androidx.recyclerview.widget.RecyclerView
 8import com.xsolla.android.store.XStore
 9import com.xsolla.android.store.callbacks.GetVirtualItemsCallback
10import com.xsolla.android.store.entity.response.items.VirtualItemsResponse
11import com.xsolla.androidsample.adapter.BuyItemAdapter
12
13class StoreActivity : AppCompatActivity() {
14
15    private lateinit var itemsView: RecyclerView
16
17    override fun onCreate(savedInstanceState: Bundle?) {
18        super.onCreate(savedInstanceState)
19        setContentView(R.layout.activity_store)
20
21        XStore.init(<projectId>)
22
23        initUI()
24        loadVirtualItems()
25    }
26
27    private fun initUI() {
28        itemsView = findViewById(R.id.buy_recycler_view)
29        itemsView.layoutManager = LinearLayoutManager(this)
30    }
31
32    private fun loadVirtualItems() {
33        val parentActivity = this
34        XStore.getVirtualItems(object : GetVirtualItemsCallback {
35            override fun onSuccess(response: VirtualItemsResponse) {
36                itemsView.adapter = BuyItemAdapter(parentActivity, response.items.filter { item -> item.virtualPrices.isEmpty() && !item.isFree })
37            }
38
39            override fun onError(throwable: Throwable?, errorMessage: String?) {
40                showNotificationMessage(errorMessage ?: throwable?.javaClass?.name ?: "Error")
41            }
42        })
43    }
44
45    private fun showNotificationMessage(message: String) {
46        Toast.makeText(
47            baseContext,
48            message,
49            Toast.LENGTH_SHORT,
50        ).show()
51    }
52}
In the XStore.init() initialization block of the script, specify the project ID that you can find in your Publisher Account next to the project name.
Set up item purchase
Create order using the Cloud Functions
To create an order with user and item data on Xsolla side, add a Cloud Function to the project that uses the Create payment token for purchase API call. This call will return a payment token, which is required to open the payment UI and make a purchase.
Limitations:
- You need to pass either the user country or the user’s IP address when requesting the payment token.
- If you don’t pass the currency in the token, it is determined by the country.
- If you pass the currency in the token, the user pays in this currency.
To add a Cloud Function to a project:
- Install the Firebase CLI (Command-Line Interface). To do this, run the CLI command:
1npm install -g firebase-tools
- To link your project to the Firebase project, initialize the Firebase project by running the CLI command:
1firebase init functions
- Follow the installer’s instructions to configure the settings:
- Select an existing codebase.
- Specify JavaScript as the language for creating Cloud Functions.
- Install dependencies.
- Open
functions/index.jsand modify it:
- javascript
 1// The Cloud Functions for Firebase SDK to create Cloud Functions and triggers.
 2const functions = require('firebase-functions/v1');
 3
 4const projectId = <projectId>;
 5const apiKey = <apiKey>;
 6
 7exports.getXsollaPaymentToken = functions.https.onRequest((req, res) => {
 8
 9  const requestBody = req.body;
10    if (!requestBody) {
11      res.status(400).send('Request body is missing');
12      return;
13    }
14
15  const userId = requestBody.data.uid;
16  const email = requestBody.data.email;
17  const sku = requestBody.data.sku;
18  const returnUrl = requestBody.data.returnUrl;
19
20  const payload = {
21    user: {
22      id: {value: userId},
23      name: {
24        value: email
25      },
26      email: {
27        value: email
28      },
29      country: {
30        value: 'US',
31        allow_modify: false
32      }
33    },
34    purchase: {
35      items: [
36        {
37          sku: sku,
38          quantity: 1
39        }
40      ]
41    },
42    sandbox: true,
43    settings: {
44      language: 'en',
45      currency: 'USD',
46      return_url: returnUrl,
47      ui: {
48        theme: '63295aab2e47fab76f7708e3'
49      }
50    }
51  }
52
53  let url = `https://store.xsolla.com/api/v3/project/${projectId.toString()}/admin/payment/token`;
54
55  fetch(
56    url,
57    {
58      method: "POST",
59      headers: {
60        'Content-Type': 'application/json',
61        Authorization: `Basic ${btoa(`${projectId}:${apiKey}`)}`
62      },
63      body: JSON.stringify(payload)
64    },
65  )
66  .then(xsollaRes => {
67    // Handle the response data
68    if (xsollaRes.ok) {
69      return xsollaRes.json();
70    } else {
71      throw new Error(`HTTP request failed with status ${xsollaRes.status} and statusText: ${xsollaRes.statusText}`)
72    }
73  })
74  .then(data => {
75    res.send(JSON.stringify(data));
76  })
77  .catch(error => {
78    res.send(`Error = ${error}`);
79  });
80});
81
82exports.webhookFakeResponse = functions.https.onRequest((request, response) => {
83  response.status(200).send()
84})
- In the script, specify the values for the variables:
projectId— project ID that you can find in your Publisher Account next to the project name.
apiKey— API key. It is shown in Publisher Account only once when it is created and must be stored on your side. You can create a new key in the following section:
- To test the Cloud Function with the emulator, run the CLI command:
1firebase emulators:start
- After running the Cloud Function, you can call the following methods on the client side of your application:
getXsollaPaymentToken— returns the payment token for opening the payment interface.webhookFakeResponse— sends the HTTP code200in response to the Payment webhook. The method doesn’t contain purchase validation logic: use it only for testing. For the full list of webhooks and general information about working with them, refer to the webhooks documentation.
- To call methods locally, use the
https://localhost:5001/{firebase-project-id}/us-central1/getXsollaPaymentTokenandhttps://localhost:5001/{firebase-project-id}/us-central1/webhookFakeResponseURLs, where{firebase-project-id}is the Firebase project ID (Firebase console > Project Settings > Project ID).
- To deploy the Cloud Function in production, run the CLI command:
1firebase deploy --only functions
- Once deployed in production, you can call methods via the
https://us-central1-{firebase-project-id}.cloudfunctions.net/getXsollaPaymentTokenandhttps://us-central1-{firebase-project-id}.cloudfunctions.net/webhookFakeResponseURLs, where{firebase-project-id}is the Firebase project ID (Firebase console > Project Settings > Project ID). For details on running the feature in production, refer to the Firebase documentation.
Set up launch of payment UI
- Add the
Payments library to your project. To do this, openbuild.gradleand add the following line to the dependencies section:
1implementation("com.xsolla.android:payments:latest.release")
- Open
AndroidManifest.xmland add permission for internet access:
- xml
1<uses-permission android:name="android.permission.INTERNET" />
- Add the logic for creating an order (calling the
XStore.getXsollaPaymentTokenmethod of the Cloud Function) and opening the payment UI with the received payment token (XPayments.createIntentBuilder()class).
- To call the
getXsollaPaymentTokenmethod, provide one of the following URLs, where{firebase-project-id}is the Firebase project ID (Firebase console > Project Settings > Project ID):- for local access —
https://localhost:5001/{firebase-project-id}/us-central1/getXsollaPaymentToken - for access in the production —
https://us-central1-{firebase-project-id}.cloudfunctions.net/getXsollaPaymentToken
- for local access —
Example (
- kotlin
  1package com.xsolla.androidsample.adapter
  2
  3import android.R.attr.duration
  4import android.os.Handler
  5import android.os.Looper
  6import android.view.LayoutInflater
  7import android.view.ViewGroup
  8import android.widget.Toast
  9import androidx.recyclerview.widget.RecyclerView
 10import com.bumptech.glide.Glide
 11import com.xsolla.android.payments.XPayments
 12import com.xsolla.android.payments.data.AccessToken
 13import com.xsolla.android.store.entity.response.items.VirtualItemsResponse
 14import com.xsolla.androidsample.R
 15import com.xsolla.androidsample.StoreActivity
 16import org.json.JSONObject
 17import java.io.BufferedReader
 18import java.io.BufferedWriter
 19import java.io.OutputStream
 20import java.io.OutputStreamWriter
 21import java.net.HttpURLConnection
 22import java.net.URL
 23
 24
 25class BuyItemAdapter(private val parentActivity: StoreActivity, private val items: List<VirtualItemsResponse.Item>) :
 26    RecyclerView.Adapter<BuyItemViewHolder>() {
 27    override fun onCreateViewHolder(parent: ViewGroup, viewType: Int): BuyItemViewHolder {
 28        return BuyItemViewHolder( LayoutInflater.from(parent.context)
 29            .inflate(R.layout.buy_item_sample, parent, false))
 30    }
 31
 32    override fun onBindViewHolder(holder: BuyItemViewHolder, position: Int) {
 33        val item = items[position]
 34        Glide.with(holder.view).load(item.imageUrl).into(holder.itemImage)
 35        holder.itemName.text = item.name
 36        holder.itemDescription.text = item.description
 37        var priceText: String
 38        if(item.virtualPrices.isNotEmpty()) {
 39            priceText = "${item.virtualPrices[0].getAmountRaw()} ${item.virtualPrices[0].name}"
 40        } else {
 41            priceText = "${item.price?.getAmountRaw()} ${item.price?.currency.toString()}"
 42        }
 43
 44        holder.itemPrice.text = priceText
 45
 46        holder.itemButton.setOnClickListener {
 47            Thread {
 48                purchase(item.sku!!)
 49            }.start()
 50        }
 51    }
 52
 53    private fun purchase(sku: String) {
 54
 55        val uid = parentActivity.intent.getStringExtra("uid")
 56        val email = parentActivity.intent.getStringExtra("email")
 57
 58        val jsonBody = JSONObject()
 59        jsonBody.put("data", JSONObject().apply {
 60            put("uid", uid)
 61            put("email", email)
 62            put("sku", sku)
 63            put("returnUrl", "app://xpayment.${parentActivity.packageName}")
 64        })
 65
 66        val connection = URL(https://localhost:5001/{firebase-project-id}/us-central1/getXsollaPaymentToken).openConnection() as HttpURLConnection
 67        connection.requestMethod = "POST"
 68        connection.setRequestProperty("Content-Type", "application/json")
 69        connection.doOutput = true
 70
 71        val outputStream: OutputStream = connection.outputStream
 72        val writer = BufferedWriter(OutputStreamWriter(outputStream))
 73        writer.write(jsonBody.toString())
 74        writer.flush()
 75        writer.close()
 76
 77        val responseCode = connection.responseCode
 78
 79        if (responseCode == HttpURLConnection.HTTP_OK) {
 80            val response = connection.inputStream.bufferedReader().use(BufferedReader::readText)
 81            connection.disconnect()
 82
 83            val jsonObject = JSONObject(response)
 84            val token = jsonObject.getString("token")
 85            val orderId = jsonObject.getString("order_id")
 86
 87            val intent = XPayments.createIntentBuilder(parentActivity)
 88                .accessToken(AccessToken(token))
 89                .isSandbox(true)
 90                .build()
 91            parentActivity.startActivityForResult(intent, 1)
 92        } else {
 93            Handler(Looper.getMainLooper()).post {
 94                showNotificationMessage("HTTP request failed with error: $responseCode")
 95            }
 96        }
 97    }
 98
 99    override fun getItemCount() = items.size
100
101    private fun showNotificationMessage(message: String) {
102        Toast.makeText(
103            parentActivity,
104            message,
105            Toast.LENGTH_SHORT,
106        ).show()
107    }
108}
- Add the
onActivityResult()method to process the payment result.
Example (
- kotlin
 1override fun onActivityResult(requestCode: Int, resultCode: Int, data: Intent?) {
 2        super.onActivityResult(requestCode, resultCode, data)
 3        if (requestCode == 1) {
 4            val (status, _) = XPayments.Result.fromResultIntent(data)
 5            when (status) {
 6                XPayments.Status.COMPLETED -> showNotificationMessage("Payment completed")
 7                XPayments.Status.CANCELLED -> showNotificationMessage("Payment canceled")
 8                XPayments.Status.UNKNOWN -> showNotificationMessage("Payment error")
 9            }
10        }
11    }
Set up order status tracking
Tracking the order status is required to ensure that the payment was successful and to grant items to the user.
Get order status on client side
To subscribe to order status changes on the client side of your application, call the XStore.getOrderStatus method and pass the following parameters to the method:
listener— a listener object of theOrderStatusListenertype.orderId— the order ID received from the purchase via the shopping cart, one-click purchase, or purchase for virtual currency.
For detailed information about how the method works, refer to the Track order status section.
Get order status on server side
The SDK allows you to track the order status on the client side of your application. However, we recommend setting up the Payment webhook handler to receive order information in the back end of your application. This allows you to implement additional validation of completed purchases
For the full list of webhooks and general information about working with them, refer to the webhooks documentation.
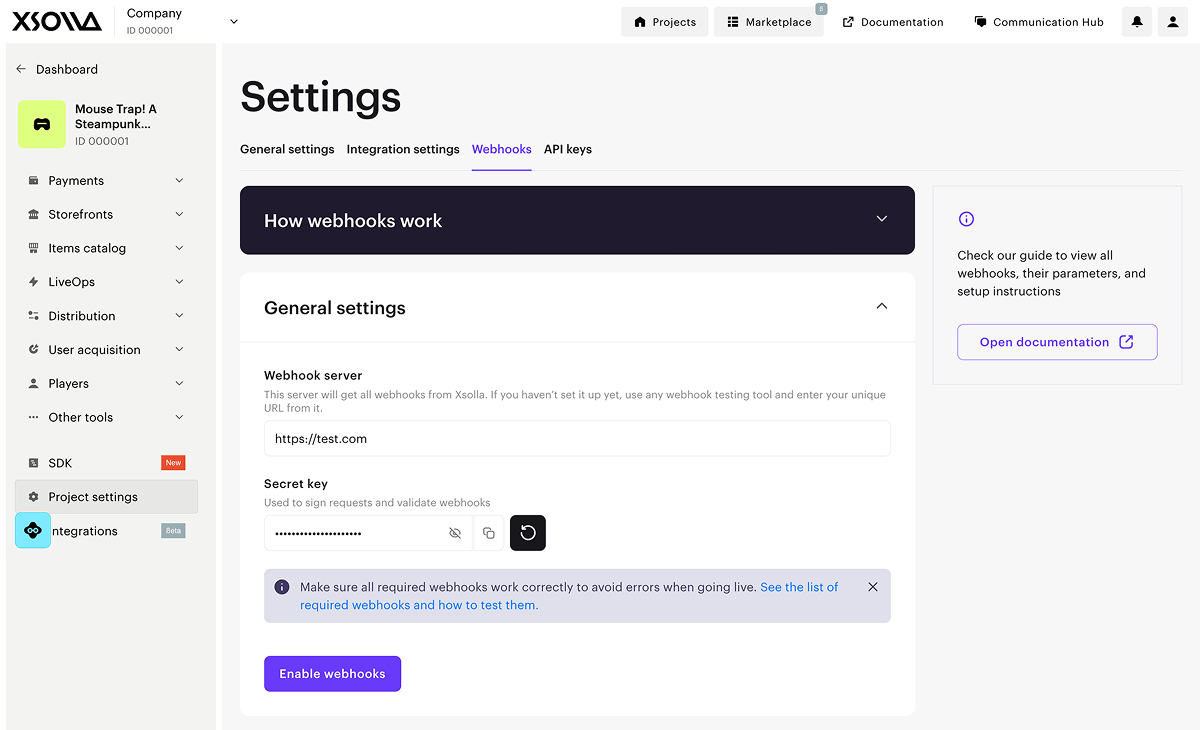
To configure webhooks on Xsolla side:
- Open your project in Publisher Account and go to the Project settings > Webhooks section.
- In the Webhook server field, enter the URL to which Xsolla will send webhooks.
For testing, you can specify https://us-central1-{firebase-project-id}.cloudfunctions.net/webhookFakeResponse, where {firebase-project-id} is the Firebase project ID (Firebase console > Project Settings > Project ID). In this case, Firebase simulates successful processing of the webhook. For a real project, you need to add purchase validation logic.
To test webhooks, you can also choose any dedicated site, such as webhook.site, or a platform, such as ngrok.
- Copy and save the value from the Secret key field. This key is generated by default and is used to sign webhooks. If you want to change it, click the update icon.
- Click Enable webhooks.
Found a typo or other text error? Select the text and press Ctrl+Enter.
