Configuration
In Unity, settings can be setup either using a settings asset or via code:
- The asset allows for a codeless approach, where you don't have to modify the code to adjust the configuration.
- The code approach works better for apps, where the configuration is modified dynamically (e.g., flags and values are received from the app's backend).
- Asset
- Code
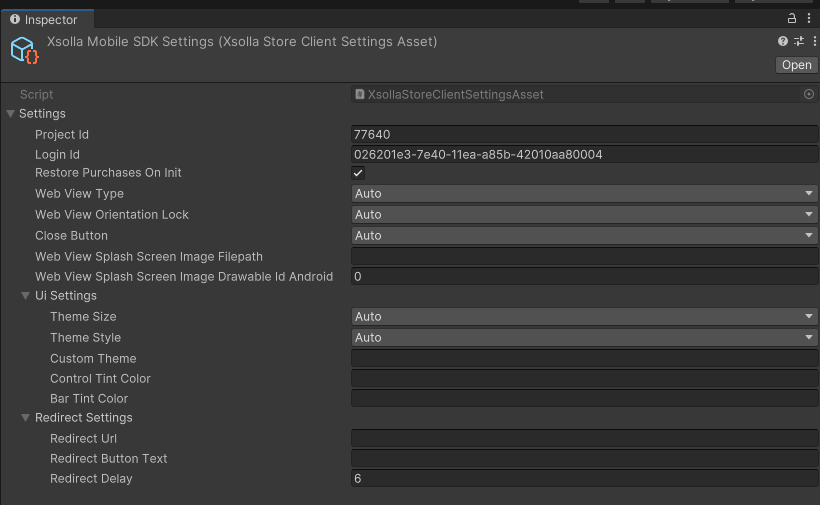
In the Unity Editor:
- Go to Window > Xsolla > SDK > Edit Settings from the main menu.
- Go to the Inspector panel.
- Fill in the Project ID and Login ID fields.
To access the asset's settings from the code, use the following snippet:
var settings = XsollaStoreClientSettingsAsset.Instance().settings;
var settings = XsollaStoreClientSettings.Builder.Create()
    .SetProjectId("< your_project_id >")
    .SetLoginId("< your_login_id >")
    .SetRestorePurchasesOnInit(true)
    .SetWebViewType(XsollaStoreClientSettings.WebViewType.Auto)
    .SetWebViewOrientationLock(XsollaStoreClientSettings.OrientationLock.Auto)
    .SetUIThemeSize(XsollaStoreClientSettings.ThemeSize.Auto)
    .SetUIThemeStyle(XsollaStoreClientSettings.ThemeStyle.Auto)
    .SetUICustomTheme("")
    .SetUseCloseButton(XsollaStoreClientSettings.CloseButton.Auto)
    .SetUIControlTintColor(Color.clear)
    .SetUIBarTintColor(Color.clear)
    .SetRedirectUrl("")
    .SetRedirectButtonText("")
    .SetRedirectDelay(6)
    .Build();
iOS
For compliance in the U.S. regarding redirecting players to the web and/or in-app payment compliance in Europe under the DMA see Configuration - iOS.
Web Shop Link-outs
Use Web Shop link-outs when you want minimal code changes by redirecting the user to your existing Xsolla Web Shop to complete the purchase.
In Web Shop link-out mode, the SDK does not execute its native in-app payment flow. It only opens the Web Shop and cancels any SDK purchase callbacks. Handle fulfillment and post-payment updates via your Web Shop processes (for example, webhooks or server-side logic), not via SDK purchase callbacks.
Configure by providing the Web Shop URL to settings and enabling the Web Shop simple mode in configuration:
// Provide Web Shop URL in settings
var settings = XsollaClientSettings.Builder.Create()
    .SetWebShopUrl("https://yourwebshop.xsolla.site")
    .Build();

// Enable Web Shop simple mode and pass user identifier
var configuration = XsollaClientConfiguration.Builder.Builder.Create()
    .SetSettings(settings)
    .SetSimpleMode(XsollaClientConfiguration.SimpleMode.WebShop)
    .SetUserId("<USER_ID>")
    .Build();
Events
The Xsolla Events API serves as an alternative to webhook-based integrations, where the integrator’s backend usually handles most of the logic (purchase validation, awarding, etc.). Instead of sending webhooks directly, the API intercepts them and stores their payloads in a remote queue managed by Xsolla. This approach enables serverless integrations for projects that lack backend capacity or don't require one, yet still prefer handling the entire transaction flow directly from the app.
Opting for the Xsolla Events API disables your project's webhooks. In other words, you cannot simultaneously handle webhooks on your backend and use the Events API in your app.
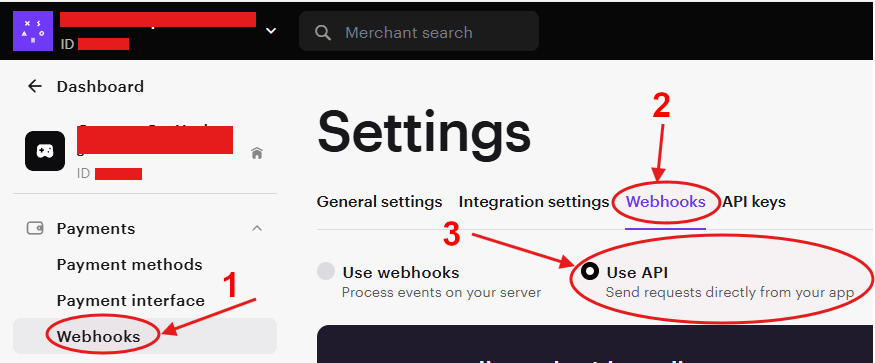
Enabling Xsolla Events API in Publisher Account
Follow these steps to enable the Xsolla Events API:
-
Open your Publisher Account.
-
In the left sidebar, select the project you want to enable the Xsolla Events API for.
-
From the left sidebar, expand the Payments menu and select Webhooks.
-
On the Webhooks page, click Webhooks on the right.
-
Select Use API.
Your project is now configured to use the Xsolla Events API, and the SDK can leverage this configuration.
To turn the Xsolla Events API mode off, follow the steps above, but select Use Webhooks this time.
Below is the minimal events configuration required to enable the events functionality in SDK:
var settings = XsollaStoreClientSettings.Builder.Create()
    //..
    .SetWebhooksMode(XsollaStoreClientSettings.WebhooksMode.EventsApi)
    .Build();
For additional information, see the webhooks page.
Build configuration from the settings
var configuration = XsollaStoreClientConfiguration.Builder.Create()
    // Set the settings object you've acquired in previous step here..
    .SetSettings(settings)
    .SetSandbox(true)
    .SetLogLevel(XsollaLogLevel.Debug)
    .Build();
Assign Xsolla access token to the configuration
- Default
- Delayed (deferred)
A valid access token must already be known prior to the SDK initialization step.
var configuration = XsollaStoreClientConfiguration.Builder.Create()
    .SetSettings(settings)
    .SetAccessToken("< your access token >")
    .Build();
If the access token is not known yet, when building the configuration, you can easily feed it into the SDK asynchronously using a Task. This works best for apps, where the access token might be acquired at some later point (e.g., from the app's backend) and cannot be provided right away.
var configuration = XsollaStoreClientConfiguration.Builder.Create()
    .SetSettings(settings)
    .SetDelayedConfigurationTask( DelayedTask() )
    .Build();

async Task<XsollaStoreClientConfiguration.OnDelayedConfiguration> DelayedTask()
{
    var task = await Server.GetXsollaTokenAsync();

    return configuration => XsollaStoreClientConfiguration.Builder.Update(configuration)
        .SetSettings(
            XsollaStoreClientSettings.Builder.Update(configuration.settings)
                .SetProjectId(task.Result.projectId)
                .Build();
        )
        .SetAccessToken(task.Result.accessToken)
        .Build();
}
Using device ID instead of the access token
Below is an example with the fields required to be set for the device ID authentication approach to work:
var settings = XsollaStoreClientSettings.Builder.Create()
    .SetProjectId("< your_project_id >")
    .SetLoginId("< your_login_id >")
    // ..other properties
    .Build();
Using OAuth2 instead of the access token
Below is an example with the fields required to be set for the OAuth2 authentication approach to work:
var settings = XsollaStoreClientSettings.Builder.Create()
    .SetProjectId("< your_project_id >")
    .SetLoginId("< your_login_id >")
    .SetOAuthClientId("< your_oauth_client_id >")
    // ..other properties
    .Build();
Using a third-party social provider's access token
Below is an example of the settings required for the social provider authentication approach to work:
-
With OAuth2
var settings = XsollaStoreClientSettings.Builder.Create()
    .SetProjectId("< your_project_id >")
    .SetLoginId("< your_login_id >")
    .SetOAuthClientId("< your_oauth_client_id >")
    .SetSocialProvider(new XsollaClientSettings.SocialProvider() {
        name = "epicgames",
        accessToken = "<social-access-token>"
    })
    // ..other properties
.Build(); -
Without OAuth2
var settings = XsollaStoreClientSettings.Builder.Create()
    .SetProjectId("< your_project_id >")
    .SetLoginId("< your_login_id >")
    .SetSocialProvider(new XsollaClientSettings.SocialProvider() {
        name = "epicgames",
        accessToken = "<social-access-token>"
    })
    // ..other properties
    .Build();
Testing purchase flow in sandbox mode
See Testing guide for more details on how to to enable the sandbox mode and avoid spending real money while testing the integration.