Quick Start 🚀
To get access to the Xsolla SDK for Unity during Developer Preview phase, please fill out the form ↗ (https://xsolla.com/mobile-sdk).
Getting Started
iOS — Effective Apr 30, 2025: Developers may include external payment links in U.S. apps. The Xsolla SDK aligns with Apple’s updated guidelines.
Android — Effective Oct 29, 2025: Following the Epic v. Google injunction, U.S. Google Play apps may guide users to external payment methods via link-outs, use alternative billing solutions, and are no longer subject to anti-steering restrictions.
For both platforms, the fastest recommended non-SDK approach is the Buy Button via link-outs to Web Shop ↗ (https://developers.xsolla.com/solutions/web-shop/other/instant-purchase).
🔥 Proven in production: follow the exact integration path used by games like Crossout and Modern Warship, complete with DMA-compliant billing and 1,000+ payment methods ready out of the box.
This quick start guide makes it simple to integrate the Xsolla SDK for Unity and start accepting payments in your Unity-based game. We'll use a pre-configured test project to cover all the essentials: setting up basic user authentication, importing your products (SKUs), and processing a test payment.
By the time you're done, you'll have a working payment system right in your game, seeing firsthand how Xsolla can streamline your monetization. Let's dive in and get your game accepting payments in just a few easy steps!
Install the SDK
During the Preview phase, please contact your Account Manager to get access to the Xsolla SDK for Unity.
- Open the Unity Editor.
- In the main menu, click Window > Package Manager.
- Add a package as a dependence:
- Click the ➕ icon and select Add package from tarball.
- Select the downloaded SDK package (.tgz).
- Click Open and wait for the import to complete.
Configure the SDK
In the Unity Editor:
-
Go to Window > Xsolla > SDK > Edit Settings from the main menu
-
Go to Inspector panel
-
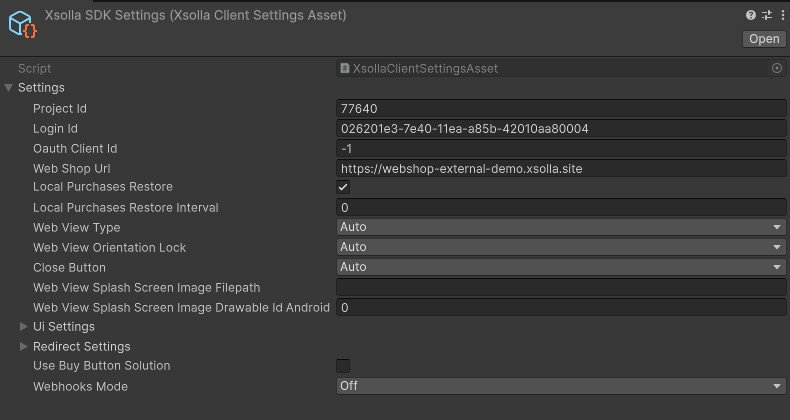
In the opened asset, set these pre-defined sample project properties below to their respective values:
Property Value Project ID 77640 Login ID 026201e3-7e40-11ea-a85b-42010aa80004
提示The provided project and login IDs are predefined and can be used for quick test integrations.
-
Your settings asset should look similar to this:
-
Now, add these few lines to your scene initialization code, e.g.
Start()method of a class that inherits fromMonoBehaviour:public class YourSDKIntegrationBehaviour : MonoBehaviour, IDetailedStoreListener {
public Start() {
var settings = XsollaStoreClientSettingsAsset.Instance().settings;
var configuration = XsollaStoreClientConfiguration.Builder.Create()
.SetSettings(settings)
.SetSandbox(true)
.SetLogLevel(XsollaLogLevel.Debug)
.Build();
// ...
}
// ...
}iOSFor compliance in the U.S. regarding redirecting players to the web, use WebViewType.External:
settings = XsollaClientSettings.Builder.Update(settings)
            .SetWebViewType(XsollaClientSettings.WebViewType.External)
            .Build();
For in-app payment compliance in Europe under the DMA, use WebViewType.Auto
settings = XsollaClientSettings.Builder.Update(settings)
            .SetWebViewType(XsollaClientSettings.WebViewType.Auto)
            .Build();
Initialize the SDK
Now, when we have our configuration ready, it's time to move onto initialization of the SDK itself.
There are currently no plans to support In-App Purchasing Unity 5.0.0 due to potential compatibility risks that may impact the overall integration experience. We will continue to monitor developments and reassess support based on future updates and demand.
-
Make sure Unity InAppPurchasing plugin is already installed:
信息For information on how to install Unity InAppPurchasing plugin, refer to this page ↗ (https://docs.unity3d.com/Packages/com.unity.purchasing@4.5/manual/GettingStarted.html)
-
Create the SDK module using the
XsollaPurchasingModule.Builderwith the configuration you prepared earlier as its parameter insideYourSDKIntegrationBehaviour'sStartmethod:var module = XsollaPurchasingModule.Builder.Create()
.SetConfiguration(configuration)
.Build(); -
Feed the created SDK module into the
ConfigurationBuilderand populate the returned instance with the SKUs pre-created for testing purposes:var configurationBuilder = ConfigurationBuilder.Instance(module)
.AddProduct("key_1", ProductType.Consumable); -
Register the SDK with the Unity's InAppPurchasing:
UnityPurchasing.Initialize(this, configurationBuilder);
Make a Purchase
Once the SDK is fully initialized, a purchase can be made.
Modify the MonoBehavior used for configuration and initialization steps to also inherit from IDetailedStoreListener. And add the lines below to it:
public class YourSDKIntegrationBehaviour : MonoBehaviour, IDetailedStoreListener {
    // ...

    public void OnInitialized(IStoreController controller, IExtensionProvider extensions) {
        controller.InitiatePurchase("key_1");
    }

    // ...

    public PurchaseProcessingResult ProcessPurchase(PurchaseEventArgs args) {
        if (args.purchasedProduct.definition.id == "key_1") {
            Debug.Log("Successfully purchased 'key_1'");
        }
        return PurchaseProcessingResult.Complete;
    }

    // ...
Collect Payment
The SDK relies on Xsolla Pay Station for secure payment collection.
These steps will guide you through a test payment collection flow:
-
Choose the Card payment method:
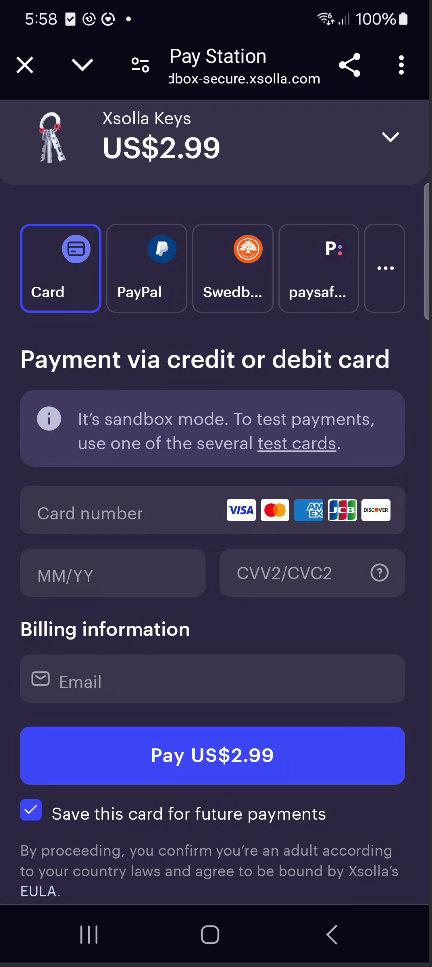
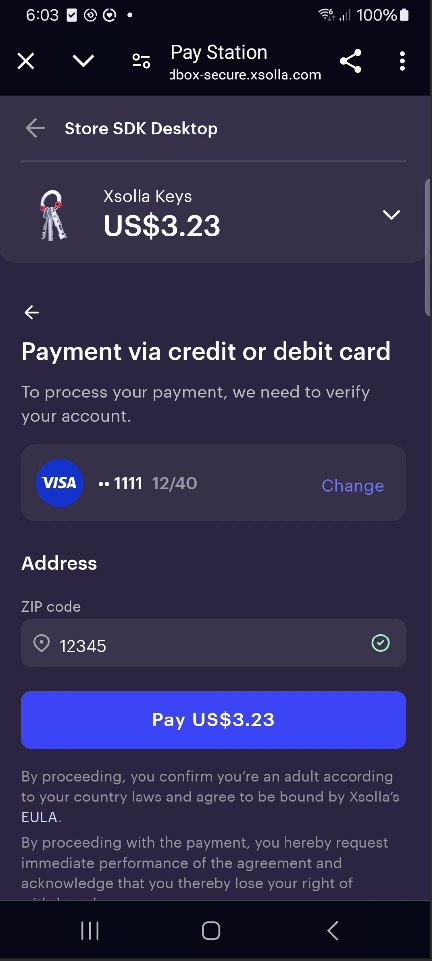
-
Use one of the test cards listed here ↗ (https://developers.xsolla.com/doc/pay-station/testing/test-cards) and click Pay to confirm the payment:
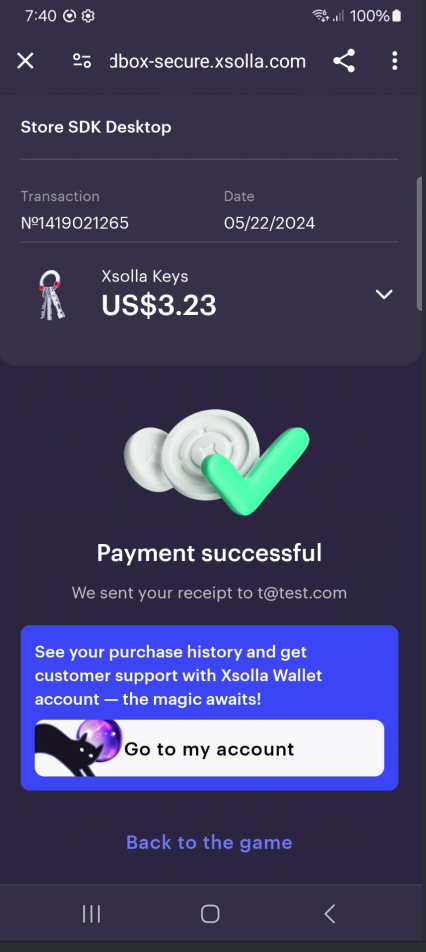
-
Once the payment goes through, you'll see a confirmation:
What's next?
Congratulations! 🎉 You've successfully integrated Xsolla SDK for Unity and processed your first test payment. This achievement unlocks access to over 1000 global payment methods and sets the foundation for integrating more Xsolla solutions, including our powerful Web Shop.
You've mastered the basics:
- ✅ User authentication
- ✅ SKU management
- ✅ Secure payment processing
This is just the beginning of optimizing your game's monetization. Ready to explore more? Check out our documentation for advanced features and other Xsolla products to further boost your game's success!
The next thing you need to do is to create your own publisher account and set up a new project.
The Buy Button for Mobile Games enables secure and seamless links directly from your iOS and Android games in the U.S.
For detailed how-to guides, see Buy Button for Mobile Games.
You might also be interested in exploring the extended example (based on Unity IAP) provided for your convenience to gain a better understanding of the whole purchasing flow based on Xsolla SDK for Unity.