Authentication
This instruction shows how to use SDK methods to implement:
- user sign-up
- resend request for a sign-up confirmation email
- user login
- user password reset
You can authenticate users with their username or email address. In the following examples we authenticate users with their username, whereas the email address is used to confirm sign-up and to reset the password.
The logics and interface in the examples are less complicated than they will be in your application. A possible authentication system implementation option is described in the demo project.
Implement user sign-up
This tutorial describes the implementation of the following logic:

Create page interface
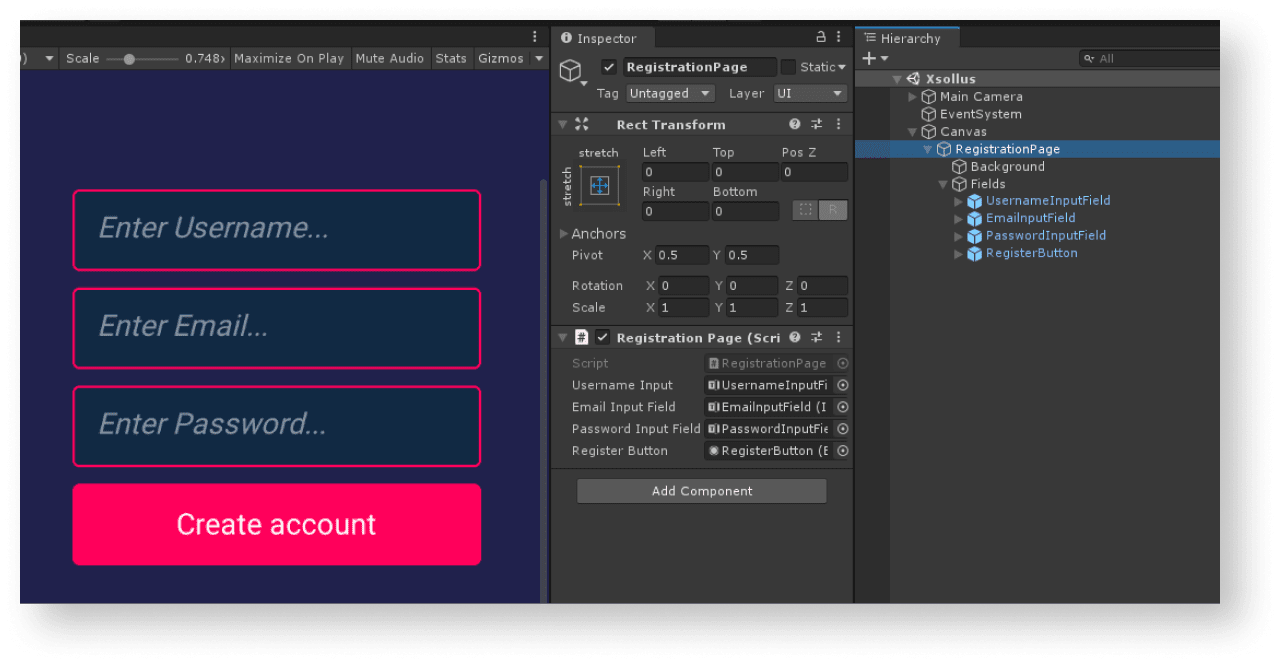
Create a scene for a sign-up page and add the following elements on it:
- username field
- user email address field
- user password field
- sign-up button
The following picture shows the example of a page structure.
Create page controller
- Create a script
RegistrationPageinherited from the MonoBehaviour base class. - Declare variables for the page interface elements and set values for them in the
Inspector panel. - Add logics to process clicking on the sign-up button:
- In the
Startmethod, subscribe to a clicking event. - Add an anonymous method that is called after clicking the button.
- In this method, declare the
username,email, andpasswordvariables and initialize them by the values from the fields on the page. - Call the
XsollaLogin.Instance.RegistrationSDK method and pass theusername,email, andpasswordvariables and the following methods to it:
- In the
OnSuccess— called if sign-up is successfulOnError— called if an error occurs
In the script’s examples, the OnSuccess and OnError methods call the standard Debug.Log method. The error code and description are passed in the error parameter.
You can add other actions like opening a page with a resend request for a sign-up email or opening a login page if sign-up is successful.
Example of a script for a sign-up page:
- C#
 1using UnityEngine;
 2using UnityEngine.UI;
 3using Xsolla.Core;
 4using Xsolla.Login;
 5
 6namespace Recipes
 7{
 8	public class RegistrationPage : MonoBehaviour
 9	{
10		// Declaration of variables for UI elements on the page
11
12		[SerializeField] private InputField UsernameInput;
13
14		[SerializeField] private InputField EmailInputField;
15
16		[SerializeField] private InputField PasswordInputField;
17
18		[SerializeField] private Button RegisterButton;
19
20		private void Start()
21		{
22			// Handling the button click
23			RegisterButton.onClick.AddListener(() =>
24			{
25				var username = UsernameInput.text;
26				var email = EmailInputField.text;
27				var password = PasswordInputField.text;
28
29				XsollaLogin.Instance.Registration(username, email, password, onSuccess: OnSuccess, onError: OnError);
30			});
31		}
32
33		private void OnSuccess()
34		{
35			UnityEngine.Debug.Log("Registration successful");
36			// Some actions
37		}
38
39		private void OnError(Error error)
40		{
41			UnityEngine.Debug.Log($"Registration failed. Description: {error.errorMessage}");
42			// Some actions
43		}
44	}
45}
Set up sign-up confirmation email
After successful sign-up, a user receives a sign-up confirmation email to a specified address. You can customize emails sent to users in Publisher Account.
If you are developing an Android application, set up deep links to return a user to an application after they confirm sign-up.
Implement sign-up confirmation email resend request
This tutorial describes the implementation of the following logic:

Create page interface
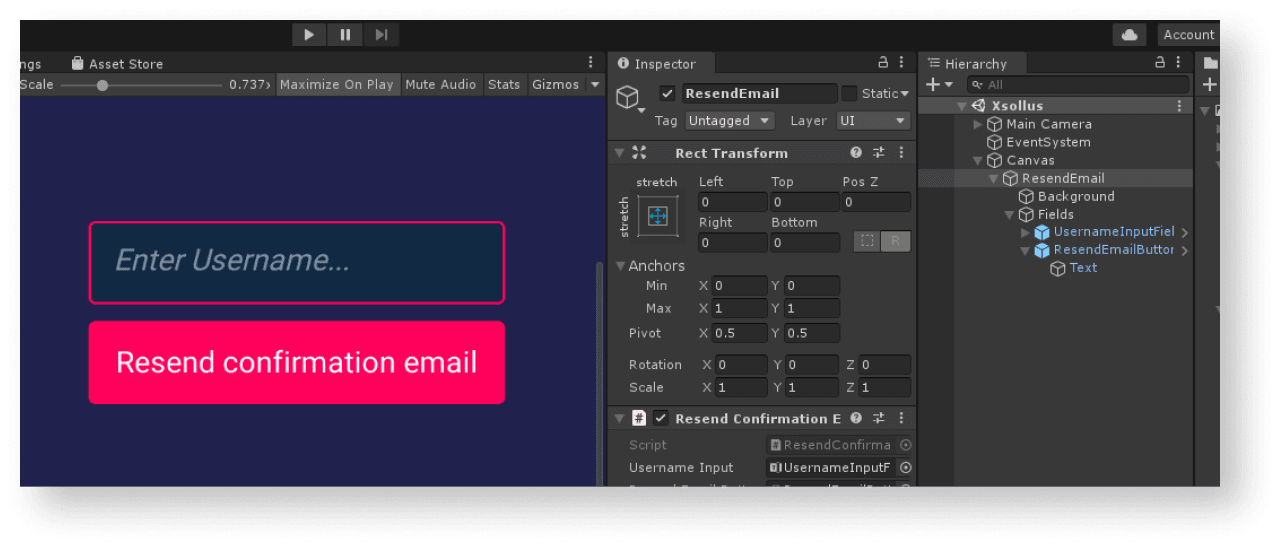
Create a scene for a page with a request to resend a confirmation email and add the following elements to it:
- username/email field
- resend email button
The following picture shows an example of the page structure.
Create page controller
- Create a script
ResendConfirmationEmailinherited from the MonoBehaviour base class. - Declare variables for page interface elements and set values for them in the
Inspector panel. - Add logics to process clicking on the resend email button:
- In the
Startmethod, subscribe to a clicking event. - Add an anonymous method that is called after clicking the button.
- In this method, declare the
usernamevariable and initialize it by the values from the fields on the page. - Call the
XsollaLogin.Instance.ResendEmailSDK method and pass theusernamevariable andOnSuccessandOnErrormethods to it.
- In the
Example of a script for an email resend page:
- C#
 1using UnityEngine;
 2using UnityEngine.UI;
 3using Xsolla.Core;
 4using Xsolla.Login;
 5
 6namespace Recipes
 7{
 8	public class ResendConfirmationEmail : MonoBehaviour
 9	{
10		// Declaration of variables for UI elements on the page
11
12		[SerializeField] private InputField UsernameInput;
13
14		[SerializeField] private Button ResendEmailButton;
15
16		private void Start()
17		{
18			// Handling the button click
19			ResendEmailButton.onClick.AddListener(() =>
20			{
21				var username = UsernameInput.text;
22
23				XsollaLogin.Instance.ResendConfirmationLink(username, onSuccess: OnSuccess, onError: OnError);
24			});
25		}
26
27		private void OnSuccess()
28		{
29			UnityEngine.Debug.Log("Resend confirmation email successful");
30			// Some actions
31		}
32
33		private void OnError(Error error)
34		{
35			UnityEngine.Debug.Log($"Resend confirmation email failed. Description: {error.errorMessage}");
36			// Some actions
37		}
38	}
39}
If the request is successful, the user receives a sign-up confirmation email to the email address specified during sign-up.
Implement user login
This tutorial describes the implementation of the following logic:

Create page interface
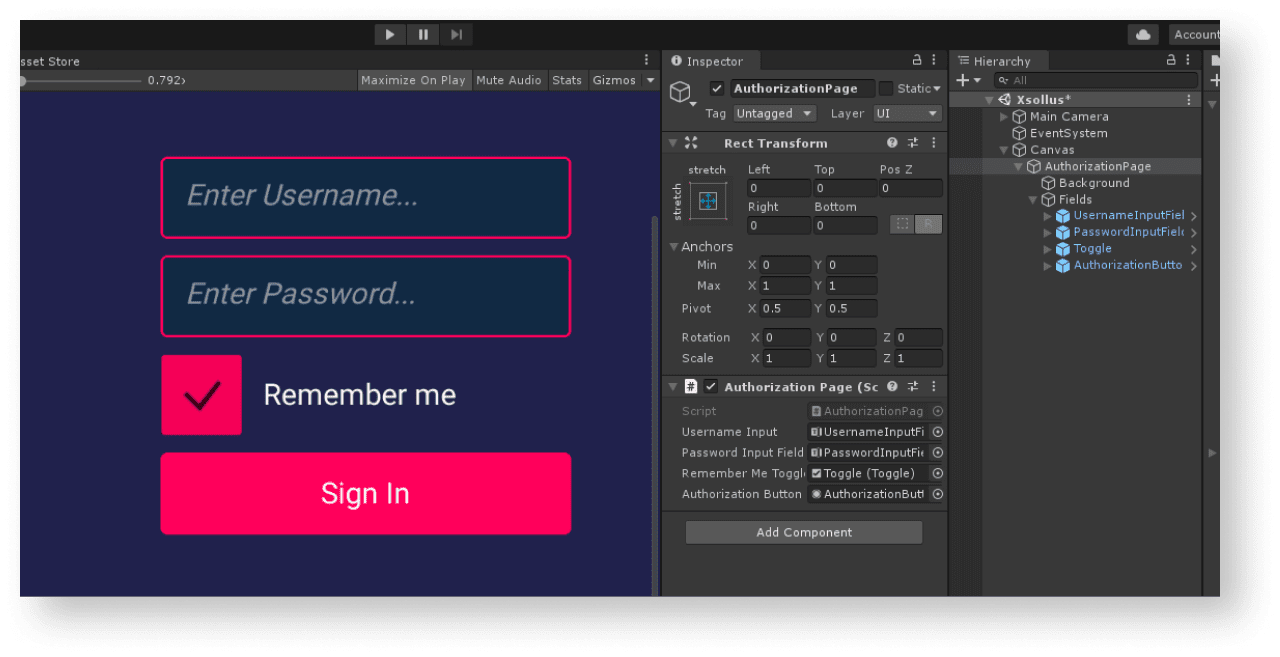
Create a scene for a login page and add the following elements to it:
- username field
- password field
- remember me checkbox
- login button
The following picture shows an example of the page structure.
Create page controller
- Create a script
AutorizationPageinherited from the MonoBehaviour base class. - Declare variables for page interface elements and set values for them in the
Inspector panel. - Add logics to process clicking on the login button:
- In the
Startmethod, subscribe to a clicking event. - Add an anonymous method that is called after clicking the button.
- In this method, declare the
usernameandpasswordvariables and initialize them by the values from the fields on the page. Create arememberMevariable and initialize it with a checkbox state to remember an account. - Call the
XsollaLogin.Instance.SignInSDK method and pass theusername,password, andrememberMevariables andOnSuccessandOnErrormethods to it.
- In the
token parameter. The authorization token is used in requests to Xsolla servers.Example of a script for a login page:
- C#
 1using UnityEngine;
 2using UnityEngine.UI;
 3using Xsolla.Core;
 4using Xsolla.Login;
 5
 6namespace Recipes
 7{
 8	public class AuthorizationPage : MonoBehaviour
 9	{
10		// Declaration of variables for UI elements on the page
11
12		[SerializeField] private InputField UsernameInput;
13
14		[SerializeField] private InputField PasswordInputField;
15
16		[SerializeField] private Toggle RememberMeToggle;
17
18		[SerializeField] private Button AuthorizationButton;
19
20		private void Start()
21		{
22			// Handling the button click
23
24			AuthorizationButton.onClick.AddListener(() =>
25			{
26				var username = UsernameInput.text;
27				var password = PasswordInputField.text;
28				var rememberMe = RememberMeToggle.isOn;
29
30				XsollaLogin.Instance.SignIn(username, password, rememberMe, null, onSuccess: OnSuccess, onError: OnError);
31			});
32		}
33
34		private void OnSuccess(string token)
35		{
36			UnityEngine.Debug.Log($"Authorization successful. Token: {token}");
37			// Some actions
38		}
39
40		private void OnError(Error error)
41		{
42			UnityEngine.Debug.Log($"Authorization failed. Description: {error.errorMessage}");
43			// Some actions
44		}
45	}
46}
Implement password reset
This tutorial describes the implementation of the following logic:

Create page interface
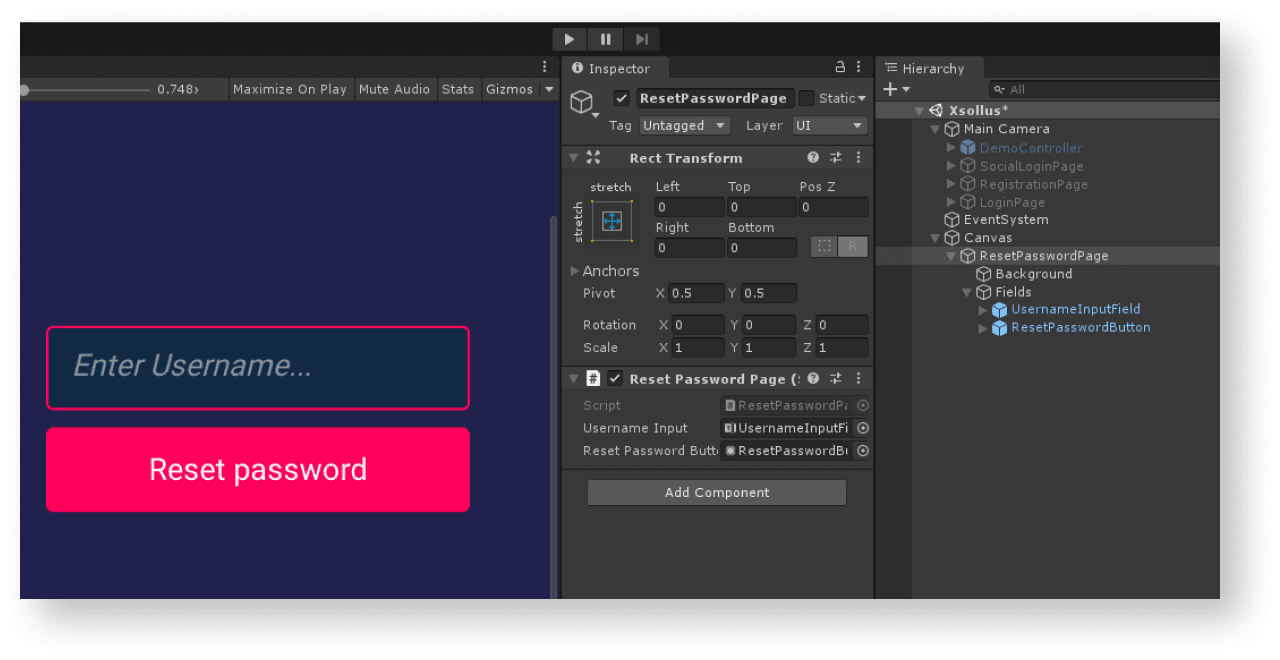
Create a scene for a password reset page and add the following elements to a page:
- username/email field
- password reset button
The following picture shows an example of the page structure.
Create page controller
- Create a script
ResetPasswordPageinherited from the MonoBehaviour base class. - Declare variables for page interface elements and set values for them in the
Inspector panel. - Add logics to process clicking on the password reset button:
- In the
Startmethod, subscribe to a clicking event. - Add an anonymous method that is called after the button is clicked.
- In this method, declare the
usernamevariable and initialize it by the values from the fields on the page. - Call the
XsollaLogin.Instance.ResetPasswordSDK method and pass theusernamevariables andOnSuccessandOnErrormethods to it.
- In the
Example of a script for a password reset page:
- C#
 1using UnityEngine;
 2using UnityEngine.UI;
 3using Xsolla.Core;
 4using Xsolla.Login;
 5
 6namespace Recipes
 7{
 8	public class ResetPasswordPage : MonoBehaviour
 9	{
10		// Declaration of variables for UI elements on the page
11
12		[SerializeField] private InputField UsernameInput;
13
14		[SerializeField] private Button ResetPasswordButton;
15
16		private void Start()
17		{
18			// Handling the button click
19
20			ResetPasswordButton.onClick.AddListener(() =>
21			{
22				var username = UsernameInput.text;
23
24				XsollaLogin.Instance.ResetPassword(username, OnSuccess, OnError);
25			});
26		}
27
28		private void OnSuccess()
29		{
30			UnityEngine.Debug.Log("Password reset successful");
31			// Some actions
32		}
33
34		private void OnError(Error error)
35		{
36			UnityEngine.Debug.Log($"Password reset failed. Description: {error.errorMessage}");
37			// Some actions
38		}
39	}
40}
After successful password reset request, the user receives an email with a password reset link. In Publisher Account > your Login project > General settings > URL > Callback URL, you can configure a URL address or a path a user is redirected to after successful authentication, email confirmation, or password reset.
This guide shows how you can use SDK methods to implement user sign-up and login via their social network account.
Unlike for user authentication via username/user email address and password, you don’t have to implement separate logics for user sign-up. If the user’s first login is via a social network, a new account is created automatically.
If you have implemented social login in your application as an alternative authentication method, the social network account automatically links to an existing user account if the following conditions are met:
- A user who signed up with username/email address and password logged into your application via a social network account.
- A social network returns an email address.
- User email address in a social network is the same as the email address used for sign-up in your application.
LinkSocialProvider SDK method.This tutorial describes the implementation of the following logic:

The examples show how to set up user login via a Twitter account. You can set up all social networks in the same way.
The logics and interface in the examples are less complicated than they will be in your application. A possible authentication system implementation option is described in the demo project.
Create page interface
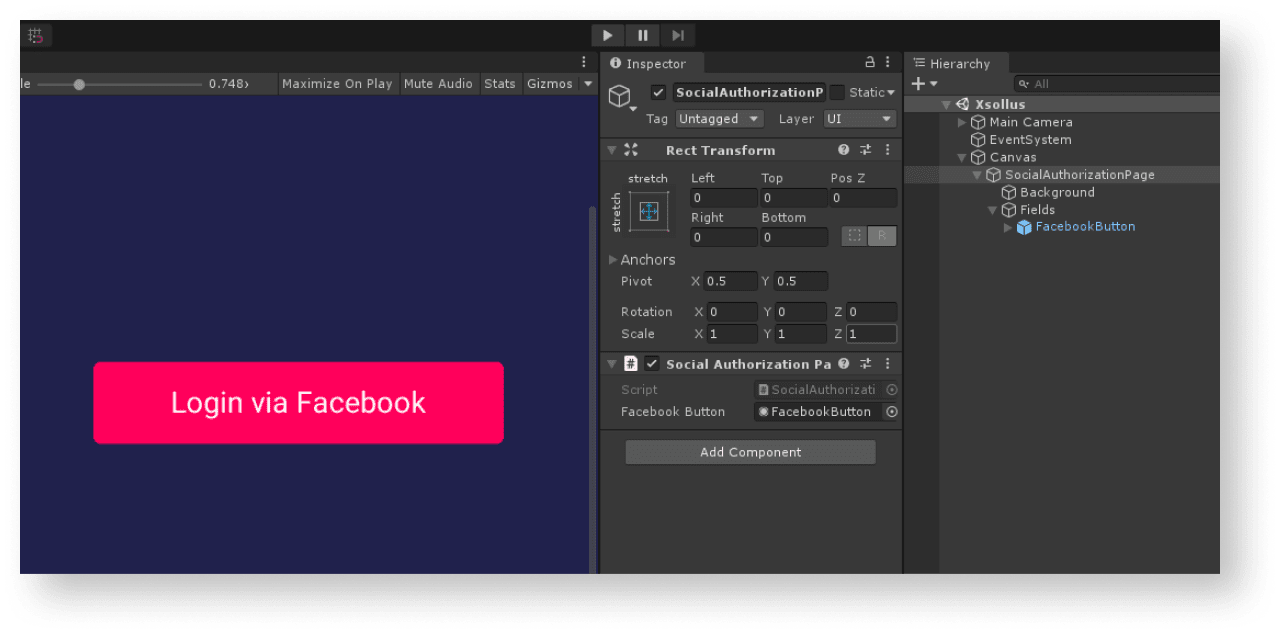
Create a scene for a login page and add the social login button to it. The following picture shows an example of the page structure.
Create page controller
- Create a script
SocialAuthorizationPageinherited from the MonoBehaviour base class. - Declare variables for the application login page interface elements and set values for them in the
Inspector panel. - Add logics to process clicking on the login button:
- In the
Startmethod, subscribe to a clicking event. - Add an anonymous method that is called after clicking the button.
- To pass a login page URL, declare the
urlvariable in an anonymous method. Initialize this variable by theGetSocialNetworkAuthUrlSDK method by passing aFacebookvalue in theSocialProviderparameter. - To open a browser, call the
BrowserHelper.Instance.Openmethod. To use a built-in browser, pass theurlvariable and atruevalue to the method.
- In the
- To get a token and close the browser, track the changes of the page URL after successful user sign-up:
- Declare a
singlePageBrowservariable and initialize it via theBrowserHelper.Instance.GetLastBrowserSDK method. - Subscribe to an active page URL changing event and set the
OnUrlChangedmethod as a handler.
- Declare a
- To get a token and close the browser, track the changes of the page URL after successful user sign-up:
- Implement getting of the token:
- Use a
ParseUtils.TryGetValueFromUrlutility method to parse a URL of an active page passed in theOnUrlChangedmethod. - Add a check for an authentication code in an active page URL. The
ParseUtils.TryGetValueFromUrlmethod passes an authentication code in thecodevariable. - To exchange an authentication code for a token, call the
ExchangeCodeToTokenSDK method and pass acodevariable and the following methods to it:OnSuccess— called if sign-up is successfulOnError— called if an error occurs
- Use a
In the script’s examples, the OnSuccess and OnError methods call the standard Debug.Log method. You can add other actions.
If a user successfully logs in, the authorization token is passed in the token parameter. This token is used in requests to Xsolla servers. If an error occurs, its code and description are passed in the error parameter.
- After you get the token, delete a game object with a browser.
Example of a script for a login page:
- C#
 1using UnityEngine;
 2using UnityEngine.UI;
 3using Xsolla.Core;
 4using Xsolla.Login;
 5
 6namespace Recipes
 7{
 8	public class SocialAuthorizationPage : MonoBehaviour
 9	{
10		// Declaration of variables for UI elements on the page
11
12		[SerializeField] private Button FacebookButton;
13
14		private void Start()
15		{
16			// Handling the button click
17
18			FacebookButton.onClick.AddListener(() =>
19			{
20				// Opening browser
21
22				var url = XsollaLogin.Instance.GetSocialNetworkAuthUrl(SocialProvider.Facebook);
23				BrowserHelper.Instance.Open(url, true);
24
25				// Determining the end of authentication
26				BrowserHelper.Instance.InAppBrowser.AddUrlChangeHandler(OnUrlChanged);
27			});
28		}
29
30		// Getting token
31		private void OnUrlChanged(string url)
32		{
33			if (ParseUtils.TryGetValueFromUrl(url, ParseParameter.code, out var code))
34			{
35				XsollaLogin.Instance.ExchangeCodeToToken(code, OnSuccess, OnError);
36				Destroy(BrowserHelper.Instance.gameObject);
37			}
38		}
39
40		private void OnSuccess(string token)
41		{
42			UnityEngine.Debug.Log($"Authorization successful. Token: {token}");
43			// Some actions
44		}
45
46		private void OnError(Error error)
47		{
48			UnityEngine.Debug.Log($"Authorization failed. Description: {error.errorMessage}");
49			// Some actions
50		}
51	}
52}
Found a typo or other text error? Select the text and press Ctrl+Enter.
