
Integrate SDK on application side
General information
- Design an interface for the login system, in-game store, and other pages for your application.
- In your application, implement logic for user authentication, store display, purchase, and more using SDK methods.
Note
You can create your own solution by following Unity instructions, or use the demo scene as a template. To adapt the demo scene UI to your application, use the UI builder.
Quick start
Note
Starting with SDK version 2.5.5, you can also use the Ready-to-use store module — a ready-made solution with a pre-configured UI and logic for user authorization, catalog display, and item purchase.
Below are instructions for the simplest implementation of the in-game sales scenario.
Interaction flow:
- The user launches the game.
- The application launches the Xsolla Login web widget.
- The user logs into the game and goes to the item catalog.
- The application requests the item catalog from Xsolla.
- After successfully receiving item data, the application displays the item catalog.
- The user clicks the item purchase button.
- The application initiates the purchase process and displays the payment UI in the browser.
- The user makes the payment.
- The application closes the payment UI and passes the payment data to Xsolla.
- The application outputs a message to the log about the results of payment processing.
Sequence diagram for interaction of your application (StoreController script) and SDK:
  %%{init: {'themeVariables': { 'noteBkgColor': 'transparent', 'noteBorderColor': 'transparent' }}}%%
sequenceDiagram
    participant Player
    participant StoreController
    participant SDK
    Player->>StoreController: Starts the game.
    activate StoreController
    activate StoreController
    note right of StoreController: Calls StartAuthorization custom method.
    deactivate StoreController
    StoreController->>SDK: Initiates authorization via Xsolla Login Widget,<br>calls XsollaAuth.AuthWithXsollaWidget SDK method.
    activate SDK
    SDK->>Player: Opens Xsolla Login Widget in a browser.
    deactivate SDK
    activate Player
    Player->>SDK: Enters login credentials.
    deactivate Player
    activate SDK
    activate SDK
    note right of SDK: Processes authentication results.
    deactivate SDK
    SDK->>StoreController: Calls OnAuthSuccess custom method.
    deactivate SDK
    StoreController->>SDK: Requests the item catalog,<br>calls XsollaCatalog.GetItems SDK method.
    activate SDK
    SDK->>StoreController: Calls OnCatalogReceived custom method.
    deactivate SDK
    activate StoreController
    note right of StoreController: Builds store UI, calls BuildStoreUI custom method.
    deactivate StoreController
    StoreController->>Player: Displays item catalog.
    deactivate StoreController
    activate Player
    Player->>StoreController: Clicks the item purchase button.
    deactivate Player
    activate StoreController
    activate StoreController
    note right of StoreController: Initiates the purchase process, calls StartPurchase custom method.
    deactivate StoreController
    StoreController->>SDK: Calls XsollaCatalog.Purchase SDK method.
    activate SDK
    SDK->>Player: Opens the payment UI in a browser.
    deactivate SDK
    activate Player
    Player->>SDK: Completes the payment.
    activate SDK
    deactivate Player
    activate SDK
    note right of SDK: Processes the payment.
    deactivate SDK
    SDK->>Player: Closes payment UI.
    activate Player
    SDK->>StoreController: Calls OnPurchaseCompleted  custom method<br>when order transitions to the 'done' status.
    deactivate SDK
    StoreController->>Player: Displays a success message in the log.
    deactivate StoreController
    deactivate Player
Scenario limitations:
- The ready-made Xsolla Login web widget is used for user authorization. Xsolla provides standard widget templates. Their appearance and content is determined by the Login method chosen for your project and widget customization settings from Publisher Account.
Note
Widget customization is available only after you sign the Xsolla Product Licensing Agreement. To sign the agreement, go to the Agreements & Taxes > Agreements section in your Publisher Account.
- The scenario implements the sale of items for real currency only, without using a shopping cart, i.e. the user can buy only one item.
Create item widget script
Create a new script named VirtualItemWidget:
- Open your project in the Unity editor.
- In the main menu, go to
Assets > Create > C# Script . - Specify the name of the new file in the
Assets folder asVirtualItemWidget. - Open the created file in the editor and add the following code to it:
Copy
- C#
 1using UnityEngine;
 2using UnityEngine.UI;
 3
 4namespace Xsolla.Example
 5{
 6    public class VirtualItemWidget : MonoBehaviour
 7    {
 8       public Image IconImage;
 9       public Text NameText;
10       public Text DescriptionText;
11       public Text PriceText;
12       public Button BuyButton;
13    }
14}
- Save the changes.
Create item widget prefab
Create the UI to display an item in the store:
- Create a
Canvasobject to display UI elements. To do this, in the main menu go toGameObject > UI > Canvas . This will create the following objects on the scene:- The
Canvasobject with theCanvas,Canvas Scaler, andGraphic Raycastercomponents. - The
EventSystemobject, if such an object doesn’t already exist on the scene.
- The
- Create the
VirtualItemWidgetchild object:- In the
Hierarchy panel, select theCanvasobject. - In the main menu, go to
GameObject > UI > Image . This will create a new game object, this object will be a child of theCanvasobject. - Rename the created object to
VirtualItemWidget.
- In the
- Add UI objects to display item information:
- Create an object to display the widget icon:
- In the
Hierarchy panel, select theVirtualItemWidgetobject. - In the main menu, go to
GameObject > UI > Image . - Rename the created object to
IconImage.
- In the
- Create an object to display the item name:
- In the
Hierarchy panel, select theVirtualItemWidgetobject. - In the main menu, go to
GameObject > UI > Legacy > Text . - Rename the created object to
NameText.
- In the
- Create an object to display the item description:
- In the
Hierarchy panel, select theVirtualItemWidgetobject. - In the main menu, go to
GameObject > UI > Legacy > Text . - Rename the created object to
DescriptionText.
- In the
- Create an object for the item purchase button:
- In the
Hierarchy panel, select theVirtualItemWidgetobject. - In the main menu, go to
GameObject > UI > Legacy > Button . This will create a button object with theTextchild object. - Rename the created object to
BuyButton. - Rename the
Textobject toPriceText.
- In the
- Create an object to display the widget icon:
- Add the item widget script as a component to the
VirtualItemWidgetobject:- In the
Hierarchy panel, select theVirtualItemWidgetobject. - In the
Inspector panel, clickAdd Component and select theVirtualItemWidgetscript.
- In the
- Assign UI elements to the required script slots:
- In the
Hierarchy panel, select theVirtualItemWidgetobject. - Drag and drop child UI objects from the
Hierarchy panel to their correspondingVirtualItemWidgetcomponent slots in theInspector panel.
- In the
- Convert the created
VirtualItemWidgetobject to a prefab:- In the
Hierarchy panel, select theVirtualItemWidgetobject. - Drag and drop the object to the
Project panel in theAssets folder. As a result, a new object appears in theAssets folder, and the object on the scene changes its color to blue.
- In the
Example of the item widget prefab:

Create store script
Create a new script named StoreController:
- Open your project in the Unity editor.
- In the main menu, go to
Assets > Create > C# Script . - Specify the name of the new file in the
Assets folder asStoreController. - Open the created file in the editor and add the following code to it:
Copy
- C#
 1using System.Linq;
 2using UnityEngine;
 3using Xsolla.Auth;
 4using Xsolla.Catalog;
 5using Xsolla.Core;
 6namespace Xsolla.Example
 7{
 8	public class StoreController : MonoBehaviour
 9	{
10		[SerializeField] private VirtualItemWidget WidgetPrefab;
11		[SerializeField] private Transform WidgetsContainer;
12		private void Start()
13		{
14			StartAuthorization();
15		}
16		private void StartAuthorization()
17		{
18			Debug.Log("Start the authorization process with the Xsolla Login Widget");
19			XsollaAuth.AuthWithXsollaWidget(OnAuthSuccess, OnError, null);
20		}
21		private void OnAuthSuccess()
22		{
23			Debug.Log("Authorization successful");
24			Debug.Log("Get the catalog of virtual items");
25			XsollaCatalog.GetItems(OnCatalogReceived, OnError);
26		}
27		private void OnCatalogReceived(StoreItems items)
28		{
29			Debug.Log("Catalog received successfully");
30			BuildStoreUI(items.items);
31		}
32		private void BuildStoreUI(StoreItem[] items)
33		{
34			// Create a widget for each item in the catalog
35			foreach (var item in items)
36			{
37				// Check if the item has a price for real money. If not, skip the item (e.g., it is a virtual currency)
38				if (item.price == null)
39					continue;
40				// Instantiate a widget prefab
41				var widget = Instantiate(WidgetPrefab, WidgetsContainer, false);
42				// Fill the widget with data
43				widget.NameText.text = item.name;
44				widget.DescriptionText.text = item.description;
45				widget.PriceText.text = $"{item.price.amount} {item.price.currency}";
46				// Loading the item image and assigning it to the UI element
47				ImageLoader.LoadSprite(item.image_url, sprite => widget.IconImage.sprite = sprite);
48				// Add a click listener to the Buy button
49				widget.BuyButton.onClick.AddListener(() => StartPurchase(item.sku));
50			}
51		}
52		private void StartPurchase(string sku)
53		{
54			Debug.Log($"Start the purchase process for the item: {sku}");
55			XsollaCatalog.Purchase(sku, OnPurchaseCompleted, OnError);
56		}
57		private void OnPurchaseCompleted(OrderStatus status)
58		{
59			Debug.Log("Purchase completed");
60		}
61		private void OnError(Error error)
62		{
63			Debug.LogError($"Error message: {error.errorMessage}");
64		}
65	}
66}
- Save the changes.
Create store object
Create the UI to display item list in the store:
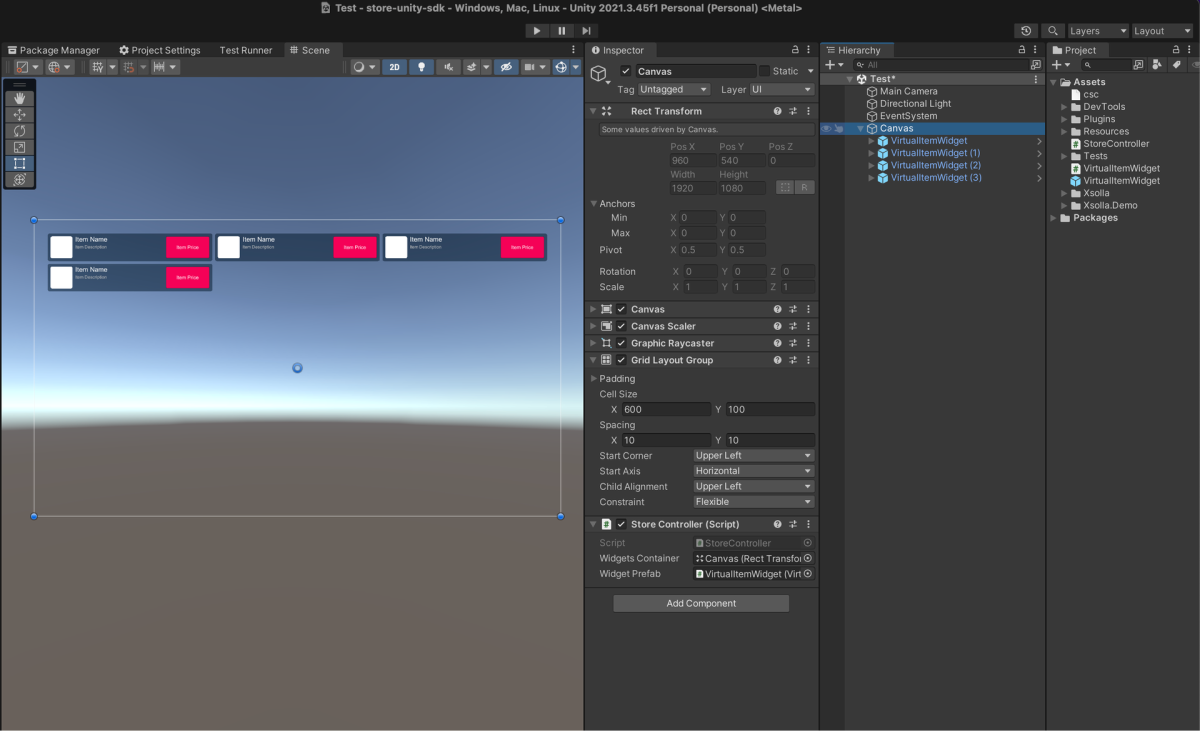
- Add a component that arranges widgets of individual items in a grid, manages the location and size of nested objects. To do this:
- In the
Hierarchy panel, select theCanvasobject. - In the
Inspector panel, clickAdd Component and select theGrid Layout Groupscript. - In the
Inspector panel, change the component settings if necessary: set the cell size, spacing, etc.
- In the
Note
We recommend making several copies of the
VirtualItemWidget object for a better visualization and easier configuration. This allows you to evaluate the general layout of your store right away.- Add the store script as a component to the
Canvasobject:- In the
Hierarchy panel, select theCanvasobject. - In the
Inspector panel, clickAdd Component and select theStoreControllerscript.
- In the
- Assign the elements to the required slots of the
StoreControllerscript:- In the
Hierarchy panel, select theCanvasobject. - Drag and drop the
Canvasobject from theHierarchy panel to theWidgetsContainer slot in theInspector panel. - Drag and drop the
VirtualItemWidgetobject from theHierarchy panel to theWidgetPrefab slot in theInspector panel.
- In the
Example of the store object:
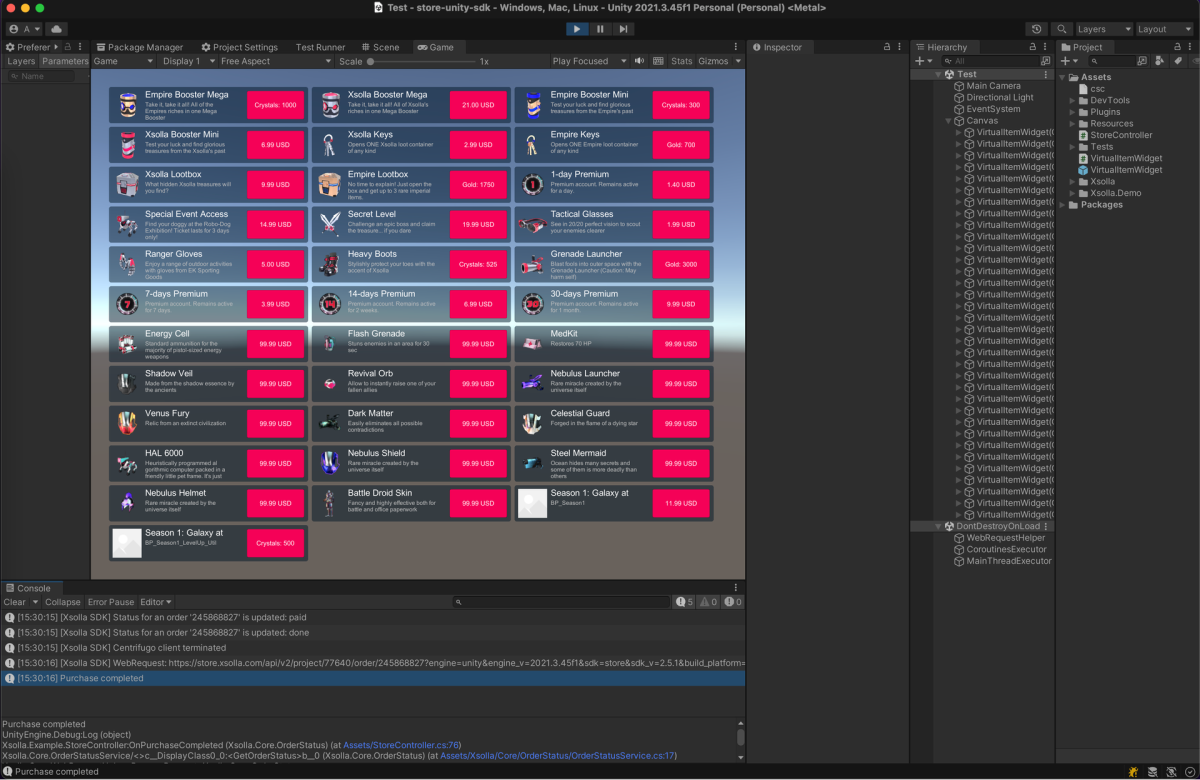
Launch and test store
Launch the store in the Unity editor and check its operation:
- For the
Canvasobject, delete all child objects. - Click
Play . As a result, when the application starts, a browser window with the Xsolla Login widget opens.

- Log into the application. After successful user authorization, the application requests the item catalog from Xsolla. After successfully receiving items’ data, the application creates necessary widgets. As a result, a list of store items is displayed.

- Click the purchase button in any item widget. The application initiates the purchase process, and shows the payment UI in the browser.

- Complete the purchase process. Use test bank cards for payment. After a successful purchase, the
Purchase completedmessage appears in the logs.
Was this article helpful?
Thank you for your feedback!
We’ll review your message and use it to help us improve your experience.Useful links
Last updated:
March 4, 2026
Found a typo or other text error? Select the text and press Ctrl+Enter.
