General information
The payment UI is based on the Pay Station product. The choice of available payment methods and other settings are available in Publisher Account in the Payments section.
The SDK supports the item purchase from the catalog in one click or via the shopping cart.
To test the purchase process, you can use test bank cards within the payment UI in sandbox mode. The sandbox mode only simulates the behavior of a payment method; no real money is involved. You don’t need to sign any agreements with Xsolla or pay any fees to use sandbox.
The method to open the payment UI depends on the platform for which your application is built:
- For desktop applications, the SDK allows you to open the payment UI in the internal browser, depending on the project settings.
- In mobile applications, the payment UI opens in an external browser.
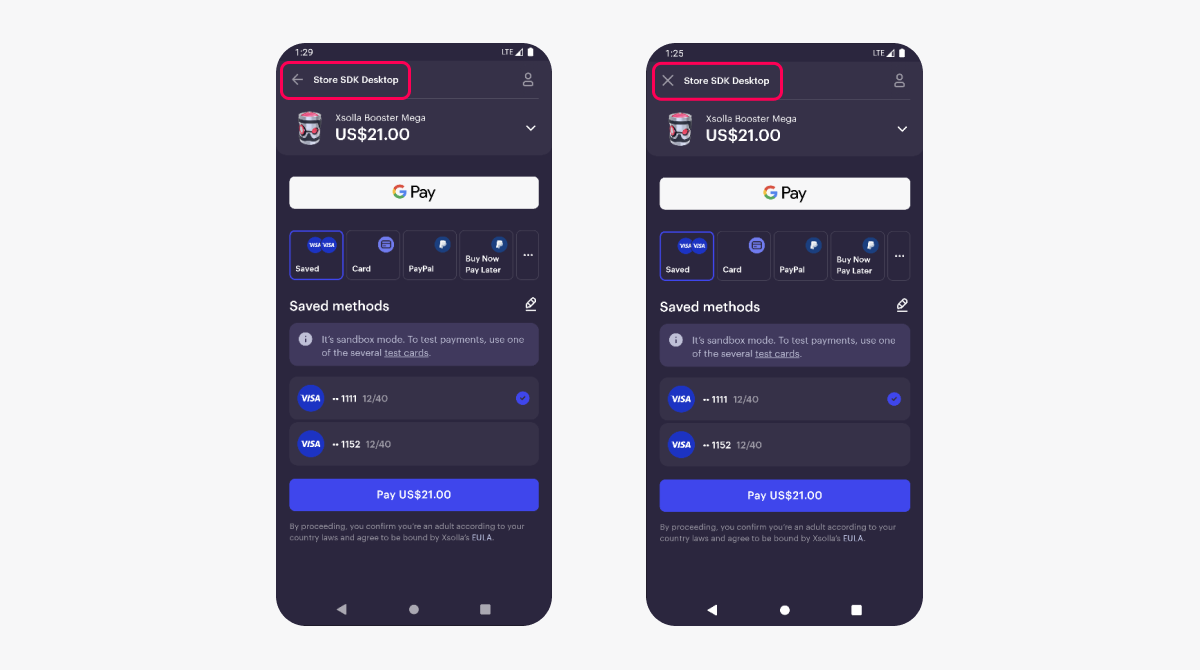
If you open the payment UI in a WebView in your mobile application, add a button so the user can close the payment UI at any stage of the purchase. To do this, when calling the UXsollaStoreSubsystem::FetchPaymentToken or UXsollaStoreSubsystem::FetchCartPaymentToken SDK method, pass true to the bShowCloseButton field in the PurchaseParams parameter of the FXsollaPaymentTokenRequestPayload structure.
You can select the icon that will be displayed on the button. To do this, in the CloseButtonIcon field of the PurchaseParams parameter, pass one of the following values:
“arrow”— to display the ← icon“cross”— to display the × icon (used by default)
Example of using the bShowCloseButton and CloseButtonIcon parameters in WebView:

How-tos
To redirect users to another page after they completed the payment, you can configure two types of redirects:
- automatic — a redirect with a set delay.
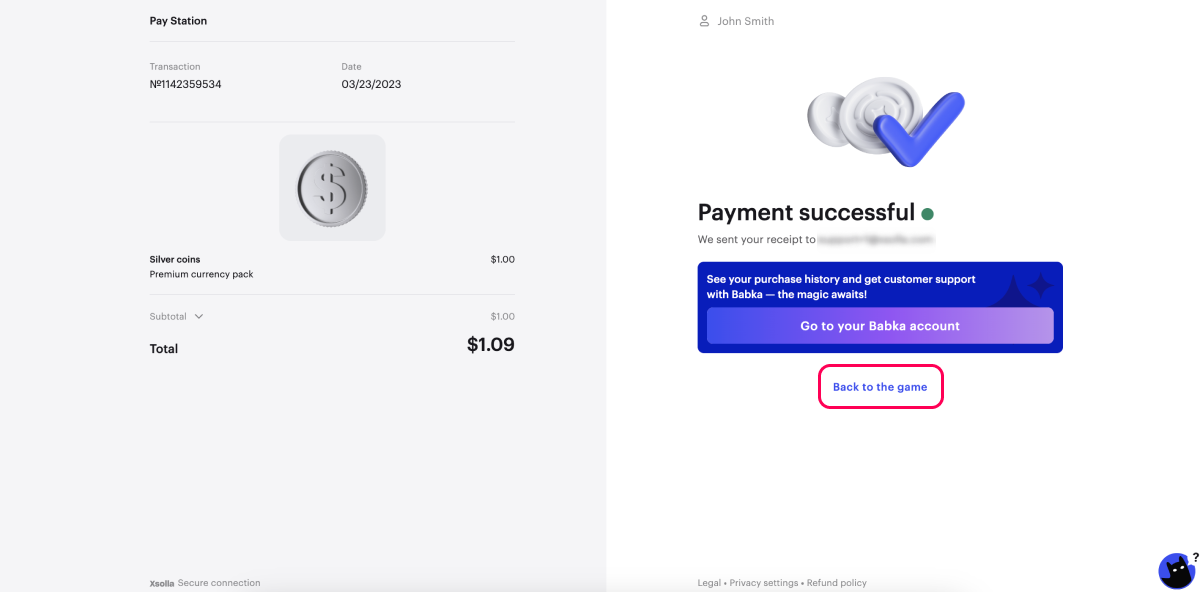
- manual — a redirect after a user clicks the redirect button.

You can configure a redirect in the following ways:
- in Publisher Account — use this option if you are setting up a project for a single application and don’t plan to create builds for different platforms.
- in the SDK settings — use this option if you plan to:
- use the project for multiple applications
- create builds for different platforms
- sell in-game items via the website
Configure redirects in Publisher Account
- Open your project in Publisher Account and go to the Payments > Payment interface > General settings > Redirect policy section.

- In the Return URL field, enter the URL or path where a user is redirected to after making a payment.
app://xpayment.<ANDROID_PACKAGE_NAME>, where<ANDROID_PACKAGE_NAME>is the package name of the Android application.app://xpayment.<BUNDLE_ID>, where<BUNDLE_ID>is the iOS application identifier.
- To set automatic redirect parameters:
- In the drop-down list, choose Automatic redirect condition:
- None — do not redirect.
- Successful payment — redirect when a payment is successful.
- Successful or canceled payment — redirect when a payment is successful or canceled.
- Any payment — redirect for any payment status.
- In the Delay field, enter a redirect timeout in seconds. By default, a redirect is activated in 0 seconds.
- In the drop-down list, choose Automatic redirect condition:
- To set manual redirect parameters:
- In the drop-down list, choose Manual redirect condition:
- None — do not redirect.
- Successful payment — the redirect button appears when a payment is successful.
- Successful or canceled payment — the redirect button appears when a payment is successful or canceled.
- Any payment — the redirect button appears for any payment status.
- In the Redirect button caption field, enter the copy for the button that redirects a user to the return URL.
- In the drop-down list, choose Manual redirect condition:
The redirect button copy is Back to the Game by default. It is localized in all Pay Station languages.
If your project supports several languages, you can specify redirect button copy for each of them in the respective fields.
When a user closes the payment UI, they are also redirected to the specified return URL.
- Click Save changes.
Configure redirects in SDK settings
- Open you Unreal Engine project.
- Go to the
Settings > Project Settings > Plugins > Xsolla Settings > Redirect Policy section. - Specify the redirect parameters:
- Uncheck the
Use settings from Publisher Account box. - In the
Return URL field, enter a URL or a path a user will be redirected to after making a payment.
- Uncheck the
app://xpayment.<ANDROID_PACKAGE_NAME>, where<ANDROID_PACKAGE_NAME>is the package name of the Android application.app://xpayment.<BUNDLE_ID>, where<BUNDLE_ID>is the iOS application identifier.
- To set automatic redirect parameters:
- In the drop-down list, choose
Redirect Conditions :None — do not redirect.Successful payment — redirect when a payment is successful.Successful or canceled payment — redirect when a payment is successful or canceled.Any payment — redirect for any payment status.
- In the
Redirect Delay field, enter a redirect timeout in seconds.
- In the drop-down list, choose
- To set automatic redirect parameters:
- To set manual redirect parameters:
- In the drop-down list, choose
Status for Manual Redirection :None — do not redirect.Successful payment — the redirect button appears when a payment is successful.Successful or canceled payment — the redirect button appears when a payment is successful or canceled.Any payment — the redirect button appears for any payment status.
- In the
Redirect Button Caption field, enter the copy for the button that will redirect a user to the return URL.
- In the drop-down list, choose
- To set manual redirect parameters:
The redirect button copy is Back to the Game by default. It is localized in all Pay Station languages.
If your project supports several languages, you can specify redirect button copy for each of them in the respective fields.
When a user closes the payment UI, they are also redirected to the specified return URL.
Xsolla can act as a payment gateway when players pay for in-game purchases via Steam. In this case, you don’t need to integrate the Steam SDK or take into account the nuances of paying via Steam when setting up an in-game store.
To set up payments via Steam:
- Sign an additional agreement with Xsolla.
- Set up the gateway for Steam in your Publisher Account.
- Go to your Unreal Engine project.
- Go to
Settings > Project Settings > Plugins > Xsolla Settings and check theBuild for Steam box. - Set up native authentication via Steam.
After changing the Unreal Engine project settings, the x-steam-userid header will be added to the payment token request.
Continue reading
Found a typo or other text error? Select the text and press Ctrl+Enter.
