Sell via widget
You can add a widget to your page to sell game keys and customize it. To copy the widget code, go to the Widget customization section after creating the keys package in your Publisher Account.
If a game is sold on a single platform, the widget will display the game price specific to that platform.
Example: Buy now for $10.
If a game is sold on multiple platforms, the widget will display the lowest price among the platforms.
Example: Get from $10.
In the order creation window, the user can see prices for all platforms and make a choice.
You can also display the price for a specific platform in the widget by specifying the platform SKU in the drm parameter.
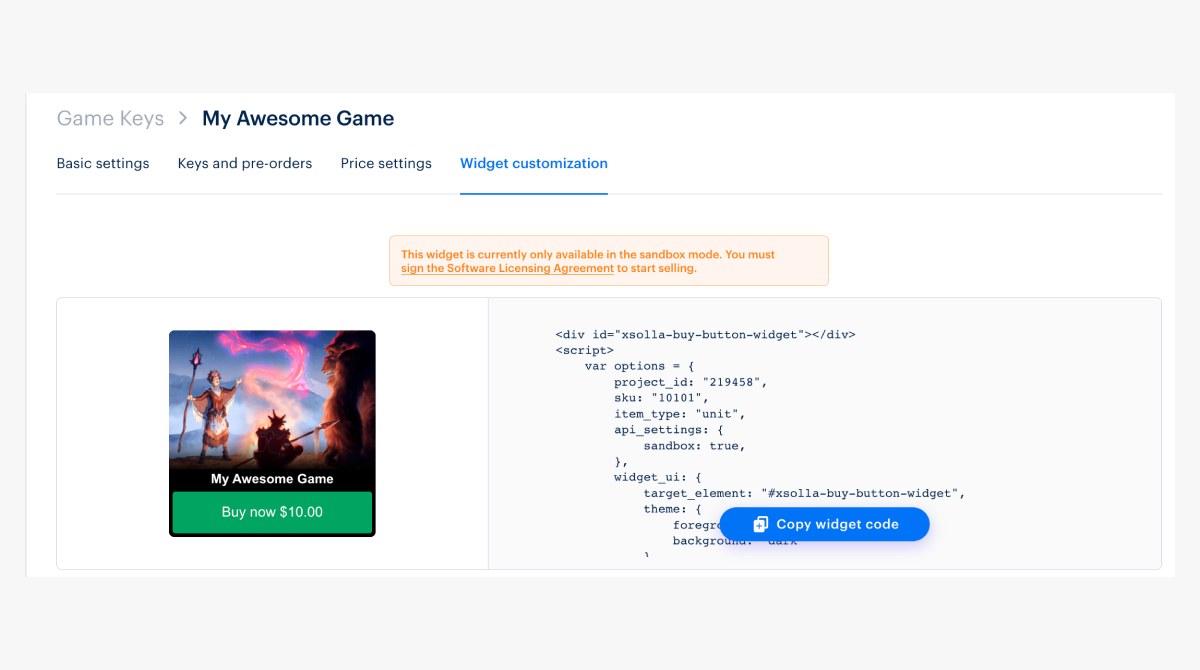
Widget code example:
- html
 1<div id="xsolla-buy-button-widget"></div>
 2
 3<script>
 4  var options = {
 5    project_id: "101010",
 6    sku: "my_key",
 7    user: {
 8      auth: "9qs9VyCIQQXBlzJQcfETIKWZDvhi4Sz1"
 9    },
10    drm: "steam",
11    item_type: "unit",
12    api_settings: {
13      sandbox: true
14    },
15    widget_ui: {
16      target_element: "#xsolla-buy-button-widget",
17      theme: {
18        foreground: "green",
19        background: "light"
20      }
21    },
22    payment_widget_ui: {
23      lightbox: {
24        height: "700px",
25        spinner: "round"
26      }
27    }
28  };
29
30  var s = document.createElement("script");
31  s.type = "text/javascript";
32  s.async = true;
33  s.src = "https://cdn.xsolla.net/embed/buy-button/3.1.9/widget.min.js";
34  s.addEventListener("load", function () {
35    var widgetInstance = XBuyButtonWidget.create(options);
36  });
37  document.getElementsByTagName("head")[0].appendChild(s);
38</script>
39
40<style>
41  #xsolla-buy-button-widget {
42    /* place code for button positioning here */
43    margin: 10px;
44  }
45
46  /* Styles the button itself */
47  .x-buy-button-widget.x-buy-button-widget__tiny .x-buy-button-widget-payment-button {
48    background-color: #73E8FF;
49    color: black;
50  }
51</style>
Widget parameters
| Parameter | Type | Description |
|---|---|---|
project_id | integer | ID of the project in which game keys or bundles with game keys, in-game items or bundles with items, are uploaded. |
item_type | string | Item type. Can take values of virtual_good, virtual_currency, game_key, unit. The unit type is used when there are multiple platforms for distributing the game. |
sku | string | Unique item ID. |
drm | string | Distribution platform SKU, for example, steam. Allows displaying the price for a specific platform. |
api_settings | object | Environment and host configuration settings:
|
user | object | An object with user data. |
user.auth | string | User authorization token: JSON Web Token or Pay Station access token. |
user.locale | string | User locale. Determines the language of the button text and payment interface. It is used a two-letter language code based on ISO_639-1. |
widget_ui.theme | object | The color theme of the widget, determining its appearance. It can take values {foreground:[‘blue’,‘red’,‘green’,‘gold’], background:[’light’,‘dark’]} |
widget_ui.template | string | Template. Possible values:
|
widget_ui.target_element | string | Element of the page, where the widget should be rendered (jQuery selector should be used, for example #widget-example). Required |
Parameters that determine the appearance of the payment interface
| Parameter | Type | Description |
|---|---|---|
payment_ui | object | Payment interface appearance parameters. |
payment_widget_ui | object | An object with parameters that determine the appearance of the payment interface. |
payment_widget_ui.lightbox | object | An object with options for the modal window in which the payment interface is opened. |
payment_widget_ui.lightbox.width | string | Lightbox frame width. If null, depends on Pay Station width. Default is null. |
payment_widget_ui.lightbox.height | string | Lightbox frame height. If null, depends on Pay Station height. Default is 100%. |
payment_widget_ui.lightbox.zIndex | integer | Defines arrangement order. Default is 1000. |
payment_widget_ui.lightbox.overlayOpacity | integer | Opacity of the widget’s background (0 — completely transparent, 1 — completely opaque). The default value is 60% (.6). |
payment_widget_ui.lightbox.overlayBackground | string | Overlay background color. Default is #000000. |
payment_widget_ui.lightbox.contentBackground | string | Frame background color. Default is #ffffff. Note that these color changes do not affect the Pay Station iframe itself, only the settings of the lightbox that hold it. |
payment_widget_ui.lightbox.spinner | string | Type of animated loading indicator. Can be xsolla or round. Default is xsolla. |
payment_widget_ui.lightbox.spinnerColor | string | Spinner color. No default value. |
payment_widget_ui.childWindow | object | Settings for the child window in which the payment interface is opened. Works for the mobile version. |
payment_widget_ui.childWindow.target | string | The property that determines where the child window should be opened. It can take values of _blank, _self, _parent. The default value is — _blank. |
Widget methods
var widgetInstance = XBuyButtonWidget.create(options)— create the widget instance and render it on the page.widgetInstance.on(event, handler)— attaches an event handler function for the event to the widget.event (string)— event type.handler (function)— a function to execute when the event is triggered.
widgetInstance.off(event, handler)— removes an event handler.event (string)— event type.handler (function)— a handler function previously attached for the event.
List of events:
| Parameter | Description |
|---|---|
| init | Widget initialized. |
| open | Widget opened. |
| load | Payment UI (Pay Station) loaded. |
| close | Payment UI (Pay Station) closed. |
| status | User is on the status page. |
| status-invoice | User is on the status page; payment in progress. |
| status-delivering | Event when the user was moved on the status page, payment was completed, and we’re sending payment notification. |
| status-done | User is on the status page; payment credited to the user’s account. |
| status-troubled | Event when the user was moved on the status page, but the payment failed. |
You can access the list of events using XBuyButtonWidget.eventTypes object.
Button customization
- Open your project in Publisher Account and go to the Items catalog > Game keys section.
- Select a game key and go to the Widget customization tab.
- In the Customize block, select the background color.
theme object in code so that the parameter background has an empty string as a value.- When you add the widget code to your page, it includes inherited styles. Add the styles below to override these styles.
style tag below the script tag that you got from the Widget customization tab for CSS inheritance/priority reasons.- css
 1/* This should be used for button positioning but note this technically repositions the entire widget */
 2#xsolla-buy-button-widget {
 3  /* place code for button positioning here */
 4}
 5
 6/* Styles the button itself */
 7.x-buy-button-widget.x-buy-button-widget__tiny
 8  .x-buy-button-widget-payment-button {
 9  background-color: #73E8FF;
10  color: black;
11}
12
13/* Button on hover */
14.x-buy-button-widget.x-buy-button-widget__tiny
15  .x-buy-button-widget-payment-button:hover {
16  background-color: #73E8FF;
17}
18
19/* The following are style overrides to leave you with just the button */
20
21/* space immediately surrounding button */
22.x-buy-button-widget-button-block.x-buy-button-widget-button-block__light {
23  background-color: white;
24}
25
26/* space above button (including game title area) */
27.x-buy-button-widget.x-buy-button-widget__tiny
28  .x-buy-button-widget-game-logo {
29  height: 200px;
30  background-image: none !important;
31  background-color: white;
32}
33
34 /* Game title (located right above button) */
35.x-buy-button-widget-game-name.x-buy-button-widget-game-name__light {
36  display: none !important;
37}
- The id/class names above and the code snippet are used in conjunction with the copied widget code (the image at step 5). For this reason, it is important that you implement the copied widget code.
- You can use the code above as is or modify the code based on your scenario. The code comments (lines 1, 3, 5, 11, 16, 18, 22, 29) are there to help determine what each CSS rule targets and assist in future styling. For example, if you want just the button (and not the entire widget), you’ll need to substitute the background color of your page in the places below where the color is
white— lines 20 and 27.
How to create multiple buttons or SKUs
You can refer to Xsolla Pay2Play Widget Simple Integration 4 buttons for a code example on how this is accomplished using the Pay2Play widget.
The structure is similar to the Buy Button widget code. An example of a migration:
- html
 1<div id="xsolla-buy-button-widget"></div>
 2<div id="xsolla-buy-button-widget-2"></div>
 3
 4<script>
 5  var options = {
 6    project_id: "191204",
 7    sku: "789",
 8    item_type: "unit",
 9    api_settings: {
10      sandbox: false
11    },
12    widget_ui: {
13      target_element: "#xsolla-buy-button-widget",
14      theme: {
15        foreground: "gold",
16        background: ""
17      }
18    },
19    payment_widget_ui: {
20      lightbox: {
21        height: "700px",
22        spinner: "round"
23      }
24    }
25  };
26
27  // options for second buy button - note the different SKU and target_element
28  var options2 = {
29    project_id: "191204",
30    sku: "123",
31    item_type: "unit",
32    api_settings: {
33      sandbox: false
34    },
35    widget_ui: {
36      target_element: "#xsolla-buy-button-widget-2",
37      theme: {
38        foreground: "gold",
39        background: ""
40      }
41    },
42    payment_widget_ui: {
43      lightbox: {
44        height: "700px",
45        spinner: "round"
46      }
47    }
48  };
49
50  var s = document.createElement("script");
51  s.type = "text/javascript";
52  s.async = true;
53  s.src = "https://cdn.xsolla.net/embed/buy-button/3.1.9/widget.min.js";
54
55  // one event listener per widget instance. repeat for more buttons, passing in different SKUs
56  s.addEventListener("load", function () {
57    var widgetInstance = XBuyButtonWidget.create(options);
58  });
59  s.addEventListener("load", function () {
60    var widgetInstance2 = XBuyButtonWidget.create(options2);
61  });
62
63  document.getElementsByTagName("head")[0].appendChild(s);
64</script>
- Lines 1 and 2 — one
divper button, each with a unique ID. - Starting on line 26 are the options for the second button (laid out in the
options2object). You will need a set ofoptionslike the ones above for each Buy button. Note the differentsku(line 28) andtarget_element(line 34, targeting thedivon line 2).
Found a typo or other text error? Select the text and press Ctrl+Enter.
