Enable Buy Button via Xsolla SDK
Why is it important

Following recent updates to Apple’s policies in certain regions, developers are now permitted to guide users from their apps to external websites to accept payments for virtual items.
You can add visible buttons, banners, messages, and other calls to action that take users directly from your game to item purchase using a secure, browser-based checkout (to your Web Shop or payment UI) in a single click — without violating Apple’s rules or risking enforcement.
Buy Button integration via Xsolla SDK is ideal if you want to link out from your game to a prebuilt, item-specific payment page and retain more control over the checkout flow, including:
- Flexible customization of the purchase experience — from transaction logic to visual presentation.
- Support for a serverless setup — the SDK can operate without a back end: purchases and item delivery are handled on the client side, with no need for webhooks.
- A wide range of payment methods, including one-click payments via Apple Pay, for fast and familiar mobile checkout experience.
Integration via Xsolla SDK is also suitable if you’re using a custom Web Shop not based on Site Builder and are looking to integrate Pay Station directly into your game.
Check the Web Shop-based integration if you are looking for the fastest low-code integration option.
How it works
In this guide, you’ll learn how to integrate Xsolla for processing payments using Xsolla SDK, in compliance with Apple’s requirements.
Apple’s requirements:
In-app WebViews for external purchases are not allowed — payments must occur via Safari or the default browser.
External purchase links are currently permitted only for iOS applications on the United States storefront. Note that Apple’s app review guidelines refer to the
United States storefront, not user location .
User flow:
- The user opens the game application on iOS.
- The user clicks the purchase button next to the desired item.
- The application opens Safari (or the default browser) with a Pay Station link that contains the payment token. The SDK handles authorization and item selection.
- The user is automatically authorized. Pay Station opens for the specific item.
- The user selects a payment method and completes the purchase.
- Pay Station redirects the user to the game application.
- The application receives the purchase confirmation via a webhook.
Quick start
Sign up for your Publisher Account and create a project
Publisher Account is the main tool to configure Xsolla features, as well as to work with analytics and transactions.
To sign up, go to Publisher Account and create an account. To create a project, click Create project in the side menu and provide any necessary information. You can modify the settings later.

During the integration process, you need to provide the project ID, found in your Publisher Account next to the project name.

Set up Xsolla Login
- In your project inside Publisher Account, go to the Players > Login section.
- Click Create Login project.
- Select Standard Login project and click Create and set up. Wait until your new Login project is created. You will then see the Login project page.
- In the Login methods block, select any option and click Configure.
- In the top settings block, click Login API integration.
- Set the Login with device ID toggle to On.
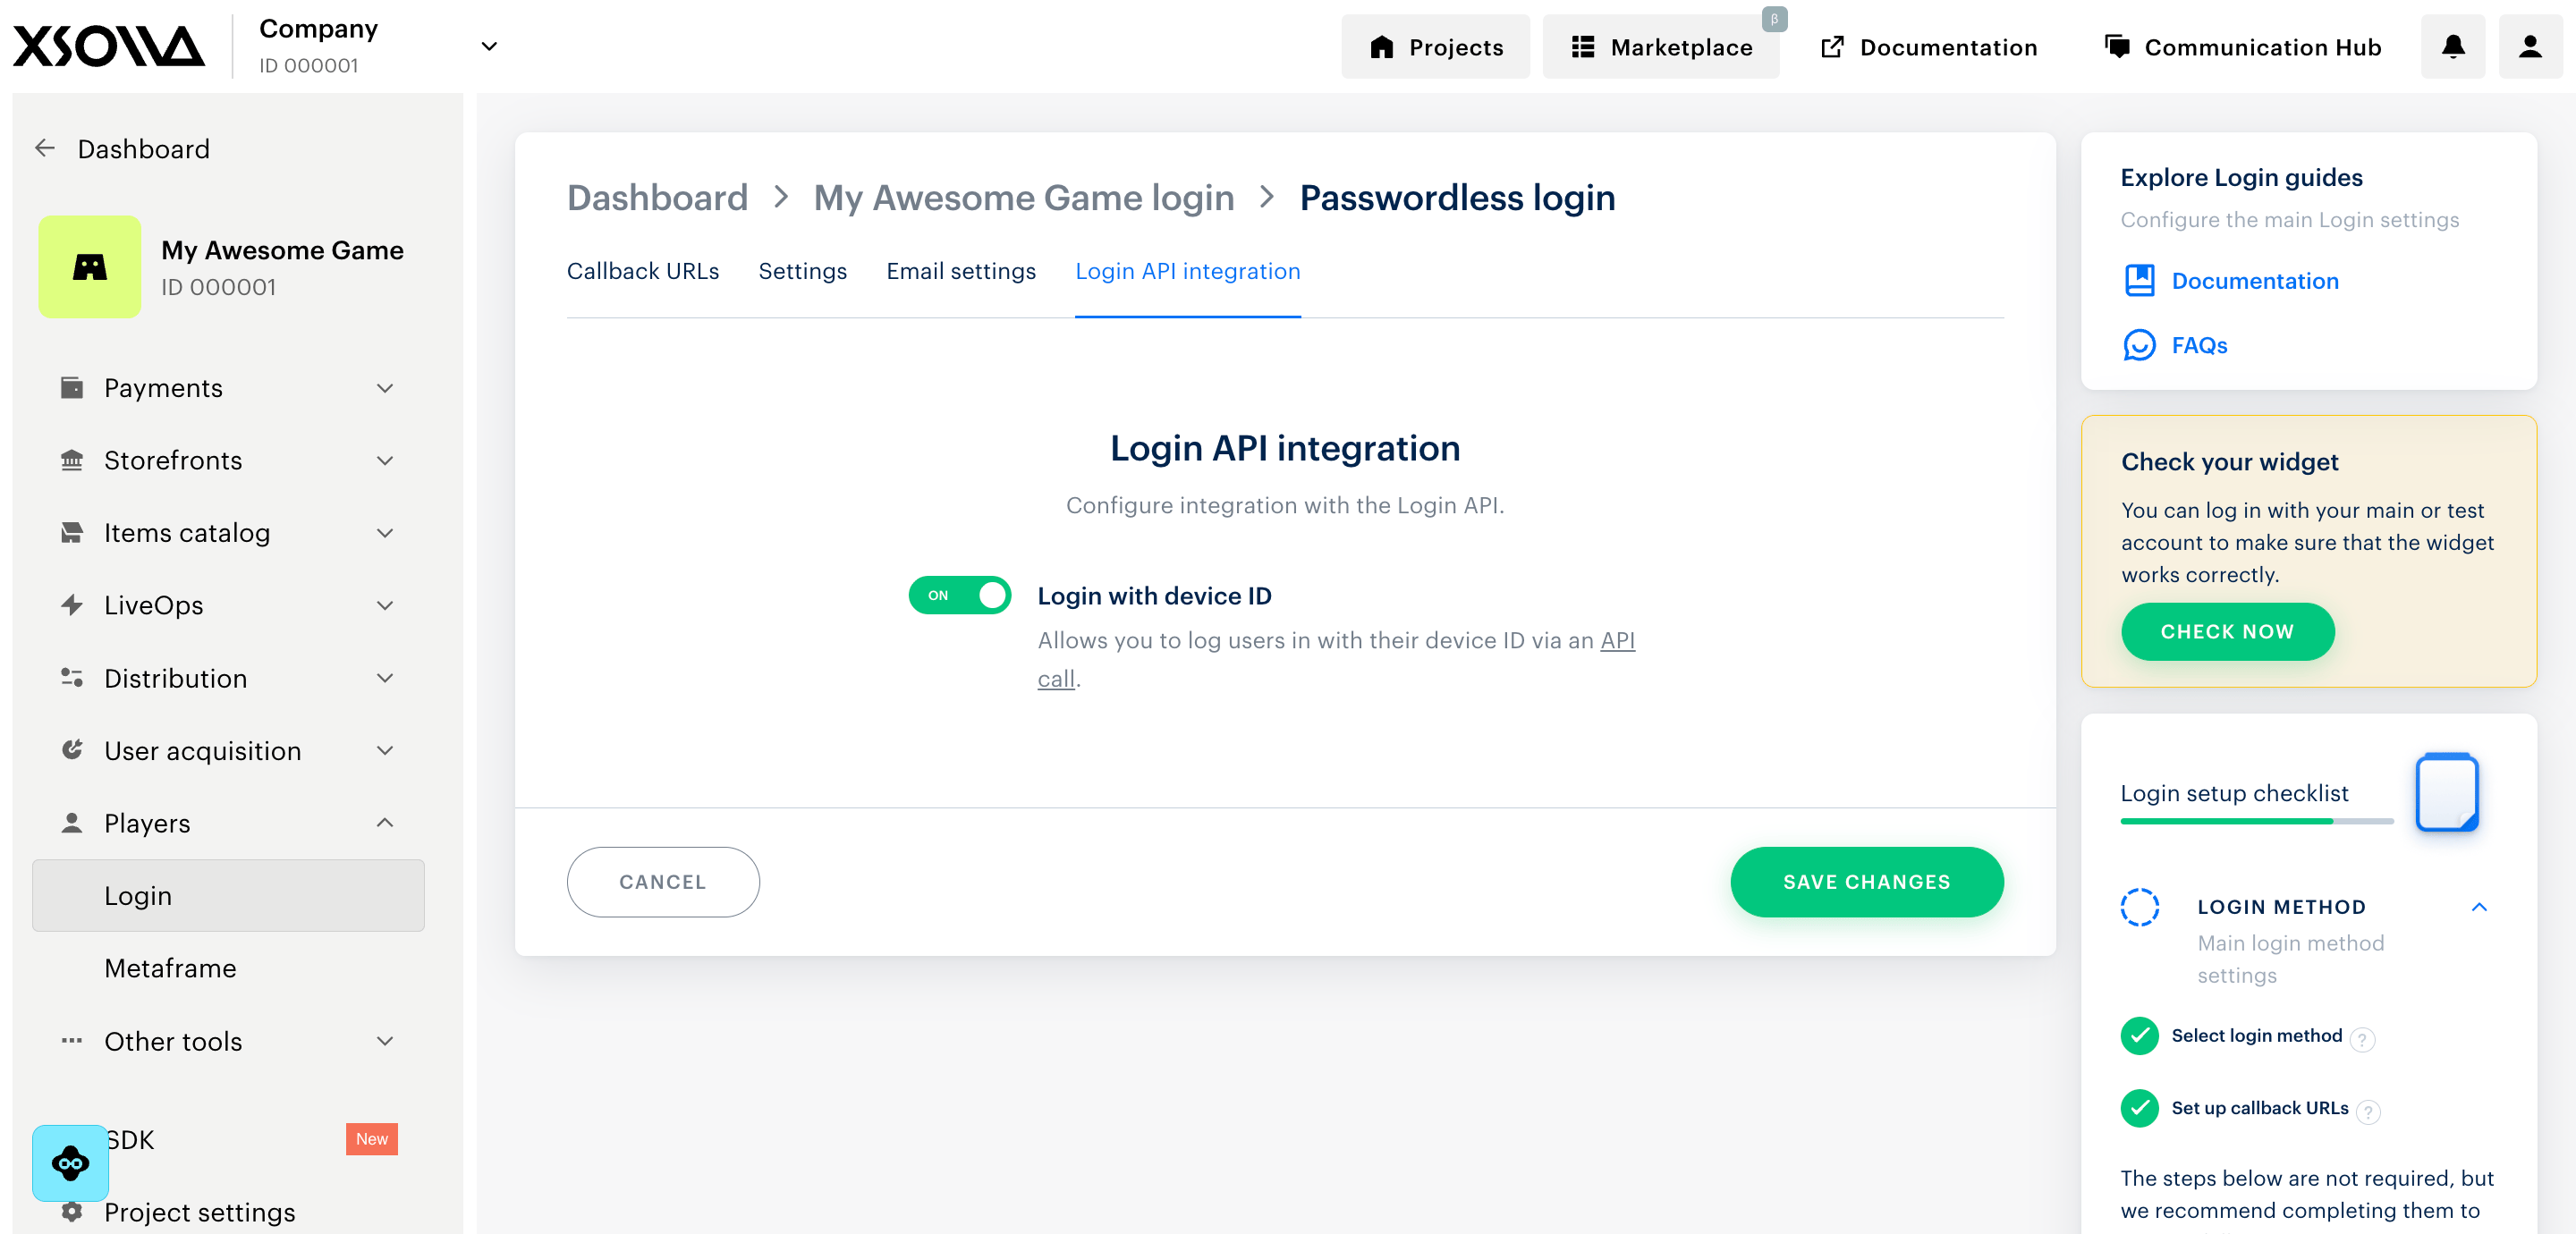
- Click Save changes.
During the integration process, you will need your Login ID. To get it, click the name of your Login project in the breadcrumb trail to return to the Login project page, and click Copy ID beside the name of the Login project.

Configure In-App Purchase products (virtual items)
Choose one of the following methods to set up your IAP SKU product catalog:
- Import items – upload a JSON file to quickly add your catalog to Publisher Account.
- Use API calls – ideal for automated or large-scale updates.
Install SDK
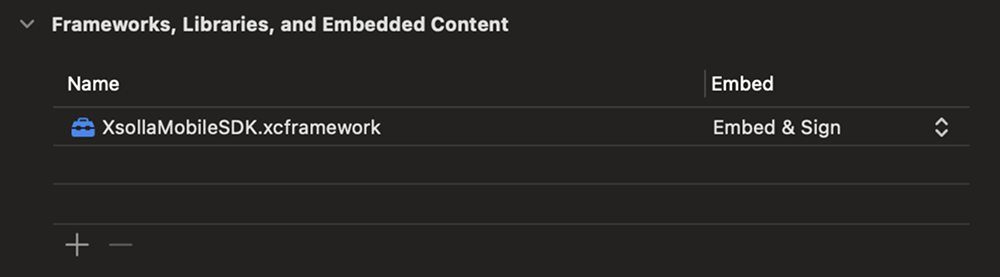
Xsolla SDK is provided as an XCFramework named XsollaMobileSDK.xcframework.
To install it manually in your Xcode project:
- Open your project in Xcode.
- Select your app target and go to the General tab.
- In the Frameworks, Libraries, and Embedded Content section, drag and drop the
XsollaMobileSDK.xcframeworkfile. - In the drop-down list next to the framework, ensure Embed & Sign is selected.
Configure SDK
For SDK configuration you need the following IDs from Publisher Account:
- Project ID. It can be found in Publisher Account next to the name of your project.
- Login ID. To access, open Publisher Account, go to the Players > Login > Dashboard > your Login project section, and click Copy ID next to the name of the Login project.
As a starting point, example IDs can be used.
settings.openExternalBrowser = YES; (Objective-C) or settings.openExternalBrowser = true; (Swift) to your SDK configuration.obj-c
- obj-c
- swift
 1#import <XsollaMobileSDK/StoreKitWrapper.h>
 2
 3// Initialize SDK settings with your project credentials
 4SKPaymentSettings* settings = [[SKPaymentSettings alloc] initWithProjectId: 77640
 5                                                    loginProjectId:@"026201e3-7e40-11ea-a85b-42010aa80004"
 6                                                    platform: SKPaymentPlatformStandalone // Target platform; SKPaymentPlatformStandalone is typically used for mobile apps
 7                                                    paystationUIThemeId: SKPaystationThemeDark
 8                                                    paystationUISize: SKPaystationSizeMedium];
 9
10// Enable sandbox mode for testing (disable for production)
11settings.useSandbox = YES;
12
13// Enable the SDK functionality (set to NO to completely disable payments)
14settings.enablePayments = YES;
15
16// Configure external browser behavior (set to YES to comply with US requirements)
17settings.openExternalBrowser = YES; // Set based on your compliance requirements
18
19// Enable Buy Button solution for native payment integration
20settings.useBuyButtonSolution = YES;
21
22// Initialize the payment queue with your settings
23SKPaymentQueue* queue = [SKPaymentQueue defaultQueue];
24[queue startWithSettings: settings];
25[queue addTransactionObserver: self];
 1import XsollaMobileSDK
 2
 3// Initialize SDK settings with your project credentials
 4let settings = SKPaymentSettings(projectId: 77640,
 5                                 loginProjectId: "026201e3-7e40-11ea-a85b-42010aa80004",
 6                                 platform: .standalone) // Target platform; .standalone is typically used for mobile apps
 7
 8// Enable sandbox mode for testing (disable for production)
 9settings.useSandbox = true
10
11// Enable the SDK functionality (set to false to completely disable payments)
12settings.enablePayments = true
13
14// Configure external browser behavior (set to true to comply with US requirements)
15settings.openExternalBrowser = true // Set based on your compliance requirements
16
17// Enable Buy Button solution for native payment integration
18settings.useBuyButtonSolution = true
19
20// Initialize the payment queue with your settings
21SKPaymentQueue.default().start(settings)
22SKPaymentQueue.default().add(self)
Configure deep linking to return users to game app after purchase
Set up URL scheme for the target:
- Select your project in the project navigator.
- Select your target.
- Open the Info tab.
- Click the ➕ button in the URL Types section.
- Set the URL Scheme to
$(PRODUCT_BUNDLE_IDENTIFIER).

Initialize SDK
After configuring, Xsolla SDK needs to be initialized and connected to Xsolla services. Place this logic in your app’s initialization flow; for example, inside AppDelegate’s didFinishLaunchingWithOptions method.
obj-c
- obj-c
- swift
 1SKPaymentQueue* queue = [SKPaymentQueue defaultQueue];
 2[queue startWithSettings: settings]; // settings from the previous step
 3
 4// conform your class to SKPaymentTransactionObserver and implement its method
 5@interface YourClass (SKPaymentTransactionObserver) <SKPaymentTransactionObserver>
 6@end
 7
 8@implementation YourClass (SKPaymentTransactionObserver)
 9
10- (void)paymentQueue:(SKPaymentQueue *)queue updatedTransactions:(NSArray *)transactions {
11    for(SKPaymentTransaction *transaction in transactions) {
12        switch (transaction.transactionState) {
13            case SKPaymentTransactionStateFailed:
14                // purchase failed, present an error
15                break;
16            case SKPaymentTransactionStatePurchased:
17                // award the player with the purchase of the SKU - transaction.payment.productIdentifier
18                break;
19            default: break;
20        }
21    }
22}
23
24@end
 1SKPaymentQueue.default().start(settings)
 2SKPaymentQueue.default().add(self)
 3
 4// conform your class to SKPaymentTransactionObserver and implement its method
 5extension YourClass: SKPaymentTransactionObserver {
 6    func paymentQueue(_: SKPaymentQueue, updatedTransactions: [SKPaymentTransaction]) {
 7        for transaction in updatedTransactions {
 8            switch transaction.transactionState {
 9            case .failed:
10                // purchase failed, present an error
11            case .purchased:
12                // award the player with the purchase of the SKU - transaction.payment.productIdentifier
13            default:
14                break
15            }
16        }
17    }
18}
After starting SKPaymentQueue and adding a transaction observer, the application can request SKU information as follows:
obj-c
- obj-c
- swift
 1NSSet *skus = [NSSet setWithArray:@[@"your_sku1", @"your_sku2"]];
 2SKProductsRequest* req = [[SKProductsRequest alloc] initWithProductIdentifiers:skus];
 3
 4req.delegate = self;
 5[req start];
 6
 7// conform your class to SKProductsRequestDelegate and implement its method
 8@interface YourClass (SKProductsRequestDelegate) <SKProductsRequestDelegate>
 9@end
10
11@implementation YourClass (SKProductsRequestDelegate)
12
13- (void)productsRequest:(SKProductsRequest *)request didReceiveResponse:(SKProductsResponse *)response {
14    // save loaded products somewhere
15    self.products = response.products
16}
17
18@end
 1let skus: Set<String> = ["your_sku1", "your_sku2"]
 2let req = SKProductsRequest(productIdentifiers: skus)
 3
 4req.delegate = self
 5req.start()
 6
 7// conform your class to SKProductsRequestDelegate and implement its method
 8extension YourClass: SKProductsRequestDelegate {
 9    func productsRequest(_ request: SKProductsRequest, didReceive response: SKProductsResponse) {
10        // save loaded products somewhere
11        self.products = response.products
12    }
13}
Make purchase
The purchasing flow is a multistage process, which involves payment collection, purchase validation, and consumption.
Start purchase flow
To create a payment and initiate a purchase, use previously acquired SKProduct info:
obj-c
- obj-c
- swift
1SKProduct *product = ...;  // previously fetched product
2SKPayment *payment = [SKPayment paymentWithProduct:product];
3[[SKPaymentQueue defaultQueue] addPayment:payment];
1let product = ... // previously fetched product
2let payment = SKPayment(product: product)
3SKPaymentQueue.default().add(payment)
Validate purchase
Each purchase should be validated before delivering it to the end-user to help prevent unauthorized purchases.
The most effective way to assure the validity of a purchase is to use the server-to-server (S2S) calls, removing the client from the decision making process; thus, avoiding creation of a potential security hole.
Commonly, S2S validation approach follows these steps:
- The application client sends the purchase’s order ID to the backend. This ID is obtained when the payment transaction is finalized on the client side (typically via a transaction callback). See Start purchase flow for how purchases are initiated.
- The server receives the order ID and validates its authenticity using the webhook approach (triggered by Xsolla services) as soon as the purchase completes server notification. This allows for asynchronous receipt handling without resorting to polling and can be done in background (the result gets cached) before even the request from a client comes in. For more information on webhooks, see the Set up webhook section.
Consume purchased content
The very final step in the purchasing flow chain is to award the purchases to the user and mark these purchases as “awarded”. The process is also known as, “purchase consumption”.
The purchase result is delivered through the paymentQueue:updatedTransactions: callback in Objective-C, or paymentQueue(_:updatedTransactions:) in Swift.
obj-c
- obj-c
- swift
 1- (void)paymentQueue:(SKPaymentQueue *)queue updatedTransactions:(NSArray *)transactions {
 2    for(SKPaymentTransaction *transaction in transactions) {
 3        switch (transaction.transactionState) {
 4            case SKPaymentTransactionStateFailed:
 5               // Check if the user cancelled the purchase (don't treat as an error)
 6                if (transaction.error.code == SKErrorPaymentCancelled) {
 7                    [[SKPaymentQueue defaultQueue] finishTransaction:transaction];
 8                    break;
 9                }
10                // Always acknowledge transaction and finish it
11                [[SKPaymentQueue defaultQueue] finishTransaction:transaction];
12                break;
13            case SKPaymentTransactionStatePurchased:
14                // here you can save the purchase and award it to the user
15                // Always acknowledge transaction and finish it after it was saved
16                [[SKPaymentQueue defaultQueue] finishTransaction:transaction];
17                break;
18            default: break;
19        }
20    }
21}
 1func paymentQueue(_: SKPaymentQueue, updatedTransactions: [SKPaymentTransaction]) {
 2    for transaction in updatedTransactions {
 3        switch transaction.transactionState {
 4        case .failed:
 5           // Check if the user cancelled the purchase (don't treat as an error)
 6            if (transaction.error as? SKXError)?.errorCode == .paymentCancelled {
 7                SKPaymentQueue.default().finishTransaction(transaction)
 8                break
 9            }
10            // Always acknowledge transaction and finish it
11            SKPaymentQueue.default().finishTransaction(transaction)
12        case .purchased:
13            // here you can save the purchase and award it to the user
14            // Always acknowledge transaction and finish it after it was saved
15            SKPaymentQueue.default().finishTransaction(transaction)
16        default:
17            break
18        }
19    }
20}
Set up webhooks
Webhooks are notifications about events occurring in the system. When a specific event occurs, Xsolla sends an HTTP request, transmitting event data to your game server. These webhooks are essential for the game client and/or server to receive notification on successful and unsuccessful payments and user authentication attempts.
Enabling webhooks
To enable receiving webhooks:
- In the project in Publisher Account go to Project settings > Webhooks section.
- In the Webhook server field, specify the URL of your server where you want to receive webhooks in the
https://example.comformat. You can also specify the URL you find in a tool for testing webhooks.
- Generate a secret key:
- In the Secret keys section, click Add key.
- In the modal window that opens, enter the key name that would allow you to identify it in the general list.
- Click Create key.
- Click Copy secret and save the created key on your side.
- Click Done.
- Confirm that you have saved the key and click Ok, close.

Key recommendations:
- Save the generated secret key on your side. You can view the key in Publisher Account only once when it is created.
- Don’t share your secret key with anyone.
- The secret key must be stored on your server and never in binaries or on the front end.
- Click Enable webhooks.
Secret key rotation
You can create up to 5 secret keys in your project to enable their rotation.
There can be only one active secret key per project. If you want to change it, click Set as active in the row of another key and confirm the action. Once you successfully migrate to a new key, we recommend deleting deactivated keys.

Testing webhooks
In the Payments and Store tab, you can test the following webhooks:
User validation (“notification_type”:“user_validation”):
- curl
 1curl -v 'https://your.hostname/your/uri' \
 2-X POST \
 3-H 'Accept: application/json' \
 4-H 'Content-Type: application/json' \
 5-H 'Authorization: Signature 13342703ccaca5064ad33ba451d800c5e823db8f' \
 6-d '{
 7    "notification_type":"user_validation",
 8    "settings": {
 9      "project_id": 18404,
10      "merchant_id": 2340
11    },
12    "user": {
13        "ip": "127.0.0.1",
14        "phone": "18777976552",
15        "email": "[email protected]",
16        "id": "1234567",
17        "name": "John Smith",
18        "country": "US"
19    }
20}'
Successful payment for order (“notification_type”: “order_paid”):
- curl
  1curl -v 'https://your.hostname/your/uri' \
  2-X POST \
  3-H 'Accept: application/json' \
  4-H 'Content-Type: application/json' \
  5-H 'Authorization: Signature d09695066c52c1b8bdae92f2d6eb59f5b5f89843' \
  6-d '{
  7    "notification_type": "order_paid",
  8    "items": [
  9      {
 10        "sku": "com.xsolla.item_1",
 11        "type": "virtual_good",
 12        "is_pre_order": false,
 13        "quantity": 3,
 14        "amount": "1000",
 15        "promotions": [
 16          {
 17            "amount_without_discount": "6000",
 18            "amount_with_discount": "5000",
 19            "sequence": 1
 20          },
 21          {
 22            "amount_without_discount": "5000",
 23            "amount_with_discount": "4000",
 24            "sequence": 2
 25          }
 26        ],
 27        "custom_attributes":
 28          {
 29            "purchased": 0,
 30            "attr": "value"
 31          }
 32      },
 33      {
 34        "sku": "com.xsolla.item_new_1",
 35        "type": "bundle",
 36        "is_pre_order": false,
 37        "quantity": 1,
 38        "amount": "1000",
 39        "promotions": []
 40      },
 41      {
 42        "sku": "com.xsolla.gold_1",
 43        "type": "virtual_currency",
 44        "is_pre_order": false,
 45        "quantity": 1500,
 46        "amount": null,
 47        "promotions": []
 48      }
 49    ],
 50    "order": {
 51      "id": 1,
 52      "mode": "default",
 53      "currency_type": "virtual",
 54      "currency": "sku_currency",
 55      "amount": "2000",
 56      "status": "paid",
 57      "platform": "xsolla",
 58      "comment": null,
 59      "invoice_id": "1",
 60      "promotions": [
 61        {
 62          "amount_without_discount": "4000",
 63          "amount_with_discount": "2000",
 64          "sequence": 1
 65        }
 66      ],
 67      "promocodes": [
 68        {
 69          "code": "promocode_some_code",
 70          "external_id": "promocode_sku"
 71        }
 72      ],
 73      "coupons": [
 74        {
 75          "code": "WINTER2021",
 76          "external_id": "coupon_sku"
 77        }
 78      ]
 79    },
 80    "user": {
 81      "external_id": "id_xsolla_login_1",
 82      "email": "[email protected]"
 83    },
 84    "billing": {
 85      "notification_type": "payment",
 86      "settings": {
 87        "project_id": 18404,
 88        "merchant_id": 2340
 89      },
 90      "purchase": {
 91          "subscription": {
 92              "plan_id": "b5dac9c8",
 93              "subscription_id": "10",
 94              "product_id": "Demo Product",
 95              "date_create": "2014-09-22T19:25:25+04:00",
 96              "date_next_charge": "2014-10-22T19:25:25+04:00",
 97              "currency": "USD",
 98              "amount": 9.99
 99          },
100          "total": {
101              "currency": "USD",
102              "amount": 200
103          },
104          "promotions": [{
105              "technical_name": "Demo Promotion",
106              "id": 853
107          }],
108          "coupon": {
109              "coupon_code": "ICvj45S4FUOyy",
110              "campaign_code": "1507"
111          }
112        },
113      "transaction": {
114          "id": 1,
115          "external_id": 1,
116          "payment_date": "2014-09-24T20:38:16+04:00",
117          "payment_method": 1,
118          "payment_method_name": "PayPal",
119          "payment_method_order_id": 1234567890123456789,
120          "dry_run": 1,
121          "agreement": 1
122      },
123      "payment_details": {
124          "payment": {
125              "currency": "USD",
126              "amount": 230
127          },
128          "vat": {
129              "currency": "USD",
130              "amount": 0,
131              "percent": 20
132          },
133          "sales_tax": {
134              "currency": "USD",
135              "amount": 0,
136              "percent": 0
137          },
138          "direct_wht": {
139              "currency": "USD",
140              "amount": 0,
141              "percent": 0
142          },
143          "payout_currency_rate": "1",
144          "payout": {
145              "currency": "USD",
146              "amount": 200
147          },
148          "country_wht": {
149              "currency": "USD",
150              "amount": 2,
151              "percent": 10
152          },
153          "user_acquisition_fee": {
154              "currency": "USD",
155              "amount": 2,
156              "percent": 1
157          },
158          "xsolla_fee": {
159              "currency": "USD",
160              "amount": 10
161          },
162          "payment_method_fee": {
163              "currency": "USD",
164              "amount": 20
165          },
166          "repatriation_commission": {
167              "currency": "USD",
168              "amount": 10
169          }
170      }
171    }
172 ,
173  "custom_parameters": {
174    "parameter1": "value1",
175    "parameter2": "value2"
176  }
177}'
Test on sandbox
This section contains code snippets and examples demonstrating how to configure the sandbox environment for testing payments, enabling detailed logging, and other related tasks.
Enabling sandbox mode
obj-c
- obj-c
- swift
1SKPaymentSettings* settings = ...;
2
3settings.useSandbox = YES;
1let settings = SKPaymentSettings(...)
2
3settings.useSandbox = true
Enabling additional logging
obj-c
- obj-c
- swift
1SKPaymentSettings* settings = ...;
2
3settings.logLevel = SKLogLevelDebug;
1let settings = SKPaymentSettings(...)
2
3settings.logLevel = .debug
Test bank cards
For a list of cards to simulate payments in sandbox mode, see the Test bank cards list section.
Go LIVE
- Sign the licensing agreement. To do this, in Publisher Account, go to the Agreements & Taxes > Agreements section, complete the agreement form.
- Set
sandboxtofalsefrom the SDK configuration code.
obj-c
- obj-c
- swift
1SKPaymentSettings* settings = ...;
2
3settings.useSandbox = NO;
4settings.logLevel = SKLogLevelError;
1let settings = SKPaymentSettings(...)
2
3settings.useSandbox = false
4settings.logLevel = .error
How to detect iOS storefront
To determine the current iOS storefront and adjust SDK functionality based on the region, use the following code snippets:
obj-c
- obj-c
- swift
1[SKPaymentQueue loadCurrentStorefrontCountryCodeWithCompletion:^(NSString* _Nullable countryCode) {
2    settings.enablePayments = countryCode && [countryCode isEqualToString:@"USA"];
3
4    [[SKPaymentQueue defaultQueue] startWithSettings:settings];
5}];
1SKPaymentQueue.loadCurrentStorefrontCountryCode { countryCode in
2    settings.enablePayments = countryCode == "USA"
3
4    SKPaymentQueue.default().start(settings)
5}
The loadCurrentStorefrontCountryCode method asynchronously retrieves the three-letter country code for the current storefront. You can use this information to enable or disable SDK functionality for specific regions.
Alternatively, you can use Apple’s native Storefront directly, as shown below:
SKStorefront implementation, as it performs synchronous loading that blocks the main thread. This can lead to UI freezes and degraded user experience, as noted in Apple’s official documentation.- swift
1let storefront = await Storefront.current
2let countryCode = storefront?.countryCode
3
4settings.enablePayments = countryCode == "USA"
5
6SKPaymentQueue.default().start(settings)
How it works
In this guide, you’ll learn how to integrate Xsolla for processing payments using Xsolla API, in compliance with Apple’s requirements.
Apple’s requirements:
In-app WebViews for external purchases are not allowed — payments must occur via Safari or the default browser.
External purchase links are currently permitted only for iOS applications on the United States storefront. Note that Apple’s app review guidelines refer to the
United States storefront, not user location .
User flow:
- The user opens the game application on iOS.
- The user clicks the purchase button next to the desired item.
- The application opens Safari (or the default browser) with a Pay Station link that contains the payment token.
- Pay Station opens for the specific item.
- The user selects a payment method and completes the purchase.
- Pay Station redirects the user to the game application.
- The application receives the purchase confirmation via a webhook.
Quick start
Sign up for your Publisher Account and create a project
Publisher Account is the main tool to configure Xsolla features, as well as to work with analytics and transactions.
To sign up, go to Publisher Account and create an account. To create a project, click Create project in the side menu and provide any necessary information. You can modify the settings later.
During the integration process, you need to provide the project ID, found in your Publisher Account next to the project name.
Configure In-App Purchase products (virtual items)
Choose one of the following methods to set up your IAP SKU product catalog:
- Import items – upload a JSON file to quickly add your catalog to Publisher Account.
- Create an item catalog using the API calls from the Virtual Items & Currency > Admin documentation section.
Configure universal links
Universal links are links like https://your-site.com/your-game that open in the application if it’s installed on the user’s device, or in the browser if the application is not installed.
To configure universal links:
- Add a domain association file to the root of your website. For example,
https://your-site.com/apple-app-site-association. - In your Xcode project, go to
Signing & Capabilities > Associated Domains and addapplinks:your-site.com.
Configure redirects to return users to game app after purchase
- Open your project in Publisher Account and go to the Payments > Payment interface > General settings > Redirect policy section.
- In the Return URL field, enter a URL address or a path (a deep link) a user is redirected to after making a payment. This URL has to support universal links. To improve user experience in a game mobile app, we recommend specifying a deep link as a return URL.
- In the Automatic redirect condition drop-down list, choose a necessary condition.
- In the Manual redirect condition drop-down list, choose None — do not redirect.
- Click Save changes.
Detect iOS Storefront
External payment systems are currently allowed only in the USA. To check if your app is obtained from the USA store, use the following code:
- swift
1let storefront = await Storefront.current
2let countryCode = storefront?.countryCode
3
4settings.enablePayments = countryCode == "USA"
5
6SKPaymentQueue.default().start(settings)
The loadCurrentStorefrontCountryCode method asynchronously retrieves the three-letter country code for the current storefront.
Make purchase
Create order on server side of application
The app client makes a request to your server to retrieve a payment token:
- swift
 1struct TokenRequest: Codable {
 2  let sku: String
 3  let userId: String
 4}
 5
 6func fetchPaymentToken(for sku: String, userId: String, completion: @escaping (Result<String, Error>) -> Void) {
 7  let req = TokenRequest(sku: sku, userId: userId)
 8  guard let url = URL(string: "https://your-backend.com/xsolla/create_token") else { return }
 9  var request = URLRequest(url: url)
10  request.httpMethod = "POST"
11  request.setValue("application/json", forHTTPHeaderField: "Content-Type")
12  request.httpBody = try? JSONEncoder().encode(req)
13  URLSession.shared.dataTask(with: request) { data, _, error in
14    if let error = error {
15      completion(.failure(error)); return
16    }
17    let token = try! JSONDecoder().decode([String: String].self, from: data!)["token"]!
18    completion(.success(token))
19  }.resume()
20}
To create an order with user and item data on the Xsolla side, use the Create payment token for purchase API call. The method will return a payment token, which is required to open the payment UI and make a payment. To use sandbox mode, pass the “sandbox”: true parameter in the body of the request for getting a token.
Open payment UI
After receiving a token, generate a link to open the payment UI in a browser via the following link: https://secure.xsolla.com/paystation4/?token=TOKEN, where TOKEN is the obtained token.
- swift
1func openPayStation(token: String) {
2    let urlString = "https://secure.xsolla.com/paystation4/?token=\(token)"
3    guard let url = URL(string: urlString) else { return }
4    UIApplication.shared.open(url, options: [:], completionHandler: nil)
5}
To test the payment process, you can use sandbox mode. It is a standalone environment that supports all features of a live environment, except real and declined payments. In sandbox mode, you can test a one-time payment and payment with saved payment methods using bank cards and PayPal.
Redirect users to app
After successful payment, handle returning users to your app using universal links. To handle the redirect, implement the following method in your SceneDelegate or AppDelegate:
- swift
 1func scene(_ scene: UIScene, continue userActivity: NSUserActivity) {
 2    guard userActivity.activityType == NSUserActivityTypeBrowsingWeb,
 3          let url = userActivity.webpageURL,
 4          url.host == "your-site.com",
 5          url.path.starts(with: "/payment_callback_success") else { return }
 6    // Extract parameters (e.g., status, transaction_id)
 7    let components = URLComponents(url: url, resolvingAgainstBaseURL: false)
 8    let queryItems = components?.queryItems
 9    let status = queryItems?.first { $0.name == "status" }?.value
10    handlePaymentResult(status: status)
11}
Set up webhooks
To enable receiving webhooks:
- In the project in Publisher Account go to Project settings > Webhooks section.
- In the Webhook server field, specify the URL of your server where you want to receive webhooks in the
https://example.comformat. You can also specify the URL you find in a tool for testing webhooks.
- Generate a secret key:
- In the Secret keys section, click Add key.
- In the modal window that opens, enter the key name that would allow you to identify it in the general list.
- Click Create key.
- Click Copy secret and save the created key on your side.
- Click Done.
- Confirm that you have saved the key and click Ok, close.
Key recommendations:
- Save the generated secret key on your side. You can view the key in Publisher Account only once when it is created.
- Don’t share your secret key with anyone.
- The secret key must be stored on your server and never in binaries or on the front end.
- Click Enable webhooks.
Secret key rotation
You can create up to 5 secret keys in your project to enable their rotation.
There can be only one active secret key per project. If you want to change it, click Set as active in the row of another key and confirm the action. Once you successfully migrate to a new key, we recommend deleting deactivated keys.
For the full operation of the in-game store and payment management, it is necessary to implement the processing of the main webhooks:
| Webhook name | Description |
|---|---|
User validation > User validation (user_validation) | Is sent at different stages of the payment process to ensure the user is registered in the game. |
Game services > Combined webhooks > Successful payment for order (order_paid) | It contains payment data, transaction details, and information about purchased items. Use the data from the webhook to add items to the user. |
Game services > Combined webhooks > Order cancellation (order_canceled) | It contains data of the canceled payment, transaction details, and information about purchased items. Use the data from the webhook to remove the purchased items. |
Launch
- Sign the licensing agreement. To do this, in Publisher Account, go to the Agreements & Taxes > Agreements section, complete the agreement form.
- Pass the tax interview. To do this, in Publisher Account, go to the Agreements & Taxes > Tax interview section and complete the form.
- Switch to a production environment. To do this, remove
“sandbox”: truefrom the request for creating a token.
Found a typo or other text error? Select the text and press Ctrl+Enter.
