Item purchase limits
How it works
You can set a purchase limit per user and configure scheduled resets for these limits.
Limit configuration is available for the following scenarios:
- sale of in-game items — virtual items, virtual currency packages, and bundles
- sale of games and DLC via game keys
You can enable periodic limit resets to:
- allow repeat purchases
- synchronize data with your system when items are sold across multiple game publishing platforms
To correctly display the quantity available to a user, you must configure authentication.
Unauthenticated users always see the maximum quantity of items they can purchase. To display the user’s remaining quantity of items with the active limit applied, include user authorization data when requesting:
- the item catalog using calls from the Catalog subsection of Virtual Items & Currency group
- the game catalog using calls from the Catalog subsection of Game Keys group
Xsolla enforces limits and prevents users from purchasing more items than the set limit:
- When the payment UI is opened and an item is paid for, all unpaid orders containing that item become invalid.
- Example: A user can open the payment form for a limited item in multiple browser tabs or different browsers before completing the purchase, which creates multiple orders for the same item. Once the purchase is completed in one tab, Xsolla cancels all unpaid orders for that item.
- When a payment is refunded or order is cancelled, limits are not reset. You can reset them using the following API calls: Refresh all purchase limits for specified user and Refresh all promotion limits for specified user.
- Example: A user can purchase an item that has purchase limits, use it in the game, and then request a refund. If limits were reset automatically, the user could buy the item again, use it, and repeat this cycle, effectively bypassing the intended limits. To prevent this, the limits are not reset when a payment is refunded or an order is canceled.
To configure promotion usage limits, refer to the instructions.
Configure and update limits
Configure and update in Publisher Account
- The configuration process below is shown using virtual items as an example.
- Before configuring virtual items, it is recommended to create groups. Groups allow you to build a multi-level catalog and manage how items are displayed in your store.
- In Publisher Account, you can update limits for a specific item for all users. Advanced configuration options are available via API calls.
To create an item with a limited number of uses:
- Open your project in Publisher Account and go to the Items catalog > All items > Virtual items section.
- Open the project in your account and go to the Items catalog > All items > Virtual items section.
- Open the project in your account and go to the Items catalog > All items > Virtual items section.
- Open the project in your account and go to the Items catalog > All items > Virtual items section.
- Open your project in the account for mobile games and go to the Catalog section.
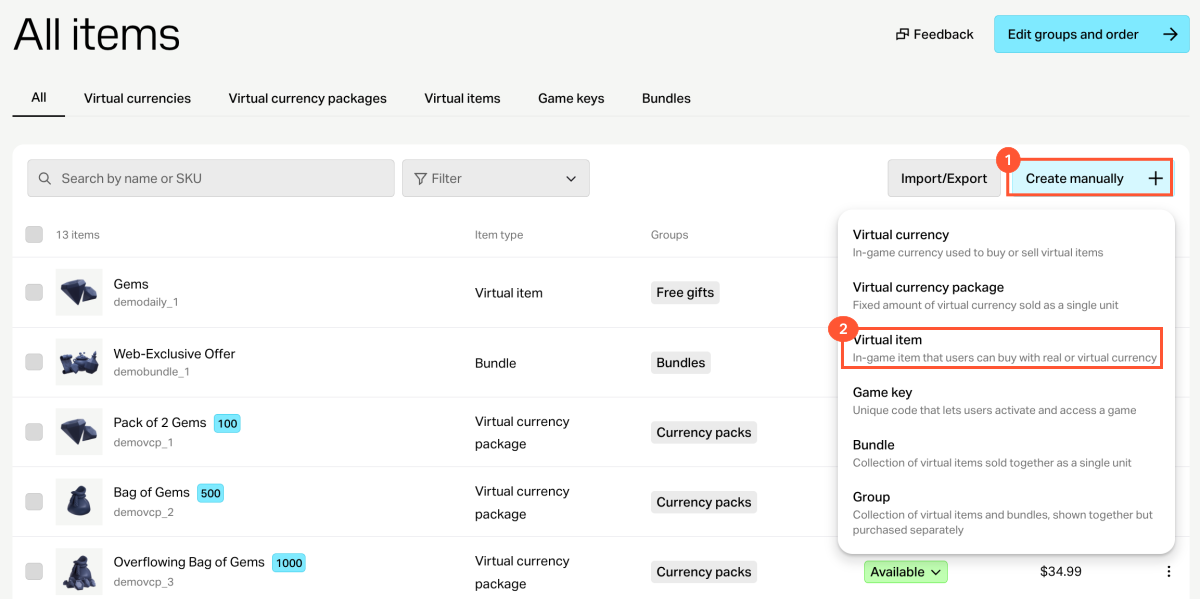
- Click Create manually and select Virtual item from the drop-down list.
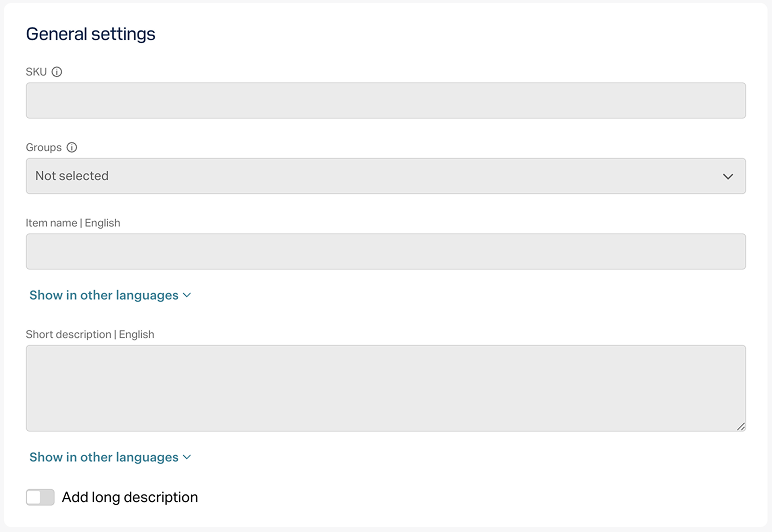
- In the General settings section, specify the following:
- SKU
- One or several groups the item should belong to (optional)
- Name
- Short description
- Extended description — to add it, turn on the corresponding toggle (optional)
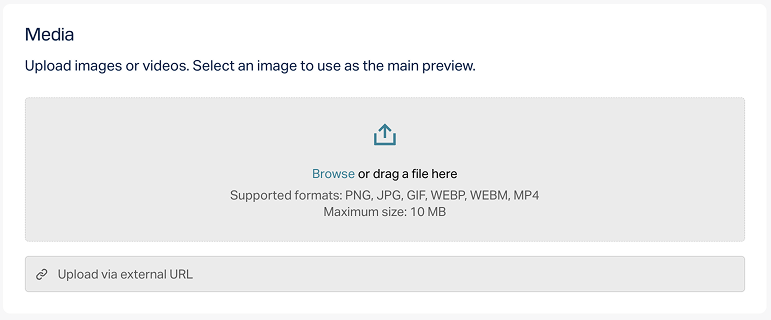
- In the Media section, upload one or more images or videos (optional) — from your device or via a link. In the store created with the Xsolla site editor, all item cards display the file marked as Main, while the remaining files are available only in item cards with a media gallery. The file marked as Main is also returned in the responses of the catalog retrieval API calls.
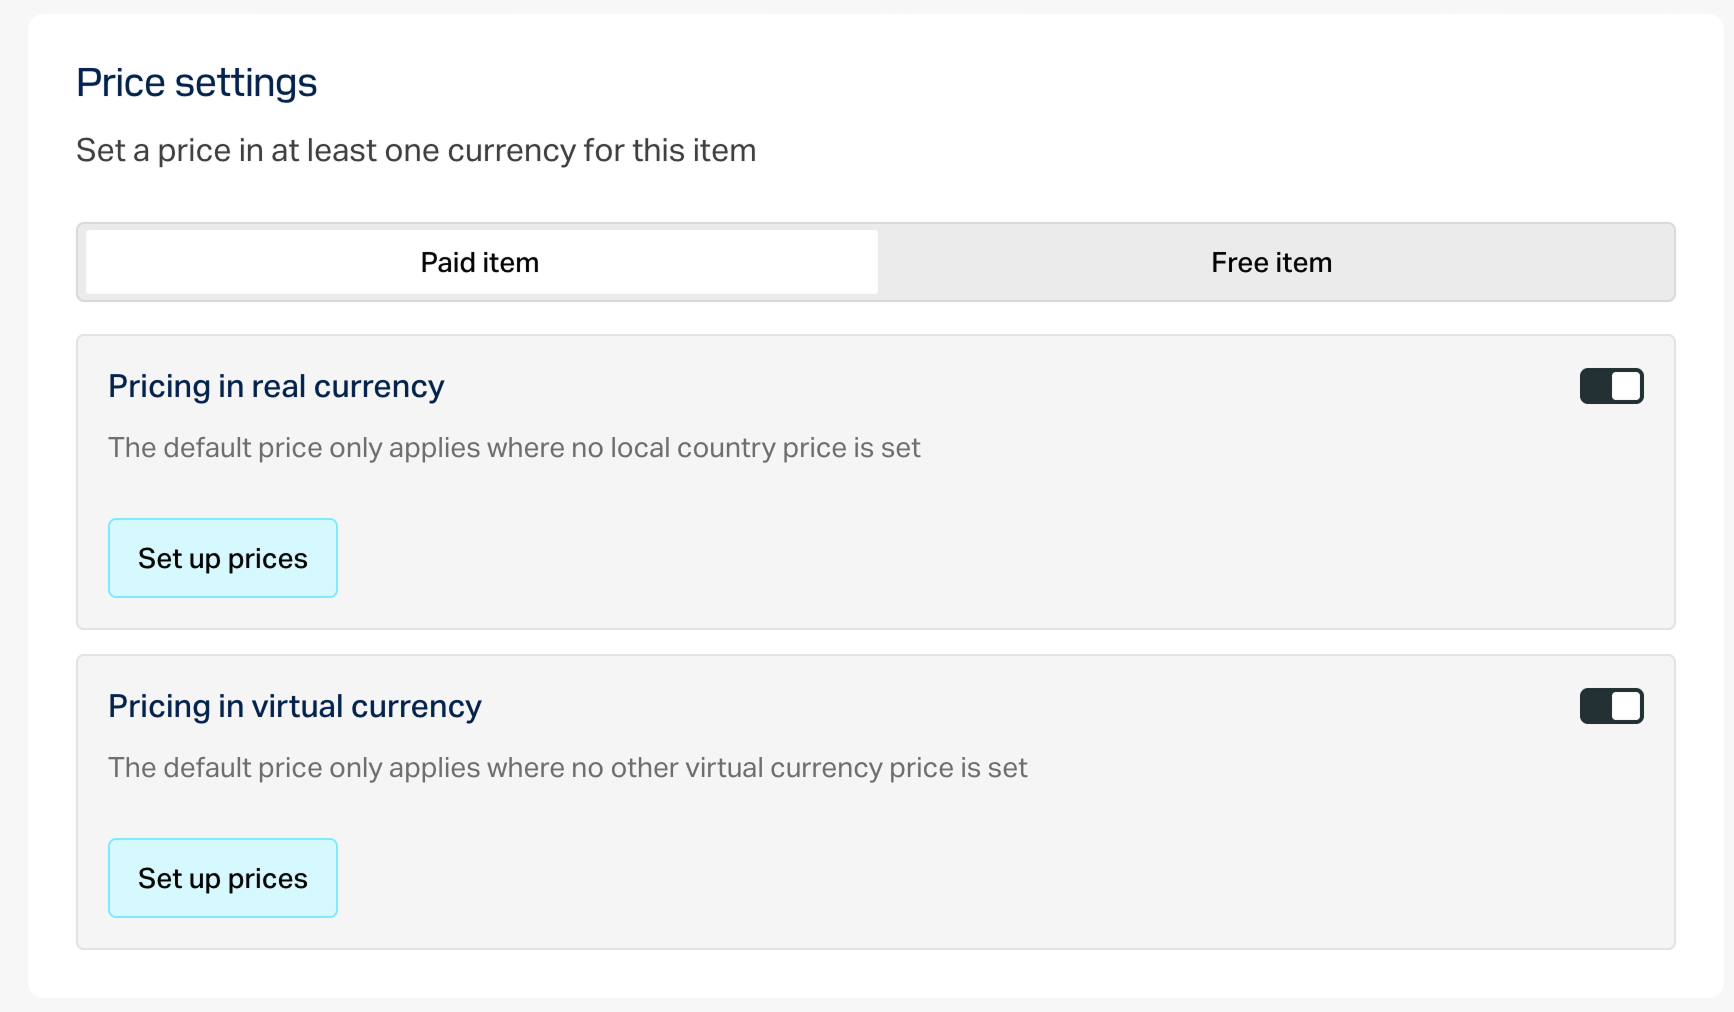
- In the Price settings section, set prices or create a free item:
- To set a price, select Paid item, turn on the Pricing in real currency and/or Pricing in virtual currency toggle, and specify the price. If needed, configure regional prices.
- To create a free item, select Free item.
An item can have prices in several real and virtual currencies. In this case, you must specify a default currency for each type — one among the real currencies and one among the virtual currencies.
You can specify a price in virtual currency only if the virtual currency has already been created in the project.
- To limit the number of items available for purchase:
- Turn on the toggle in the Limits section and specify the quantity.
- Configure the limit reset frequency. To do this, select a period from the drop-down list:
- Daily.
- Weekly.
- Monthly.
- Custom interval. The interval is calculated from the item’s display start date in the store.
- No regular refresh.
- Set up the reset schedule by specifying the parameters that correspond to the selected period.
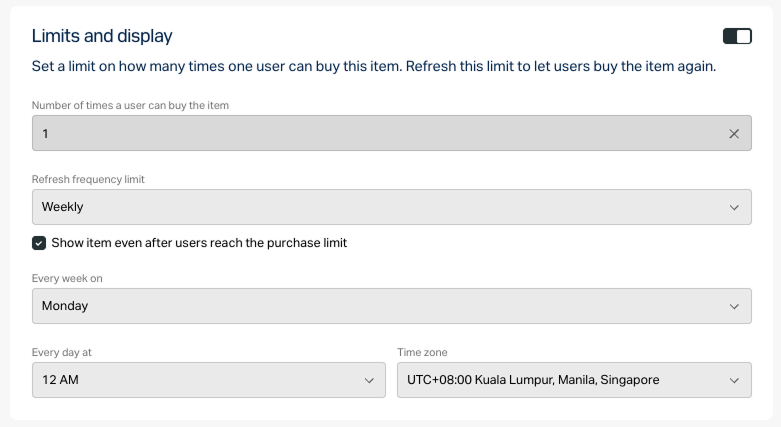
To configure a display time limit for the item (optional):
- Turn on the toggle in the Add specific display period section.
- Specify the time zone and the beginning and the end of the period.
To leave the end of the item’s display period unspecified, turn on the No end date toggle.
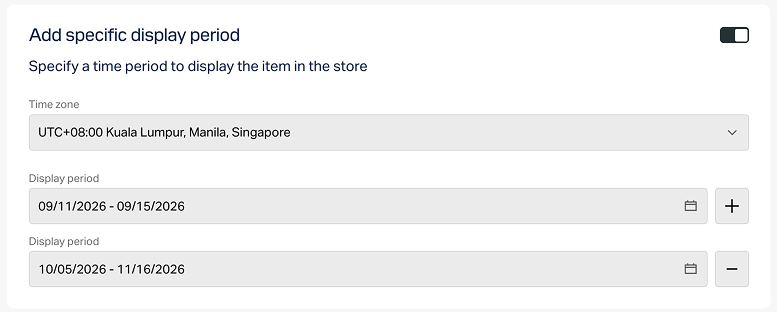
- Configure attributes using one of the following options (optional):
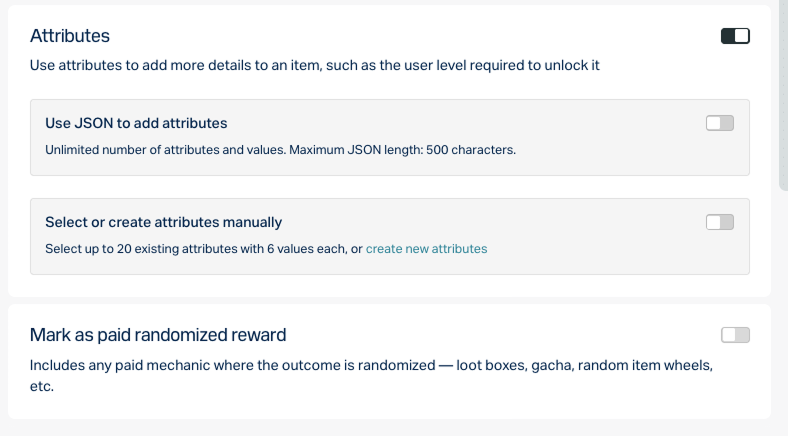
- If the paid item will be used in any mechanics with a random reward (e.g., loot boxes or gacha), enable the Mark as paid randomized reward toggle.
Click Create.
In the window that opens, select the item status and click Continue.
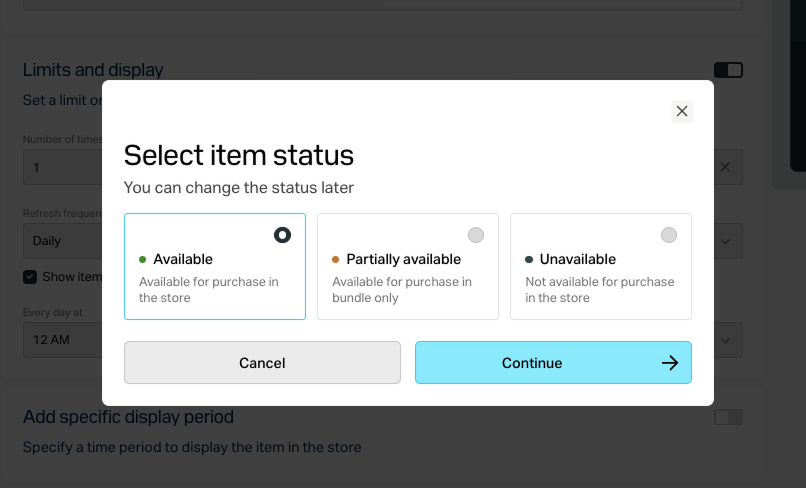
The created item will appear in the All items section.
To configure or update limits for an existing item:
Configure and update in your account
- The configuration process below is shown using virtual items as an example.
- Before configuring virtual items, it is recommended to create groups. Groups allow you to build a multi-level catalog and manage how items are displayed in your store.
- In your account, you can update limits for a specific item for all users. Advanced configuration options are available via API calls.
To create an item with a limited number of uses:
- Open your project in Publisher Account and go to the Items catalog > All items > Virtual items section.
- Open the project in your account and go to the Items catalog > All items > Virtual items section.
- Open the project in your account and go to the Items catalog > All items > Virtual items section.
- Open the project in your account and go to the Items catalog > All items > Virtual items section.
- Open your project in the account for mobile games and go to the Catalog section.
- Click Create manually and select Virtual item from the drop-down list.
- In the General settings section, specify the following:
- SKU
- One or several groups the item should belong to (optional)
- Name
- Short description
- Extended description — to add it, turn on the corresponding toggle (optional)
- In the Media section, upload one or more images or videos (optional) — from your device or via a link. In the store created with the Xsolla site editor, all item cards display the file marked as Main, while the remaining files are available only in item cards with a media gallery. The file marked as Main is also returned in the responses of the catalog retrieval API calls.
- In the Price settings section, set prices or create a free item:
- To set a price, select Paid item, turn on the Pricing in real currency and/or Pricing in virtual currency toggle, and specify the price. If needed, configure regional prices.
- To create a free item, select Free item.
An item can have prices in several real and virtual currencies. In this case, you must specify a default currency for each type — one among the real currencies and one among the virtual currencies.
You can specify a price in virtual currency only if the virtual currency has already been created in the project.
- To limit the number of items available for purchase:
- Turn on the toggle in the Limits section and specify the quantity.
- Configure the limit reset frequency. To do this, select a period from the drop-down list:
- Daily.
- Weekly.
- Monthly.
- Custom interval. The interval is calculated from the item’s display start date in the store.
- No regular refresh.
- Set up the reset schedule by specifying the parameters that correspond to the selected period.
To configure a display time limit for the item (optional):
- Turn on the toggle in the Add specific display period section.
- Specify the time zone and the beginning and the end of the period.
To leave the end of the item’s display period unspecified, turn on the No end date toggle.
- Configure attributes using one of the following options (optional):
- If the paid item will be used in any mechanics with a random reward (e.g., loot boxes or gacha), enable the Mark as paid randomized reward toggle.
Click Create.
In the window that opens, select the item status and click Continue.
The created item will appear in the All items section.
To configure or update limits for an existing item:
Configure and update in your account
- The configuration process below is shown using virtual items as an example.
- Before configuring virtual items, it is recommended to create groups. Groups allow you to build a multi-level catalog and manage how items are displayed in your store.
- In your account, you can update limits for a specific item for all users. Advanced configuration options are available via API calls.
To create an item with a limited number of uses:
- Open your project in Publisher Account and go to the Items catalog > All items > Virtual items section.
- Open the project in your account and go to the Items catalog > All items > Virtual items section.
- Open the project in your account and go to the Items catalog > All items > Virtual items section.
- Open the project in your account and go to the Items catalog > All items > Virtual items section.
- Open your project in the account for mobile games and go to the Catalog section.
- Click Create manually and select Virtual item from the drop-down list.
- In the General settings section, specify the following:
- SKU
- One or several groups the item should belong to (optional)
- Name
- Short description
- Extended description — to add it, turn on the corresponding toggle (optional)
- In the Media section, upload one or more images or videos (optional) — from your device or via a link. In the store created with the Xsolla site editor, all item cards display the file marked as Main, while the remaining files are available only in item cards with a media gallery. The file marked as Main is also returned in the responses of the catalog retrieval API calls.
- In the Price settings section, set prices or create a free item:
- To set a price, select Paid item, turn on the Pricing in real currency and/or Pricing in virtual currency toggle, and specify the price. If needed, configure regional prices.
- To create a free item, select Free item.
An item can have prices in several real and virtual currencies. In this case, you must specify a default currency for each type — one among the real currencies and one among the virtual currencies.
You can specify a price in virtual currency only if the virtual currency has already been created in the project.
- To limit the number of items available for purchase:
- Turn on the toggle in the Limits section and specify the quantity.
- Configure the limit reset frequency. To do this, select a period from the drop-down list:
- Daily.
- Weekly.
- Monthly.
- Custom interval. The interval is calculated from the item’s display start date in the store.
- No regular refresh.
- Set up the reset schedule by specifying the parameters that correspond to the selected period.
To configure a display time limit for the item (optional):
- Turn on the toggle in the Add specific display period section.
- Specify the time zone and the beginning and the end of the period.
To leave the end of the item’s display period unspecified, turn on the No end date toggle.
- Configure attributes using one of the following options (optional):
- If the paid item will be used in any mechanics with a random reward (e.g., loot boxes or gacha), enable the Mark as paid randomized reward toggle.
Click Create.
In the window that opens, select the item status and click Continue.
The created item will appear in the All items section.
To configure or update limits for an existing item:
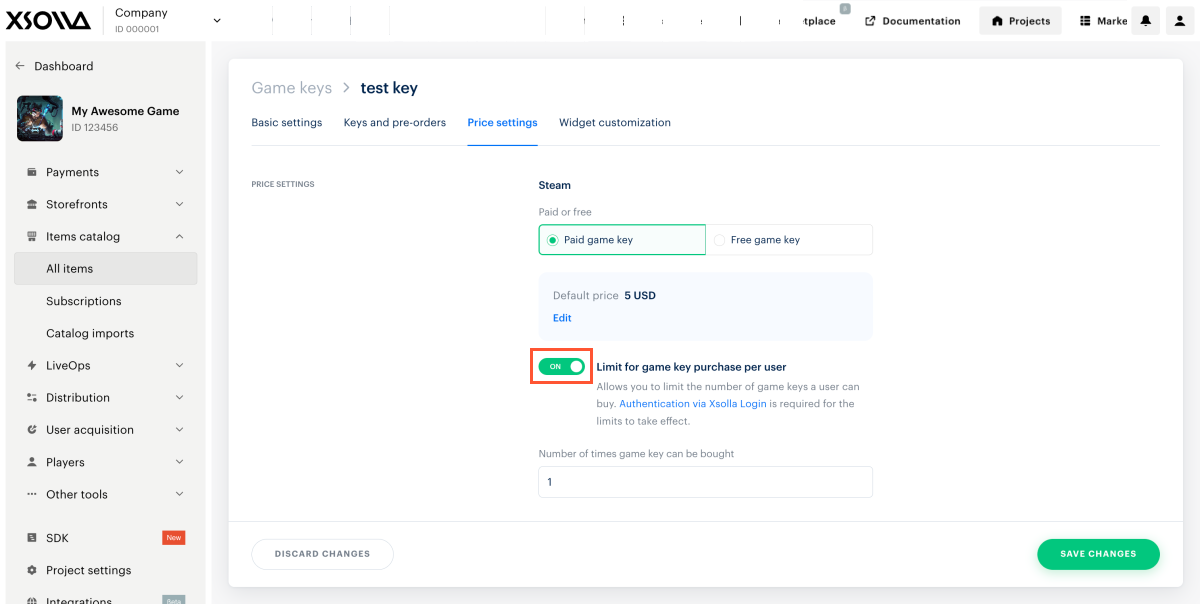
- Open your project in Publisher Account and go to the Items catalog > All items > Virtual items section.
- Open the project in your account and go to the Items catalog > All items > Virtual items section.
- Open the project in your account and go to the Items catalog > All items > Virtual items section.
- Open the project in your account and go to the Items catalog > All items > Virtual items section.
- Open the project in your account for mobile games and go to the Catalog > Virtual items section.
- Open the group containing the item.
- In the row of the item, click ••• and choose Edit in the drop-down list.
- In the Limits for single user section, set the limit and/or select the limit reset frequency, then specify the time and time zone.
- Click Save changes.
Set up and update via API calls
To configure item purchase limits via API, use the limits object in the following methods:
To set up daily, weekly, or monthly limit refresh, pass the limits.recurrent_schedule object.
If you have a limit refresh period configured, you can also control whether the item remains visible in the catalog after the purchase limit is reached. To do this, pass the “limits.per_user.limit_exceeded_visibility”: “show” parameter.
If no recurring refresh is configured, the item is hidden from the catalog after the limit is reached regardless of the parameter value.
To update and manage limits via API, use the methods in the Management subsection of the Limits method group.
| Feature | API call |
|---|---|
| Refresh limits for specified item for all or specified users. | Refresh purchase limit. |
| Clear all item limits for specified user. | Refresh all purchase limits for specified user. |
| Change the limit on the purchase of a specified item for a specified user. | Set number of items available to specified user. |
| Get information about what limits are configured for a specified item for a specified user. | Get number of items available to specified user. |
| Increase the number of items that can be purchased for a specified user. | Increase number of items available to specified user. |
| Decrease the number of items that can be purchased for a specified user. | Decrease number of items available to specified user. |
Display limits in the catalog of items
Limits on item sales are displayed in the catalog depending on how it is implemented — either through the site builder or via API.
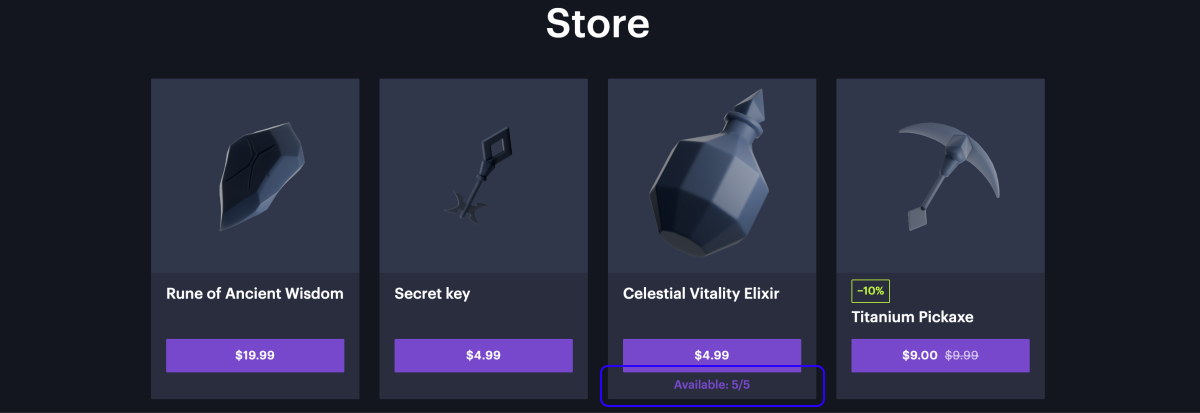
Display via site builder
If you use the site builder, limits are displayed automatically — an item card shows a counter of items available to the user.
Get limit information via API
If the catalog is implemented using API, limit information is returned in the items.limits array in the following catalog-related API calls:
- Get virtual items list
- Get virtual currency list
- Get virtual currency packages list
- Get bundles list
- Get games list
Items for which the user has reached their purchase limit are returned with can_be_bought = false.
You can update these limits as needed.
This data can be used to display limits in the catalog — for example, to show the maximum number of items available for purchase.
Useful links
Last updated: October 14, 2026Found a typo or other text error? Select the text and press Ctrl+Enter.
