Quests
Overview
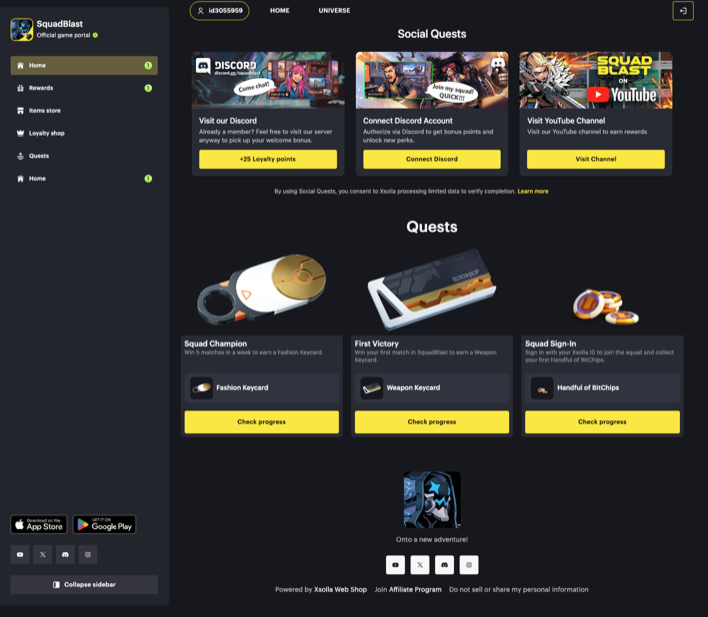
The Quests block shows quests as cards in your Web Shop. Each card shows the following:
- quest image
- quest name
- description
- reward
- button
Users complete the quest conditions and receive the reward. Quest conditions are based on in-game events: player actions in your game that you send to the quest platform, for example, reaching a level or winning a number of matches.
You can add the block through the AI toolkit or manually in Site Builder. The quests themselves can be created and edited only through the Xsolla AI toolkit.
Benefits
The Quests block offers the following benefits:
Engagement: Quests give users goals to return to your Web Shop and game.
No coding: You can add and configure the block in Site Builder, or let your AI agent do it with the AI toolkit.
Control over what is shown: You can choose which quests appear, in what order, and how many.
Customization: You can edit all card texts, images and layout to match your Web Shop design.
Requirements
To use the Quests block, make sure:
- You created Web Shop using Xsolla Site Builder.
- You configured Xsolla Login on your site.
- You created quests for the project using the Xsolla AI toolkit. The block can show only quests that already exist.
User flow
- The user opens Web Shop and sees the Quests block with quest cards.
- The user clicks the button on a quest card and logs in with Xsolla Login, if they are not logged in yet.
- The user completes the quest conditions.
- The quest card changes its state depending on the user’s progress.
- When the quest is completed, the user receives the reward.
Set up quests with AI toolkit
You can create and change quests only through the Xsolla AI toolkit, which works with AI coding tools such as Claude Code, OpenAI Codex and Gemini CLI. Your AI agent can also add the Quests block to your site and update it.
To set up quests and the block with the AI toolkit:
- Create or change quests with your AI agent.
- Ask your AI agent to add the Quests block to your site or update it. The agent saves the blocks it creates or changes as a draft.
- Review the draft in Site Builder.
- Publish the site to make the changes live.
Set up Quests block in Site Builder
To add the Quests block:
- Open your project in Publisher Account and go to the Storefronts > Websites section.
- Click the pane of your site.
- Open the project in your account and go to the Web Shop section.
- Click the pane of your site.
- Open the project in your account and go to the Storefronts > Website section.
- Click the pane of your site.
- Open the project in your account and go to the Storefronts > Website section.
- Click the pane of your site.
- Open the project in your account and go to the Storefronts > Website section.
- Click the pane of your site.
- If your site has several pages, select the one you need from the drop-down list at the top of the builder.
- Click Add block and choose Quests.
- Click the block to open its settings panel and configure the settings.
- Edit the block texts.
- Click Preview in the upper-right corner to review your changes.
- Publish your site:
- In the upper-right corner of the site builder, click Publish.
- Check the boxes next to the pages you want to publish.
- Click Publish.
Configure block settings
The block settings panel contains the following groups of settings: Quests, Layout and Preview state.
Quests
In the
Selected quests — the quests created for your project with the AI toolkit. To find a quest, enter its name in the search field. For each quest, you can do the following:- Turn on the toggle to show the quest in the block. Quests with the toggle off don’t appear.
- Drag the quest up or down by the handle to change the order. The top quest appears first from the left.
- Expand the quest and upload the image shown on its card. You can use any image, such as the reward or a quest-themed illustration.
Maximum quests shown — the maximum number of quest cards displayed in the block.
Layout
In the
Show heading — shows or hides the block title.Show card descriptions — shows or hides the quest description on each card.Show card images — shows or hides the image on each card.Image fit — how the image fills the card’s image area:Fill image area — the image covers the whole area and may be cropped.Fit whole image — the whole image is shown without cropping.
Card text alignment — left, center or right alignment of the card texts.Button style — the button style on each card, taken from your site’s theme:Primary ,Secondary ,Tertiary orTheme default .Block background — the background behind all cards:Transparent , or thePrimary /Secondary color of your site’s theme.Card background — the background of each card:Transparent , or thePrimary /Secondary color of your site’s theme.
Preview state
In the
Editor simulation — lets you check the block’s appearance in different card states. Simulated actions on cards are disabled in the editor.Live — shows real data.
Edit block texts
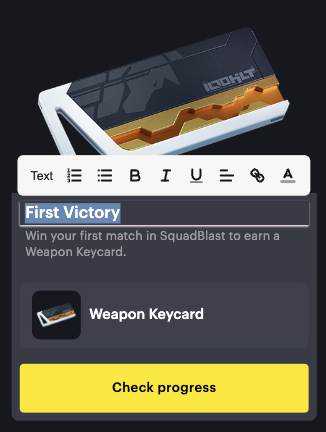
In Site Builder, you can edit the following texts directly on the block:
- Block title
- Quest name
- Quest description
- Button text
To edit a text:
- Click the text you want to change.
- Enter the new text.
- Use the toolbar to format the text (optional). You can change the text style, create numbered and bulleted lists, apply bold, italic and underline, set alignment, add a link and change the text color.
Found a typo or other text error? Select the text and press Ctrl+Enter.
