在应用程序侧集成SDK
- 设计应用程序的登录系统、游戏内商店及其他页面的界面。
- 使用SDK方法在应用程序中实现用户认证、商店显示、购买及其他逻辑。
<xsollaExtention>/assets/scripts/samples目录下找到使用的脚本。通过用户名、邮箱和密码进行用户注册和登录
本说明解释如何使用SDK方法实现以下内容:
您可以使用用户名或邮箱地址来认证用户身份。以下示例中,我们使用用户的用户名来进行认证,使用邮箱地址来进行注册验证及重置密码。
实现用户注册
本教程介绍以下逻辑的实现:

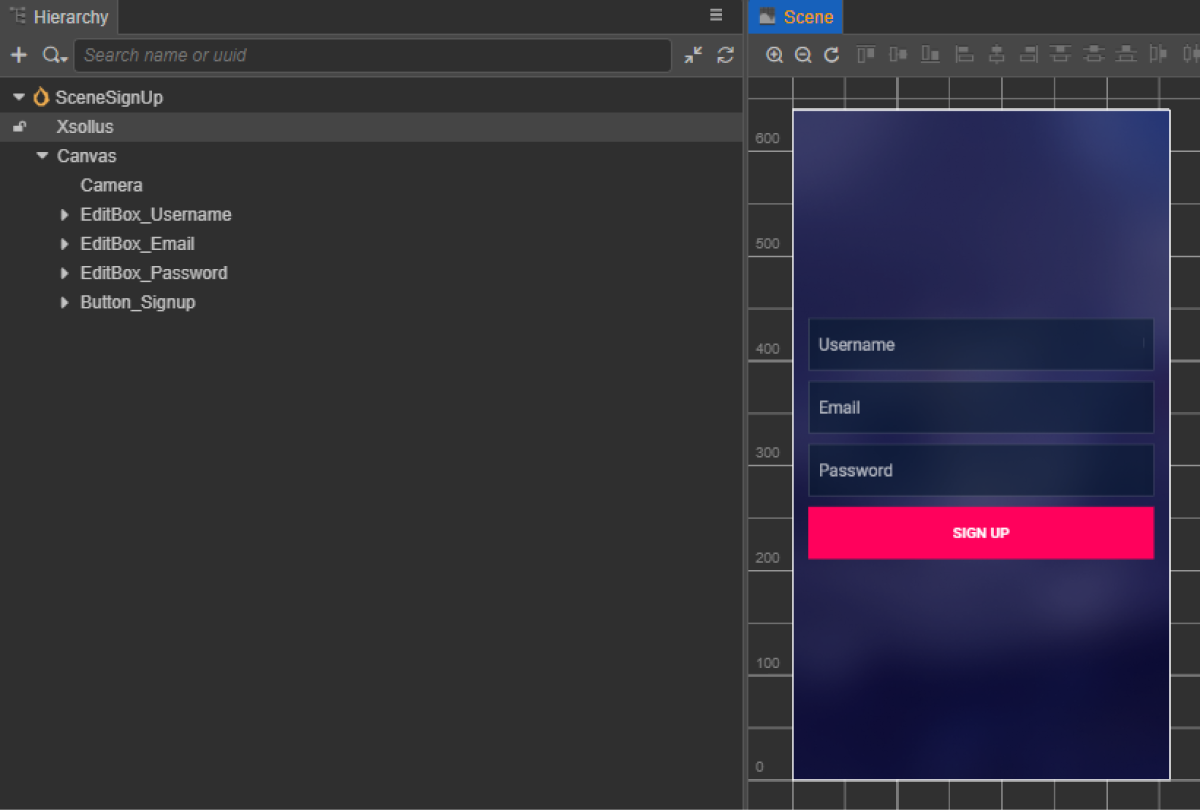
创建页面界面
为注册页面创建一个场景并添加以下元素:
- 用户名字段
- 用户邮箱地址字段
- 用户密码字段
- 注册按钮
页面结构示例:
创建注册脚本组件
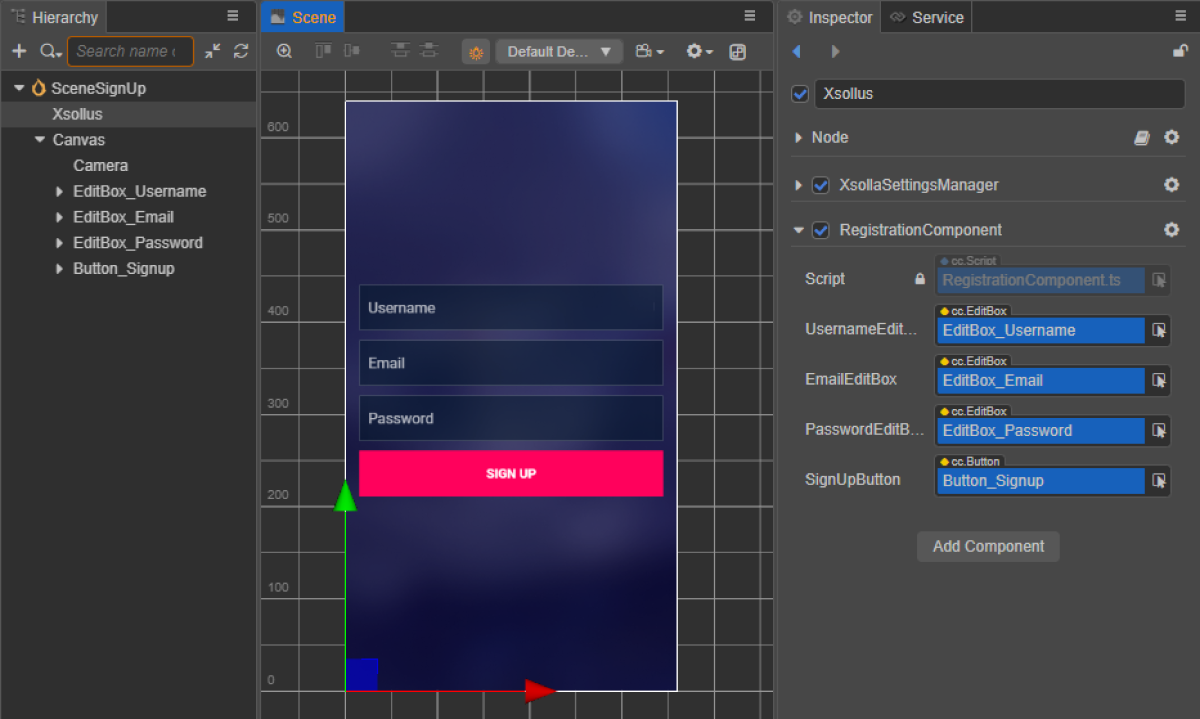
- 创建一个RegistrationComponent并添加以下属性:
usernameEditBoxemailEditBoxpasswordEditBoxsignUpButton— 可选。用代码将回调函数与该按钮绑定时使用
- 将方法添加到点击
SignUpButton时调用的RegistrationComponent类,并添加处理该点击事件的逻辑,如脚本示例中所示。 - 在场景中将RegistrationComponent添加到节点。可添加新节点或使用SDK初始化期间添加的含
XsollaSettingsManager组件的现有节点。 - 将场景元素与
RegistrationComponent的属性绑定,如图所示:
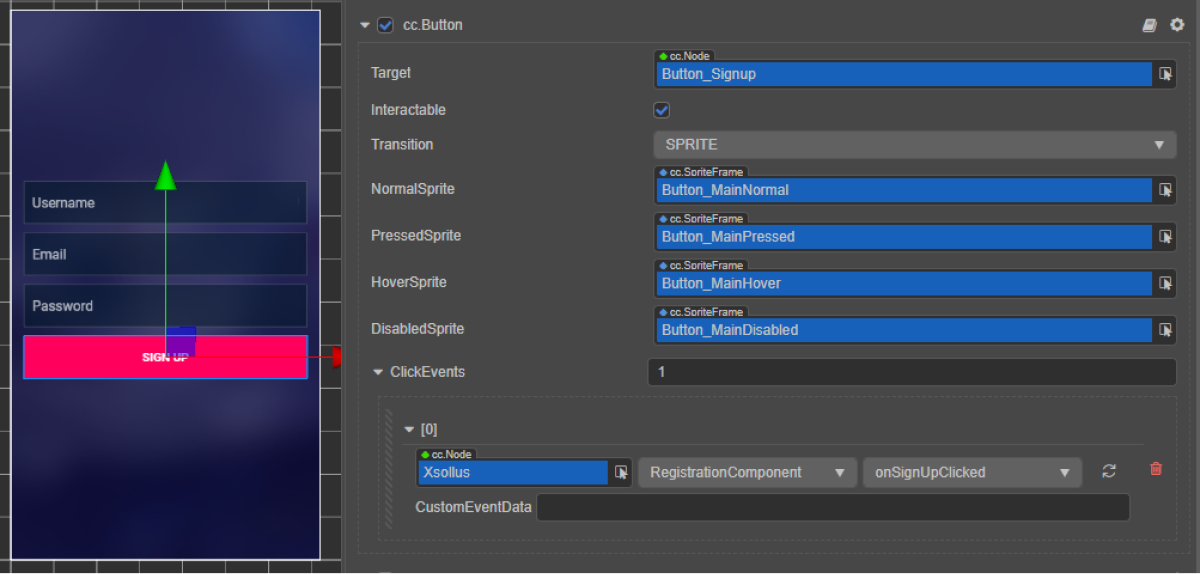
- 通过以下方式之一将回调与注册按钮绑定:
- 使用
Inspector 面板,如下图所示 - 将下方代码块插入页面脚本
- 使用
使用
通过代码绑定回调:
- typescript
1start() {
2 this.signUpButton.node.on(Button.EventType.CLICK, this.onSignUpClicked, this);
3 }
在脚本示例中,onComplete和onError方法调用标准console.log方法。发生错误时,错误代码和描述在error参数中传递。
您还可以添加其他动作,例如打开一个包含重新发送注册邮件请求的页面或在注册成功时打开一个登录页面。
- typescript
 1import { _decorator, Button, Component, EditBox } from 'cc';
 2import { XsollaAuth } from 'db://xsolla-commerce-sdk/scripts/api/XsollaAuth';
 3const { ccclass, property } = _decorator;
 4
 5
 6@ccclass('RegistrationComponent')
 7export class RegistrationComponent extends Component {
 8
 9    @property(EditBox)
10    usernameEditBox: EditBox;
11
12    @property(EditBox)
13    emailEditBox: EditBox;
14
15    @property(EditBox)
16    passwordEditBox: EditBox;
17
18    @property(Button)
19    signUpButton: Button;
20
21    start() {
22        this.signUpButton.node.on(Button.EventType.CLICK, this.onSignUpClicked, this);
23    }
24
25    onSignUpClicked() {
26        XsollaAuth.registerNewUser(this.usernameEditBox.string, this.passwordEditBox.string, this.emailEditBox.string, 'xsollatest', null, null, token => {
27            if(token != null) {
28                console.log(`Successful login. Token - ${token.access_token}`);
29            }
30            else {
31                console.log('Thank you! We have sent you a confirmation email');
32            }
33        }, err => {
34            console.log(err);
35        });
36    }
37}
设置注册验证邮件
成功注册后,用户将在指定邮箱中收到一封注册验证邮件。您可以在发布商帐户中自定义发送给用户的邮件。
如果您开发的是移动应用程序,请设置深度链接以在用户验证注册后将用户返回到应用程序。
实现重新发送注册验证邮件请求
本教程介绍以下逻辑的实现:

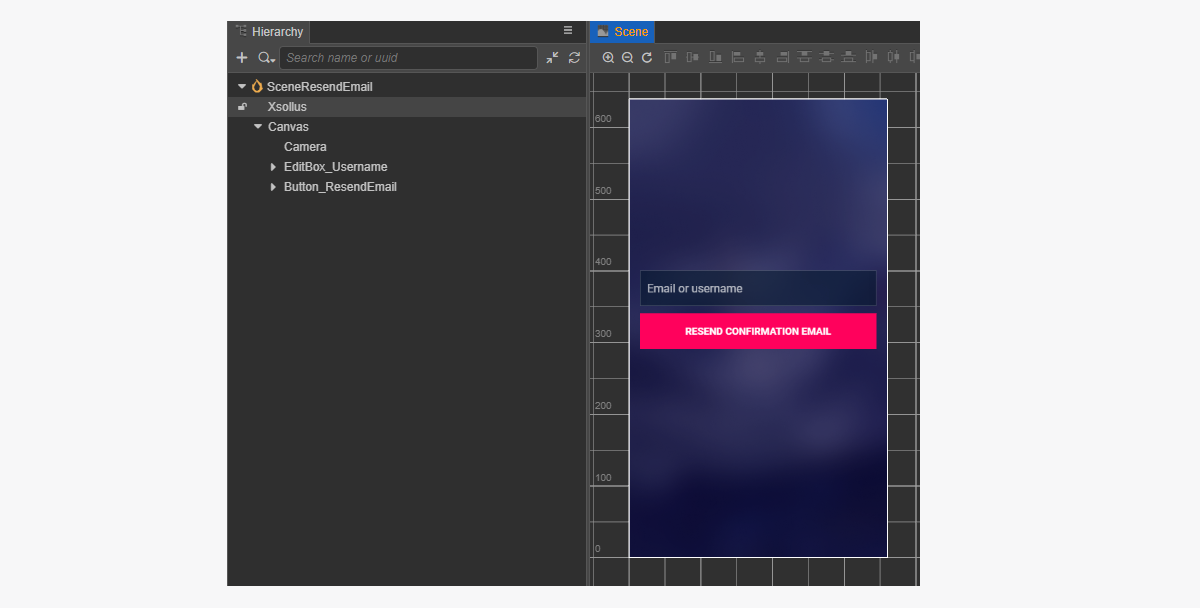
创建页面界面
为包含重新发送验证邮件请求的页面创建一个场景并添加以下元素:
- 用户名/邮箱字段
- 重新发送邮件按钮
页面结构示例:
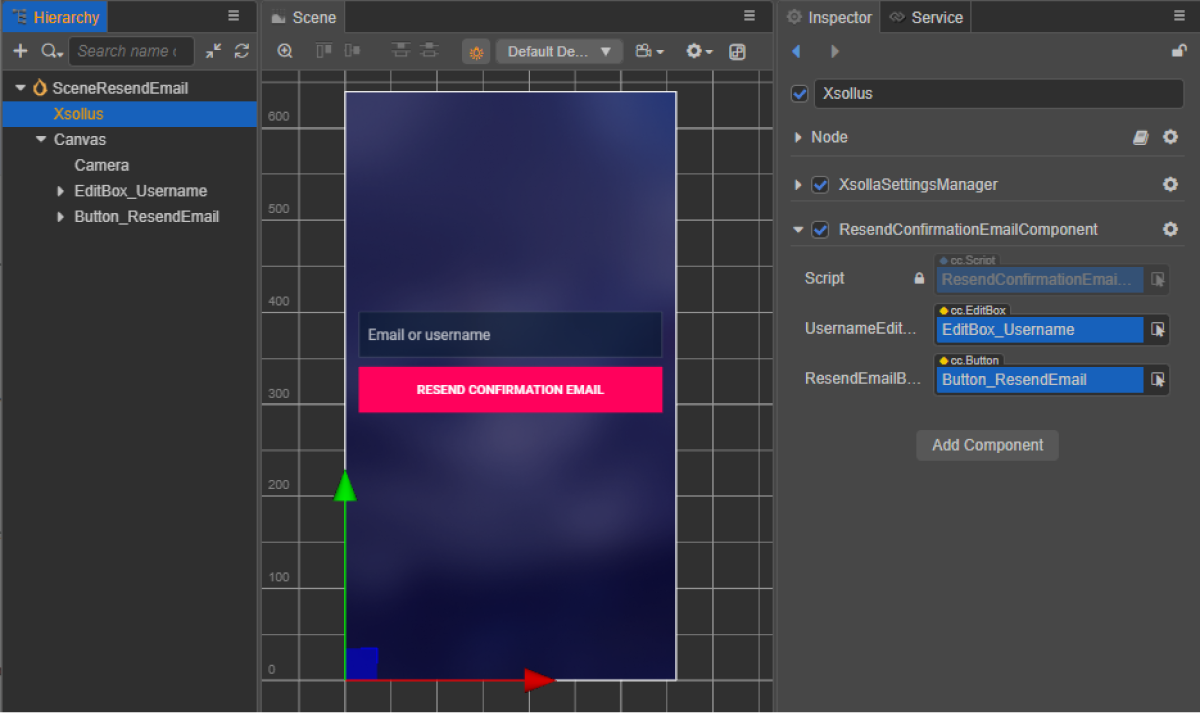
创建重新发送邮件脚本组件
- 创建一个ResendConfirmationEmailComponent并添加以下属性:
usernameTextBoxresendEmailButton— 可选。用代码将回调函数与该按钮绑定时使用
- 将方法添加到点击
ResendEmail时调用的ResendConfirmationEmailComponent类,并添加处理该点击事件的逻辑,如脚本示例中所示。 - 在场景中将ResendConfirmationEmailComponent添加到节点。可添加新节点或使用SDK初始化期间添加的含
XsollaSettingsManager组件的现有节点。 - 将场景元素与
ResendConfirmationEmailComponent的属性绑定,如图所示:
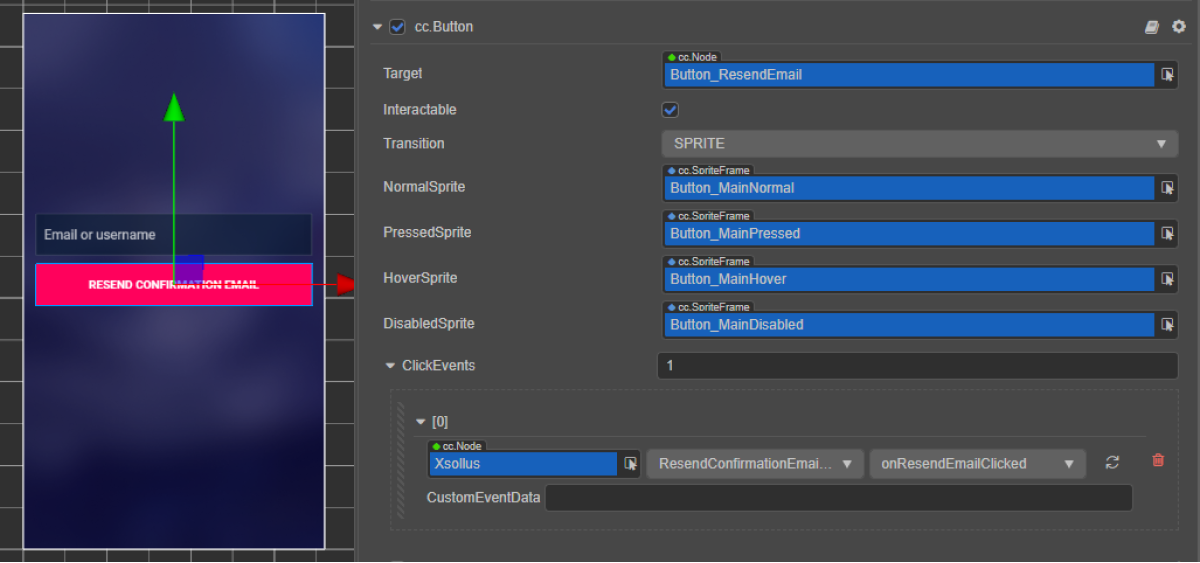
- 通过以下方式之一将回调与请求注册验证邮件按钮绑定:
- 使用
Inspector 面板,如下图所示 - 将下方代码块插入请求重新发送验证邮件的页面脚本
- 使用
使用
通过代码绑定回调:
- typescript
1start() {
2	this.resendEmailButton.node.on(Button.EventType.CLICK, this.onResendEmailClicked, this);
3  }
如果请求成功,用户将在注册时指定的邮箱中收到一封注册验证邮件。
在脚本示例中,onComplete和onError方法调用标准console.log方法。您还可以添加其他动作。
发生错误时,错误代码和描述在error参数中传递。
- typescript
 1import { _decorator, Button, Component, EditBox } from 'cc';
 2import { XsollaAuth } from 'db://xsolla-commerce-sdk/scripts/api/XsollaAuth';
 3const { ccclass, property } = _decorator;
 4
 5
 6@ccclass('ResendConfirmationEmailComponent')
 7export class ResendConfirmationEmailComponent extends Component {
 8
 9    @property(EditBox)
10    usernameEditBox: EditBox;
11
12    @property(Button)
13    resendEmailButton: Button;
14
15    start() {
16        this.resendEmailButton.node.on(Button.EventType.CLICK, this.onResendEmailClicked, this);
17    }
18
19    onResendEmailClicked() {
20        XsollaAuth.resendAccountConfirmationEmail(this.usernameEditBox.string, 'xsollatest', null, () => {
21            console.log('A verification link has been successfully sent to your email');
22        }, err => {
23            console.log(err);
24        });
25    }
26}
实现用户登录
本教程介绍以下逻辑的实现:

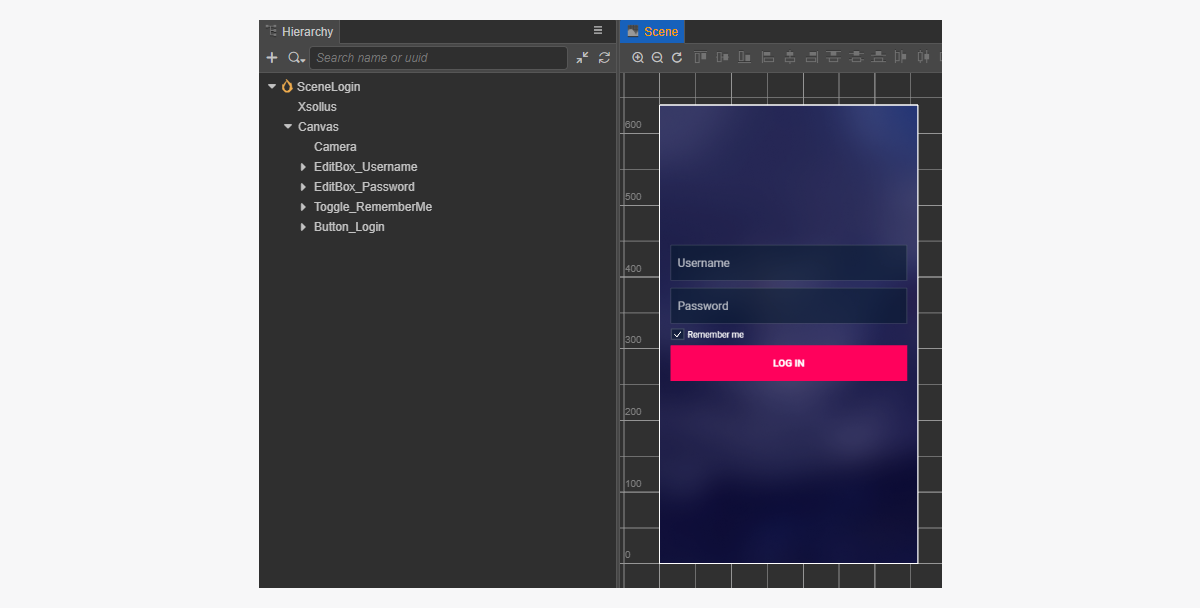
创建页面界面
为登录页面创建一个场景并添加以下元素:
- 用户名字段
- 密码字段
- “记住我”开关
- 登录按钮
页面结构示例:
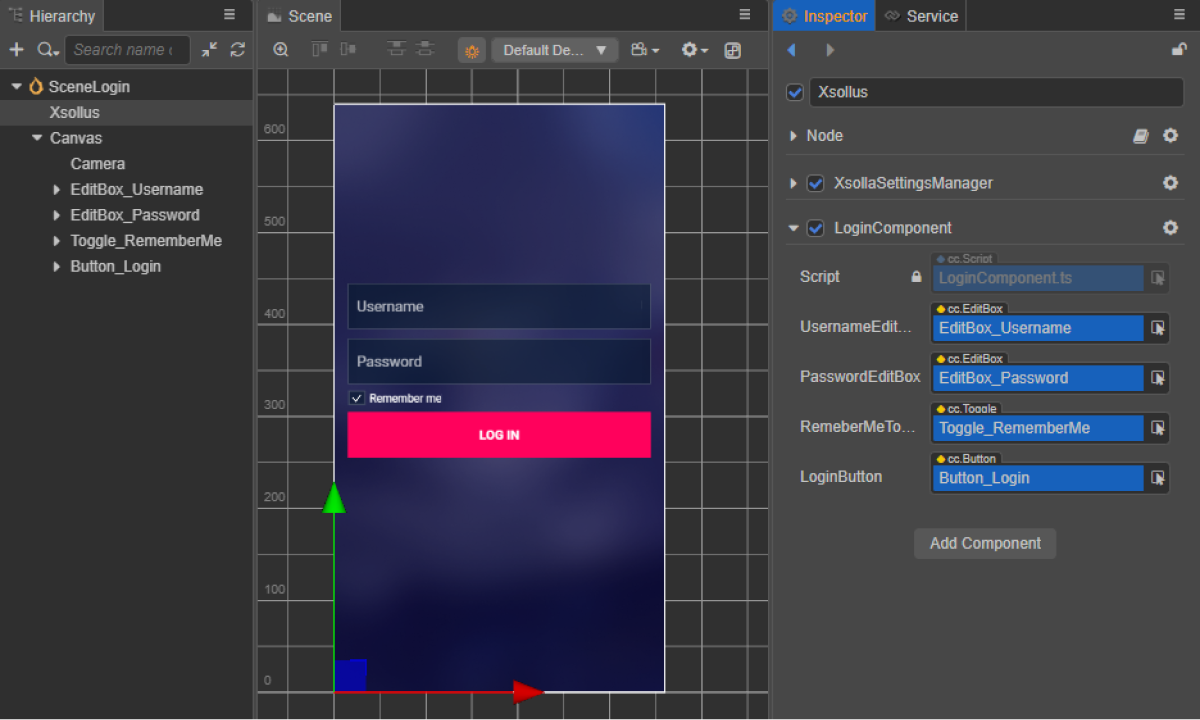
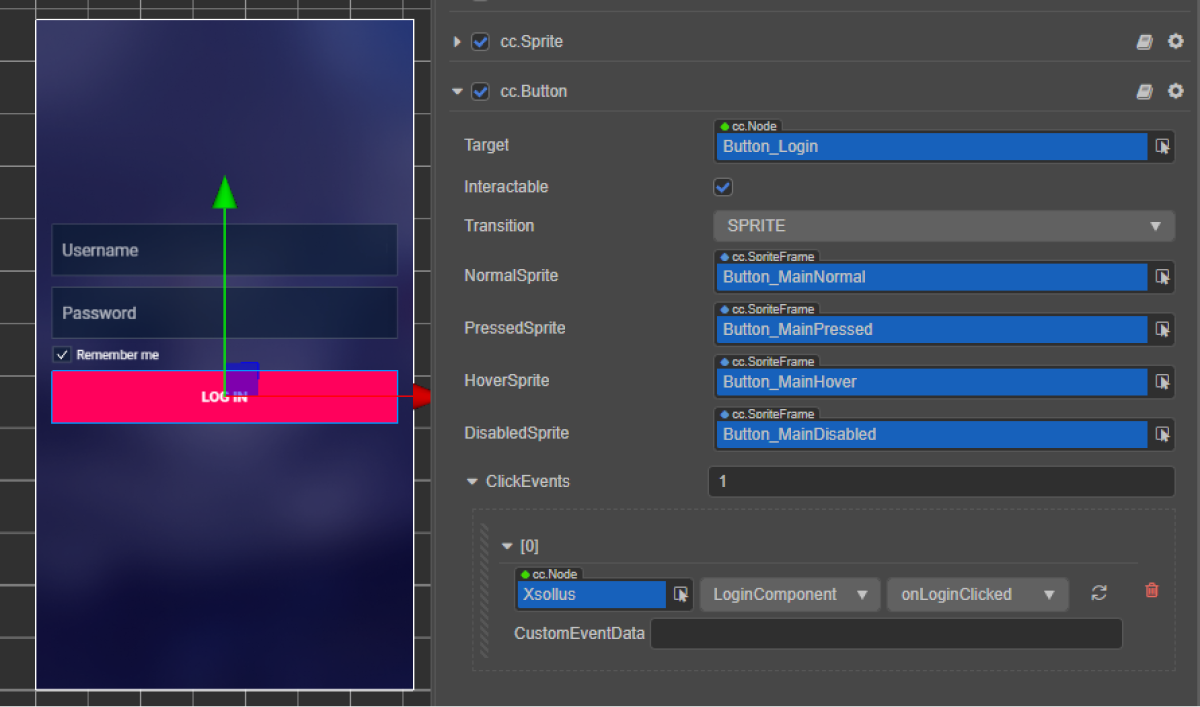
创建登录脚本组件
- 创建一个LoginComponent并添加以下属性:
usernameEditBoxpasswordEditBoxremeberMeToggleloginButton— 可选。用代码将回调函数与该按钮绑定时使用
- 将方法添加到点击
LoginButton时调用的LoginComponent类,并添加处理该点击事件的逻辑,如脚本示例中所示。 - 在场景中将LoginComponent添加到节点。可添加新节点或使用SDK初始化期间添加的含
XsollaSettingsManager组件的现有节点。 - 将场景元素与
LoginComponent的属性绑定,如图所示:
- 通过以下方式之一将回调与登录按钮绑定:
- 使用
Inspector 面板,如下图所示 - 将下方代码块插入页面脚本
- 使用
使用
通过代码绑定回调:
- typescript
1start() {
2	 this.loginButton.node.on(Button.EventType.CLICK, this.onLoginClicked, this);
3  }
在脚本示例中,onComplete和onError方法调用标准console.log方法。您还可以添加其他动作。
发生错误时,错误代码和描述在error参数中传递。
- typescript
 1import { _decorator, Button, Component, EditBox, Toggle } from 'cc';
 2import { XsollaAuth } from 'db://xsolla-commerce-sdk/scripts/api/XsollaAuth';
 3const { ccclass, property } = _decorator;
 4
 5
 6@ccclass('LoginComponent')
 7export class LoginComponent extends Component {
 8
 9    @property(EditBox)
10    usernameEditBox: EditBox;
11
12    @property(EditBox)
13    passwordEditBox: EditBox;
14
15    @property(Toggle)
16    remeberMeToggle: Toggle;
17
18    @property(Button)
19    loginButton: Button;
20
21    start() {
22        this.loginButton.node.on(Button.EventType.CLICK, this.onLoginClicked, this);
23    }
24
25    onLoginClicked() {
26        XsollaAuth.authByUsernameAndPassword(this.usernameEditBox.string, this.passwordEditBox.string, this.remeberMeToggle.isChecked, token => {
27            console.log(`Successful login. Token - ${token.access_token}`);
28        }, err => {
29            console.log(err);
30        });
31    }
32}
实现密码重置
本教程介绍以下逻辑的实现:

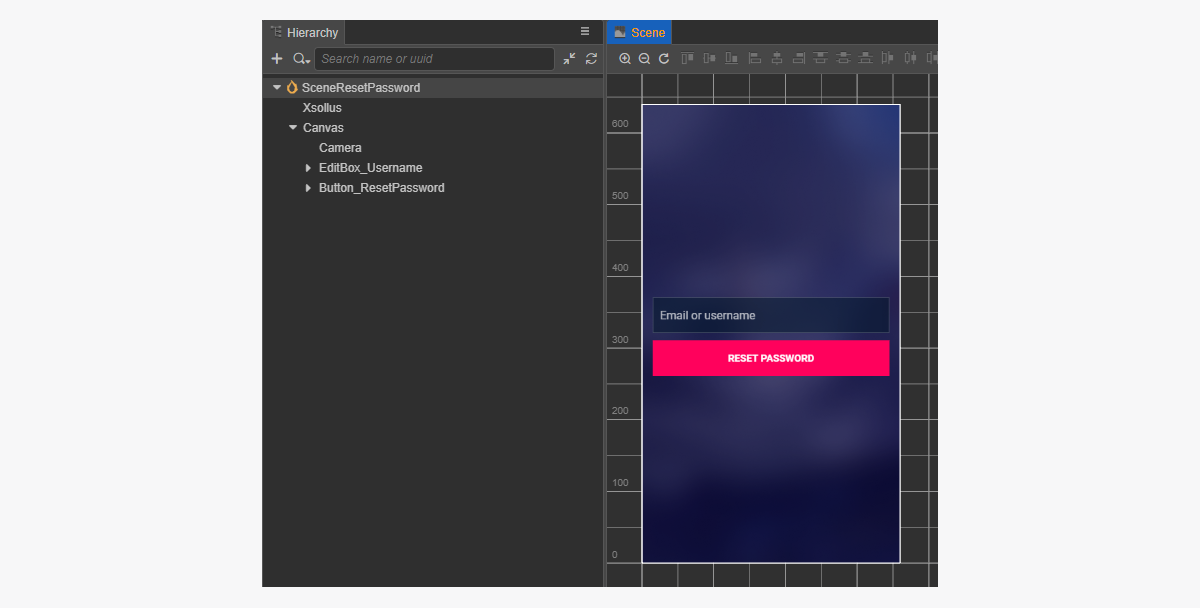
创建页面界面
为重置密码页面创建一个场景并添加以下元素:
- 用户名字段
- 重置密码按钮
页面结构示例:
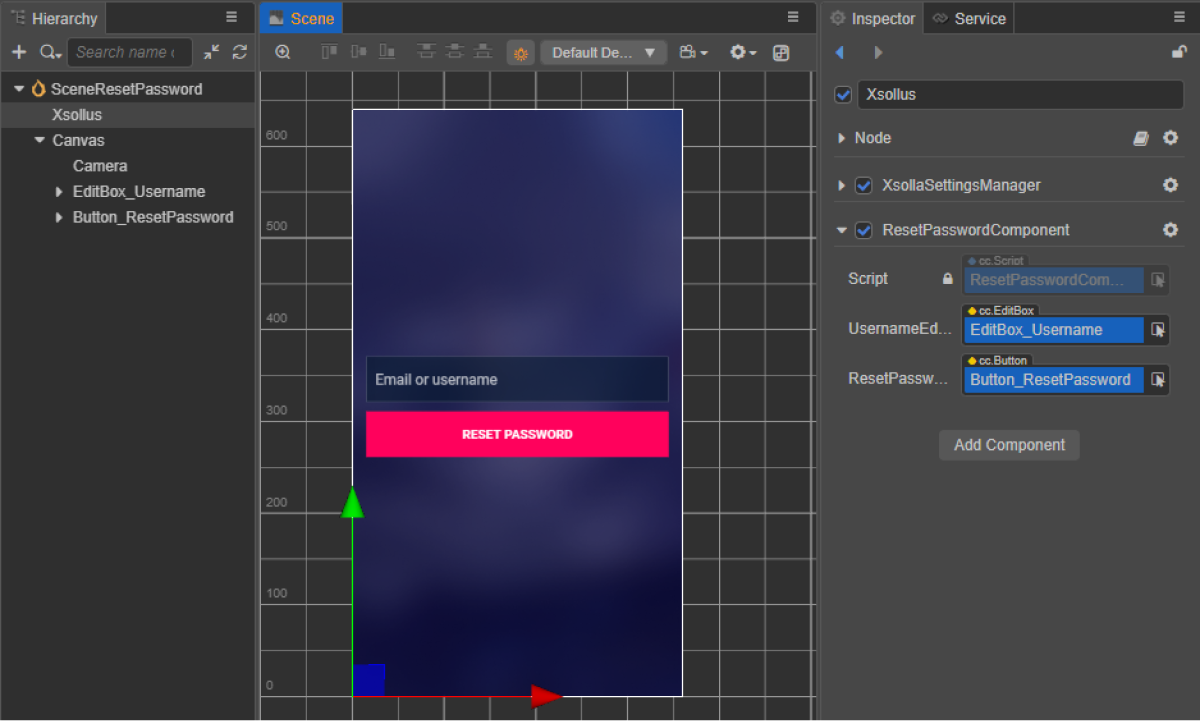
创建重置密码脚本组件
- 创建一个ResetPasswordComponent并添加以下属性:
usernameEditBoxresetPasswordButton— 可选。用代码将回调函数与该按钮绑定时使用
- 将方法添加到点击
ResetPassword时调用的ResetPasswordComponent类,并添加处理该点击事件的逻辑,如脚本示例中所示。 - 在场景中将ResetPasswordComponent添加到节点。可添加新节点或使用SDK初始化期间添加的含
XsollaSettingsManager组件的现有节点。 - 将场景元素与
ResetPasswordComponent的属性绑定,如图所示:
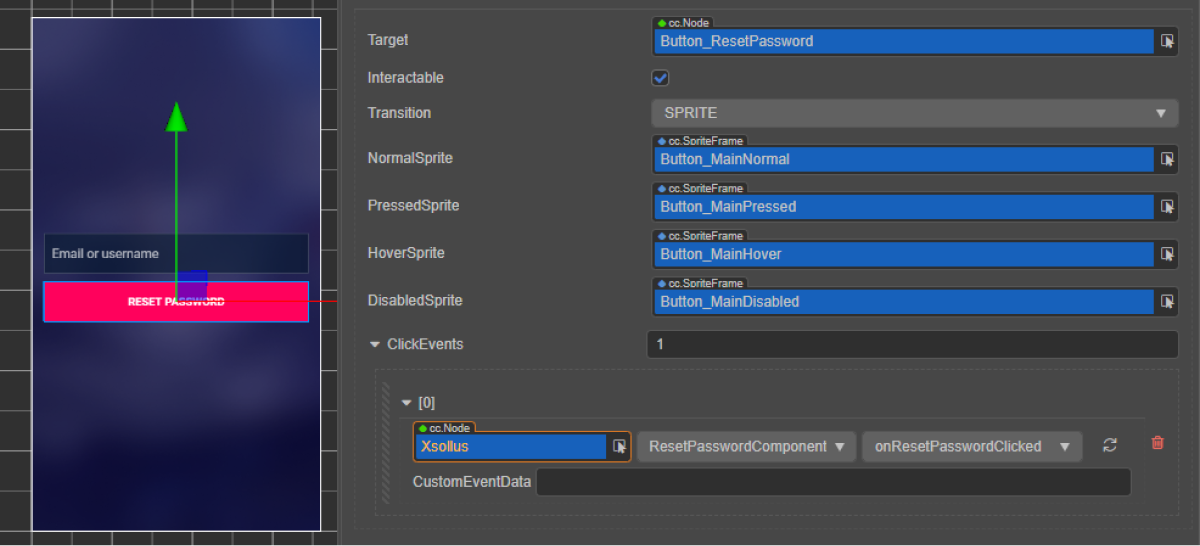
- 通过以下方式之一将回调与密码重置按钮绑定:
- 使用
Inspector 面板,如下图所示 - 将下方代码块插入页面脚本
- 使用
使用
通过代码绑定回调:
- typescript
1start() {
2        this.resetPasswordButton.node.on(Button.EventType.CLICK, this.onResetPasswordClicked, this);
3    }
在脚本示例中,onComplete和onError方法调用标准console.log方法。您还可以添加其他动作。
发生错误时,错误代码和描述在error参数中传递。
- typescript
 1import { _decorator, Button, Component, EditBox } from 'cc';
 2import { XsollaAuth } from 'db://xsolla-commerce-sdk/scripts/api/XsollaAuth';
 3const { ccclass, property } = _decorator;
 4
 5
 6@ccclass('ResetPasswordComponent')
 7export class ResetPasswordComponent extends Component {
 8
 9    @property(EditBox)
10    usernameEditBox: EditBox;
11
12    @property(Button)
13    resetPasswordButton: Button;
14
15    start() {
16        this.resetPasswordButton.node.on(Button.EventType.CLICK, this.onResetPasswordClicked, this);
17    }
18
19    onResetPasswordClicked() {
20        XsollaAuth.resetPassword(this.usernameEditBox.string, null, () => {
21            console.log('Follow the instructions we sent to your email');
22        }, err => {
23            console.log(err);
24        });
25    }
26}
社交网络登录
本指南说明如何使用SDK方法实现用户通过社交网络帐户进行注册和登录。
与通过用户名/邮箱地址和密码进行用户认证不同,您无需实现单独的用户注册逻辑。如果用户的首次登录是通过社交网络进行,将自动创建一个帐户。
如果您在应用程序中将社交网络登录设置为一种备选认证方法,则在满足下列条件的情况下,社交网络帐户将自动与现有用户帐户关联:
- 使用用户名/邮箱地址和密码注册的用户通过社交网络帐户登录您的应用程序。
- 社交网络返回一个邮箱地址。
- 社交网络帐户中用户邮箱地址与其注册您的应用程序时使用的邮箱地址一致。
本教程介绍以下逻辑的实现:

示例展示了如何设置通过Facebook帐户进行用户登录。您可以用相同的方法设置其他社交网络。
示例提供对SDK方法的基本展示。实际应用通常需要更复杂的界面和逻辑。
创建页面界面
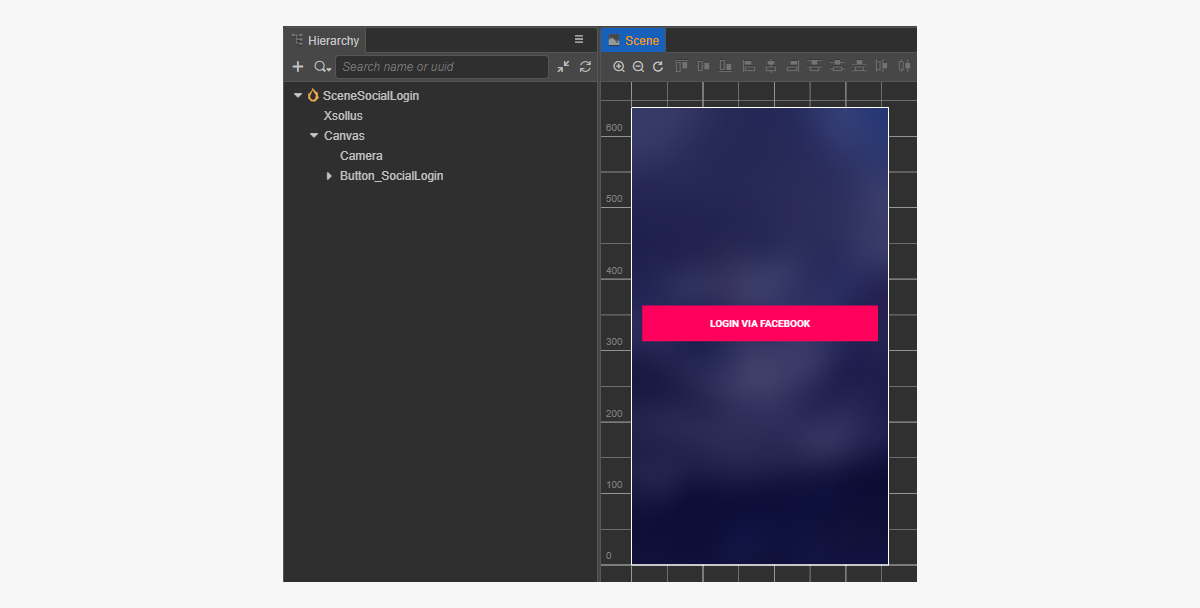
为社交网络登录页创建一个场景并在其中添加社交网络登录按钮。
页面结构示例:
创建社交网络登录脚本组件
- 创建一个SocialLoginComponent。要通过代码将回调函数与社交网络登录按钮绑定,请添加
socialLoginButton属性。 - 将方法添加到点击
SocialLogin时调用的SocialLoginComponent类,并添加处理该点击事件的逻辑,如脚本示例中所示。
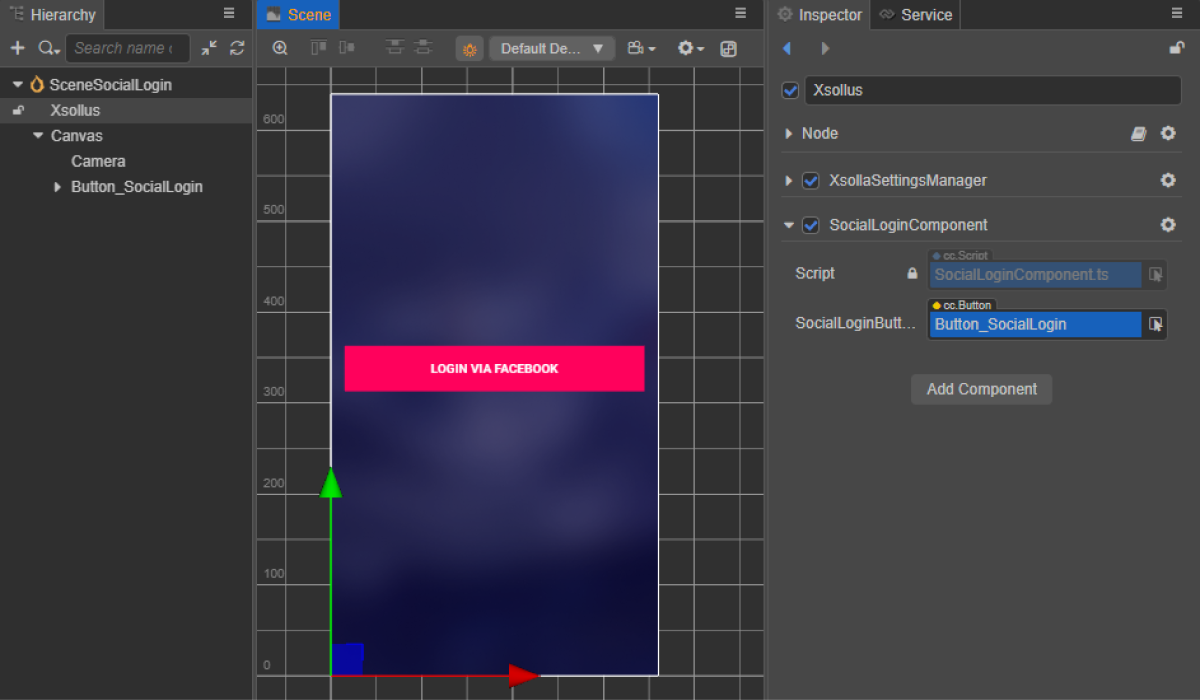
- 在场景中将SocialLoginComponent添加到节点。可添加新节点或使用SDK初始化期间添加的含
XsollaSettingsManager组件的现有节点。 - 将
SocialLogin按钮与SocialLoginComponent的socialLoginButton属性绑定,如图所示:
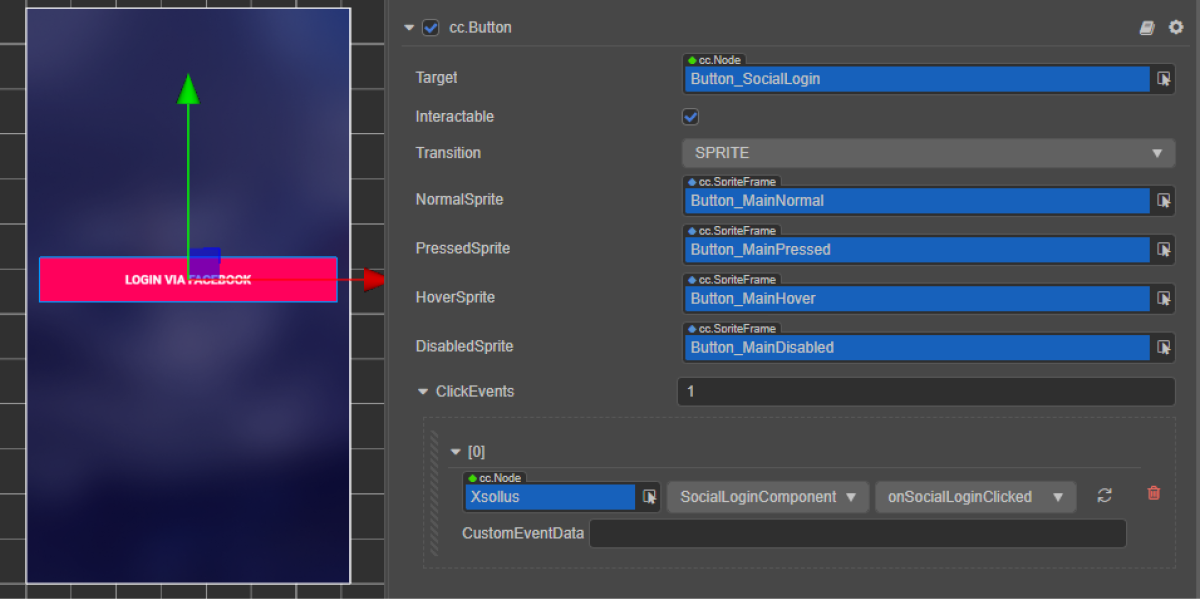
- 通过以下方式之一将回调与社交网络登录按钮绑定:
- 使用
Inspector 面板,如下图所示 - 将下方代码块插入页面脚本
- 使用
使用
通过代码绑定回调:
- typescript
1start() {
2        this.socialLoginButton.node.on(Button.EventType.CLICK, this.onSocialLoginClicked, this);
3}
在脚本示例中,onComplete、onCanceled和onError方法调用标准console.log方法。发生错误时,错误代码和描述在error参数中传递。
您还可以添加其他动作,例如打开一个包含重新发送注册邮件请求的页面或在注册成功时打开一个登录页面。
- typescript
 1import { _decorator, Button, Component } from 'cc';
 2import { Token, XsollaAuth } from '../../api/XsollaAuth';
 3const { ccclass, property } = _decorator;
 4
 5
 6namespace authorization {
 7
 8    @ccclass('SocialLoginComponent')
 9    export class SocialLoginComponent extends Component {
10
11        @property(Button)
12        socialLoginButton: Button;
13
14
15        start() {
16            this.socialLoginButton.node.on(Button.EventType.CLICK, this.onSocialLoginClicked, this);
17        }
18
19
20        onSocialLoginClicked() {
21            XsollaAuth.authSocial('facebook', (token: Token) => {
22                console.log(`Successful social authentication. Token - ${token.access_token}`);
23            }, () => {
24                console.log('Social auth was canceled');
25            }, (error:string) => {
26                console.log(error);
27            });
28        }
29    }
30}
显示商品目录
本教程介绍如何使用SDK方法在游戏内商店中显示以下商品:
- 虚拟物品
- 捆绑包
- 虚拟货币套餐
开始之前,请在发布商帐户中配置商品:
本教程介绍以下逻辑的实现:

目录中的每个商品示例显示以下内容:
- 名称
- 描述
- 价格
- 图片
如果游戏内商店中还存储了其他信息,也可以显示那些信息。
实现虚拟物品的显示
创建物品小组件
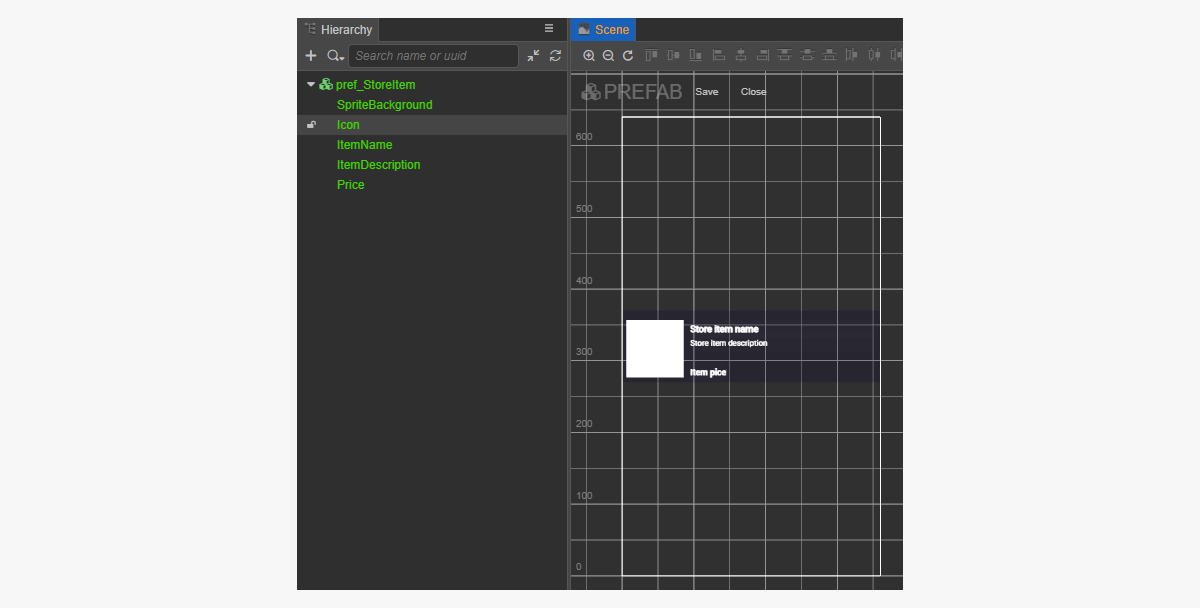
- 创建一个预制件。方法是从文件夹的快捷菜单中选择
Create > Node Prefab 。 - 打开创建的预制件。
- 将
UITransform组件添加到预制件的根,如图所示,并设置内容尺寸。
- 添加以下UI元素作为预制件的子对象并配置其视效:
- 小组件背景图片
- 商品名称
- 商品描述
- 商品价格
- 商品图片
小组件结构的示例:
创建商品小组件脚本
- 创建一个
StoreItemComponent并添加以下属性:iconSpriteitemNameLabelitemDescriptionLabelpriceLabel
- 将
init方法和初始化逻辑添加到StoreItemComponent类,如脚本示例中所示。 - 将StoreItemComponent组件附加到预制件的根节点。
- 将预制件元素与
StoreItemComponent的属性绑定,如图所示:
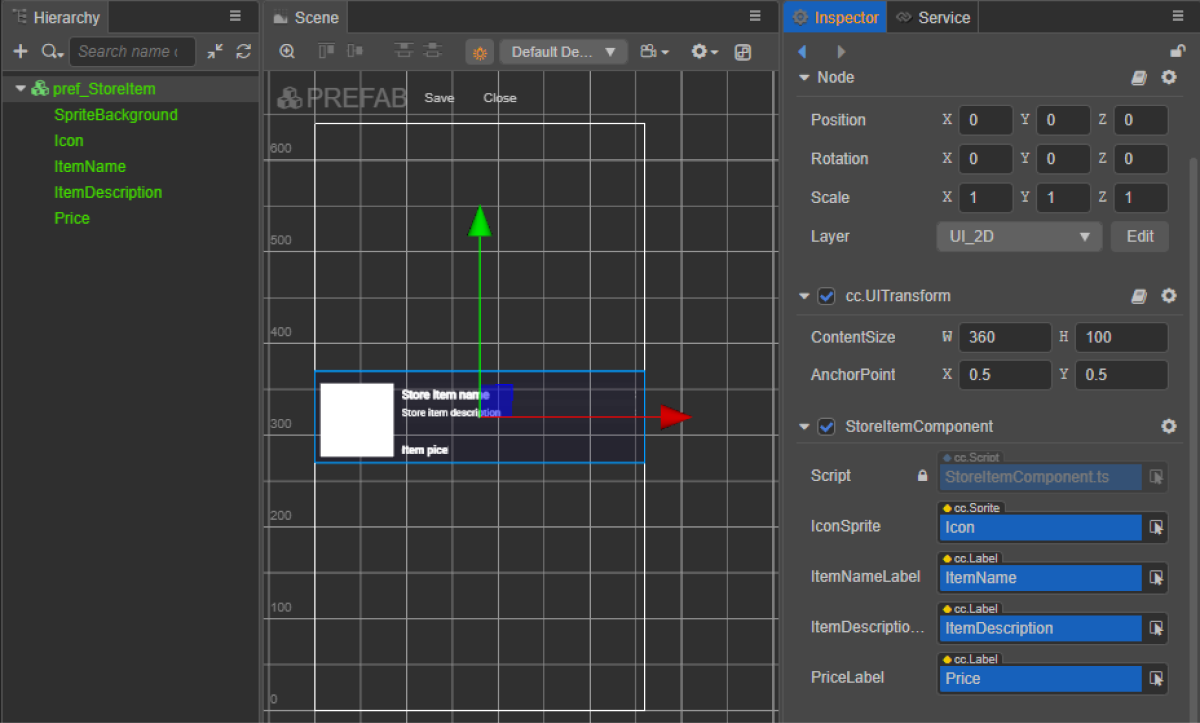
小组件脚本示例(StoreItemComponent):
- typescript
 1import { _decorator, assetManager, Component, ImageAsset, Label, Sprite, SpriteFrame, Texture2D } from 'cc';
 2import { StoreItem } from 'db://xsolla-commerce-sdk/scripts/api/XsollaCatalog';
 3const { ccclass, property } = _decorator;
 4
 5
 6@ccclass('StoreItemComponent')
 7export class StoreItemComponent extends Component {
 8
 9    @property(Sprite)
10    iconSprite: Sprite;
11
12    @property(Label)
13    itemNameLabel: Label;
14
15    @property(Label)
16    itemDescriptionLabel: Label;
17
18    @property(Label)
19    priceLabel: Label;
20
21    private _data: StoreItem;
22
23    init(data: StoreItem) {
24
25        this._data = data;
26
27        this.itemNameLabel.string = data.name;
28        this.itemDescriptionLabel.string = data.description;
29
30        if (data.virtual_prices.length > 0) {
31            this.priceLabel.string = `${data.virtual_prices[0].amount.toString()} ${data.virtual_prices[0].name}`;
32        } else {
33            this.priceLabel.string = `${parseFloat(data.price.amount)} ${data.price.currency}`;
34        }
35
36        assetManager.loadRemote<ImageAsset>(data.image_url, (err, imageAsset) => {
37            if(err == null) {
38            const spriteFrame = new SpriteFrame();
39            const texture = new Texture2D();
40            texture.image = imageAsset;
41            spriteFrame.texture = texture;
42            this.iconSprite.spriteFrame = spriteFrame;
43            } else {
44                console.log(`Can’t load image with URL ${data.image_url}`);
45            }
46        });
47    }
48}
创建页面界面
为物品目录页面创建一个场景,并向其添加ScrollView元素。
页面结构示例:
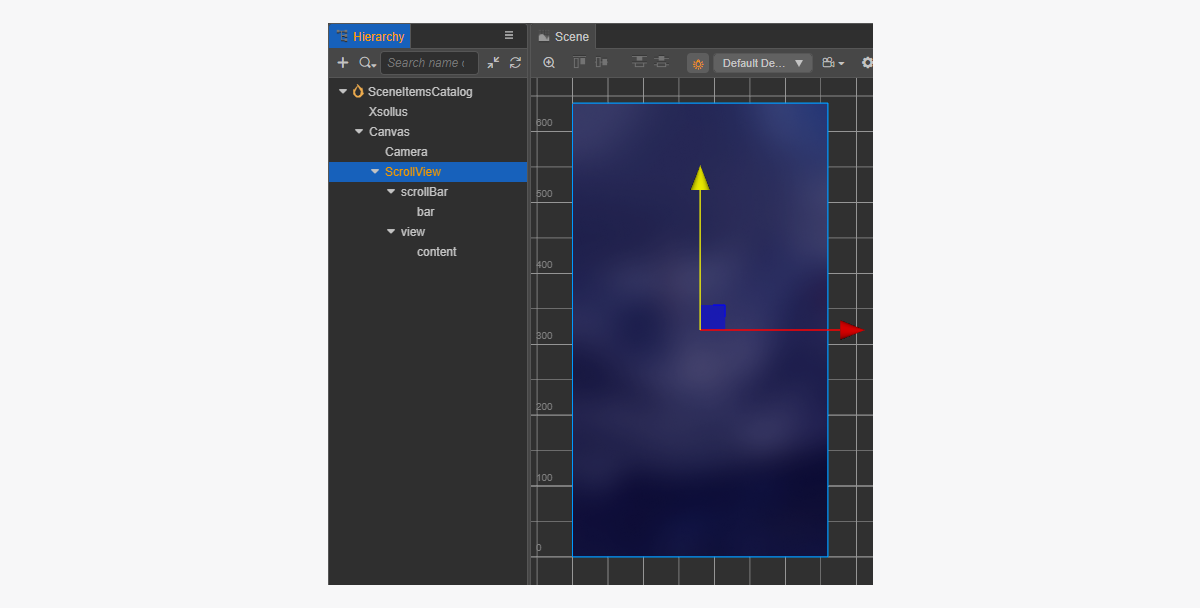
要让ScrollView与创建的StoreItem预制件匹配,请设置其大小:
- 更改
ScrollView节点和内部view节点中ContentSize参数的值。 - 将
Layout组件与content节点绑定并完成设置。示例中选择了以下设置:Type == verticalResizeMode == Container
创建物品目录脚本组件
- 创建一个ItemsCatalogComponent并添加以下属性:
itemsScrollViewstoreItemPrefab
- 将
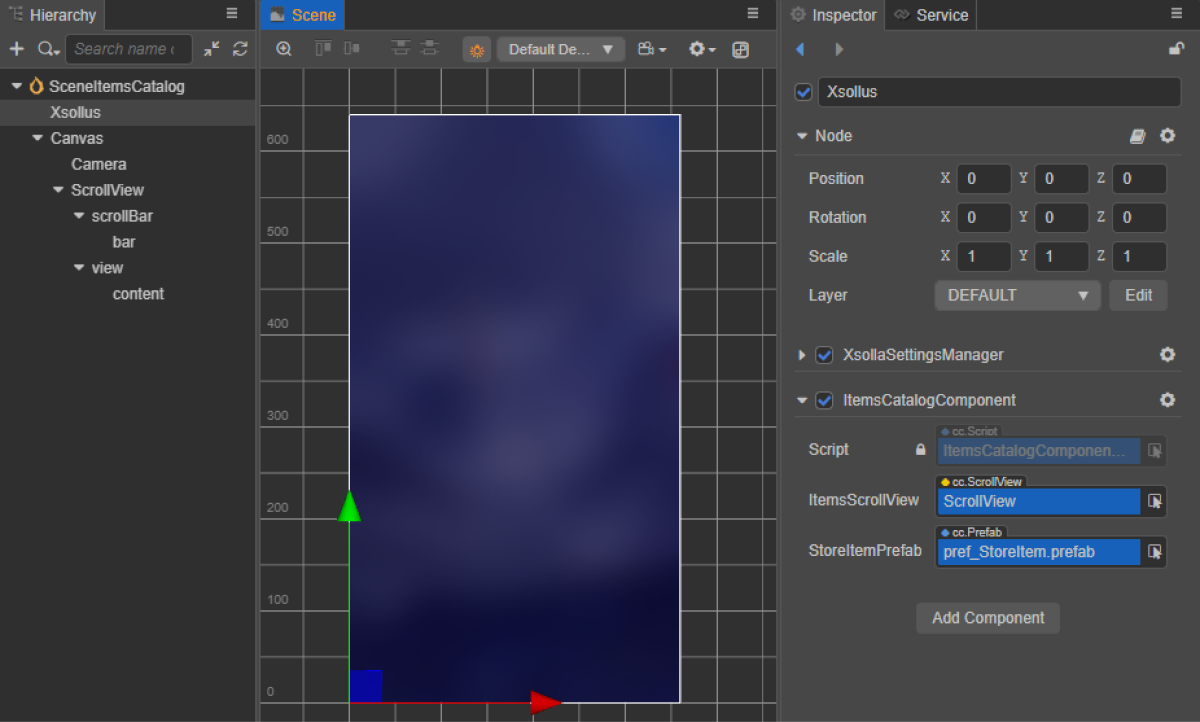
start 生命周期函数和初始化逻辑添加到ItemsCatalogComponent类,如脚本示例中所示。 - 在场景中将ItemsCatalogComponent添加到节点。可添加新节点或使用SDK初始化期间添加的含
XsollaSettingsManager组件的现有节点。 - 将预制件元素与
ItemsCatalogComponent的属性绑定,如图所示:
类脚本示例(ItemsCatalogComponent):
- typescript
 1import { _decorator, Component, instantiate, Prefab, ScrollView } from 'cc';
 2import { XsollaCatalog } from 'db://xsolla-commerce-sdk/scripts/api/XsollaCatalog';
 3import { StoreItemComponent } from './StoreItemComponent';
 4const { ccclass, property } = _decorator;
 5
 6
 7@ccclass('ItemsCatalogComponent')
 8export class ItemsCatalogComponent extends Component {
 9
10    @property(ScrollView)
11    itemsScrollView: ScrollView;
12
13    @property(Prefab)
14    storeItemPrefab: Prefab;
15
16    start() {
17        XsollaCatalog.getCatalog(null, null, [], itemsData => {
18            for (let i = 0; i < itemsData.items.length; ++i) {
19                let storeItem = instantiate(this.storeItemPrefab);
20                this.itemsScrollView.content.addChild(storeItem);
21                storeItem.getComponent(StoreItemComponent).init(itemsData.items[i]);
22            }
23        });
24    }
25}
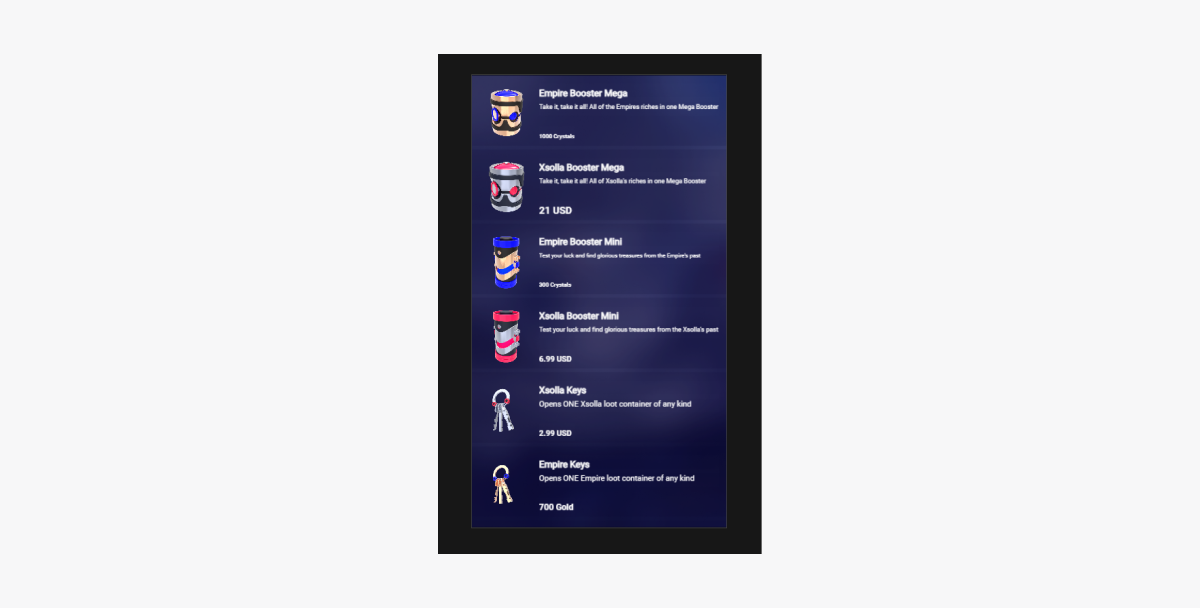
脚本工作结果示例:
实现捆绑包的显示
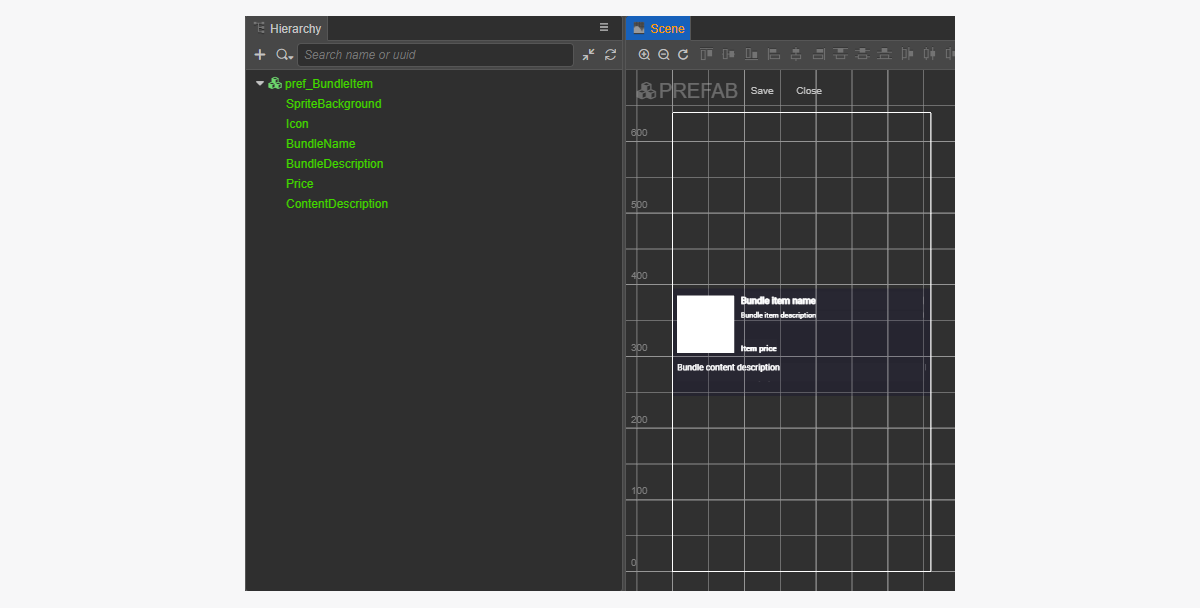
创建捆绑包小组件
- 创建一个预制件。方法是从文件夹的快捷菜单中选择
Create > Node Prefab 。 - 打开创建的预制件。
- 将
UITransform组件添加到预制件的根,如图所示,并设置内容尺寸。
- 添加以下UI元素作为预制件的子对象并配置其视效:
- 小组件背景图片
- 捆绑包名称
- 捆绑包描述
- 捆绑包价格
- 捆绑包图片
- 捆绑包内容描述(商品及其数量)
小组件结构的示例:
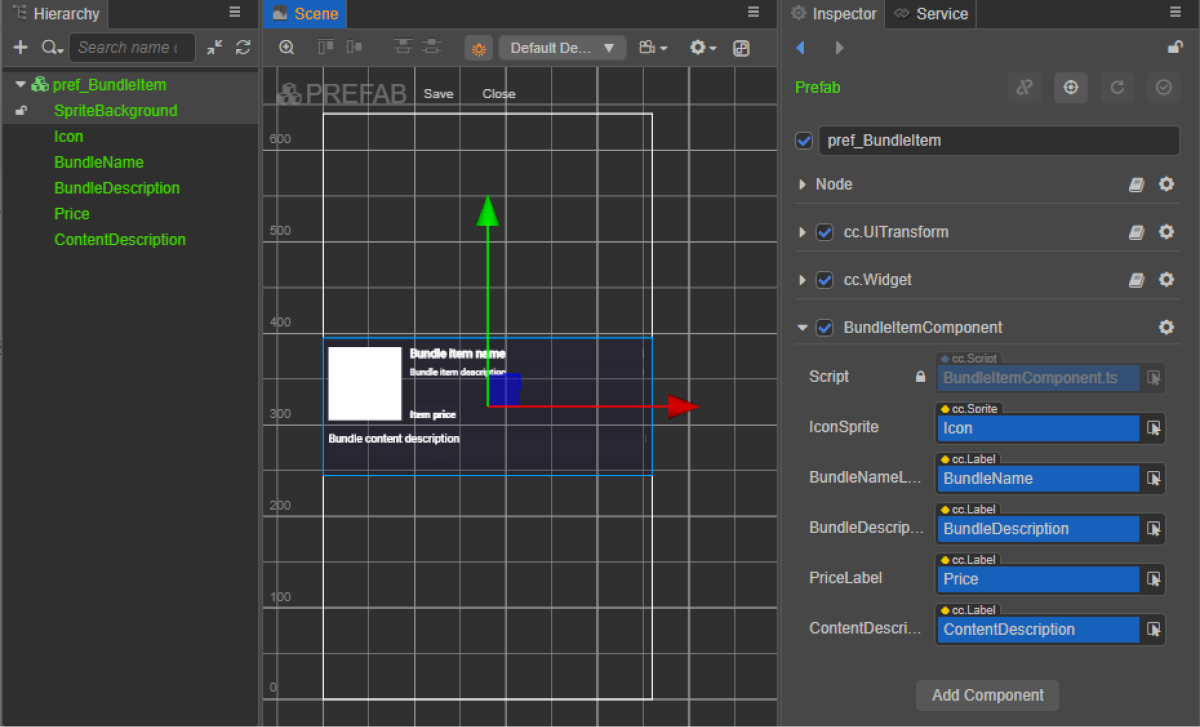
创建捆绑包小组件脚本
- 创建一个BundleItemComponent并添加以下属性:
iconSpritebundleNameLabelbundleDescriptionLabelpriceLabelcontentDescriptionlabel
- 将
init方法和初始化逻辑添加到BundleItemComponent类,如脚本示例中所示。 - 将BundleItemComponent添加到预制件的根节点。
- 将预制件元素与
BundleItemComponent的属性绑定,如图所示:
小组件脚本示例(BundleItemComponent):
- typescript
 1import { _decorator, assetManager, Component, ImageAsset, Label, Sprite, SpriteFrame, Texture2D } from 'cc';
 2import { StoreBundle } from 'db://xsolla-commerce-sdk/scripts/api/XsollaCatalog';
 3const { ccclass, property } = _decorator;
 4
 5
 6@ccclass('BundleItemComponent')
 7export class BundleItemComponent extends Component {
 8
 9    @property(Sprite)
10    iconSprite: Sprite;
11
12    @property(Label)
13    bundleNameLabel: Label;
14
15    @property(Label)
16    bundleDescriptionLabel: Label;
17
18    @property(Label)
19    priceLabel: Label;
20
21    @property(Label)
22    contentDescriptionLabel: Label;
23
24    init(data: StoreBundle) {
25
26        this.bundleNameLabel.string = data.name;
27        this.bundleDescriptionLabel.string = data.description;
28
29        if (data.virtual_prices.length > 0) {
30            this.priceLabel.string = `${data.virtual_prices[0].amount.toString()} ${data.virtual_prices[0].name}`;
31        } else {
32            this.priceLabel.string = `${parseFloat(data.price.amount)} ${data.price.currency}`;
33        }
34
35        assetManager.loadRemote<ImageAsset>(data.image_url, (err, imageAsset) => {
36            if(err == null) {
37            const spriteFrame = new SpriteFrame();
38            const texture = new Texture2D();
39            texture.image = imageAsset;
40            spriteFrame.texture = texture;
41            this.iconSprite.spriteFrame = spriteFrame;
42            } else {
43                console.log(`Can’t load image with URL ${data.image_url}`);
44            }
45        });
46
47        this.contentDescriptionLabel.string = `This bundle includes ${data.content.length} items: `;
48        var bandles = data.content.map(bundle => bundle.name).join(', ');
49        this.contentDescriptionLabel.string += bandles;
50    }
51}
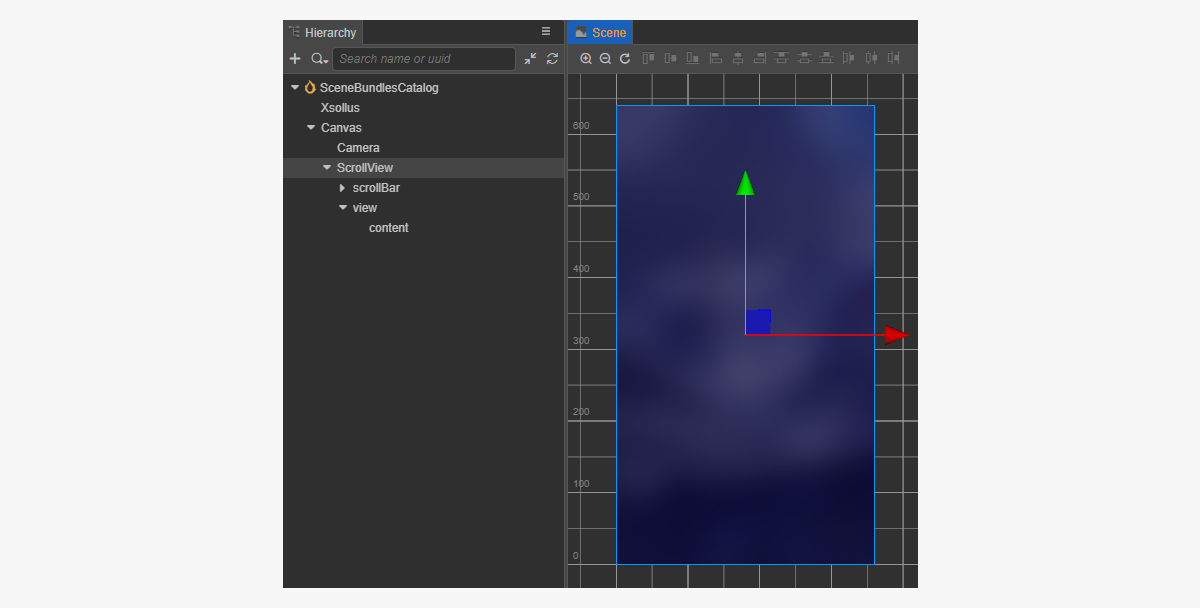
创建页面界面
为捆绑包目录页面创建一个场景,并向其添加ScrollView元素。
页面结构示例:
要让ScrollView与创建的BundleItem预制件匹配,请设置其大小:
- 更改
ScrollView节点和内部view节点中ContentSize参数的值。 - 将
Layout组件与content节点绑定并完成设置。示例中选择了以下设置:Type == verticalResizeMode == Container
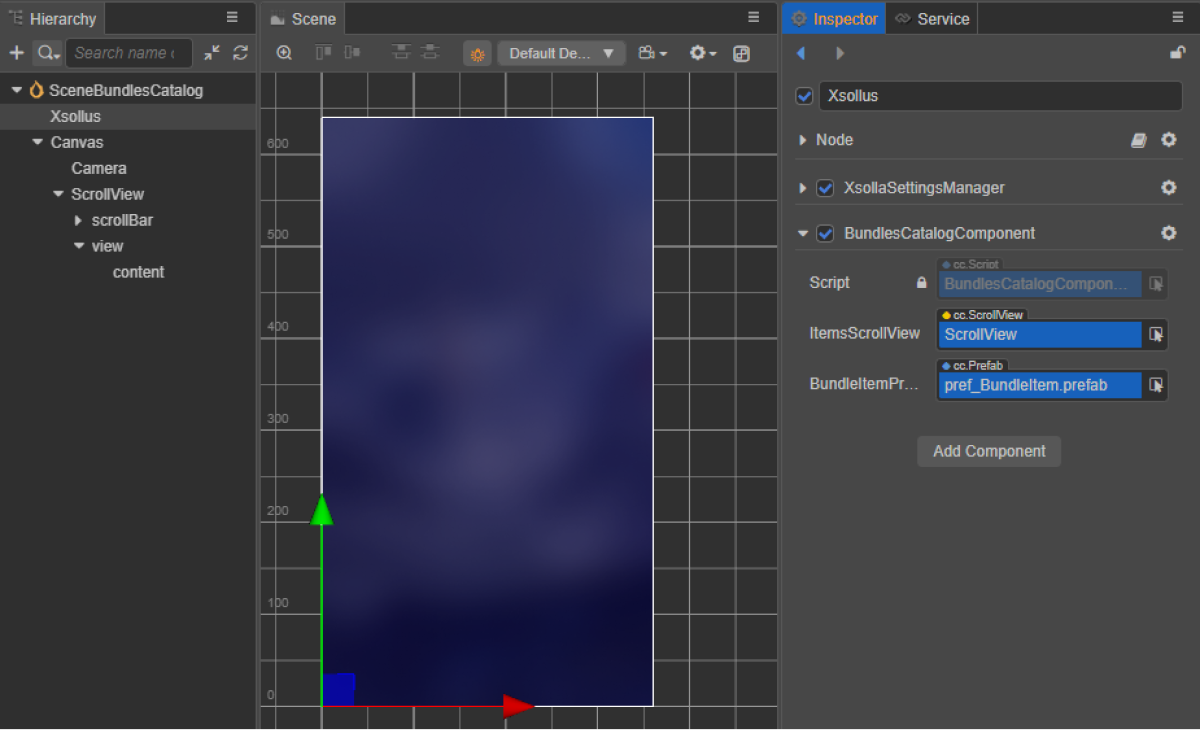
创建捆绑包目录脚本组件
- 创建一个BundlesCatalogComponent并添加以下属性:
itemsScrollViewbundleItemPrefab
- 将
start 生命周期函数和初始化逻辑添加到BundlesCatalogComponent类,如脚本示例中所示。 - 在场景中将BundlesCatalogComponent添加到节点。可添加新节点或使用SDK初始化期间添加的含
XsollaSettingsManager组件的现有节点。 - 将预制件元素与
BundlesCatalogComponent的属性绑定,如图所示:
类脚本示例(BundlesCatalogComponent):
- typescript
 1import { _decorator, Component, instantiate, Prefab, ScrollView } from 'cc';
 2import { XsollaCatalog } from 'db://xsolla-commerce-sdk/scripts/api/XsollaCatalog';
 3import { BundleItemComponent } from './BundleItemComponent';
 4const { ccclass, property } = _decorator;
 5
 6
 7@ccclass('BundlesCatalogComponent')
 8export class BundlesCatalogComponent extends Component {
 9
10    @property(ScrollView)
11    itemsScrollView: ScrollView;
12
13    @property(Prefab)
14    bundleItemPrefab: Prefab;
15
16    start() {
17        XsollaCatalog.getBundleList(null, null, [], itemsData => {
18        for (let i = 0; i < itemsData.items.length; ++i) {
19                let bundleItem = instantiate(this.bundleItemPrefab);
20                this.itemsScrollView.content.addChild(bundleItem);
21                bundleItem.getComponent(BundleItemComponent).init(itemsData.items[i]);
22            }
23        });
24    }
25}
脚本工作结果示例:

实现虚拟货币套餐目录的显示
创建虚拟货币套餐的小组件
- 创建一个预制件。方法是从文件夹的快捷菜单中选择
Create > Node Prefab 。 - 打开创建的预制件。
- 将
UITransform组件添加到预制件的根,如图所示,并设置内容尺寸。
- 添加以下UI元素作为预制件的子对象并配置其视效:
- 小组件背景图片
- 货币名称
- 货币描述
- 货币价格
- 货币图片
小组件结构的示例:
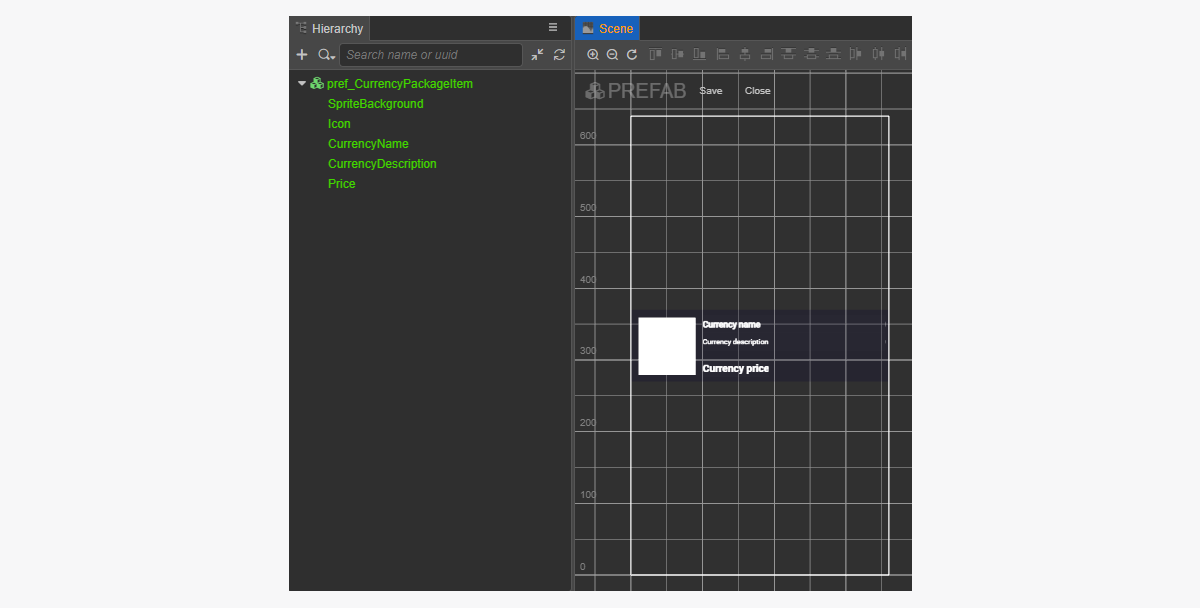
创建虚拟货币套餐的小组件脚本
- 创建一个CurrencyPackageItemComponent并添加以下属性:
iconSpritecurrencyNameLabelcurrencyDescriptionLabelpriceLabel
- 将
init方法和初始化逻辑添加到CurrencyPackageItemComponent类,如脚本示例中所示。 - 将CurrencyPackageItemComponent组件附加到预制件的根节点。
- 将预制件元素与
CurrencyPackageItemComponent的属性绑定,如图所示:
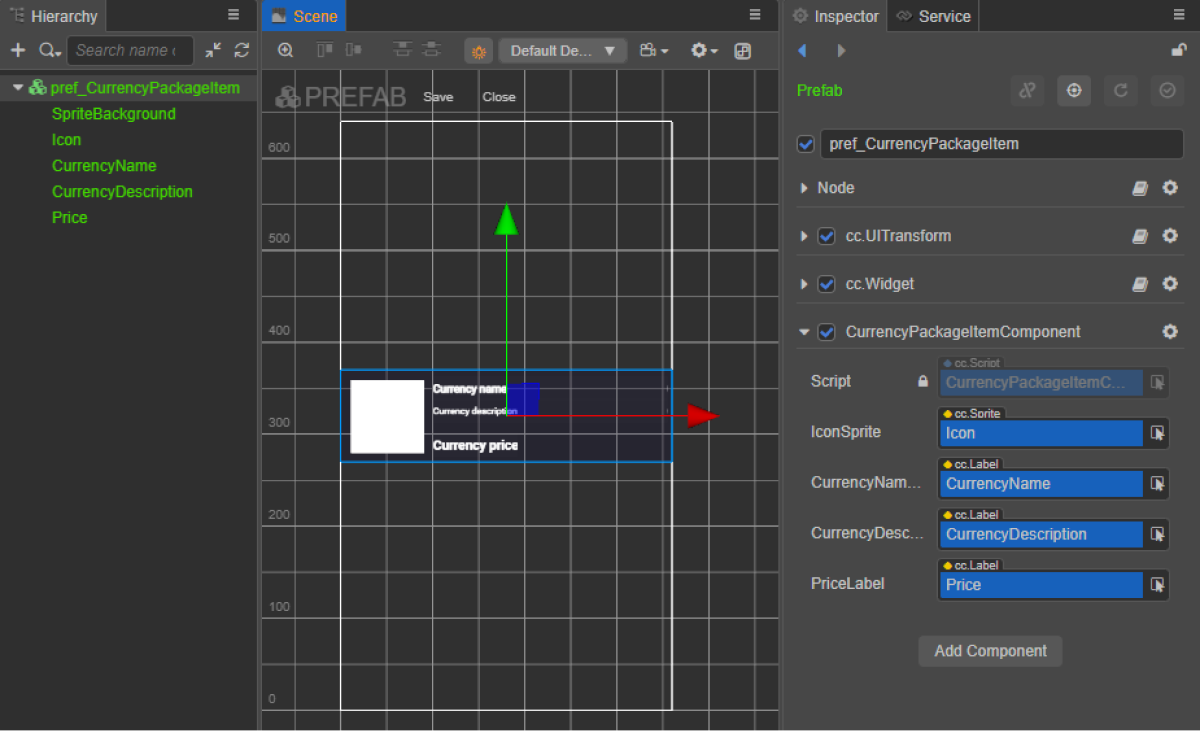
小组件脚本示例(CurrencyPackageItemComponent):
- typescript
 1import { _decorator, assetManager, Component, ImageAsset, Label, Sprite, SpriteFrame, Texture2D } from 'cc';
 2import { VirtualCurrencyPackage } from 'db://xsolla-commerce-sdk/scripts/api/XsollaCatalog';
 3const { ccclass, property } = _decorator;
 4
 5
 6@ccclass('CurrencyPackageItemComponent')
 7export class CurrencyPackageItemComponent extends Component {
 8
 9    @property(Sprite)
10    iconSprite: Sprite;
11
12    @property(Label)
13    currencyNameLabel: Label;
14
15    @property(Label)
16    currencyDescriptionLabel: Label;
17
18    @property(Label)
19    priceLabel: Label;
20
21    init(data: VirtualCurrencyPackage) {
22
23        this.currencyNameLabel.string = data.name;
24        this.currencyDescriptionLabel.string = data.description;
25
26        if (data.virtual_prices.length > 0) {
27            this.priceLabel.string = `${data.virtual_prices[0].amount.toString()} ${data.virtual_prices[0].name}`;
28        } else {
29            this.priceLabel.string = `${parseFloat(data.price.amount)} ${data.price.currency}`;
30        }
31
32        assetManager.loadRemote<ImageAsset>(data.image_url, (err, imageAsset) => {
33            if(err == null) {
34            const spriteFrame = new SpriteFrame();
35            const texture = new Texture2D();
36            texture.image = imageAsset;
37            spriteFrame.texture = texture;
38            this.iconSprite.spriteFrame = spriteFrame;
39            } else {
40                console.log(`Can’t load image with URL ${data.image_url}`);
41            }
42        });
43    }
44}
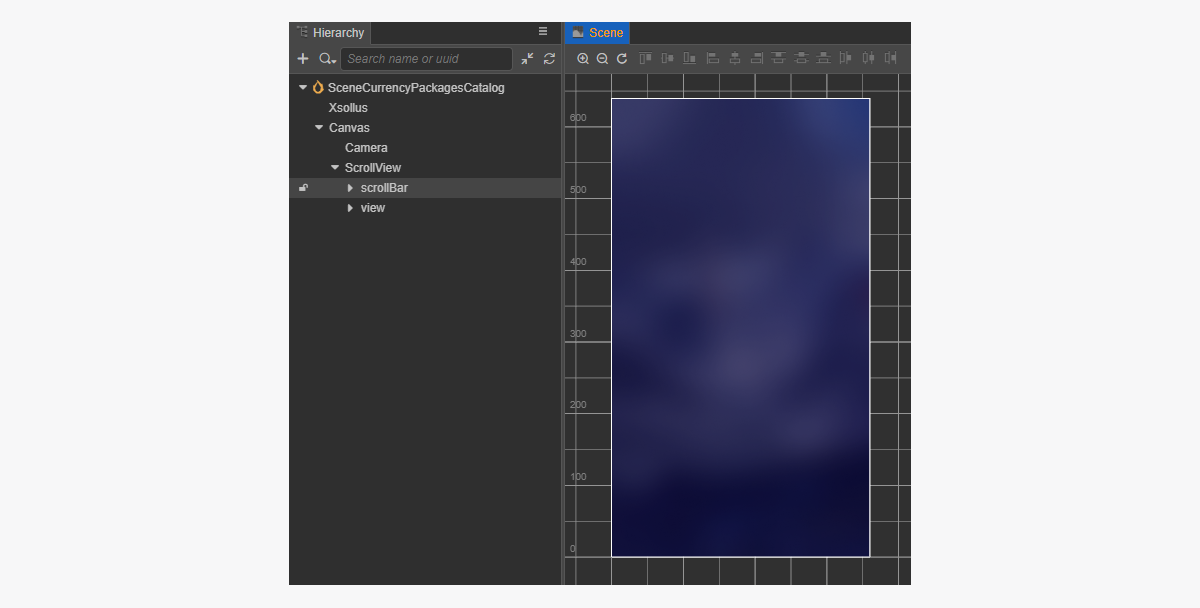
创建页面界面
为虚拟货币套餐目录页面创建一个场景,并向其添加ScrollView元素。
页面结构示例:
要让ScrollView与创建的CurrencyPackageItem预制件匹配,请设置其大小:
- 更改
ScrollView节点和内部view节点中ContentSize参数的值。 - 将
Layout组件与content节点绑定并完成设置。示例中选择了以下设置:Type == verticalResizeMode == Container
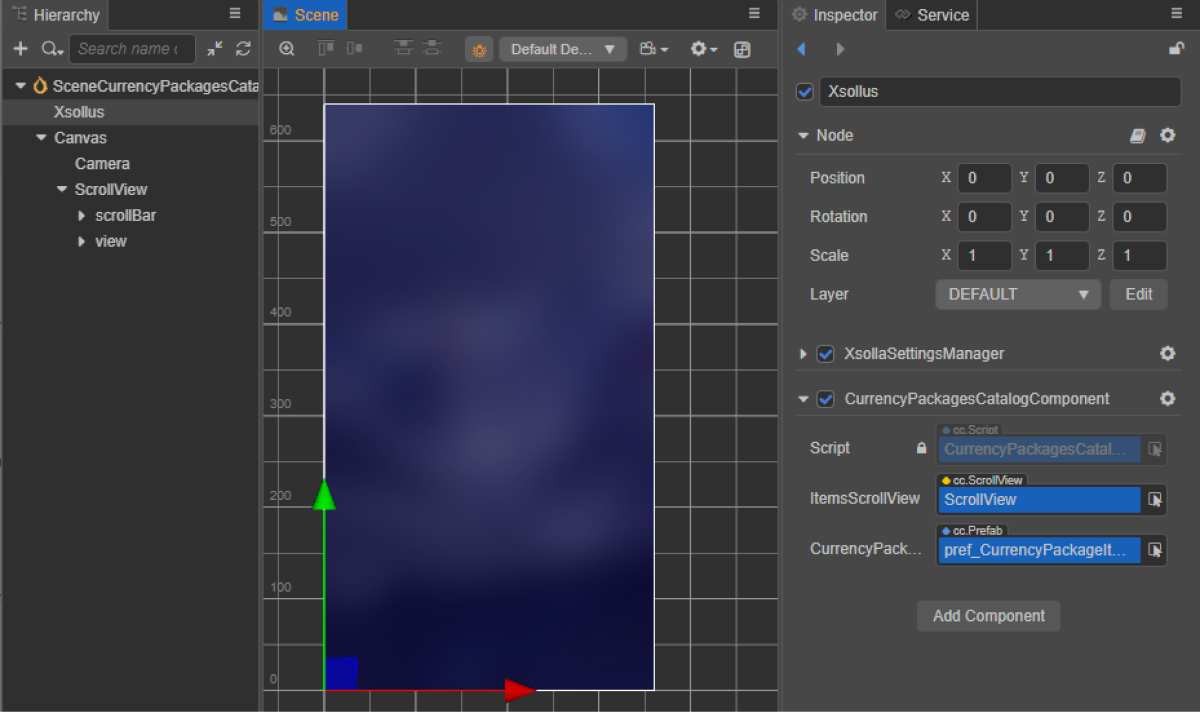
创建货币套餐目录脚本组件
- 创建一个
CurrencyPackagesCatalogComponent并添加以下属性:itemsScrollViewcurrencyPackageItemPrefab
- 将
start 生命周期函数和初始化逻辑添加到CurrencyPackagesCatalogComponent类,如脚本示例中所示。 - 在场景中将CurrencyPackagesCatalogComponent添加到节点。可添加新节点或使用SDK初始化期间添加的含
XsollaSettingsManager组件的现有节点。 - 将预制件元素与
CurrencyPackagesCatalogComponent的属性绑定,如图所示:
类脚本示例(CurrencyPackagesCatalogComponent):
 1import { _decorator, Component, instantiate, Prefab, ScrollView } from 'cc';
 2import { XsollaCatalog } from 'db://xsolla-commerce-sdk/scripts/api/XsollaCatalog';
 3import { CurrencyPackageItemComponent } from './CurrencyPackageItemComponent';
 4const { ccclass, property } = _decorator;
 5
 6
 7@ccclass('CurrencyPackagesCatalogComponent')
 8export class CurrencyPackagesCatalogComponent extends Component {
 9
10    @property(ScrollView)
11    itemsScrollView: ScrollView;
12
13    @property(Prefab)
14    currencyPackageItemPrefab: Prefab;
15
16    start() {
17        XsollaCatalog.getVirtualCurrencyPackages(null, null, [], itemsData => {
18        for (let i = 0; i < itemsData.items.length; ++i) {
19                let currencyPackageItem = instantiate(this.currencyPackageItemPrefab);
20                this.itemsScrollView.content.addChild(currencyPackageItem);
21                currencyPackageItem.getComponent(CurrencyPackageItemComponent).init(itemsData.items[i]);
22            }
23        });
24    }
25}
脚本工作结果示例:
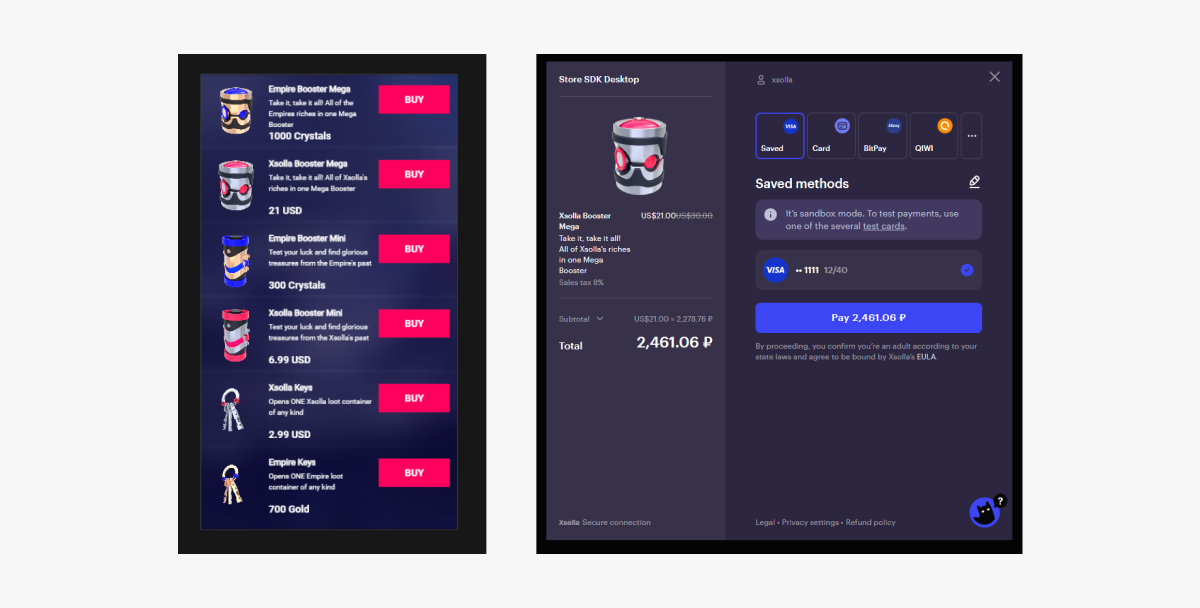
以真实货币的形式销售虚拟物品
本节介绍如何通过SDK方法实现以真实货币形式销售虚拟物品。
开始之前,需实现在目录中显示虚拟物品。下方示例中我们描述了如何实现虚拟物品的购买。其他商品类型的配置与此类似。
本教程介绍以下逻辑的实现:

在登录脚本示例中我们使用的是演示帐户的凭证(用户名:xsolla,密码:xsolla)。该帐户仅适用于演示项目。
脚本示例不包含按页显示目录中商品(分页)的实现。请使用getCatalog SDK方法的offset和limit参数来实现分页。每页最大商品数为50。如目录中的商品数超过50,则需要分页。
完成商品小组件
在商品小组件中添加购买按钮,并配置其显示元素。
RC_StoreItemComponent。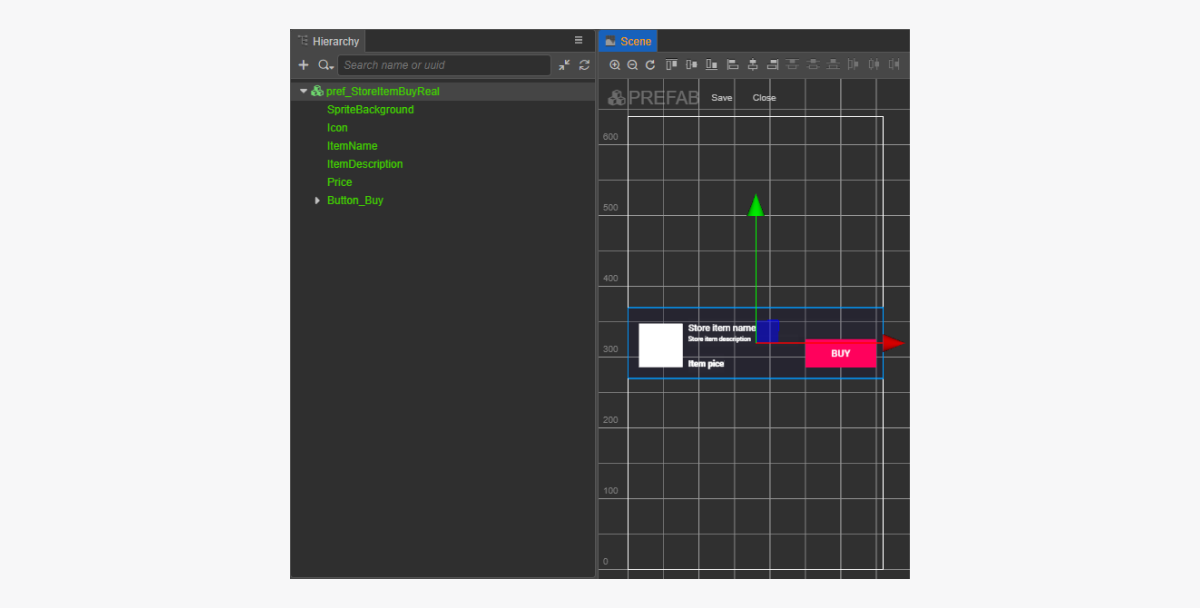
完成商品小组件脚本
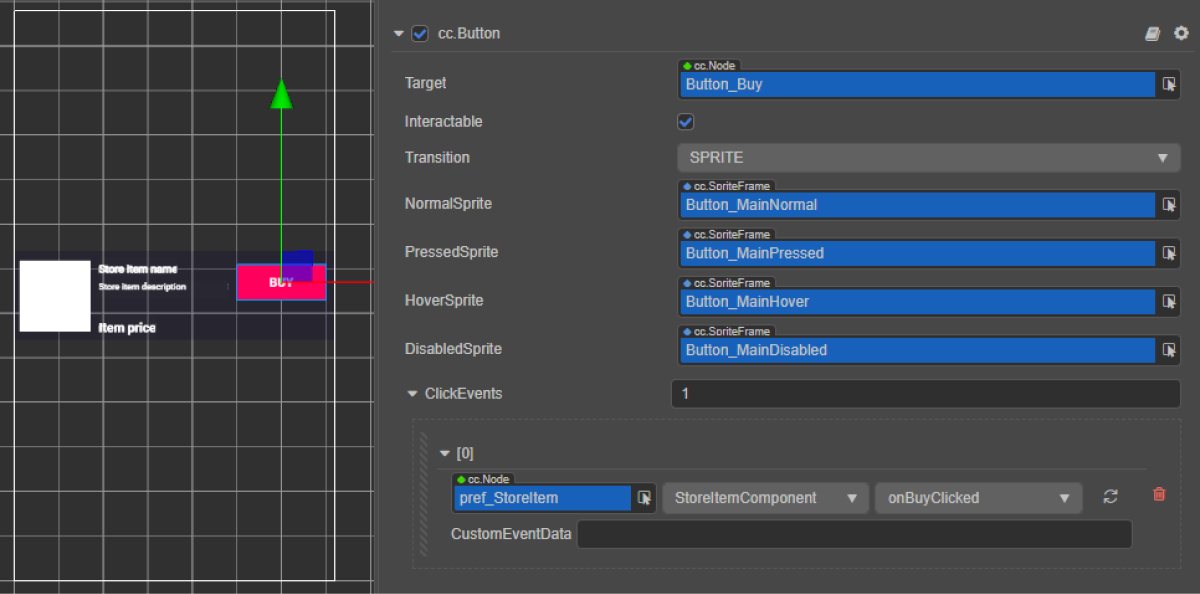
- 要通过代码将回调函数与购买按钮绑定,请向
RC_StoreItemComponent添加buyButton属性。 - 将方法添加到点击
BuyButton时调用的RC_StoreItemComponent类,并添加处理该点击事件的逻辑,脚本示例中所示。 - 通过以下方式之一:将回调与购买按钮绑定:
- 使用
Inspector 面板,如下图所示 - 将下方代码块插入页面脚本
- 使用
使用
通过代码绑定回调:
- typescript
1start() {
2	this.buyButton.node.on(Button.EventType.CLICK, this.onBuyClicked, this);
3  }
小组件脚本示例(RC_StoreItemComponent):
- typescript
 1import { _decorator, assetManager, Button, Component, ImageAsset, Label, Sprite, SpriteFrame, Texture2D } from 'cc';
 2import { StoreItem, XsollaCatalog } from '../../api/XsollaCatalog';
 3import { TokenStorage } from '../../common/TokenStorage';
 4import { OrderTracker } from '../../common/OrderTracker';
 5import { XsollaPayments } from '../../api/XsollaPayments';
 6const { ccclass, property } = _decorator;
 7
 8
 9export namespace sellForRealMoneyItem {
10
11
12    @ccclass('RC_StoreItemComponent')
13    export class RC_StoreItemComponent extends Component {
14
15
16        @property(Sprite)
17        iconSprite: Sprite;
18
19
20        @property(Label)
21        itemNameLabel: Label;
22
23
24        @property(Label)
25        itemDescriptionLabel: Label;
26
27
28        @property(Label)
29        priceLabel: Label;
30
31
32        @property(Button)
33        buyButton: Button;
34
35
36        private _data: StoreItem;
37
38
39        start() {
40            this.buyButton.node.on(Button.EventType.CLICK, this.onBuyClicked, this);
41        }
42
43
44        init(data: StoreItem) {
45
46            this._data = data;
47
48
49            this.itemNameLabel.string = data.name;
50            this.itemDescriptionLabel.string = data.description;
51
52            if (data.virtual_prices.length > 0) {
53                this.priceLabel.string = `${data.virtual_prices[0].amount.toString()} ${data.virtual_prices[0].name}`;
54            } else {
55                this.priceLabel.string = `${parseFloat(data.price.amount)} ${data.price.currency}`;
56            }
57
58
59            assetManager.loadRemote<ImageAsset>(data.image_url, (err, imageAsset) => {
60                if(err == null) {
61                const spriteFrame = new SpriteFrame();
62                const texture = new Texture2D();
63                texture.image = imageAsset;
64                spriteFrame.texture = texture;
65                this.iconSprite.spriteFrame = spriteFrame;
66                } else {
67                    console.log(`Cant load image with url ${data.image_url}`);
68                }
69            });
70        }
71
72
73        onBuyClicked() {
74            XsollaCatalog.fetchPaymentToken(TokenStorage.getToken().access_token, this._data.sku, 1, undefined, undefined, undefined, undefined, undefined, result => {
75                OrderTracker.checkPendingOrder(result.token, result.orderId, () => {
76                    console.log('success purchase!');
77                }, error => {
78                    console.log(`Order checking failed - Status code: ${error.status}, Error code: ${error.code}, Error message: ${error.description}`);
79                });
80                XsollaPayments.openPurchaseUI(result.token);
81            }, error => {
82                console.log(error.description);
83            });
84        }
85    }
86}
完成商品目录脚本组件
RC_ItemsCatalogComponent。向RC_ItemsCatalogComponent类的start方法添加获取有效授权令牌的逻辑,如脚本示例中所示。
类脚本示例(RC_ItemsCatalogComponent):
- typescript
 1import { _decorator, Component, instantiate, Prefab, ScrollView } from 'cc';
 2import { XsollaCatalog } from 'db://xsolla-commerce-sdk/scripts/api/XsollaCatalog';
 3import { RC_StoreItemComponent } from './RC_StoreItemComponent';
 4import { XsollaAuth } from 'db://xsolla-commerce-sdk/scripts/api/XsollaAuth';
 5import { TokenStorage } from 'db://xsolla-commerce-sdk/scripts/common/TokenStorage';
 6const { ccclass, property } = _decorator;
 7
 8
 9
10
11@ccclass('RC_ItemsCatalogComponent')
12export class RC_ItemsCatalogComponent extends Component {
13
14    @property(ScrollView)
15    itemsScrollView: ScrollView;
16
17
18    @property(Prefab)
19    storeItemPrefab: Prefab;
20
21
22    start() {
23        XsollaAuth.authByUsernameAndPassword('xsolla', 'xsolla', false, token => {
24            TokenStorage.saveToken(token, false);
25            XsollaCatalog.getCatalog(null, null, [], itemsData => {
26                for (let i = 0; i < itemsData.items.length; ++i) {
27                        let storeItem = instantiate(this.storeItemPrefab);
28                        this.itemsScrollView.content.addChild(storeItem);
29                        storeItem.getComponent(RC_StoreItemComponent).init(itemsData.items[i]);
30                    }
31                });
32        });
33    }
34}
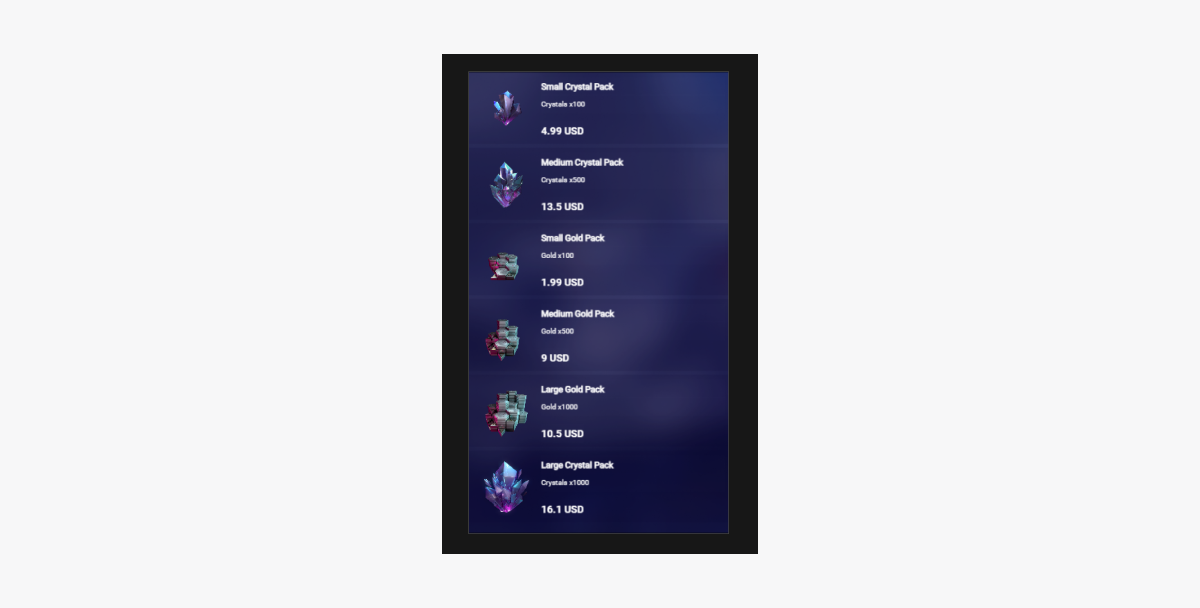
脚本工作结果示例:
以虚拟货币计价的形式销售虚拟物品
本节介绍如何通过SDK方法实现以虚拟货币形式销售虚拟物品。
开始之前,需实现在目录中显示虚拟物品。下方示例中我们描述了如何实现虚拟物品的购买。其他商品类型的配置与此类似。
本教程介绍以下逻辑的实现:

在登录脚本示例中我们使用的是演示帐户的凭证(用户名:xsolla,密码:xsolla)。该帐户仅适用于演示项目。
脚本示例不包含按页显示目录中商品(分页)的实现。请使用getCatalog SDK方法的offset和limit参数来实现分页。每页最大商品数为50。如目录中的商品数超过50,则需要分页。
完成商品小组件
在商品小组件中添加购买按钮,并配置其显示元素。
VC_StoreItemComponent。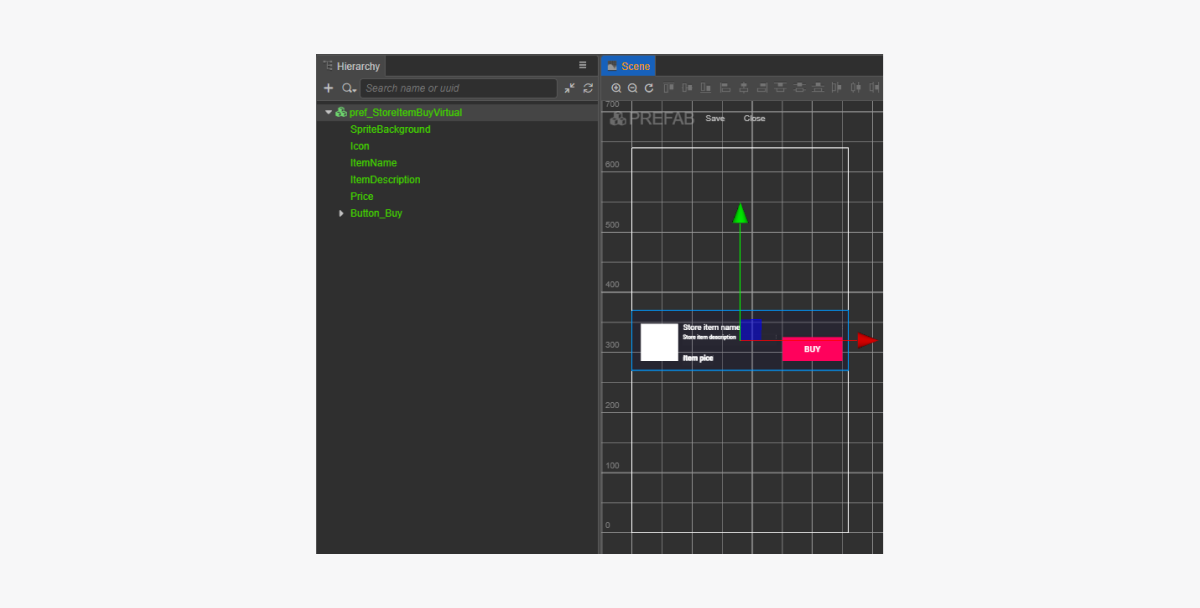
完成商品小组件脚本
- 要通过代码将回调函数与购买按钮绑定,请向
VC_StoreItemComponent添加buyButton属性。 - 将方法添加到点击
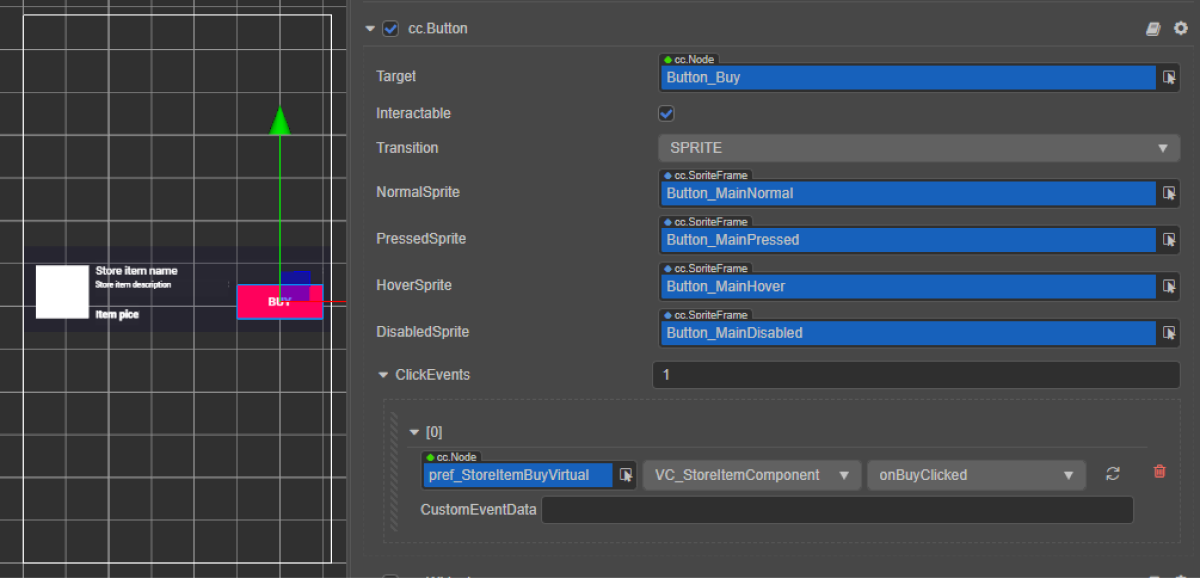
BuyButton时调用的VC_StoreItemComponent类,并添加处理该点击事件的逻辑,脚本示例中所示。 - 通过以下方式之一:将回调与购买按钮绑定:
- 使用
Inspector 面板,如下图所示 - 将下方代码块插入页面脚本
- 使用
使用
通过代码绑定回调:
- typescript
1start() {
2	this.buyButton.node.on(Button.EventType.CLICK, this.onBuyClicked, this);
3  }
小组件脚本示例(VC_StoreItemComponent):
- typescript
 1import { _decorator, assetManager, Button, Component, ImageAsset, Label, Sprite, SpriteFrame, Texture2D } from 'cc';
 2import { StoreItem, XsollaCatalog } from 'db://xsolla-commerce-sdk/scripts/api/XsollaCatalog';
 3import { TokenStorage } from 'db://xsolla-commerce-sdk/scripts/common/TokenStorage';
 4import { OrderTracker } from 'db://xsolla-commerce-sdk/scripts/common/OrderTracker';
 5const { ccclass, property } = _decorator;
 6
 7
 8@ccclass('VC_StoreItemComponent')
 9export class VC_StoreItemComponent extends Component {
10
11    @property(Sprite)
12    iconSprite: Sprite;
13
14    @property(Label)
15    itemNameLabel: Label;
16
17    @property(Label)
18    itemDescriptionLabel: Label;
19
20    @property(Label)
21    priceLabel: Label;
22
23    @property(Button)
24    buyButton: Button;
25
26    private _data: StoreItem;
27
28    start() {
29        this.buyButton.node.on(Button.EventType.CLICK, this.onBuyClicked, this);
30    }
31
32    init(data: StoreItem) {
33
34        this._data = data;
35
36        this.itemNameLabel.string = data.name;
37        this.itemDescriptionLabel.string = data.description;
38
39        if (data.virtual_prices.length > 0) {
40            this.priceLabel.string = `${data.virtual_prices[0].amount.toString()} ${data.virtual_prices[0].name}`;
41        } else {
42            this.priceLabel.string = `${parseFloat(data.price.amount)} ${data.price.currency}`;
43        }
44
45        assetManager.loadRemote<ImageAsset>(data.image_url, (err, imageAsset) => {
46            if(err == null) {
47            const spriteFrame = new SpriteFrame();
48            const texture = new Texture2D();
49            texture.image = imageAsset;
50            spriteFrame.texture = texture;
51            this.iconSprite.spriteFrame = spriteFrame;
52            } else {
53                console.log(`Can’t load image with URL ${data.image_url}`);
54            }
55        });
56    }
57
58    onBuyClicked() {
59        XsollaCatalog.purchaseItemForVirtualCurrency(TokenStorage.getToken().access_token, this._data.sku, this._data.virtual_prices[0].sku, orderId => {
60            OrderTracker.checkPendingOrder(TokenStorage.getToken().access_token, orderId, () => {
61                console.log('success purchase!');
62            }, error => {
63                console.log(`Order checking failed - Status code: ${error.status}, Error code: ${error.code}, Error message: ${error.description}`);
64            });
65        }, error => {
66            console.log(error.description);
67        });
68    }
69}
完成商品目录脚本组件
VC_ItemsCatalogComponent。向VC_ItemsCatalogComponent类的start方法添加获取有效授权令牌的逻辑,如脚本示例中所示。
类脚本示例(VC_ItemsCatalogComponent):
- typescript
 1import { _decorator, Component, instantiate, Prefab, ScrollView } from 'cc';
 2import { XsollaCatalog } from 'db://xsolla-commerce-sdk/scripts/api/XsollaCatalog';
 3import { VC_StoreItemComponent } from './VC_StoreItemComponent';
 4import { XsollaAuth } from 'db://xsolla-commerce-sdk/scripts/api/XsollaAuth';
 5import { TokenStorage } from 'db://xsolla-commerce-sdk/scripts/common/TokenStorage';
 6const { ccclass, property } = _decorator;
 7
 8
 9@ccclass('VC_ItemsCatalogComponent')
10export class VC_ItemsCatalogComponent extends Component {
11
12    @property(ScrollView)
13    itemsScrollView: ScrollView;
14
15    @property(Prefab)
16    storeItemPrefab: Prefab;
17
18    start() {
19        XsollaAuth.authByUsernameAndPassword('xsolla', 'xsolla', false, token => {
20            TokenStorage.saveToken(token, false);
21            XsollaCatalog.getCatalog(null, null, [], itemsData => {
22                for (let i = 0; i < itemsData.items.length; ++i) {
23                        let storeItem = instantiate(this.storeItemPrefab);
24                        this.itemsScrollView.content.addChild(storeItem);
25                        storeItem.getComponent(VC_StoreItemComponent).init(itemsData.items[i]);
26                    }
27                });
28        });
29    }
30}
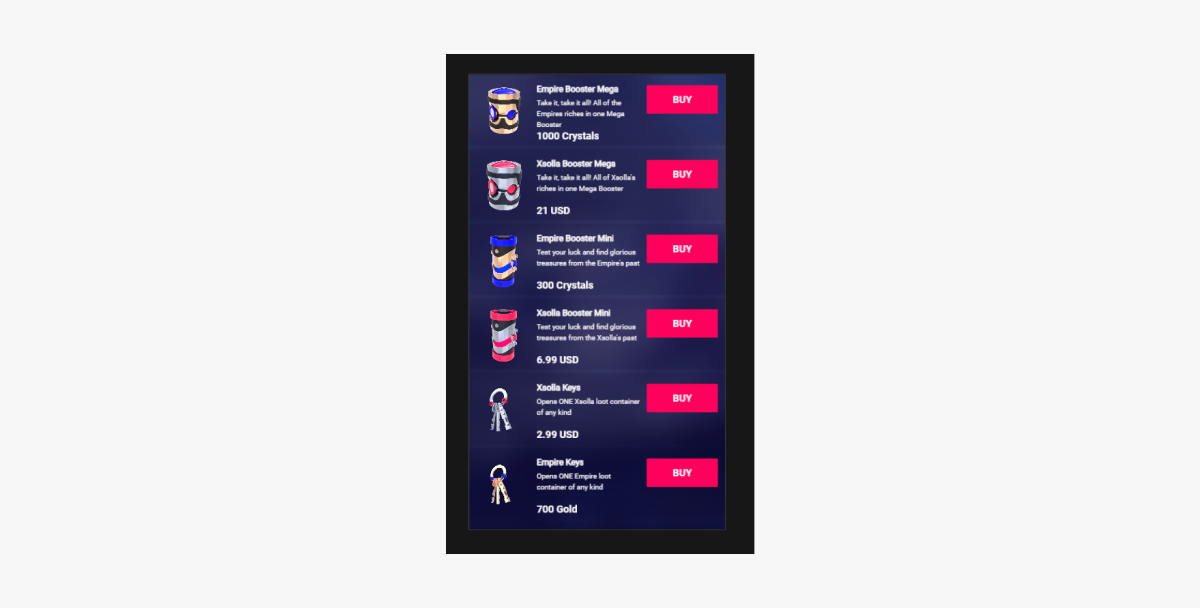
脚本工作结果示例:
显示虚拟货币余额
本教程介绍如何使用SDK方法在应用中显示虚拟货币的余额。
创建显示余额的小组件
- 创建一个预制件。方法是从文件夹的快捷菜单中选择
Create > Node Prefab 。 - 打开创建的预制件。
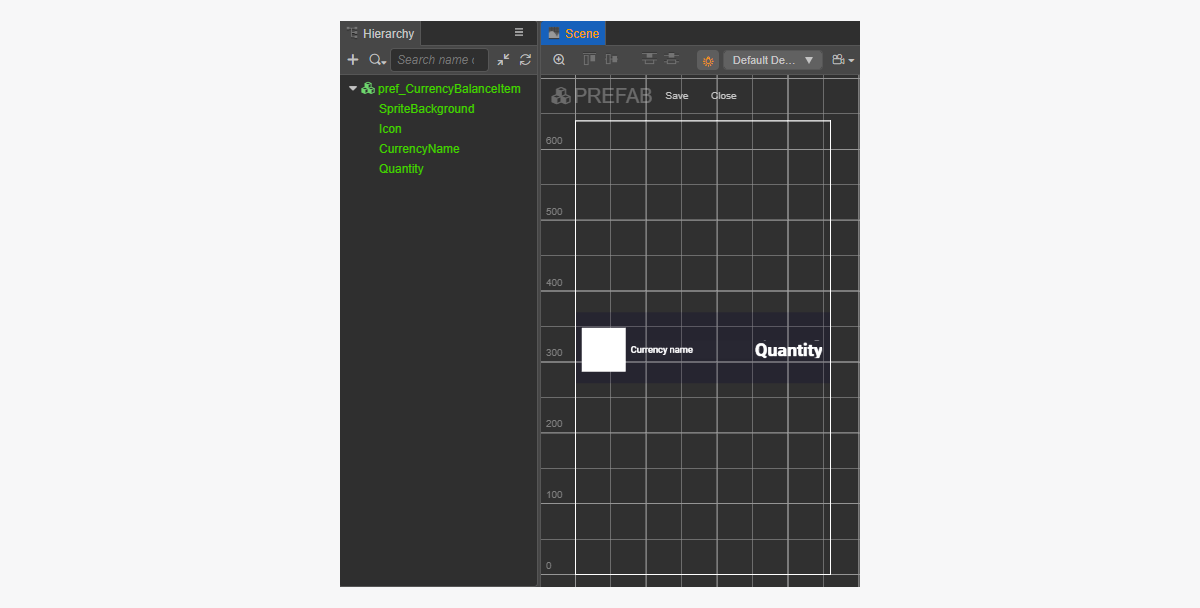
- 将
UITransform组件添加到预制件的根,如图所示,并设置内容尺寸。
- 添加以下UI元素作为预制件的子对象并配置其视效:
- 小组件背景图片
- 货币名称
- 货币数量
- 货币图片
小组件结构的示例:
创建显示余额的小组件脚本
- 创建一个CurrencyBalanceItemComponent并添加以下属性:
iconSpritecurrencyNameLabelquantityLabel
- 将
init方法和初始化逻辑添加到CurrencyBalanceItemComponent类,如脚本示例中所示。 - 将CurrencyBalanceItemComponent组件附加到预制件的根节点。
- 将预制件元素与
CurrencyBalanceItemComponent的属性绑定,如图所示:

小组件脚本示例(CurrencyBalanceItemComponent):
- typescript
 1import { _decorator, assetManager, Component, ImageAsset, Label, Sprite, SpriteFrame, Texture2D } from 'cc';
 2import { VirtualCurrencyBalance } from 'db://xsolla-commerce-sdk/scripts/api/XsollaInventory';
 3const { ccclass, property } = _decorator;
 4
 5
 6@ccclass('CurrencyBalanceItemComponent')
 7export class CurrencyBalanceItemComponent extends Component {
 8
 9    @property(Sprite)
10    iconSprite: Sprite;
11
12    @property(Label)
13    currencyNameLabel: Label;
14
15    @property(Label)
16    quantityLabel: Label;
17
18    init(data: VirtualCurrencyBalance) {
19
20        this.currencyNameLabel.string = data.name;
21        this.quantityLabel.string = data.amount.toString();
22
23        assetManager.loadRemote<ImageAsset>(data.image_url, (err, imageAsset) => {
24            if(err == null) {
25            const spriteFrame = new SpriteFrame();
26            const texture = new Texture2D();
27            texture.image = imageAsset;
28            spriteFrame.texture = texture;
29            this.iconSprite.spriteFrame = spriteFrame;
30            } else {
31                console.log(`Can’t load image with URL ${data.image_url}`);
32            }
33        });
34    }
35}
创建页面界面
为虚拟货币余额页面创建一个场景,并向其添加ScrollView元素。
页面结构示例:
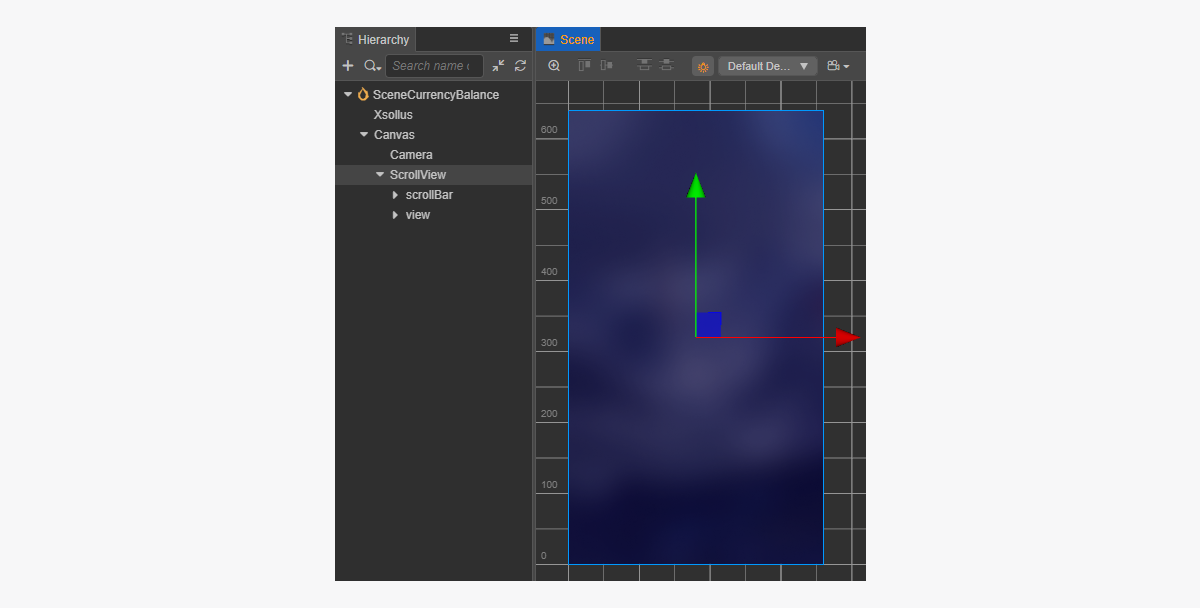
要让ScrollView与创建的CurrencyBalanceItem预制件匹配,请设置其大小:
- 更改
ScrollView节点和内部view节点中ContentSize参数的值。 - 将
Layout组件与content节点绑定并完成设置。示例中选择了以下设置:Type == verticalResizeMode == Container
创建货币余额脚本组件
- 创建一个CurrencyBalanceComponent并添加以下属性:
itemsScrollViewcurrencyBalanceItemPrefab
- 将
start 生命周期函数和初始化逻辑添加到CurrencyBalanceComponent类,如脚本示例中所示。 - 在场景中将
CurrencyBalanceComponent 添加到节点。可添加新节点或使用SDK初始化期间添加的含XsollaSettingsManager组件的现有节点。 - 将预制件元素与
CurrencyBalanceItemComponent的属性绑定,如图所示:
xsolla,密码:xsolla)。该帐户仅适用于演示项目。- typescript
 1import { _decorator, Component, instantiate, Prefab, ScrollView } from 'cc';
 2import { XsollaAuth } from 'db://xsolla-commerce-sdk/scripts/api/XsollaAuth';
 3import { XsollaInventory } from 'db://xsolla-commerce-sdk/scripts/api/XsollaInventory';
 4import { CurrencyBalanceItemComponent } from './CurrencyBalanceItemComponent';
 5const { ccclass, property } = _decorator;
 6
 7
 8@ccclass('CurrencyBalanceComponent')
 9export class CurrencyBalanceComponent extends Component {
10
11    @property(ScrollView)
12    itemsList: ScrollView;
13
14    @property(Prefab)
15    currencyBalanceItemPrefab: Prefab;
16
17    start() {
18        XsollaAuth.authByUsernameAndPassword('xsolla', 'xsolla', false, token => {
19            XsollaInventory.getVirtualCurrencyBalance(token.access_token, null, itemsData => {
20                for (let i = 0; i < itemsData.items.length; ++i) {
21                        let currencyBalanceItem = instantiate(this.currencyBalanceItemPrefab);
22                        this.itemsList.content.addChild(currencyBalanceItem);
23                             currencyBalanceItem.getComponent(CurrencyBalanceItemComponent).init(itemsData.items[i]);
24                    }
25                });
26        });
27
28    }
29}
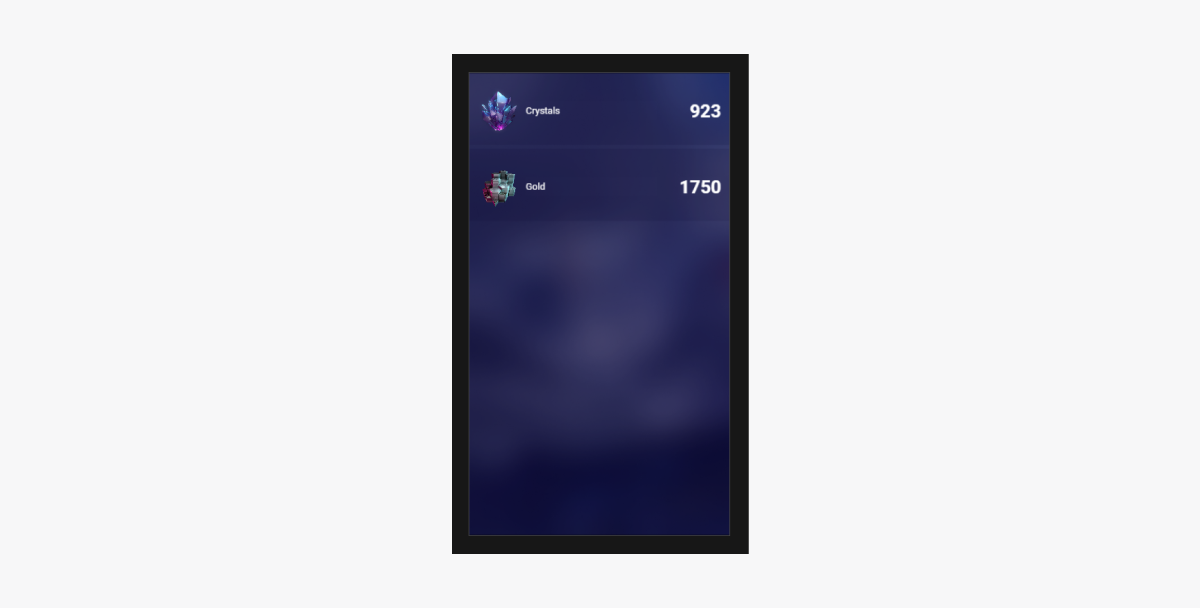
脚本工作结果示例:
显示物品库中的物品
本教程介绍如何使用SDK方法显示用户物品库中的商品。
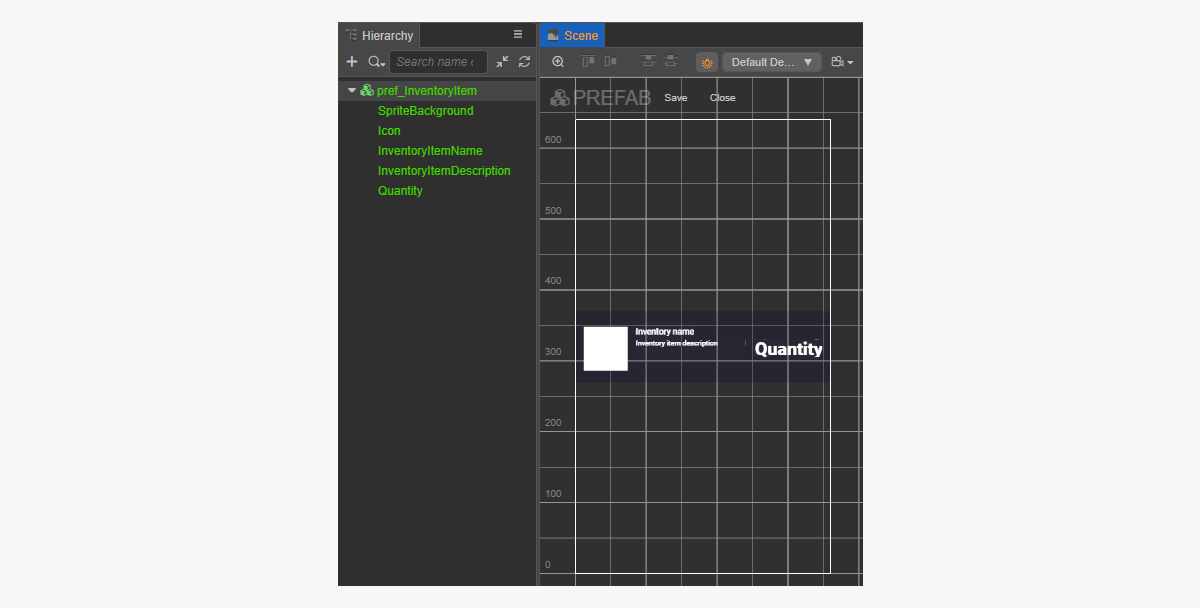
创建物品小组件
- 创建一个预制件。方法是从文件夹的快捷菜单中选择
Create > Node Prefab 。 - 打开创建的预制件。
- 将
UITransform组件添加到预制件的根,如图所示,并设置内容尺寸。
- 添加以下UI元素作为预制件的子对象并配置其视效:
- 小组件背景图片
- 物品库物品名称
- 物品库物品描述
- 物品数量
- 物品图片
小组件结构的示例:
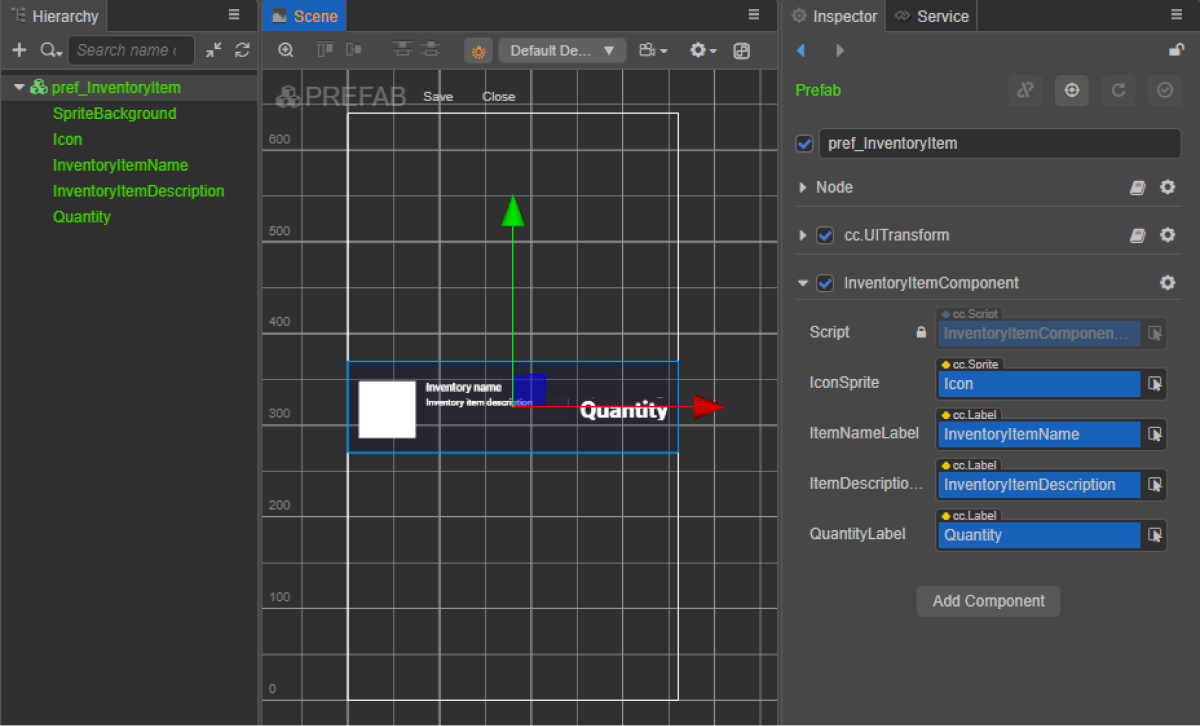
创建物品小组件脚本
- 创建一个InventoryItemComponent并添加以下属性:
iconSpriteitemNameLabelitemDescriptionLabelquantityLabel
- 将
init方法和初始化逻辑添加到InventoryItemComponent类,如脚本示例中所示。 - 将InventoryItemComponent组件附加到预制件的根节点。
- 将预制件元素与
InventoryItemComponent的属性绑定,如图所示:
小组件脚本示例(InventoryItemComponent):
- typescript
 1import { _decorator, assetManager, Component, ImageAsset, Label, Sprite, SpriteFrame, Texture2D } from 'cc';
 2import { InventoryItem } from 'db://xsolla-commerce-sdk/scripts/api/XsollaInventory';
 3const { ccclass, property } = _decorator;
 4
 5@ccclass('InventoryItemComponent')
 6export class InventoryItemComponent extends Component {
 7
 8    @property(Sprite)
 9    iconSprite: Sprite;
10
11    @property(Label)
12    itemNameLabel: Label;
13
14    @property(Label)
15    itemDescriptionLabel: Label;
16
17    @property(Label)
18    quantityLabel: Label;
19
20    init(data: InventoryItem) {
21
22        this.itemNameLabel.string = data.name;
23        this.itemDescriptionLabel.string = data.description;
24        this.quantityLabel.string = data.quantity.toString();
25
26        assetManager.loadRemote<ImageAsset>(data.image_url, (err, imageAsset) => {
27            if(err == null) {
28            const spriteFrame = new SpriteFrame();
29            const texture = new Texture2D();
30            texture.image = imageAsset;
31            spriteFrame.texture = texture;
32            this.iconSprite.spriteFrame = spriteFrame;
33            } else {
34                console.log(`Can’t load image with URL ${data.image_url}`);
35            }
36        });
37    }
38}
创建页面界面
为物品库页面创建一个场景,并向其添加ScrollView元素。
页面结构示例:
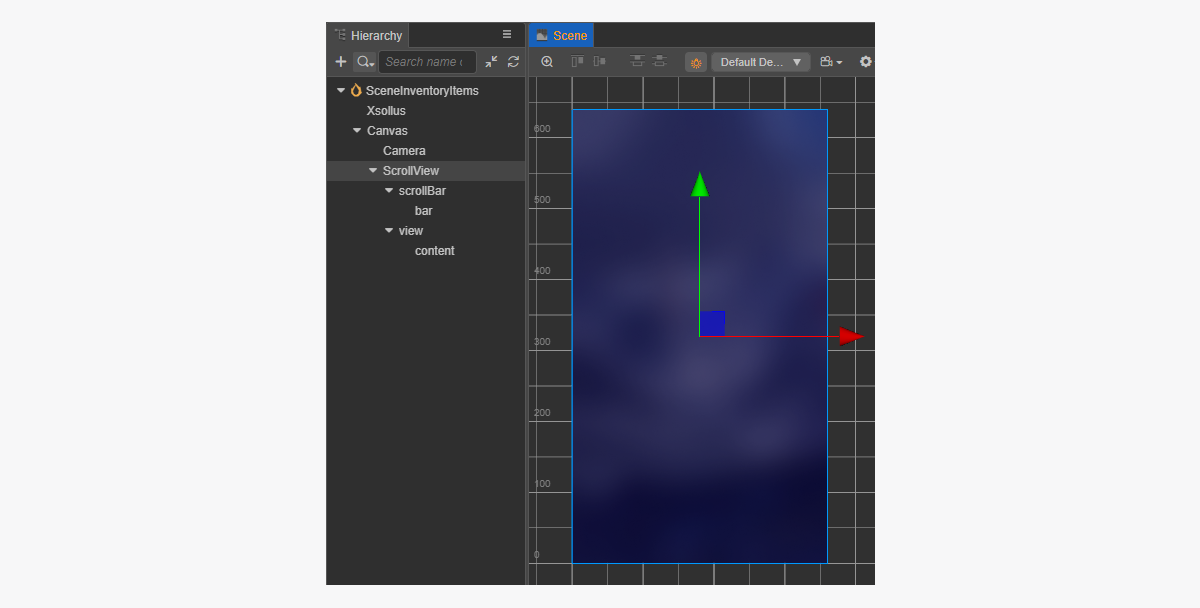
要让ScrollView与创建的InventoryItem预制件匹配,请设置其大小:
- 更改
ScrollView节点和内部view节点中ContentSize参数的值。 - 将
Layout组件与content节点绑定并完成设置。示例中选择了以下设置:Type == verticalResizeMode == Container
创建物品库页面脚本组件
- 创建一个InventoryItemsComponent并添加以下属性:
itemsScrollViewinventoryItemPrefab
- 将
start 生命周期函数和初始化逻辑添加到InventoryItemsComponent,如脚本示例中所示。 - 在场景中将InventoryItemsComponent添加到节点。可添加新节点或使用SDK初始化期间添加的含
XsollaSettingsManager组件的现有节点。 - 将预制件元素与
InventoryItemsComponent的属性绑定,如图所示:
xsolla,密码:xsolla)。该帐户仅适用于演示项目。- typescript
 1import { _decorator, Component, instantiate, Prefab, ScrollView } from 'cc';
 2import { XsollaAuth } from 'db://xsolla-commerce-sdk/scripts/api/XsollaAuth';
 3import { XsollaInventory } from 'db://xsolla-commerce-sdk/scripts/api/XsollaInventory';
 4import { InventoryItemComponent } from './InventoryItemComponent';
 5const { ccclass, property } = _decorator;
 6
 7
 8@ccclass('InventoryItemsComponent')
 9export class InventoryItemsComponent extends Component {
10
11    @property(ScrollView)
12    itemsScrollView: ScrollView;
13
14    @property(Prefab)
15    inventoryItemPrefab: Prefab;
16
17    start() {
18        XsollaAuth.authByUsernameAndPassword('xsolla', 'xsolla', false, token => {
19            XsollaInventory.getInventory(token.access_token, null, itemsData => {
20                for (let i = 0; i < itemsData.items.length; ++i) {
21                        let inventoryItem = instantiate(this.inventoryItemPrefab);
22                        this.itemsScrollView.content.addChild(inventoryItem);
23                        inventoryItem.getComponent(InventoryItemComponent).init(itemsData.items[i]);
24                    }
25                });
26        });
27
28    }
29}
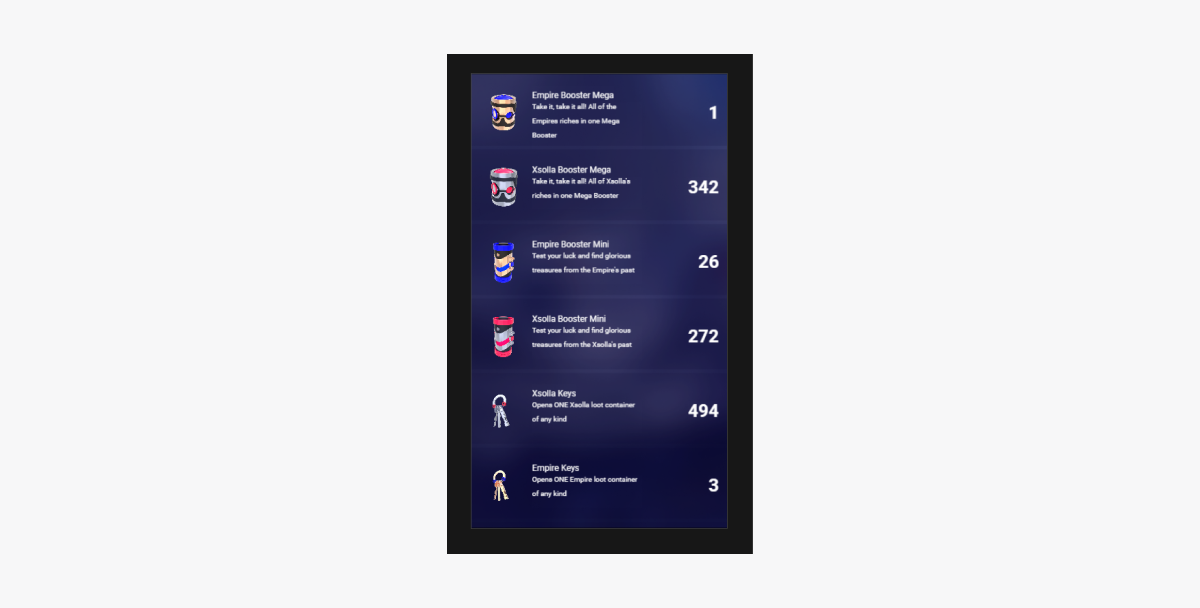
脚本工作结果示例:
发现了错别字或其他内容错误? 请选择文本,然后按Ctrl+Enter。
