在应用程序侧集成SDK
一般信息
快速指南
注:
从SDK版本2.5.5开始,您还可以使用即用型商店模块 — 它是一个具有预配置UI和逻辑的现成解决方案,用于用户授权、目录显示和商品购买。
以下是最简单的游戏内销售方案实施说明。
交互流程:
- 用户启动游戏。
- 该应用程序将启动艾克索拉登录web小部件。
- 用户登录到游戏并转到商品目录。
- 应用程序从艾克索拉请求商品目录。
- 成功接收商品数据后,应用程序将显示商品目录。
- 用户点击商品购买按钮。
- 应用程序启动购买过程并在浏览器中显示支付UI。
- 用户进行支付。
- 应用程序关闭支付UI并将支付数据传递给艾克索拉。
- 应用程序向日志输出关于支付处理结果的消息。
应用(StoreController脚本)与SDK交互时序图:
  %%{init: {'themeVariables': { 'noteBkgColor': 'transparent', 'noteBorderColor': 'transparent' }}}%%
sequenceDiagram
    participant Player
    participant StoreController
    participant SDK
    Player->>StoreController: Starts the game.
    activate StoreController
    activate StoreController
    note right of StoreController: Calls StartAuthorization custom method.
    deactivate StoreController
    StoreController->>SDK: Initiates authorization via Xsolla Login Widget,<br>calls XsollaAuth.AuthWithXsollaWidget SDK method.
    activate SDK
    SDK->>Player: Opens Xsolla Login Widget in a browser.
    deactivate SDK
    activate Player
    Player->>SDK: Enters login credentials.
    deactivate Player
    activate SDK
    activate SDK
    note right of SDK: Processes authentication results.
    deactivate SDK
    SDK->>StoreController: Calls OnAuthSuccess custom method.
    deactivate SDK
    StoreController->>SDK: Requests the item catalog,<br>calls XsollaCatalog.GetItems SDK method.
    activate SDK
    SDK->>StoreController: Calls OnCatalogReceived custom method.
    deactivate SDK
    activate StoreController
    note right of StoreController: Builds store UI, calls BuildStoreUI custom method.
    deactivate StoreController
    StoreController->>Player: Displays item catalog.
    deactivate StoreController
    activate Player
    Player->>StoreController: Clicks the item purchase button.
    deactivate Player
    activate StoreController
    activate StoreController
    note right of StoreController: Initiates the purchase process, calls StartPurchase custom method.
    deactivate StoreController
    StoreController->>SDK: Calls XsollaCatalog.Purchase SDK method.
    activate SDK
    SDK->>Player: Opens the payment UI in a browser.
    deactivate SDK
    activate Player
    Player->>SDK: Completes the payment.
    activate SDK
    deactivate Player
    activate SDK
    note right of SDK: Processes the payment.
    deactivate SDK
    SDK->>Player: Closes payment UI.
    activate Player
    SDK->>StoreController: Calls OnPurchaseCompleted  custom method<br>when order transitions to the 'done' status.
    deactivate SDK
    StoreController->>Player: Displays a success message in the log.
    deactivate StoreController
    deactivate Player
场景限制:
注:
小组件自定义仅在签署艾克索拉产品许可协议后可用。要签署该协议,请前往您发布商帐户中的协议与税务信息 > 协议部分。
- 该场景仅使用真实货币销售商品,不使用购物车,即用户只能购买一件商品。
创建商品小组件脚本
创建一个名为VirtualItemWidget的新脚本:
- 在Unity Editor中打开您的项目。
- 在主菜单中,前往
Assets > Create > C# Script 。 - 将
Assets 文件夹中的新文件的名称指定为VirtualItemWidget。 - 在编辑器中打开创建的文件,并向其中添加以下代码:
Copy
- C#
 1using UnityEngine;
 2using UnityEngine.UI;
 3
 4namespace Xsolla.Example
 5{
 6    public class VirtualItemWidget : MonoBehaviour
 7    {
 8       public Image IconImage;
 9       public Text NameText;
10       public Text DescriptionText;
11       public Text PriceText;
12       public Button BuyButton;
13    }
14}
- 保存更改。
创建商品小组件预制体
创建UI以在商店中显示商品:
- 创建一个
Canvas对象来显示UI元素。方法是在主菜单中转到GameObject > UI > Canvas 。这将在场景中创建以下对象:- 带有
Canvas、Canvas Scaler以及Graphic Raycaster组件的Canvas对象。 - 如果场景中不存在此类对象,则为
EventSystem对象。
- 带有
- 创建
VirtualItemWidget子对象:- 在
Hierarchy 面板中,选择Canvas对象。 - 在主菜单中,前往
GameObject > UI > Image 。这将创建一个新的游戏对象,该对象将是Canvas对象的子对象。 - 将创建的对象重命名为
VirtualItemWidget。
- 在
- 添加UI对象以显示商品信息:
- 创建一个对象以显示小部件图标:
- 在
Hierarchy 面板中,选择VirtualItemWidget对象。 - 在主菜单中,前往
GameObject > UI > Image 。 - 将创建的对象重命名为
IconImage。
- 在
- 创建一个对象以显示商品名称:
- 在
Hierarchy 面板中,选择VirtualItemWidget对象。 - 在主菜单中,前往
GameObject > UI > Legacy > Text 。 - 将创建的对象重命名为
NameText。
- 在
- 创建一个对象以显示商品说明:
- 在
Hierarchy 面板中,选择VirtualItemWidget对象。 - 在主菜单中,前往
GameObject > UI > Legacy > Text 。 - 将创建的对象重命名为
DescriptionText。
- 在
- 为商品购买按钮创建对象:
- 在
Hierarchy 面板中,选择VirtualItemWidget对象。 - 在主菜单中,前往
GameObject > UI > Legacy > Button 。这将创建一个带有Text子对象的按钮对象。 - 将创建的对象重命名为
BuyButton。 - 将
Text对象重命名为PriceText。
- 在
- 创建一个对象以显示小部件图标:
- 将商品小部件脚本作为组件添加到
VirtualItemWidget对象:- 在
Hierarchy 面板中选择VirtualItemWidget对象。 - 在
Inspector 面板中,单击Add Component ,然后选择VirtualItemWidget脚本。
- 在
- 将UI元素分配到所需的脚本插槽:
- 在
Hierarchy 面板中,选择VirtualItemWidget对象。 - 将子UI对象从
Hierarchy 面板拖放到Inspector 面板中的相应的VirtualItemWidget组件插槽。
- 在
- 将创建的
VirtualItemWidget对象转换为预制件:- 在
Hierarchy 面板中,选择VirtualItemWidget对象。 - 将对象拖放到
Assets 文件夹中的Project 面板。因此,Assets 文件夹中会出现一个新对象,场景中的对象颜色也会变为蓝色。
- 在
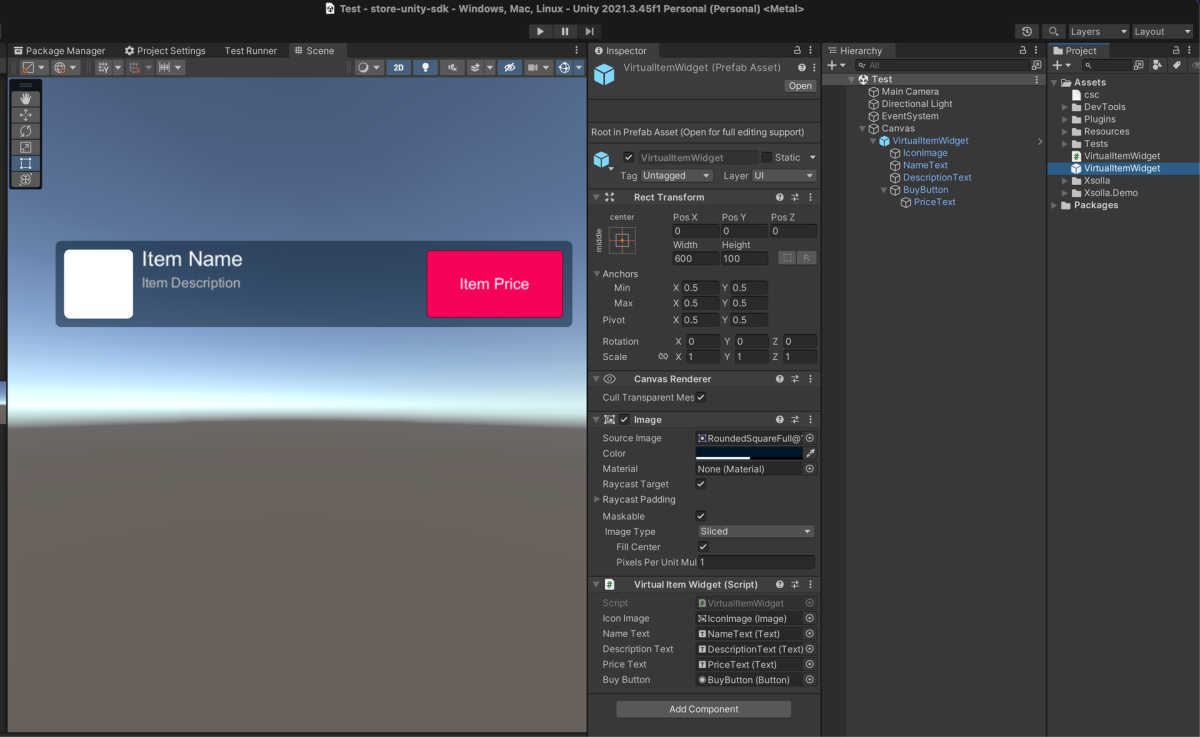
小组件预制件的示例:
创建商店脚本
创建一个名为StoreController的新脚本:
- 在Unity Editor中打开您的项目。
- 在主菜单中,前往
Assets > Create > C# Script 。 - 将
Assets 文件夹中的新文件的名称指定为StoreController。 - 在编辑器中打开创建的文件,并向其中添加以下代码:
Copy
- C#
 1using System.Linq;
 2using UnityEngine;
 3using Xsolla.Auth;
 4using Xsolla.Catalog;
 5using Xsolla.Core;
 6namespace Xsolla.Example
 7{
 8	public class StoreController : MonoBehaviour
 9	{
10		[SerializeField] private VirtualItemWidget WidgetPrefab;
11		[SerializeField] private Transform WidgetsContainer;
12		private void Start()
13		{
14			StartAuthorization();
15		}
16		private void StartAuthorization()
17		{
18			Debug.Log("Start the authorization process with the Xsolla Login Widget");
19			XsollaAuth.AuthWithXsollaWidget(OnAuthSuccess, OnError, null);
20		}
21		private void OnAuthSuccess()
22		{
23			Debug.Log("Authorization successful");
24			Debug.Log("Get the catalog of virtual items");
25			XsollaCatalog.GetItems(OnCatalogReceived, OnError);
26		}
27		private void OnCatalogReceived(StoreItems items)
28		{
29			Debug.Log("Catalog received successfully");
30			BuildStoreUI(items.items);
31		}
32		private void BuildStoreUI(StoreItem[] items)
33		{
34			// Create a widget for each item in the catalog
35			foreach (var item in items)
36			{
37				// Check if the item has a price for real money. If not, skip the item (e.g., it is a virtual currency)
38				if (item.price == null)
39					continue;
40				// Instantiate a widget prefab
41				var widget = Instantiate(WidgetPrefab, WidgetsContainer, false);
42				// Fill the widget with data
43				widget.NameText.text = item.name;
44				widget.DescriptionText.text = item.description;
45				widget.PriceText.text = $"{item.price.amount} {item.price.currency}";
46				// Loading the item image and assigning it to the UI element
47				ImageLoader.LoadSprite(item.image_url, sprite => widget.IconImage.sprite = sprite);
48				// Add a click listener to the Buy button
49				widget.BuyButton.onClick.AddListener(() => StartPurchase(item.sku));
50			}
51		}
52		private void StartPurchase(string sku)
53		{
54			Debug.Log($"Start the purchase process for the item: {sku}");
55			XsollaCatalog.Purchase(sku, OnPurchaseCompleted, OnError);
56		}
57		private void OnPurchaseCompleted(OrderStatus status)
58		{
59			Debug.Log("Purchase completed");
60		}
61		private void OnError(Error error)
62		{
63			Debug.LogError($"Error message: {error.errorMessage}");
64		}
65	}
66}
- 保存更改。
创建商店对象
创建UI以在商店中显示商品列表:
- 添加一个组件,在网格中排列单个商品的小部件,管理嵌套对象的位置和大小。方法是:
- 在
Hierarchy 面板中,选择Canvas对象。 - 在
Inspector 面板中,单击Add Component 并选择Grid Layout Group脚本。 - 在
Inspector 面板中,必要时更改组件设置:设置单元格大小、间距等。
- 在
注:
我们建议制作
VirtualItemWidget对象的多个副本,以获得更好的可视化效果和更轻松的配置。这使您可以立即评估商店的总体布局。- 将商店小部件脚本作为组件添加到
Canvas对象:- 在
Hierarchy 面板中选择Canvas对象。 - 在
Inspector 面板中,单击Add Component ,然后选择StoreController脚本。
- 在
- 将元素分配到所需的
StoreController脚本插槽:- 在
Hierarchy 面板中,选择Canvas对象。 - 将
Canvas对象从Hierarchy 面板拖放到Inspector 面板中的WidgetsContainer 插槽。 - 将
VirtualItemWidget对象从Hierarchy 面板拖放到Inspector 面板中的WidgetPrefab 插槽。
- 在
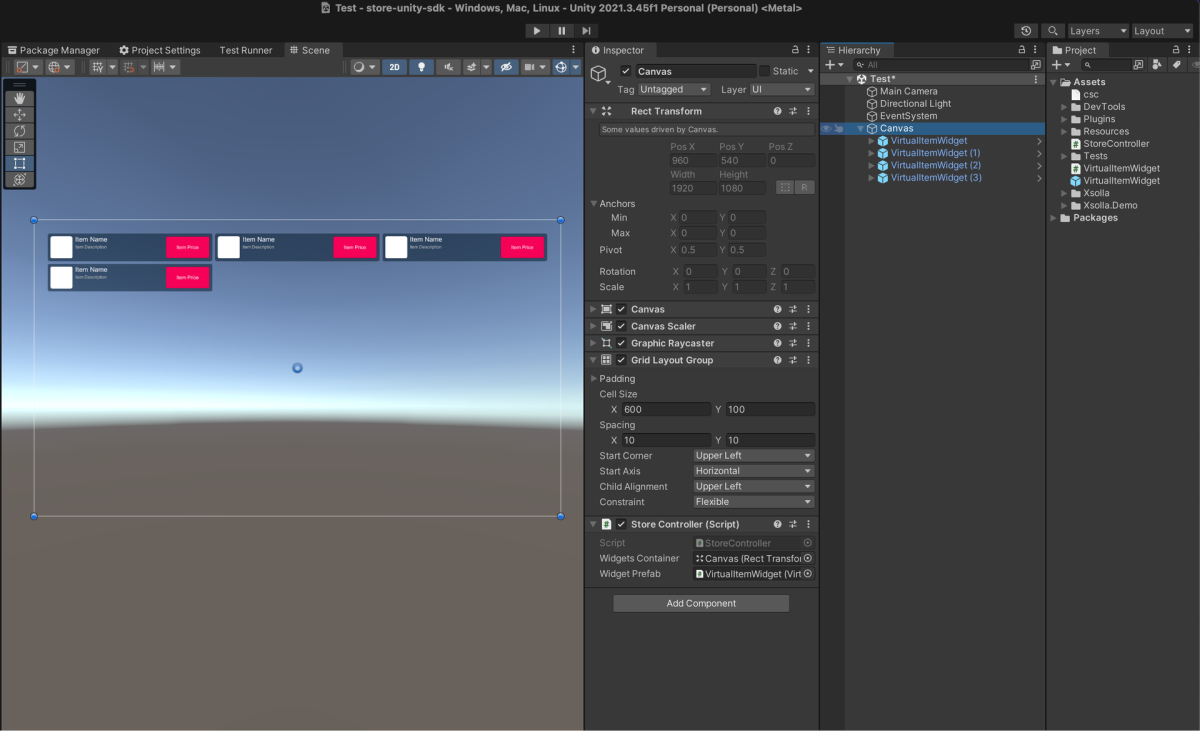
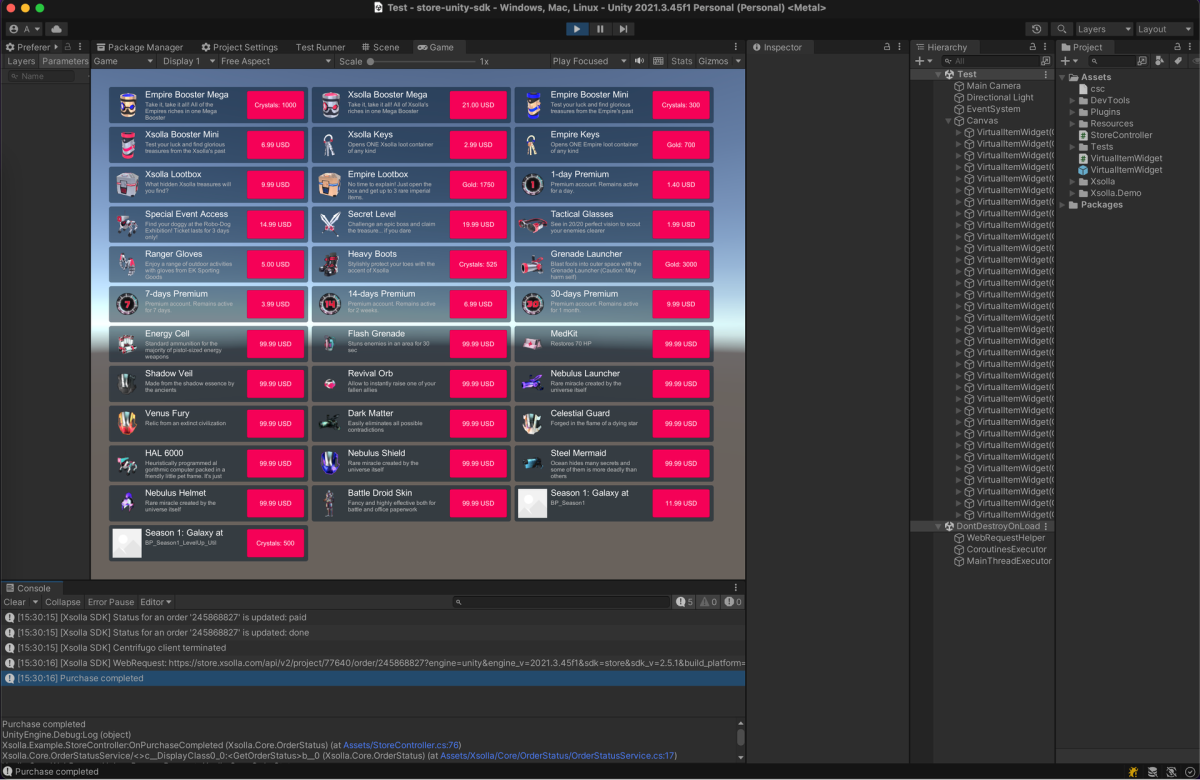
商店对象的示例:
启动和测试商店
在Unity Editor中启动商店并检查其操作:
- 对于
Canvas对象,删除所有子对象。 - 单击
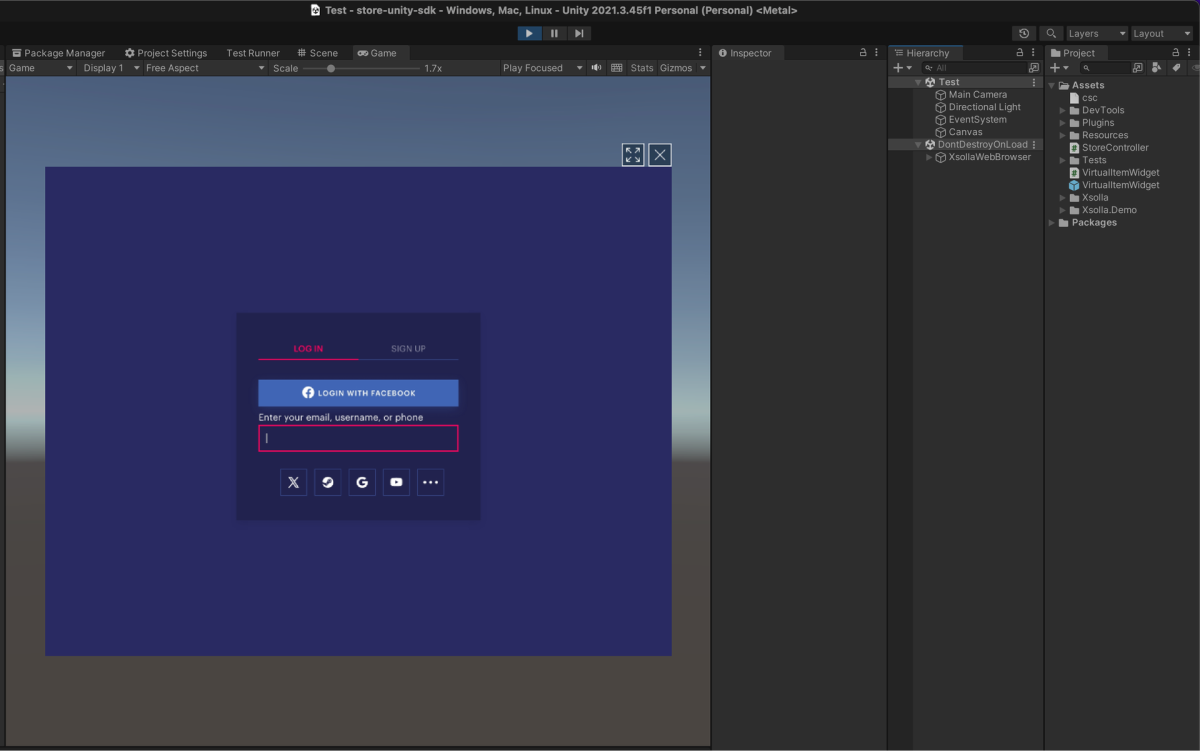
Play 。这样,当应用程序启动时,就会打开一个带有艾克索拉登录部件的浏览器窗口。
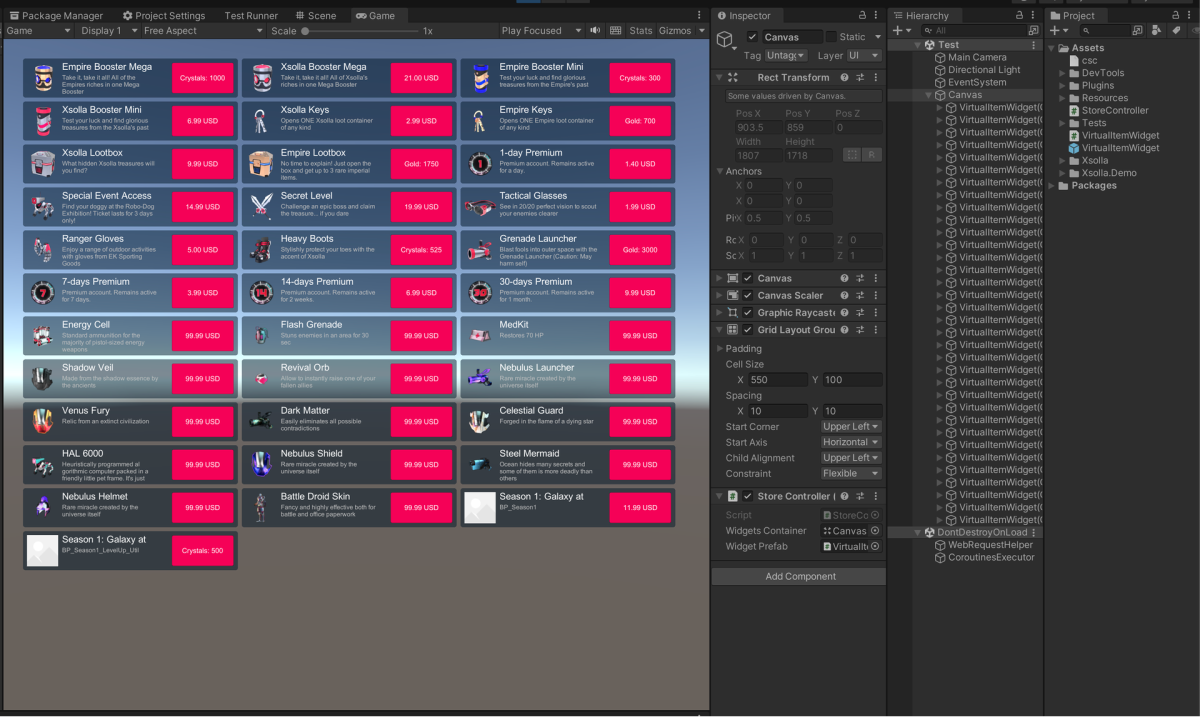
- 登录到应用程序。用户授权成功后,应用程序将从艾克索拉请求商品目录。成功接收商品数据后,应用程序将创建必要的小部件。而后,显示商店商品列表。
- 点击任何商品部件中的购买按钮。应用程序就会启动购买流程,并在浏览器中显示支付UI。
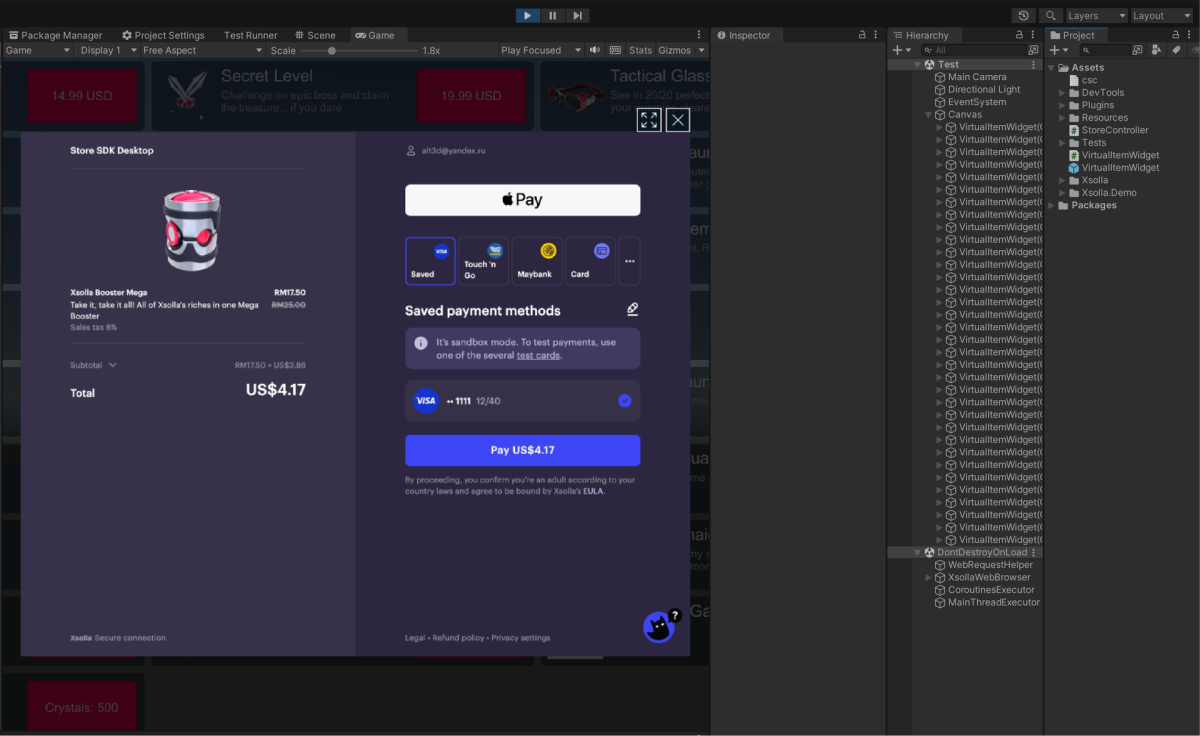
- 完成购买过程。使用测试银行卡进行支付。购买成功后,日志中会显示
Purchase completed消息。
本文对您的有帮助吗?
感谢您的反馈!
我们会查看您的留言并运用它改进用户体验。有用链接
上次更新时间: 2026年3月4日发现了错别字或其他内容错误? 请选择文本,然后按Ctrl+Enter。
