通过小组件销售
您可以在您的页面上添加一个部件来销售游戏钥匙并进行自定义设置。如需复制部件代码,在在您的发布商帐户中创建密钥包后转到部件定制部分。
如果游戏在单个平台上销售,部件可以显示针对该平台的游戏价钱。
示例:立即购买,仅售 $10。
如果游戏在多个平台上销售,部件将显示各个平台之间的最低价格。
示例:立即获得,售价 $10 起。
在订单创建窗口中,用户可以看到所有平台的价格并进行选择。
您还可以通过在drm参数中指定平台 SKU,在部件中显示特定平台的价格。
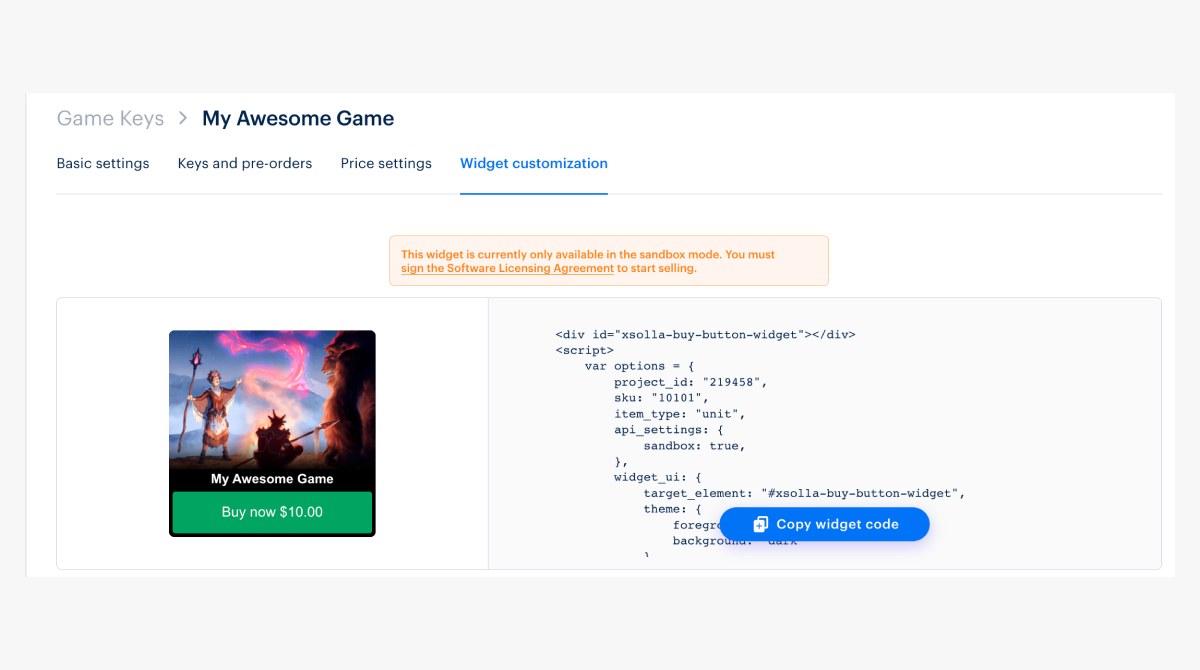
小组件代码示例:
Copy
- html
 1<div id="xsolla-buy-button-widget"></div>
 2
 3<script>
 4  var options = {
 5    project_id: "101010",
 6    sku: "my_key",
 7    user: {
 8      auth: "9qs9VyCIQQXBlzJQcfETIKWZDvhi4Sz1"
 9    },
10    drm: "steam",
11    item_type: "unit",
12    api_settings: {
13      sandbox: true
14    },
15    widget_ui: {
16      target_element: "#xsolla-buy-button-widget",
17      theme: {
18        foreground: "green",
19        background: "light"
20      }
21    },
22    payment_widget_ui: {
23      lightbox: {
24        height: "700px",
25        spinner: "round"
26      }
27    }
28  };
29
30  var s = document.createElement("script");
31  s.type = "text/javascript";
32  s.async = true;
33  s.src = "https://cdn.xsolla.net/embed/buy-button/3.1.9/widget.min.js";
34  s.addEventListener("load", function () {
35    var widgetInstance = XBuyButtonWidget.create(options);
36  });
37  document.getElementsByTagName("head")[0].appendChild(s);
38</script>
39
40<style>
41  #xsolla-buy-button-widget {
42    /* place code for button positioning here */
43    margin: 10px;
44  }
45
46  /* Styles the button itself */
47  .x-buy-button-widget.x-buy-button-widget__tiny .x-buy-button-widget-payment-button {
48    background-color: #73E8FF;
49    color: black;
50  }
51</style>
注:
部件参数
| 参数 | 类型 | 描述 |
|---|---|---|
project_id | integer | 上传了游戏密钥或游戏密钥捆绑包、游戏内商品或商品捆绑包的项目的ID。 |
item_type | string | 商品类型。值可以是virtual_good、virtual_currency、game_key、unit。unit类型用于使用多个平台分发游戏的情况。 |
sku | string | 唯一商品ID。 |
drm | string | 分发平台 SKU,例如,steam,允许显示特定平台的价格。 |
api_settings | object | 环境和主机设置:
|
user | object | 包含用户数据的对象。 |
user.auth | string | 用户授权令牌:JSON 网页令牌或支付中心访问令牌。 |
user.locale | string | 用户语言环境。确定按钮文本和支付界面的语言。它使用基于ISO_639-1的双字母语言代码。 |
widget_ui.theme | object | 小部件的颜色主题,决定其外观。可以取值{foreground:[‘blue’,‘red’,‘green’,‘gold’], background:[’light’,‘dark’]} |
widget_ui.template | string | 模板。可能值:
|
widget_ui.target_element | string | 显示小组件的页面的元素(应使用jQuery选择器,如#widget-example)。必需 |
决定支付界面外观的参数
| 参数 | 类型 | 描述 |
|---|---|---|
payment_ui | object | 支付界面外观参数。 |
payment_widget_ui | object | 含参数的对象,参数决定支付界面的外观。 |
payment_widget_ui.lightbox | object | 含模态窗口选项的对象,支付界面在该窗口打开。 |
payment_widget_ui.lightbox.width | string | Lightbox框架的高度。如果为null,则取决于支付中心的高度。默认值为null。 |
payment_widget_ui.lightbox.height | string | Lightbox框架的高度。如果为null,则取决于支付中心的高度。默认值为100%。 |
payment_widget_ui.lightbox.zIndex | integer | 控制垂直堆叠顺序的属性,默认值为1000。 |
payment_widget_ui.lightbox.overlayOpacity | integer | 小组件背景的不透明度(0 — 完全透明,1 — 完全不透明)。默认值为60% (.6)。 |
payment_widget_ui.lightbox.overlayBackground | string | 浮层背景色,默认值为#000000。 |
payment_widget_ui.lightbox.contentBackground | string | 框架的背景,默认值为#ffffff。请注意,颜色更改不会影响支付中心iframe本身,只会影响容纳iframe的灯箱的设置。 |
payment_widget_ui.lightbox.spinner | string | 加载指示器的动画类型。可为xsolla或round。默认值为xsolla。 |
payment_widget_ui.lightbox.spinnerColor | string | 旋转加载动画的颜色,非默认设置。 |
payment_widget_ui.childWindow | object | 子窗口的设置,支付界面在该窗口打开。适用于移动版本。 |
payment_widget_ui.childWindow.target | string | 决定应在哪里打开子窗口的属性。值可以是_blank、_self、_parent。默认值是_blank。 |
部件方法
var widgetInstance = XBuyButtonWidget.create(options)— 创建小组件实例并在页面上显示。widgetInstance.on(event, handler)— 将事件的一个事件处理器函数附加到小组件。event (string)— 事件类型。handler (function)— 事件被触发时执行的函数。
widgetInstance.off(event, handler)— 移除事件处理器。event (string)— 事件类型。handler (function)— 之前为该事件附加的处理器函数。
事件列表:
| 参数 | 描述 |
|---|---|
| init | 小部件初始化事件。 |
| open | 打开小部件时的事件。 |
| load | 已加载支付UI(支付中心)。 |
| close | 已关闭支付UI(支付中心)。 |
| status | 用户在状态页面上移动时的事件。 |
| status-invoice | 用户在状态页面上移动但支付尚未完成时的事件。 |
| status-delivering | 用户在状态页面上移动,支付完成以及我们正在发送支付通知时的事件。 |
| status-done | 用户在状态页面上移动且支付已成功完成时的事件。 |
| status-troubled | 用户在状态页面上移动但支付失败时的事件。 |
您可以使用XBuyButtonWidget.eventTypes对象访问事件列表。
按钮自定义
- 在发布商帐户中打开您的项目,前往商品目录 > 游戏密钥部分。
- 选择游戏密钥,然后前往小组件自定义选项卡。
注:
如没有游戏密钥,请新建一个。
- 在自定义区块中,选择作为背景颜色。
注:
您也可以在代码中修改
theme对象,让background参数以空字符串作为值。- 将小组件代码添加到页面时,它包含了继承的样式。请添加下方的样式来覆盖这些样式。
注意
出于CSS继承/优先级原因,将这些代码添加在从小组件自定义选项卡获得的
script标记下方的style标记中。Copy
- css
 1/* This should be used for button positioning but note this technically repositions the entire widget */
 2#xsolla-buy-button-widget {
 3  /* place code for button positioning here */
 4}
 5
 6/* Styles the button itself */
 7.x-buy-button-widget.x-buy-button-widget__tiny
 8  .x-buy-button-widget-payment-button {
 9  background-color: #73E8FF;
10  color: black;
11}
12
13/* Button on hover */
14.x-buy-button-widget.x-buy-button-widget__tiny
15  .x-buy-button-widget-payment-button:hover {
16  background-color: #73E8FF;
17}
18
19/* The following are style overrides to leave you with just the button */
20
21/* space immediately surrounding button */
22.x-buy-button-widget-button-block.x-buy-button-widget-button-block__light {
23  background-color: white;
24}
25
26/* space above button (including game title area) */
27.x-buy-button-widget.x-buy-button-widget__tiny
28  .x-buy-button-widget-game-logo {
29  height: 200px;
30  background-image: none !important;
31  background-color: white;
32}
33
34 /* Game title (located right above button) */
35.x-buy-button-widget-game-name.x-buy-button-widget-game-name__light {
36  display: none !important;
37}
注意
- 上方的id/类名称和代码片段与复制的小组件代码(见步骤5的图片)一起使用。因此,请务必实现复制的小组件代码。
- 您可以直接使用上方代码,也可以根据实际情况进行修改。代码注释(第1、3、5、11、16、18、22、29行)用于帮助您了解每条CSS规则的作用及做样式上的修改。例如,如果只需要按钮(不需要整个组件),则需在下方颜色是
white的地方(第20和27行)替换页面的背景色。
如何创建多个按钮或SKU
关于如何使用Pay2Play小组件来实现的代码示例,请参阅Xsolla Pay2Play Widget Simple Integration 4 buttons。
该结构类似于购买按钮小组件代码。迁移示例:
Copy
- html
 1<div id="xsolla-buy-button-widget"></div>
 2<div id="xsolla-buy-button-widget-2"></div>
 3
 4<script>
 5  var options = {
 6    project_id: "191204",
 7    sku: "789",
 8    item_type: "unit",
 9    api_settings: {
10      sandbox: false
11    },
12    widget_ui: {
13      target_element: "#xsolla-buy-button-widget",
14      theme: {
15        foreground: "gold",
16        background: ""
17      }
18    },
19    payment_widget_ui: {
20      lightbox: {
21        height: "700px",
22        spinner: "round"
23      }
24    }
25  };
26
27  // options for second buy button - note the different SKU and target_element
28  var options2 = {
29    project_id: "191204",
30    sku: "123",
31    item_type: "unit",
32    api_settings: {
33      sandbox: false
34    },
35    widget_ui: {
36      target_element: "#xsolla-buy-button-widget-2",
37      theme: {
38        foreground: "gold",
39        background: ""
40      }
41    },
42    payment_widget_ui: {
43      lightbox: {
44        height: "700px",
45        spinner: "round"
46      }
47    }
48  };
49
50  var s = document.createElement("script");
51  s.type = "text/javascript";
52  s.async = true;
53  s.src = "https://cdn.xsolla.net/embed/buy-button/3.1.9/widget.min.js";
54
55  // one event listener per widget instance. repeat for more buttons, passing in different SKUs
56  s.addEventListener("load", function () {
57    var widgetInstance = XBuyButtonWidget.create(options);
58  });
59  s.addEventListener("load", function () {
60    var widgetInstance2 = XBuyButtonWidget.create(options2);
61  });
62
63  document.getElementsByTagName("head")[0].appendChild(s);
64</script>
注意
- 第1、2行 — 每个按钮一个
div,且每个都有唯一ID。 - 第26行起是第二个按钮的选项(在
options2中展开)。对于每个Buy按钮,都需要类似上面的一组options。请注意sku(第28行)和target_element(第34行,指向第2行的div)的不同。
本文对您的有帮助吗?
感谢您的反馈!
我们会查看您的留言并运用它改进用户体验。发现了错别字或其他内容错误? 请选择文本,然后按Ctrl+Enter。
