Set up user authentication
Authentication allows users to buy items in the Web Shop and see unique offers in the catalog.
Key features of the Web Shop with authentication:
- Multiple authorization methods in the Web Shop.
- Set up personalized storefronts and promo codes for authorized users.
- Compliance with regional laws and regulations for the protection and processing of personal data.
- Rate limit and DDoS protection.
You can choose one of the following authentication methods:
- User ID authentication:
- Simplifies the integration of the Web Shop with the game.
- The authentication widget does not require registration or password entry. A user simply needs to enter the user ID from the game or use the same social network account for login as for logging in to the game.
- User ID and deep link authentication:
- Deep links can be used as an additional authentication method when logging in via User ID.
- The User ID and deep link authentication widget does not require registration or password entry. The user simply needs to enter their User ID from the game or log in via the game using a deep link.
- Deep link authentication:
- When a deep link is used as the primary login method, it allows saving payment details, which is not possible with user ID authentication.
- Authentication via Xsolla Login:
- Provides a wide range of authorization methods: social networks, one-time codes or links, and login and password.
- Allows you to customize the Xsolla Login widget.
- You can impose age restrictions on authorization.
- Authentication via Xsolla Login with linked user ID:
- Allows you to combine Xsolla Login security with the advantage of using a user ID from a game. The Xsolla Login widget works independently from the game client — integration with the game is handled via webhooks. The linked user ID is used to quickly grant purchases to the user in the game and provide personalized offers.
- Does not require changes on the game client side and is suitable for cases where it’s important to ensure that only the account owner can access the Web Shop — for example, to prevent unauthorized usage of loyalty points.
User flow
- The user goes to Web Shop with user ID authentication configured.
- The user authorizes in the Web Shop in one of the following ways:
- The user enters their ID in the Fast Login block and clicks the login button.
- The user clicks the buy button for the selected item or the login button on the top bar:
- A modal window for entering the user ID or logging in through a social network opens.
- User enters their ID and clicks Continue or clicks on the social networks icon to choose a social network and completes authentication on the social network page.
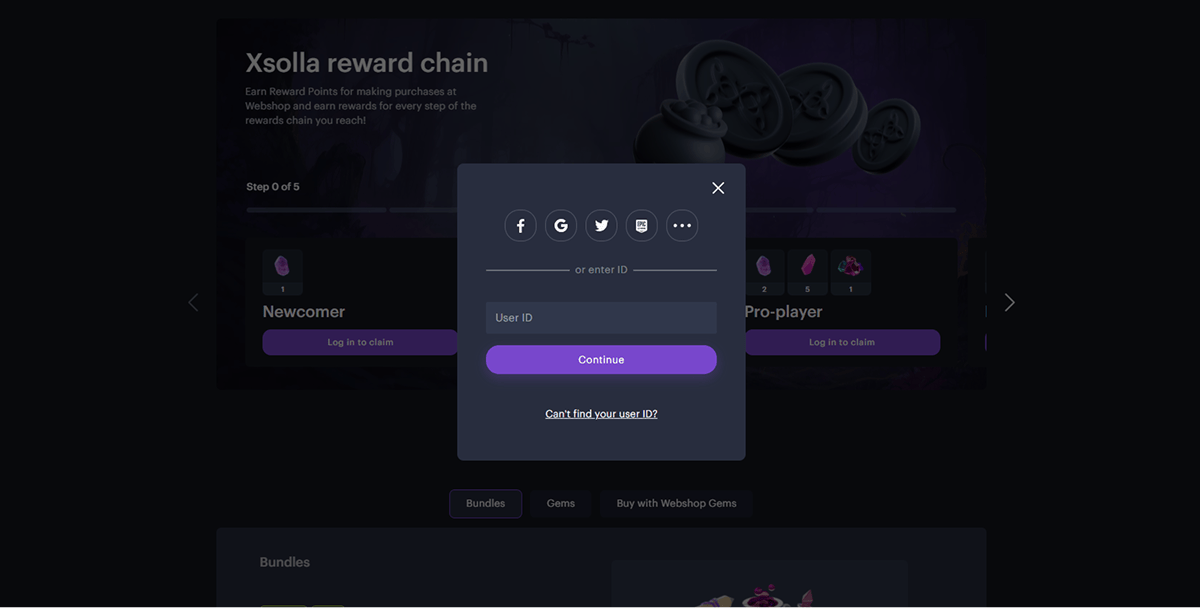
- The system checks if a user exists in the game. If a user with this ID or social account exists in the game, the user is authorized in the Web Shop. Otherwise an error message is displayed.
How to get it
- On your application’s side, implement handling of the user validation webhook.
When receiving a webhook, the application should do the following:
- Search for a user by their ID passed in the webhook.
- Depending on the result, send one of the following status codes:
- 200 HTTP-code with an answer from webhook if a user is found
- 404 HTTP-code if the user ID is not found
- Send user attributes for personalization.
Open your project in Publisher Account and go to the Storefronts > Websites section.
In the pane of the necessary site, click Open Site Builder.
Open your project in the account for mobile games and go to the Web Shop section.
Click the pane of the necessary site.
Open the project in your account and go to the Storefronts > Websites section.
Click the pane of the necessary site.
Open the project in your account and go to the Storefronts > Websites section.
Click the pane of the necessary site.
Open the project in your account and go to the Storefronts > Websites section.
Click the pane of the necessary site.
- If your site includes multiple pages, select the one you need:
- Click the current page title at the top of the builder.
- Select the necessary page from the drop-down list.
- Go to the Login settings block.
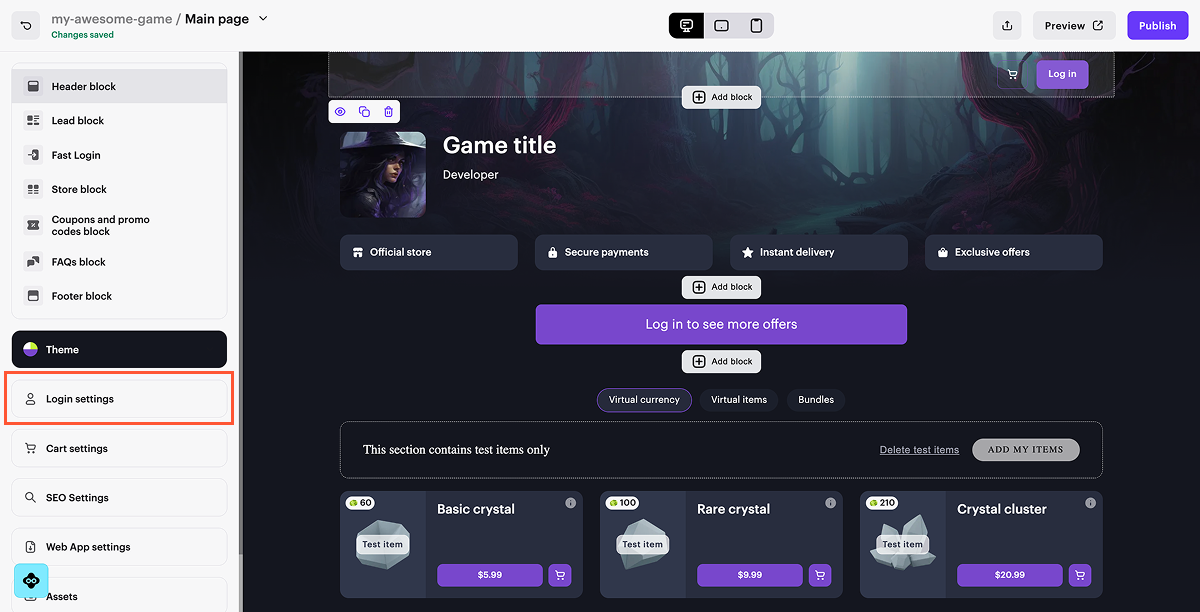
- Select the User ID option.
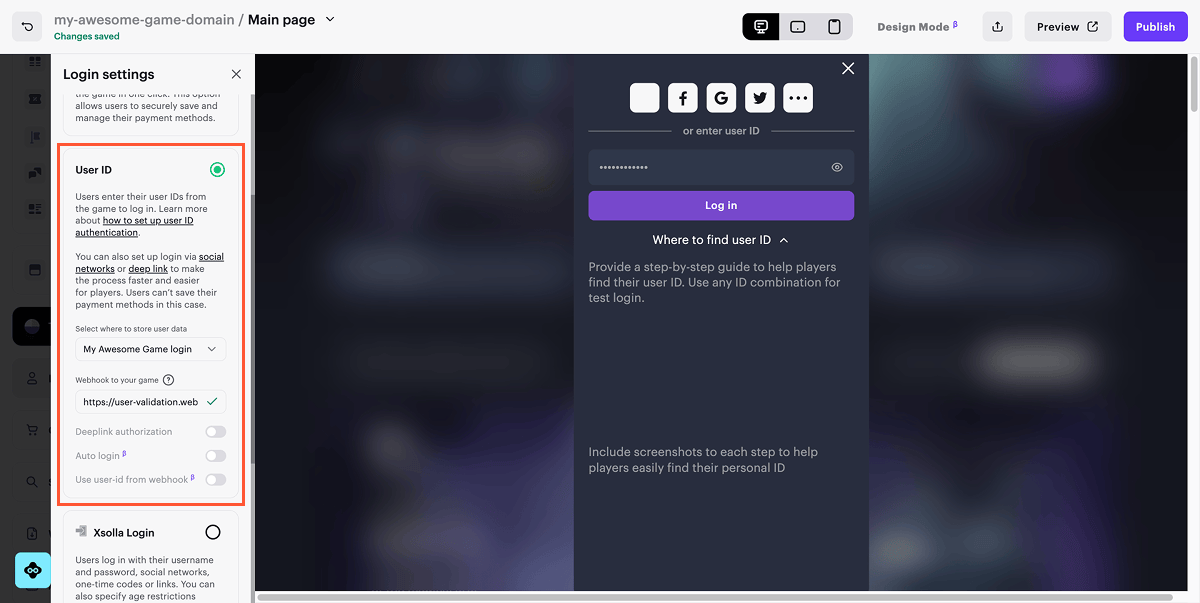
- In the drop-down list, select New Login.
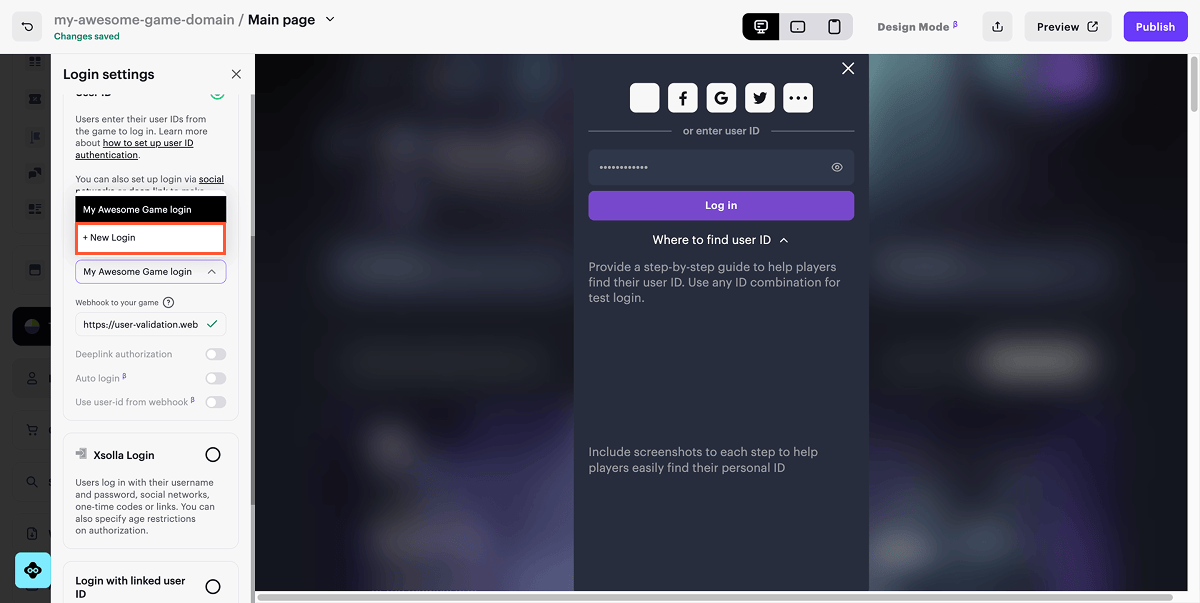
- Enter the URL to receive webhooks. This URL may differ from the one specified in Project settings > Webhooks.
- Enter the URL to receive webhooks. This URL may differ from the one specified in Settings > Webhooks.
- Enter the URL to receive webhooks. This URL may differ from the one specified in Settings > Webhooks.
- Enter the URL to receive webhooks. This URL may differ from the one specified in Settings > Webhooks.
- Enter the URL to receive webhooks. This URL may differ from the one specified in Settings > Webhooks.
https://. Using http:// will cause an error.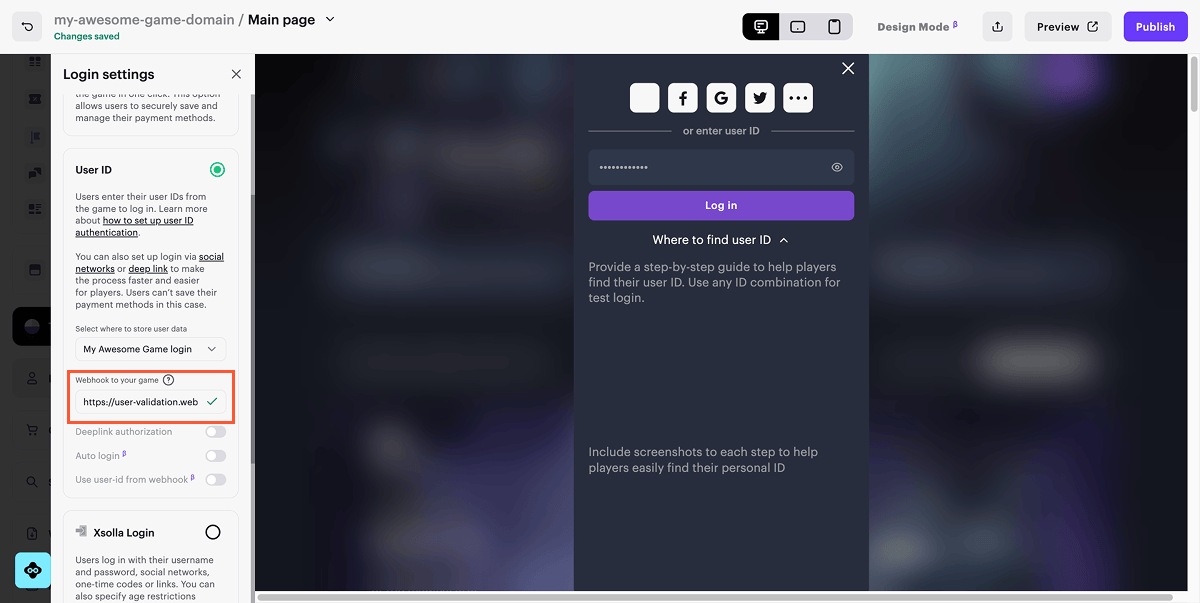
- Set up authorization via social networks already connected to your application (optional):
- Open your project in Publisher Account and go to the Login section.
- Click Configure in the site bar.
- Go to the Authentication block and select Social login.
- Set up authorization via social networks already connected to your application (optional):
- Open your project in your account and go to the Players > Login section.
- Click Configure in the site bar.
- Go to the Authentication block and select Social login.
- Set up authorization via social networks already connected to your application (optional):
- Open your project in your account and go to the Players > Login section.
- Click Configure in the site bar.
- Go to the Authentication block and select Social login.
- Set up authorization via social networks already connected to your application (optional):
- Open your project in your account and go to the Players > Login section.
- Click Configure in the site bar.
- Go to the Authentication block and select Social login.
- Set up authorization via social networks already connected to your application (optional):
- Open your project in the account for mobile games and go to the Other tools > Login section.
- Click Configure in the site bar.
- Go to the Authentication block and select Social login.
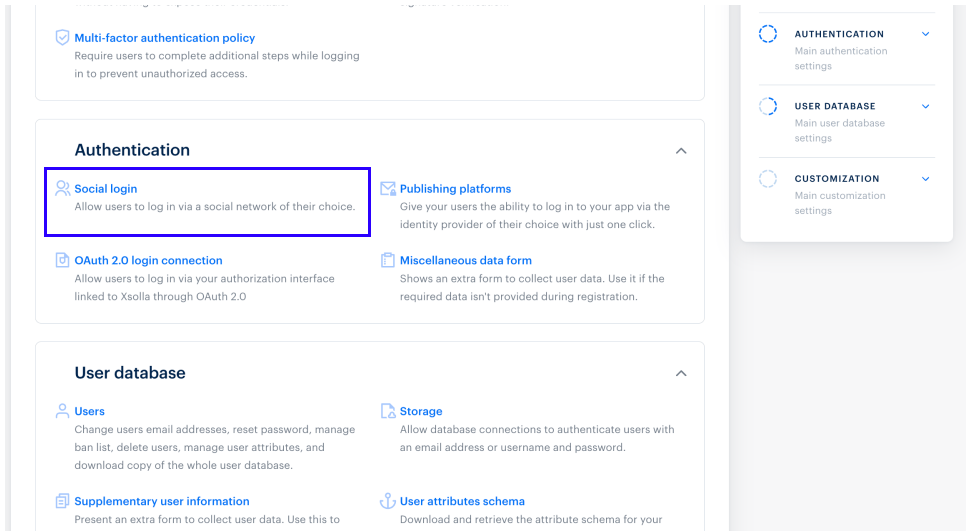
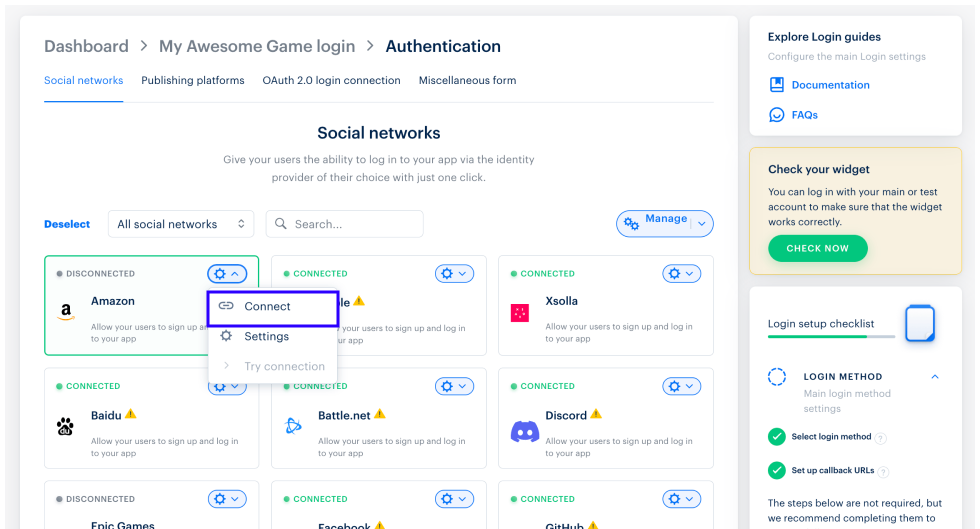
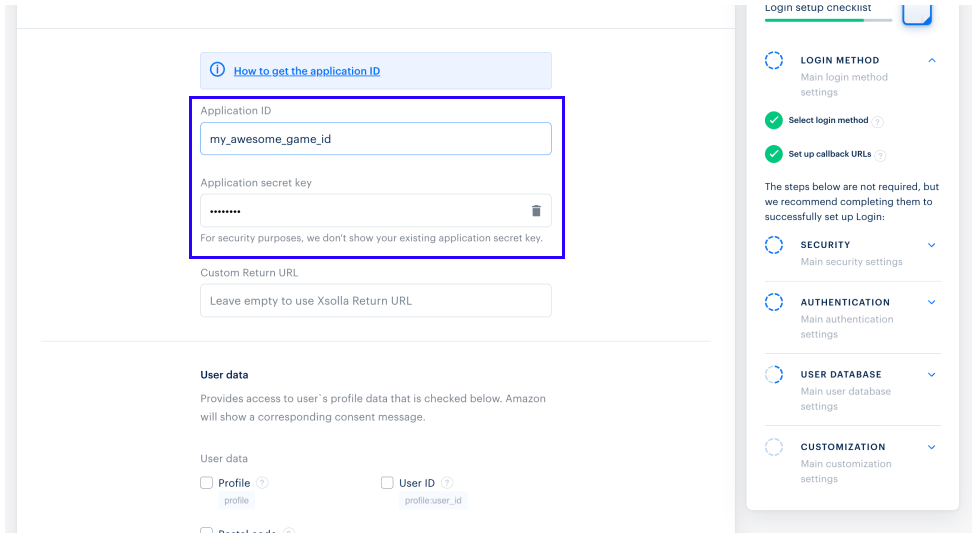
- To set up a social network, go to the social network card, click the ⚙ icon to the right of the title, and select Connect.
A deep link is a special URL that directs the user not just to the main page of an application or website but directly to a specific section, page, or action.
Deep links can be used as an additional authentication method when logging in via user ID. If the game is installed on the user’s mobile device, they will be redirected to the game via deep link to get an authorization token.
User flow
In the mobile app
- An unauthorized user in the Web Shop clicks the login button or the buy button. A modal window for entering the user ID or logging in through the mobile game opens.
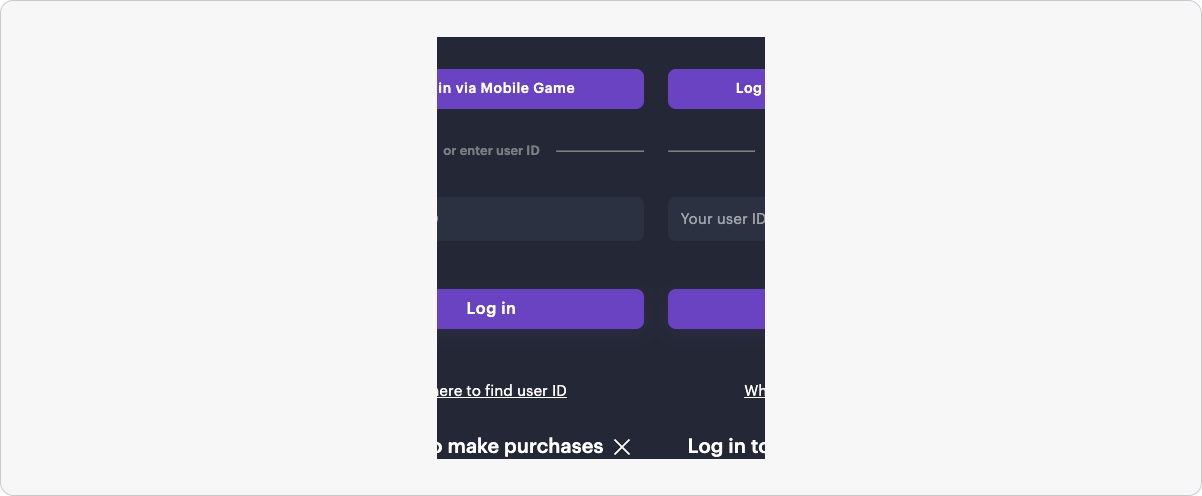
- The user clicks the Log in via Mobile Game button.
- The user is redirected to the game and then automatically back to the Web Shop as an authorized user.
In the desktop version
- An unauthorized user in the Web Shop clicks the login button or the buy button. A modal window for entering the user ID or logging into the mobile version of the game using a QR code opens.
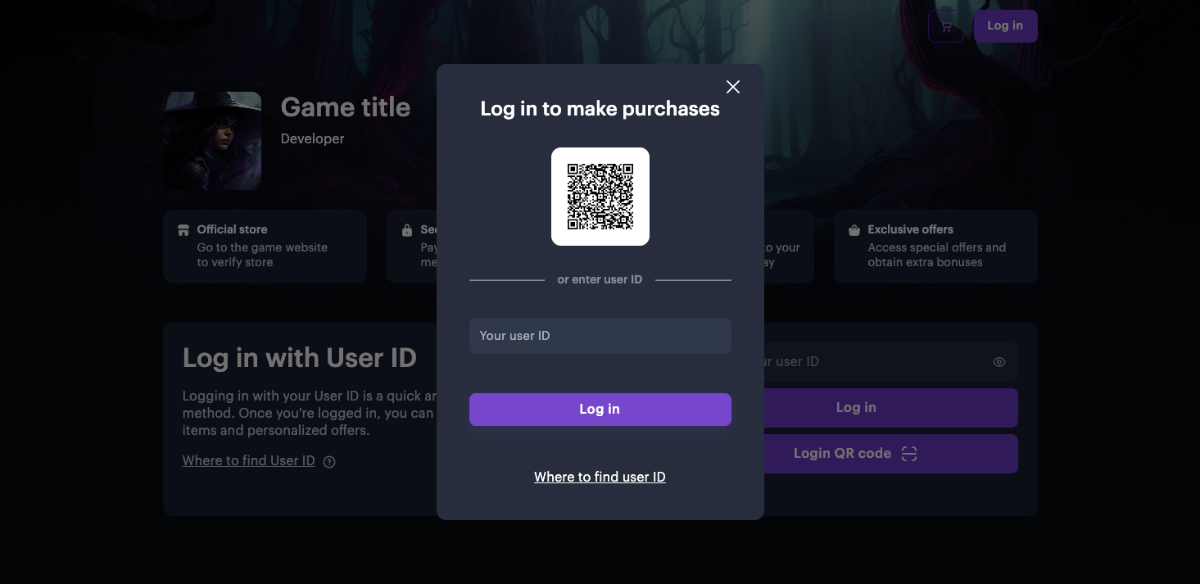
- The user scans the QR code using their mobile device.
- The Web Shop opens on the user's mobile device.
- The user is automatically redirected to the game and then back to the Web Shop as an authenticated user.
Services interaction flow
  %%{init: {'themeVariables': { 'noteBkgColor': 'transparent', 'noteBorderColor': 'transparent' }}}%%
sequenceDiagram
    participant U as User
    participant WS as Web Shop
    participant B as Browser
    participant MOS as Mobile OS
    participant G as Game
    participant LA as Login API
    U->>WS: Clicks button to log in via mobile game
    activate WS
    WS->>B: Redirects user via deeplink
    activate B
    B->>MOS: Makes system call to open mobile game
    activate MOS
    MOS->>G: Opens mobile game
    activate G
    G->>LA: Generates authorization token
    activate LA
    LA-->>G: Returns authorization token
    deactivate LA
    G->>MOS: Makes system call to open browser with token in URL
    deactivate G
    MOS-->>B: Opens browser with token in URL
    deactivate MOS
    B-->>WS: Opens Web Shop page for authorized user
    deactivate B
    WS-->>U: Displays username in header
    deactivate WS
How to set up
On the game side
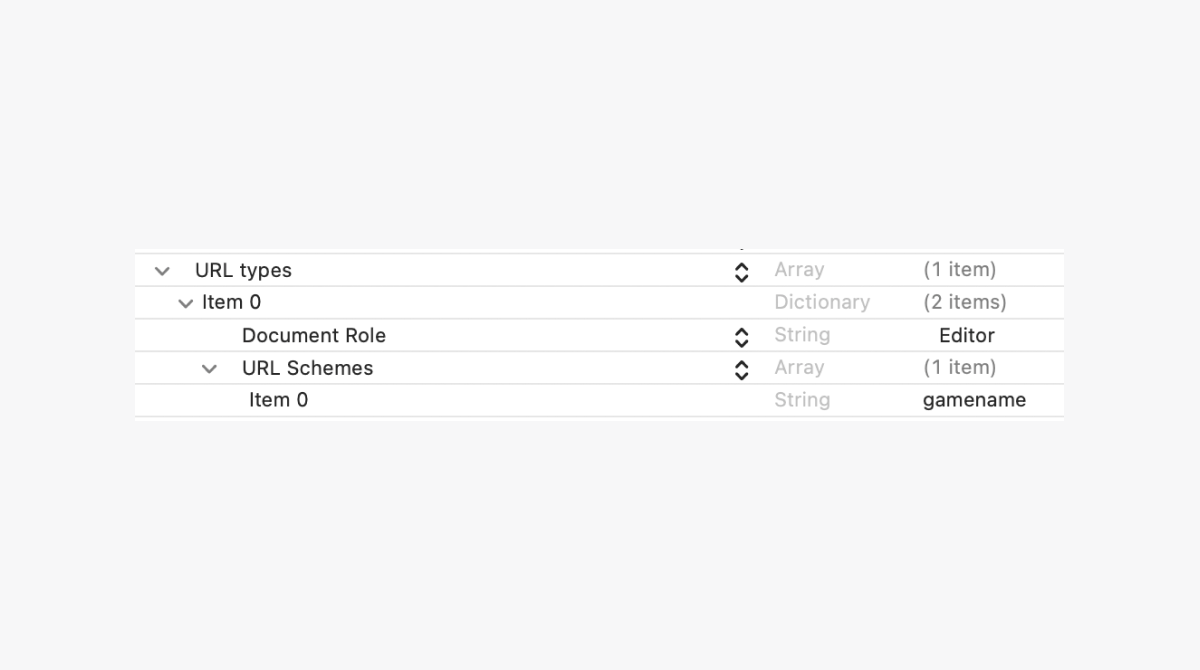
- In your game’s mobile app settings, register a URL scheme to open the game via deep link:
- in Android applications — in the
AndroidManifest.xmlfile. - in iOS applications — in the
Info.plistfile.
- in Android applications — in the
- After registering the scheme, when the user authenticates in the Web Shop via the game, the game should open at the specified address.
- Example of a link to open the game via a registered URL scheme:
scheme— a unique identifier of your game used in a custom URL scheme to launch the app and navigate to the required action.authorize— an example of an action name that should be performed after the game opens. Use the action name that matches the actions in your application’s operating system.operationPayload=<VALUE>— a parameter that contains information for token generation during authentication. The value is a Base64-encoded data generated by Xsolla.
scheme://authorize?operationPayload=<VALUE>, where:Ensure that the operationPayload parameter is handled correctly. Pass it without any changes — don’t decrypt, modify, or generate it manually.
If the parameter is missing or modified, the request returns a 400 error code.
- Examples:
- xml
 1<key>CFBundleURLTypes</key>
 2  <array>
 3    <dict>
 4      <key>CFBundleTypeRole</key>
 5      <string>Editor</string>
 6      <key>CFBundleURLSchemes</key>
 7      <array>
 8        <string>scheme</string>
 9      </array>
10    </dict>
11  </array>
- xml
1<intent-filter>
2    <action android:name="android.intent.action.VIEW" />
3    <category android:name="android.intent.category.DEFAULT" />
4    <category android:name="android.intent.category.BROWSABLE" />
5    <data android:scheme="scheme" android:host="authorize" />
6</intent-filter>
- Implement the generation of an authorization token in JWT format using the user ID from the game.
| Parameter | Type | Description |
|---|---|---|
loginId | string | ID of the authorization method from the Publisher Account. Required. |
settings.projectId | integer | Project ID found in Publisher Account, which is specified next to the name of your project in browser address bar. The URL has the following format: https://publisher.xsolla.com/<merchantId>/projects/<projectId>. Required. |
settings.merchantId | integer | Merchant ID found in Publisher Account, specified in the Company settings > Company section or in the browser address bar on any page of the Publisher Account. The URL has the following format: https://publisher.xsolla.com/<merchantId>/. Required. |
user.id | string | User ID in the game. Required. |
user.country | string | Two-letter uppercase country code per ISO 3166-1 alpha-2. Check the documentation for detailed information about countries supported by Xsolla and the process of determining the country. Example: US |
operationPayload | string | Parameter that contains information for token generation during authentication. The value is a Base64-encoded data generated by Xsolla. Required. |
| Parameter | Type | Description |
|---|---|---|
loginId | string | ID of the authorization method from your account. Required. |
settings.projectId | integer | Project ID found in your account, which is specified next to the name of your project in browser address bar. The URL has the following format: https://xsolla.com/for/free-to-play-pc/account/<merchantId>/projects/<projectId>. Required. |
settings.merchantId | integer | Merchant ID found in your account, specified in the Company settings section or in the browser address bar on any page of your account. The URL has the following format: https://xsolla.com/for/free-to-play-pc/account/<merchantId>/. Required. |
user.id | string | User ID in the game. Required. |
user.country | string | Two-letter uppercase country code per ISO 3166-1 alpha-2. Check the documentation for detailed information about countries supported by Xsolla and the process of determining the country. Example: US |
operationPayload | string | Parameter that contains information for token generation during authentication. The value is a Base64-encoded data generated by Xsolla. Required. |
| Parameter | Type | Description |
|---|---|---|
loginId | string | ID of the authorization method from your account. Required. |
settings.projectId | integer | Project ID found in your account, which is specified next to the name of your project in browser address bar. The URL has the following format: https://xsolla.com/for/premium-pc-games/account/<merchantId>/projects/<projectId>. Required. |
settings.merchantId | integer | Merchant ID found in your account, specified in the Company settings section or in the browser address bar on any page of your account. The URL has the following format: https://xsolla.com/for/premium-pc-games/account/<merchantId>/. Required. |
user.id | string | User ID in the game. Required. |
user.country | string | Two-letter uppercase country code per ISO 3166-1 alpha-2. Check the documentation for detailed information about countries supported by Xsolla and the process of determining the country. Example: US |
operationPayload | string | Parameter that contains information for token generation during authentication. The value is a Base64-encoded data generated by Xsolla. Required. |
| Parameter | Type | Description |
|---|---|---|
loginId | string | ID of the authorization method from your account. Required. |
settings.projectId | integer | Project ID found in your account, which is specified next to the name of your project in browser address bar. The URL has the following format: https://xsolla.com/for/web-games/account/<merchantId>/projects/<projectId>. Required. |
settings.merchantId | integer | Merchant ID found in your account, specified in the Company settings section or in the browser address bar on any page of your account. The URL has the following format: https://xsolla.com/for/web-games/account/<merchantId>/. Required. |
user.id | string | User ID in the game. Required. |
user.country | string | Two-letter uppercase country code per ISO 3166-1 alpha-2. Check the documentation for detailed information about countries supported by Xsolla and the process of determining the country. Example: US |
operationPayload | string | Parameter that contains information for token generation during authentication. The value is a Base64-encoded data generated by Xsolla. Required. |
| Parameter | Type | Description |
|---|---|---|
loginId | string | ID of the authorization method from the account for mobile games. Required. |
settings.projectId | integer | Project ID found in the account for mobile games, which is specified next to the name of your project in browser address bar. The URL has the following format: https://xsolla.com/for/mobile-games/account/<merchantId>/projects/<projectId>. Required. |
settings.merchantId | integer | Merchant ID found in the account for mobile games, specified in the Company settings > Company section or in the browser address bar on any page of your account. The URL has the following format: https://xsolla.com/for/mobile-games/account/<merchantId>/. Required. |
user.id | string | User ID in the game. Required. |
user.country | string | Two-letter uppercase country code per ISO 3166-1 alpha-2. Check the documentation for detailed information about countries supported by Xsolla and the process of determining the country. Example: US |
operationPayload | string | Parameter that contains information for token generation during authentication. The value is a Base64-encoded data generated by Xsolla. Required. |
- Example of calling the user token generation API method using curl:
- curl
 1curl -X 'POST' \
 2'https://sb-user-id-service.xsolla.com/api/v1/user-id/token' \
 3-H 'accept: /' \
 4-H 'Content-Type: application/json' \
 5-d '{
 6 "loginId": "000001aa-001a-0ab0-00001-01a01a01a01a",
 7 "settings": {
 8   "projectId": 123456,
 9   "merchantId": 123456
10 },
11 "user": {
12   "id": "123",
13   "country": "US"
14 }
15 "operationPayload": "kosarb2NyrtIWaegJAH1f6P7XrBYPXYDya5coc_ZzcfiS_5o4QTUAL-CcGRC_Kv4CAtg"
16}'
- You will get a response like
{token="JWT_TOKEN"}.Add a pop-up window with a notification of successful authorization (optional).
Implement the opening of the Web Shop in the browser using the obtained user token.
- Example of creating a URL for opening the Web Shop in the browser for an authorized user:
https://example.com/?token={token}, if you are using a custom domainhttps://example.xsolla.site/?token={token}, if you are using an Xsolla domain
- Where
{token} is the user’s authorization token.Within Site Builder
- Open your project in Publisher Account and go to the Storefronts > Websites section.
- Open the project in your account and go to the Storefronts > Websites section.
- Open the project in your account and go to the Storefronts > Websites section.
- Open the project in your account and go to the Storefronts > Websites section.
- Open your project in the account for mobile games and go to the Web Shop section.
- Click Configure on the card of your Web Shop site with authentication via User ID.
- Go to the Login Settings and select the User ID section.
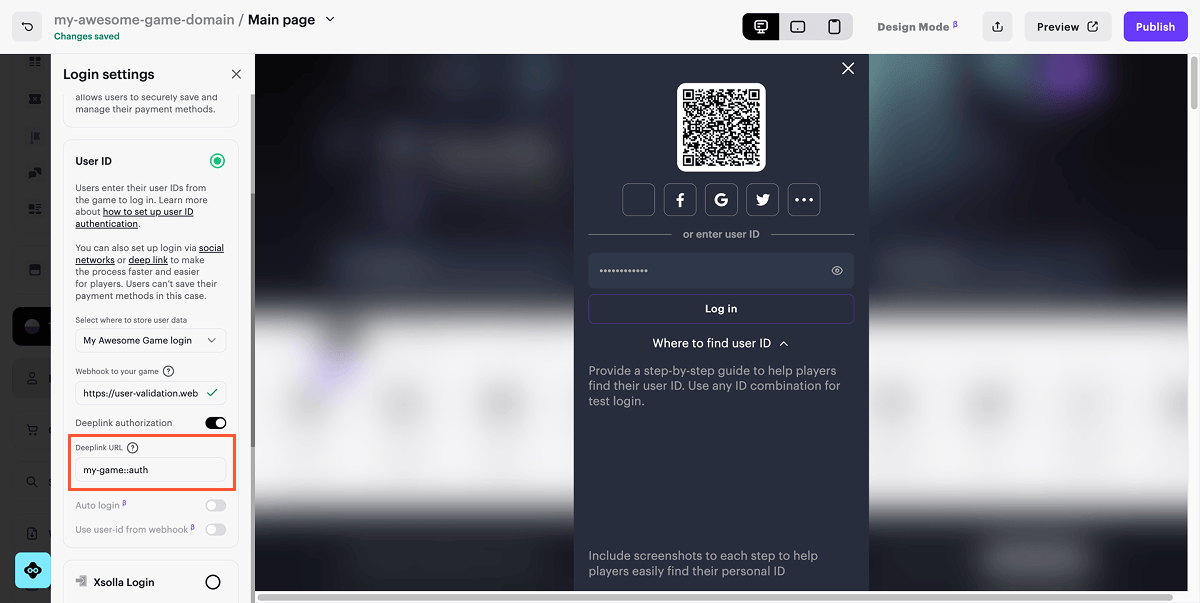
- Enable Deeplink authorization toggle.
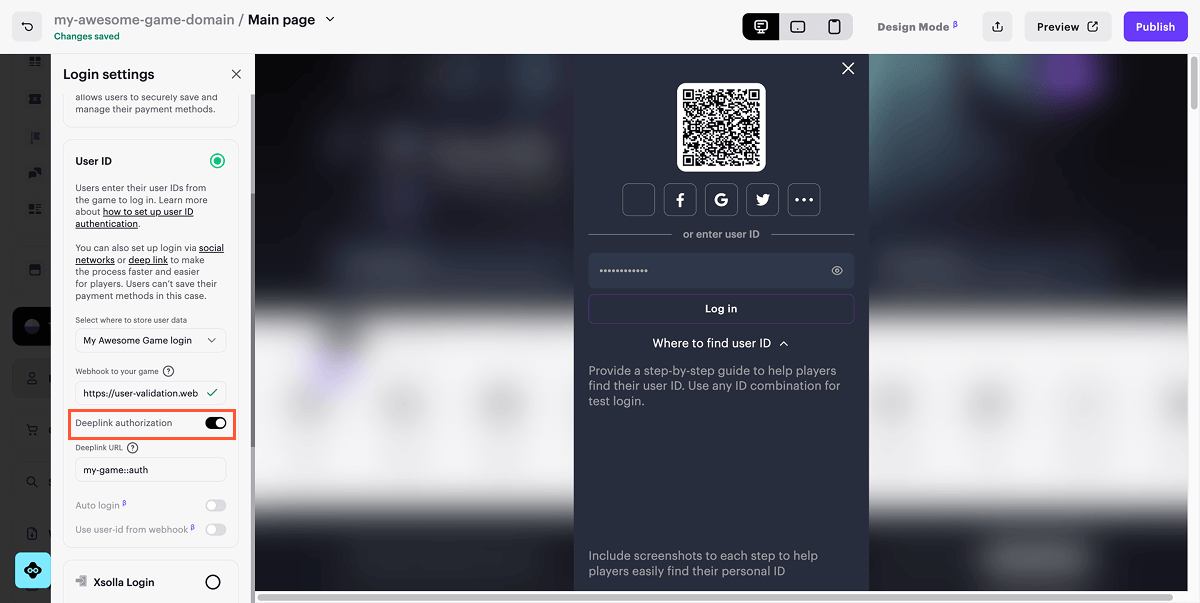
- In the Deeplink URL field enter the link for user authentication.
- If you are using the Fast Login block on the site:
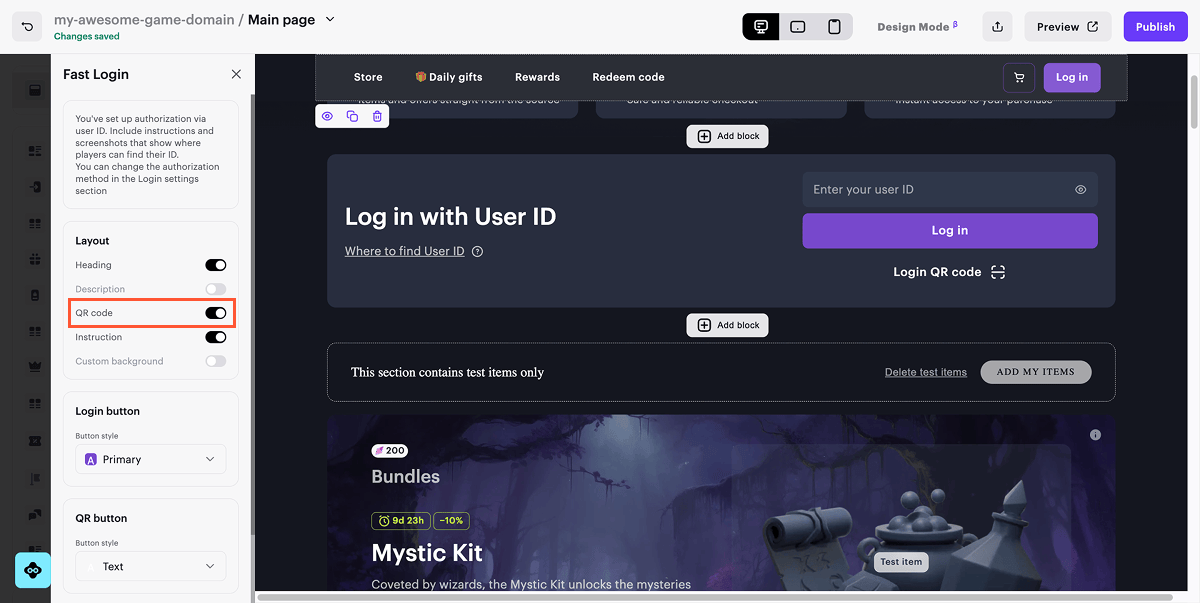
- Go to the Fast Login block.
- In the Layout section, enable the QR code toggle.
- To check the authentication, click on Preview.
- To publish the website, click on Publish.
A deep link is a special URL that directs the user not just to the main page of an application or website but directly to a specific section, page, or action.
Deep links allow the user to authenticate in the Web Shop through the game in one click, instead of going through the authentication process via user ID or Xsolla Login.
If the game is installed on the user’s mobile device, they will be redirected to the game via deep link to get an authorization token.
When a deep link is used as the primary authentication method, it allows saving payment details, which is not possible with authentication via user ID and deeplink. In this case, the deep link only speeds up authentication but does not add any new features.
User flow
In the mobile app
- An unauthorized user in the Web Shop clicks the login button or the buy button. A modal window for logging in through the mobile game opens.
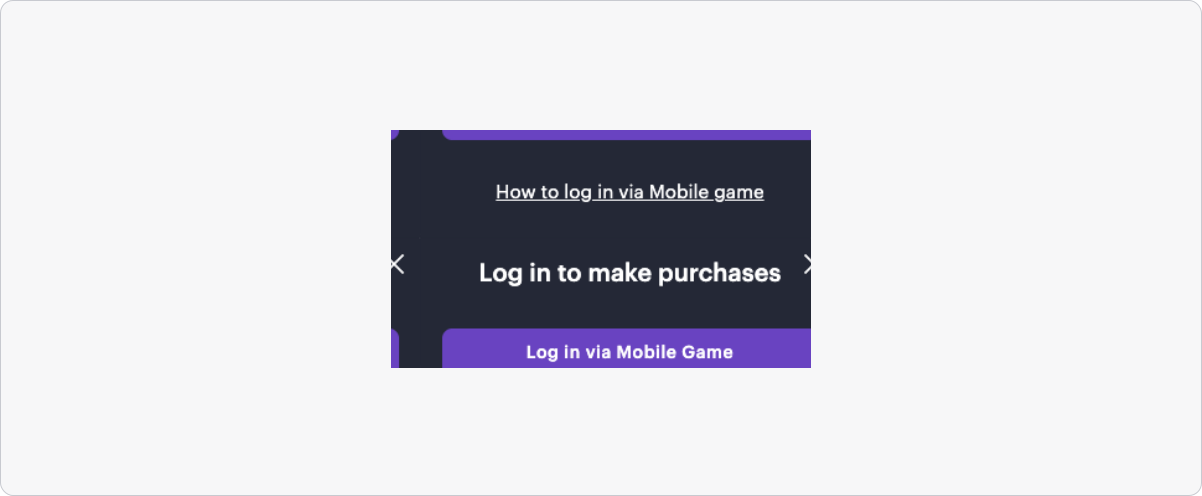
- The user clicks the Log in via Mobile Game button.
- The user is redirected to the game and then automatically back to the Web Shop as an authorized user.
In the desktop version
- An unauthorized user in the Web Shop clicks the login button or the buy button. A modal window for logging into the mobile version of the game using a QR code opens.
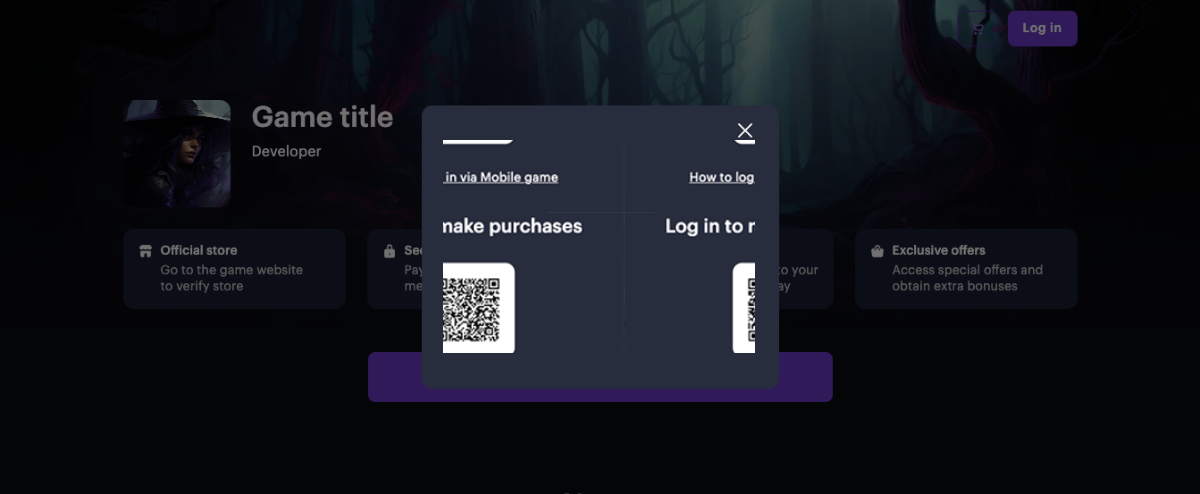
- The user scans the QR code using their mobile device.
- The Web Shop opens on the user's mobile device.
- The user is automatically redirected to the game and then back to the Web Shop as an authenticated user.
Services interaction flow
  %%{init: {'themeVariables': { 'noteBkgColor': 'transparent', 'noteBorderColor': 'transparent' }}}%%
sequenceDiagram
    participant U as User
    participant WS as Web Shop
    participant B as Browser
    participant MOS as Mobile OS
    participant G as Game
    participant LA as Login API
    U->>WS: Clicks button to log in via mobile game
    activate WS
    WS->>B: Redirects user via deeplink
    activate B
    B->>MOS: Makes system call to open mobile game
    activate MOS
    MOS->>G: Opens mobile game
    activate G
    G->>LA: Generates authorization token
    activate LA
    LA-->>G: Returns authorization token
    deactivate LA
    G->>MOS: Makes system call to open browser with token in URL
    deactivate G
    MOS-->>B: Opens browser with token in URL
    deactivate MOS
    B-->>WS: Opens Web Shop page for authorized user
    deactivate B
    WS-->>U: Displays username in header
    deactivate WS
How to set up
On the game side
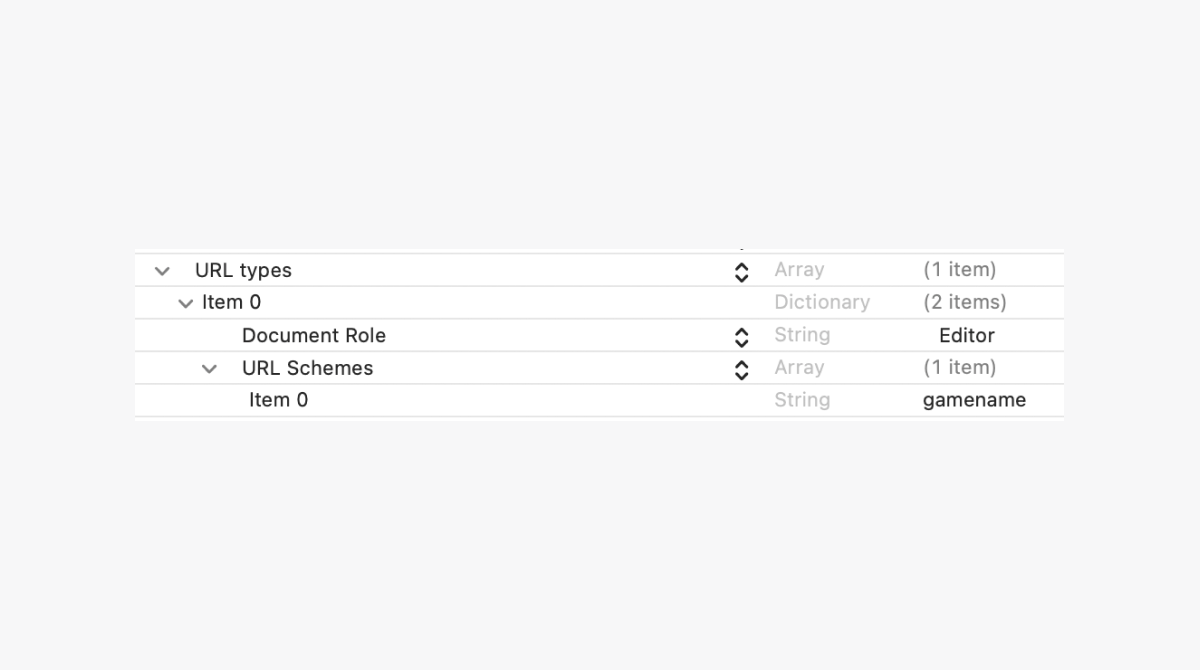
- In your game’s mobile app settings, register a URL scheme to open the game via deep link:
- in Android applications — in the
AndroidManifest.xmlfile. - in iOS applications — in the
Info.plistfile.
- in Android applications — in the
- After registering the scheme, when the user authenticates in the Web Shop via the game, the game should open at the specified address.
- Example of a link to open the game via a registered URL scheme:
scheme— a unique identifier of your game used in a custom URL scheme to launch the app and navigate to the required action.authorize— an example of an action name that should be performed after the game opens. Use the action name that matches the actions in your application’s operating system.operationPayload=<VALUE>— a parameter that contains information for token generation during authentication. The value is a Base64-encoded data generated by Xsolla.
scheme://authorize?operationPayload=<VALUE>, where:Ensure that the operationPayload parameter is handled correctly. Pass it without any changes — don’t decrypt, modify, or generate it manually.
If the parameter is missing or modified, the request returns a 400 error code.
- Examples:
- xml
 1<key>CFBundleURLTypes</key>
 2  <array>
 3    <dict>
 4      <key>CFBundleTypeRole</key>
 5      <string>Editor</string>
 6      <key>CFBundleURLSchemes</key>
 7      <array>
 8        <string>scheme</string>
 9      </array>
10    </dict>
11  </array>
- xml
1<intent-filter>
2    <action android:name="android.intent.action.VIEW" />
3    <category android:name="android.intent.category.DEFAULT" />
4    <category android:name="android.intent.category.BROWSABLE" />
5    <data android:scheme="scheme" android:host="authorize" />
6</intent-filter>
- Implement the generation of an authorization token in JWT format using the user ID from the game.
| Parameter | Type | Description |
|---|---|---|
loginId | string | ID of the authorization method from the Publisher Account. Required. |
settings.projectId | integer | Project ID found in Publisher Account, which is specified next to the name of your project in browser address bar. The URL has the following format: https://publisher.xsolla.com/<merchantId>/projects/<projectId>. Required. |
settings.merchantId | integer | Merchant ID found in Publisher Account, specified in the Company settings > Company section or in the browser address bar on any page of the Publisher Account. The URL has the following format: https://publisher.xsolla.com/<merchantId>/. Required. |
user.id | string | User ID in the game. Required. |
user.country | string | Two-letter uppercase country code per ISO 3166-1 alpha-2. Check the documentation for detailed information about countries supported by Xsolla and the process of determining the country. Example: US |
operationPayload | string | Parameter that contains information for token generation during authentication. The value is a Base64-encoded data generated by Xsolla. Required. |
| Parameter | Type | Description |
|---|---|---|
loginId | string | ID of the authorization method from your account. Required. |
settings.projectId | integer | Project ID found in your account, which is specified next to the name of your project in browser address bar. The URL has the following format: https://xsolla.com/for/free-to-play-pc/account/<merchantId>/projects/<projectId>. Required. |
settings.merchantId | integer | Merchant ID found in your account, specified in the Company settings section or in the browser address bar on any page of your account. The URL has the following format: https://xsolla.com/for/free-to-play-pc/account/<merchantId>/. Required. |
user.id | string | User ID in the game. Required. |
user.country | string | Two-letter uppercase country code per ISO 3166-1 alpha-2. Check the documentation for detailed information about countries supported by Xsolla and the process of determining the country. Example: US |
operationPayload | string | Parameter that contains information for token generation during authentication. The value is a Base64-encoded data generated by Xsolla. Required. |
| Parameter | Type | Description |
|---|---|---|
loginId | string | ID of the authorization method from your account. Required. |
settings.projectId | integer | Project ID found in your account, which is specified next to the name of your project in browser address bar. The URL has the following format: https://xsolla.com/for/premium-pc-games/account/<merchantId>/projects/<projectId>. Required. |
settings.merchantId | integer | Merchant ID found in your account, specified in the Company settings section or in the browser address bar on any page of your account. The URL has the following format: https://xsolla.com/for/premium-pc-games/account/<merchantId>/. Required. |
user.id | string | User ID in the game. Required. |
user.country | string | Two-letter uppercase country code per ISO 3166-1 alpha-2. Check the documentation for detailed information about countries supported by Xsolla and the process of determining the country. Example: US |
operationPayload | string | Parameter that contains information for token generation during authentication. The value is a Base64-encoded data generated by Xsolla. Required. |
| Parameter | Type | Description |
|---|---|---|
loginId | string | ID of the authorization method from your account. Required. |
settings.projectId | integer | Project ID found in your account, which is specified next to the name of your project in browser address bar. The URL has the following format: https://xsolla.com/for/web-games/account/<merchantId>/projects/<projectId>. Required. |
settings.merchantId | integer | Merchant ID found in your account, specified in the Company settings section or in the browser address bar on any page of your account. The URL has the following format: https://xsolla.com/for/web-games/account/<merchantId>/. Required. |
user.id | string | User ID in the game. Required. |
user.country | string | Two-letter uppercase country code per ISO 3166-1 alpha-2. Check the documentation for detailed information about countries supported by Xsolla and the process of determining the country. Example: US |
operationPayload | string | Parameter that contains information for token generation during authentication. The value is a Base64-encoded data generated by Xsolla. Required. |
| Parameter | Type | Description |
|---|---|---|
loginId | string | ID of the authorization method from the account for mobile games. Required. |
settings.projectId | integer | Project ID found in the account for mobile games, which is specified next to the name of your project in browser address bar. The URL has the following format: https://xsolla.com/for/mobile-games/account/<merchantId>/projects/<projectId>. Required. |
settings.merchantId | integer | Merchant ID found in the account for mobile games, specified in the Company settings > Company section or in the browser address bar on any page of your account. The URL has the following format: https://xsolla.com/for/mobile-games/account/<merchantId>/. Required. |
user.id | string | User ID in the game. Required. |
user.country | string | Two-letter uppercase country code per ISO 3166-1 alpha-2. Check the documentation for detailed information about countries supported by Xsolla and the process of determining the country. Example: US |
operationPayload | string | Parameter that contains information for token generation during authentication. The value is a Base64-encoded data generated by Xsolla. Required. |
Before generating an authorization token for the first time, you must contact your project’s personal manager or email [email protected] to activate the token configuration. This step is necessary to ensure the proper functioning of the secure user authentication method.
- Example of calling the user token generation API method using curl:
- curl
 1curl -X 'POST' \
 2'https://sb-user-id-service.xsolla.com/api/v1/user-id/token' \
 3-H 'Accept: /' \
 4-H 'Content-Type: application/json' \
 5-d '{
 6 "loginId": "string",
 7 "settings": {
 8   "projectId": 0,
 9   "merchantId": 0
10 },
11 "user": {
12   "id": "string",
13   "country": "string",
14   "name": "string",
15   "picture": "string"
16 },
17 "operationPayload": "eyJ4c29sbGF1aWQiOiIzNzE5Nzc5NjU1MDE2Nzc2MzcifQ%3D%3D"
18}'
- You will get a response like
{token="JWT_TOKEN"}.Add a pop-up window with a notification of successful authorization (optional).
Implement the opening of the Web Shop in the browser using the obtained user token.
- Example of creating a URL for opening the Web Shop in the browser for an authorized user:
https://example.com/?token={token}, if you are using a custom domainhttps://example.xsolla.site/?token={token}, if you are using an Xsolla domain
- Where
{token} is the user’s authorization token.Within Site Builder
- Open your project in Publisher Account and go to the Storefronts > Websites section.
- Click Configure on your Web Shop site card.
- Open the project in your account and go to the Storefronts > Websites section.
- Click Configure on your Web Shop site card.
- Open the project in your account and go to the Storefronts > Websites section.
- Click Configure on your Web Shop site card.
- Open the project in your account and go to the Storefronts > Websites section.
- Click Configure on your Web Shop site card.
- Open your project in the account for mobile games and go to the Web Shop section.
- In the card for your site, click the ⋮ icon and select Configure.
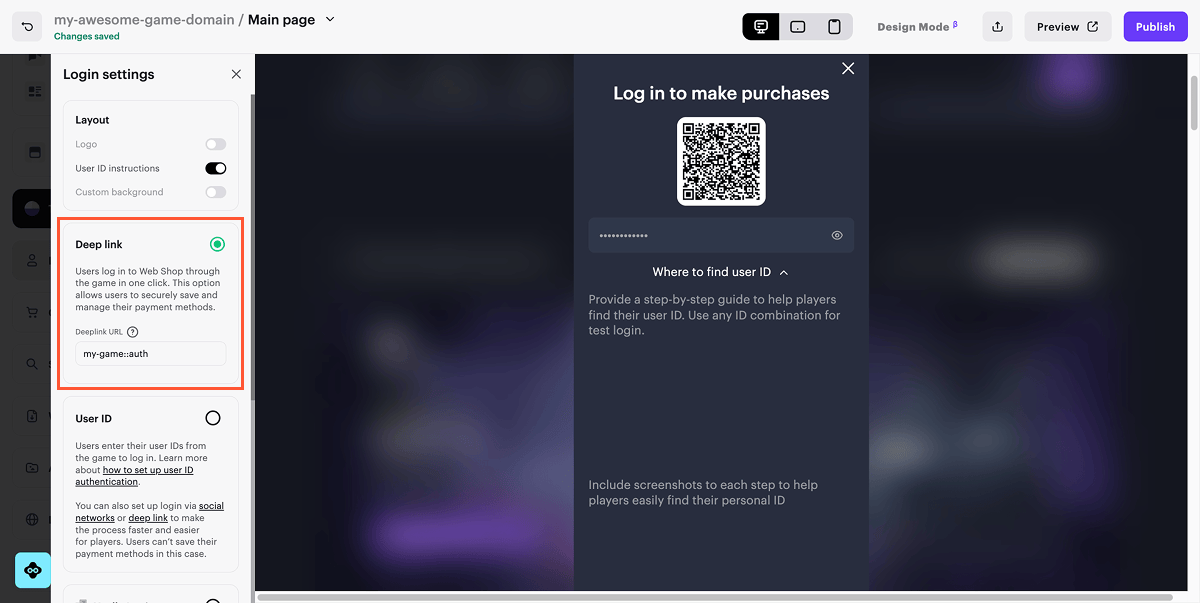
- Go to the Login Settings and select the Deep link section.
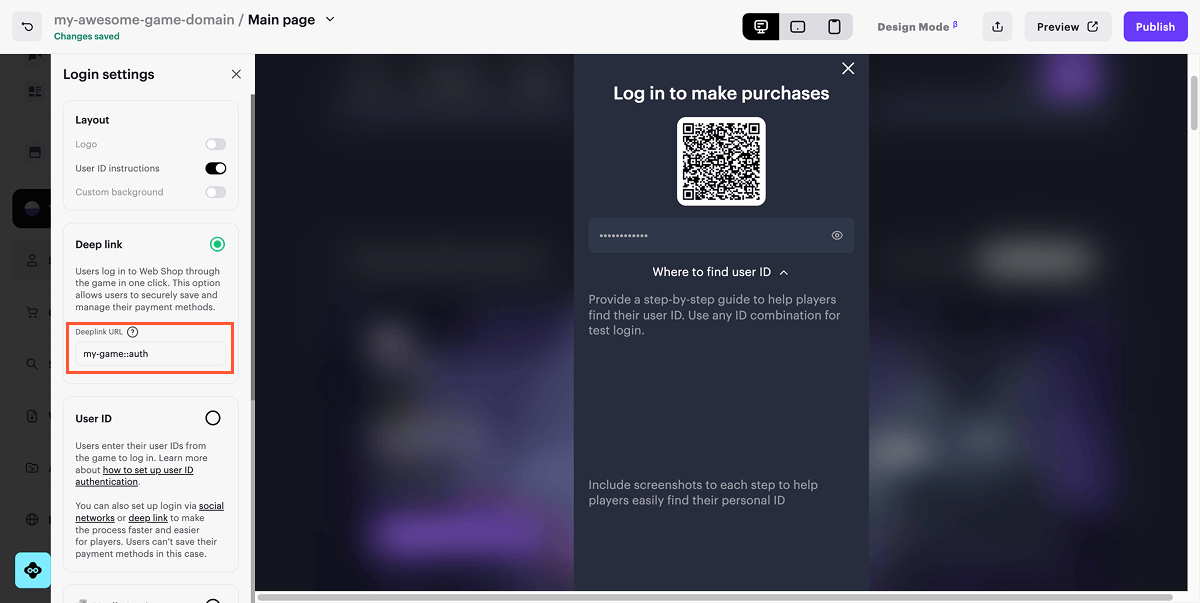
- In the Deeplink URL field enter the link for user authentication.
- If you are using the Fast Login block on the site:
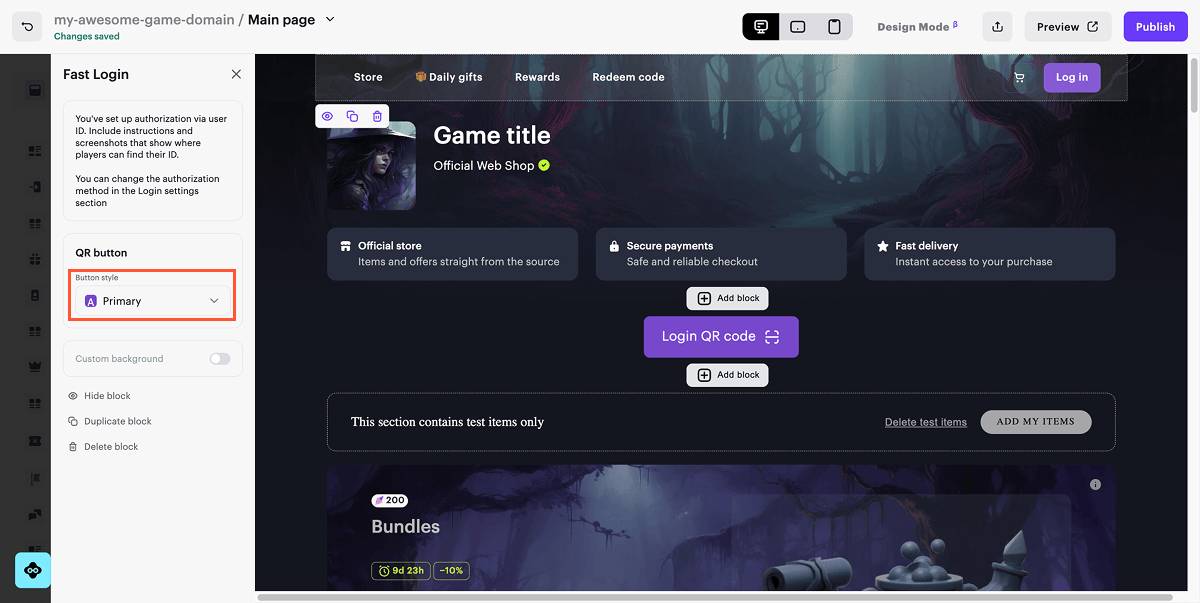
- Go to the Fast Login block.
- In the Block Settings, adjust the display style for the QR code login button.
- To check the authentication, click on Preview.
- To publish the website, click on Publish.
User flow
- The user goes to Web Shop with Xsolla Login authentication configured.
- The user clicks the buy button for the selected item, the login button on the top bar, or the login button in the Fast Login block.
- A modal window opens with authorization methods.
- The user proceeds to authorization and enters additional data if necessary.
- The system checks if the user exists in the game. If so, the user is authorized in Web Shop. Otherwise an error message is displayed.
How to get it
- Open the project in your account, go to the Storefronts > Websites section.
- Open your project in the account for mobile games and go to the Web Shop section.
- Open the project in your account, go to the Storefronts > Websites section.
- Open the project in your account, go to the Storefronts > Websites section.
- Open the project in your account, go to the Storefronts > Websites section.
- Click the ••• icon on the card of your Web Shop site with Xsolla Login authentication and select Configure.
- Click Go to Builder and scroll to the Login settings block.
- Select the Xsolla Login authorization method.
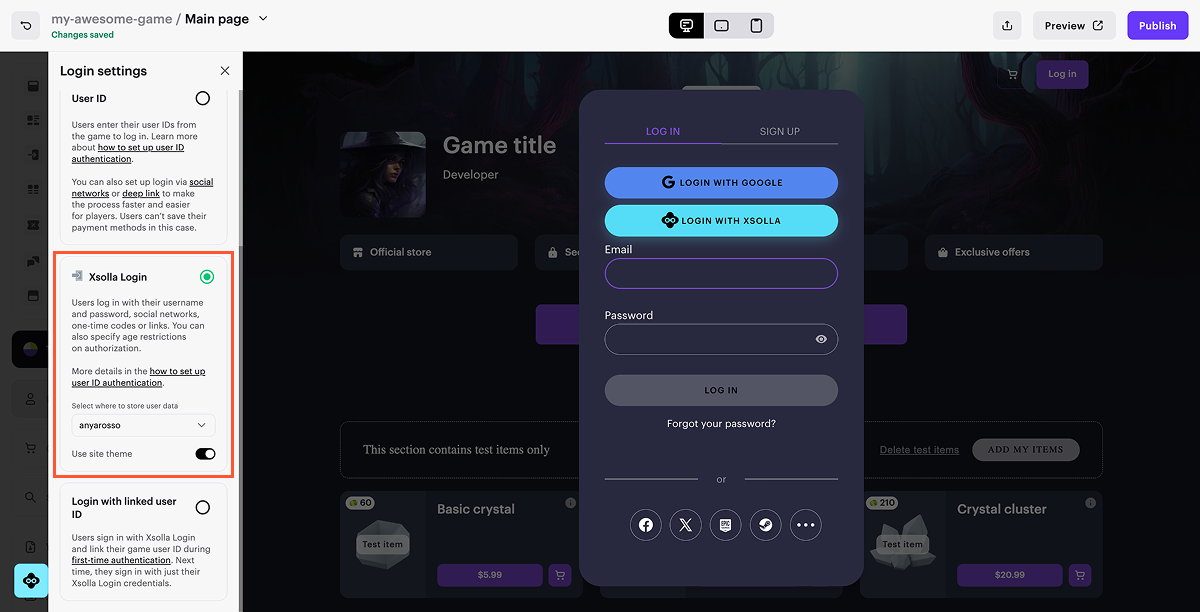
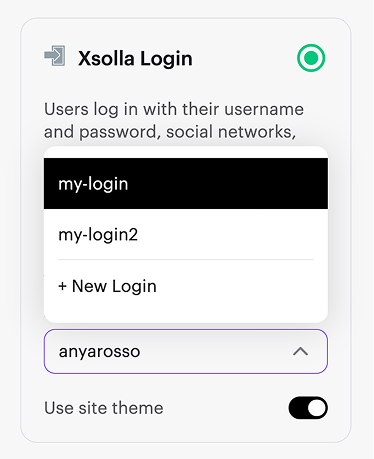
- In the Xsolla Login option, select an authentication option from the drop-down list:
- an existing one, if Xsolla Login is already configured in your project
- New Login, if there is no authentication option for Web Shop yet
When you preview or publish the site for the first time, the Web Shop preview URL and domain are automatically added to the Callback URL field in the authentication option settings. The user is redirected to these URLs in the following cases:
- after successful authentication
- after email confirmation
- after password reset
- in case of authentication failure
When you change the Web Shop domain, these URLs are updated automatically.
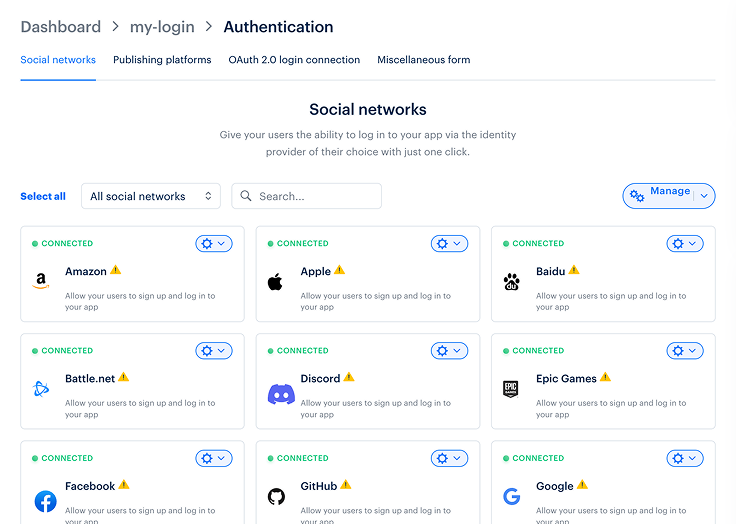
- Set up the social networks that users can use to sign in to Web Shop (optional). For more information, see the Social login documentation.
- If you do not want to store user data on Xsolla’s side, connect another storage (optional). For more information, see the Connect user data storage documentation.
The available functionality depends on the selected storage. For more information, see the Comparison of user data storage options documentation.
User flow
- The user goes for the first time to Web Shop with configured authentication with linked user ID.
- The user clicks the purchase button for the selected item, the login button on the top bar, or the login button in the Fast Login block.
- A modal window opens with authorization methods set up in Xsolla Login.
- The user proceeds to authorization and enters additional data if necessary.
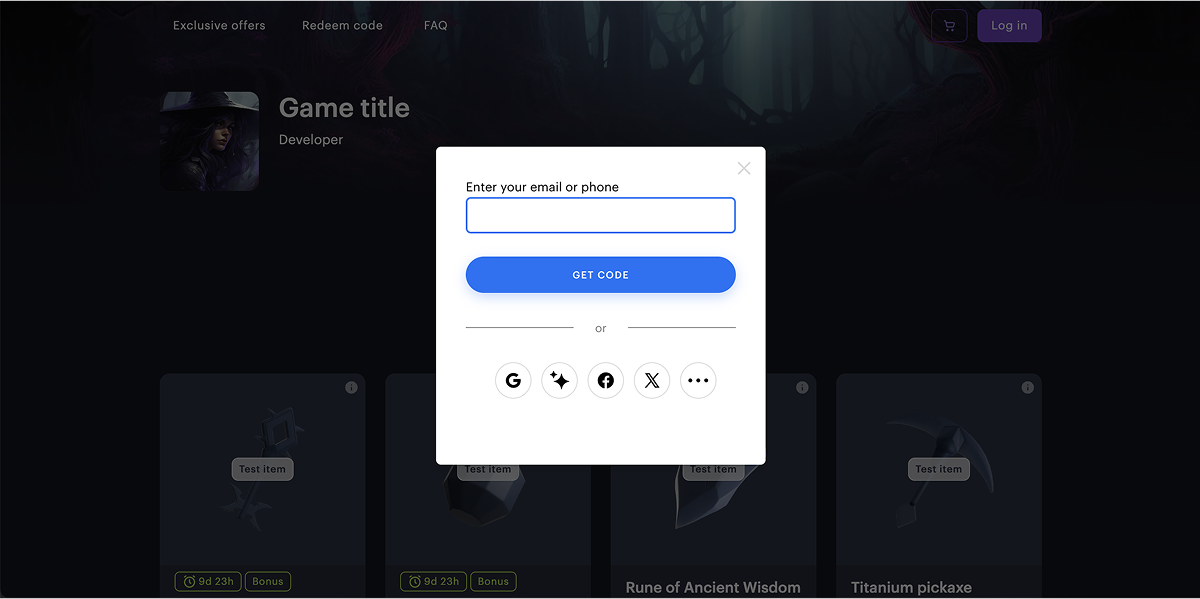
- After successful authorization via Xsolla Login, the modal window for linking user ID from the game opens.
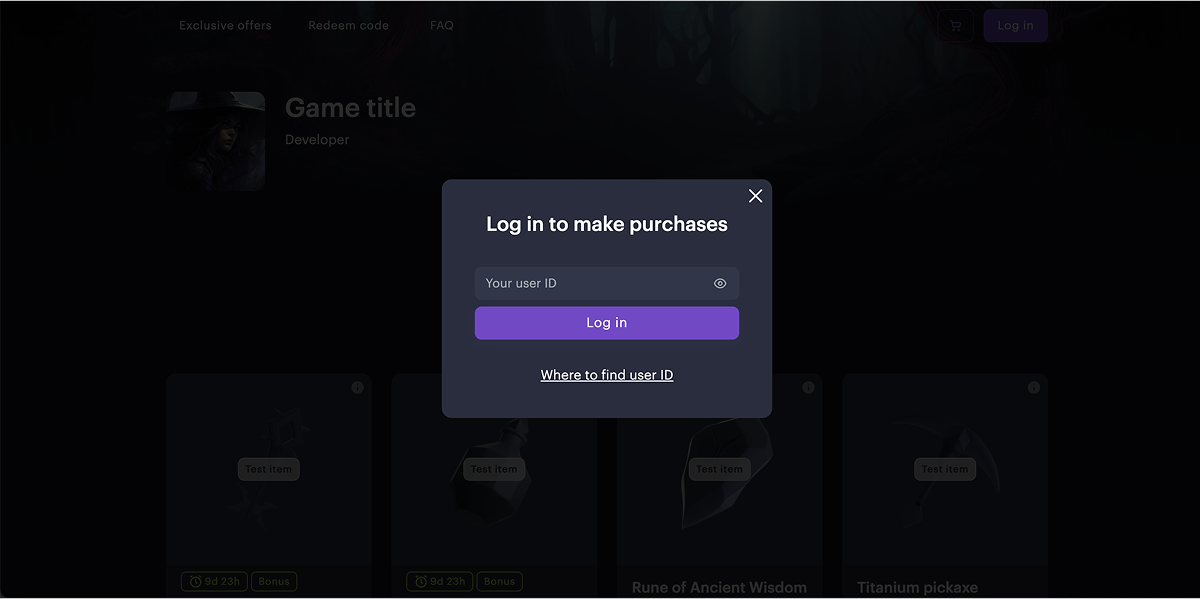
- The system checks if the user exists. If the user with the specified ID exists in the game, the user is authorized in Web Shop. Otherwise an error message is displayed.
How to get it
On your application’s side, implement handling of the user validation webhook.
When receiving a webhook, the application should do the following:
- Search for a user by their ID passed in the webhook.
- Depending on the result, send one of the following status codes:
- 200 HTTP-code with an answer from webhook if a user is found
- 404 HTTP-code if the user ID is not found
- Send user attributes for personalization.
- Open your project in Publisher Account and go to the Storefronts > Websites section.
- In the pane of the necessary site, click Open Site Builder.
- Open the project in your account and go to the Storefronts > Websites section.
- In the pane of the necessary site, click Open Site Builder.
- Open the project in your account and go to the Storefronts > Websites section.
- In the pane of the necessary site, click Open Site Builder.
- Open the project in your account and go to the Storefronts > Websites section.
- In the pane of the necessary site, click Open Site Builder.
- Open your project in the account for mobile games and go to the Web Shop section.
- Click the pane of the necessary site.
- If your site includes multiple pages, select the one you need:
- Click the current page title at the top of the builder.
- Select the necessary page from the drop-down list.
- Go to the Login settings block.
- Select the Login with linked user ID option.
- In the drop-down list, select New Login or one of the created projects.
- Enter the URL to receive webhooks.
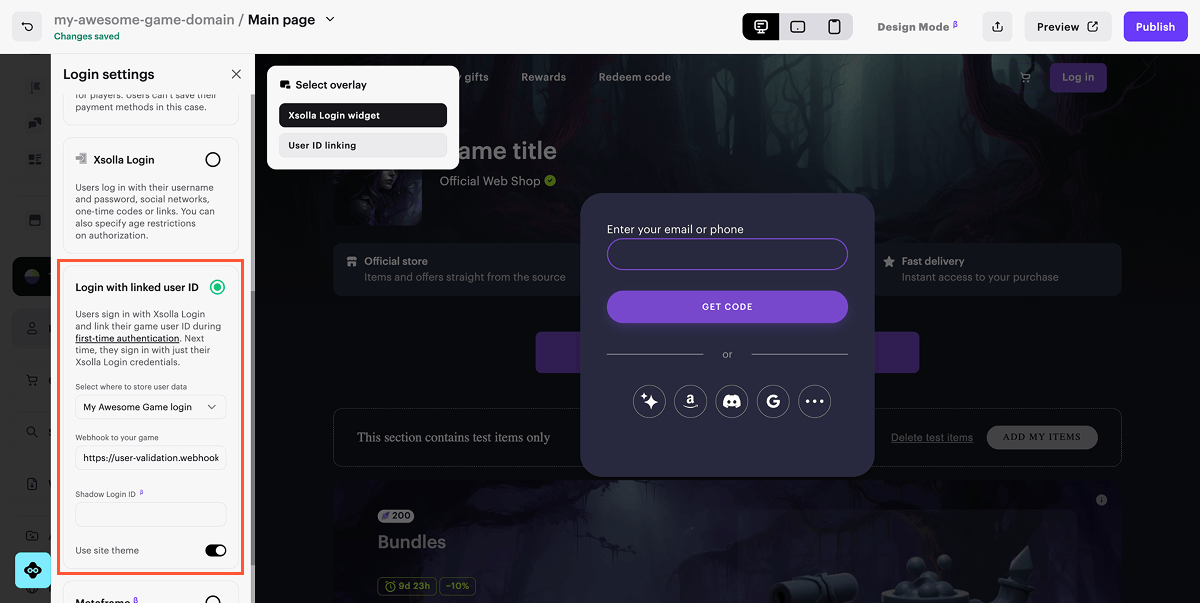
https://. Using http:// will cause an error.You can set up any authorization method, but to simplify the user experience during the initial authentication stage, we recommend using social login:
a. Open your project in Publisher Account and go to the Players > Login section.
b. Click Configure in the pane of the necessary Login project.
c. Go to the Authentication block and select Social login.
d. To set up a social network, go to the social network card, click the ⚙ icon to the right of the title, and select Connect.
You can set up any authorization method, but to simplify the user experience during the initial authentication stage, we recommend using social login:
a. Open the project in your account and go to the Players > Login section. b. Click Configure in the pane of the necessary Login project.
c. Go to the Authentication block and select Social login.
d. To set up a social network, go to the social network card, click the ⚙ icon to the right of the title, and select Connect.
You can set up any authorization method, but to simplify the user experience during the initial authentication stage, we recommend using social login:
a. Open the project in your account and go to the Players > Login section. b. Click Configure in the pane of the necessary Login project.
c. Go to the Authentication block and select Social login.
d. To set up a social network, go to the social network card, click the ⚙ icon to the right of the title, and select Connect.
You can set up any authorization method, but to simplify the user experience during the initial authentication stage, we recommend using social login:
a. Open the project in your account and go to the Players > Login section. b. Click Configure in the pane of the necessary Login project.
c. Go to the Authentication block and select Social login.
d. To set up a social network, go to the social network card, click the ⚙ icon to the right of the title, and select Connect.
You can set up any authorization method, but to simplify the user experience during the initial authentication stage, we recommend using social login: a. Open your project in the account for mobile games and go to the Other tools > Login section.
b. Click Configure in the pane of the necessary Login project.
c. Go to the Authentication block and select Social login.
d. To set up a social network, go to the social network card, click the ⚙ icon to the right of the title, and select Connect.
Set up Fast Login block
The Fast Login block allows you to highlight the authorization step and streamline the user’s path to purchase.
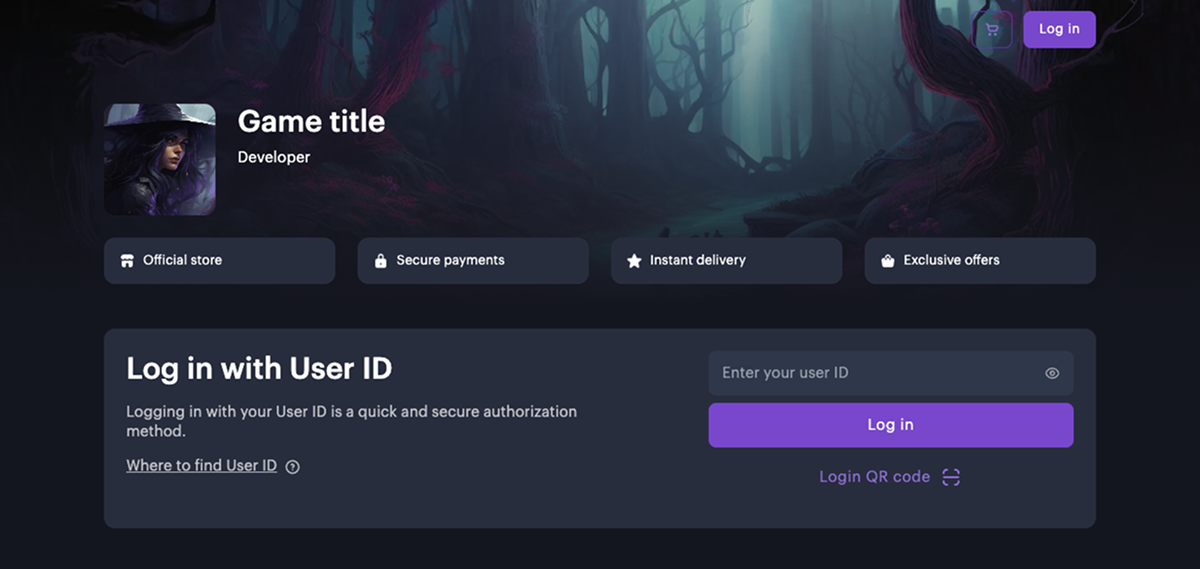
To use this Fast Login block, you must first select an authorization method in the Login Settings section. The appearance and behavior of the block depend on the chosen authentication method.
If authentication via user ID is configured for the site, the Fast Login block displays a field for entering the ID and a login button.
Features:
- User authentication without additional transition to the modal window.
- Setting up the content of the block. You can enable and configure the following sections:
- Title
- Description
- Instructions on how to find the user ID
- Custom background
You can also expand the features of the block, for example, add text, a button, or an image, using JS code.
For the user ID authentication method in the Login settings section, you also need to specify the URL to receive the webhook. If you don’t specify it, the site can’t be published because user authentication will be unavailable.
User authentication during site preview is possible without adding a webhook URL.
The Fast Login block is automatically added to sites created using the Web Shop template.
If your site doesn’t include this block, you can manually add it in the site builder.
To add a Fast Login block:
- Open the project in Publisher Account and go to the Storefronts > Websites section.
- In the Sites section, select your site and click Open Site Builder.
- Open your project in the account for mobile games and go to the Web Shop section.
- Click the card of your site.
- Click Add block.
- Choose Fast Login block.
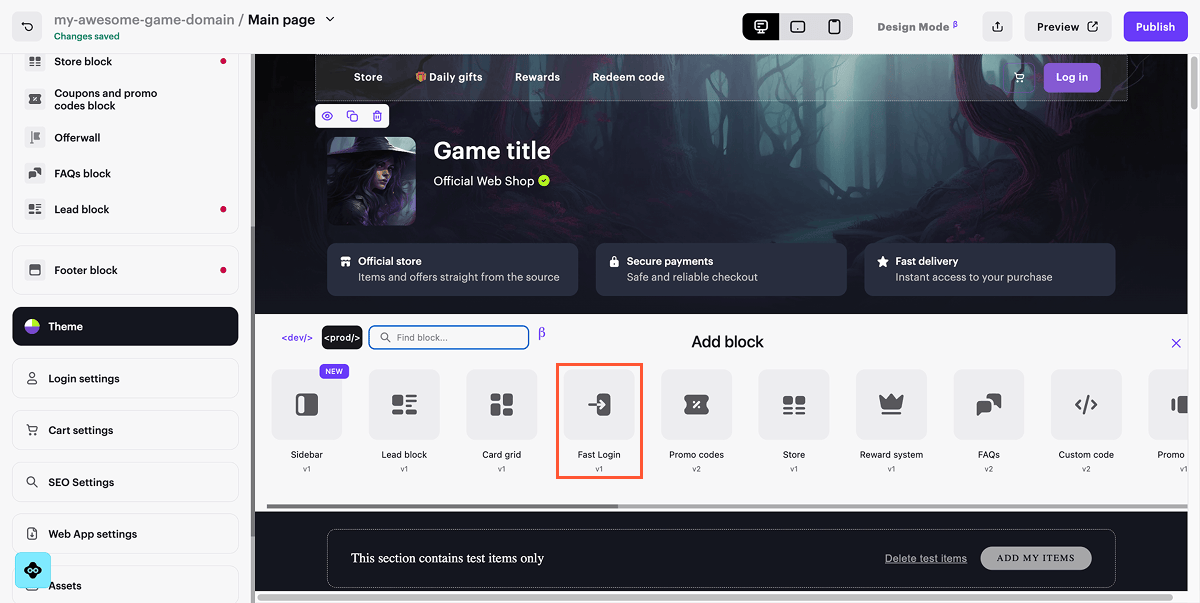
Continue reading
Useful links
Integration flowFound a typo or other text error? Select the text and press Ctrl+Enter.
