Welcome to the Xsolla SDK
Xsolla SDK is a versatile solution built by Xsolla — a global video game commerce leader trusted by the game studios behind Crossout, Modern Warship, and Fantasy Tales: Sword and Magic. It empowers developers to seamlessly integrate in-game payments via Xsolla Pay Station across mobile, PC and web-based games, supporting monetization for both in-store builds (e.g., App Store iOS and Google Play builds in the USA) and out-of-store distributed game builds (e.g., Android APK, Notarized iOS, Xsolla Launcher and standalone PC). All of this helps developers overcome challenges like restricted market access, high native payment fees, and fragmented user experiences, maximizing revenue potential across every distribution channel.
INTERACTIVE DEMO
SDK Explorer
Walk through every step of the integration — authentication, catalog loading, purchasing, and finalization — in a live, interactive environment. No code required.
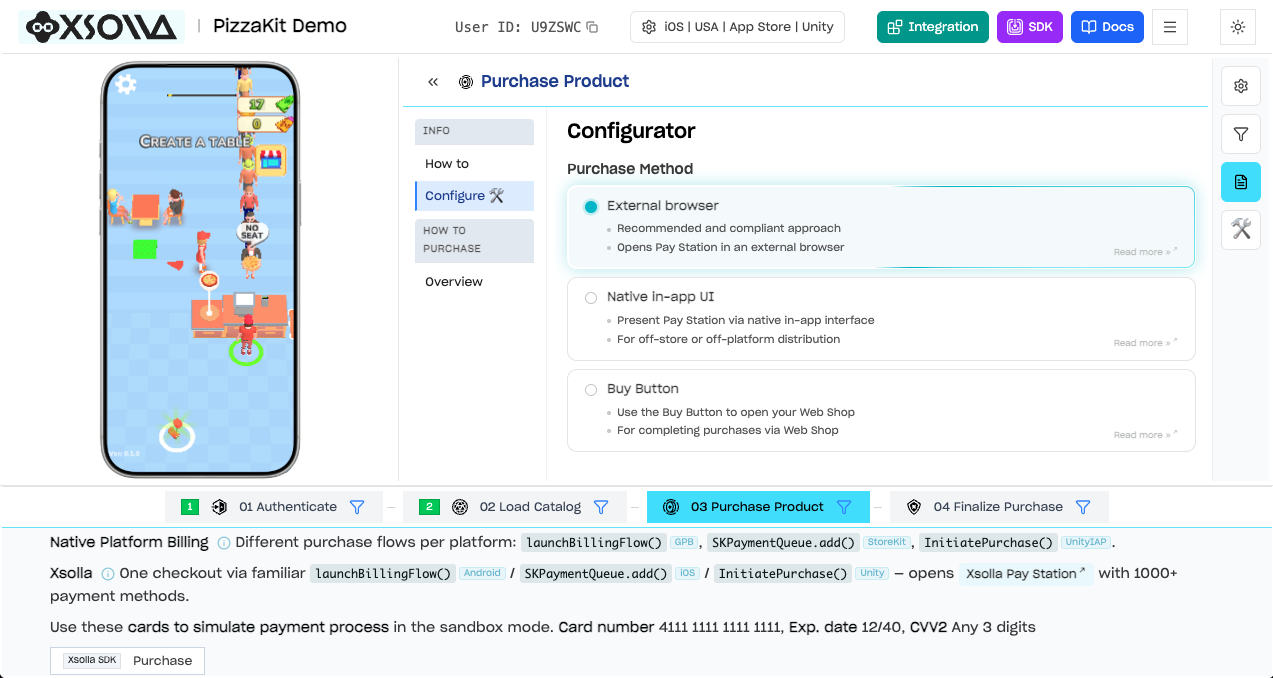
SDK Explorer — try the full payment flow in your browser
PRIMARY SOLUTION
Buy Button: Instant Web Shop Access
The April 2025 contempt ruling in Epic v. Apple requires Apple to allow external payment links in US iOS apps; the December 2025 appellate modification permits Apple to charge a commission on such transactions, with the rate under court review. The Epic v. Google injunction (effective October 29, 2025), subsequently settled in November 2025, requires Google Play to permit alternative billing options and external payment links for US users. The Xsolla SDK is fully compliant with both Apple's revised App Store guidelines and Google Play's updated billing policies.
The Buy Button ↗ (xsolla.com) feature enables direct access to your Web Shop payment UI:
Players access payment UI for specific items instantly — no extra navigation steps.
Launch web payment UI directly from your game without breaking user flow.
Full Web Shop payment range including Apple Pay and global alternatives.
Streamlined purchase flow reduces friction and increases completion rates.
MMP attribution via Adjust ↗ (developers.xsolla.com), AppsFlyer ↗ (developers.xsolla.com), Airbridge ↗ (developers.xsolla.com), and Singular ↗ (developers.xsolla.com) — maintaining full visibility into your campaigns and revenue.
DISTRIBUTION STRATEGY
Supporting Multiple Monetization Models
With the Xsolla SDK, we bring ease of integration to all developers as part of our "Equal Access for Everyone" initiative, greatly simplifying the initial phases of integration while allowing for further fine-tuning and customization. Setting and integrating your project with Xsolla SDK automatically provides access to a fully-fledged, highly customizable Xsolla Web Shop — establishing your direct-to-consumer connection outside of your application.
SDK overview — payment flows, distribution, and direct-to-consumer in one platform
Out-of-store payments allow developers to distribute their own application files — like APKs for Android or Notarized versions of apps for iOS (e.g., through Web Distribution) — outside the confines of traditional app stores. When developers opt for distributing games independently, in a direct-to-consumer way, they retain greater control over their profits. This approach is further supported by evolving regulations such as the Digital Markets Act (DMA), which expands developers' freedom to offer alternative payment methods. The answer to these complexities lies in Xsolla Pay Station, accessible through the Xsolla SDK.
PAY STATION
Solutions
Xsolla Pay Station is specifically designed to enable developers to monetize their applications efficiently, preserving a larger share of revenue. With over 1,000 payment options, Xsolla Pay Station opens up monetization opportunities in regions and through methods not typically supported by platform-native billing, letting developers tap into new markets and cater to a broader audience.
Additionally, pairing the Xsolla SDK with distribution solutions like those from Digital Turbine amplifies this advantage. Digital Turbine drives large-scale APK distribution through partnerships with major carriers and device manufacturers, putting games directly on millions of devices worldwide. Beyond pre-installs, its SingleTap technology delivers instant installs from ads, links, or messages from a CDN of your choice — bypassing "scare screens," app store friction and boosting conversions. This combination lets developers go direct-to-player at scale, keep UA workflows intact, and capture a greater share of their revenue.
Please reach out to your Account Manager and/or Business Development team for recipes for success to supercharge your out-of-store distribution strategy with up-to-date tips and tricks.
Alternative Payment Options
If you're interested in implementing Apple's Alternative Payment options ↗ (developer.apple.com) on the App Store or Google Play's Alternative Billing ↗ (developer.android.com), please contact your Account Manager and/or Business Development team for guidance and implementation support.
GET STARTED