Unity Web — Xsolla SDK 3 Integration Guide
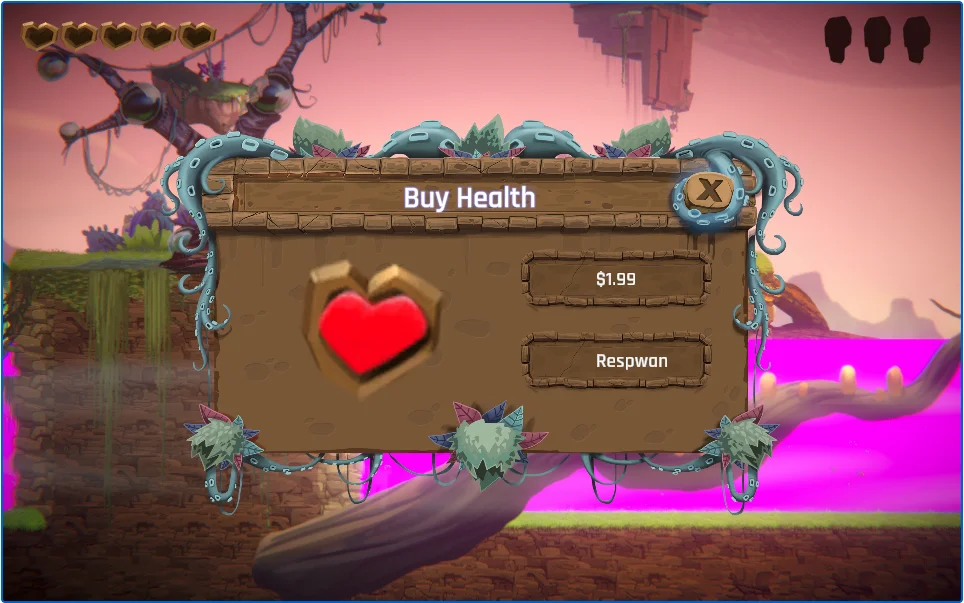
Demo game - "Buy full health" popup after the player loses their last life triggering a spontaneous purchase opportunity
What We're Building
By the end of this article, you'll have a fully working Xsolla payment flow integrated into your Unity Web project - from package installation through to a completed test transaction.
We're using the Unity 2D Game Kit as our reference project throughout this article. The scenario is deliberately simple: the moment the player loses their last life, a popup appears with two options - buy full health and carry on from where they left off, or restart and lose their game progress. That's a spontaneous purchase moment, and a perfect fit for a Pay Station integration.
When the purchase button is selected, it opens the Xsolla Pay Station natively inside the game. For web that's the recommended route, but you can configure it to behave differently if you'd rather. Once the purchase completes, the player respawns with full health from the latest checkpoint.
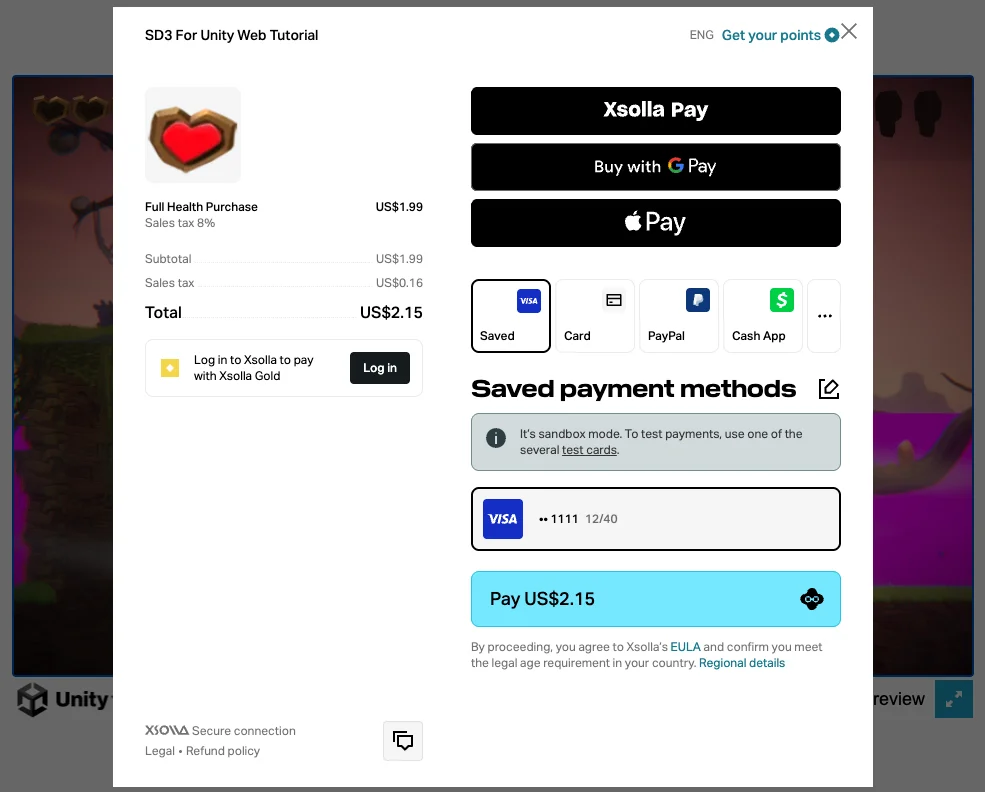
Pay Station
Here's a quick summary of the specifics of this integration:
- Authentication method: Server-side, via Custom ID (no login or sign-up for the player)
- Catalog Management: Manual
- Purchase validation method: Client-side only
Prerequisites
Before reading this article, make sure you have the following sorted:
- Unity - the reference project used in this article uses version 6.3.5 of the Unity Game Engine.
- A game project that's ready to take a payment flow. We assume you already know where in your project the Xsolla payment flow is going to go. In our demo it's a game event that fires when the player dies - you want something similar in your own game, wherever it makes sense to offer the player a purchase.
- Unity IAP package installed. The Xsolla SDK builds directly on top of Unity's In-App Purchasing framework. If you don't already have it, the Xsolla package install will take care of it for you. At the time of writing, Unity IAP version 5 isn't supported yet - so if you're installing it separately, check which version you're using.
- An active Xsolla Publisher Account. We'll walk through everything you need to configure inside it, but creating the account itself isn't covered here. If you haven't done that yet, head to the Xsolla Publisher Account sign-up page and get that set up first.
- A server. Custom ID authentication on web needs a backend to request tokens from Xsolla. Building that server is outside the scope of this guide - we'll cover what it needs to do at a high level only.
Your Reference Resources
There are three resources worth having open as you work through this, and worth keeping as a reference for later:
- Xsolla SDK docs - everything you need to understand SDK 3, with documentation for each platform and all the key concepts.
- SDK Explorer - think of this as your interactive documentation. On the left is a game you can play in real time. On the right, by default, you get the real-time log output for your payment flow, where each entry can be opened up and inspected. Along the bottom are four tabs, one for each of the four steps of a payment flow - each gives you the relevant documentation and code for that step, and you can configure each step to match the implementation you're building. The code and docs update in real time to match.
- Publisher Account - where you manage everything in your Xsolla ecosystem, such as your authentication system, catalog and payment preferences.
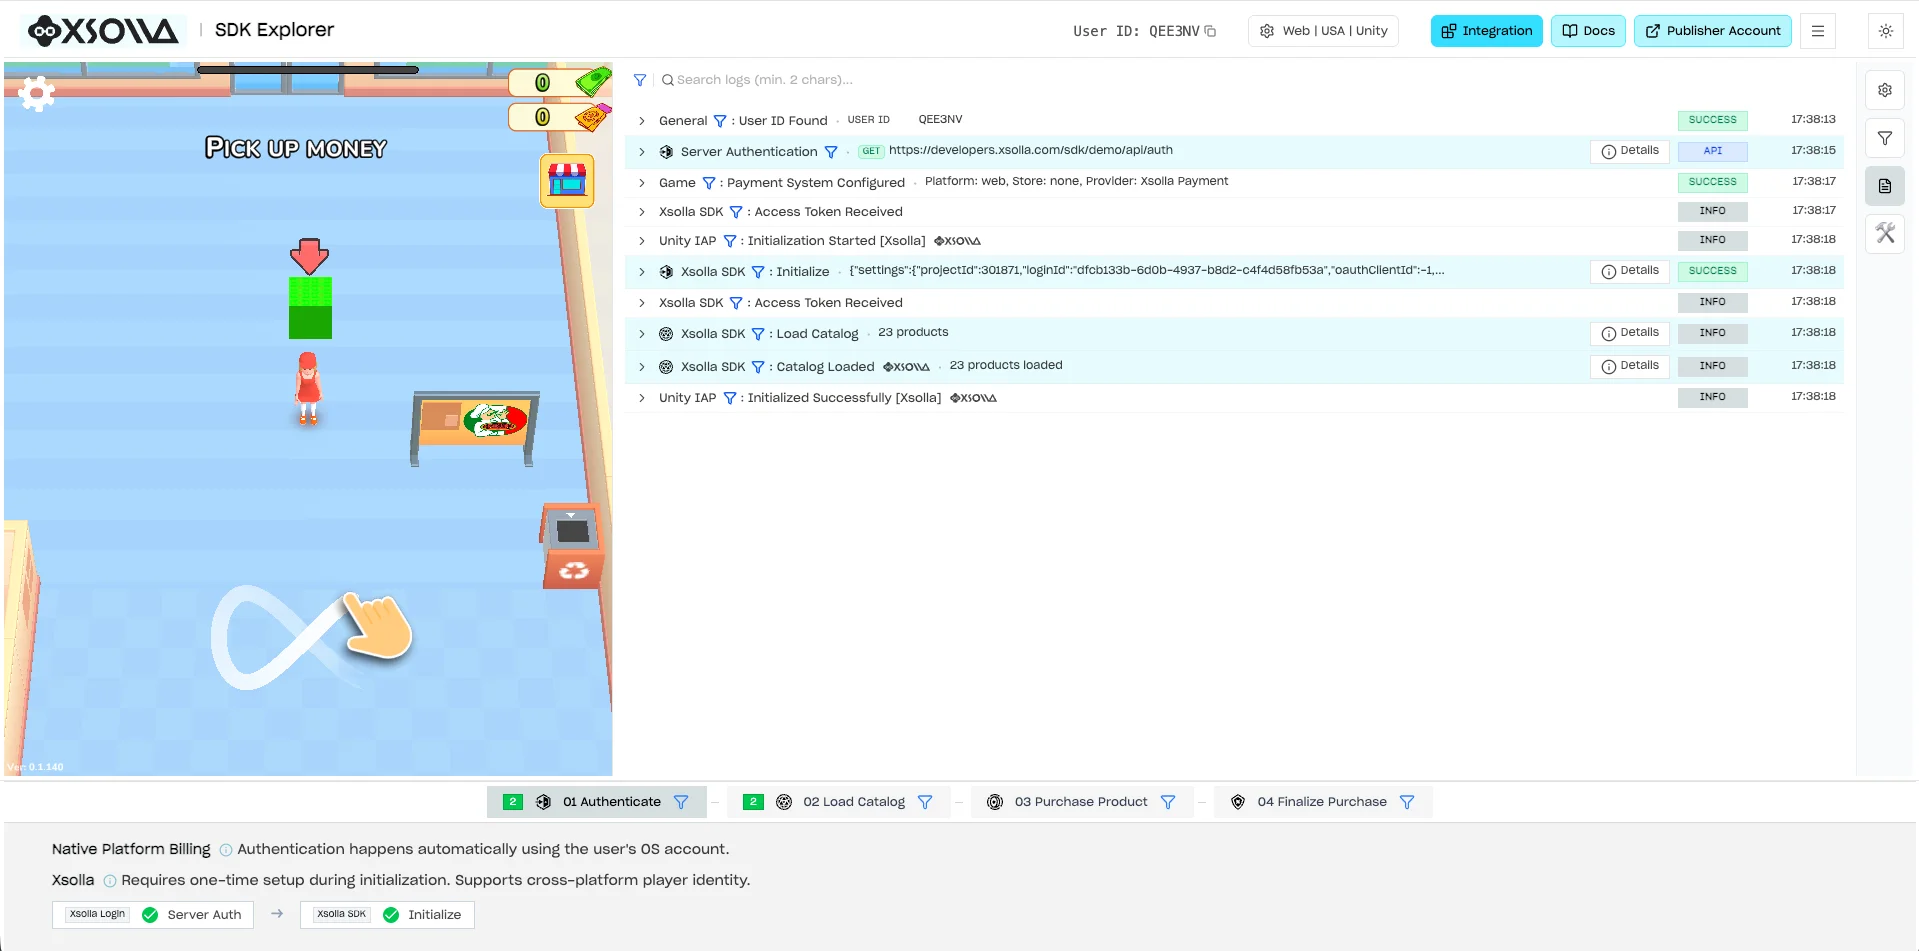
SDK Explorer - default view
There's one more resource that lives inside both the SDK docs and the SDK Explorer worth knowing about: the Integration Widget. For the simplest implementation path, it hands you complete, drag-and-droppable code for each of the four steps of a payment flow, allowing you to set up a working payment flow in a few clicks.
(This is possible due to the use of template project credentials tied to a template catalog, so be sure to update your login and project IDs before going live.)
In this guide we use the Integration Widget for the code structure only, then update it to use our own project, catalog and configuration.
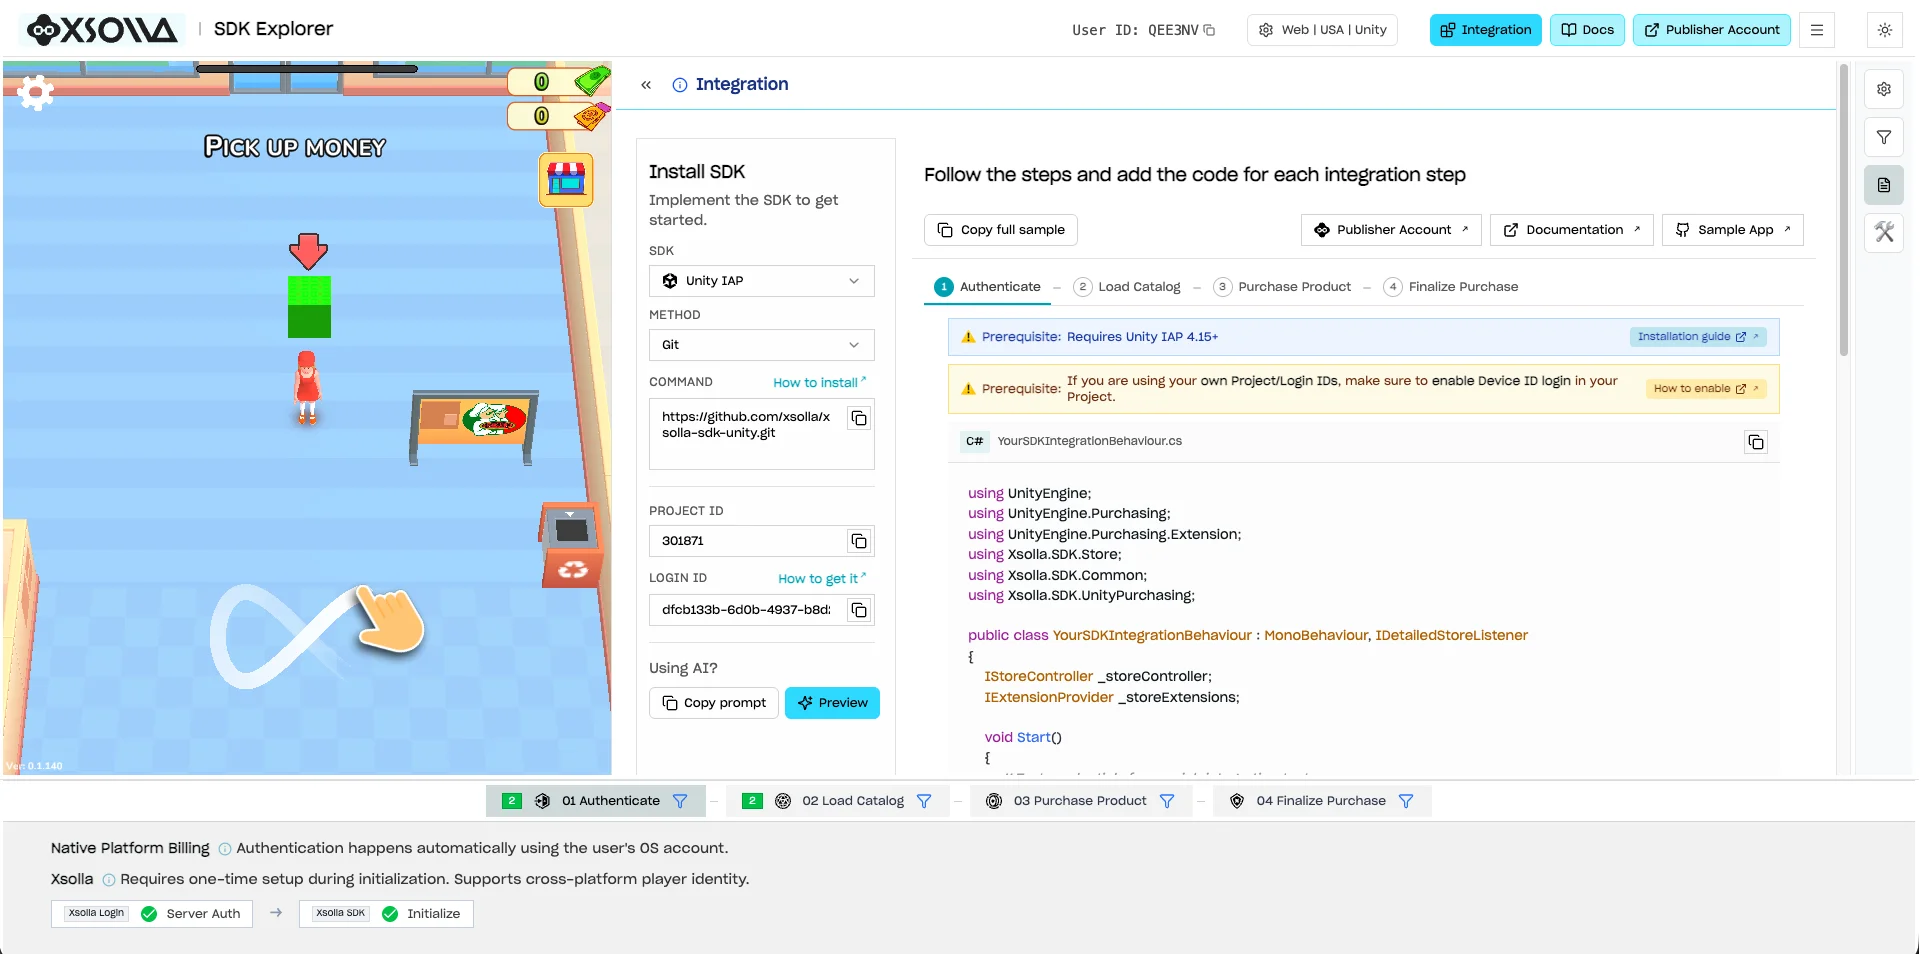
Integration Widget window inside the SDK Explorer
The Four Stages of Integration
The Xsolla SDK and SDK Explorer organize a complete payment integration into four stages, and each step in this guide maps directly to one of them:
- Authenticate -> establishing who the player is. For this project, we do this in the background using a Custom ID and a server-issued access token, so the player never sees a login screen.
- Load Catalog -> registering your products with Unity's IAP layer so they're available for purchase at runtime.
- Purchase Product -> initiating the transaction. The SDK hands off to Pay Station, which handles the payment UI and status, and returns success or failure.
- Finalize Purchase -> acting on the result, validating the purchase and granting the item to your player.
Step 0: Install the Xsolla SDK Package
Before any of the four steps, the Xsolla SDK package needs to be in your Unity project.
To check, open Window > Package Management > Package Manager and search for "Xsolla".
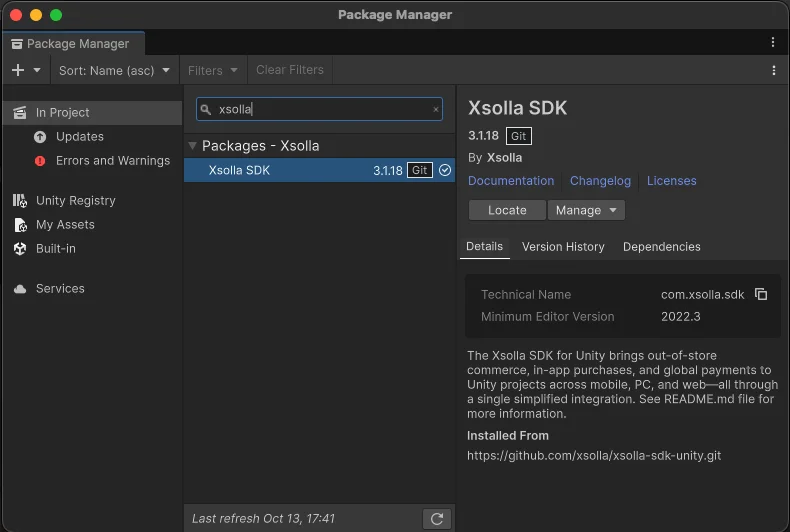
Unity Package Manager with Xsolla SDK listed as installed
If you don't have it installed, open the Integration Widget in the SDK Explorer and copy the Git URL command from the Install sidebar panel. Then in the Package Manager:
- Click the + icon.
- Select Install package from Git URL.
- Paste the URL* and click Install.
https://github.com/xsolla/xsolla-sdk-unity.git
*Correct at time of writing - always grab the latest URL from the Integration Widget or the GitHub repo installation section.
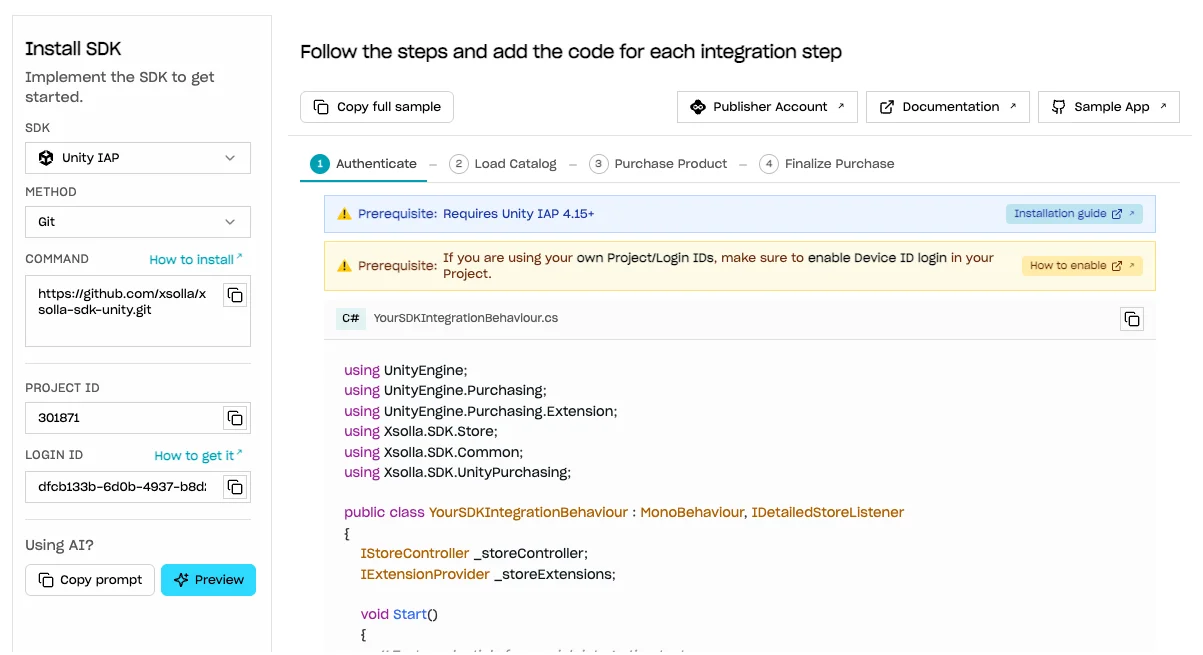
Integration Widget showing the Git install command
Step 1: Authenticate
Set Up the Script
Create an empty GameObject in your scene - we're calling ours XsollaPayStation. Add a new C# script to it as a component, then open the script and remove the template code.
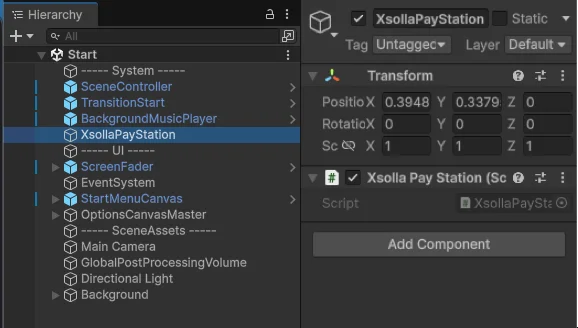
Hierarchy with the XsollaPayStation GameObject and its script component in the Inspector
Head to the SDK Explorer, open the Integration Widget and copy everything in the Authenticate tab into your class. This gives us the initial code structure.
A Note on Errors at This Stage
You'll see a compile error straight away. That's expected - we're building on Unity IAP, which expects certain functions to be present that are covered in subsequent steps. Hovering over the error tells you exactly which ones are missing: OnPurchaseFailed and ProcessPurchase.
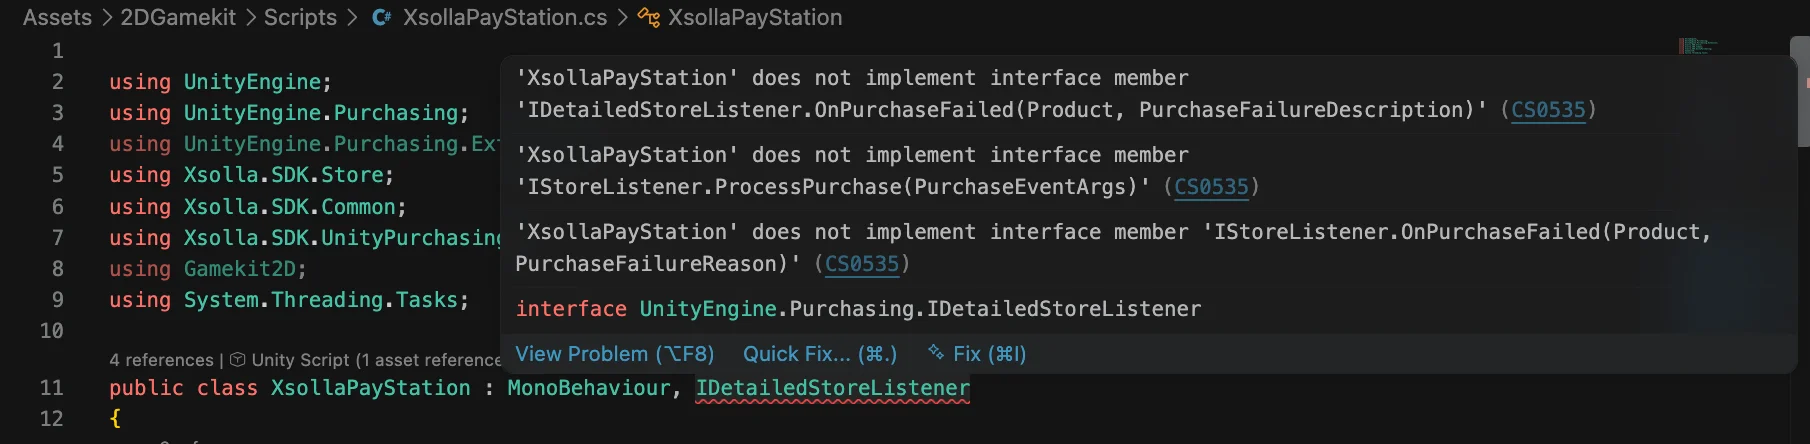
VS Code with hover tooltip listing the missing interface members on IDetailedStoreListener
There's a note at the bottom of the copied code that says these functions come from the Purchase Product and Finalize Purchase steps. So:
- In the Integration Widget, open Purchase Product and copy all three functions it includes into your class (
PurchaseSkuand bothOnPurchaseFailedvariants).- The
PurchaseSkuisn't a missing function as far as Unity IAP is concerned, but it is a function we need to make the payment flow work, so you might as well include it now.
- The
- Open Finalize Purchase and copy in the
ProcessPurchasefunction.
With that, the errors clear and you have the basic structure of the complete payment flow. We'll configure these properly in Steps 3 and 4.
Tip: Now's a good time to rename the class to match your script component (in our case
XsollaPayStation) - the pasted widget code usesYourSDKIntegrationBehaviour.
Switch to Server-Side Authentication
The Integration Widget is set up for the simplest path, which in most cases is client-side authentication via Device ID. That isn't available for web, so we need the web equivalent: authentication via Custom ID, which requires a server. This method is the lowest-friction experience for the player, and the simplest path for web integrations, as it involves no login or sign-up screens and happens completely in the background.
To see what's involved in setting it up, head back to the SDK Explorer, make sure you're on the Authenticate step, and open the Configure tab where you can set it to Server-Side Auth.
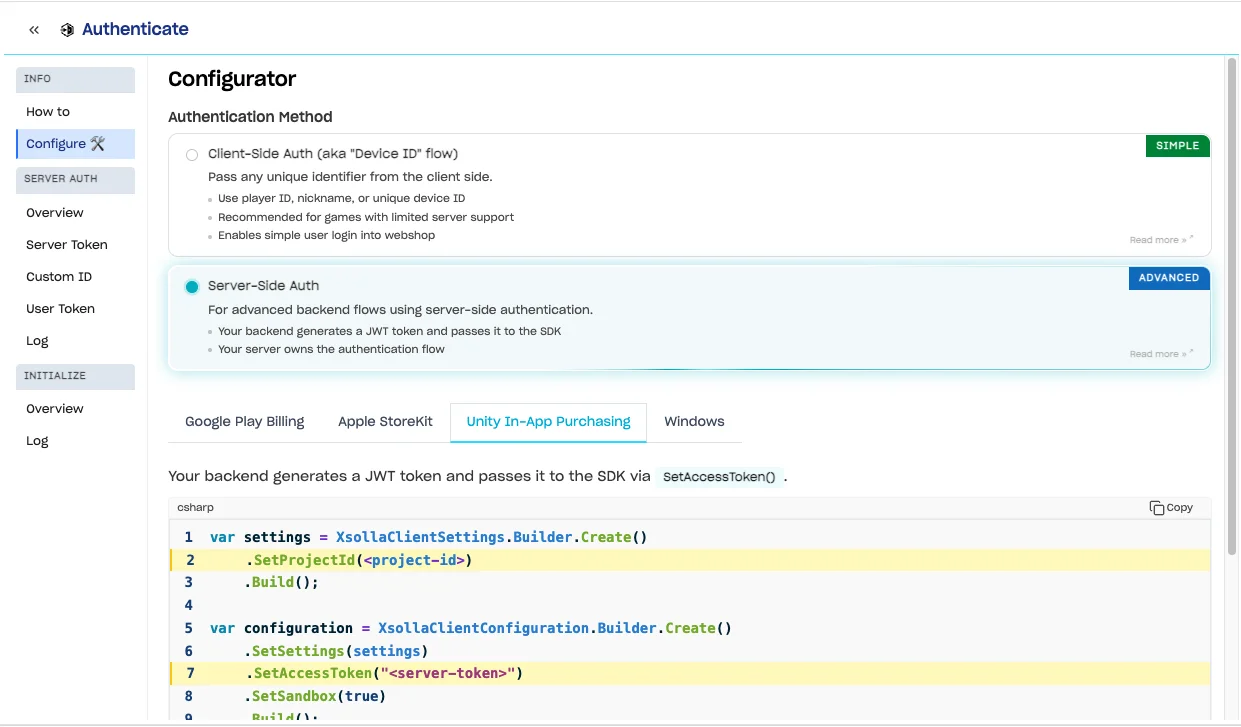
SDK Explorer, Authenticate Step > Configure with Server-Side Auth selected
Scroll down to the code. There are two things worth calling out:
var settings = XsollaClientSettings.Builder.Create()
    .SetProjectId(<project-id>)
    .Build();
var configuration = XsollaClientConfiguration.Builder.Create()
    .SetSettings(settings)
    .SetAccessToken("<server-token>")
    .SetSandbox(true)
    .Build();
var module = XsollaPurchasingModule.Builder.Create()
    .SetConfiguration(configuration)
    .Build();
var builder = ConfigurationBuilder.Instance(module);
UnityPurchasing.Initialize(this, builder);
SetSandbox(true)- this lets your payment flow run with test transactions and test card details, so you can test quickly without needing to use real money. Remember to remove this before going live or in any production builds.SetAccessToken- this is where your server hands over the access token, which you pass into your configuration to authenticate the user.
Defer the Access Token
Follow the SetAccessToken link in the SDK Explorer through to the Configuration docs page, and go to the Assign Xsolla access token to the configuration section.
The Default approach passes the token straight in - but for this to work, a valid token has to be known before the SDK initializes. That works if you have a login platform that runs before the player enters the game, but for authentication via Custom ID we don't, so we need to pass the token in after initialization. For this we need to switch to the Delayed (deferred) tab.
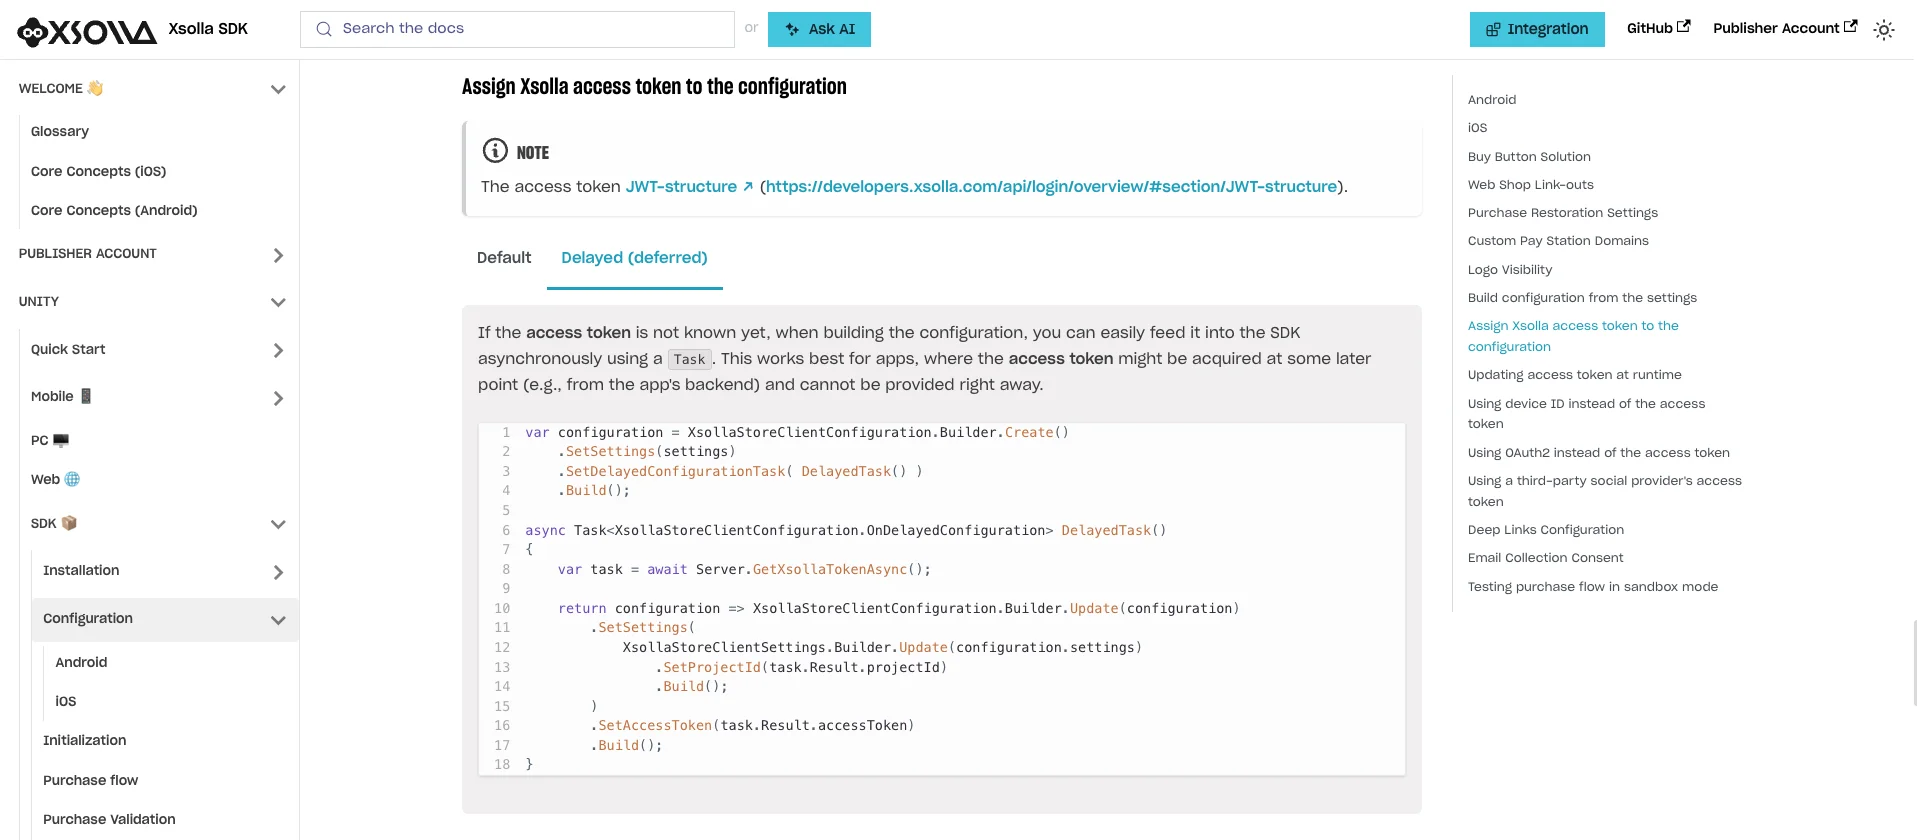
Docs - "Assign Xsolla access token to the configuration" with the Delayed (deferred) tab selected
The idea is that you build the configuration first, then add the access token asynchronously once it's available. To do this, the original configuration sets a delayed configuration task that calls a DelayedTask function, and that function then waits for the server to return the token before updating the configuration:
var configuration = XsollaStoreClientConfiguration.Builder.Create()
    .SetSettings(settings)
    .SetDelayedConfigurationTask( DelayedTask() )
    .Build();
async Task<XsollaStoreClientConfiguration.OnDelayedConfiguration> DelayedTask()
{
    var result = await Server.GetXsollaTokenAsync();
    return configuration => XsollaStoreClientConfiguration.Builder.Update(configuration)
        .SetSettings(
            XsollaStoreClientSettings.Builder.Update(configuration.settings)
                .SetProjectId(result.projectId)
                .Build()
        )
        .SetAccessToken(result.accessToken)
        .Build();
}
With the delayed configuration task set up, we need two more things for this process to work: a server, and something on the client that asks the server for a token.
The Server (High Level)
If you haven't got a server already, you'll need to set one up. Once you have your basic server running, head back to the SDK Explorer. Making sure you are still in the Authenticate step, you'll see the Overview, Server Token, Custom ID and User Token tabs. Between them, these cover what your server needs to do, and therefore the code you need to add to run the Xsolla payment flow.
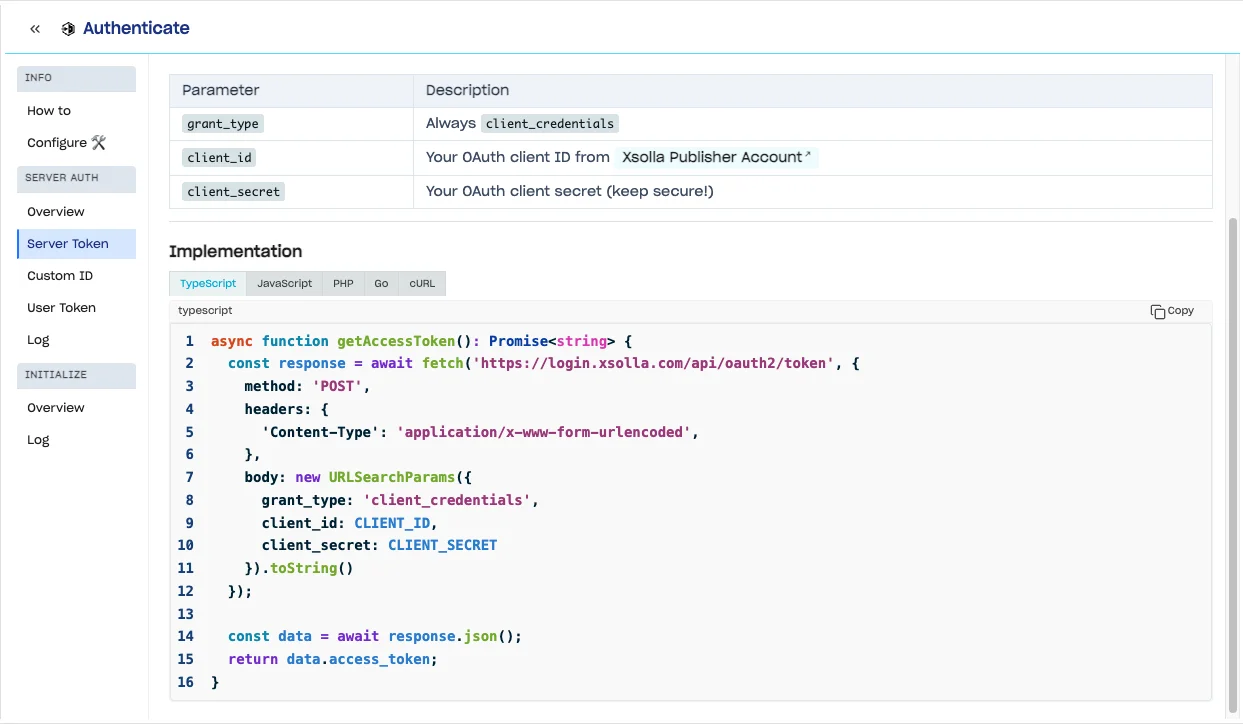
SDK Explorer Authenticate > Server Token tab with the implementation code
In short, some of the key things your server needs to do:
- Request an Xsolla access token using your OAuth client credentials.
- Use that authorization to create the user access token for the player's Custom ID.
- Return the token to the game client.
Xsolla's response will include the access token plus a refresh token and expiry times. In our demo we only forward the access token on, but a production server should store and use all of these so the session persists across timeouts.
Finally, to connect to Xsolla, the server needs your client credentials - which means setting up your project in Publisher Account.
Set Up Your Project in Publisher Account
Create the project. In Publisher Account, create a new project and fill in the basic information. For our demo:
- Monetization options: In-game transactions
- Development stage: In production
- Genre: Action
- Game engine: Unity
- Then click Create
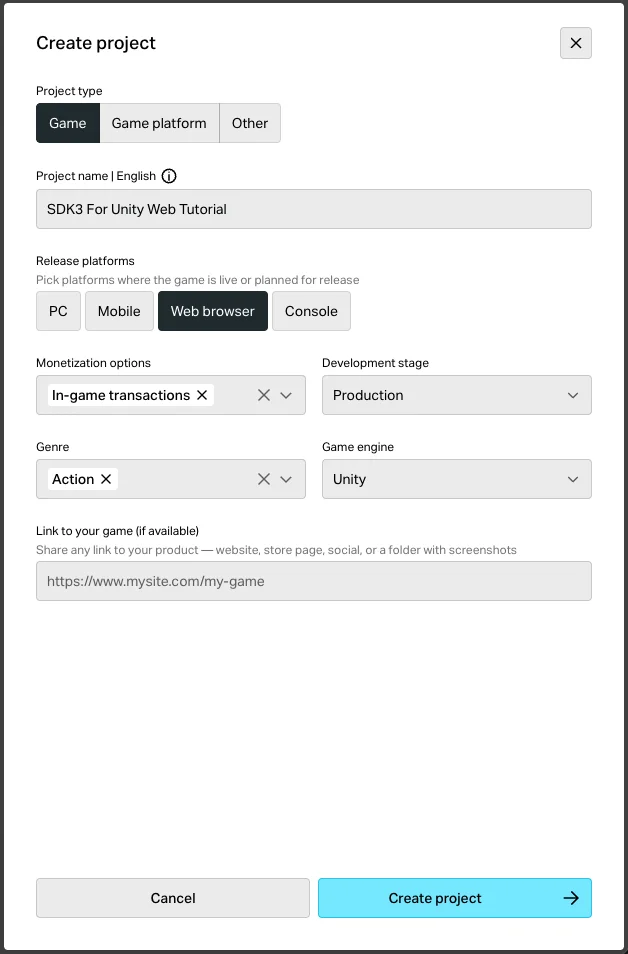
Publisher Account - new project details form
Then, create the Login project. Go to the Player section and create a Login project - this is the system that handles verified player identities.
- A Standalone project is fine for our demo. Rename it to reflect what it's doing (we used "AuthViaCustomID").
- Choose Classic Login - authorization by Custom ID overrides this base configuration so we won't go into any further detail about what Classic Login normally does.
- Go to Security, and create a new OAuth 2.0 client.
- Make sure server-to-server connection is enabled.
- Create and then copy the Client ID and Secret key into the relevant sections of the server code you took from the SDK Explorer.
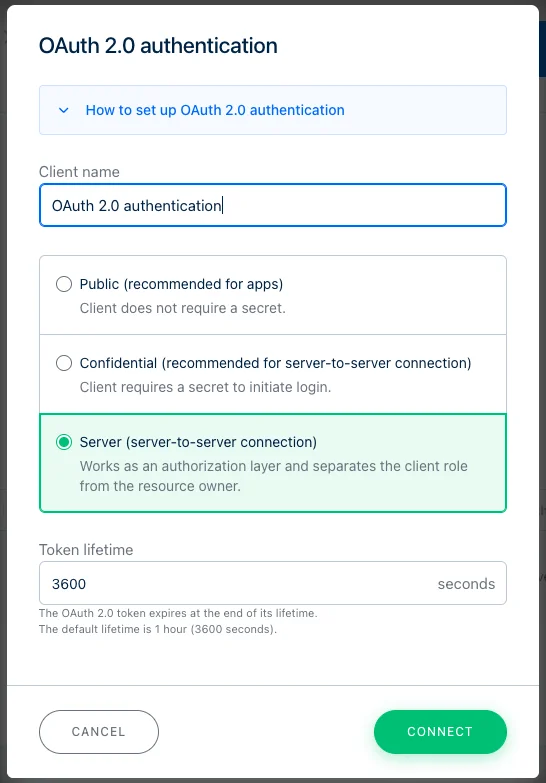
Login project Security > OAuth 2.0 client section
Warning: The client secret belongs on your server only - never put it in your Unity client code.
Back in the Login dashboard you'll now see your Login ID and Project ID. These need adding to both the server and the XsollaPayStation class (SetProjectId / SetLoginId*).
*Technically your Login ID is only needed in your server; however, there's no harm in adding it in your client as well.
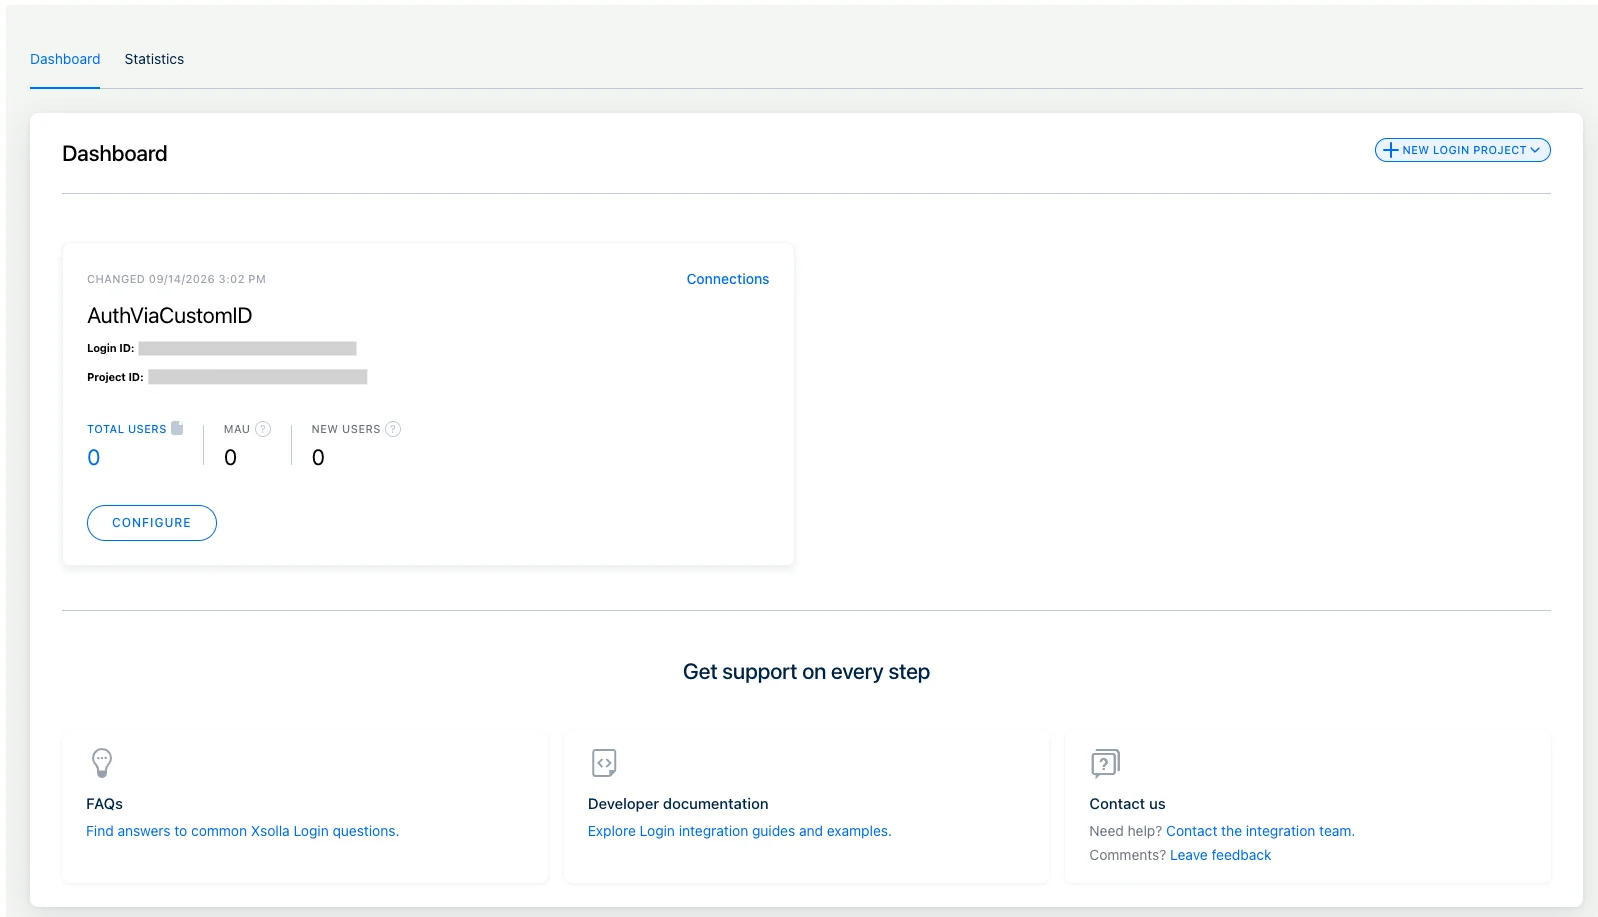
Login dashboard showing the Login ID and Project ID
Now everything references your own game project rather than the Xsolla template one.
Request the Token from the Client
The last task in this process is the client-side of the contract - something that tells the server a new access token is needed for this player. In the SDK Explorer code this is handled by the Server.GetXsollaTokenAsync() call in the DelayedTask function. It does two key things:
- Generates or retrieves the player ID - in our project, we do this via a
GetOrCreatePlayerIdfunction that stores a GUID inPlayerPrefs. - Sends it to the server and waits for the token - which it then passes back to
XsollaPayStationto feed into the configuration and authenticate the user.
Here's the class from our demo for reference - please note yours will likely differ depending on your setup. The request and response shapes (gameId in, token out) and _localServerUrl match our demo server - swap them for whatever your own server expects:
using System;
using System.Text;
using System.Threading.Tasks;
using UnityEngine;
using UnityEngine.Networking;
public class <your-classname>
{
    // Your server's token endpoint
    private readonly string _localServerUrl = "<your-server-token-endpoint>";
    [Serializable]
    private class LoginRequest { public string gameId; }
    [Serializable]
    private class LoginResponse { public string token; }
    public async Task<string> GetXsollaTokenAsync()
    {
        string gameId = GetOrCreatePlayerId();
        var requestBody = new LoginRequest { gameId = gameId };
        byte[] bodyRaw = Encoding.UTF8.GetBytes(JsonUtility.ToJson(requestBody));
        using (var request = new UnityWebRequest(_localServerUrl, "POST"))
        {
            request.uploadHandler = new UploadHandlerRaw(bodyRaw);
            request.downloadHandler = new DownloadHandlerBuffer();
            request.SetRequestHeader("Content-Type", "application/json");
            await request.SendWebRequest();
            if (request.result != UnityWebRequest.Result.Success)
                throw new Exception($"Custom ID login failed: {request.error}\n{request.downloadHandler.text}");
            var response = JsonUtility.FromJson<LoginResponse>(request.downloadHandler.text);
            if (string.IsNullOrEmpty(response.token))
                throw new Exception("Login response did not contain a token.");
            return response.token;
        }
    }
    public string GetOrCreatePlayerId()
    {
        const string key = "xsolla_game_id";
        if (!PlayerPrefs.HasKey(key))
            PlayerPrefs.SetString(key, Guid.NewGuid().ToString());
        return PlayerPrefs.GetString(key);
    }
}
Then point your DelayedTask at this class. The documentation shows both the access token and Project ID being returned by the server, which is why its snippet reads result.accessToken and result.projectId. In our example our server only returns the access token, so this class gives it back as a plain string - which can then be passed straight into SetAccessToken. Your Project ID is already set via SetProjectId in your initial configuration, so the SetSettings block found in the documentation isn't needed.
GetXsollaTokenAsync is an instance method, so create an instance of the class in XsollaPayStation and call it from there:
private readonly <your-classname> _authenticator = new <your-classname>();
async Task<XsollaStoreClientConfiguration.OnDelayedConfiguration> DelayedTask()
{
    string token = await _authenticator.GetXsollaTokenAsync();
    return configuration => XsollaStoreClientConfiguration.Builder.Update(configuration)
        .SetAccessToken(token)
        .Build();
}
This is just one way to do it - the details depend on your server. The two key points are what matter.
Verify Authentication is Working
The loop's now complete and we're feeding the access token into the SDK asynchronously. A build at this point won't do much, but to check it's working, you can make a WebGL build, open it in the browser, and filter the developer console by "Xsolla" to look for logs that say something like:
XsollaToken created (access only); IsBasedOnDeviceId: False- the token from your server was received (Falseconfirms it's not using Device ID as this is not applicable to web builds. This is separate from Custom ID).Authenticate By Saved Token onSuccess- authentication completed.[XsollaPurchasingStore]: Initialize finished- the SDK is ready.
These are debug-level logs, so make sure your configuration keeps .SetLogLevel(XsollaLogLevel.Debug) from the Integration Widget code.
You'll also see an error highlighting no products are currently available. That's expected as we've switched from the Integration Widget's test credentials and project to our own, but haven't created any items in it yet. We will fix that in the next step so you can ignore any error like that for now.
Step 2: Load Catalog
Configure the Step
In the SDK Explorer, go to the Load Catalog step, open Configure and select Manual entry - for our demo we're not syncing products from an existing platform store or making programmatic changes to the catalog, so manual entry is the quickest way to get it up and running.
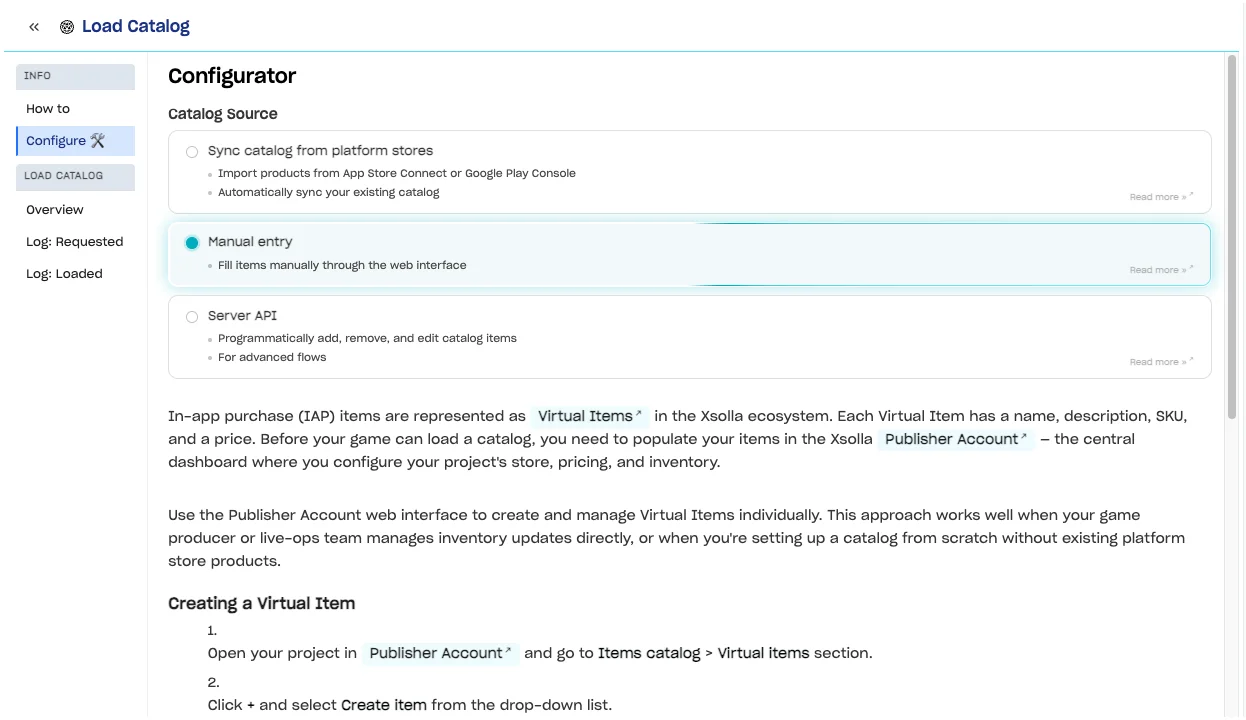
SDK Explorer Load Catalog > Configurator with Manual entry selected
Back on the How to tab, the relevant code is effectively one line - AddProduct:
var builder = ConfigurationBuilder.Instance(module);
builder.AddProduct("product_sku1", ProductType.Consumable);
builder.AddProduct("product_sku2", ProductType.Consumable);
builder.AddProduct("product_sku3", ProductType.Consumable);
// ...
UnityPurchasing.Initialize(this, builder);
This tells Unity IAP which products to include and make accessible in your game. The Integration Widget code you copied earlier already has this in place, however it adds several template products (e.g. ticket.10). Add or remove the extra lines depending on how many products you need.
The Integration Widget's Load Catalog step also adds a loop to OnInitialized that stores product info for use programmatically, like populating a storefront. We don't need that in our example and so will ignore it.
Now we need to create our own item in our catalog to call.
Create Your Item in Publisher Account
In your Publisher Account project, go to Items catalog > All items and choose Create manually.
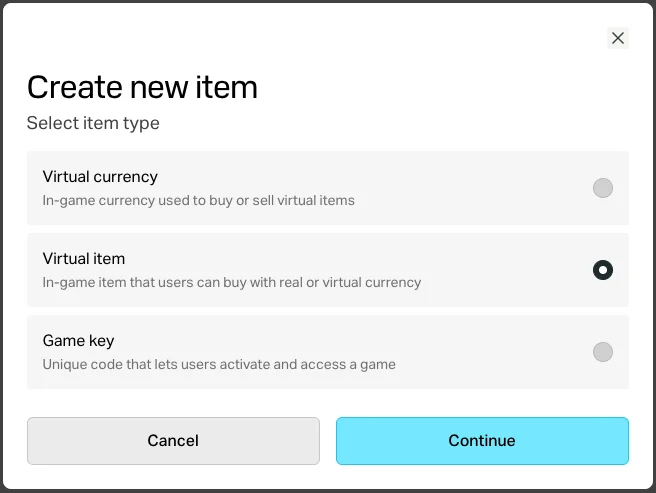
Create new item with Virtual item selected
Our health pack is a Virtual item, so select that and click Continue. Then complete the prompts:
- Upload an image.
- Add the name, SKU, description etc.
- The SKU is the product ID you will use to call it in game.
- Make it a paid item, priced in real currency, and set the prices you want.
Leave everything else as default and hit create.
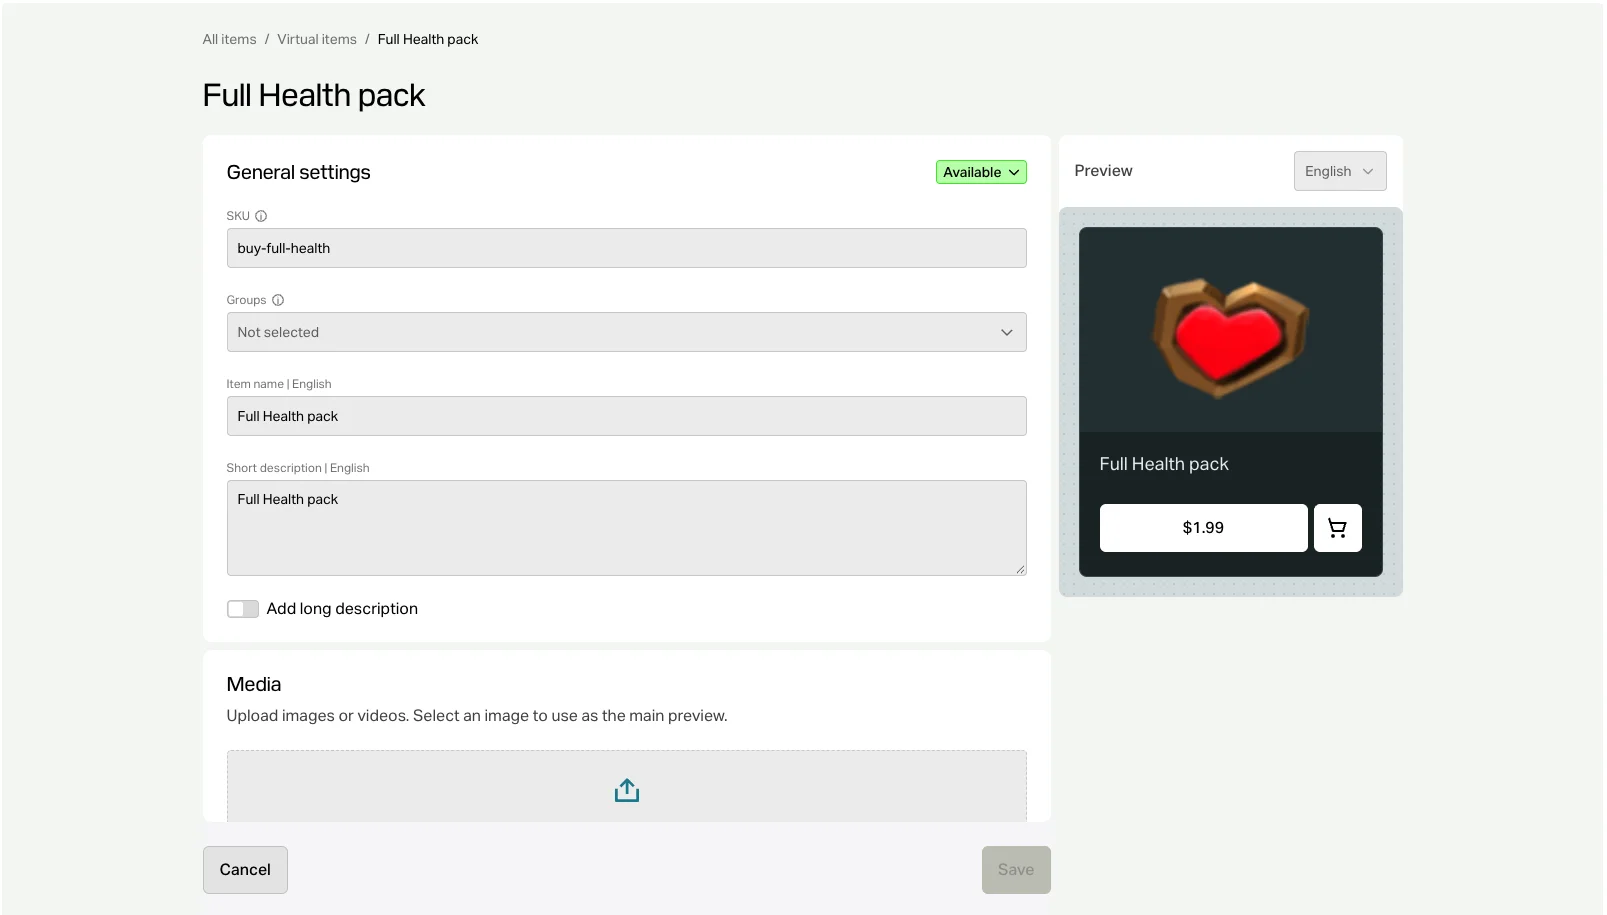
New virtual item form with the SKU, name and image filled in
Important: New items are Unavailable by default - they won't show up in your game even if you query the correct SKU. Set the item to Available when you create it. If you missed that as part of the creation flow, or need to update it after the fact, don't worry - you can change it from the item catalog after it's created. This is also the first thing to check if you get a "no products" error later.
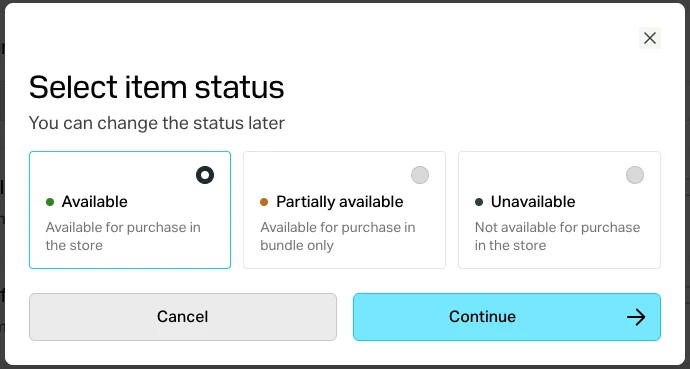
Select item status dialog with Available selected
Connect the Item to Your Game
Take your new SKU(s) and drop them into your AddProduct line(s):
var configurationBuilder = ConfigurationBuilder.Instance(module)
    .AddProduct("buy-full-health", ProductType.Consumable);
Verify the Catalog is Loading
If you were to build the project again now, the "no products" error from Step 1 should be gone and instead you'll see something similar to:
ProductsRequest: products=["product-sku"]- the product being requested.RetrieveProducts finished successfully. Restored: 0, Retrieved: n- followed by the product data you've just added (SKU, title, price).

Console showing RetrieveProducts finished successfully with the buy-full-health product data
Step 3: Purchase Product
Configure the Step
In the SDK Explorer, open the Purchase Product step. Here the configuration controls how Pay Station is presented to the player. We're using Native in-app UI, which opens Pay Station inside the game - that's the default and suggested path for web projects because it's a much nicer experience for the player.
If you'd rather use an external browser or a Buy Button through to a Web Shop, select those to see what you'd change in your code.
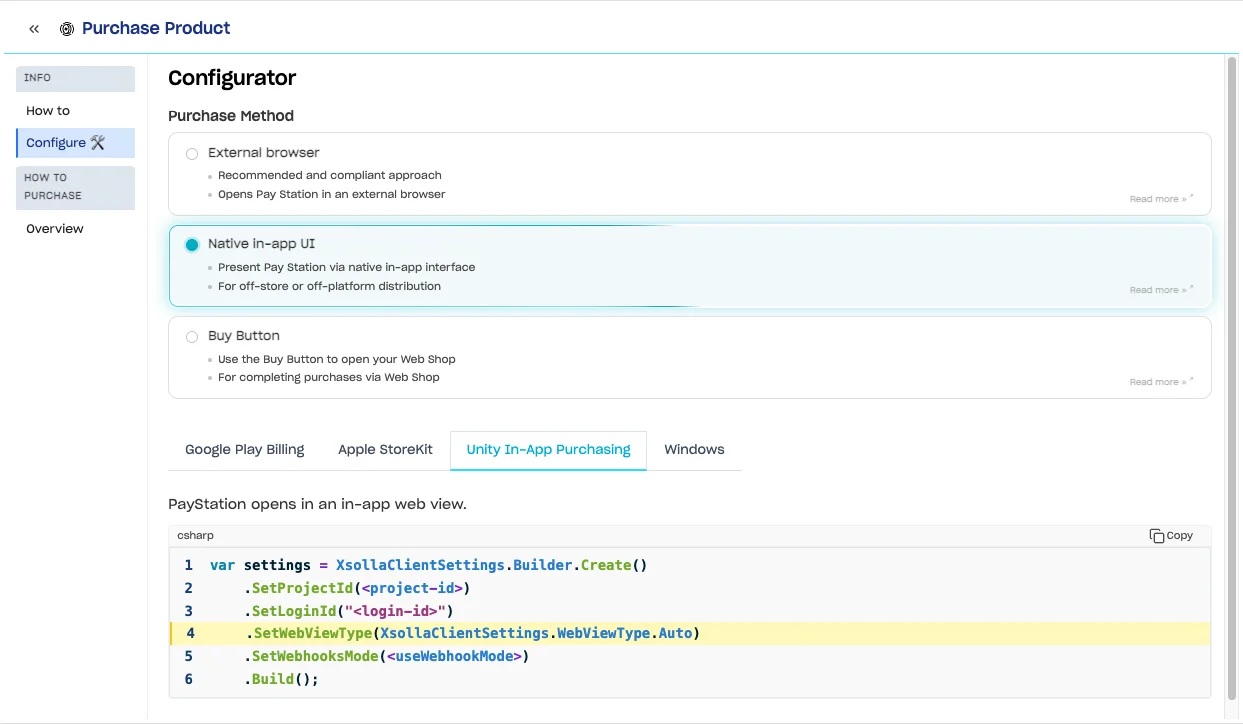
SDK Explorer Purchase Product > Configurator with Native in-app UI selected
The How to tab breaks down the code needed into three functions:
- Initiate the purchase - this triggers the payment flow and is what your game trigger will need to call.
- In our demo this will be triggered on the buy button listener.
ProcessPurchase- the logic to run once the purchase completes. This is mostly handled in Step 4.- In our demo this will trigger the player respawn and max health reset.
OnPurchaseFailed- the failure pathway.
You already copied these functions from the Integration Widget in Step 1. You'll notice there are two OnPurchaseFailed functions - that's because Unity IAP has two callback signatures, one with a reason and one with a description.
Update the Purchase Code
Back in your code, swap your new item SKU into the PurchaseSku function.
public void PurchaseSku()
{
    _storeController.InitiatePurchase("<your-product-sku>");
}
In the OnPurchaseFailed functions, add any logic you need to handle the failure pathway.
public void OnPurchaseFailed(Product product, PurchaseFailureReason failureReason)
{
    if (failureReason == PurchaseFailureReason.UserCancelled)
    {
        Debug.Log("Purchase Process has been cancelled by the user");
        // Handle user cancellation here
        return;
    }
    Debug.LogError($"Purchase failed: {product.definition.id}, reason: {failureReason}");
}
public void OnPurchaseFailed(Product product, PurchaseFailureDescription failureDescription)
{
    if (failureDescription.reason == PurchaseFailureReason.UserCancelled)
    {
        Debug.Log("Purchase Process has been cancelled by the user");
        // Handle user cancellation here
        return;
    }
    Debug.LogError($"Purchase failed: {product.definition.id}, reason: {failureDescription.reason}, message: {failureDescription.message}");
}
Add a Dynamic Price
In our demo, we pull the price on the button straight from our item in our catalog. To do that we added a GetProductPrice function to XsollaPayStation:
public string GetProductPrice(string productId)
{
    if (_storeController == null) return "...";
    var product = _storeController.products.WithID(productId);
    return product != null ? product.metadata.localizedPriceString : "...";
}
Our popup UI class uses this to set the button price, and calls PurchaseSku from the button's click listener. The rest of that logic depends heavily on your project, so we won't cover it here.
By this stage the player is authenticated via server-side Custom ID, a custom catalog is loading from our Publisher Account project, and the player can initiate a purchase. This will automatically trigger the Pay Station to open and a payment can complete successfully* - which leaves the last step.
(*It's worth noting if you are building here, that when in sandbox mode the Pay Station UI includes a link to test cards that can be used to verify the flow - please see our "Build and Test" section below for more detail.)
Step 4: Finalize Purchase
Configure the Step
In the SDK Explorer, open the Finalize Purchase step and go to Configure. For the simplest path, select Client-side validation, which means we will be handling the validation without the use of a server or event system.
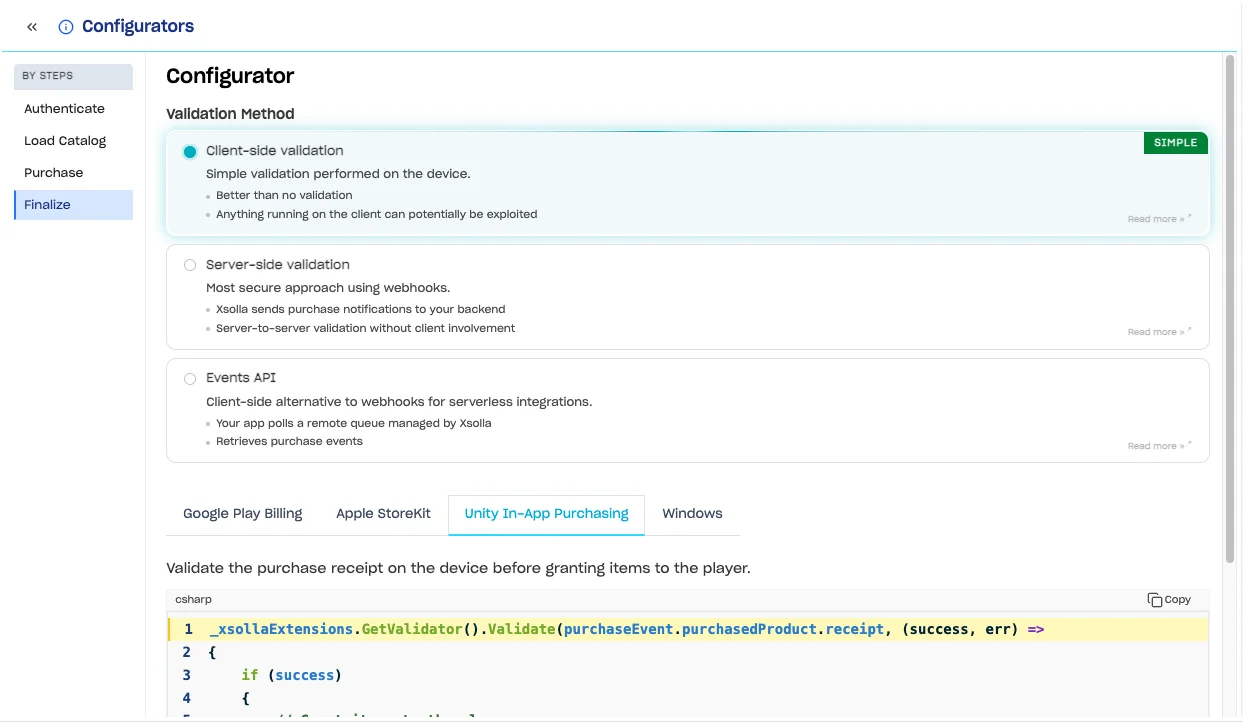
SDK Explorer Finalize Purchase > Configurator with Client-side validation selected
Since we copied the code from the Integration Widget earlier, the only relevant code is ProcessPurchase. This function calls Validate, which uses the Pay Station receipt to verify the purchase. If it's successful, it's then down to your game logic to grant the item.
The Integration Widget code uses Unity IAP's standard deferred confirmation: ProcessPurchase returns PurchaseProcessingResult.Pending straight away, and ConfirmPendingPurchase is called only once validation succeeds:
public PurchaseProcessingResult ProcessPurchase(PurchaseEventArgs args)
{
    var product = args.purchasedProduct;
    var validator = _storeExtensions.GetExtension<IXsollaPurchasingStoreExtension>().GetValidator();
    // Validate the receipt before granting items
    validator.Validate(product.receipt, (success, error) =>
    {
        if (error == null && success)
        {
            // Purchase is valid - grant the item to the player, then confirm (unconfirmed
            // transactions persist and are redelivered on each app launch).
            _storeController.ConfirmPendingPurchase(product);
            Debug.Log($"Purchase Validation successful");
        }
        else
        {
            // Purchase validation failed - do not award item
            Debug.LogWarning($"Validation failed for {product.definition.id}");
        }
    });
    // Returned immediately while the async validation callback is pending
    return PurchaseProcessingResult.Pending;
}
Why Keep Pending
Validation runs asynchronously, so ProcessPurchase returns before the Validate callback fires. Returning Pending tells Unity IAP not to finish the transaction yet. If validation fails, or the player closes the game before it completes, the purchase stays unconfirmed and is delivered again on the next launch instead of being lost.
Leave this code as it is - don't switch to PurchaseProcessingResult.Complete. That would consume the purchase before your game has validated it and granted the item.
Note - server-side validation for production: Client-side validation is a good starting point, but for high-value economies or competitive games, consider moving to server-side validation or client-side via the Events API.
Add Your Game Logic
All that's left is to make the game react when the purchase completes. This is specific to your game - in our demo, when validation succeeds we close the popup and respawn the player with full health from the latest checkpoint. The key point is that it lives inside the success block of the ProcessPurchase function, before the ConfirmPendingPurchase call.
Build and Test
Return to Unity and create a clean build, making sure all your changes are saved. Then:
- Start your server.
- Open your browser and the developer console, and filter by "Xsolla".
- Go to your localhost port.
Straight away you should see the console logs appear: initialize, the token being acquired, authentication, and initialization completing. Further down you'll see the product request going out and the products being retrieved.
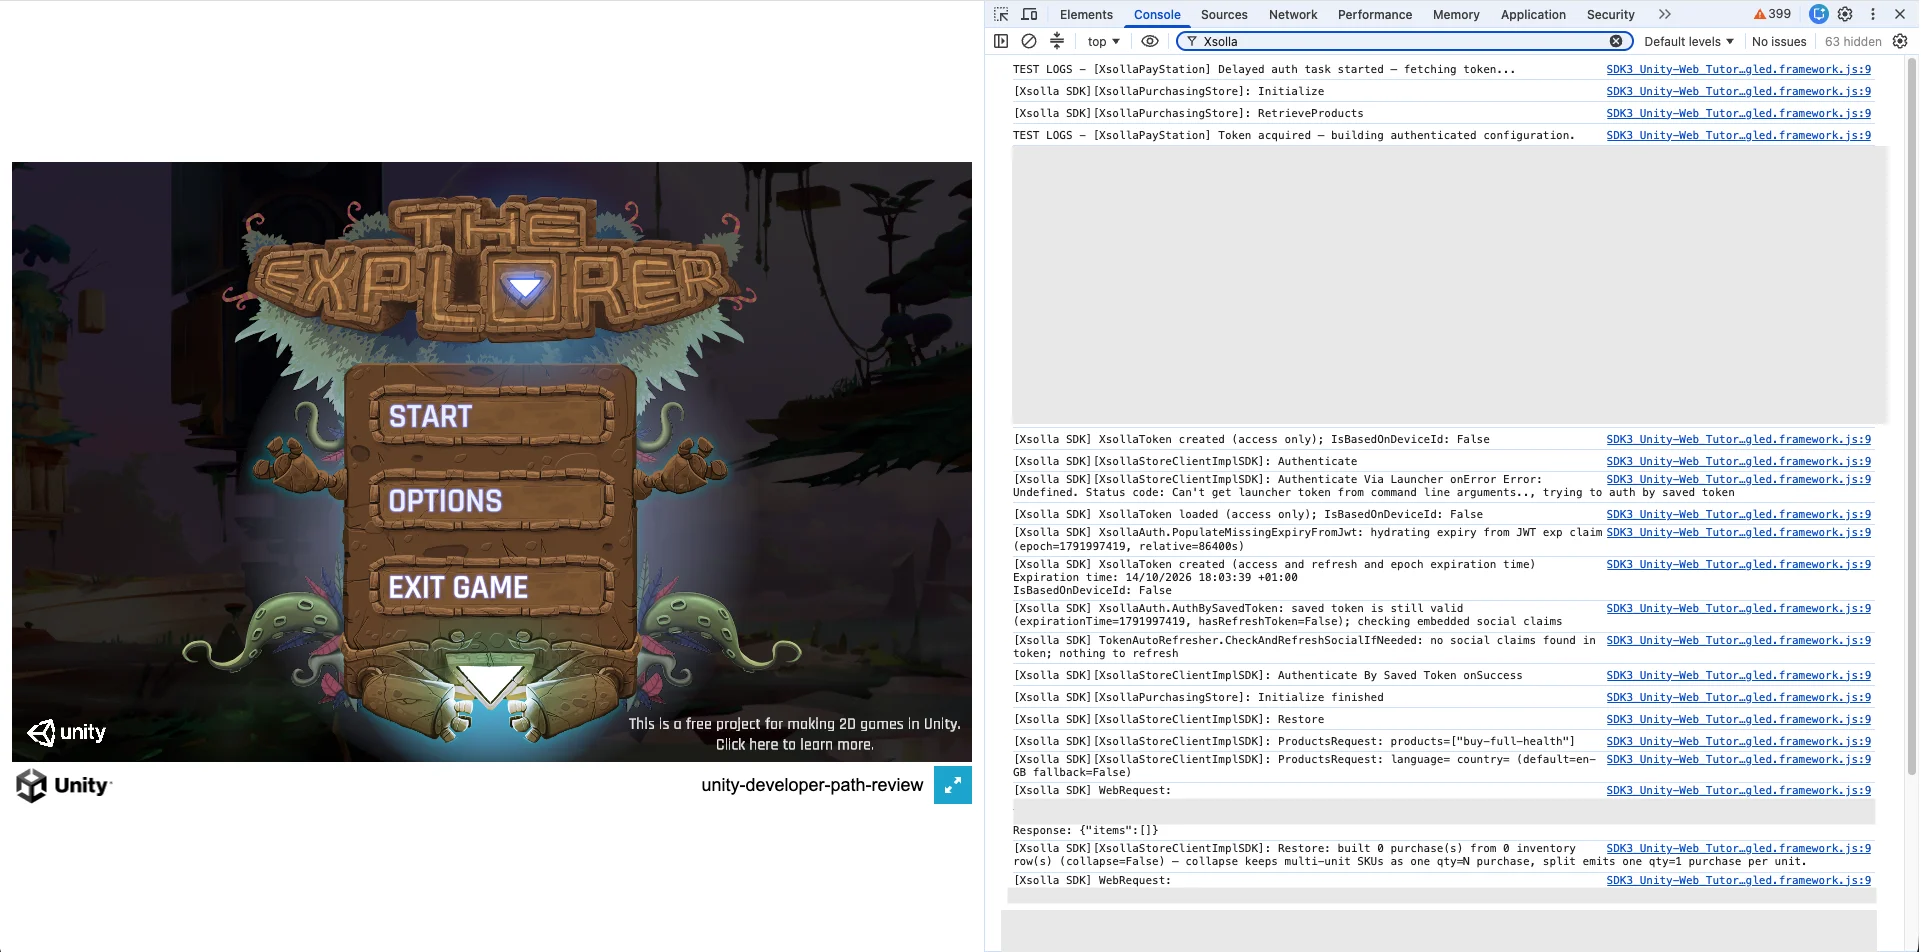
Browser with the build running and the dev console filtered by "Xsolla" showing init/auth/product logs
Play the game through to your trigger and start the purchase flow. Verify the logs show the purchase initiating, then Pay Station opening in-game (or however you have it configured). You should see your catalog item's info - image and price etc. - alongside the payment details form.
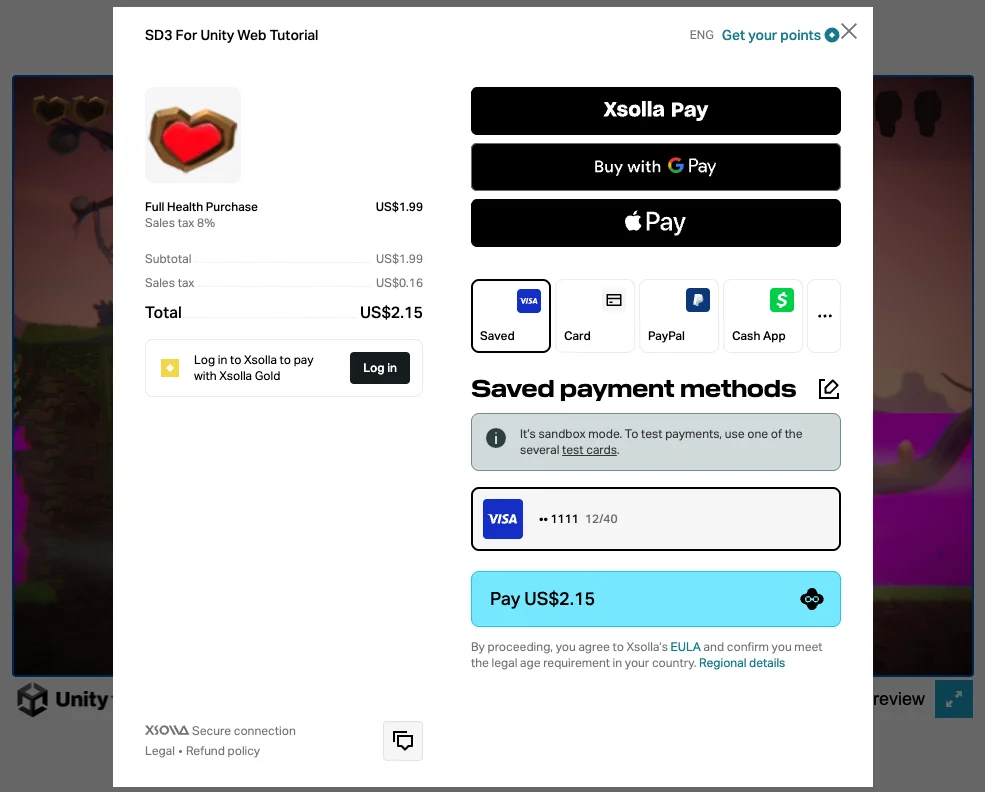
Pay Station open in-game showing the item image, price and payment form
Because we're in sandbox mode, there's a test card link right in the Pay Station window. It takes you to a set of test card details you can use to test the payment flow quickly without having to worry about using real card details and money.
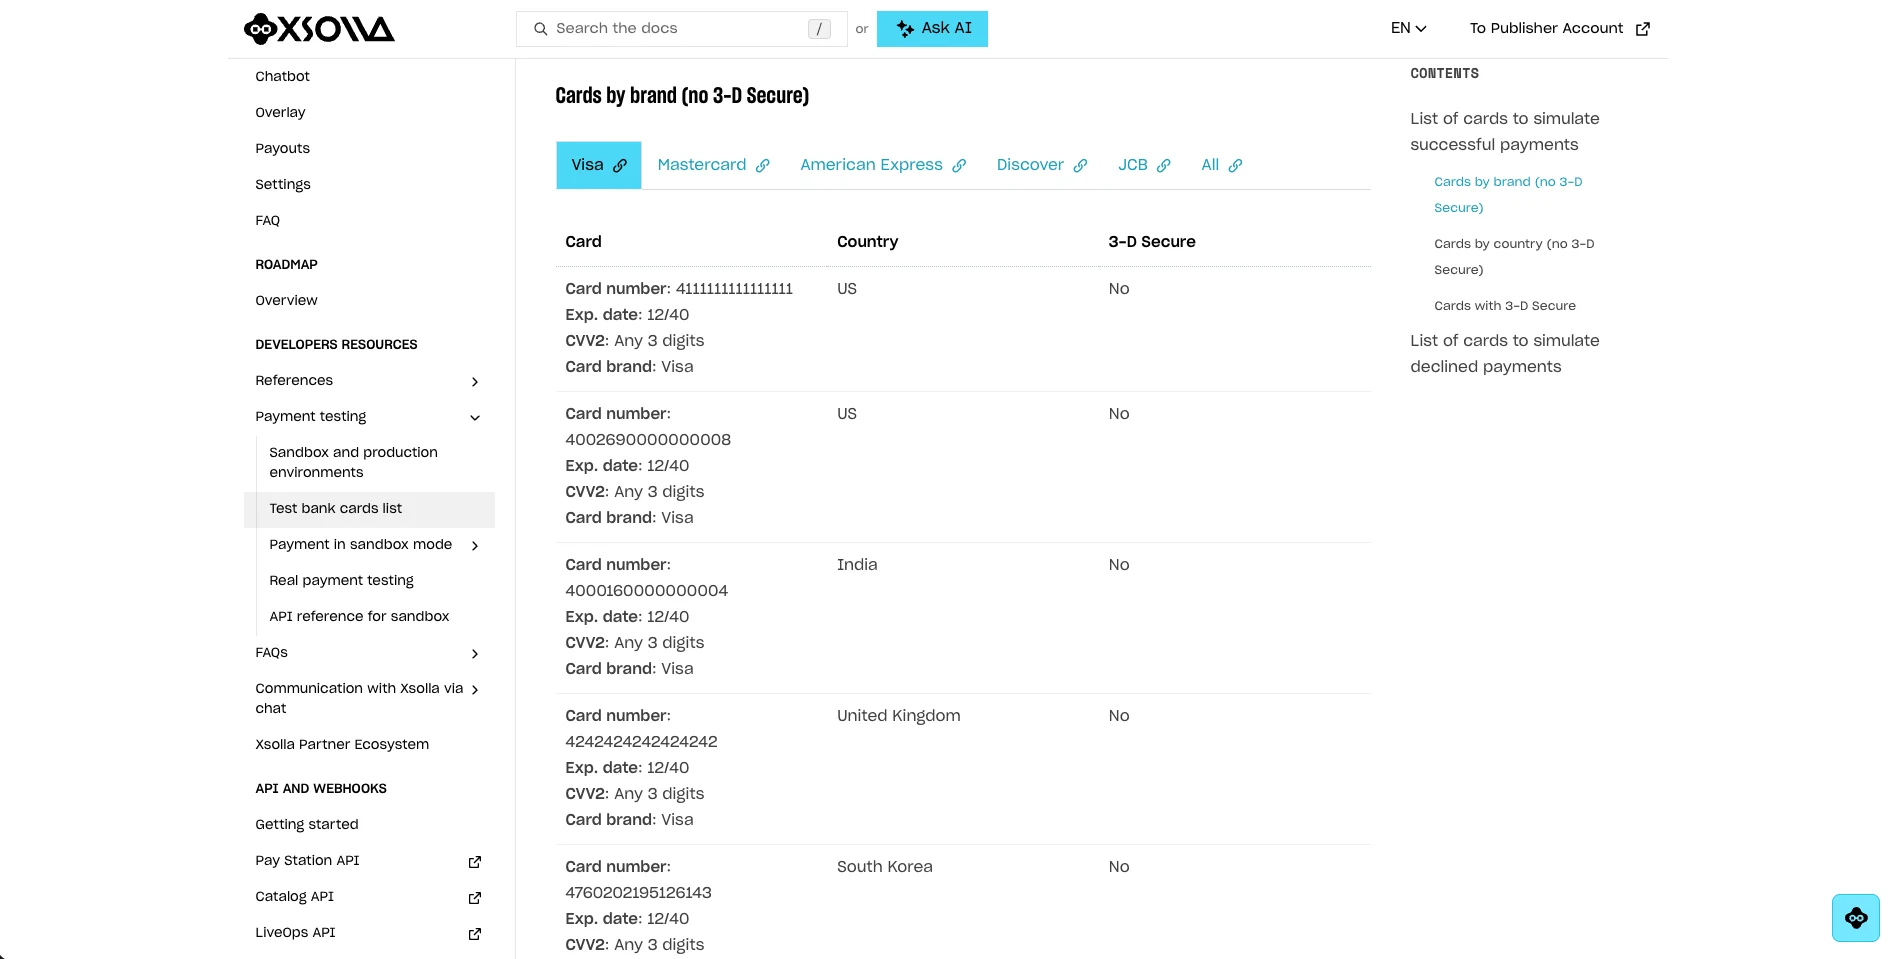
Xsolla docs page with test card details
Return to your Pay Station window and enter the test card credentials, complete the purchase, and verify your game reacts as expected, signifying visually that the purchase flow completes. In our demo this shows the player respawning from the latest checkpoint with full health. Back in the logs, you can verify the logs confirming the finalization sequence:
[XsollaPurchasingStore]: Purchase finished[XsollaPurchasingStoreValidator]: ValidateFinishTransaction: consuming sku=buy-full-healthConsume finished: sku=buy-full-health quantity=1 consumed.FinishTransaction finished: sku=buy-full-health consumed 1 unit(s)
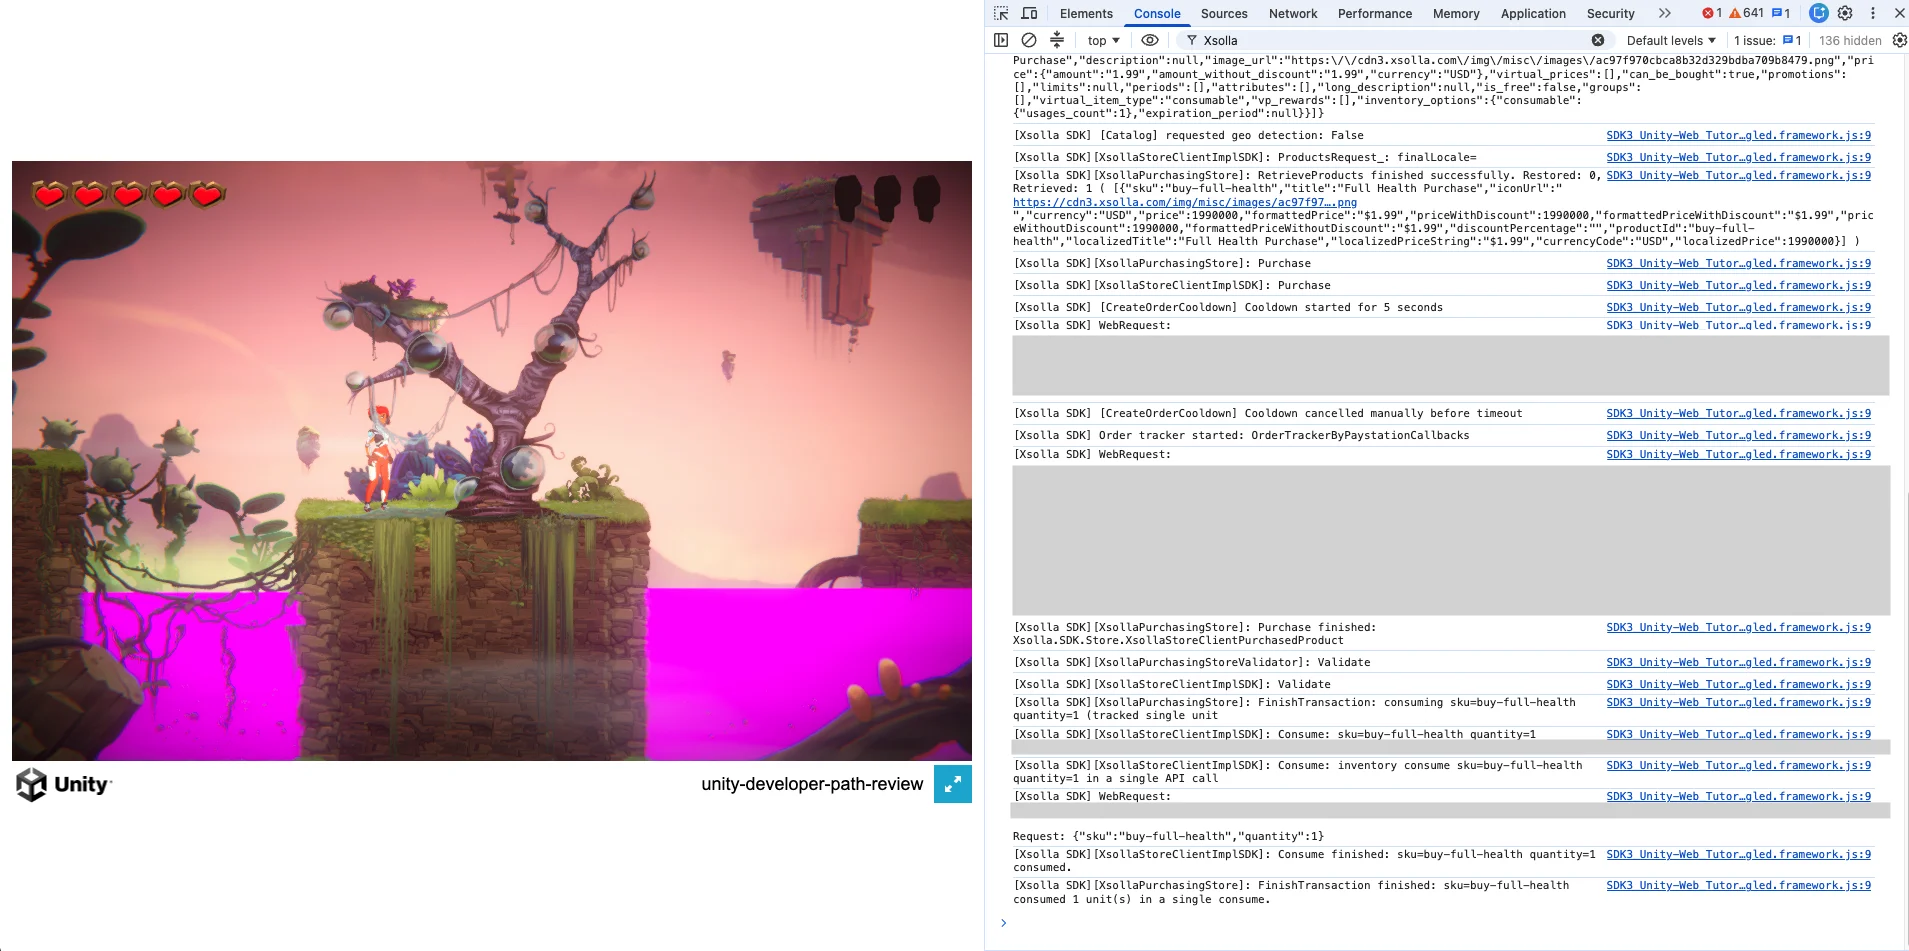
Player respawned with full health, console showing the transaction finished and product consumed logs
Integration Complete
That's a complete Xsolla payment integration in a Unity Web project - server-side Custom ID authentication, a custom catalog, Pay Station opening natively in-app, and client-side purchase validation.
The final class structure you should have:
- Initialization configured with your Project ID and Login ID, plus a delayed configuration task that sets the access token from your server.
- Catalog registration with your product SKU(s) declared to Unity IAP.
PurchaseSkuwired up to your game UI trigger.ProcessPurchasereturningPending, triggering your post-purchase game logic and callingConfirmPendingPurchaseonce validation succeeds.- Both
OnPurchaseFailedvariants in place.