Native iOS — Xsolla SDK 3 Integration Guide
Integrating Xsolla SDK 3 into Your Native iOS Game
A step-by-step guide for Swift developers: authentication, catalog loading, purchasing, and validation.
Introduction
Xsolla SDK 3 gives native iOS games a direct path to Xsolla's payment infrastructure-without abandoning StoreKit. If you already have a StoreKit project, the SDK slots in as a thin wrapper around the familiar SKPaymentQueue API, adding authentication, Pay Station, and purchase validation on top of what you already know.
This guide walks through the full integration in four discrete steps: authentication, catalog loading, purchasing, and finalizing transactions. Every section pairs the what with the why, so you walk away with an integration you understand-not one you've copy-pasted.
Info: SDK Explorer
Xsolla provides a live browser-based demo that mirrors the iOS integration exactly.
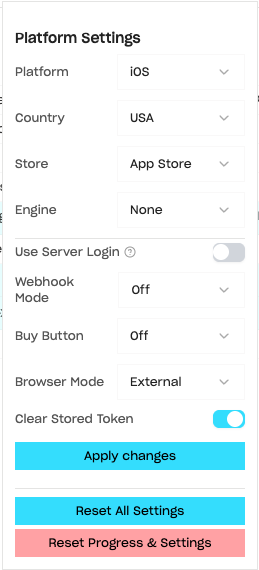
To configure it for this guide, click the settings at the top center of the screen and choose the following settings:
Platform - iOS Country - USA
- Platform - iOS
- Country - USA
- Store - App Store
- Engine - None
- Disable Use Server Login
- Webhook Mode - Off
- Buy Button - Off
- Browser Mode - External
then hit Apply Changes.

Prerequisites
Before starting, make sure you have the following in place:
- Xcode - a current stable release. The Xsolla Mobile SDK supports iOS 12.0+, though some Apple External Purchase features require iOS 17.5+.
- A Swift or SwiftUI iOS project - targeting iPhone and iPad, with a working StoreKit setup and your product identifiers registered in App Store Connect.
- An Xsolla Publisher Account - you'll need it to create your item catalog and retrieve your Project ID and Login Project ID. Sign up at publisher.xsolla.com.
- Your IDs ready - Project ID (numeric) and Login Project ID (UUID). Find them in Publisher Account: Project ID is next to your project name; Login Project ID is under Players → Login → Dashboard.
ID Precision Matters
An incorrect Project ID or Login Project ID will still result in a successful connection-but the SDK will return zero results. Double-check both before debugging anything else.
Installation
Add the Xsolla Mobile SDK via Swift Package Manager:
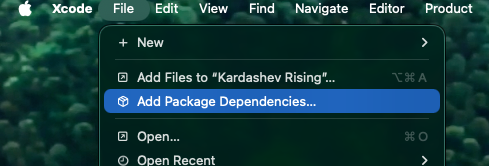
1. In Xcode, go to File → Add Package Dependencies…
2. Search for the repository URL:
https://github.com/xsolla/xsolla-sdk-ios
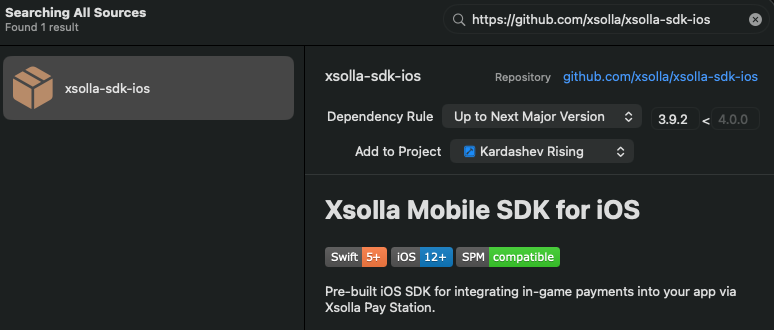
3. Set the dependency rule to Up to Next Major Version (e.g., 3.8.0) and click Add Package.
4. In the package products dialog, select XsollaMobileSDK and add it to your target.

If you manage dependencies via Package.swift instead:
// Package.swift
dependencies: [
    .package(url: "https://github.com/xsolla/xsolla-sdk-ios", from: "3.9.2")
],

targets: [
    .target(
        name: "YourTarget",
        dependencies: [
            .product(name: "XsollaMobileSDK", package: "xsolla-sdk-ios")

        ]
    )
]
Step 1: Authentication
Authentication in SDK 3 is handled through a settings object passed to SKPaymentQueue. It bridges Xsolla's authentication layer and StoreKit in a single initialization call-you're not replacing SKPaymentQueue; you're extending it.
Creating the SKPaymentSettings Object
Import XsollaMobileSDK and construct your SKPaymentSettings object with your Project ID, Login Project ID, and platform target. Place this in your app's initialization path-AppDelegate.application(_:didFinishLaunchingWithOptions:) is the natural home.
import XsollaMobileSDK

let settings = SKPaymentSettings(
    projectId: YOUR_PROJECT_ID,         // Numeric, from Publisher Account
    loginProjectId: "YOUR-LOGIN-UUID",  // UUID string, from Login → Dashboard
    platform: .standalone               // Use .standalone for mobile
)

// Required: enable payments (false = silent no-op on purchase attempts)
settings.enablePayments = true

// Required for U.S. storefronts: opens Pay Station in external Safari
settings.openExternalBrowser = true

// Enable during development and testing only
settings.useSandbox = true

// Pass into SKPaymentQueue on start and connect SKPaymentTransactionObserver
SKPaymentQueue.default().start(settings)
SKPaymentQueue.default().add(self)
.enablePayments = falseis a silent fail conditionIf enablePayments is false, purchase calls will appear to succeed but nothing will happen. No error, no callback, no log. Always set this to true explicitly, as it defaults to false.
💡 Best Practice: Configuration Dependent Settings
Instead of an explicit
falseortrue, take advantage of environment properties for your Development and Release build configurations.useSandbox = ProcessInfo.processInfo.environment["XSOLLA_SANDBOX"] == "1"
External Browser and U.S. compliance
As of April 30, 2025, Apple requires apps distributed in the U.S. App Store to open external payment links in Safari (not in-app web views). Set
.openExternalBrowser = trueto comply. For EU apps using the Digital Markets Act (DMA) alternative distribution path, set this tofalseto keep Pay Station within your app. See storefront detection docs for region-aware configuration.
Client-Side Anonymous Authentication
For games that don't require an account system, SDK 3 supports device-based anonymous authentication using a custom user ID. This can be any stable, unique string-a device identifier, a UUID you generate on first launch, or a player handle.
The key requirement is persistence: the ID must survive app restarts so Xsolla can associate purchases with the same user across sessions. UserDefaults is the right tool for this:
// Generate Player ID once and persist to UserDefaults
func resolvedPlayerID() -> String {

    let key = "xsolla_player_id"
    if let existing = UserDefaults.standard.string(forKey: key) {
        return existing
    }

    let newID = UUID().uuidString
    UserDefaults.standard.set(newID, forKey: key)
    return newID
}

settings.customUserId = resolvedPlayerID()
If your game already has an account system backed by Xsolla Login, you can provide the login JWT directly instead:
// When using Xsolla Login for account management
settings.customLoginToken = yourXsollaLoginJWT
💡 Best Practice: Wrapping Settings in a Provider Class
Rather than scattering SDK initialization across your codebase, it's good practice to encapsulate it in a dedicated store manager class. This makes the integration easy to test, mock, and extend-especially useful when you want to support both sandbox and production modes via a build flag:
class XsollaStoreProvider {

    init(projectId: Int, loginProjectId: String, sandbox: Bool) {
        // Create SKPaymentSettings object
        let settings = SKPaymentSettings(
            projectId: projectId,
            loginProjectId: loginProjectId,
            platform: .standalone
        )

        // Configure settings
        settings.enablePayments      = true
        settings.openExternalBrowser = true
        settings.useSandbox          = sandbox
        settings.customUserId        = resolvedPlayerID()

        // Start SKPaymentQueue and connect observer
        SKPaymentQueue.default().start(settings)
        SKPaymentQueue.default().add(transactionObserver)
    }
}
Configuring URL Schemes and Redirect Handling
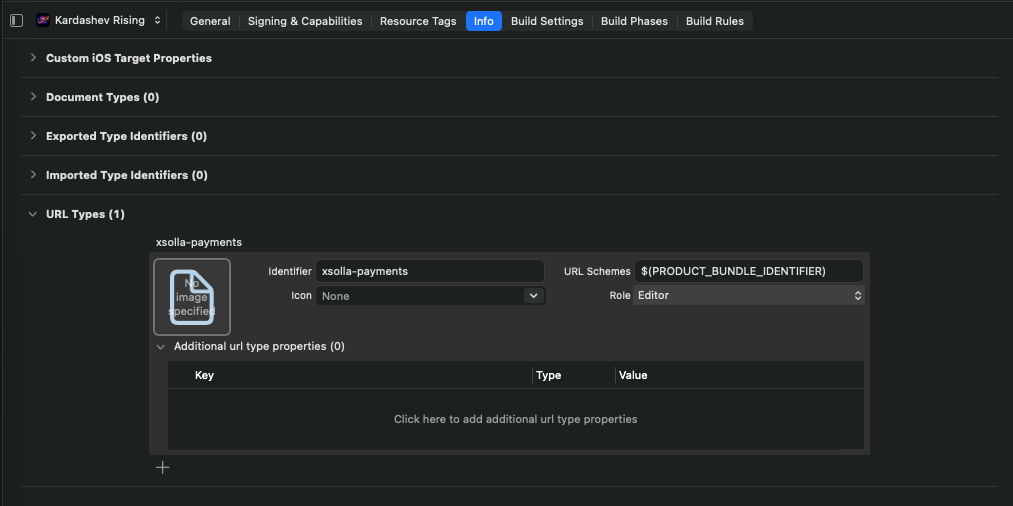
Pay Station and Xsolla Login use deep links to return the user to your app after payment and authentication flows complete. You must register a URL scheme and wire it through your settings.
In Xcode, select your target → Info tab → URL Types section. Add a new entry and set its URL Scheme to your bundle identifier (e.g., com.yourcompany.yourgame). You can use the variable $(PRODUCT_BUNDLE_IDENTIFIER) so it automatically tracks your target's ID.
Then wire those redirects into your settings object:
let bundleID = Bundle.main.bundleIdentifier ?? "com.yourcompany.yourgame"

// Pay Station returns here after a completed purchase
settings.payments.redirectUrl = "\(bundleID)://xsolla_confirm/payment"

// Xsolla Login returns here after authentication callbacks
settings.redirectUrl = "\(bundleID)://auth/callback"
Finally, forward incoming URLs to the payment queue in your app delegate or scene delegate:
// For AppDelegate
func application(_ app: UIApplication,
                 open url: URL,
                 options: [UIApplication.OpenURLOptionsKey: Any] = [:]) -> Bool {
    SKPaymentQueue.default().open(url)
    return true
}

// For SwiftUI scene lifecycle
// Add .onOpenURL { url in SKPaymentQueue.default().open(url) }
// to your root view
💡 Best Practice: Pre-Warming Pay Station Connections
Cold-launching Pay Station on first purchase can take several seconds. DNS resolution, TLS handshakes, and spinning up SFSafariViewController all compound. On slower connections this delay is noticeable enough to cause players to question whether their tap registered.
Pre-warming eliminates most of this lag. The strategy is to start warming the network stack and the Xsolla authentication handshake at app launch-before the player ever opens the store. SFSafariViewController.prewarmConnections(to:) has been available since iOS 15:
import SafariServices

class XsollaStoreProvider {
    private var prewarmSessions: [URLSessionDataTask] = []

    func prewarm() {
        // 1. Pre-warm Safari's network connections to Xsolla endpoints
        let endpoints = [
            "https://secure.xsolla.com",
            "https://sandbox-secure.xsolla.com"   // include in debug builds
        ]
        let urls = endpoints.compactMap { URL(string: $0) }
        prewarmSessions = SFSafariViewController.prewarmConnections(to: urls)

      // 2. Trigger catalog load early to warm the auth handshake
        loadProducts()
    }
}
Note: Call
prewarm()during app initialization-not when the store UI opens. The goal is to have the warm sessions ready by the time the player's thumb reaches the buy button.
Step 2: Loading Your Catalog
Before your app can display prices or initiate purchases, it needs to fetch the corresponding SKProduct objects from Apple. SDK 3 doesn't add a new catalog API-you use the standard SKProductsRequest. The SDK's role here is ensuring that the product identifiers in your app match those registered in the Xsolla Publisher Account.
Creating Items in Publisher Account
Log in to Publisher Account, select your project, and navigate to its Items Catalog.

For SDK 3 native integration, you must use the Virtual Items type-other item types such as Currency Packages are not returned by the SDK's StoreKit path.

For each item, you'll need to provide:
- A SKU matching one of your
.storekit - Name, description, and optionally an image
- A default price (e.g., $0.99 for your entry-level package)

You can populate the catalog manually, import via JSON, or migrate from App Store Connect or Google Play directly. Once your catalog is set up, flip every item to Available before testing.
Status must be set to Available-unavailable items are silently excluded from query results

Requesting Products via SKProductsRequest
After authentication is initialized, create an SKProductsRequest with the set of SKUs you want to load. Product identifiers are case-sensitive strings-they must match exactly what's in both App Store Connect and your Publisher Account catalog.
Log
.invalidProductIdentifiersin developmentSKProductsResponse includes an
invalidProductIdentifiersarray containing any SKUs Apple couldn't resolve. In production this array is silent-nothing is returned and nothing fails. Log it during development; a non-empty array almost always means a SKU mismatch between your app, App Store Connect, and Publisher Account.
import StoreKit

class ProductLoader: NSObject, SKProductsRequestDelegate {

    var loadedProducts: [SKProduct] = []

    func loadProducts(skus: [String]) {
        let identifiers = Set(skus)
        let request = SKProductsRequest(productIdentifiers: identifiers)
        request.delegate = self
        request.start()
    }

    // SKProductsRequestDelegate
    func productsRequest(_ request: SKProductsRequest,
                         didReceive response: SKProductsResponse) {

        loadedProducts = response.products

        if !response.invalidProductIdentifiers.isEmpty {
            print("[Xsolla] Invalid SKUs: \(response.invalidProductIdentifiers)")
        }
    }
}
💡 Best Practice: Hardening the Request for Real-World Conditions
In production, SKProductsRequest can fail silently on poor connections or mid-session network changes. A minimal hardening strategy adds a small delay after initialization and wraps the request in error handling with retry capability:
func loadProductsWithRetry(skus: [String], attempt: Int = 0) {

    // Brief delay on first load to let SDK initialization settle
    let delay: TimeInterval = attempt == 0 ? 0.5 : 2.0

    DispatchQueue.main.asyncAfter(deadline: .now() + delay) {
        let request = SKProductsRequest(productIdentifiers: Set(skus))
        self.activeRequest = request
        request.delegate = self
        request.start()
    }
}

func request(_ request: SKRequest, didFailWithError error: Error) {
    print("[Xsolla] Product request failed: \(error.localizedDescription)")

    // Retry up to 3 times with exponential backoff
    if currentAttempt < 3 {
        loadProductsWithRetry(skus: pendingSKUs, attempt: currentAttempt + 1)
    }
}
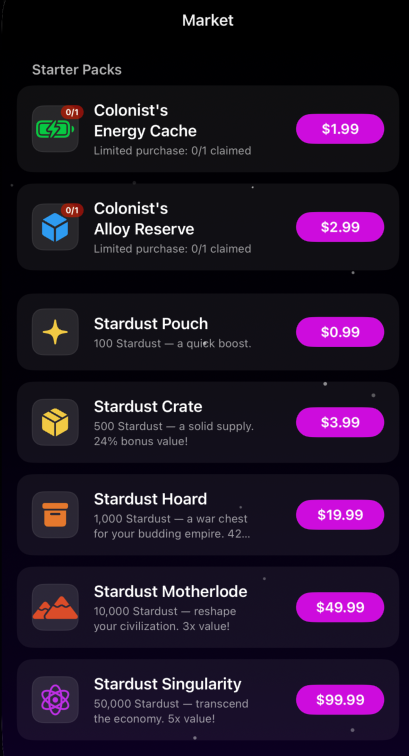
A catalog loaded in-game
Catalog Troubleshooting Checklist
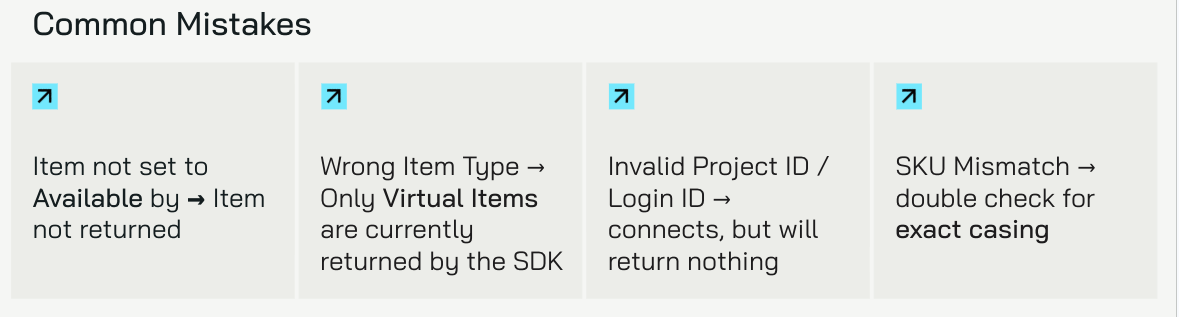
If your catalog loads but returns no products, work through this list before digging deeper:
- Item availability - every item in Publisher Account must be explicitly set to Available. Draft and inactive items are excluded from query results.
- Item type - only Virtual Items are returned via the SKProductsRequest path. Currency Packages and Bundle types will not appear.
- Project ID and Login ID - verify both against Publisher Account. An incorrect ID produces a successful connection but zero results.
- SKU case sensitivity -
com.yourcompany.stardust_packis a different identifier thancom.yourcompany.Stardust_Pack. Match character-for-character.- App Store Connect sync - confirm the same product identifiers exist in App Store Connect and are in a Ready to Submit or Approved state.
Step 3: Purchasing Products
With products loaded, initiating a purchase is a single line. The SDK wraps the familiar SKPayment API and routes the request through Pay Station when payment processing begins. The main threading requirement and observer pattern remain exactly as they are in vanilla StoreKit.
Initiating a Purchase
Pass the SKProduct for the selected item into SKPayment and add it to the queue. The critical constraint is that SKPaymentQueue interacts with UIKit and must always be called from the main thread:
func purchase(_ product: SKProduct) {

    // SKPaymentQueue calls UIKit-always dispatch to main thread
    DispatchQueue.main.async {

        // Set the root view controller so Pay Station has a presentation anchor
        if let windowScene = UIApplication.shared.connectedScenes
            .compactMap({ $0 as? UIWindowScene })
            .first,
           let root = windowScene.windows.first?.rootViewController {
            SKPaymentQueue.default().rootViewController = root
        }

        // Kick off payment, passing in the product to be purchased
        let payment = SKPayment(product: product)
        SKPaymentQueue.default().add(payment)
    }
}
Note: Always set rootViewController before adding to the queue
Pay Station is presented as a Safari view over your app's window. Without a
rootViewControllerset on SKPaymentQueue, the payment UI has no anchor to present from and the purchase will fail or produce unexpected behavior. Set it immediately before callingadd().
Handling Transactions in the Observer
Your class registered via SKPaymentQueue.default().add(self) receives every transaction state change. The key behavioral rule: always call SKPaymentQueue.default().finishTransaction(_:) for every state-purchased, failed, and restored alike.
Unfinished transactions are durable. They redeliver on every app launch until consumed. Failing to call finishTransaction is a common source of duplicate fulfillment bugs that are extremely difficult to reproduce in testing but very visible to players.
extension YourClass: SKPaymentTransactionObserver {
    func paymentQueue(_ queue: SKPaymentQueue, updatedTransactions transactions: [SKPaymentTransaction]) {
        for transaction in transactions {
            let sku = transaction.payment.productIdentifier
            switch transaction.transactionState {
            case .purchased:
                // Grant items and call finishTransaction to consume
                grantItem(sku: sku)
                SKPaymentQueue.default().finishTransaction(transaction)

            case .failed:
                // Surface genuine errors; ignore user cancellations
                if let error = transaction.error as? SKError,
                   error.code != .paymentCancelled {
                    handlePurchaseError(error, sku: sku)
                }
                // Always finish-even on failure
                SKPaymentQueue.default().finishTransaction(transaction)

            @unknown default:
                break
            }
        }
    }
}
Treat .failed and .cancelled differently
SKError.paymentCancelled is the normal code when a player dismisses the purchase sheet. It does not indicate a problem and should not be shown as an error to the user. All other SKError codes are genuine failures worth surfacing or logging.
💡 Best Practice: Customizing Pay Station Theming
The SKPaymentSettings object exposes Pay Station UI parameters. While optional, matching Pay Station's appearance to your game's visual style creates a more seamless experience and signals to players they haven't left your product:
// Constructor parameters for Pay Station visual customization
let settings = SKPaymentSettings(
    ...
    Pay StationUIThemeId: .dark,   // or .light
    Pay StationUISize:    .medium   // or .small, .large
    ...
)
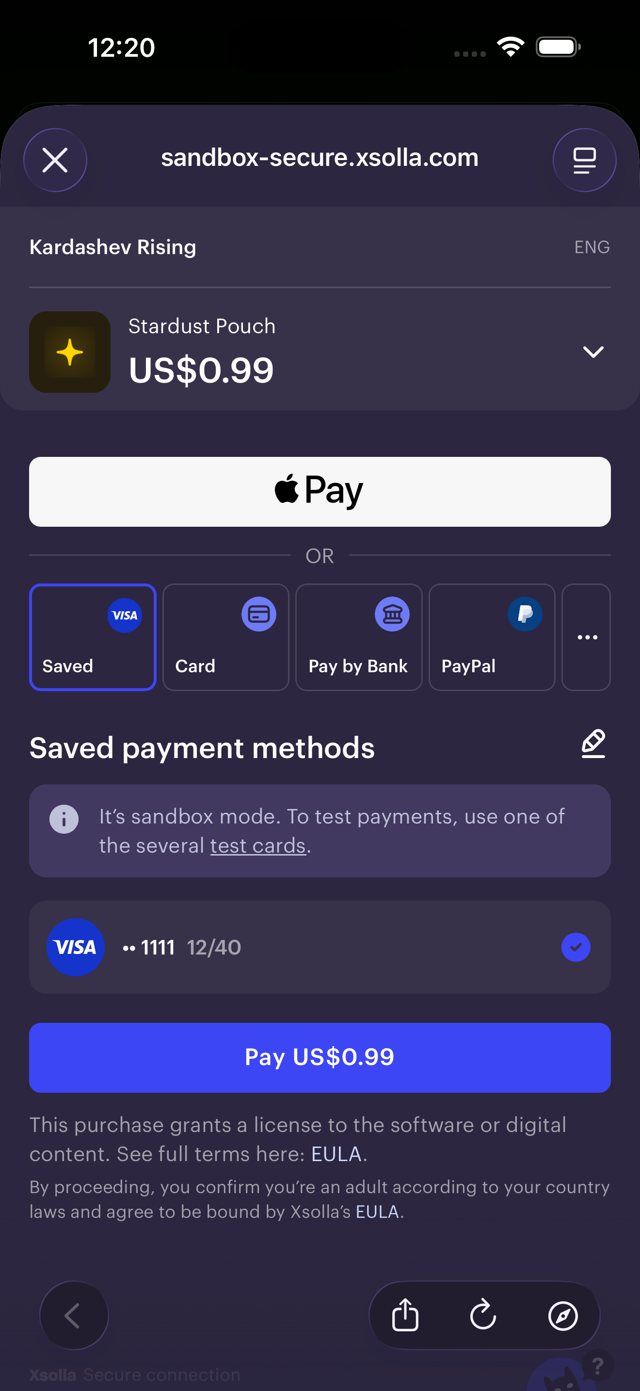
Pay Station on device
Step 4: Finalizing the Purchase
Finalizing a purchase has two components: calling finishTransaction (required, covered in Step 3) and calling validateTransaction before granting the item (strongly recommended). Validation confirms with Xsolla's servers that the payment was processed successfully-it's your defense against replayed or manipulated receipts.
Client-Side Validation
For client-side validation, call validateTransaction on the payment queue, wrapping your item-granting logic inside its completion handler. This ensures items are only awarded after Xsolla confirms the transaction:
func validateAndGrant(transaction: SKPaymentTransaction, sku: String) {
    // Call .validateTransaction and handle appropriately
    SKPaymentQueue.default().validateTransaction(transaction) { result in
        switch result {
        case .success:
            // Safe to grant the item
            self.grantItem(sku: sku)
            SKPaymentQueue.default().finishTransaction(transaction)

        case .failure(let error):
            // Validation failed-do not grant the item
            // Log for investigation; optionally surface a support prompt
            print("[Xsolla] Validation failed for \(sku): \(error)")
            SKPaymentQueue.default().finishTransaction(transaction)
        }
    }
}

// Replace non-validated pass in case .purchased with validation helper
func paymentQueue(_ queue: SKPaymentQueue,
                      updatedTransactions transactions: [SKPaymentTransaction]) {
  ...
            case .purchased:
                // Validate before granting
                validateAndGrant(transaction: transaction, sku: sku)

            case .failure:
                ...
  ...

  }
Always finishTransaction inside the validation callback
Notice that
finishTransactionis called inside both the success and failure branches of the validation callback. This matters: you don't want an unvalidated transaction looping forever. If validation fails, finish the transaction, log it, and let your support team investigate via the Publisher Account transaction logs.
Server-side validation for production
Client-side validation is a good starting point and appropriate for many games. For high-value economies or competitive games where fraudulent item grants would have meaningful impact, consider migrating to server-side validation using Xsolla's webhook system. Server-side validation is harder to intercept or tamper with, as the receipt never passes through client code you don't control.
Putting It All Together
Here's the complete initialization sequence, condensed to show how all four steps connect:
import XsollaMobileSDK
import StoreKit
import SafariServices

class XsollaStoreManager: NSObject {

    static let shared = XsollaStoreManager()
    var products: [SKProduct] = []

    func configure() {
        // Step 1: Authentication
        let settings = SKPaymentSettings(
            projectId: YOUR_PROJECT_ID,
            loginProjectId: "YOUR-LOGIN-UUID",
            platform: .standalone
        )

        settings.enablePayments      = true
        settings.openExternalBrowser = true
        settings.useSandbox          = ProcessInfo.processInfo.environment["XSOLLA_SANDBOX"] == "1"
        settings.customUserId        = resolvedPlayerID()

        SKPaymentQueue.default().start(settings)
        SKPaymentQueue.default().add(self)

        // Best practice: pre-warm before the player opens the store
        prewarm()

        // Step 2: Load Catalog
        loadProducts(["com.yourcompany.item1", "com.yourcompany.item2", ...])
    }

    // Retrieve persisted player ID, create on first launch
    private func resolvedPlayerID() -> String {
        let key = "xsolla_player_id"
        if let existing = UserDefaults.standard.string(forKey: key) { return existing }
        let newID = UUID().uuidString
        UserDefaults.standard.set(newID, forKey: key)

        return newID
    }

    // Prewarm connections
    private func prewarm() {
        // 1. Pre-warm Safari's network connections to Xsolla endpoints
        let endpoints = [
            "https://secure.xsolla.com",
            "https://sandbox-secure.xsolla.com"   // include in debug builds
        ]
        let urls = endpoints.compactMap { URL(string: $0) }
        SFSafariViewController.prewarmConnections(to: urls)
    }

    private func loadProducts(_ skus: [String]) {
        let request = SKProductsRequest(productIdentifiers: Set(skus))
        request.delegate = self
        request.start()
    }
}

// Step 3: Process Purchase Events
extension XsollaStoreManager: SKPaymentTransactionObserver {
    func paymentQueue(_ queue: SKPaymentQueue,
                      updatedTransactions transactions: [SKPaymentTransaction]) {

        for transaction in transactions {
            let sku = transaction.payment.productIdentifier
            switch transaction.transactionState {

            case .purchased: validateAndGrant(transaction: transaction, sku: sku)

            case .failed:
                handleError(transaction.error, sku: sku)
                SKPaymentQueue.default().finishTransaction(transaction)

            @unknown default: break
            }
        }
    }

  // Step 4: Validation
    func validateAndGrant(transaction: SKPaymentTransaction, sku: String) {

        SKPaymentQueue.default().validateTransaction(transaction) { result in
            if case .success = result { self.grantItem(sku: sku) }
            SKPaymentQueue.default().finishTransaction(transaction)
        }
    }
}

extension XsollaStoreManager: SKProductsRequestDelegate {

    func productsRequest(_ r: SKProductsRequest,
                         didReceive response: SKProductsResponse) {
        products = response.products
        if !response.invalidProductIdentifiers.isEmpty {
            print("[Xsolla] Invalid SKUs: \(response.invalidProductIdentifiers)")
        }
    }
}
Summary
Xsolla SDK 3 integrates with native iOS through four steps, each building directly on StoreKit primitives you likely already have:
- Authenticate - create SKPaymentSettings with your Project ID and Login Project ID, set
enablePayments = trueandopenExternalBrowser = truefor U.S. compliance, configure a stable custom user ID for anonymous auth, and register your URL scheme for Pay Station callbacks. - Load Catalog - use SKProductsRequest to pull your items, making sure every Virtual Item in Publisher Account is set to Available. Log
invalidProductIdentifiersin development to catch SKU mismatches early. - Purchasing - dispatch to the main thread before calling SKPaymentQueue.add(), set
rootViewControlleron the queue as a presentation anchor, and handle all transaction states in your observer-including deferred and failed. - Finalizing - wrap your item-granting logic inside
validateTransactionto confirm payment server-side before fulfilling. Always call finishTransaction in every branch of the validation callback.
The full SDK documentation, including advanced topics like storefront detection and server-side webhooks, lives at developers.xsolla.com/sdk/mobilesdk. The SDK Explorer is worth revisiting whenever you add new item types or change payment configuration-it gives you a live event log that makes the SDK's behavior visible in a way that debugger logs alone can't match.
Where to Go Next
There are a couple of natural steps to take from here:
- Move to server-side validation or Events API
- Note: Currently you will need to speak to your account manager or email [email protected] to get the Events API configured for your project
- Explore other authentication and login methods
- Configure your Pay Station
Resources
| Xsolla Mobile SDK Documentation | Installation, configuration, and advanced integration options |
| SDK Explorer | Configurable interactive demo with live event log for visualizing the full payment flow, and quick-references for all steps |
| iOS Quick Start Guide | Minimal integration to process your first test payment |
| iOS Installation Details | SPM setup including Package.swift configuration |
| iOS Configuration Reference | All SKPaymentSettings properties and payment integration options |
| Finding Your Project IDs | Locating Project ID and Login Project ID in Publisher Account |
| Pay Station Test Cards | Card numbers available to use for testing in Sandbox |
| Setting Up the Transaction Observer | Apple's reference for SKPaymentTransactionObserver |
| SFSafariViewController.prewarmConnections | Pre-warming network connections for faster Pay Station launches |
| SKError - Apple | full list of StoreKit error codes including paymentCancelled |