Unity Mobile — Xsolla SDK 3 Integration Guide
What We're Building
By the end of this walkthrough, you'll have a fully working Xsolla payment flow integrated into a Unity iOS project - from package installation through to a completed test transaction.
We're using the Unity 2D Game Kit as our demo project. The scenario is deliberately simple: a player dies, a popup appears with two options - restart and lose progress, or buy full health and respawn from the latest checkpoint. That's an impulse-buy moment, and it's a perfect fit for the Pay Station implementation.
Here's a quick summary of some specifics used for this walkthrough:
- Unity version: 6.3.5
- Demo project: Unity 2D Game Kit
- Xsolla SDK
- Authentication Method: Client side Device ID (no login required)
- Payment UI: Xsolla Pay Station opening in an external browser (Safari), which is the compliant path for iOS in the US right now
- Purchase validation: Client-side only
iOS
Following the April 30, 2025 U.S. court decision, developers may include external payment links in iOS apps. The Xsolla SDK for Mobile is fully compliant with Apple's revised App Store guidelines, supporting both in-app Pay Station flows and link-out payments via Web Shop.
Android
Following the October 29, 2025 Epic v. Google injunction, U.S. Google Play apps may use alternative billing solutions, external payment links, and are no longer subject to anti-steering restrictions. The SDK supports out-of-store APK distribution, Google Play Billing, and browser-based checkout - all in one integration.
Prerequisites
Before picking up this guide, make sure you have the following sorted:
- A Unity project, ideally with your payment trigger already in place. This walkthrough doesn't cover building your game UI - we assume you already know where in your project the Xsolla payment flow is going to live (a popup, a store menu, a button, etc.).
- Unity IAP package installed. The Xsolla SDK builds on top of Unity's In-App Purchasing framework. The advantage of this is that interacting with the Xsolla SDK will feel very familiar, but it does mean that you'll need the Unity IAP package installed in your project before continuing.
- An active Xsolla Publisher Account. We'll walk through everything you need to do inside your Publisher Account as part of this guide, but creating and activating the account itself isn't covered here. If you haven't done that yet, head to the Xsolla Publishing Account Sign Up Page and get that set up first.
Your Reference Resources
The two resources you'll want open as you work through this are the SDK Explorer and its Integration Widget. The Integration Widget is a page on the Xsolla SDK site and a tab within the SDK Explorer that gives you the full, ready-to-use code for each integration step - that's what we'll be copying directly into our project throughout this guide. We'll also reference the SDK Explorer itself occasionally for configuration and context along the way.
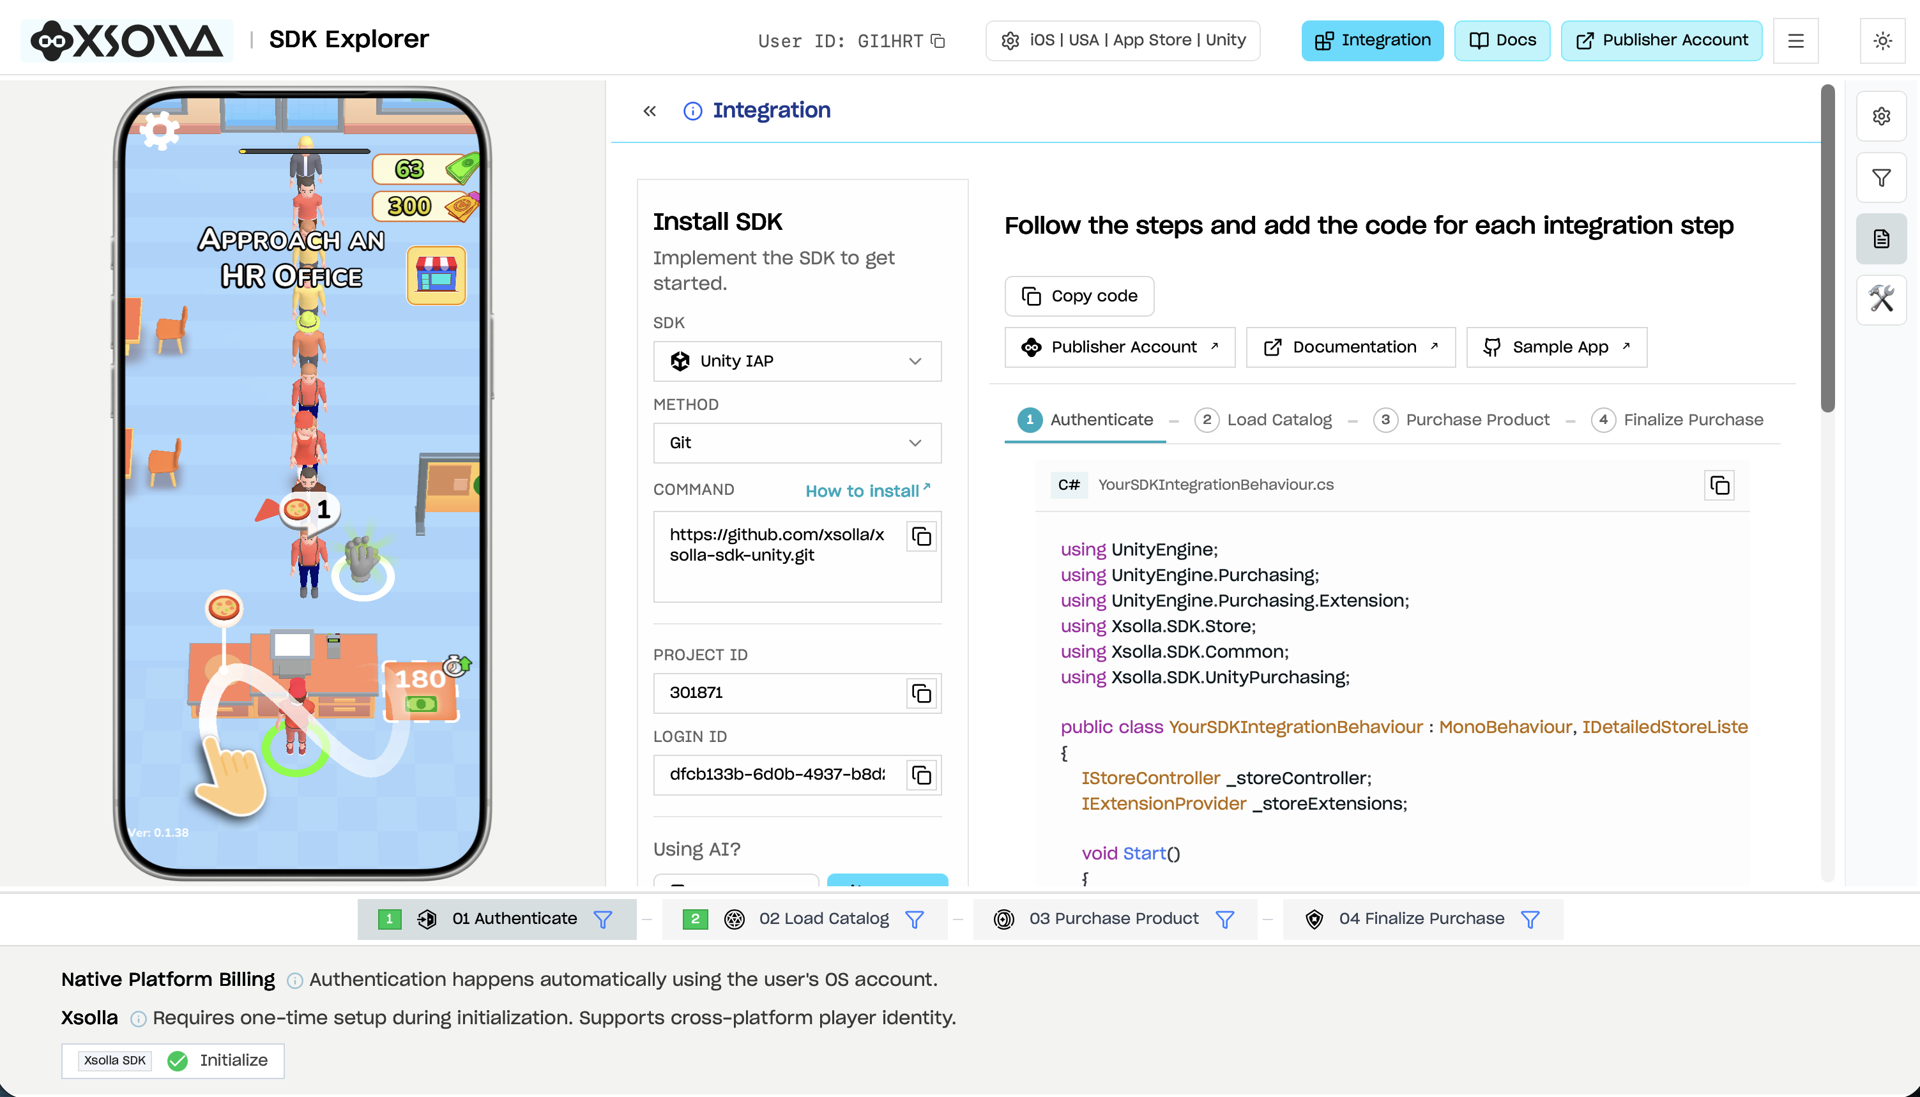
SDK Explorer - Integration Widget View (Large)
The Four Stages of Integration
Before we dive in, it's worth understanding the framework we're working within. The Xsolla SDK and SDK Explorer organizes a complete payment integration into four distinct stages:
- Authenticate -> establishing who the player is. Before any transaction can happen, the SDK needs a valid user identity. In our case this is handled silently using Device ID, so the player never sees a login screen.
- Load Catalog -> fetching your products. This is where the SDK pulls your item catalog from Xsolla's backend and registers those products with Unity's IAP layer, making them available for purchase at runtime.
- Purchase Product -> initiating the transaction. This is the moment the player hits buy. The SDK hands off to the Xsolla Pay Station, which handles the payment UI, processes the transaction, and returns a success or failure signal along with your purchase receipt.
- Finalize Purchase -> acting on the result. This is where your game responds to a completed transaction - validating it, granting the item (along with any relevant game code), updating game state, and closing the transaction cleanly.
Each of the four integration steps in this guide maps directly to one of these stages - and both the SDK Explorer and Integration Widget is organized around this same framework, so the relevant code for each stage is always easy to find.
Step 0: Install the Xsolla SDK Package
In order to even begin monetizing with Xsolla, and before any of the 4 monetization steps can be applied, we need the Xsolla SDK package installed in our Unity project.
The Integration Widget and SDK Explorer both give you the exact Git URL you need. Grab it from there, or directly from the Github Repo Installation section then in Unity:
- Go to Window > Package Management > Package Manager
- Click the + icon
- Select Install package from Git URL
- Paste the URL and click Install
- At time of writing
https://github.com/xsolla/xsolla-sdk-unity.git
- At time of writing
You should now see the Xsolla SDK listed in your Package Manager.
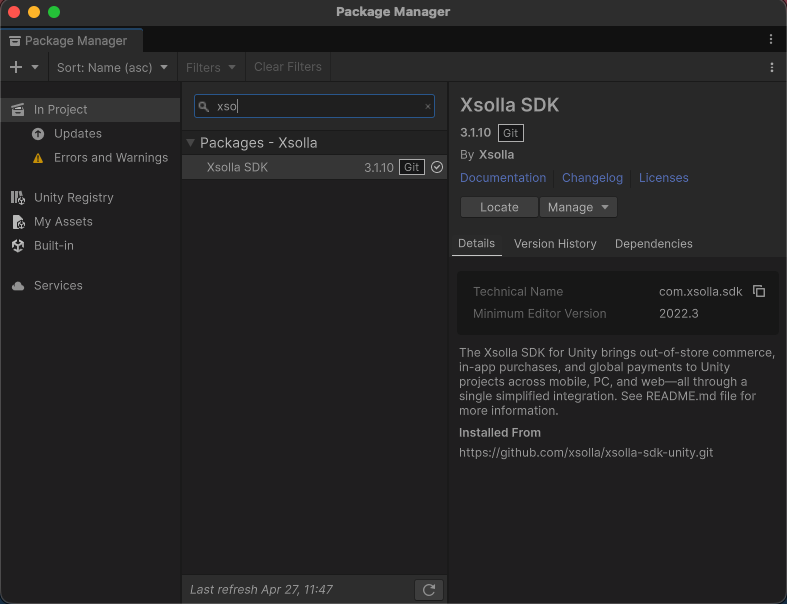
Unity Package Manager confirming Xsolla SDK is installed
Step 1: Authenticate
Set Up the Script
Create an empty GameObject in your scene - we're calling ours XsollaPay Station. Tuck it into a sensible spot in your hierarchy, then add a new C# script to it as a component with the same name.
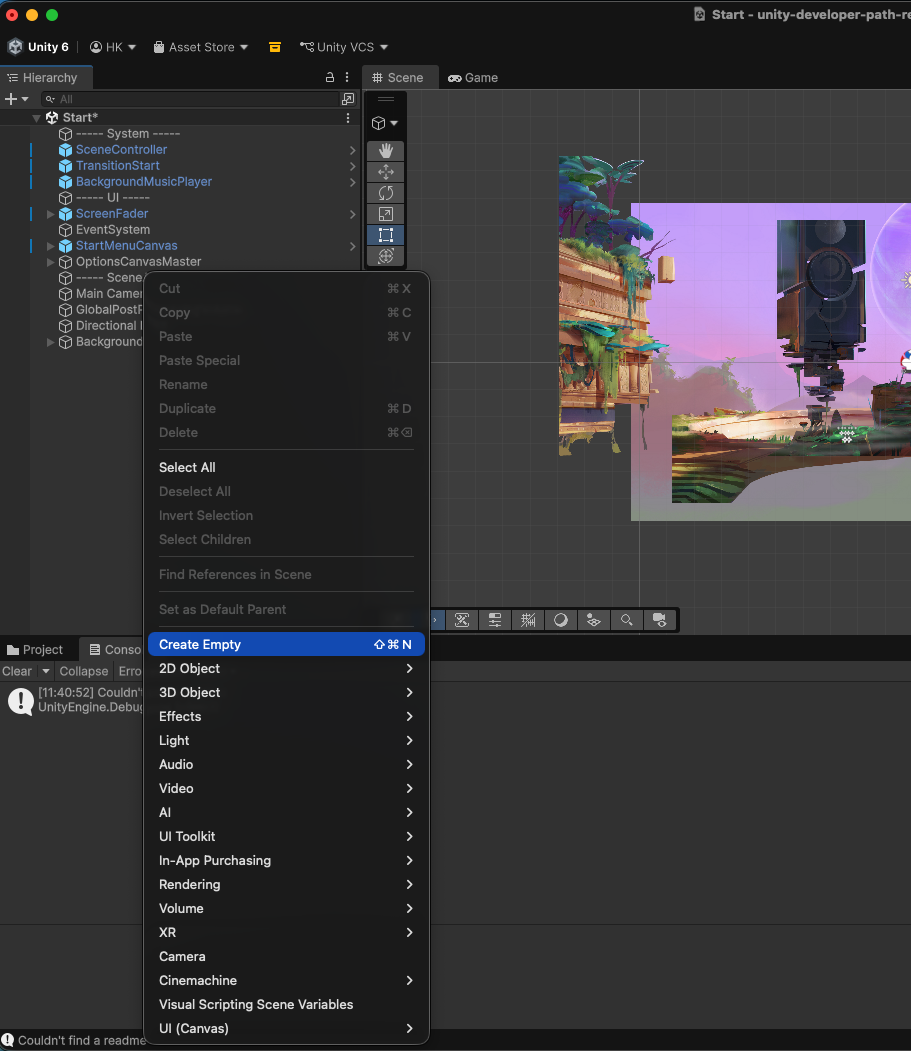
Adding Empty Game Object to project hierarchy
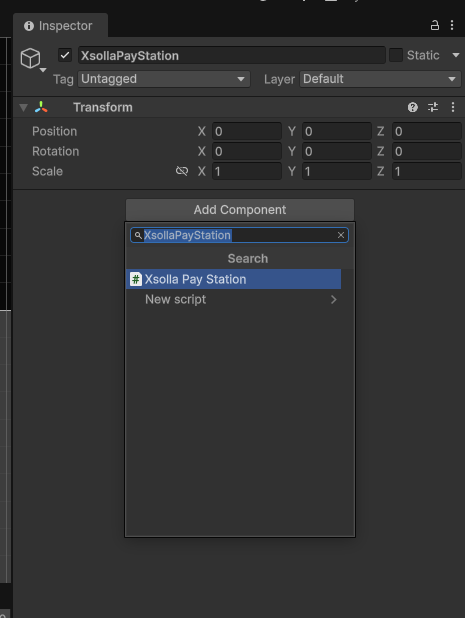
Attaching Script to Game Object
Clear out the default Unity script boilerplate, then head to the SDK Explorer to understand what is required for authentication. When your ready to write some code, head to the Integration Widget. Select the Authentication tab and copy the full class it gives you - this is the code in the right context, rather than just a snippet.
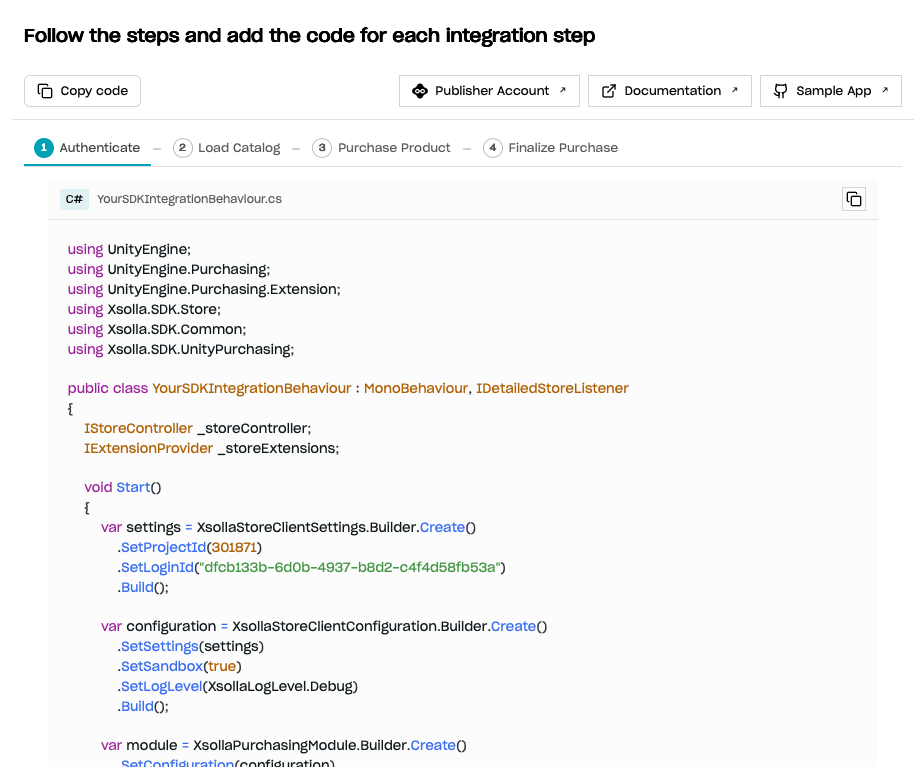
Integration Widget with code for Step 1: Authenticate
Paste that into your script file, then update the class name to match your file name, as this will have been overwritten when you pasted the widget code in.
A Note on Errors at This Stage
You'll likely see some compile errors straight away. Don't worry - this is expected. The Unity IAP framework requires certain method signatures to be present (in this case ProcessPurchase and OnPurchaseFailed) even though those methods aren't implemented yet. The SDK Explorer and Integration Widget however, build these up step by step, and so some functions aren't included and explained until future steps where they become relevant. Unfortunately, Unity needs at least the shells of those methods now, to compile cleanly, and so if you want to build and run the project before completing all 4 steps we need to add the require code now.

Errors thrown
Fix this by jumping ahead briefly to the Purchase Product and Finalize Purchase steps in the SDK Explorer, copying the shells of the ProcessPurchase and onPurchaseFailed (x2) functions from the Integration Widget, and adding them to your class with their bodies commented out. Once Unity can see the right method signatures, the errors will clear.
public PurchaseProcessingResult ProcessPurchase(PurchaseEventArgs args)
{
    // Logic to be added here in Step 4
    return PurchaseProcessingResult.Complete;
}

public void OnPurchaseFailed(Product product, PurchaseFailureReason failureReason)
{
    if (failureReason == PurchaseFailureReason.UserCancelled)
    {
        // Handle user cancellation here (Reviewed in Step3/4)
        return;
    }

    Debug.LogError($"Purchase failed: {product.definition.id}, reason: {failureReason}");
}

public void OnPurchaseFailed(Product product, PurchaseFailureDescription failureDescription)
{
    if (failureDescription.reason == PurchaseFailureReason.UserCancelled)
    {
        // Handle user cancellation here (Reviewed in Step3/4)
        return;
    }
}
We'll come back and implement these functions properly in Steps 3 and 4.
Info: This is a known friction point when using the Integration Widget step-by-step. You're not doing anything wrong - it's just how the Unity IAP framework works. Grab the shells early, and you can test each stage as you go.
Configure Your Project ID and Login ID
Inside the copied code you'll see SetProjectId and SetLoginId calls with default placeholder values. These point to a generic Xsolla demo account complete with dummy catalog - fine for a quick sanity check, but you'll want to replace them with your own credentials and products. For that you will need to set up your project in your Publisher Account.
Creating a new project in Publisher Account:
Setting up a project connects your game to your desired Xsolla store configuration which enables you to sell your own catalog and manage that catalog whilst also configuring your payment and monetization settings. To create one:
1. Log into your Publisher Account and click Create Project
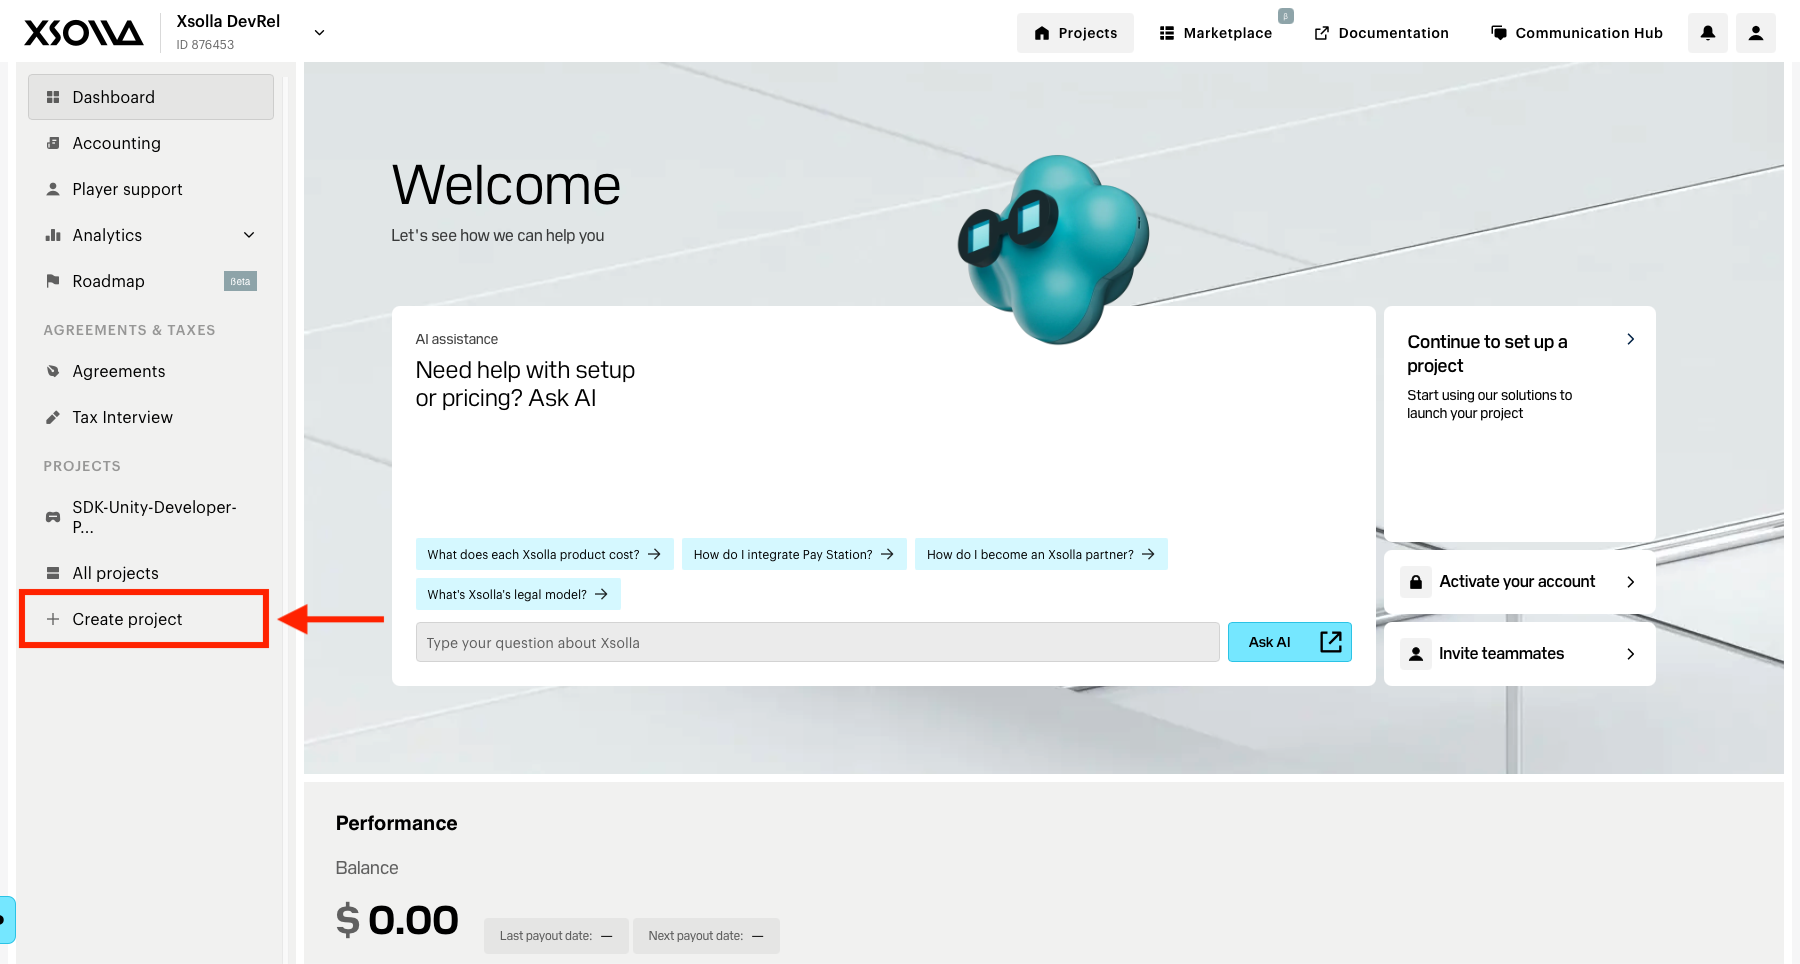
Navigating to the Project section of the Publisher Account to create a new project
2. Fill in the basics
For our demo:
- Project Type: Game
- Release Platforms: Mobile
- Monetization Options: in-game transactions
- Development Stage: Production
- Genre: Action
- Game Engine: Unity
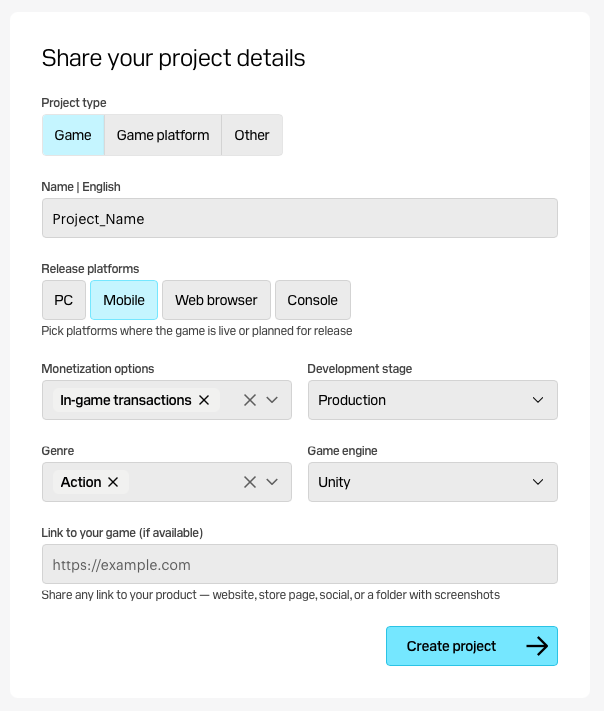
Example of completing your project details
3. Create the project and take note of your new Project ID
Setting up a Login Project:
A login project tells your SDK which authentication setup you want to use for your app. This can be configured by both authentication type, but also platform and generally helps you organize how you want to separate and manage your various player bases. To create one:
1. Navigate to the Player section and click Login
In a Publisher Account Project, navigate to the Player section in the left side bar and click Login.
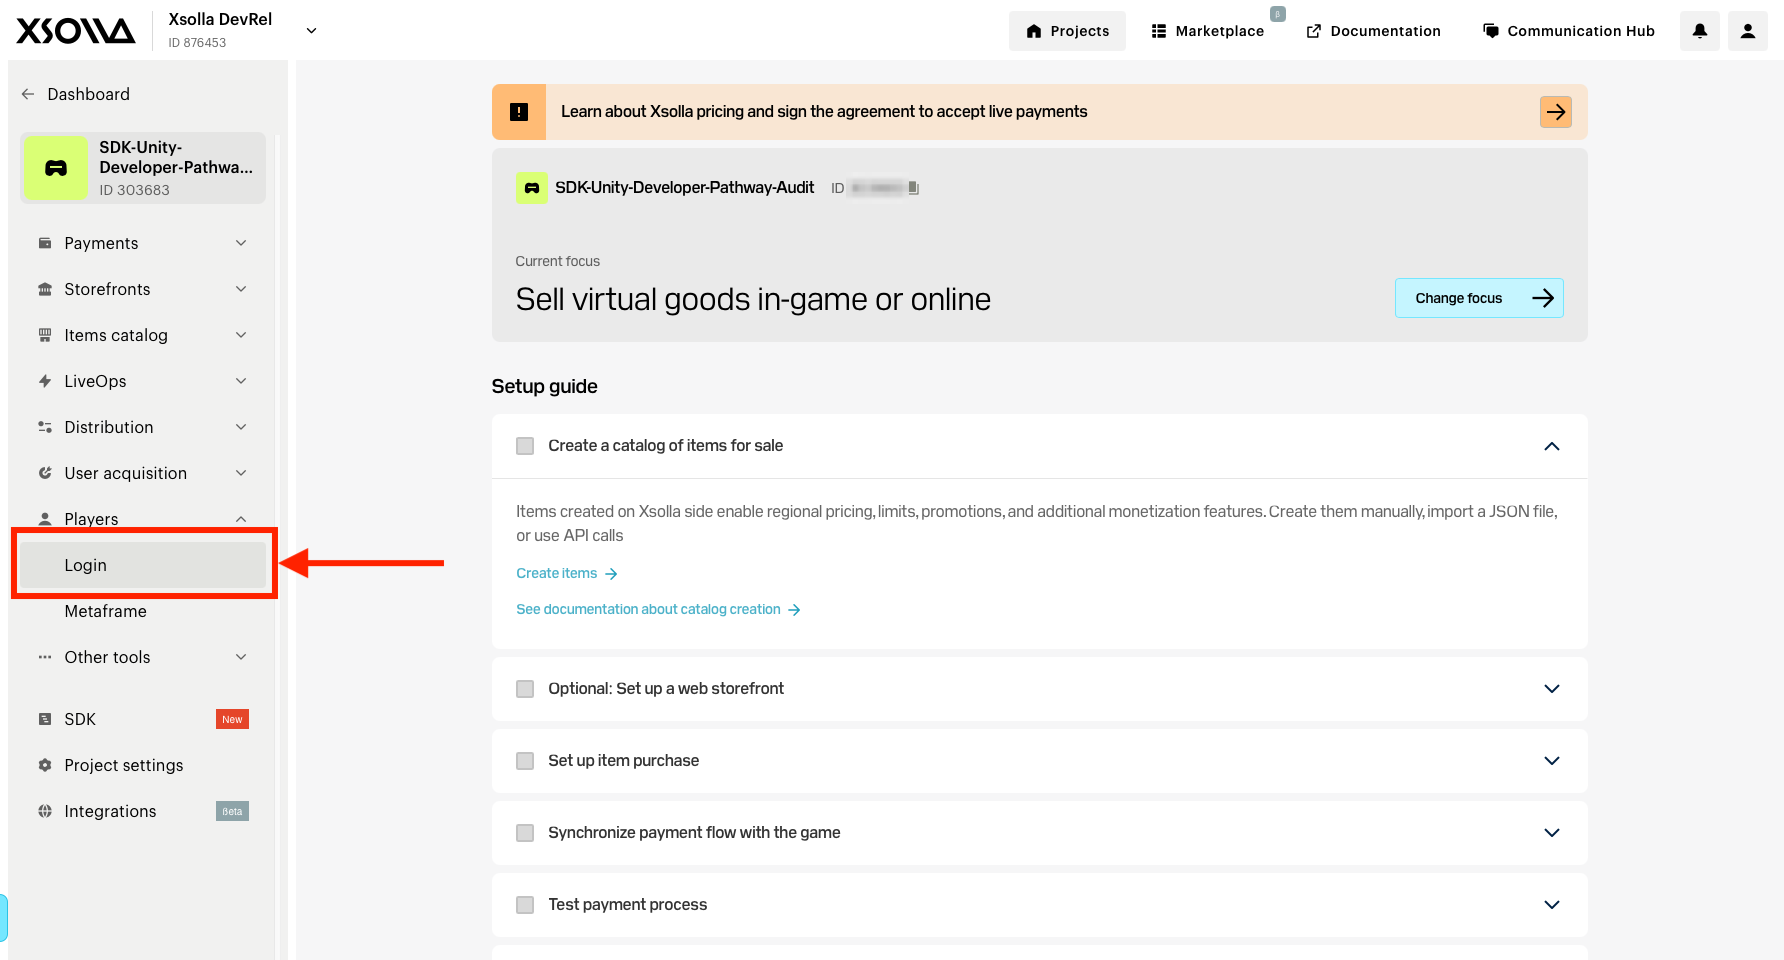
Navigating to the Login Project dashboard in the Publisher Account
2. Create a new Login Project
Give it a memorable name reflecting its purpose (we used "client-auth").
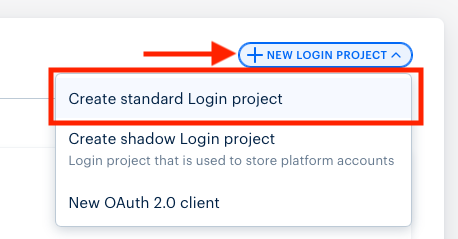
Creating a new Login Project
3. Select Classic Login as the base method
We'll override this in a moment.
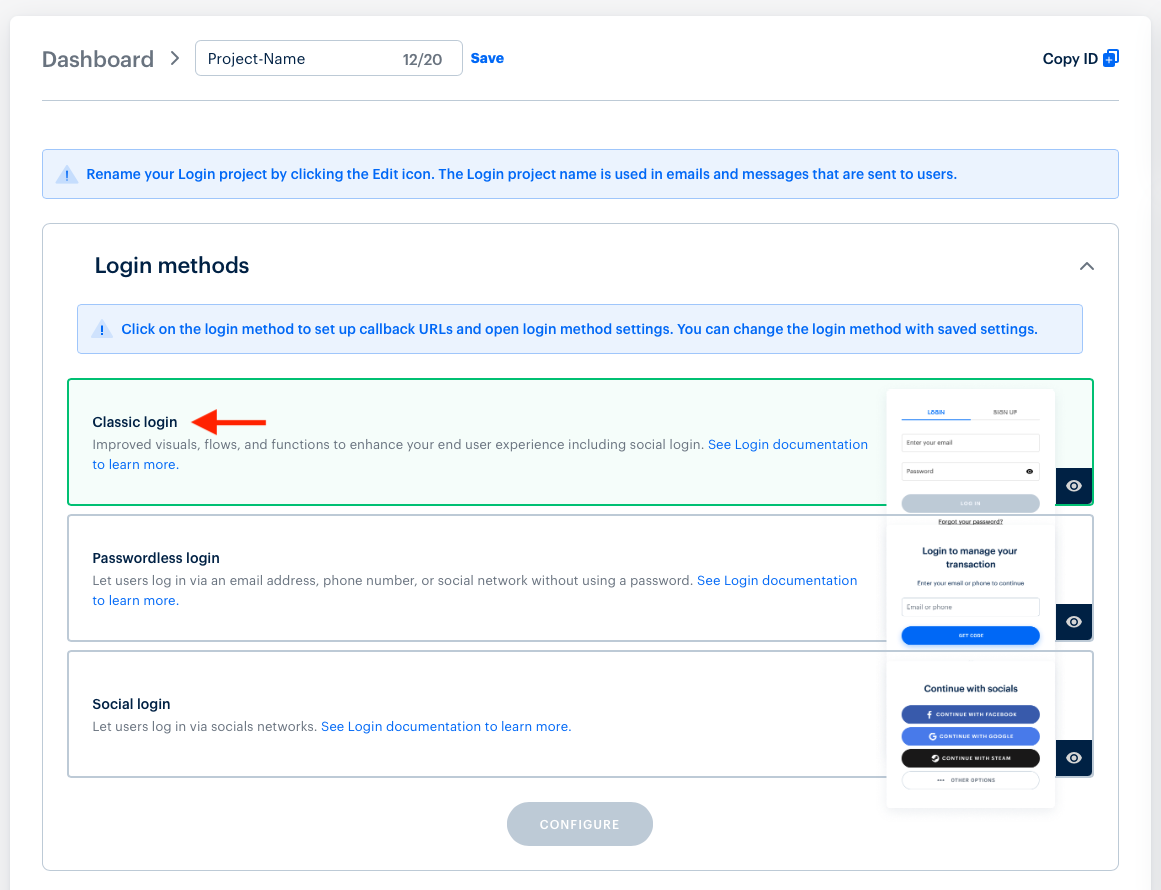
Configuring login project as Classic Login - this will be superseded by Device ID authentication but a default method is required
4. Enable Login API Integration
This is the critical toggle that unlocks Device ID (client-side) authentication and bypasses the standard login flow.
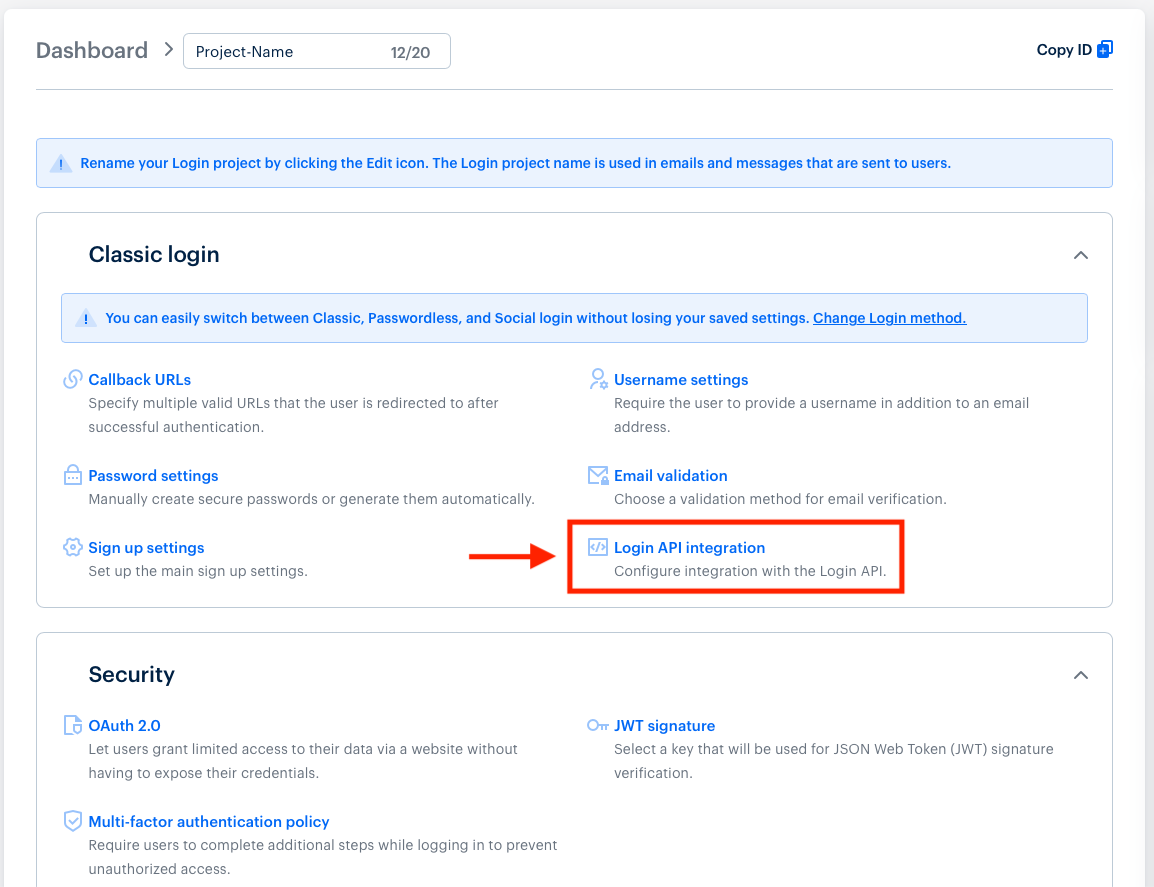
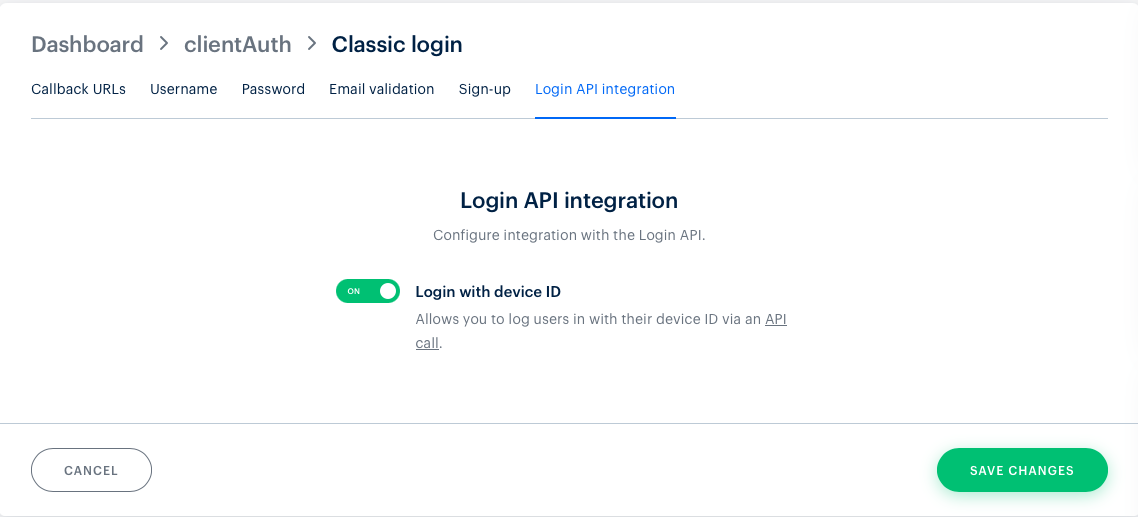
Toggling on API Integration which enables Device ID authentication
Save those settings and return to your Publisher Account dashboard. You'll now see both your Project ID and your Login ID.
Head back to VS Code and replace the placeholder values:
var settings = XsollaStoreClientSettings.Builder.Create()
    .SetProjectId(XXXXXX)
    .SetLoginId("XXXXXXXX-XXXX-XXXX-XXXX-XXXXXXXXXXXX")
    .Build();
Set Sandbox to True
While you're in the code, make sure this is set:
var configuration = XsollaStoreClientConfiguration.Builder.Create()
    ....
    .SetSandbox(true)
    .Build();
Sandbox mode lets you run test transactions without using real money. Remember to remove this before going live.
Warning: Leaving
IsSandbox = truein production means real purchases won't process. Set a reminder to flip this when you ship.
Verify Authentication is Working
Run your game and check the Unity Console. The key things to look for are the Initialize finished log confirming the store is ready, and Authenticate By Saved Token onSuccess confirming auth completed. You may also see some intermediate log entries during the auth process - these are normal. The final confirmation you want is IsBasedOnDeviceId: True, which tells you Device ID authentication is working correctly.
You'll also see an error saying something like "no products were returned from the store" - that's completely expected at this stage as we haven't set up a catalog yet. That's Step 2.
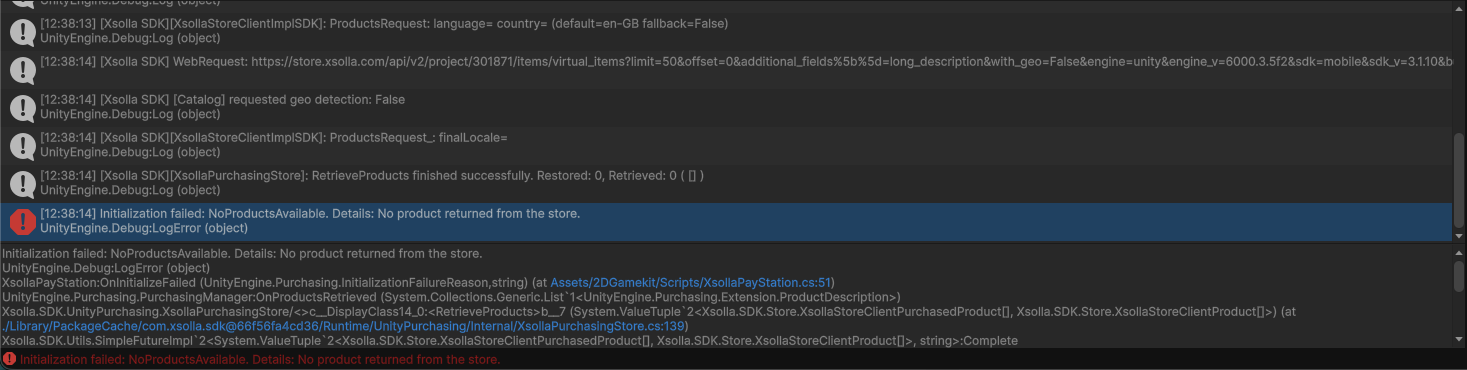
No products received Error
Step 2: Load Catalog
Create Your Item in Publisher Account
Head to your Project in your Publisher Account and navigate to Items Catalog > All Items in the left side panel.
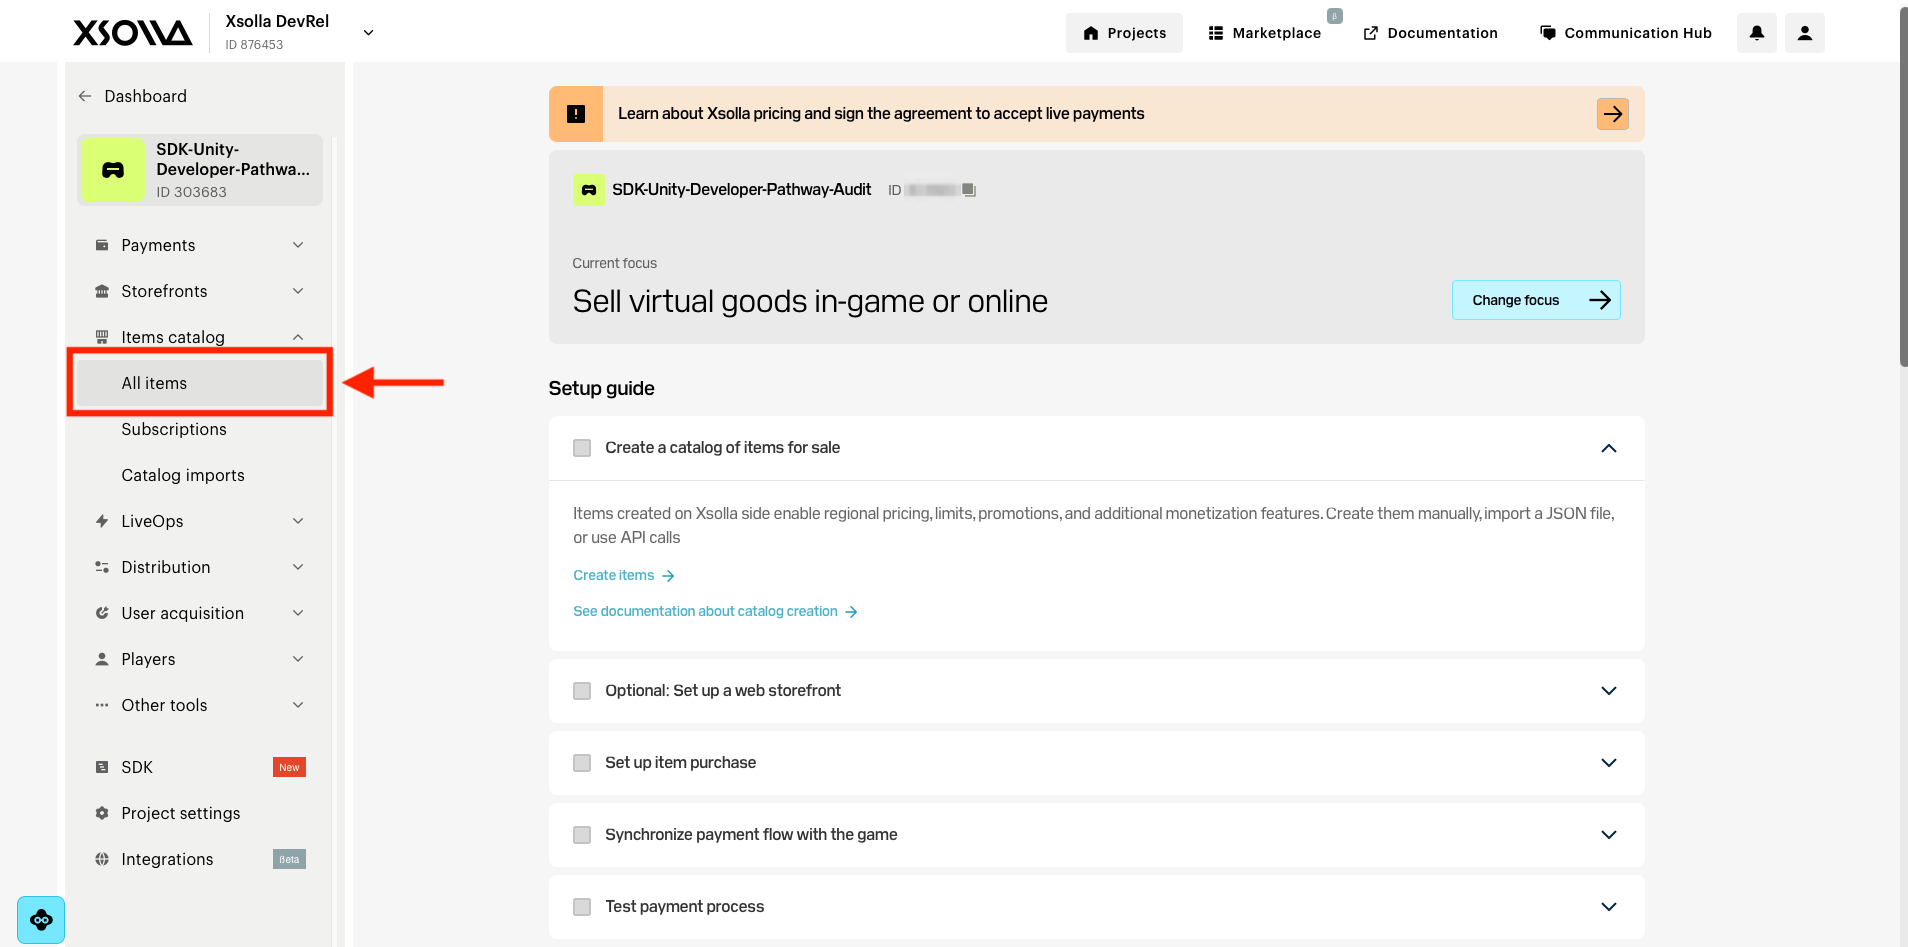
Navigating to the Catalog manager in the Publisher Account Dashboard
For a new item, click Create Item > Virtual Item. Fill in the details:
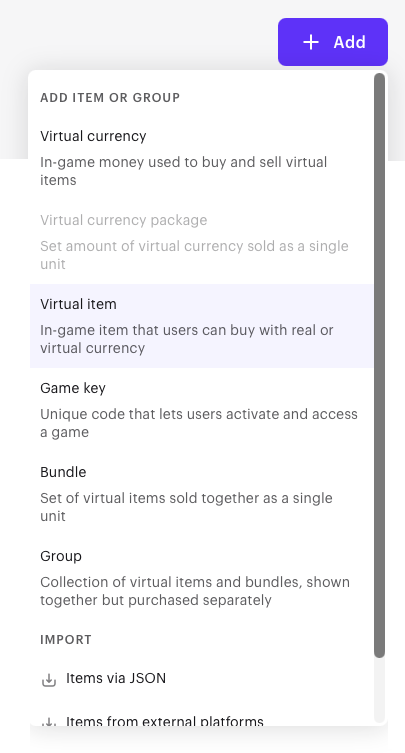
Creating new Virtual Item
- Name: What players will see during the purchase flow
- SKU: The ID you'll use to reference this product in code
- Description: Optional, but good practice
- Price: Set in real currency (we used $1.99)
- Leave the remaining options as defaults for now
Important: Before saving, make sure you mark the item as Available (at top of page). If you don't, the item won't be accessible in your game even if the SKU is correct. This is also the first thing to check if you later see a "no products found" error when you're sure the item exists.
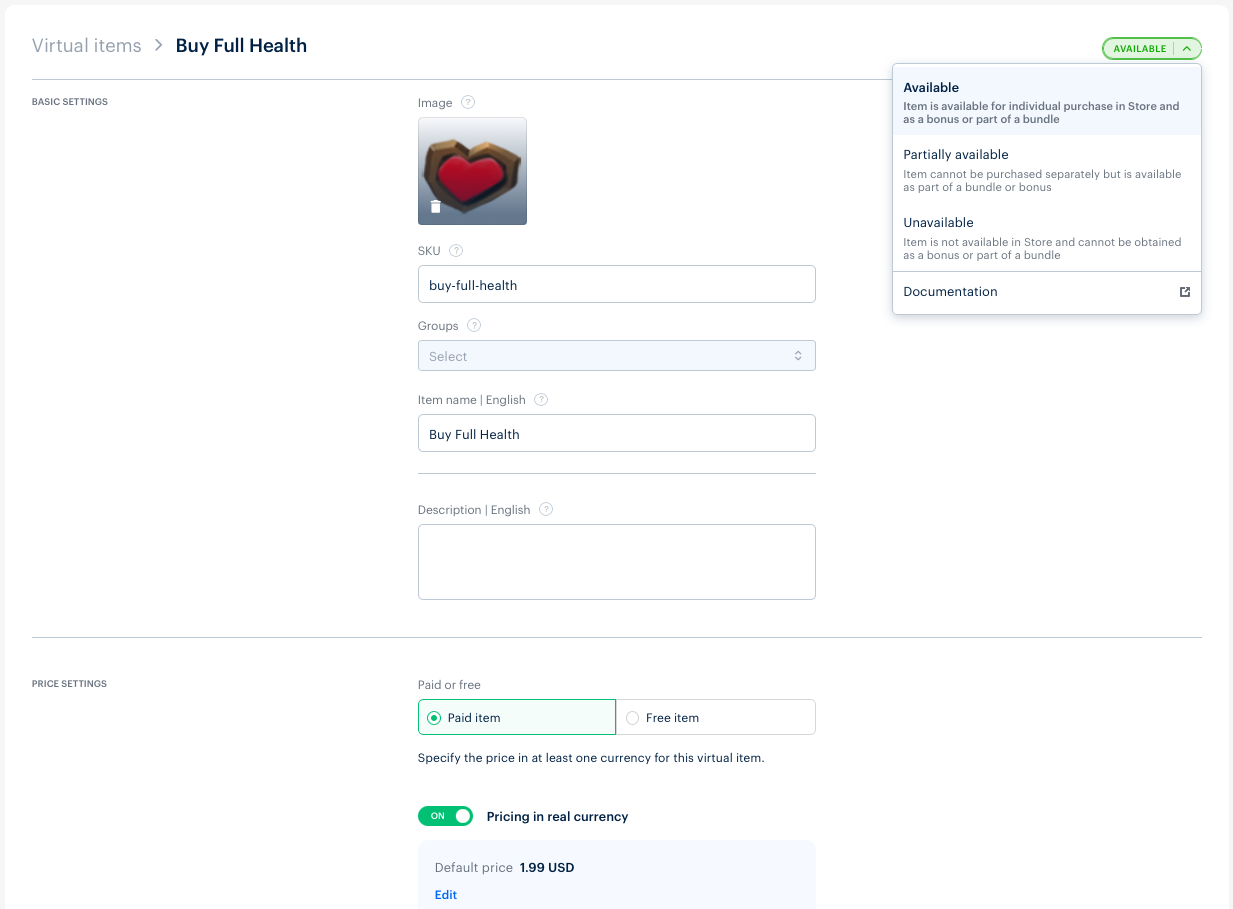
Adding a new Virtual Item properties and making it available
Connect the Catalog to Your Game
Return to the Integration Widget and select the Load Catalog step. You'll see two new pieces of code are being added to your class in this section.
In your Start function, register your product with Unity's IAP layer:
var configurationBuilder = ConfigurationBuilder.Instance(module)
    .AddProduct("product-sku", ProductType.Consumable);
A quick note on what this is doing: the Xsolla backend manages your catalog, but Unity's IAP layer also needs to know at runtime which products to initialize and fetch. AddProduct is how you tell Unity's layer what to expect. The ProductType.Consumable flag tells Unity that this item can be purchased more than once - important for something like a health upgrade that players might buy repeatedly.
In your OnInitialized callback, you can optionally iterate through the returned product data to do something with it - for example, populating a store UI with live prices and descriptions on load. We cover an alternative way to utilize this in Step 3 to drive our dynamic price button, so won't be using this code but have shared it here for reference.
public void OnInitialized(IStoreController controller, IExtensionProvider extensions)
{
    ...

    // Products available via _storeController.products.all
    foreach (var product in _storeController.products.all)
    {
        string id = product.definition.id;
        string title = product.metadata.localizedTitle;
        string price = product.metadata.localizedPriceString;
        string currency = product.metadata.isoCurrencyCode;
        // Display product to user
    }
}
Verify the Catalog is Loading
Run the game and check the Console. Look for a log entry confirming retrieved products finished successfully, showing retrieved count of 1 (or however many items you added) and the no-products error from Step 1 should now be gone. At this stage it will likely be one of the final logs present.

Unity logs confirming products were requested and retrieved successfully
Step 3: Initiate a Purchase
Add the Purchase Code
Head back to the Integration Widget - select the Purchase Product step. The key addition here is the InitiatePurchase call.
public void PurchaseSku(string productID)
{
    _storeController.InitiatePurchase(productID);
}
This single line is what kicks off the entire Xsolla purchase flow. When called, control hands over to Xsolla's backend: it launches Pay Station and provides all the necessary item information, handles the transaction and interaction, and then fires either ProcessPurchase or OnPurchaseFailed when it's done. It's intentionally thin - all the real logic lives in your callbacks and on the backend.
Info: The external browser behavior (Safari on iOS) is configured in the SDK Explorer under the Configuration tab for the Purchase Product step. This is set to External Browser by default, which is the correct and compliant choice for iOS in the US right now. Native and Buy Button implementations are also available if you need them.
Wire Up Your Game Logic
The SDK Explorer code gets you a working purchase trigger - but you still need to connect it to your actual game. For our demo we made a couple of adaptations:
-
Made the initiate purchase dynamic - instead of hardcoding a product ID in
InitiatePurchase, we pass it in as a parameter:public void PurchaseSku(string productID)
{
_storeController.InitiatePurchase(productID);
} -
Added a
GetProductPricefunction - this fetches the live price for a given SKU from the initialized product data and returns it as a formatted string:public string GetProductPrice(string productId)
{
if (_storeController == null) return "...";
var product = _storeController.products.WithID(productId);
return product != null ? product.metadata.localizedPriceString : "...";
} -
Made the class a Singleton - since our project uses multiple scenes, we needed global access to the
XsollaPayStationclass from other scripts:public class XsollaPayStation : MonoBehaviour, IDetailedStoreListener
{
public static XsollaPayStation Instance { get; private set; }
...
void Awake()
{
if (Instance != null && Instance != this)
{
Destroy(gameObject);
return;
}
Instance = this;
DontDestroyOnLoad(gameObject);
}
} -
UI Popup - In a separate class we then built out a UI pop up which displays the price returned from the
GetProductPricefunction, and selecting this will trigger theInitiatePurchasecall. Selecting respawn triggers a full reset with all progress lost.
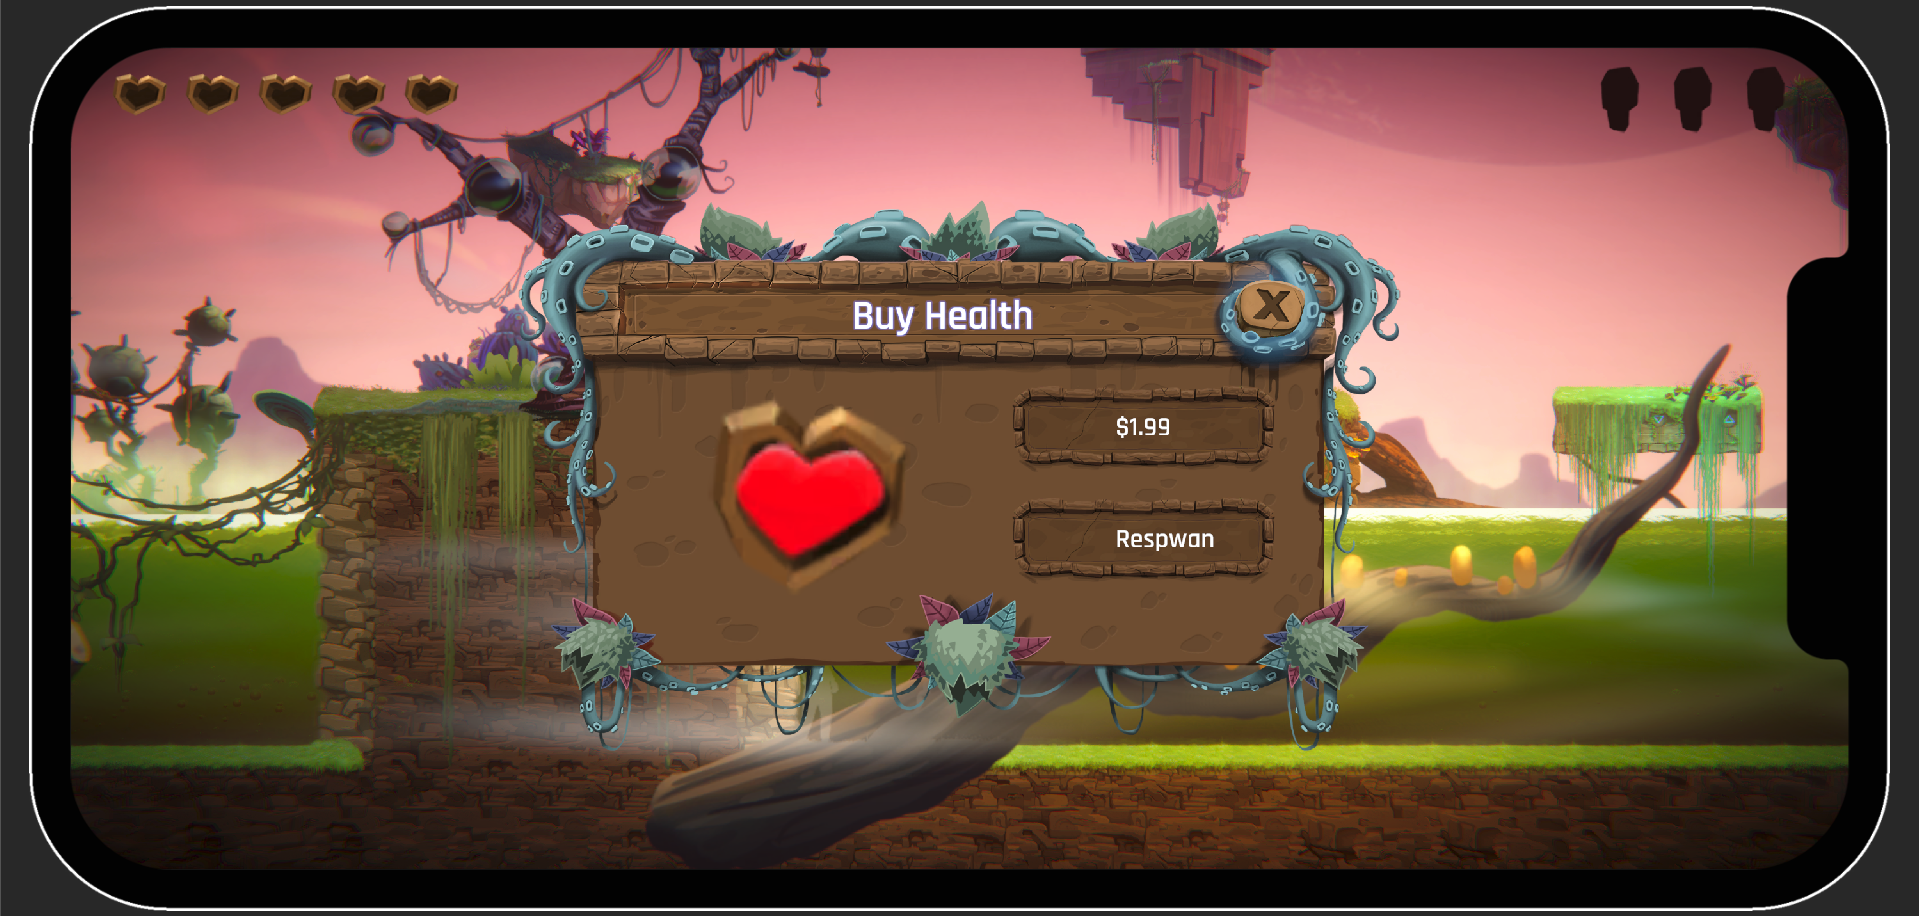
Screenshot of the in game UI popup to buy more health and trigger purchase flow
Test Your Purchase Flow
Run the game and trigger your purchase. You should see Pay Station open in an external browser window showing:
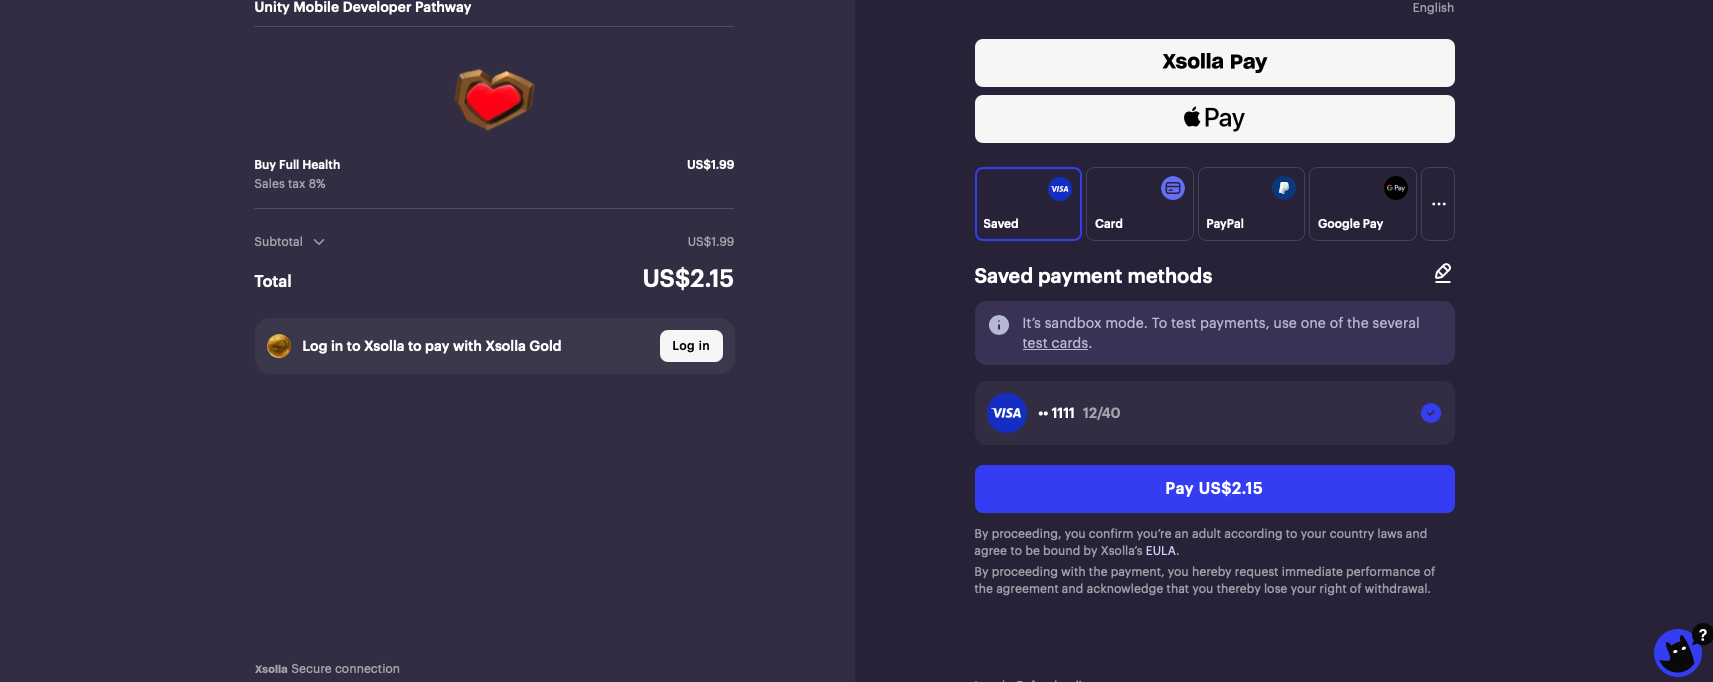
Xsolla Pay Station opening in the external browser
- Your product image
- Your game name
- Product name and price (including taxes) from your catalog
- Payment options
For sandbox testing, there's a link to test card details directly in Pay Station - use these rather than your own card details during development.
Complete the purchase and check your Unity Console. You should see the purchase flow complete: the purchase initiating, Xsolla's backend confirming the order, and Unity IAP closing the transaction (FinishTransaction). You won't see your game react yet because ProcessPurchase is still to be implemented in Step 4.
Step 4: Finalize the Purchase
Understanding the Return Value
Before we look at the code, one thing worth flagging: ProcessPurchase returns different values depending on your validation method. Since we're using client-side validation, we return PurchaseProcessingResult.Complete immediately - there's no external system to wait on, so we confirm and close the transaction right away. If you were using server-side validation, you'd return Pending instead, holding the transaction open until a backend confirmation arrives.
Note: The SDK Explorer defaults to showing the Events API / server-side code. Make sure you check the Configuration tab in the Finalize Purchase step and select Client-Side Only to see the correct code for our approach.
Implement ProcessPurchase
Here's the ProcessPurchase implementation for client-side validation:
public PurchaseProcessingResult ProcessPurchase(PurchaseEventArgs args)
{
    var product = args.purchasedProduct;
    var validator = _storeExtensions.GetExtension<IXsollaPurchasingStoreExtension>().GetValidator();

    validator.Validate(product.receipt, (success, error) =>
    {
        if (success)
        {
            // Purchase is valid - grant the item to the player, then confirm:
        }
        else
        {
            // Purchase validation failed - do not award item
            Debug.LogWarning($"Validation failed for {product.definition.id}");
        }
    });

    return PurchaseProcessingResult.Complete;
}
Info: Note this code snippet is reflective of client side purchase validation only. Server-side or Events API based validation will have additional code.
Note: Server-side validation for production
Client-side validation is a good starting point and appropriate for many games. For high-value economies or competitive games where fraudulent item grants would have meaningful impact, consider migrating to server-side validation using Xsolla's webhook system. Server-side validation is harder to intercept or tamper with, as the receipt never passes through client code you don't control.
A Note on OnPurchaseFailed
You may notice there are two versions of the OnPurchaseFailed callback. That's because Unity IAP has two different listener interfaces, each of which fires a slightly different version of the method. Having both present just means you're covered regardless of which interface is in play. For our project and a client-side validation, no additional logic is needed in either at this time so we can keep the Integration Widget defaults.
public void OnPurchaseFailed(Product product, PurchaseFailureReason failureReason)
{
    if (failureReason == PurchaseFailureReason.UserCancelled)
    {
        // Handle user cancellation here
        return;
    }
    Debug.LogError($"Purchase failed: {product.definition.id}, reason: {failureReason}");
}

public void OnPurchaseFailed(Product product, PurchaseFailureDescription failureDescription)
{
    if (failureDescription.reason == PurchaseFailureReason.UserCancelled)
    {
        // Handle user cancellation here
        return;
    }
    Debug.LogError($"Purchase failed: {product.definition.id}, reason: {failureDescription.reason}, message: {failureDescription.message}");
}
Add Your Game Logic
With the Xsolla plumbing done, add whatever your game needs to do following a successful purchase inside the ProcessPurchase block. In our demo, that's closing the popup and calling the player respawn function with full health from the latest checkpoint. This will be entirely specific to your project - the key point is that ProcessPurchase is where it lives.
Verify the Complete Flow
Run the game end-to-end. Trigger your purchase flow, complete the transaction in Pay Station, and this time you should see your game react - in our case, the player respawning at the checkpoint with full health.
Check the Console for the finalized purchase confirmation log. You should see the full finalization sequence play out: validation firing (confirming your ProcessPurchase implementation triggered the client-side validation path correctly), FinishTransaction closing the transaction on the Unity IAP side, and potentially your own Purchase successful log confirming your game logic ran.
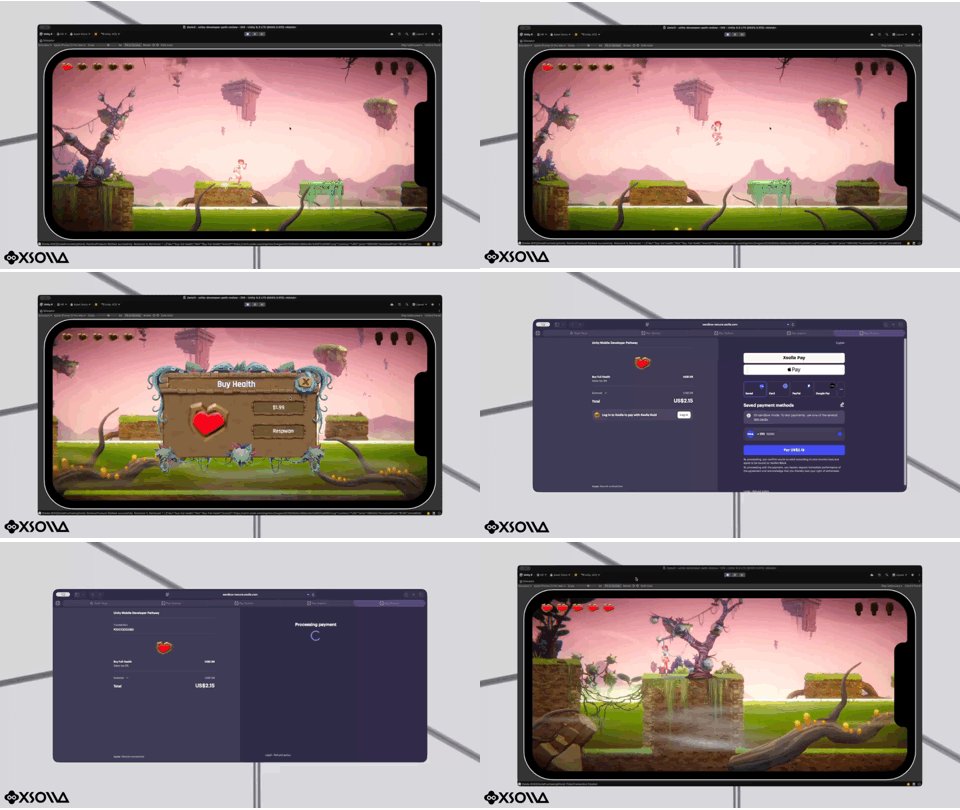
GIF showcasing key features and flow of final working integration
You're Done
That's a complete Xsolla payment integration in Unity for iOS - Device ID authentication, a dynamic catalog, Pay Station via external browser, and client-side purchase validation.
The final class structure you should have:
- Initialization and authentication configured with your Project ID and Login ID
- Catalog registration with your product SKU(s) declared to Unity IAP
InitiatePurchasewired up to your game UI triggerProcessPurchasereturningCompleteimmediately and triggering your game's post-purchase logicOnPurchaseFailed(both variants) present and handling failure gracefully
Where to Go Next
A few natural next steps from here:
- Add more products - extend
AddProductand your store UI to support a full catalog - Move to server-side validation or Events API - if security is a priority (and for real-money transactions it usually should be), the Xsolla Events API or webhook-based server validation is the upgrade path. The SDK Explorer makes it easy to see exactly what changes
- Note: Currently you will need to speak to your account manager or email [email protected] to get the Events API configured for your project
- Explore other authentication and login methods - Device ID is quick to set up but doesn't persist across device changes. Xsolla supports a full range of login options including email, social, and platform-native auth
- Configure your Pay Station - Publisher Account gives you control over payment methods, UI theming, and regional settings
- Your reference resources - the Xsolla SDK Site has detailed walkthroughs, quick guides, and videos for every feature covered here and beyond. The SDK Explorer is worth spending time in once you have a working integration - filtering by stage and watching the logs update in real time gives you a much deeper understanding of what the SDK is doing under the hood.
Good luck - and if you run into anything, the Xsolla developer community and support team are there to help.