如何结合Firebase身份认证使用支付中心
如已使用Firebase在应用程序中实现用户身份认证,可在Firebase侧生成一个支付令牌,然后将其传入应用程序的客户端侧来打开支付UI。
如使用此集成方案,需独立实现决定用户国家/地区和支付所使用的货币的逻辑。
集成过程:
- 创建项目。
- 注册发布商帐户并新建一个项目。后续步骤需要用到所创建项目的ID。
- 设置目录:
- 在艾克索拉侧创建一个商品目录。您可以手动添加商品或从App Store、Google Play或PlayFab导入。
- 使用SDK实现在应用程序客户端侧获取和显示目录。
- 设置商品购买:
- 通过Firebase云函数使用用户和商品数据在应用程序客户端侧创建一个订单。
- 使用SDK实现在应用程序客户端侧打开支付UI。
与艾克索拉签署许可协议,这样才能完成集成并开始接受真实付款。请前往发布商帐户中的协议与税务信息 > 协议 > 许可协议部分,填写表单并等待批准。
您可以在集成的任意阶段签署协议,但请知晓审核过程最长可能需要3个工作日。
请使用样本应用程序作为示例来实现Firebase身份认证和支付中心的结合使用。样本应用程序的源代码在GitHub上提供。
创建项目
发布商帐户是配置艾克索拉功能以及对分析和交易进行操作的主要工具。
注册时指定的公司及应用程序信息将用于创建与艾克索拉许可协议的草稿以及生成合适解决方案的推荐。后续您可以更改这些数据,但在注册时提供正确的信息可以加快签署许可协议的速度。
要创建项目:
- 注册发布商帐户。
密码生成规则
发布商帐户的密码可以包含英文字母、数字和特殊字符,且必须至少包含:
- 8个字符
- 一个数字
- 一个大写字母
- 一个小写字母
为确保密码安全性,建议您:
- 每90天至少更改一次密码
- 使用与帐户中过去4个密码不同的新密码
- 使用与其他地方的密码不同的特殊密码
- 勿将密码保存在可以轻易访问的地方
- 使用密码管理器来保存您的密码
发布商帐户使用双因素认证,每次认证尝试都会发送验证码。
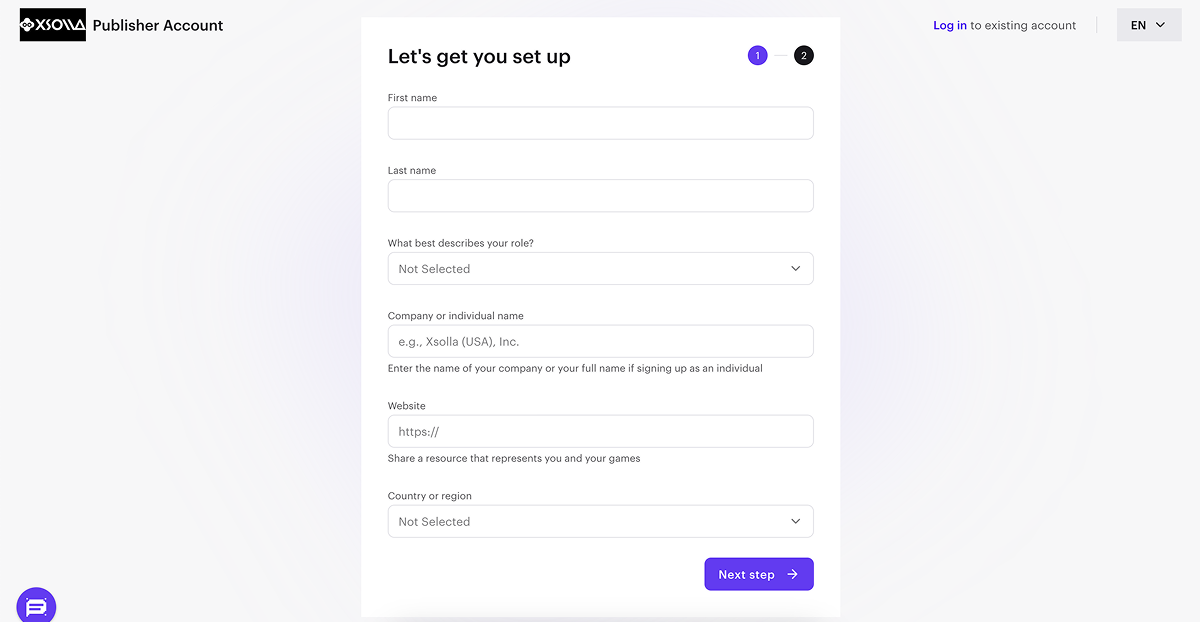
- 提供以下信息创建您的帐户:
- 您的名和姓。
- 您在公司中的职位。
- 公司名称。如果以个人身份注册帐户,请输入您的全名。
- 关于您和您的游戏或产品的详细信息链接(可选)。
- 您的国家/地区。
- 单击下一步。
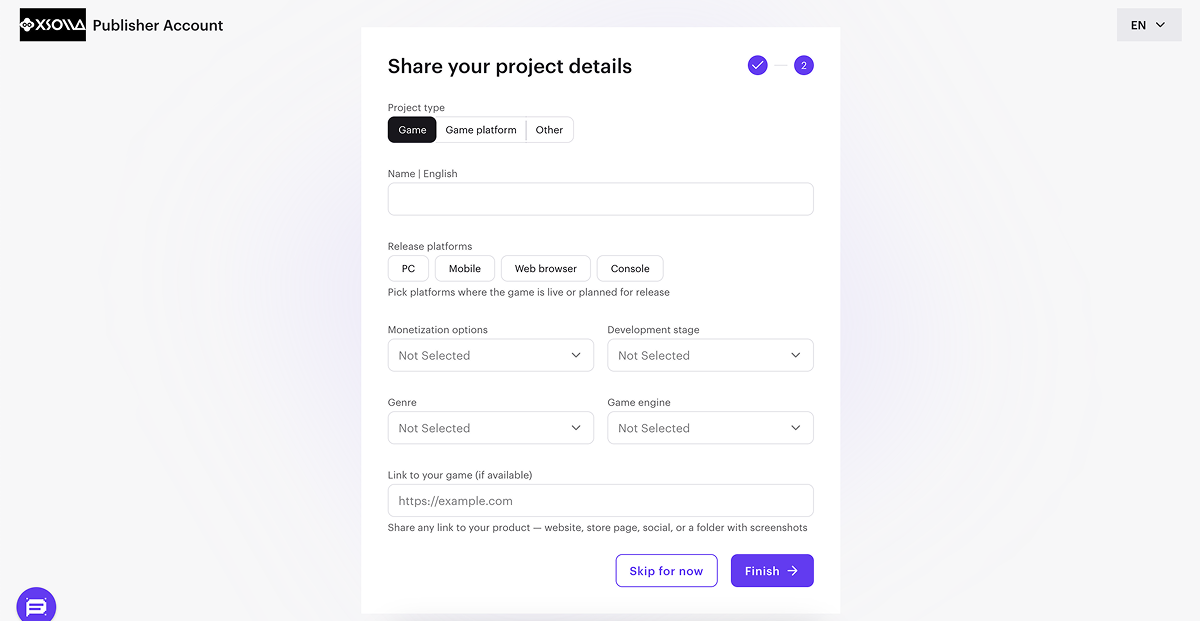
- 要自动创建您的首个项目,请指定关于项目的主要信息:
- 选择项目类型:游戏、游戏平台或其他。
- 用英文输入项目名称。
- 选择一个或多个发布平台。
- 选择您正在使用或计划使用的盈利方式。
- 选择开发阶段。
- 如果您的项目类型是游戏,请选择其类型和游戏引擎。
- 添加您的游戏或产品链接(可选)。
- 单击完成。
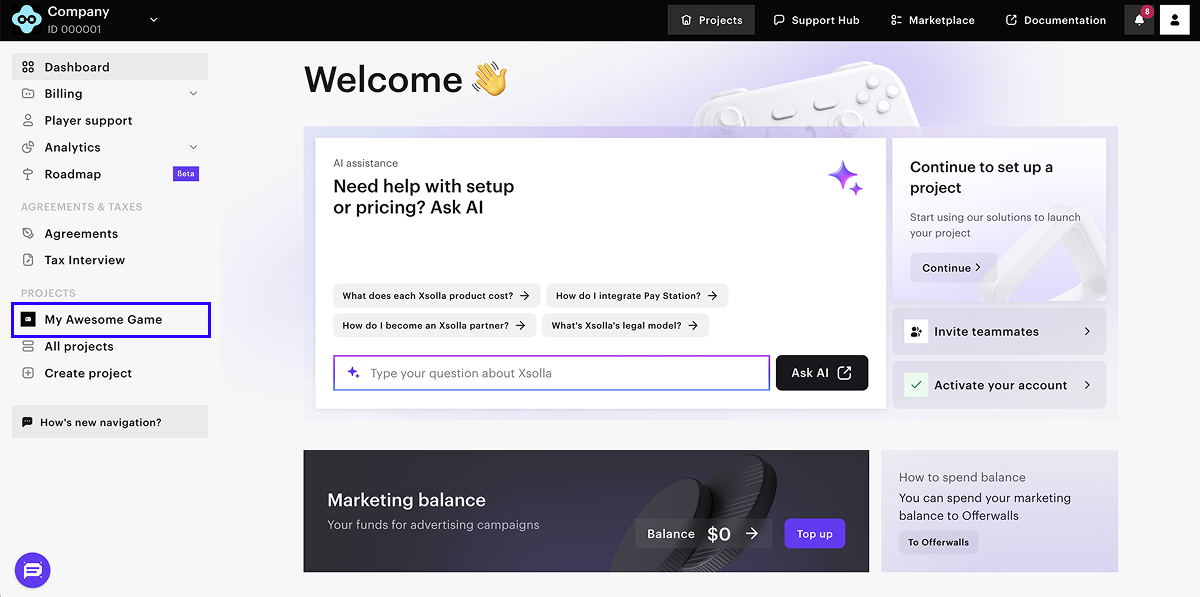
项目创建后,您将被重定向到公司页面。创建的项目会显示在侧边栏中:
- 单击其名称开始集成艾克索拉产品和解决方案。
- 前往项目设置部分添加其他语言和本地化项目名称(可选)。
如果有多个游戏或产品,请为每个创建单独的项目。为此,在公司页面的侧边栏中,单击创建项目并指定必要信息。

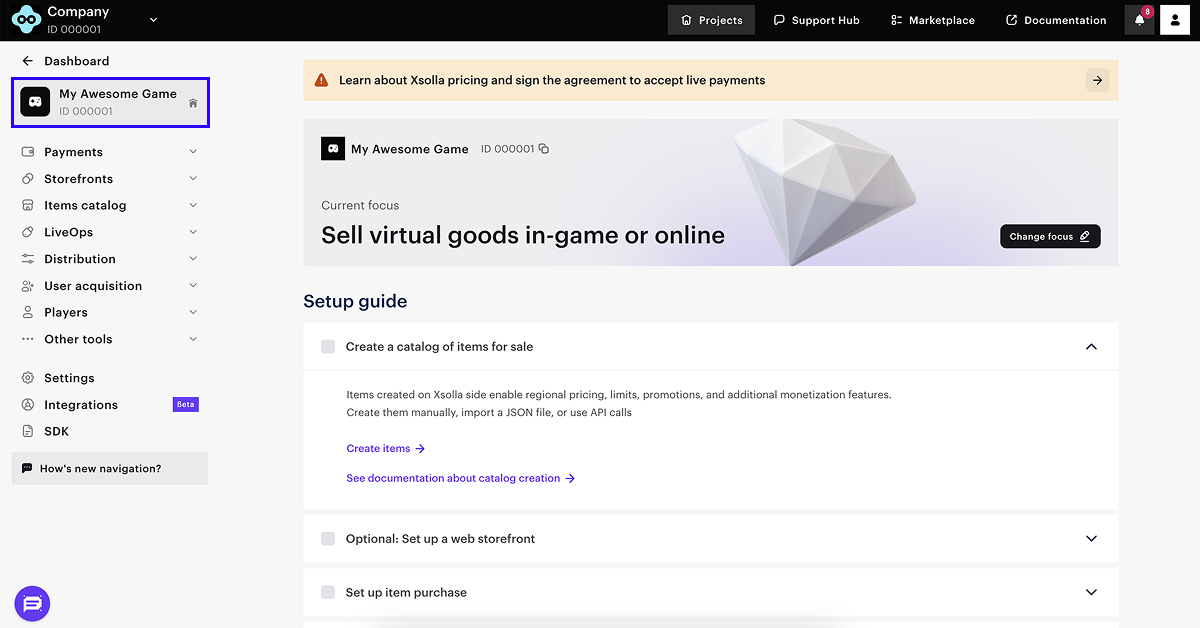
集成过程中需提供项目ID,可在发布商帐户中项目名称的旁边找到。
设置目录
在发布商帐户中创建商品
您需要在艾克索拉侧创建一个目录。您可以手动添加商品或从App Store、Google Play或PlayFab导入商品。从Google Play导入时,一次最多可以导入100个商品。
以下说明提供的是设置虚拟物品的基本步骤。您可以在后来向目录添加其他商品(虚拟货币、捆绑包、游戏密钥等)、创建商品组、设置促销活动和区域价格等。
要向目录添加具有基本设置的虚拟物品:
- 在发布商帐户中打开您的项目,前往商品目录 > 全部商品部分。
- 单击添加并从下拉列表中选择虚拟物品。

- 在以下字段中完成物品的基本设置:
- 图片(可选)
- SKU(物品唯一ID)
- 物品名称
- 描述(可选)
- 指定物品价格:
- 将真实货币定价开关设置为开。
- 在默认货币字段,更改货币(可选)并指定物品价格。
- 如更改了默认货币字段中的货币,请在真实货币定价字段中选择同样的货币。
- 将物品状态更改为可用。

- 单击创建物品。
在应用程序客户端侧显示目录
- 下载最新SDK版本(推荐),或在GitHub上选择所需版本并下载。
- 解压缩包。
- 在主菜单中,前往
Assets > Import Package > Custom Package ,然后选择下载的SDK。 - 在主菜单中,前往
Window > Xsolla > Edit Settings 。 - 前往
Inspector 面板。在Project ID 字段中指定可在发布商帐户项目名称旁边找到的项目ID。

- 在应用程序的客户端侧,添加显示商品目录的UI。
- 实现向艾克索拉服务器请求商品目录。
GetCatalog SDK方法。您也可以使用其他SDK方法获取目录商品的信息。设置商品购买
使用云函数创建订单
要使用用户和商品数据在艾克索拉侧创建订单,请添加使用为购买创建支付令牌API调用的云函数至项目。该调用将返回一个支付令牌,用于打开支付UI并进行购买。
限制:
- 需在请求支付令牌时传入用户国家/地区或用户IP地址。
- 如未在令牌中传入货币,则货币由国家/地区决定。
- 如在令牌中传入了货币,则用户用该货币进行支付。
要将云函数添加至项目:
- 安装Firebase CLI(命令行界面)。方法是运行以下CLI命令:
1npm install -g firebase-tools
- 要将您的项目关联至Firebase项目,请运行以下CLI命令来初始化Firebase项目:
1firebase init functions
- 按照安装程序的说明来配置设置:
- 选择一个现有代码库。
- 指定JavaScript作为创建云函数的语言。
- 安装依赖项。
- 打开
functions/index.js并进行修改:
- javascript
 1// The Cloud Functions for Firebase SDK to create Cloud Functions and triggers.
 2const functions = require('firebase-functions/v1');
 3
 4const projectId = <projectId>;
 5const apiKey = <apiKey>;
 6
 7exports.getXsollaPaymentToken = functions.https.onRequest((req, res) => {
 8
 9  const requestBody = req.body;
10    if (!requestBody) {
11      res.status(400).send('Request body is missing');
12      return;
13    }
14
15  const userId = requestBody.data.uid;
16  const email = requestBody.data.email;
17  const sku = requestBody.data.sku;
18  const returnUrl = requestBody.data.returnUrl;
19
20  const payload = {
21    user: {
22      id: {value: userId},
23      name: {
24        value: email
25      },
26      email: {
27        value: email
28      },
29      country: {
30        value: 'US',
31        allow_modify: false
32      }
33    },
34    purchase: {
35      items: [
36        {
37          sku: sku,
38          quantity: 1
39        }
40      ]
41    },
42    sandbox: true,
43    settings: {
44      language: 'en',
45      currency: 'USD',
46      return_url: returnUrl,
47      ui: {
48        theme: '63295aab2e47fab76f7708e3'
49      }
50    }
51  }
52
53  let url = `https://store.xsolla.com/api/v3/project/${projectId.toString()}/admin/payment/token`;
54
55  fetch(
56    url,
57    {
58      method: "POST",
59      headers: {
60        'Content-Type': 'application/json',
61        Authorization: `Basic ${btoa(`${projectId}:${apiKey}`)}`
62      },
63      body: JSON.stringify(payload)
64    },
65  )
66  .then(xsollaRes => {
67    // Handle the response data
68    if (xsollaRes.ok) {
69      return xsollaRes.json();
70    } else {
71      throw new Error(`HTTP request failed with status ${xsollaRes.status} and statusText: ${xsollaRes.statusText}`)
72    }
73  })
74  .then(data => {
75    res.send(JSON.stringify(data));
76  })
77  .catch(error => {
78    res.send(`Error = ${error}`);
79  });
80});
81
82exports.webhookFakeResponse = functions.https.onRequest((request, response) => {
83  response.status(200).send()
84})
- 在脚本中,指定变量的值:
projectId— 可在发布商帐户中项目名称旁边找到的项目ID。

apiKey— API密钥。密钥仅在创建它时在发布商帐户中显示一次,必须存储在己侧。您可以在以下部分中创建新的密钥:
- 要使用模拟器测试云函数,请运行CLI命令:
1firebase emulators:start
- 运行云函数后,您可以在应用程序客户端侧调用以下方法:
- 要在本地调用方法,请使用
https://localhost:5001/{firebase-project-id}/us-central1/getXsollaPaymentToken和https://localhost:5001/{firebase-project-id}/us-central1/webhookFakeResponseURL,其中{firebase-project-id}是Firebase项目ID(Firebase控制台 > Project Settings > Project ID)。
- 要在生产中部署云函数,请运行CLI命令:
1firebase deploy --only functions
- 在生产中部署后,即可通过
https://us-central1-{firebase-project-id}.cloudfunctions.net/getXsollaPaymentToken和https://us-central1-{firebase-project-id}.cloudfunctions.net/webhookFakeResponseURL调用方法,其中{firebase-project-id}是Firebase项目ID(Firebase控制台 > Project Settings > Project ID)。关于在生产环境中运行功能的详细信息,请参阅Firebase文档。
在Unity项目中创建订单并打开支付UI
- 打开您的Unity项目。
- 对页面控制器脚本进行更改:
- 添加
MakeCloudFunctionRequest方法以调用云函数。要调用getXsollaPaymentToken方法,请提供以下URL之一,其中{firebase-project-id}是Firebase项目ID(Firebase控制台 > Project Settings > Project ID):
- 添加
- 对于本地访问 —
https://localhost:5001/{firebase-project-id}/us-central1/getXsollaPaymentToken - 对于生产环境中的访问 —
https://us-central1-{firebase-project-id}.cloudfunctions.net/getXsollaPaymentToken
- 对于本地访问 —
- C++
 1IEnumerator MakeCloudFunctionRequest(string sku)
 2   {
 3       string url = "https://localhost:5001/{firebase-project-id}/us-central1/getXsollaPaymentToken";
 4
 5       using (UnityWebRequest webRequest = UnityWebRequest.Get(url))
 6       {
 7           var userData = new UserData()
 8           {
 9               data = new UserData.Data() {
10                   uid = user.UserId,
11                   email = user.Email,
12                   sku = sku,
13                   returnUrl = "app://xpayment.com.xsolla.unitysample"
14               }
15           };
16
17           byte[] data = System.Text.Encoding.UTF8.GetBytes(JsonUtility.ToJson(userData, true));
18           UploadHandlerRaw upHandler = new UploadHandlerRaw(data);
19           upHandler.contentType = "application/json";
20           webRequest.uploadHandler = upHandler;
21           webRequest.method = "POST";
22           yield return webRequest.SendWebRequest();
23
24           if (webRequest.result != UnityWebRequest.Result.Success)
25           {
26               Debug.LogError($"Error: {webRequest.error}");
27           }
28           else
29           {
30               var paymentToken = "";
31               XsollaWebBrowser.OpenPurchaseUI(
32                       paymentToken,
33                       false);
34               Debug.Log($"Response: {webRequest.downloadHandler.text}");
35           }
36       }
37   }
- 对点击购买按钮添加云函数回调:
- C++
 1private void OnItemsRequestSuccess(StoreItems storeItems)
 2    {
 3        foreach (var storeItem in storeItems.items)
 4        {
 5            var widgetGo = Instantiate(WidgetPrefab, WidgetsContainer, false);
 6            var widget = widgetGo.GetComponent<StoreItemWidget>();
 7
 8            widget.BuyButton.onClick.AddListener(() =>
 9            {
10                StartCoroutine(MakeCloudFunctionRequest(storeItem.sku));
11            });
12
13            widget.NameText.text = storeItem.name;
14            widget.DescriptionText.text = storeItem.description;
15
16            if (storeItem.price != null)
17            {
18                var realMoneyPrice = storeItem.price;
19                widget.PriceText.text = $"{realMoneyPrice.amount} {realMoneyPrice.currency}";
20            }
21
22            ImageLoader.LoadSprite(storeItem.image_url, sprite => widget.IconImage.sprite = sprite);
23        }
24    }
您可以将测试项目当做实现示例。该Unity项目的源代码在GitHub上提供。
页面控制器示例脚本:
- C++
  1using Firebase.Extensions;
  2using System;
  3using System.Collections;
  4using UnityEngine;
  5using UnityEngine.Networking;
  6using UnityEngine.UI;
  7using Xsolla.Catalog;
  8using Xsolla.Core;
  9
 10[Serializable]
 11public class UserData
 12{
 13    public Data data;
 14
 15    [Serializable]
 16    public class Data
 17    {
 18        public string uid;
 19        public string email;
 20        public string sku;
 21        public string returnUrl;
 22    }
 23}
 24
 25public class FirebaseExamplePage : MonoBehaviour
 26{
 27    public GameObject LoginContainer;
 28    public GameObject StoreItemsContainer;
 29
 30    public InputField EmailInputField;
 31    public InputField PasswordInputField;
 32    public Button LoginButton;
 33    public Button RegisterButton;
 34
 35    public Transform WidgetsContainer;
 36    public GameObject WidgetPrefab;
 37
 38    protected Firebase.Auth.FirebaseAuth auth;
 39    Firebase.Auth.FirebaseUser user = null;
 40
 41    Firebase.DependencyStatus dependencyStatus = Firebase.DependencyStatus.UnavailableOther;
 42
 43    public virtual void Start()
 44    {
 45        Firebase.FirebaseApp.CheckAndFixDependenciesAsync().ContinueWithOnMainThread(task => {
 46            dependencyStatus = task.Result;
 47            if (dependencyStatus == Firebase.DependencyStatus.Available)
 48            {
 49                InitializeFirebase();
 50            }
 51            else
 52            {
 53                Debug.LogError(
 54                  $"Could not resolve all Firebase dependencies: {dependencyStatus}");
 55            }
 56        });
 57    }
 58
 59    protected void InitializeFirebase()
 60    {
 61        StoreItemsContainer.SetActive(false);
 62
 63        Debug.Log("Setting up Firebase Auth");
 64        auth = Firebase.Auth.FirebaseAuth.DefaultInstance;
 65        auth.StateChanged += AuthStateChanged;
 66        RegisterButton.onClick.AddListener(() =>
 67        {
 68            auth.CreateUserWithEmailAndPasswordAsync(EmailInputField.text, PasswordInputField.text).ContinueWith(task =>
 69            {
 70                if (task.IsCanceled)
 71                {
 72                    Debug.LogError("CreateUserWithEmailAndPasswordAsync was canceled.");
 73                    return;
 74                }
 75                if (task.IsFaulted)
 76                {
 77                    Debug.LogError($"CreateUserWithEmailAndPasswordAsync encountered an error: {task.Exception}");
 78                    return;
 79                }
 80
 81                Firebase.Auth.AuthResult result = task.Result;
 82                Debug.LogFormat("Firebase user created successfully: {0} ({1})",
 83                    result.User.DisplayName, result.User.UserId);
 84            });
 85        });
 86
 87        LoginButton.onClick.AddListener(() =>
 88        {
 89            auth.SignInWithEmailAndPasswordAsync(EmailInputField.text, PasswordInputField.text).ContinueWith(task =>
 90            {
 91                if (task.IsCanceled)
 92                {
 93                    Debug.LogError("SignInWithEmailAndPasswordAsync was canceled.");
 94                    return;
 95                }
 96                if (task.IsFaulted)
 97                {
 98                    Debug.LogError($"SignInWithEmailAndPasswordAsync encountered an error: {task.Exception}");
 99                    return;
100                }
101
102                Firebase.Auth.AuthResult result = task.Result;
103                Debug.LogFormat("Firebase user logged in successfully: {0} ({1})",
104                    result.User.DisplayName, result.User.UserId);
105            });
106        });
107    }
108
109    void AuthStateChanged(object sender, System.EventArgs eventArgs)
110    {
111        Firebase.Auth.FirebaseAuth senderAuth = sender as Firebase.Auth.FirebaseAuth;
112        if (senderAuth == auth && senderAuth.CurrentUser != user)
113        {
114            bool signedIn = user != senderAuth.CurrentUser && senderAuth.CurrentUser != null;
115            if (!signedIn && user != null)
116            {
117                Debug.Log($"Signed out {user.UserId}");
118            }
119            user = senderAuth.CurrentUser;
120            if (signedIn)
121            {
122                Debug.Log($"AuthStateChanged Signed in {user.UserId}");
123                LoadCatalog();
124            }
125        }
126    }
127
128    void OnDestroy()
129    {
130        if (auth != null)
131        {
132            auth.SignOut();
133            auth.StateChanged -= AuthStateChanged;
134            auth = null;
135        }
136    }
137    private void LoadCatalog()
138    {
139        LoginContainer.SetActive(false);
140        StoreItemsContainer.SetActive(true);
141        XsollaCatalog.GetCatalog(OnItemsRequestSuccess, OnError);
142    }
143
144    private void OnItemsRequestSuccess(StoreItems storeItems)
145    {
146
147        foreach (var storeItem in storeItems.items)
148        {
149            var widgetGo = Instantiate(WidgetPrefab, WidgetsContainer, false);
150            var widget = widgetGo.GetComponent<StoreItemWidget>();
151
152            if(widget != null)
153            {
154                widget.NameText.text = storeItem.name;
155                widget.DescriptionText.text = storeItem.description;
156
157                widget.BuyButton.onClick.AddListener(() =>
158                {
159                    StartCoroutine(MakeCloudFunctionRequest(storeItem.sku));
160                });
161
162                if (storeItem.price != null)
163                {
164                    var realMoneyPrice = storeItem.price;
165                    widget.PriceText.text = $"{realMoneyPrice.amount} {realMoneyPrice.currency}";
166                }
167
168                ImageLoader.LoadSprite(storeItem.image_url, sprite => widget.IconImage.sprite = sprite);
169            }
170        }
171    }
172    IEnumerator MakeCloudFunctionRequest(string sku)
173    {
174        string url = "https://localhost:5001/{firebase-project-id}/us-central1/getXsollaPaymentToken";
175
176        using (UnityWebRequest webRequest = UnityWebRequest.Get(url))
177        {
178            var userData = new UserData()
179            {
180                data = new UserData.Data() {
181                    uid = user.UserId,
182                    email = user.Email,
183                    sku = sku,
184                    returnUrl = "app://xpayment.com.xsolla.unitysample"
185                }
186            };
187
188            byte[] data = System.Text.Encoding.UTF8.GetBytes(JsonUtility.ToJson(userData, true));
189            UploadHandlerRaw upHandler = new UploadHandlerRaw(data);
190            upHandler.contentType = "application/json";
191            webRequest.uploadHandler = upHandler;
192            webRequest.method = "POST";
193            yield return webRequest.SendWebRequest();
194
195            if (webRequest.result != UnityWebRequest.Result.Success)
196            {
197                Debug.LogError($"Error: {webRequest.error}");
198            }
199            else
200            {
201                string responseJson = webRequest.downloadHandler.text;
202                var responseData = JsonUtility.FromJson<OrderData>(responseJson);
203
204                var paymentToken = responseData.token;
205                int orderId = responseData.order_id;
206
207                XsollaWebBrowser.OpenPurchaseUI(
208                        paymentToken,
209                        false);
210                Debug.Log($"Response: {webRequest.downloadHandler.text}");
211            }
212        }
213    }
214
215    private void OnError(Error error)
216    {
217        Debug.LogError($"Error: {error.errorMessage}");
218    }
219}
设置订单状态跟踪
您需要跟踪项目状态,以确保支付成功并向用户发放商品。
获取客户端侧订单状态
订单跟踪逻辑包含在GetXsollaPaymentToken方法中。要处理成功的购买,需传递一个在订单状态变为done时调用的函数。
AddOrderForTracking SDK方法用于跟踪。关于该方法的详细使用信息,请参阅跟踪订单状态。
在服务器侧获取订单状态
要在艾克索拉侧配置Webhook:
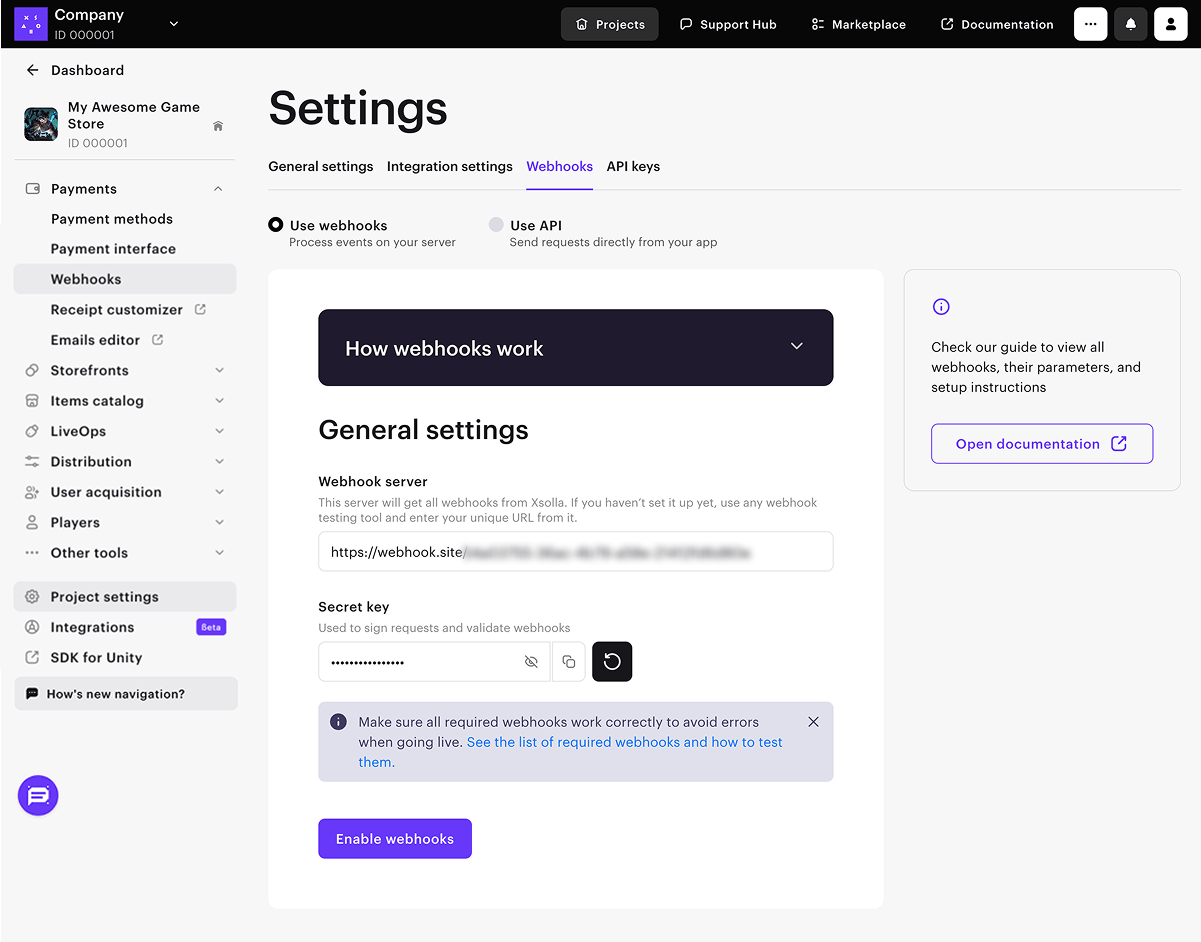
- 在发布商帐户中打开您的项目,然后前往项目设置 > Webhooks部分。
- 在Webhook服务器字段中,输入艾克索拉要向其发送Webhook的URL。
进行测试时,可指定https://us-central1-{firebase-project-id}.cloudfunctions.net/webhookFakeResponse,其中{firebase-project-id}是Firebase项目ID(Firebase控制台 > Project Settings > Project ID)。本例中,Firebase模拟了对Webhook的成功处理。对于真实项目,您需要添加购买验证逻辑。
要测试Webhook,您还可以选择任意专门网站(如webhook.site)或平台(如ngrok)。
- 复制并保存密钥字段的值。该密钥默认生成,并用于Webhook签名。如要更改该密钥,请单击更新图标。
- 单击启用Webhook。
发现了错别字或其他内容错误? 请选择文本,然后按Ctrl+Enter。
