엔터프라이즈급 Unity용 SDK / 애플리케이션 측 SDK 통합
  문서로 돌아가기

엔터프라이즈급 Unity용 SDK

애플리케이션 측 SDK 통합

  1. 로그인 시스템, 인게임 스토어 및 기타 페이지에서 사용할 인터페이스를 디자인합니다.
  2. SDK 메소드를 사용하여 사용자 인증, 스토어 디스플레이, 구매 등을 위한 애플리케이션 로직을 구현합니다.
알림
Unity 지침에 따라 자체 솔루션을 생성하거나, 데모 장면을 템플릿으로 사용할 수 있습니다. 데모 장면 인터페이스를 애플리케이션에 적용하려면, UI 빌더를 사용합니다.
기본 SDK 기능을 시작하려면 다음 단계별 튜토리얼을 따라하세요.사용된 스크립트는 SDK의 Assets/Xsolla/Samples 디렉터리에서 확인할 수 있습니다.

사용자 이름/이메일 및 암호를 통한 사용자 로그인

SDK 메소드를 사용하여 구현하는 방법 지침:

  • 사용자 등록
  • 등록 확인 이메일 요청 재전송
  • 사용자 로그인
  • 사용자 암호

사용자 이름 또는 이메일 주소로 사용자를 인증할 수 있습니다. 다음 예시에서 사용자를 사용자 이름 이름으로 인증합니다. 반면 이메일 주소는 등록 확인 및 암호 재설정에 사용합니다.

알림
로그인 위젯을 귀하의 사이트에서 사용하는 경우(예: 웹 스토어) 같은 사용자 인증 방법을 귀하의 사이트 및 애플리케이션에서 구현했는지 확인하십시오. 위젯은 기본적으로 이메일 주소를 인증에 사용합니다. 사용자 로그인을 사용자 이름을 통해 설정하려면 고객 성공 매니저에게 연락하거나 csm@xsolla.com으로 이메일을 보내주세요.
예시의 로직 및 인터페이스는 귀하의 애플리케이션의 것보다 덜 복잡합니다. 가능한 인증 시스템 구현 옵션은 데모 프로젝트에 서술되어 있습니다.

사용자 등록 구현

이 튜토리얼이 설명하는 논리의 구현:

페이지 컨트롤러 생성

등록 페이지용 장면을 생성하고 페이지에 추가할 요소:

  • 사용자 이름 필드
  • 사용자 이메일 주소 필드
  • 사용자 암호 필드
  • 등록 버튼

다음 그림은 페이지 구조의 예시를 보여줍니다.

페이지 컨트롤러 생성

  1. MonoBehaviour 기본 클래스에서 상속된RegistrationPage 스크립트를 생성합니다.
  2. 페이지 인터페이스 요소에 대한 변수를 선언하고 Inspector 패널에서 그에 대한 값을 설정합니다.
  3. 스크립트 예시와 같이 등록 버튼 클릭을 처리하는 로직을 추가합니다.
알림

스크립트 예시에서 OnSuccessOnError 메소드는 표준 Debug.Log 메소드를 호출합니다. 오류가 발생하면 오류 코드 및 설명이 error 매개변수에서 전달됩니다.

등록이 성공적이라면 등록 이메일 또는 로그인 페이지 열기 요청 재전송을 포함하는 페이지 열기 같은 다른 동작을 추가할 수 있습니다.

등록 페이지 스크립트 예시:
Copy
Full screen
Small screen
using UnityEngine;
using UnityEngine.UI;
using Xsolla.Auth;
using Xsolla.Core;

namespace Xsolla.Samples.Authorization
{
	public class RegistrationPage : MonoBehaviour
	{
		// Declaration of variables for UI elements
		public InputField UsernameInput;
		public InputField EmailInputField;
		public InputField PasswordInputField;
		public Button RegisterButton;

		private void Start()
		{
			// Handling the button click
			RegisterButton.onClick.AddListener(() =>
			{
				// Get the username, email and password from input fields
				var username = UsernameInput.text;
				var email = EmailInputField.text;
				var password = PasswordInputField.text;

				// Call the user registration method
				// Pass credentials and callback functions for success and error cases
				XsollaAuth.Register(username, password, email, OnSuccess, OnError);
			});
		}

		private void OnSuccess(LoginLink loginLink)
		{
			Debug.Log("Registration successful");
			// Add actions taken in case of success
		}

		private void OnError(Error error)
		{
			Debug.LogError($"Registration failed. Error: {error.errorMessage}");
			// Add actions taken in case of error
		}
	}
}

등록 확인 이메일 설정

성공적인 등록 후 사용자는 지정된 주소로 등록 확인 이메일을 받습니다. 관리자 페이지에서 사용자에게 보낼 이메일을 맞춤 설정할 수 있습니다.

Android 애플리케이션을 개발 중이라면 사용자가 등록 확인을 한 후에 애플리케이션으로 사용자들 돌려보내기 위한 딥 링크를 설정합니다.

알림
보안 표준이 이를 허용한다면 이메일 주소를 통한 등록 확인을 비활성화할 수 있습니다. 고객 성공 매니저에게 연락하여 비활성화하거나 csm@xsolla.com으로 연락해 주십시오.

등록 확인 이메일 재전송 요청 구현

이 튜토리얼이 설명하는 논리의 구현:

페이지 컨트롤러 생성

확인 이메일 재전송 요청 페이지용 장면을 생성하고 페이지에 추가할 요소:

  • 사용자 이름/이메일 필드
  • 이메일 재전송 버튼

다음 그림은 페이지 구조의 예시를 보여줍니다.

페이지 컨트롤러 생성

  1. MonoBehaviour 기본 클래스에서 상속된ResendConfirmationEmail 스크립트를 생성합니다.
  2. 페이지 인터페이스 요소에 대한 변수를 선언하고 Inspector 패널에서 그에 대한 값을 설정합니다.
  3. 스크립트 예시와 같이 이메일 재전송 버튼 클릭을 처리하는 로직을 추가합니다.

이메일 재전송 페이지 스크립트 예:

Copy
Full screen
Small screen
using UnityEngine;
using UnityEngine.UI;
using Xsolla.Auth;
using Xsolla.Core;

namespace Xsolla.Samples.Authorization
{
	public class ResendConfirmationEmailPage : MonoBehaviour
	{
		// Declaration of variables for UI elements
		public InputField UsernameInput;
		public Button ResendEmailButton;

		private void Start()
		{
			// Handling the button click
			ResendEmailButton.onClick.AddListener(() =>
			{
				// Get the username from the input field
				var username = UsernameInput.text;

				// Call the resend confirmation email method
				// Pass the username and callback functions for success and error cases
				XsollaAuth.ResendConfirmationLink(username, OnSuccess, OnError);
			});
		}

		private void OnSuccess()
		{
			Debug.Log("Resend confirmation email successful");
			// Add actions taken in case of success
		}

		private void OnError(Error error)
		{
			Debug.LogError($"Resend confirmation email failed. Error: {error.errorMessage}");
			// Add actions taken in case of error
		}
	}
}

요청이 성공적이면 사용자가 등록 확인 이메일을 등록할 동안 지정한 이메일 주소로 받습니다.

사용자 로그인 구현

이 튜토리얼이 설명하는 논리의 구현:

페이지 컨트롤러 생성

로그인 페이지용 장면을 생성하고 추가할 요소:

  • 사용자 이름 필드
  • 암호 필드
  • 기억 체크 박스
  • 로그인 버튼

다음 그림은 페이지 구조의 예시를 보여줍니다.

페이지 컨트롤러 생성

  1. MonoBehaviour 기본 클래스에서 상속된AutorizationPage 스크립트를 생성합니다.
  2. 페이지 인터페이스 요소에 대한 변수를 선언하고 Inspector 패널에서 그에 대한 값을 설정합니다.
  3. 스크립트 예시와 같이 로그인 버튼 클릭을 처리하는 로직을 추가합니다.

로그인 페이지 스크립트 예시:

Copy
Full screen
Small screen
using UnityEngine;
using UnityEngine.UI;
using Xsolla.Auth;
using Xsolla.Core;

namespace Xsolla.Samples.Authorization
{
	public class AuthorizationPage : MonoBehaviour
	{
		// Declaration of variables for UI elements
		public InputField UsernameInput;
		public InputField PasswordInputField;
		public Button SignInButton;

		private void Start()
		{
			// Handling the button click
			SignInButton.onClick.AddListener(() =>
			{
				// Get the username and password from input fields
				var username = UsernameInput.text;
				var password = PasswordInputField.text;

				// Call the user authorization method
				// Pass credentials and callback functions for success and error cases
				XsollaAuth.SignIn(username, password, OnSuccess, OnError);
			});
		}

		private void OnSuccess()
		{
			Debug.Log("Authorization successful");
			// Add actions taken in case of success
		}

		private void OnError(Error error)
		{
			Debug.LogError($"Authorization failed. Error: {error.errorMessage}");
			// Add actions taken in case of error
		}
	}
}

암호 재설정 구현

이 튜토리얼이 설명하는 논리의 구현:

페이지 컨트롤러 생성

암호 재설정 페이지용 장면을 생성하고 페이지에 추가할 요소:

  • 사용자 이름/이메일 필드
  • 암호 재설정 버튼

다음 그림은 페이지 구조의 예시를 보여줍니다.

페이지 컨트롤러 생성

  1. MonoBehaviour 기본 클래스에서 상속된ResetPasswordPage 스크립트를 생성합니다.
  2. 페이지 인터페이스 요소에 대한 변수를 선언하고 Inspector 패널에서 그에 대한 값을 설정합니다.
  3. 스크립트 예시와 같이 비밀번호 재설정 버튼 클릭을 처리하는 로직을 추가합니다.

암호 재설정 페이지 스크립트 예시:

Copy
Full screen
Small screen
using UnityEngine;
using UnityEngine.UI;
using Xsolla.Auth;
using Xsolla.Core;

namespace Xsolla.Samples.Authorization
{
	public class ResetPasswordPage : MonoBehaviour
	{
		// Declaration of variables for UI elements
		public InputField UsernameInput;
		public Button ResetPasswordButton;

		private void Start()
		{
			// Handling the button click
			ResetPasswordButton.onClick.AddListener(() =>
			{
				// Get the username from the input field
				var username = UsernameInput.text;

				// Call the password reset method
				// Pass the username and callback functions for success and error cases
				XsollaAuth.ResetPassword(username, OnSuccess, OnError);
			});
		}

		private void OnSuccess()
		{
			Debug.Log("Password reset successful");
			// Add actions taken in case of success
		}

		private void OnError(Error error)
		{
			Debug.LogError($"Password reset failed. Error: {error.errorMessage}");
			// Add actions taken in case of error
		}
	}
}

성공적인 암호 재설정 요청 후 사용자는 암호 재설정 링크가 있는 이메일을 받게 됩니다. 관리자 페이지 > 로그인 프로젝트 > 보안 > OAuth 2.0 > OAuth 2.0 리디렉션 URI에서 인증 성공, 이메일 확인, 암호 재설정 후 사용자가 리디렉션되는 URL 주소 또는 경로를 구성할 수 있습니다.

소셜 로그인

본 지침은 SDK 메소드를 통하여 사용자의 SNS 계정으로 사용자 등록 및 로그인을 구현하는 방법을 보여줍니다.

사용자 이름/사용자 이메일 주소 및 비밀번호를 통한 사용자 인증과는 달리, 사용자 등록을 위한 별도의 로직을 구현할 필요가 없습니다. 사용자가 SNS를 통해 최초 로그인 하는 경우, 새 계정이 자동으로 생성됩니다.

여러분의 애플리케이션에서 대체 인증 메소드를 자체 구현한 경우, 다음 조건이 일치하면 해당 SNS 계정이 기존 사용자 계정에 자동으로 연결 됩니다.

  • 사용자 이름/이메일 주소 및 비밀번호로 가입한 사용자가 SNS 계정을 통해 애플리케이션에 로그인했습니다.
  • SNS는 이메일 주소를 반환합니다.
  • SNS의 사용자 이메일 주소가 애플리케이션에서 가입 시 사용한 이메일 주소와 동일합니다.
알림
SNS 계정 수동 연결을 구현할 수 있습니다. 사용자가 SNS 계정을 자신의 계정에 연결할 수 있도록 하는 페이지를 애플리케이션에 추가합니다. 페이지 컨트롤러에서, LinkSocialProvider SDK 메소드를 사용합니다.
이 튜토리얼이 설명하는 논리의 구현:

Facebook 계정을 통해 사용자 로그인을 설정하는 방법을 보여주는 예시입니다. 모든 소셜 네트워크를 같은 압법으로 설정할 수 있습니다.

예시의 로직 및 인터페이스는 귀하의 애플리케이션의 것보다 덜 복잡합니다. 가능한 인증 시스템 구현 옵션은 데모 프로젝트에 서술되어 있습니다.

페이지 컨트롤러 생성

로그인 페이지용 장면을 생성하고 소셜 로그인 버튼을 이에 추가합니다. 다음 사진은 페이지 구조의 예시를 보여줍니다.

페이지 컨트롤러 생성

  1. MonoBehaviour 기본 클래스에서 상속된SocialAuthorizationPage 스크립트를 생성합니다.
  2. 애플리케이션 로그인 페이지 인터페이스 요소에 대한 변수를 선언하고 Inspector 패널에서 그에 대한 값을 설정합니다.
  3. 스크립트 예시와 같이 로그인 버튼 클릭을 처리하는 로직을 추가합니다.
알림

스크립트 예시에서 OnSuccessOnError 메소드가 표준 Debug.Log 메소드를 호출합니다. 다른 동작을 추가할 수 있습니다.

오류가 발생하면 오류 코드와 설명이 error 매개변수에서 전달됩니다.

로그인 페이지 스크립트 예시:
Copy
Full screen
Small screen
using UnityEngine;
using UnityEngine.UI;
using Xsolla.Auth;
using Xsolla.Core;

namespace Xsolla.Samples.Authorization
{
	public class SocialAuthorizationPage : MonoBehaviour
	{
		// Declaration of variables for SocialProvider and signIn button
		public SocialProvider SocialProvider = SocialProvider.Facebook;
		public Button SignInButton;

		private void Start()
		{
			// Handling the button click
			SignInButton.onClick.AddListener(() =>
			{
				// Call the social authorization method
				// Pass the social network provider and callback functions for success, error and cancel cases
				XsollaAuth.AuthViaSocialNetwork(SocialProvider, OnSuccess, OnError, OnCancel);
			});
		}

		private void OnSuccess()
		{
			Debug.Log("Social authorization successful");
			// Add actions taken in case of success
		}

		private void OnError(Error error)
		{
			Debug.LogError($"Social authorization failed. Error: {error.errorMessage}");
			// Add actions taken in case of error
		}

		private void OnCancel()
		{
			Debug.Log("Social authorization cancelled by user.");
			// Add actions taken in case the user canceles authorization
		}
	}
}

아이템 카탈로그 표시

이 튜토리얼은 SDK 메소드를 사용하여 인게임 스토어에서 다음 아이템을 표시하는 방법을 보여줍니다.

  • 가상 아이템
  • 가상 아이템 그룹
  • 번들
  • 인게임 재화 패키지

시작하기 전에 관리자 페이지의 아이템을 구성해야 합니다.

  1. 가상 아이템과 가상 아이템 그룹을 구성합니다.
  2. 인게임 재화 패키지를 구성합니다.
  3. 번들을 구성합니다.

이 튜토리얼이 설명하는 논리의 구현:

예시의 로직 및 인터페이스는 귀하의 애플리케이션의 것보다 덜 복잡합니다. 가능한 인게임 스토어 아이템 카탈로그 구현 옵션은 데모 프로젝트에 서술되어 있습니다.

알림

카탈로그의 모든 아이템 예시가 표시하는 내용:

  • 아이템 이름
  • 아이템 설명
  • 아이템 가격
  • 이미지

이 정보가 인게임 스토어에 정보가 저장되어 있다면 아이템에 관한 다른 정보도 표시할 수 있습니다.

가상 아이템 표시 구현

아이템 위젯 생성

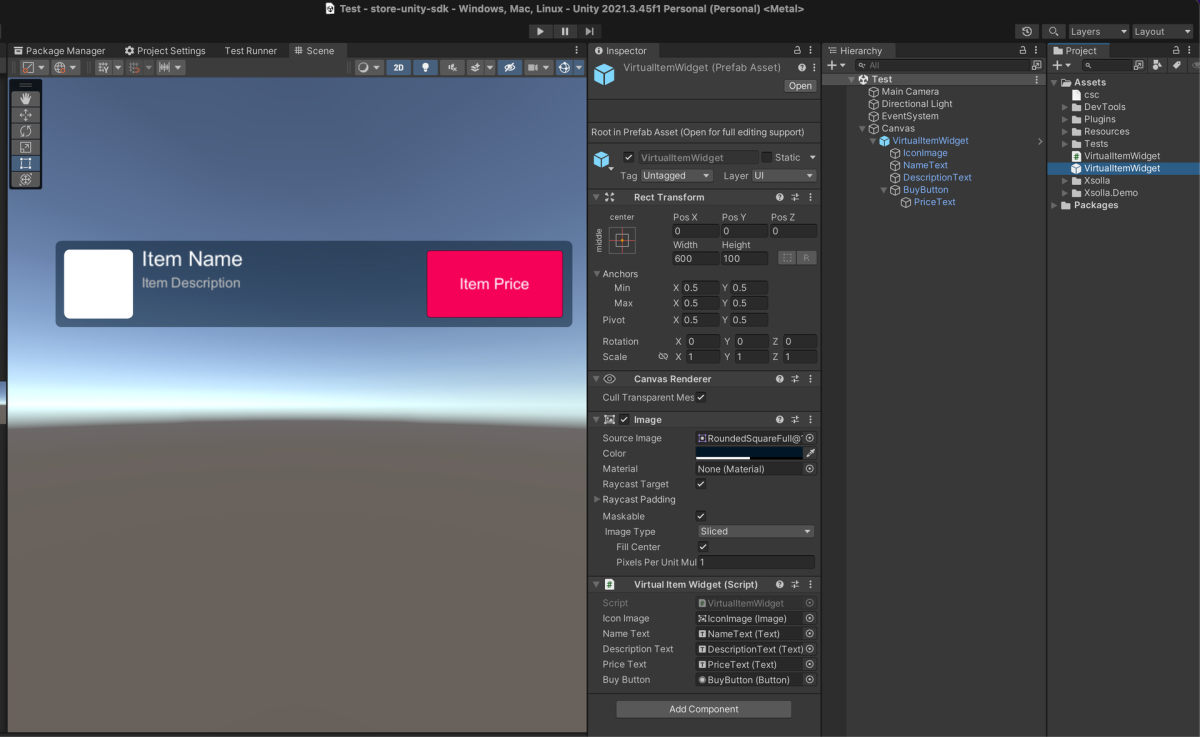
  1. 비어 있는 게임 개체를 생성합니다. 이 작업을 수행하려면 메인 메뉴로 이동하여 GameObject > Create Empty를 선택합니다.
  2. 게임 개체를 Hierarchy 패널에서 Project 패널로 끌어서 프리패브의 생성한 게임 개체를 변환합니다.
  3. 생성한 프리패브를 선택하고 Inspector 패널에서 Open Prefab를 클릭합니다.
  4. 다음 UI 요소를 프리패브 자식 개체로 추가하고 시각 정보를 구성합니다.
    • 아이템 배경 이미지
    • 아이템 이름
    • 아이템 설명
    • 아이템 가격
    • 아이템 이미지

다음 그림은 위젯 구조의 예시를 보여줍니다.

아이템 위젯 스크립트 생성

  1. MonoBehaviour 기본 클래스에서 상속된 VirtualItemWidget 스크립트를 생성합니다.
  2. 아이템 위젯 인터페이스 요소에 대한 변수를 선언하고 Inspector 패널에서 그에 대한 값을 설정합니다.

위젯 스크립트 예시t:

Copy
Full screen
Small screen
using UnityEngine;
using UnityEngine.UI;

namespace Xsolla.Samples.DisplayCatalog
{
	public class VirtualItemWidget : MonoBehaviour
	{
		// Declaration of variables for UI elements
		public Text NameText;
		public Text DescriptionText;
		public Text PriceText;
		public Image IconImage;
	}
}

아이템 목록을 표시할 페이지 생성

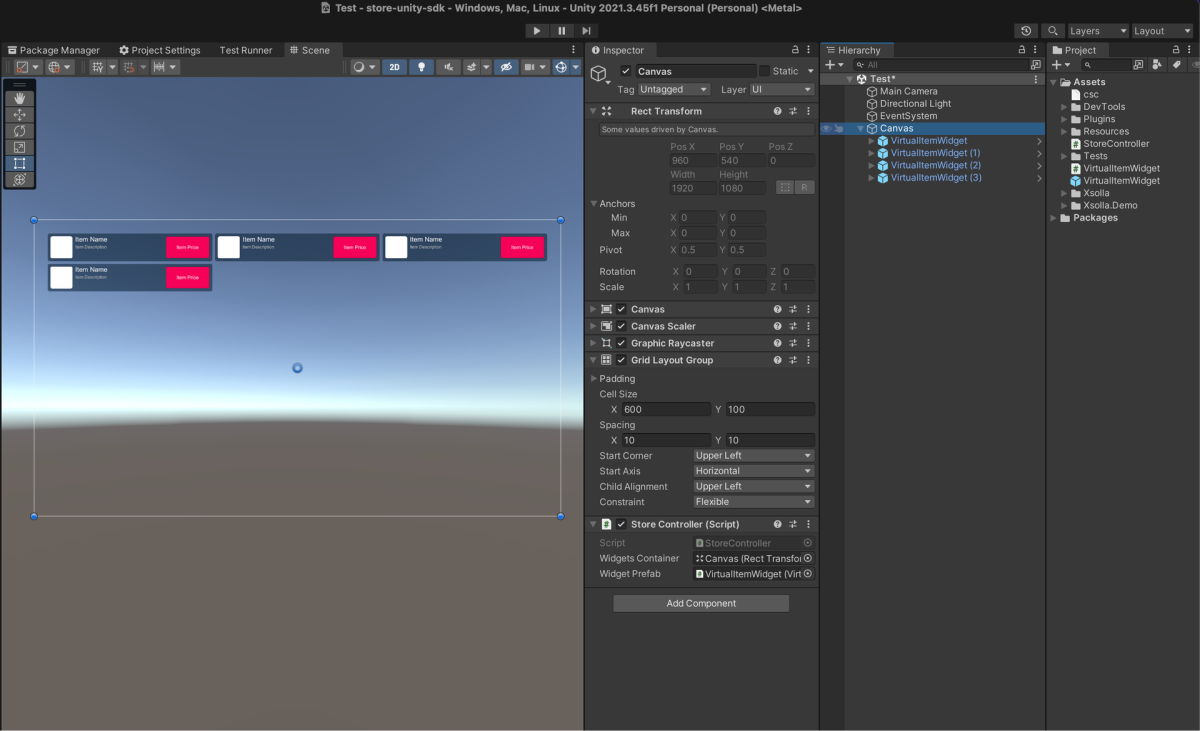
  1. 장면에서 비어 있는 게임 개체를 생성합니다. 이 작업을 수행하려면 메인 메뉴로 이동하여 GameObject > Create Empty를 선택합니다.
  2. 다음 UI 요소를 프리패브 자식 개체로 추가하고 시각 정보를 구성합니다.
    • 페이지 배경 이미지
    • 아이템 위젯 표시 영역

다음 그림은 페이지 구조의 예시를 보여줍니다.

페이지 컨트롤러 생성

  1. MonoBehaviour 기본 클래스에서 상속된 VirtualItemsPage 스크립트를 생성합니다.
  2. 선언할 변수:
    • WidgetsContainer — 위젯용 컨테이너
    • WidgetPrefab — 아이템 위젯 프리패브

  1. 페이지 게임 개체에 스크립트 첨부:
    1. Hierarchy 패널의 개체를 선택합니다.
    2. Inspector 패널에서 Add Component를 클릭하고 VirtualItemsPage 스크립트를 선택합니다.
  2. Inspector 패널의 변숫값을 설정합니다.

  1. 스크립트 예시와 같이 로그인 로직과 아이템 목록을 가져오는 로직을 추가합니다.
알림

로그인 스크립트 예시에서 저희는 데모 계정 자격 증명을 사용합니다(사용자 이름 : xsolla, 암호: xsolla).

스크립트 샘플에는 카탈로그에 있는 아이템의 페이지별 표시 구현(페이지 매김)이 포함되어 있지 않습니다. 페이지 매김을 구현하려면 GetCatalog SDK 메소드의 offsetlimit 매개변수를 사용합니다. 한 페이지 당 최대 아이템 개수는 50개입니다. 카탈로그에 아이템이 50개 이상 있는 경우 페이지 매김이 필요합니다.

페이지 컨트롤러 스크립트 예시:
Copy
Full screen
Small screen
using System.Linq;
using UnityEngine;
using Xsolla.Auth;
using Xsolla.Catalog;
using Xsolla.Core;

namespace Xsolla.Samples.DisplayCatalog
{
	public class VirtualItemsPage : MonoBehaviour
	{
		// Declaration of variables for widget's container and prefab
		public Transform WidgetsContainer;
		public GameObject WidgetPrefab;

		private void Start()
		{
			// Starting the authentication process
			// Pass the credentials and callback functions for success and error cases
			// The credentials (username and password) are hard-coded for simplicity
			XsollaAuth.SignIn("xsolla", "xsolla", OnAuthenticationSuccess, OnError);
		}

		private void OnAuthenticationSuccess()
		{
			// Starting the items request from the store after successful authentication
			XsollaCatalog.GetCatalog(OnItemsRequestSuccess, OnError);
		}

		private void OnItemsRequestSuccess(StoreItems storeItems)
		{
			// Iterating the items collection
			foreach (var storeItem in storeItems.items)
			{
				// Instantiating the widget prefab as child of the container
				var widgetGo = Instantiate(WidgetPrefab, WidgetsContainer, false);
				var widget = widgetGo.GetComponent<VirtualItemWidget>();

				// Assigning the values for UI elements
				widget.NameText.text = storeItem.name;
				widget.DescriptionText.text = storeItem.description;

				// The item can be purchased for real money or virtual currency
				// Checking the price type and assigning the values for appropriate UI elements
				if (storeItem.price != null)
				{
					var realMoneyPrice = storeItem.price;
					widget.PriceText.text = $"{realMoneyPrice.amount} {realMoneyPrice.currency}";
				}
				else if (storeItem.virtual_prices != null)
				{
					var virtualCurrencyPrice = storeItem.virtual_prices.First(x => x.is_default);
					widget.PriceText.text = $"{virtualCurrencyPrice.name}: {virtualCurrencyPrice.amount}";
				}

				// Loading the item image and assigning it to the UI element
				ImageLoader.LoadSprite(storeItem.image_url, sprite => widget.IconImage.sprite = sprite);
			}
		}

		private void OnError(Error error)
		{
			Debug.LogError($"Error: {error.errorMessage}");
			// Add actions taken in case of error
		}
	}
}

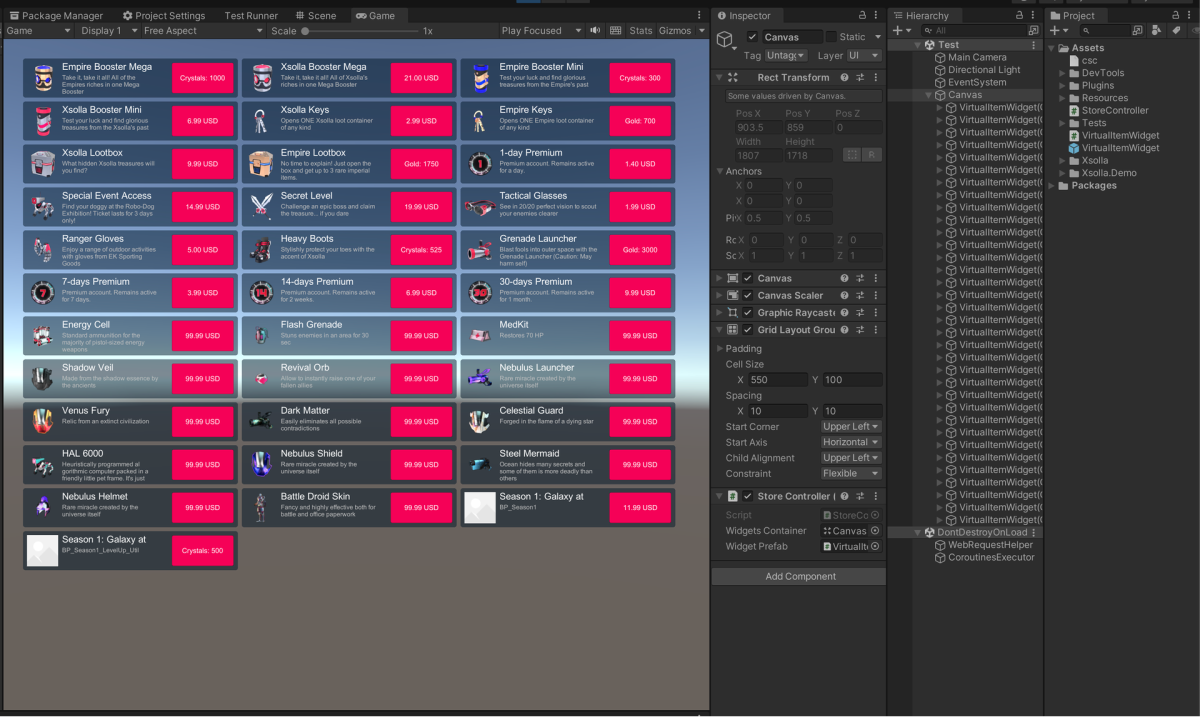
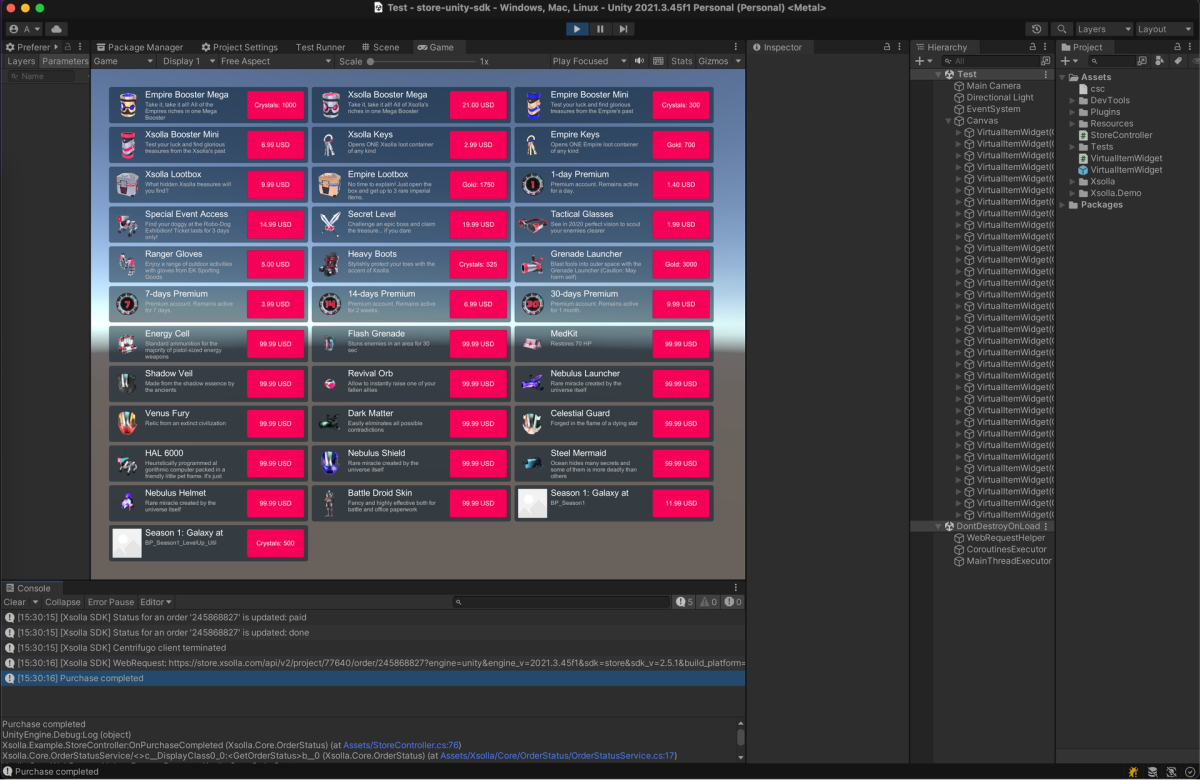
다음 그림은 스크립트 작업 결과를 보여줍니다.

가상 아이템 그룹 표시 구현

아이템 위젯 생성

  1. 비어 있는 게임 개체를 생성합니다. 이 작업을 수행하려면 메인 메뉴로 이동하여 GameObject > Create Empty를 선택합니다.
  2. 게임 개체를 Hierarchy 패널에서 Project 패널로 끌어서 프리패브의 생성한 게임 개체를 변환합니다.
  3. 생성한 프리패브를 선택하고 Inspector 패널에서 Open Prefab를 클릭합니다.
  4. 다음 UI 요소를 프리패브 자식 개체로 추가하고 시각 정보를 구성합니다.
    • 아이템 배경 이미지
    • 아이템 이름
    • 아이템 설명
    • 아이템 가격
    • 아이템 이미지

다음 그림은 위젯 구조의 예시를 보여줍니다.

아이템 위젯 스크립트 생성

  1. MonoBehaviour 기본 클래스에서 상속된 VirtualItemWidget 스크립트를 생성합니다.
  2. 아이템 위젯 인터페이스 요소에 대한 변수를 선언하고 Inspector 패널에서 그에 대한 값을 설정합니다.

위젯 스크립트 예시t:

Copy
Full screen
Small screen
using UnityEngine;
using UnityEngine.UI;

namespace Xsolla.Samples.DisplayCatalog
{
	public class VirtualItemWidget : MonoBehaviour
	{
		// Declaration of variables for UI elements
		public Text NameText;
		public Text DescriptionText;
		public Text PriceText;
		public Image IconImage;
	}
}

아이템 그룹을 여는 버튼용 위젯 생성

  1. 비어 있는 게임 개체를 생성합니다. 이 작업을 수행하려면 메인 메뉴로 이동하여 GameObject > Create Empty를 선택합니다.
  2. 게임 개체를 Hierarchy 패널에서 Project 패널로 끌어서 프리패브의 생성한 게임 개체를 변환합니다.
  3. 생성한 프리패브를 선택하고 Inspector 패널에서 Open Prefab를 클릭합니다.
  4. 프리패브의 자식 개체로 아이템 그룹을 표시할 수 있게 하는 버튼을 추가하고 시각적 정보를 구성합니다.

다음 그림은 위젯 구조의 예시를 보여줍니다.

아이템 그룹을 여는 버튼용 스크립트 생성

  1. MonoBehaviour 기본 클래스에서 상속된 VirtualItemGroupButton 스크립트를 생성합니다.
  2. 아이템 그룹을 여는 버튼에 대한 변수를 선언하고 Inspector 패널의 변숫값을 설정합니다.
  3. 프리패브 루트 개체에 스크립트를 추가하는 방법:
    1. Hierarchy 패널의 개체를 선택합니다.
    2. Inspector 패널에서 Add Component를 클릭하고 VirtualItemGroupButton 스크립트를 선택합니다.

위젯 스크립트 예시t:

Copy
Full screen
Small screen
using UnityEngine;
using UnityEngine.UI;

namespace Xsolla.Samples.DisplayCatalog
{
	public class VirtualItemGroupButton : MonoBehaviour
	{
		// Declaration of variables for UI elements
		public Text NameText;
		public Button Button;
	}
}

아이템 목록을 표시할 페이지 생성

  1. 장면에서 비어 있는 게임 개체를 생성합니다. 이 작업을 수행하려면 메인 메뉴로 이동하여 GameObject > Create Empty를 선택합니다.
  2. 다음 UI 요소를 프리패브 자식 개체로 추가하고 시각 정보를 구성합니다.
    • 페이지 배경 이미지
    • 아이템 그룹 버튼 표시 영역
    • 아이템 위젯 표시 영역

다음 그림은 페이지 구조의 예시를 보여줍니다.

페이지 컨트롤러 생성

  1. MonoBehaviour 기본 클랙스에서 상속된 VirtualItemsByGroupsPage 스크립트를 생성합니다.
  2. 다음 변수 선언:
    • GroupButtonsContainer - 그룹 버튼용 컨테이너
    • GroupButtonPrefab - 버튼 프리패브
    • ItemWidgetsContainer - 아이템 위젯용 컨테이너
    • WidgetPrefab - 아이템 위젯 프리패브

  1. 페이지 게임 개체에 스크립트 첨부합니다.
    1. Hierarchy 패널의 개체를 선택합니다.
    2. Inspector 패널에서 Add Component를 클릭하고 VirtualItemsByGroupsPage 스크립트를 선택합니다.
  2. Inspector 창의 변숫값을 설정합니다.
  3. 스크립트 예시와 같이 로그인 로직과 아이템 목록을 가져오는 로직을 추가합니다.
알림

로그인 스크립트 예시에서 저희는 데모 계정 자격 증명을 사용합니다(사용자 이름 : xsolla, 암호: xsolla).

스크립트 샘플에는 카탈로그에 있는 아이템의 페이지별 표시 구현(페이지 매김)이 포함되어 있지 않습니다. 페이지 매김을 구현하려면 GetCatalog SDK 메소드의 offsetlimit 매개변수를 사용합니다. 한 페이지 당 최대 아이템 개수는 50개입니다. 카탈로그에 아이템이 50개 이상 있는 경우 페이지 매김이 필요합니다.

페이지 컨트롤러 스크립트 예시:
Copy
Full screen
Small screen
using System.Collections.Generic;
using System.Linq;
using UnityEngine;
using Xsolla.Auth;
using Xsolla.Catalog;
using Xsolla.Core;

namespace Xsolla.Samples.DisplayCatalog
{
	public class VirtualItemsByGroupsPage : MonoBehaviour
	{
		// Declaration of variables for widget's container and prefab
		public Transform GroupButtonsContainer;
		public GameObject GroupButtonPrefab;
		public Transform ItemWidgetsContainer;
		public GameObject ItemWidgetPrefab;

		private void Start()
		{
			// Starting the authentication process
			// Pass the credentials and callback functions for success and error cases
			// The credentials (username and password) are hard-coded for simplicity
			XsollaAuth.SignIn("xsolla", "xsolla", OnAuthenticationSuccess, OnError);
		}

		private void OnAuthenticationSuccess()
		{
			// Starting the items request from the store after successful authentication
			// Pass the callback functions for success and error cases
			XsollaCatalog.GetCatalog(OnItemsRequestSuccess, OnError);
		}

		private void OnItemsRequestSuccess(StoreItems storeItems)
		{
			// Selecting the group’s name from items and order them alphabetically
			var groupNames = storeItems.items
				.SelectMany(x => x.groups)
				.GroupBy(x => x.name)
				.Select(x => x.First())
				.OrderBy(x => x.name)
				.Select(x => x.name)
				.ToList();

			// Add group name for catalog category with all items regardless of group affiliation
			groupNames.Insert(0, "All");

			// Iterating the group names collection
			foreach (var groupName in groupNames)
			{
				// Instantiating the button prefab as child of the container
				var buttonGo = Instantiate(GroupButtonPrefab, GroupButtonsContainer, false);
				var groupButton = buttonGo.GetComponent<VirtualItemGroupButton>();

				// Assigning the values for UI elements
				groupButton.NameText.text = groupName;

				// Adding listener for button click event
				groupButton.Button.onClick.AddListener(() => OnGroupSelected(groupName, storeItems));
			}

			// Calling method for redraw page
			OnGroupSelected("All", storeItems);
		}

		private void OnGroupSelected(string groupName, StoreItems storeItems)
		{
			// Clear container
			DeleteAllChildren(ItemWidgetsContainer);

			// Declaring variable for items to be displayed on the page
			IEnumerable<StoreItem> itemsForDisplay;
			if (groupName == "All")
			{
				itemsForDisplay = storeItems.items;
			}
			else
			{
				itemsForDisplay = storeItems.items.Where(item => item.groups.Any(group => group.name == groupName));
			}

			// Iterating the items collection and assigning values for appropriate UI elements
			foreach (var storeItem in itemsForDisplay)
			{
				// Instantiating the widget prefab as child of the container
				var widgetGo = Instantiate(ItemWidgetPrefab, ItemWidgetsContainer, false);
				var widget = widgetGo.GetComponent<VirtualItemWidget>();

				// Assigning the values for UI elements
				widget.NameText.text = storeItem.name;
				widget.DescriptionText.text = storeItem.description;

				// The item can be purchased for real money or virtual currency
				// Checking the price type and assigning the appropriate value for price text
				if (storeItem.price != null)
				{
					var realMoneyPrice = storeItem.price;
					widget.PriceText.text = $"{realMoneyPrice.amount} {realMoneyPrice.currency}";
				}
				else if (storeItem.virtual_prices != null)
				{
					var virtualCurrencyPrice = storeItem.virtual_prices.First(x => x.is_default);
					widget.PriceText.text = $"{virtualCurrencyPrice.name}: {virtualCurrencyPrice.amount}";
				}

				// Loading the image for item icon and assigning it to the UI element
				ImageLoader.LoadSprite(storeItem.image_url, sprite => widget.IconImage.sprite = sprite);
			}
		}

		private void OnError(Error error)
		{
			Debug.LogError($"Error: {error.errorMessage}");
			//  Add actions taken in case of error
		}

		// Utility method to delete all children of a container
		private static void DeleteAllChildren(Transform parent)
		{
			var childList = parent.Cast<Transform>().ToList();
			foreach (var childTransform in childList)
			{
				Destroy(childTransform.gameObject);
			}
		}
	}
}

다음 그림은 스크립트 작업 결과를 보여줍니다.

번들 표시 구현

번들 위젯 생성

  1. 비어 있는 게임 개체를 생성합니다. 이 작업을 수행하려면 메인 메뉴로 이동하여 GameObject > Create Empty를 선택합니다.
  2. 게임 개체를 Hierarchy 패널에서 Project 패널로 끌어서 프리패브의 생성한 게임 개체를 변환합니다.
  3. 생성한 프리패브를 선택하고 Inspector 패널에서 Open Prefab를 클릭합니다.
  4. 다음 UI 요소를 프리패브 자식 개체로 추가하고 시각 정보를 구성합니다.

    • 위젯 배경 이미지
    • 번들 이름
    • 번들 설명
    • 번들 가격
    • 번들 콘텐츠 설명(아이템 및 수량)
    • 번들 이미지

다음 그림은 위젯 구조의 예시를 보여줍니다.

위젯 스크립트 생성

  1. MonoBehaviour 기본 클래스에서 상속된 BundleWidget 스크립트를 생성합니다.
  2. 아이템 위젯 인터페이스 요소에 대한 변수를 선언하고 Inspector 패널에서 그에 대한 값을 설정합니다.

위젯 스크립트 예시t:

Copy
Full screen
Small screen
using UnityEngine;
using UnityEngine.UI;

namespace Xsolla.Samples.DisplayCatalog
{
	public class BundleWidget : MonoBehaviour
	{
		// Declaration of variables for UI elements
		public Text NameText;
		public Text DescriptionText;
		public Text PriceText;
		public Text ContentText;
		public Image IconImage;
	}
}

번들을 표시할 페이지 생성

  1. 장면에서 비어 있는 게임 개체를 생성합니다. 이 작업을 수행하려면 메인 메뉴로 이동하여 GameObject > Create Empty를 선택합니다.
  2. 다음 UI 요소를 프리패브 자식 개체로 추가하고 시각 정보를 구성합니다.
    • 페이지 배경 이미지
    • 번들 위젯 표시 영역

다음 그림은 페이지 구조의 예시를 보여줍니다.

페이지 컨트롤러 생성

  1. BundlesPage 스크립트를 생성하는데, 이는 MonoBehaviour 기본 클래스에서 상속된 것입니다.
  2. 다음 변수 선언:
    • WidgetsContainer - 위젯용 컨테이너
    • WidgetPrefab - 번들 위젯 프리패브

  1. 페이지 게임 개체에 스크립트 첨부:
    1. Hierarchy 패널의 개체를 선택합니다.
    2. Inspector 패널에서 Add Component를 클릭하고 BundlesPage 스크립트를 선택합니다.

  1. Inspector 창에서 변수에 대한 값을 설정합니다.
  2. 스크립트 예시와 같이 로그인 로직과 아이템 목록을 가져오는 로직을 추가합니다.
알림

로그인 스크립트 예시에서 저희는 데모 계정 자격 증명을 사용합니다(사용자 이름 : xsolla, 암호: xsolla).

스크립트 샘플에는 카탈로그에 있는 아이템의 페이지별 표시 구현(페이지 매김)이 포함되어 있지 않습니다. 페이지 매김을 구현하려면 GetCatalog SDK 메소드의 offsetlimit 매개변수를 사용합니다. 한 페이지 당 최대 아이템 개수는 50개입니다. 카탈로그에 아이템이 50개 이상 있는 경우 페이지 매김이 필요합니다.

페이지 컨트롤러 스크립트 예시:
Copy
Full screen
Small screen
using System.Linq;
using UnityEngine;
using Xsolla.Auth;
using Xsolla.Catalog;
using Xsolla.Core;

namespace Xsolla.Samples.DisplayCatalog
{
	public class BundlesPage : MonoBehaviour
	{
		// Declaration of variables for widget's container and prefab
		public Transform WidgetsContainer;
		public GameObject WidgetPrefab;

		private void Start()
		{
			// Starting the authentication process
			// Pass the credentials and callback functions for success and error cases
			// The credentials (username and password) are hard-coded for simplicity
			XsollaAuth.SignIn("xsolla", "xsolla", OnAuthenticationSuccess, OnError);
		}

		private void OnAuthenticationSuccess()
		{
			// Starting the bundle request from the store after successful authentication
			// Pass the callback functions for success and error cases
			XsollaCatalog.GetBundles(OnBundlesRequestSuccess, OnError);
		}

		private void OnBundlesRequestSuccess(BundleItems bundleItems)
		{
			// Iterating the bundles collection
			foreach (var bundleItem in bundleItems.items)
			{
				// Instantiating the widget prefab as child of the container
				var widgetGo = Instantiate(WidgetPrefab, WidgetsContainer, false);
				var widget = widgetGo.GetComponent<BundleWidget>();

				// Assigning the values for UI elements
				widget.NameText.text = bundleItem.name;
				widget.DescriptionText.text = bundleItem.description;

				// Creating the string with bundle content and assigning it to the UI element
				var bundleContent = bundleItem.content.Select(x => $"{x.name} x {x.quantity}");
				widget.ContentText.text = string.Join("\n", bundleContent);

				// The bundle can be purchased for real money or virtual currency
				// Checking the price type and assigning the values for appropriate UI elements
				if (bundleItem.price != null)
				{
					var realMoneyPrice = bundleItem.price;
					widget.PriceText.text = $"{realMoneyPrice.amount} {realMoneyPrice.currency}";
				}
				else if (bundleItem.virtual_prices != null)
				{
					var virtualCurrencyPrice = bundleItem.virtual_prices.First(x => x.is_default);
					widget.PriceText.text = $"{virtualCurrencyPrice.name}: {virtualCurrencyPrice.amount}";
				}

				// Loading the bundle image and assigning it to the UI element
				ImageLoader.LoadSprite(bundleItem.image_url, sprite => widget.IconImage.sprite = sprite);
			}
		}

		private void OnError(Error error)
		{
			Debug.LogError($"Error: {error.errorMessage}");
			// Add actions taken in case of error
		}
	}
}

다음 그림은 스크립트 작업 결과를 보여줍니다.

인게임 재화 패키지 표시 구현

인게임 재화 패키지용 위젯 생성

  1. 비어 있는 게임 개체를 생성합니다. 이 작업을 수행하려면 메인 메뉴로 이동하여 GameObject > Create Empty를 선택합니다.
  2. 게임 개체를 Hierarchy 패널에서 Project 패널로 끌어서 프리패브의 생성한 게임 개체를 변환합니다.
  3. 생성한 프리패브를 선택하고 Inspector 패널에서 Open Prefab를 클릭합니다.
  4. 다음 UI 요소를 자식 개체로 추가하고 시각 정보를 구성합니다.

    • 위젯 배경 이미지
    • 패키지 이름
    • 패키지 설명
    • 패키지 가격
    • 패키지 이미지

다음 그림은 위젯 구조의 예시를 보여줍니다.

위젯 스크립트 생성

  1. MonoBehaviour 기본 클래스에서 상속된 VirtualCurrencyPackageWidget 스크립트를 생성합니다.
  2. 아이템 위젯 인터페이스 요소에 대한 변수를 선언하고 Inspector 패널에서 그에 대한 값을 설정합니다.

위젯 스크립트 예시t:

Copy
Full screen
Small screen
using UnityEngine;
using UnityEngine.UI;

namespace Xsolla.Samples.DisplayCatalog
{
	public class VirtualCurrencyPackageWidget : MonoBehaviour
	{
		// Declaration of variables for UI elements
		public Text NameText;
		public Text DescriptionText;
		public Text PriceText;
		public Image IconImage;
	}
}

인게임 재화 패키지 목록을 표시할 페이지 생성

  1. 장면에서 비어 있는 게임 개체를 생성합니다. 이 작업을 수행하려면 메인 메뉴로 이동하여 GameObject > Create Empty를 선택합니다.
  2. 다음 UI 요소를 프리패브 자식 개체로 추가하고 시각 정보를 구성합니다.
    • 페이지 배경 이미지
    • 인게임 재화 패키지 위젯 표시 영역

다음 그림은 페이지 구조의 예시를 보여줍니다.

페이지 컨트롤러 생성

  1. VirtualCurrencyPackagesPage 스크립트를 생성하는데, 이는 MonoBehaviour 기본 클래스에서 상속된 것입니다.
  2. 다음 변수 선언:
    • WidgetsContainer - 위젯용 컨테이너
    • WidgetPrefab - 인게임 재화 패키지 프리패브

  1. 페이지 게임 개체에 스크립트 첨부합니다.
    1. Hierarchy 패널의 개체를 선택합니다.
    2. Inspector 패널에서 Add Component를 클릭하고 VirtualCurrencyPackagesPage 스크립트를 선택합니다.
  2. Inspector 창의 변숫값을 설정합니다.
  3. 스크립트 예시와 같이 로그인 로직과 인게임 재화 패키지 목록을 가져오는 로직을 추가합니다.
알림

로그인 스크립트 예시에서 저희는 데모 계정 자격 증명을 사용합니다(사용자 이름 : xsolla, 암호: xsolla).

스크립트 샘플에는 카탈로그에 있는 아이템의 페이지별 표시 구현(페이지 매김)이 포함되어 있지 않습니다. 페이지 매김을 구현하려면 GetCatalog SDK 메소드의 offsetlimit 매개변수를 사용합니다. 한 페이지 당 최대 아이템 개수는 50개입니다. 카탈로그에 아이템이 50개 이상 있는 경우 페이지 매김이 필요합니다.

페이지 컨트롤러 스크립트 예시:
Copy
Full screen
Small screen
using System.Linq;
using UnityEngine;
using Xsolla.Auth;
using Xsolla.Catalog;
using Xsolla.Core;

namespace Xsolla.Samples.DisplayCatalog
{
	public class VirtualCurrencyPackagesPage : MonoBehaviour
	{
		// Declaration of variables for widget's container and prefab
		public Transform WidgetsContainer;
		public GameObject WidgetPrefab;

		private void Start()
		{
			// Starting the authentication process
			// Pass the credentials and callback functions for success and error cases
			// The credentials (username and password) are hard-coded for simplicity
			XsollaAuth.SignIn("xsolla", "xsolla", OnAuthenticationSuccess, OnError);
		}

		private void OnAuthenticationSuccess()
		{
			// After successful authentication starting the request for packages from store
			// Pass the callback functions for success and error cases
			XsollaCatalog.GetVirtualCurrencyPackagesList(OnPackagesRequestSuccess, OnError);
		}

		private void OnPackagesRequestSuccess(VirtualCurrencyPackages packageItems)
		{
			// Iterating the virtual currency packages collection
			foreach (var packageItem in packageItems.items)
			{
				// Instantiating the widget prefab as child of the container
				var widgetGo = Instantiate(WidgetPrefab, WidgetsContainer, false);
				var widget = widgetGo.GetComponent<VirtualCurrencyPackageWidget>();

				// Assigning the values for UI elements
				widget.NameText.text = packageItem.name;
				widget.DescriptionText.text = packageItem.description;

				// The package can be purchased for real money or virtual currency
				// Checking the price type and assigning the values for appropriate UI elements
				if (packageItem.price != null)
				{
					var realMoneyPrice = packageItem.price;
					widget.PriceText.text = $"{realMoneyPrice.amount} {realMoneyPrice.currency}";
				}
				else if (packageItem.virtual_prices != null)
				{
					var virtualCurrencyPrice = packageItem.virtual_prices.First(x => x.is_default);
					widget.PriceText.text = $"{virtualCurrencyPrice.name}: {virtualCurrencyPrice.amount}";
				}

				// Loading the package image and assigning it to the UI element
				ImageLoader.LoadSprite(packageItem.image_url, sprite => widget.IconImage.sprite = sprite);
			}
		}

		private void OnError(Error error)
		{
			Debug.LogError($"Error: {error.errorMessage}");
			// Add actions taken in case of error
		}
	}
}

다음 그림은 스크립트 작업 결과를 보여줍니다.

실질 화폐용 가상 아이템 판매

이 섹션에서는 가상 아이템을 사용하여 실제 화폐로 아이템 판매하기를 구현할 수 있도록 SDK 메소드를 사용하는 방식을 설명합니다.

시작하기 전에 카탈로그의 가상 아이템 표시를 구현합니다. 다음 예에서는 가상 아이템 구매 구현 방법을 설명합니다. 다른 아이템 유형용 구성은 이와 유사합니다.

이 튜토리얼이 설명하는 논리의 구현:

예시의 논리와 인터페이스는 귀하의 애플리케이션의 것보다 덜 복잡합니다. 실질 화폐용 판매 아이템 및 아이템 카탈로그 표시의 가능한 구현 옵션은 데모 프로젝트에 설명되어 있습니다.

아이템 위젯 완료

아이템 위젯에 구매 버튼을 추가하고 이 버튼의 시각적 정보를 구성합니다.

다음 그림은 위젯 구조의 예시를 보여줍니다.

아이템 위젯 스크립트 완료

  1. VirtualItemWidget 스크립트를 엽니다.
  2. 구매 버튼용 변수를 선언하고 그 값을 Inspector 패널에서 설정합니다.

위젯 스크립트 예시:

Copy
Full screen
Small screen
using UnityEngine;
using UnityEngine.UI;

namespace Xsolla.Samples.SellForRealMoney
{
	public class VirtualItemWidget : MonoBehaviour
	{
		// Declaration of variables for UI elements
		public Text NameText;
		public Text DescriptionText;
		public Text PriceText;
		public Image IconImage;
		public Button BuyButton;
	}
}

아이템 목록을 표시할 페이지 컨트롤러 완료

  1. VirtualItemsPage 스크립트를 엽니다.
  2. 스크립트 예시와 같이 가상 아이템 구매 버튼 클릭을 처리하는 로직을 추가합니다.
알림

스크립트 예시에서 아이템 구매가 성공적인 경우 Debug.Log 기본 메소드를 호출합니다. 인벤토리 표시 등과 같은 다른 동작을 추가할 수 있습니다.

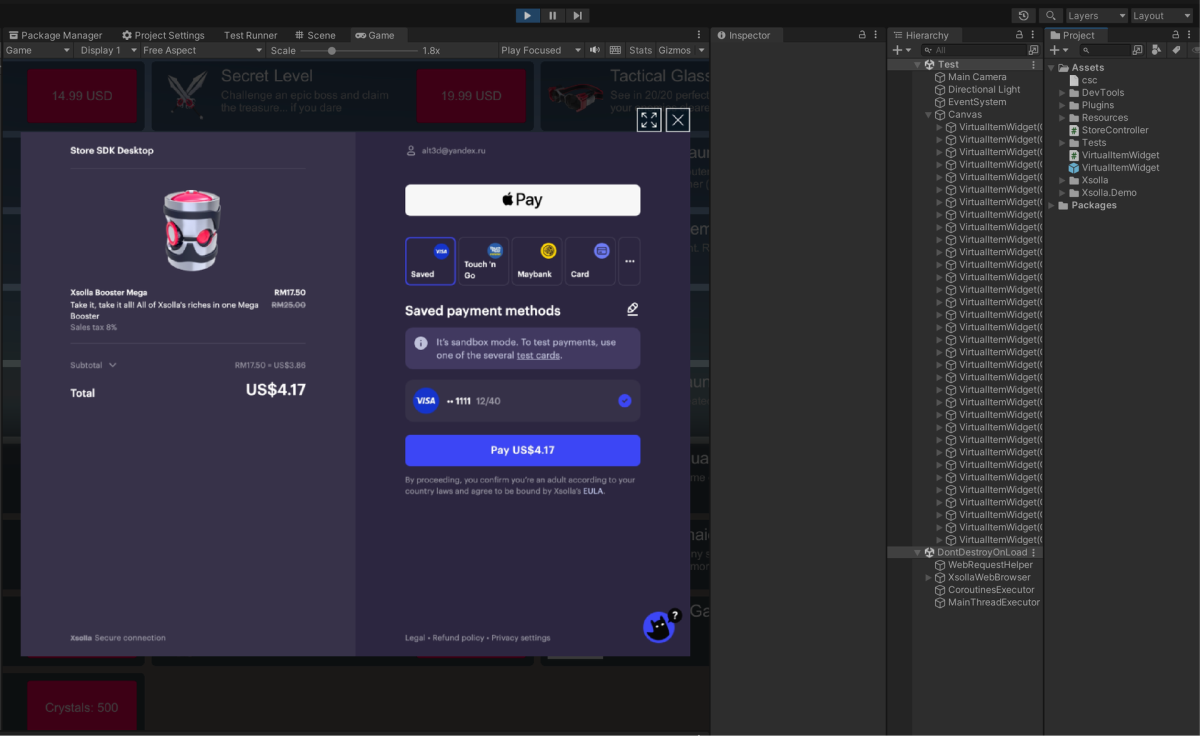
기본값으로 결제 페이지는 기본 제공 브라우저에서 열립니다. 외부 브라우저에서 이를 열려면 Unity 편집기 메인 메뉴의 Window > Xsolla > Edit Settings로 이동하여 Inspector 패널의 Enable in-app browser? 상자를 체크 해제합니다. Android 애플리케이션용 외부 브라우저를 사용한다면 사용자가 결제한 후에 사용자를 리디렉션할 딥 링크를 설정하는 것이 좋습니다.

페이지 스크립트 예시:
Copy
Full screen
Small screen
using UnityEngine;
using Xsolla.Auth;
using Xsolla.Catalog;
using Xsolla.Core;

namespace Xsolla.Samples.SellForRealMoney
{
	public class VirtualItemsPage : MonoBehaviour
	{
		// Declaration of variables for widget's container and prefab
		public Transform WidgetsContainer;
		public GameObject WidgetPrefab;

		private void Start()
		{
			// Starting the authentication process
			// Pass the credentials and callback functions for success and error cases
			// The credentials (username and password) are hard-coded for simplicity
			XsollaAuth.SignIn("xsolla", "xsolla", OnAuthenticationSuccess, OnError);
		}

		private void OnAuthenticationSuccess()
		{
			// Starting the items request from the store after successful authentication
			// Pass the callback functions for success and error cases
			XsollaCatalog.GetCatalog(OnItemsRequestSuccess, OnError);
		}

		private void OnItemsRequestSuccess(StoreItems storeItems)
		{
			// Iterating the items collection
			foreach (var storeItem in storeItems.items)
			{
				// Skipping items without prices in real money
				if (storeItem.price == null)
					continue;

				// Instantiating the widget prefab as child of the container
				var widgetGo = Instantiate(WidgetPrefab, WidgetsContainer, false);
				var widget = widgetGo.GetComponent<VirtualItemWidget>();

				// Assigning the values for UI elements
				widget.NameText.text = storeItem.name;
				widget.DescriptionText.text = storeItem.description;

				// Assigning the price and currency values for UI elements
				var price = storeItem.price;
				widget.PriceText.text = $"{price.amount} {price.currency}";

				// Loading the item image and assigning it to the UI element
				ImageLoader.LoadSprite(storeItem.image_url, sprite => widget.IconImage.sprite = sprite);

				// Assigning the click listener for the buy button
				widget.BuyButton.onClick.AddListener(() =>
				{
					// Starting the purchase process
					// Pass the item SKU and callback functions for success and error cases
					XsollaCatalog.Purchase(storeItem.sku, OnPurchaseSuccess, OnError);
				});
			}
		}

		private void OnPurchaseSuccess(OrderStatus status)
		{
			Debug.Log("Purchase successful");
			// Add actions taken in case of success
		}

		private void OnError(Error error)
		{
			Debug.LogError($"Error: {error.errorMessage}");
			// Add actions taken in case of error
		}
	}
}

인게임 재화용 가상 아이템 판매

이 섹션에서는 가상 아이템을 사용하여 인게임 재화로 아이템 판매하기를 구현할 수 있도록 SDK 메소드를 사용하는 방식을 설명합니다.

시작하기 전에 카탈로그의 가상 아이템 표시를 구현합니다. 다음 예에서는 가상 아이템 구매 구현 방법을 설명합니다. 다른 아이템 유형용 구성은 이와 유사합니다.

이 튜토리얼이 설명하는 논리의 구현:

예시의 논리와 인터페이스는 귀하의 애플리케이션의 것보다 덜 복잡합니다. 인게임 재화용 판매 아이템 및 아이템 카탈로그 표시의 가능한 구현 옵션은 데모 프로젝트에 설명되어 있습니다.

아이템 위젯 완료

아이템 위젯에 구매 버튼을 추가하고 이 버튼의 시각적 정보를 구성합니다.

다음 그림은 위젯 구조의 예시를 보여줍니다.

아이템 위젯 스크립트 완료

  1. VirtualItemWidget 스크립트를 엽니다.
  2. 구매 버튼용 변수를 선언하고 그 값을 Inspector 패널에서 설정합니다.

위젯 스크립트 예시:

Copy
Full screen
Small screen
using UnityEngine;
using UnityEngine.UI;

namespace Xsolla.Samples.SellForVirtualCurrency
{
	public class VirtualItemWidget : MonoBehaviour
	{
		// Declaration of variables for UI elements
		public Text NameText;
		public Text DescriptionText;
		public Text PriceText;
		public Image IconImage;
		public Button BuyButton;
	}
}

아이템 목록을 표시할 페이지 컨트롤러 완료

  1. VirtualItemsPage 스크립트를 엽니다.
  2. 스크립트 예시와 같이 가상 아이템 구매 버튼 클릭을 처리하는 로직을 추가합니다.
알림

스크립트 예시에서 아이템 구매가 성공적인 경우 Debug.Log 기본 메소드를 호출합니다. 인벤토리 표시, 인게임 재화 잔액 변경 등과 같은 다른 동작을 추가할 수 있습니다.

인벤토리에 구매한 아이템 추가 논리의 구현은 필요하지 않습니다. 자동으로 수행됩니다.

페이지 스크립트 예시:
Copy
Full screen
Small screen
using System.Linq;
using UnityEngine;
using Xsolla.Auth;
using Xsolla.Catalog;
using Xsolla.Core;

namespace Xsolla.Samples.SellForVirtualCurrency
{
	public class VirtualItemsPage : MonoBehaviour
	{
		// Declaration of variables for containers and widget prefabs
		public Transform WidgetsContainer;
		public GameObject WidgetPrefab;

		private void Start()
		{
			// Starting the authentication process
			// Pass the credentials and callback functions for success and error cases
			// The credentials (username and password) are hard-coded for simplicity
			XsollaAuth.SignIn("xsolla", "xsolla", OnAuthenticationSuccess, OnError);
		}

		private void OnAuthenticationSuccess()
		{
			// After successful authentication starting the request for catalog from store
			// Pass the callback functions for success and error cases
			XsollaCatalog.GetCatalog(OnItemsRequestSuccess, OnError);
		}

		private void OnItemsRequestSuccess(StoreItems storeItems)
		{
			// Iterating the items collection
			foreach (var storeItem in storeItems.items)
			{
				// Skipping items without prices in virtual currency
				if (storeItem.virtual_prices.Length == 0)
					continue;

				// Instantiating the widget prefab as child of the container
				var widgetGo = Instantiate(WidgetPrefab, WidgetsContainer, false);
				var widget = widgetGo.GetComponent<VirtualItemWidget>();

				// Assigning the values for UI elements
				widget.NameText.text = storeItem.name;
				widget.DescriptionText.text = storeItem.description;

				// Assigning the price and currency values for UI elements
				// The first price is used for the sake of simplicity
				var price = storeItem.virtual_prices.First(x => x.is_default);
				widget.PriceText.text = $"{price.name}: {price.amount}";

				// Loading the item image and assigning it to the UI element
				ImageLoader.LoadSprite(storeItem.image_url, sprite => widget.IconImage.sprite = sprite);

				// Assigning the click listener for the buy button
				widget.BuyButton.onClick.AddListener(() =>
				{
					// Starting the purchase process
					// Pass the item SKU, the price virtual currency SKU and callback functions for success and error cases
					XsollaCatalog.PurchaseForVirtualCurrency(storeItem.sku, price.sku, OnPurchaseSuccess, OnError);
				});
			}
		}

		private void OnPurchaseSuccess(OrderStatus status)
		{
			Debug.Log("Purchase successful");
			// Add actions taken in case of success
		}

		private void OnError(Error error)
		{
			Debug.LogError($"Error: {error.errorMessage}");
			// Add actions taken in case of error
		}
	}
}

인게임 재화 잔액 표시

이 튜토리얼은 SDK 메소드를 사용하여 귀하의 앱에서 인게임 재화 잔액을 표시하는 방법을 보여줍니다.

예시의 로직 및 인터페이스는 귀하의 애플리케이션의 것보다 덜 복잡합니다. 가능한 인게임 스토어 아이템 카탈로그 구현 옵션은 데모 프로젝트에 서술되어 있습니다.

잔액 표시용 위젯 생성

  1. 비어 있는 게임 개체를 생성합니다. 이 작업을 수행하려면 메인 메뉴로 이동하여 GameObject > Create Empty를 선택합니다.
  2. 게임 개체를 Hierarchy 패널에서 Project 패널로 끌어서 프리패브의 생성한 게임 개체를 변환합니다.
  3. 생성한 프리패브를 선택하고 Inspector 패널에서 Open Prefab를 클릭합니다.
  4. 다음 UI 요소를 프리패브 자식 개체로 추가하고 시각 정보를 구성합니다.
    • 위젯 배경 이미지
    • 인게임 재화 이름
    • 인게임 재화 수량
    • 인게임 재화 이미지 이미지

다음 그림은 위젯 구조의 예시를 보여줍니다.

잔액 표시 위젯 스크립트 생성

  1. MonoBehaviour 기본 클래스에서 상속된 VirtualCurrencyWidget 스크립트를 생성합니다.
  2. 아이템 위젯 인터페이스 요소에 대한 변수를 선언하고 Inspector 패널에서 그에 대한 값을 설정합니다.

위젯 스크립트 예시:

Copy
Full screen
Small screen
using UnityEngine;
using UnityEngine.UI;

namespace Xsolla.Samples.DisplayVirtualCurrencyBalance
{
	public class VirtualCurrencyWidget : MonoBehaviour
	{
		// Declaration of variables for UI elements
		public Text NameText;
		public Text AmountText;
		public Image IconImage;
	}
}

인게임 재화 목록이 있는 페이지 생성

  1. 장면에서 비어 있는 게임 개체를 생성합니다. 이 작업을 수행하려면 메인 메뉴로 이동하여 GameObject > Create Empty를 선택합니다.
  2. 다음 UI 요소를 프리패브 자식 개체로 추가하고 시각 정보를 구성합니다.
    • 페이지 배경 이미지
    • 위젯 표시 영역

다음 그림은 페이지 구조의 예시를 보여줍니다.

인게임 재화 목록이 있는 페이지용 컨트롤러 생성

  1. MonoBehaviour 기본 클래스에서 상속된 VirtualCurrenciesPage 스크립트를 생성합니다.
  2. 선언할 변수:
    • WidgetsContainer — 위젯용 컨테이너
    • WidgetPrefab — 잔액 표시 위젯 프리패브

  1. 페이지 게임 개체에 스크립트 첨부:
    1. Hierarchy 패널의 개체를 선택합니다.
    2. Inspector 패널에서 Add Component를 클릭하고 VirtualCurrenciesPage 스크립트를 선택합니다.

  1. Inspector 창에서 변수에 대한 값을 설정합니다.
  2. 스크립트 예시와 같이 로그인 로직과 인게임 재화 목록 가져오기 로직을 추가합니다.
알림
로그인 스크립트 예시에서 저희는 데모 계정 자격 증명을 사용합니다(사용자 이름 : xsolla, 암호: xsolla).
페이지 컨트롤러 스크립트 예시:
Copy
Full screen
Small screen
using UnityEngine;
using Xsolla.Auth;
using Xsolla.Core;
using Xsolla.Inventory;

namespace Xsolla.Samples.DisplayVirtualCurrencyBalance
{
	public class VirtualCurrenciesPage : MonoBehaviour
	{
		// Declaration of variables for widget's container and prefab
		public Transform WidgetsContainer;
		public GameObject WidgetPrefab;

		private void Start()
		{
			// Starting the authentication process
			// Pass the credentials and callback functions for success and error cases
			// The credentials (username and password) are hard-coded for simplicity
			XsollaAuth.SignIn("xsolla", "xsolla", OnAuthenticationSuccess, OnError);
		}

		private void OnAuthenticationSuccess()
		{
			// Starting the virtual currencies request from the store after successful authentication
			// Pass the callback functions for success and error cases
			XsollaInventory.GetVirtualCurrencyBalance(OnBalanceRequestSuccess, OnError);
		}

		private void OnBalanceRequestSuccess(VirtualCurrencyBalances balance)
		{
			// Iterating the virtual currency balances collection
			foreach (var balanceItem in balance.items)
			{
				// Instantiating the widget prefab as child of the container
				var widgetGo = Instantiate(WidgetPrefab, WidgetsContainer, false);
				var widget = widgetGo.GetComponent<VirtualCurrencyWidget>();

				// Assigning the values for UI elements
				widget.NameText.text = balanceItem.name;
				widget.AmountText.text = balanceItem.amount.ToString();

				ImageLoader.LoadSprite(balanceItem.image_url, sprite => widget.IconImage.sprite = sprite);
			}
		}

		private void OnError(Error error)
		{
			Debug.LogError($"Error: {error.errorMessage}");
			// Add actions taken in case of error
		}
	}
}

다음 그림은 스크립트 작업 결과를 보여줍니다.

인벤토리 아이템 표시

이 튜토리얼은 SDK 메소드를 사용하여 사용자 인벤토리에 아이템을 표시하는 방법을 보여줍니다.

예시의 로직 및 인터페이스는 귀하의 애플리케이션의 것보다 덜 복잡합니다. 가능한 인벤토리 구현 옵션은 데모 프로젝트에 서술되어 있습니다.

아이템 위젯 생성

  1. 비어 있는 게임 개체를 생성합니다. 이 작업을 수행하려면 메인 메뉴로 이동하여 GameObject > Create Empty를 선택합니다.
  2. 게임 개체를 Hierarchy 패널에서 Project 패널로 끌어서 프리패브의 생성한 게임 개체를 변환합니다.
  3. 생성한 프리패브를 선택하고 Inspector 패널에서 Open Prefab를 클릭합니다.
  4. 다음 UI 요소를 프리패브 자식 개체로 추가하고 시각 정보를 구성합니다.
    • 아이템 배경 이미지
    • 아이템 이름
    • 아이템 설명
    • 아이템 수량
    • 아이템 이미지

다음 그림은 위젯 구조의 예시를 보여줍니다.

아이템 위젯 스크립트 생성

  1. MonoBehaviour 기본 클래스에서 상속된 InventoryItemWidget 스크립트를 생성합니다.
  2. 아이템 위젯 인터페이스 요소에 대한 변수를 선언하고 Inspector 패널에서 그에 대한 값을 설정합니다.

위젯 스크립트 예시:

Copy
Full screen
Small screen
using UnityEngine;
using UnityEngine.UI;

namespace Xsolla.Samples.DisplayItemsInInventory
{
	public class InventoryItemWidget : MonoBehaviour
	{
		// Declaration of variables for UI elements
		public Text NameText;
		public Text DescriptionText;
		public Text QuantityText;
		public Image IconImage;
	}
}

인벤토리 표시 페이지 생성

  1. 장면에서 비어 있는 게임 개체를 생성합니다. 이 작업을 수행하려면 메인 메뉴로 이동하여 GameObject > Create Empty를 선택합니다.
  2. 다음 UI 요소를 프리패브 자식 개체로 추가하고 시각 정보를 구성합니다.
    • 페이지 배경 이미지
    • 아이템 위젯 표시 영역

다음 그림은 페이지 구조의 예시를 보여줍니다.

페이지 컨트롤러 생성

  1. MonoBehaviour 기본 클래스에서 상속된 InventoryItemsPage 스크립트를 생성합니다.
  2. 선언할 변수:
    • WidgetsContainer — 아이템 위젯용 컨테이너
    • WidgetPrefab — 아이템 위젯 프리패브

  1. 페이지 게임 개체에 스크립트 첨부:
    1. Hierarchy 패널의 개체를 선택합니다.
    2. Inspector 패널에서 Add Component를 클릭하고 InventoryItemsPage 스크립트를 선택합니다.

  1. Inspector 창에서 변수에 대한 값을 설정합니다.
  2. 로그인 로직과 인벤토리에 있는 아이템 목록을 가져오는 로직을 추가합니다.
알림
로그인 스크립트 예시에서 저희는 데모 계정 자격 증명을 사용합니다(사용자 이름 : xsolla, 암호: xsolla).
페이지 컨트롤러 스크립트 예시:
Copy
Full screen
Small screen
using UnityEngine;
using Xsolla.Auth;
using Xsolla.Core;
using Xsolla.Inventory;

namespace Xsolla.Samples.DisplayItemsInInventory
{
	public class InventoryItemsPage : MonoBehaviour
	{
		// Declaration of variables for widget's container and prefab
		public Transform WidgetsContainer;
		public GameObject WidgetPrefab;

		private void Start()
		{
			// Starting the authentication process
			// Pass the credentials and callback functions for success and error cases
			// The credentials (username and password) are hard-coded for simplicity
			XsollaAuth.SignIn("xsolla", "xsolla", OnAuthenticationSuccess, OnError);
		}

		private void OnAuthenticationSuccess()
		{
			// Starting the items request from the store after successful authentication
			// Pass the callback functions for success and error cases
			XsollaInventory.GetInventoryItems(OnItemsRequestSuccess, OnError);
		}

		private void OnItemsRequestSuccess(InventoryItems inventoryItems)
		{
			// Iterating the items collection
			foreach (var inventoryItem in inventoryItems.items)
			{
				// Skipping virtual currency items
				if (inventoryItem.VirtualItemType == VirtualItemType.VirtualCurrency)
					continue;

				// Instantiating the widget prefab as child of the container
				var widgetGo = Instantiate(WidgetPrefab, WidgetsContainer, false);
				var widget = widgetGo.GetComponent<InventoryItemWidget>();

				// Assigning the values for UI elements
				widget.NameText.text = inventoryItem.name;
				widget.DescriptionText.text = inventoryItem.description;
				widget.QuantityText.text = inventoryItem.quantity.ToString();

				// Loading the item image and assigning it to the UI element
				ImageLoader.LoadSprite(inventoryItem.image_url, sprite => widget.IconImage.sprite = sprite);
			}
		}

		private void OnError(Error error)
		{
			Debug.LogError($"Error: {error.errorMessage}");
			// Add actions taken in case of error
		}
	}
}

다음 그림은 스크립트 작업 결과를 보여줍니다.

이 기사가 도움이 되었나요?
감사합니다!
개선해야 할 점이 있을까요? 메시지
유감입니다
이 기사가 도움이 안 된 이유를 설명해 주세요. 메시지
의견을 보내 주셔서 감사드립니다!
메시지를 검토한 후 사용자 경험 향상에 사용하겠습니다.

유용한 링크

마지막 업데이트: 2023년 10월 10일

오자 또는 기타 텍스트 오류를 찾으셨나요? 텍스트를 선택하고 컨트롤+엔터를 누르세요.

문제 보고
콘텐츠를 항상 검토합니다. 여러분의 피드백은 콘텐츠를 개선에 도움이 됩니다.
후속 조치를 위해 이메일을 제공해 주세요
의견을 보내 주셔서 감사드립니다!