How to use Epic Online Services with Xsolla Login
How it works
Epic Online Services (EOS) are cross-platform services that make it easier and faster for developers to successfully launch, operate, and scale games.
To start using Epic Online Services, you need to set up Login and create interfaces for each service. Epic Online Services support authentication with an external OpenID provider. When authenticated in this way, each external provider user receives an internal OpenID in the Epic system.
Who can use it
Partners who have already integrated Launcher and Xsolla Login.
How to get it
- Create and set up a project in the Epic Games Developer Portal.
- Link the EOS SDK.
- Initialize the EOS SDK.
- Authenticate a user.
Create and set up a project
- Create a new Product in the Epic Developer Portal.
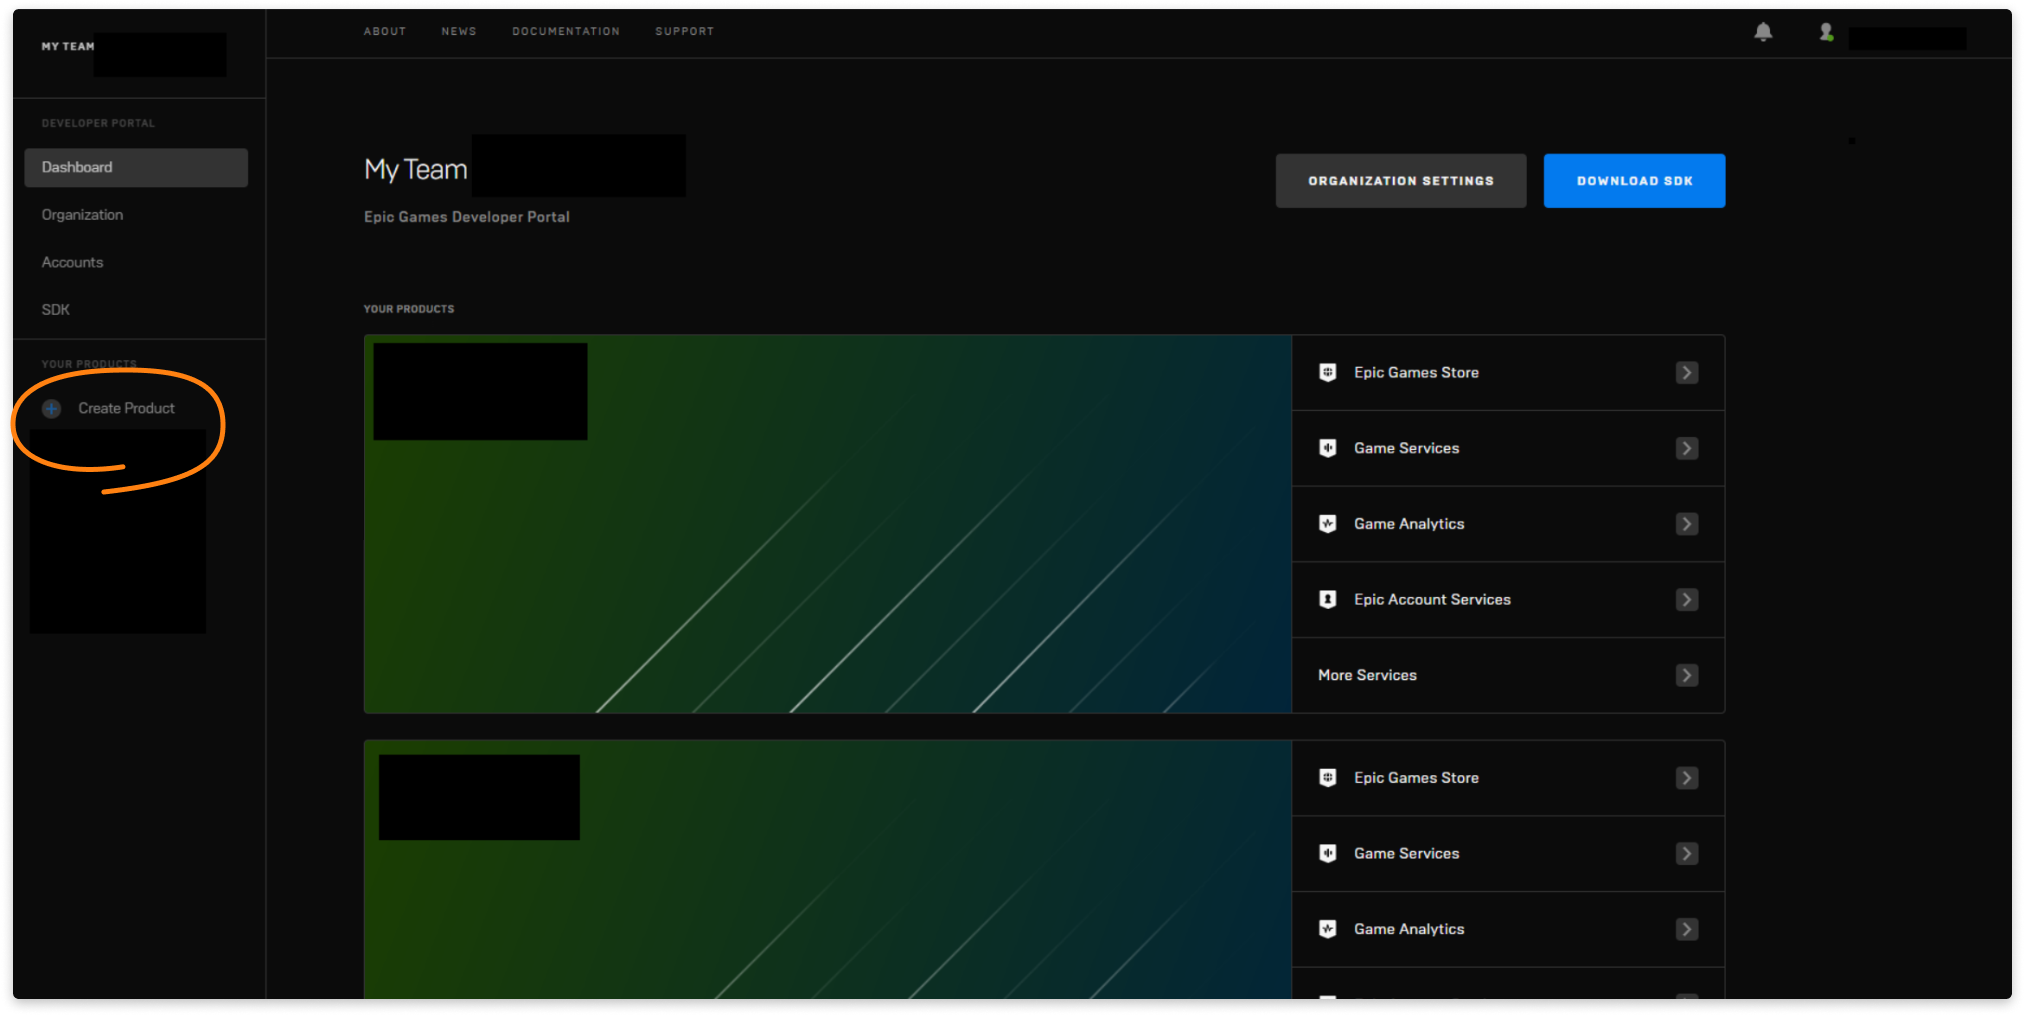
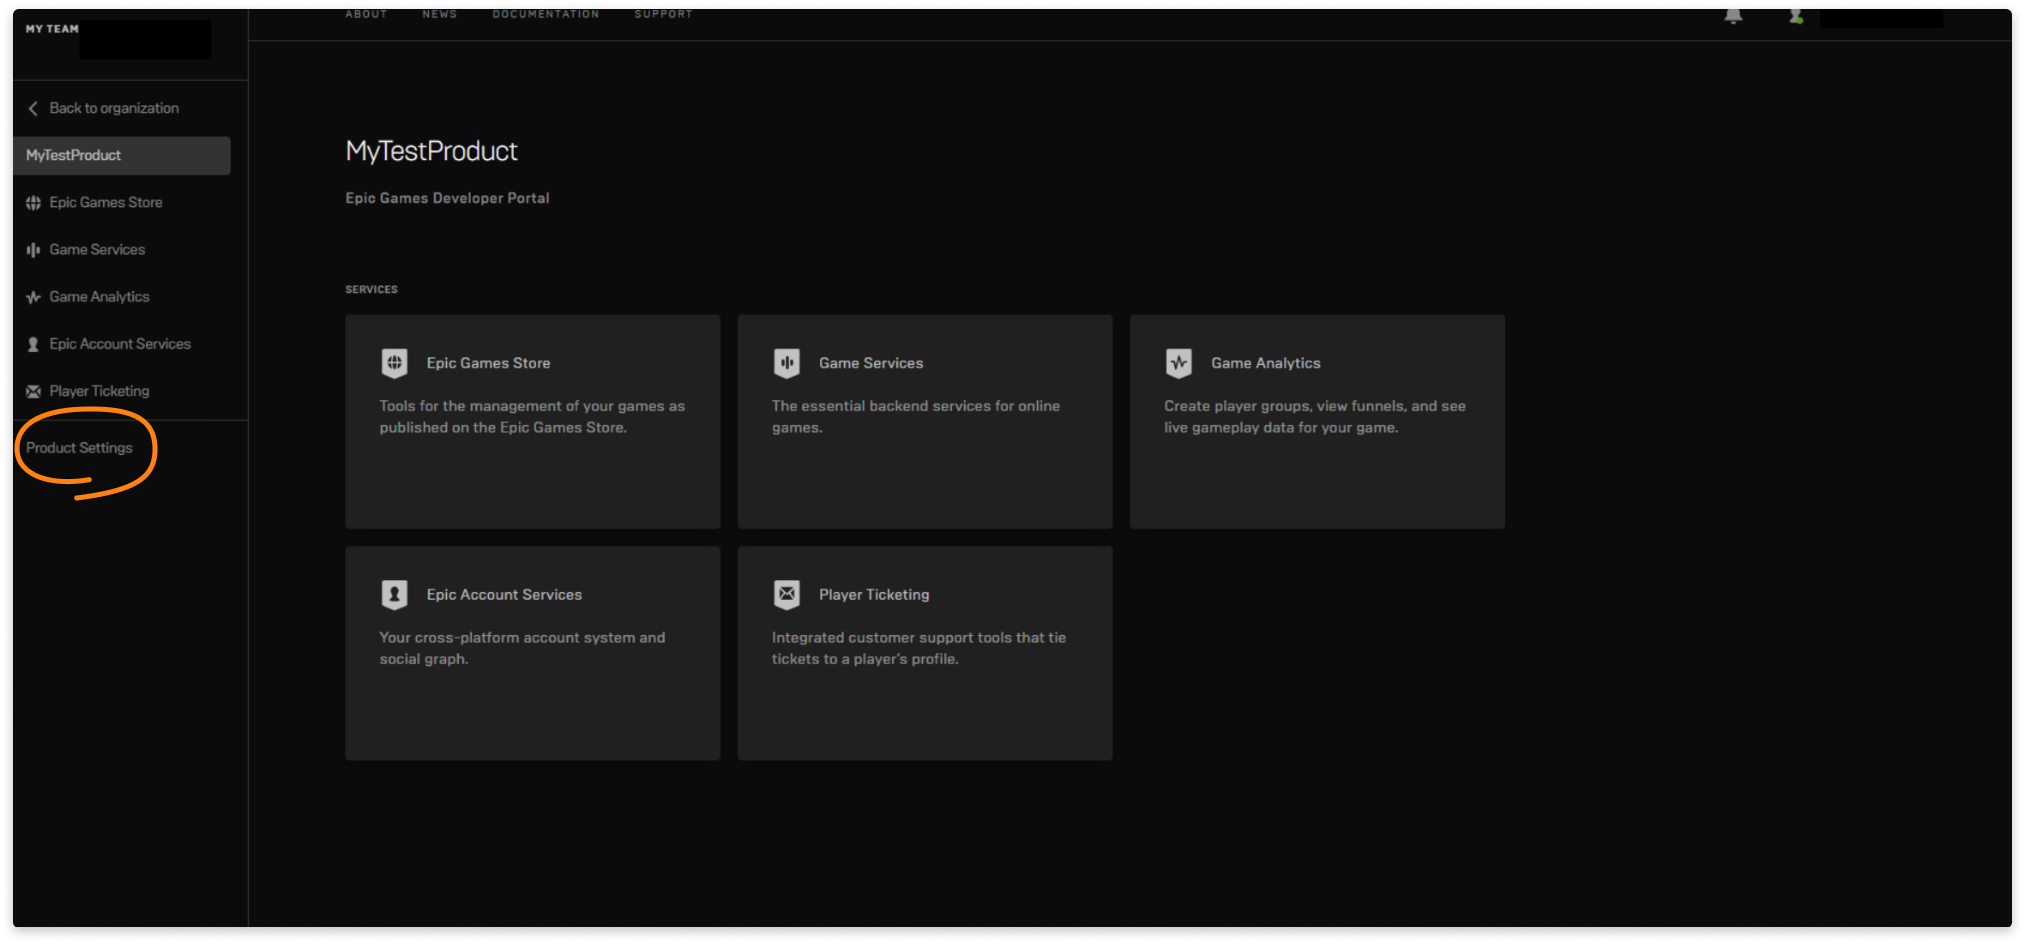
- Go to Product Settings.
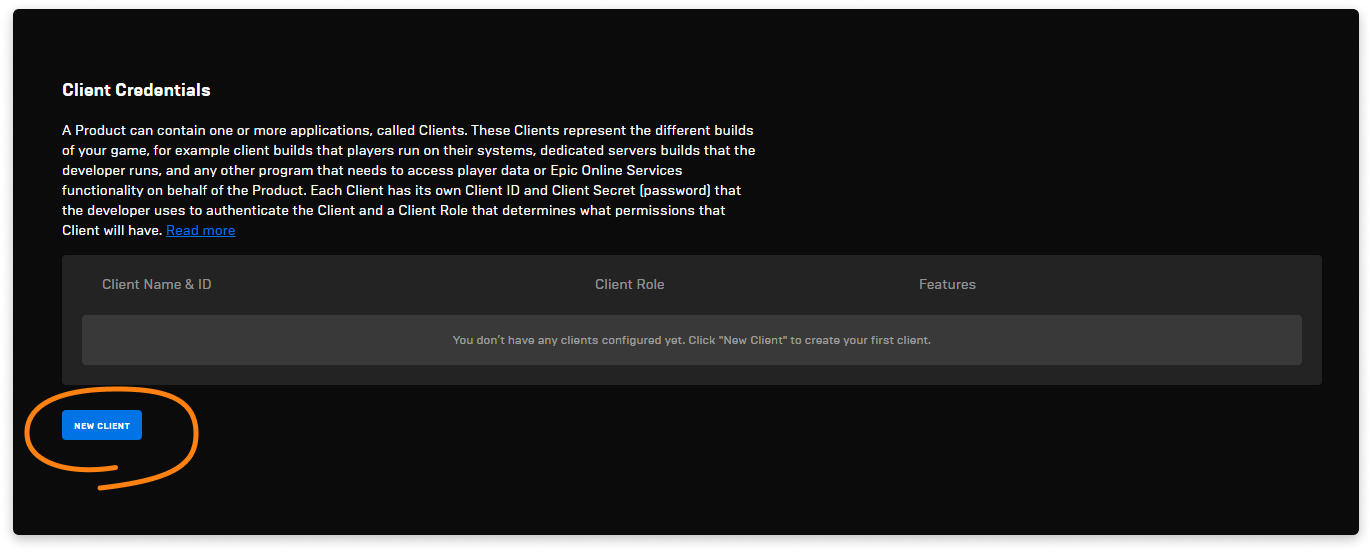
- Open the Client Credentials section and press New client:
- Create a new client and fill out the parameters as follows:
- Type the name of the client in the Client Name field;
- In the Client Role field, select Game Server. This will give the app access to creating a session.

- In the Identity Providers section, select the OpenID provider and press CONFIGURE.

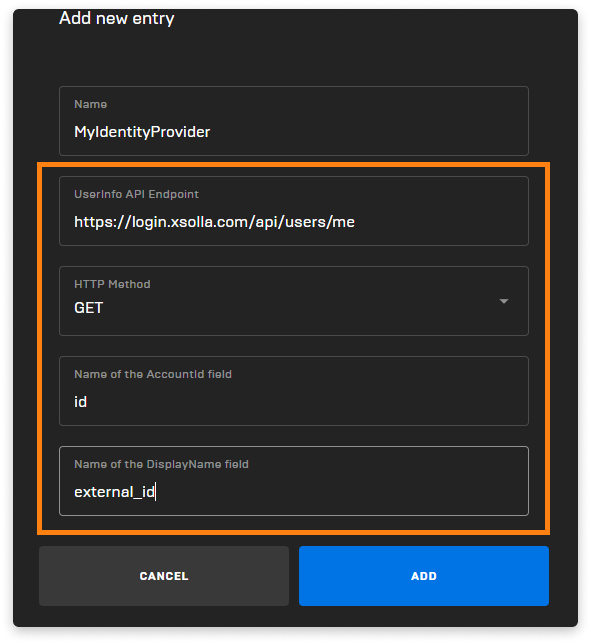
- Press NEW ENTRY in the tab that appears and fill out the fields as follows:
- In the UserInfo API Endpoint field, insert
https://login.xsolla.com/api/users/me. This URL is the Xsolla Login method to which Epic will send a request to access user data. As a response, it receives a JSON file with user data; - In the HTTP Method, select GET;
- For Name of the AccountId field, type id. It will be the name of the field with the unique user ID;
- For Name of the DisplayName field, type external_id. It will be the name of the field with the user ID which can be used by external resources.
- In the UserInfo API Endpoint field, insert
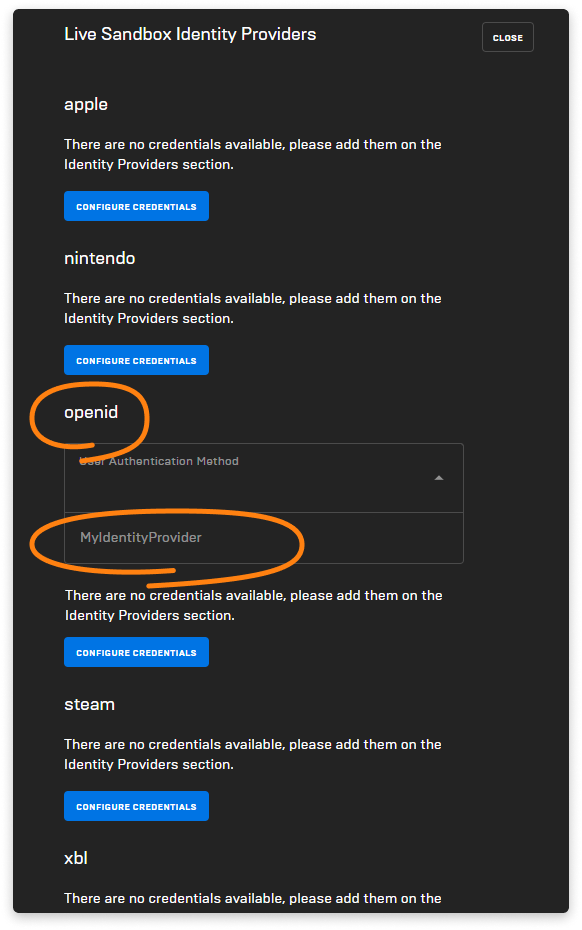
- Add the created identity provider to a Sandbox. To do it, go to the Sandboxes section and press IDENTITY PROVIDERS.

- Specify the provider in the OpenID section of the window.
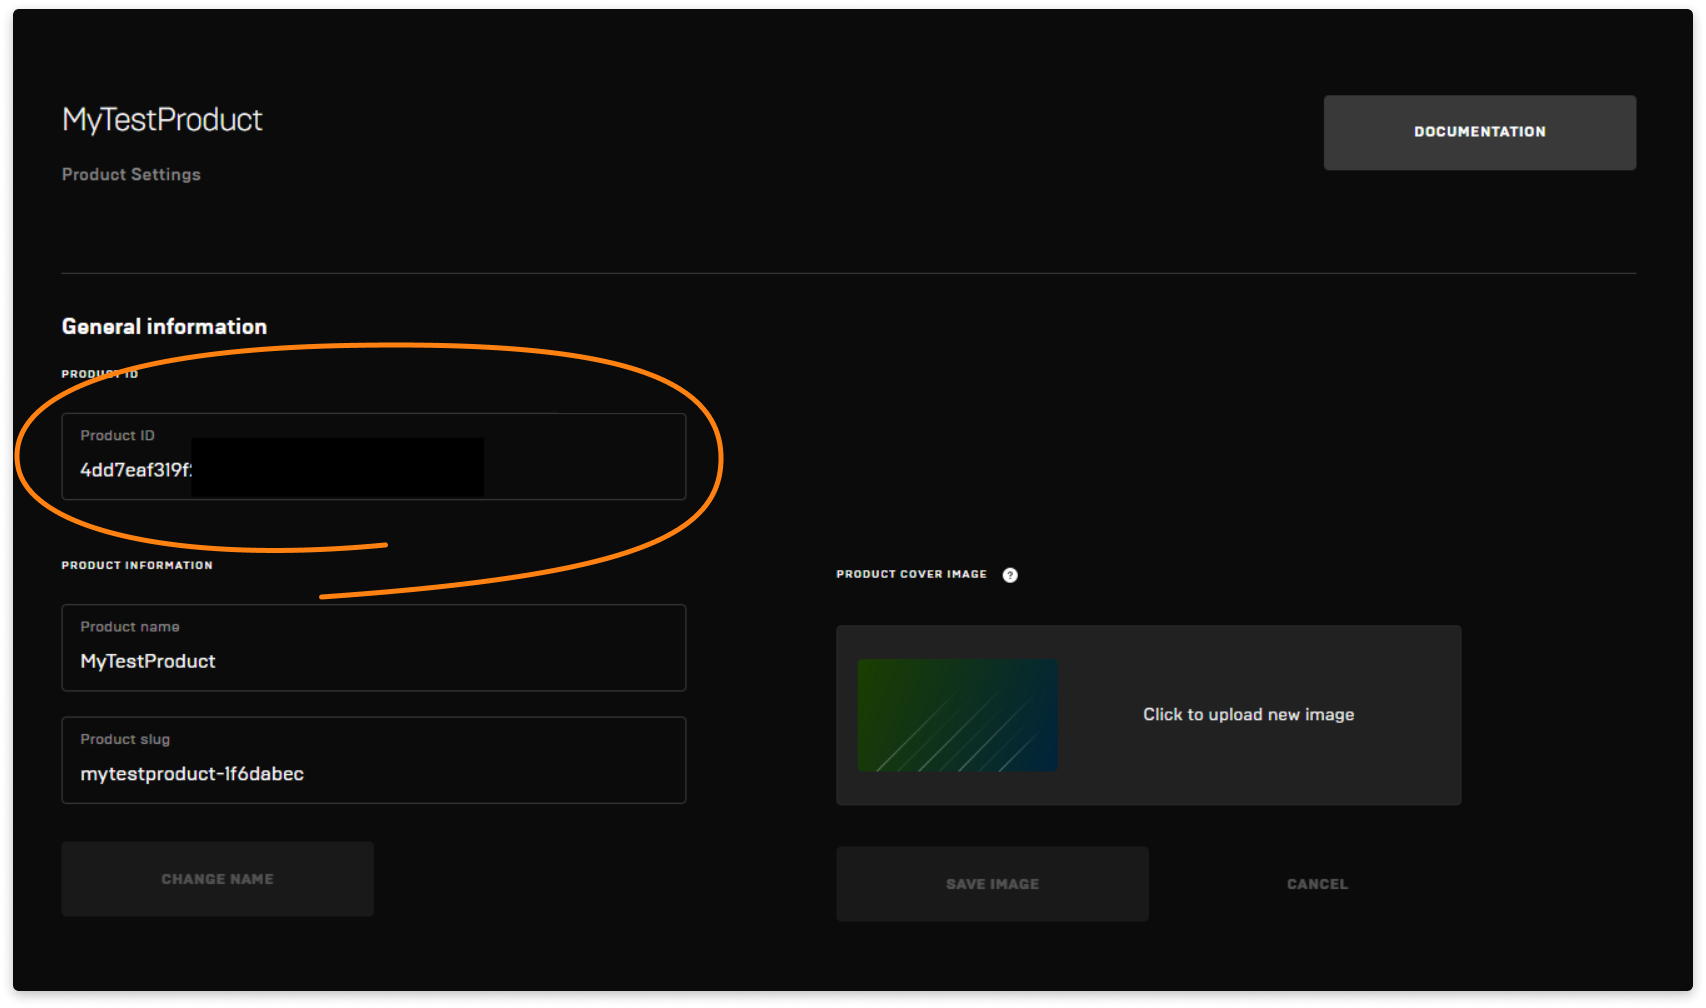
To set up the EOS SDK, you need a number of parameters:
- Product ID:
- Sandbox ID:

- Deployment ID:

You can find the list of deployments in Sandboxes > Deployment.
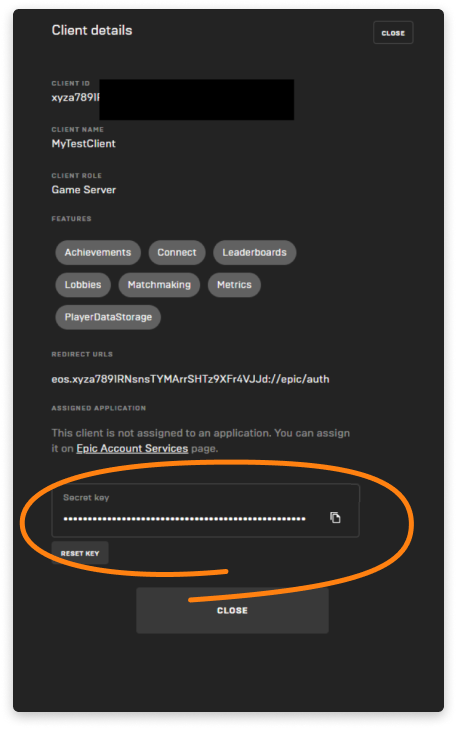
- Client ID:

- Client secret:
Link the EOS SDK
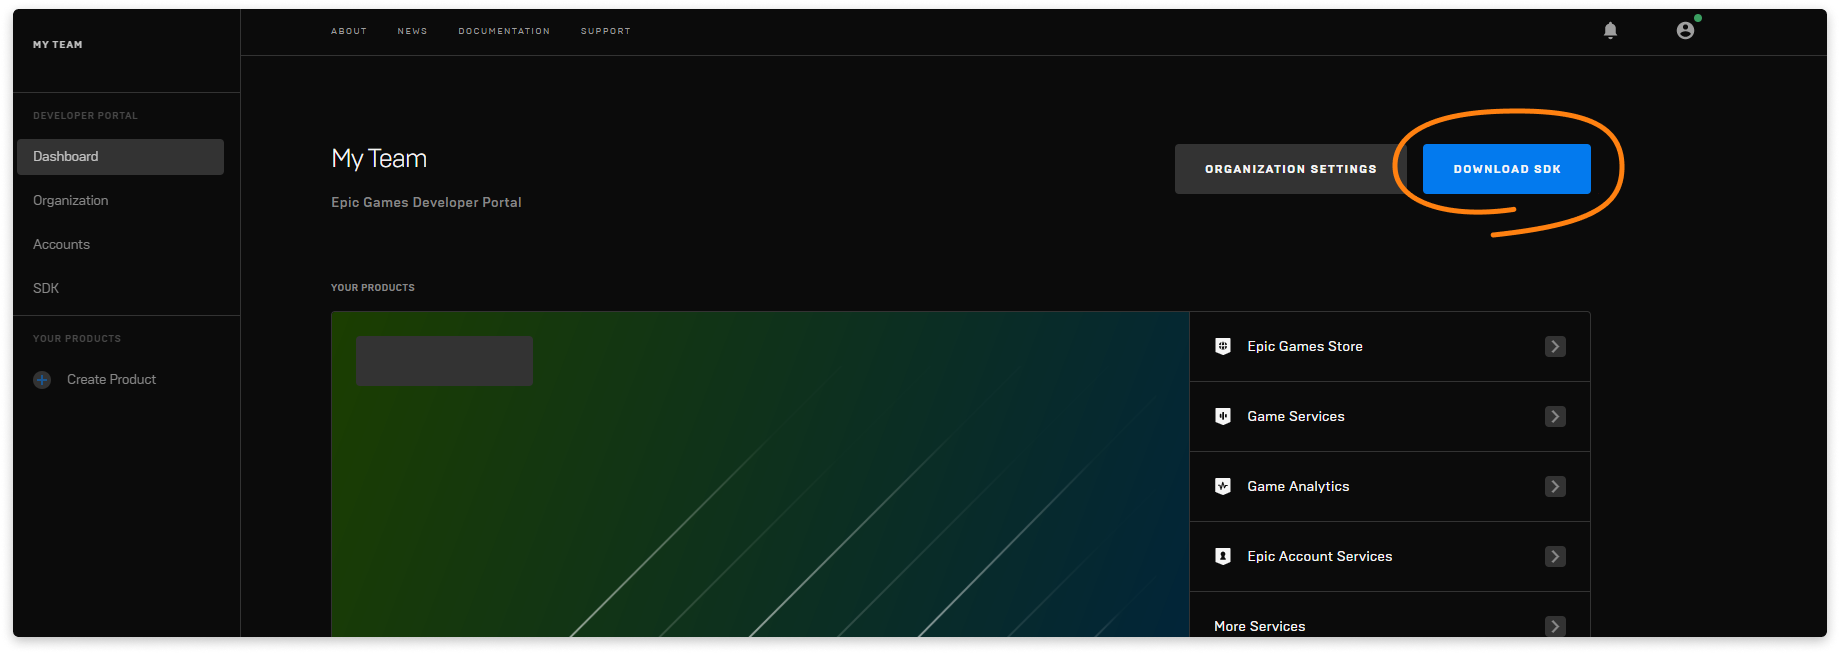
- Go to the Dashboard section of the Epic Developer Portal and download SDK.
- Unpack the archive and link the library to your project:
Initialize the EOS SDK
Initialize the EOS SDK to get access to its features.
Here is an example of the EOS SDK initializing code:
- php
 1EOS_InitializeOptions SDKOptions;
 2SDKOptions.ApiVersion = EOS_INITIALIZE_API_LATEST;
 3SDKOptions.AllocateMemoryFunction = NULL;
 4SDKOptions.ReallocateMemoryFunction = NULL;
 5SDKOptions.ReleaseMemoryFunction = NULL;
 6SDKOptions.ProductName = "MyProduct";
 7SDKOptions.ProductVersion = "1.0";
 8SDKOptions.Reserved = NULL;
 9SDKOptions.SystemInitializeOptions = NULL;
10EOS_Initialize(&SDKOptions);
After initialization, the platform interface becomes available. The platform interface is an object that provides access to other EOS SDK components. To create a platform interface, you will need IDs you got after creating a project.
Create the Platform Interface by calling the EOS_Platform_Create function with an EOS_Platform_Options structure.
EOS_Platform_Options structure description:
- php
 1/** API version of EOS_Platform_Create. */
 2int32_t ApiVersion;
 3/** A reserved field that should always be nulled. */
 4void* Reserved;
 5/** The product id for the running application, found on the dev portal */
 6const char* ProductId;
 7/** The sandbox id for the running application, found on the dev portal */
 8const char* SandboxId;
 9/** Set of service permissions associated with the running application */
10EOS_Platform_ClientCredentials ClientCredentials;
11/** Is this running as a server */
12EOS_Bool bIsServer;
13/** Only used by Player Data Storage. Must be null initialized if unused. 256-bit Encryption Key for file encryption in hexadecimal format (64 hex chars)*/
14const char* EncryptionKey;
15/** The override country code to use for the logged in user. (EOS_COUNTRYCODE_MAX_LENGTH)*/
16const char* OverrideCountryCode;
17/** The override locale code to use for the logged in user. This follows ISO 639. (EOS_LOCALECODE_MAX_LENGTH)*/
18const char* OverrideLocaleCode;
19/** The deployment id for the running application, found on the dev portal */
20const char* DeploymentId;
21/** Platform creation flags, e.g. EOS_PF_LOADING_IN_EDITOR. This is a bitwise-or union of the defined flags. */
22uint64_t Flags;
23/** Only used by Player Data Storage. Must be null initialized if unused. Cache directory path. Absolute path to the folder that is going to be used for caching temporary data. The path is created if it's missing. */
24const char* CacheDirectory;
25/**
26 * A budget, measured in milliseconds, for EOS_Platform_Tick to do its work. When the budget is met or exceeded (or if no work is available), EOS_Platform_Tick will return.
27 * This allows your game to amortize the cost of SDK work across multiple frames in the event that a lot of work is queued for processing.
28 * Zero is interpreted as "perform all available work"
29 */
30uint32_t TickBudgetInMilliseconds;
When creating the platform interface, specify the next parameters:
- The value of the PlatformOptions.bIsServer parameter must equal the Client Role you specified when creating a client;
- PlatformOptions.CacheDirectory is an app’s working directory;
- PlatformOptions.ProductId, PlatformOptions.SandboxId, PlatformOptions.DeploymentId, PlatformOptions.ClientCredentials.ClientId, and PlatformOptions.ClientCredentials.ClientSecret are values you received when creating and setting up a project.
- php
 1EOS_Platform_Options PlatformOptions;
 2PlatformOptions.ApiVersion = EOS_PLATFORM_OPTIONS_API_LATEST;
 3PlatformOptions.Reserved = NULL;
 4PlatformOptions.bIsServer = false;
 5PlatformOptions.EncryptionKey = NULL;
 6PlatformOptions.OverrideCountryCode = NULL;
 7PlatformOptions.OverrideLocaleCode = NULL;
 8PlatformOptions.Flags = 0;
 9PlatformOptions.CacheDirectory = "path/to/cache/directory";
10
11PlatformOptions.ProductId = "product id";
12PlatformOptions.SandboxId = "sandbox id";
13PlatformOptions.DeploymentId = "deployment id";
14PlatformOptions.ClientCredentials.ClientId = "client id";
15PlatformOptions.ClientCredentials.ClientSecret = "client secret";
16EOS_HPlatform platformInterface = EOS_Platform_Create(&PlatformOptions);
When the EOS SDK is initialized, you can use the platformInterface object to authenticate a user.
Authenticate a user
After initializing the EOS SDK and creating the platform interface object, follow the preparation steps and run the user authentication request.
Preparation steps
Before executing authentication methods, set up calling the EOS_Platform_Tick method on a timer. Pass the platformInterface object as an argument to this method. It ensures the execution of callback functions that are passed to various methods including authorization ones.User authentication request
Authentication with an external provider is performed with the connectInterface object. To get this object, run this code:- php
1EOS_HConnect connectInterface = EOS_Platform_GetConnectInterface(platformInterface);
where platformInterface is the platform interface received in the Initialize the EOS SDK step.
After getting the connectInterface object, call the EOS_Connect_Login method and pass the parameter as follows:
- connectInterface is the connect interface received in the previous step;
- The EOS_Connect_LoginOptions structure. See its description below;
- void *clientData is data passed back when executing the CompletionDelegate callback function;
- CompletionDelegate is the callback function that must be executed after finishing the authentication process.
The EOS_Connect_LoginOptions structure, which is passed to the method, must be filled out as follows:
- php
1EOS_Connect_LoginOptions loginOptions;
2loginOptions.ApiVersion = EOS_CONNECT_LOGIN_API_LATEST;
3loginOptions.UserLoginInfo = NULL;
4loginOptions.Credentials = &connectCredentials;
where the connectCredentials is the EOS_Connect_Credentials structure that includes a user token. Fill it out as follows:
- php
1EOS_Connect_Credentials connectCredentials;
2connectCredentials.ApiVersion = EOS_CONNECT_CREDENTIALS_API_LATEST;
3connectCredentials.Token = "jwt token";
4connectCredentials.Type = EOS_EExternalCredentialType::EOS_ECT_OPENID_ACCESS_TOKEN;
Add this data to the code:
- connectCredentials.Token, a user JWT token. The game received this from Launcher as launch arguments.
- connectCredentials.Type, the authentication type. The example is given for the authentication with an external OpenID provider.
After creating and filling out structures with options, call the EOS_Connect_Login method:
- php
1EOS_Connect_Login(
2  connectHandle,
3  &loginOptions,
4  NULL,
5  &onLoginConnect
6);
The onLoginConnect static function is called when the authentication process is finished. Declare it as follows:
- php
1static void EOS_CALL onLoginConnect(const EOS_Connect_LoginCallbackInfo *Data);
where *Data is a pointer to the EOS_Connect_LoginCallbackInfo structure that contains data about authentication attempt.
The structure description:
- php
 1/** Result code for the operation. EOS_Success is returned for a successful query, otherwise one of the error codes is returned. See eos_result.h */
 2EOS_EResult ResultCode;
 3/** Context that was passed into EOS_Connect_Login */
 4void* ClientData;
 5/** If login was successful, this is the account ID of the local player that logged in */
 6EOS_ProductUserId LocalUserId;
 7/**
 8* If the user was not found with credentials passed into EOS_Connect_Login,
 9* this continuance token can be passed to either EOS_Connect_CreateUser
10* or EOS_Connect_LinkAccount to continue the flow
11*/
12EOS_ContinuanceToken ContinuanceToken;
Example of the callback function:
- php
1static void EOS_CALL onLoginConnect(const EOS_Connect_LoginCallbackInfo *Data) {
2  if (Data->ResultCode == EOS_EResult::EOS_InvalidUser) {
3    continuanceToken = Data->ContinuanceToken;
4  }
5  if (Data->ResultCode == EOS_EResult::EOS_Success) {
6    userId = Data->LocalUserId;
7  }
8}
When authenticating, the system checks whether there is an Epic account linked to an external provider account.
If this type of Epic account exists:
- In the Data object, the ResultCode parameter returns the
EOS_EResult::EOS_Success (0)value; - In the Data object, the LocalUserId parameter returns the account ID. Save this for further interaction with other Epic services.
If there is no linked Epic account:
- In the Data object, the ResultCode parameter returns the
OS_EResult::EOS_InvalidUser (3)value; - The Data->ContinuanceToken parameter returns data about the authentication attempt. Save this to create a new Epic user and link it with an external provider account.
To create a new Epic user, call the EOS_Connect_CreateUser method. See the code example below, where:
- connectHandle is the connectInterface object that you already used;
options is the EOS_Connect_CreateUserOptions structure that contains the continuanceToken that you received in the previous step;NULL is the clientData received in the previous step along with the EOS_Connect_Login method;- onCreateUser is a static callback function that is called after creating an account along with the function from the previous step.
- php
1EOS_Connect_CreateUserOptions options;
2options.ApiVersion = EOS_CONNECT_CREATEUSER_API_LATEST;
3options.ContinuanceToken = continuanceToken;
4EOS_Connect_CreateUser(
5  connectHandle,
6  &options,
7  NULL,
8  &onCreateUser
9);
Example of the onCreateUser function:
- php
 1static void EOS_CALL onCreateUser(const EOS_Connect_CreateUserCallbackInfo *Data) {
 2  if (Data->ResultCode == EOS_EResult::EOS_Success) {
 3    userId = Data->LocalUserId;
 4  }
 5}
 6/** Result code for the operation. EOS_Success is returned for a successful query, otherwise one of the error codes is returned. See eos_result.h */
 7EOS_EResult ResultCode;
 8/** Context that was passed into EOS_Connect_CreateUser */
 9void* ClientData;
10/** Account ID of the local player created by this operation */
11EOS_ProductUserId LocalUserId;
If an Epic user account was successfully created and linked to an external provider account:
- In the Data object, the ResultCode parameter returns the
EOS_EResult::EOS_Success (0)value; - In the Data object, the LocalUserId parameter returns the account ID. Save this for further interaction with other Epic services.
Found a typo or other text error? Select the text and press Ctrl+Enter.
