How to integrate launcher with Steam
Cross-platform flow
You can integrate your game with launcher in Steam. It allows you to promote your other Steam games via Xsolla Launcher.
If your launcher is integrated into Steam, it is installed on the user’s computer as a separate application when Steam is launched for the first time. Subsequent launcher behavior depends on how it is launched:
- Via Steam:
- The launcher only displays games for which the Steam AppID is specified in Publisher Account.
- The Buy button leads to the game’s page in the Steam application.
- The Install button initiates game installation through the Steam SDK in the Steam application.
- The launcher redirects the user to Steam for in-game purchases.
- If you have enabled the store in the launcher project settings for a specific game and provided its Steam AppID, the launcher will retrieve information about available DLCs for that game from Steam and create cards for these DLCs in the Xsolla Launcher store. When users click the Buy button, they are redirected to the items’ page in the Steam application.
- Xsolla Login automatically creates a user account within the Xsolla ecosystem using the user’s data from Steam. This allows you to see all launcher users in the Publisher account in the Xsolla Login database. Users can use the same account when launching the launcher outside Steam and make in-game purchases through the Xsolla Launcher store. Therefore, even when launched from Steam, you can check the user’s ownership of items purchased through the Xsolla Launcher store using Xsolla API methods.
- If the user clicks the Play button on a game other than the game through which the launcher was started, the launcher closes, and the selected game is started in Steam in the background. The launcher immediately starts the game without displaying the launcher UI. After the user closes the game, the launcher UI is displayed.
- As a standalone application through the launcher's executable file or its desktop shortcut:
- The launcher displays all games added to the launcher project, regardless of whether their Steam AppID is specified.
Note
Only one launch method can be selected for each game in Publisher Account: through Steam or standalone. If you want both launch methods to be available to the user, you need to create two projects in Publisher Account and add them to the launcher.
- The Xsolla Launcher store displays in-game items that have been added to it through Publisher Account.
Note
If you sell the same items through the Steam store and the Xsolla Launcher store, their prices must be the same, as this is a requirement of the Steam policy.
- The launcher has access to information about locally installed games through Steam. If a game distributed through Steam is locally installed, the Buy button is replaced with a Play button. When the user clicks the Play button, the launcher restarts through Steam.
Prerequisites
To set up Steam integration, you need:
- a Steam AppID
- an account and game in Steamworks
- a game build for publication on Steam
- a ready-to-use Launcher configured in Publisher Account
You can find your Steam AppID in your game administration panel in Steamworks. Go to the Steamworks > App Admin section and you will see it next to the name of your project.

Integration steps

Set up Steam platform and download files
- Open your project in Publisher Account and go to the Distribution > Launcher section.
- Find the launcher on the dashboard, and click Edit launcher.
- Go to the Settings section and click Set up to the right of the Steam platform logo.
- Enter your Steam Web API Key.
- Enter Steam App ID of your game.
- Click Download launcher host to download the
LauncherHost.ziparchive for Windows or macOS. - Click Download config to download the game’s configuration files.
- Go to the Launcher behavior tab and select what the launcher should do when a user runs the game from Steam (optional):
- Run the launcher (default)
- Run a game

Note
Regardless of your choice, the launcher is still displayed after closing the game.
- Go to the User login tab and select a login method (optional):
- Automatically via Steam account (default).
- Manually via login widget. The widget uses the login project selected during launcher creation.
Generate and download launcher installer
Refer to the guide to generate and download the launcher installer.
Prepare the game build for Steam
- Unpack the
LauncherHost.ziparchive (should be downloaded at step 1) to any directory. This archive contains theGameBuilddirectory for preparing the game with a launcher to be uploaded to Steam. Folder structure for Windows:LauncherHost.exe— an executable file for theLauncherHostutilityQt5Core.dll,vcruntime140-140_1.dll,msvcp140-140_1.dll— service libraries for theLauncherHost.exeutilityinstaller— a folder for the launcher installer

- Folder structure for macOS:
LauncherHost— a executable file forLauncherHostutilityFrameworks— a system folder for theLauncherHostutility libsinstaller— a folder for the launcher installer

- Create a new folder in the
GameBuildfolder. - Copy and paste your game build into that folder.
- Set up the game executable file name (Windows / macOS) in the Game > Build > Executable files section and specify the relative path to the game executable file.
Note
You should specify the name of the game executable file with the extension.
- Copy and paste a stand-alone launcher installer (Windows / macOS) to the installer folder.
- Copy and paste the Steam configuration files in the
GameBuildfolder. - If you already have your game on Steam, replace the
LauncherHost.exefile name with the name of your game’s executable file. You can find this information in your game administration panel in the Executable field of the Apps & Packages > All applications > Steamworks admin > Installation > General installation section.
Note
You can replace the name of the
LauncherHost.exe file with the name of your game’s executable file for integration debugging if you do not want to change the executable file.
- Enable using
ISteamApps::GetLaunchCommandLine()in your game administration panel.

- Click Prepare for Publishing to check if there are any conflicts between your work and that of other users.
Upload Windows game build files to Steam
- Log in to Steamworks and download the Steamworks SDK.
- Unpack the SDK archive.
- Go to the
steamworks_sdk_151\sdk\toolsfolder and unpack theSteamPipeGUIutility for uploading game builds to Steam.
- Run the
SteamPipeGUIutility.
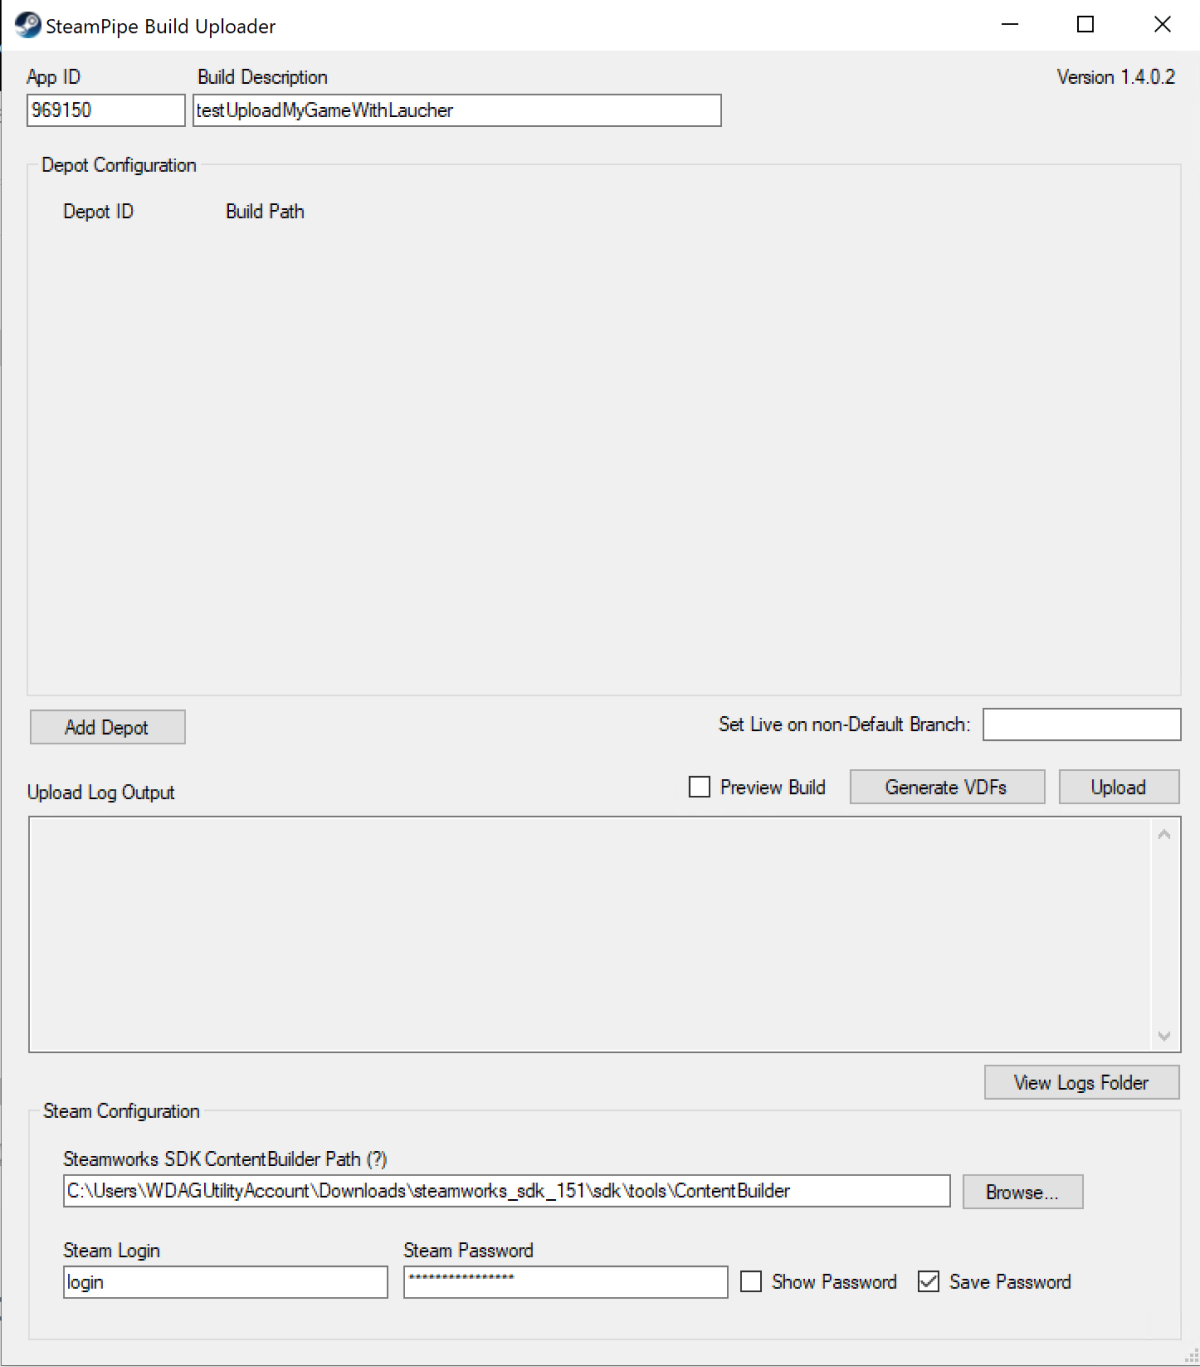
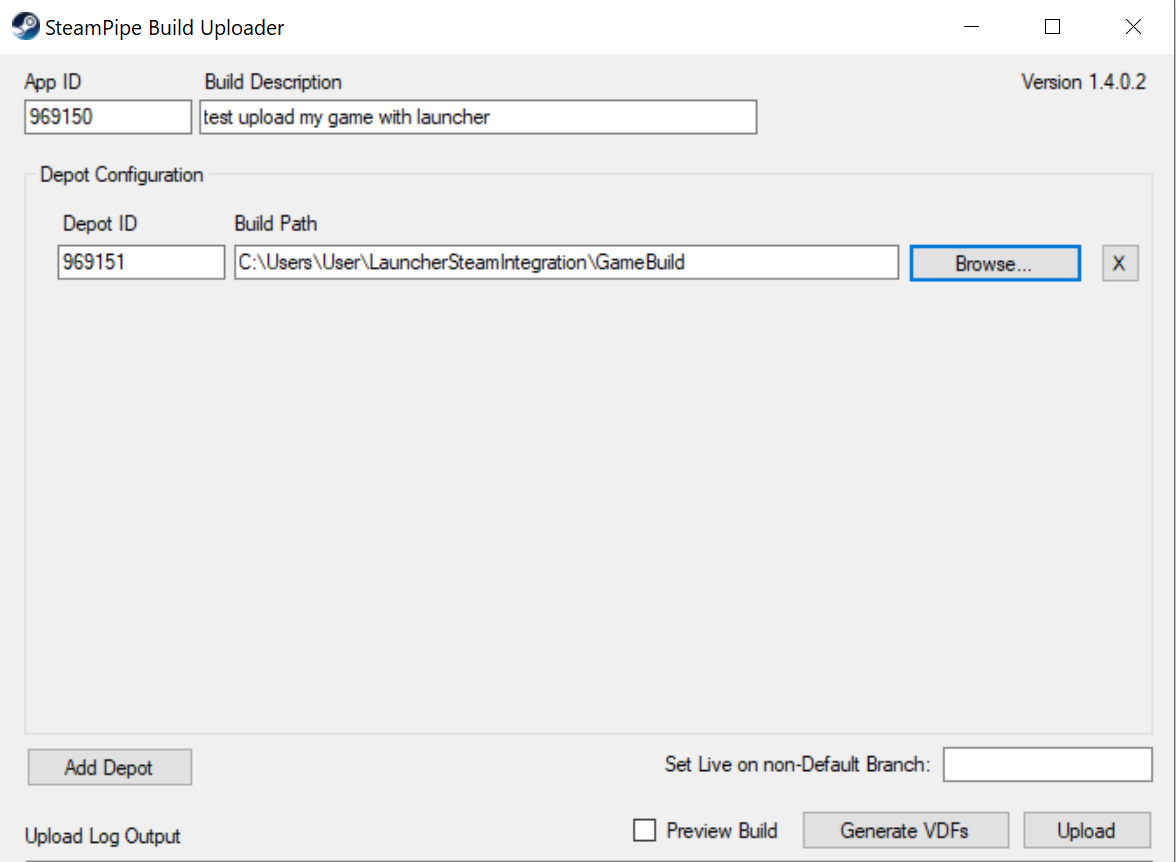
- Fill out the following fields in the settings window:
- In the App ID field, specify your game’s Steam AppID.
- In the Build description field, enter a short description of this build to make it easier to identify in your Steam admin panel.
- In the Steamworks SDK ContentBuilder Path field, specify the path to the Steamworks SDK ContentBuilder.
- In the Steam Login and Steam Password fields, enter your Steamworks login and password.

- Click Add Depot. In the Build Path field, specify the path to GameBuild with the game build and the Launcher installer.

- Click Upload and wait for the uploading to finish.
Upload macOS game build files to Steam
- Copy and paste
launcher.dmgin theGameBuild/installer. - Copy and paste
hostArgs.jsonin theGameBuildfolder. - Upload files to Steam:
- Open the unpacked
SteamSDKfolder.
- Open the unpacked
- Go to the
tools/scriptsfolder. - Create a vdf script named
app_build_<steam_id>.vdf, where<steam_id>is your project’s Steam ID and the following content (replacexxxxxxin line 3 with Steam ID,yyyyyyin line 11 with Depot ID - this is Steam ID + 1:
- Go to the
Copy
 1"AppID" "xxxxxx" // your AppID
 2"Desc" "This is a simple build script 1" // internal description for this build
 3
 4"ContentRoot" "../content/" // root content folder, relative to location of this file
 5"BuildOutput" "../output/" // build output folder for build logs and build cache files
 6
 7"Depots"
 8{
 9  "yyyyyy" // your DepotID
10  {
11    "FileMapping"
12    {
13      "LocalPath" "*"    // all files from contentroot folder
14      "DepotPath" "."    // mapped into the root of the depot
15      "recursive" "1"    // include all subfolders
16    }
17  }
18}
- Save changes.
- Copy the contents of the
GameBuilddirectory and paste them into thetools/ContentBuilder/Contentfolder. - In the terminal console, go to the
tools/ContentBuilder/builder_osxfolder. - Call the
./steamcmd.shcommand to start initialization and configuration. - Call the following command to run the script that uploads the build to the Steam servers:
Copy
1cmd.sh +login <username> <password> +run_app_build_http ../scripts/app_build_{Steam_id}.vdf
Publish game build on Steamworks
- Go to your game administration panel in Steamworks.
- Click Steamworks Admin to open the application admin page.
- Go to the SteamPipes > Builds section.
- Create a new branch or use a default branch.
- Find the uploaded build by its build ID, uploading date, or description, and place the build in your branch.
- Click Preview change and view your changes.
- Click Set Build Live Now.
Was this article helpful?
Thank you for your feedback!
We’ll review your message and use it to help us improve your experience.Found a typo or other text error? Select the text and press Ctrl+Enter.
