
Integrate SDK on application side
- Design an interface for the login system, in-game store, and other pages for your application.
- Implement in your application logic for user authentication, store display, purchase, and more using SDK methods.
<xsollaExtention>/assets/scripts/samples directory of SDK.User signup and login via username, email and password
This instruction shows how to use SDK methods to implement:
You can authenticate users with their username or email address. In the following examples we authenticate users with their username, whereas the email address is used to confirm sign-up and to reset the password.
Implement user sign-up
This tutorial describes the implementation of the following logic:

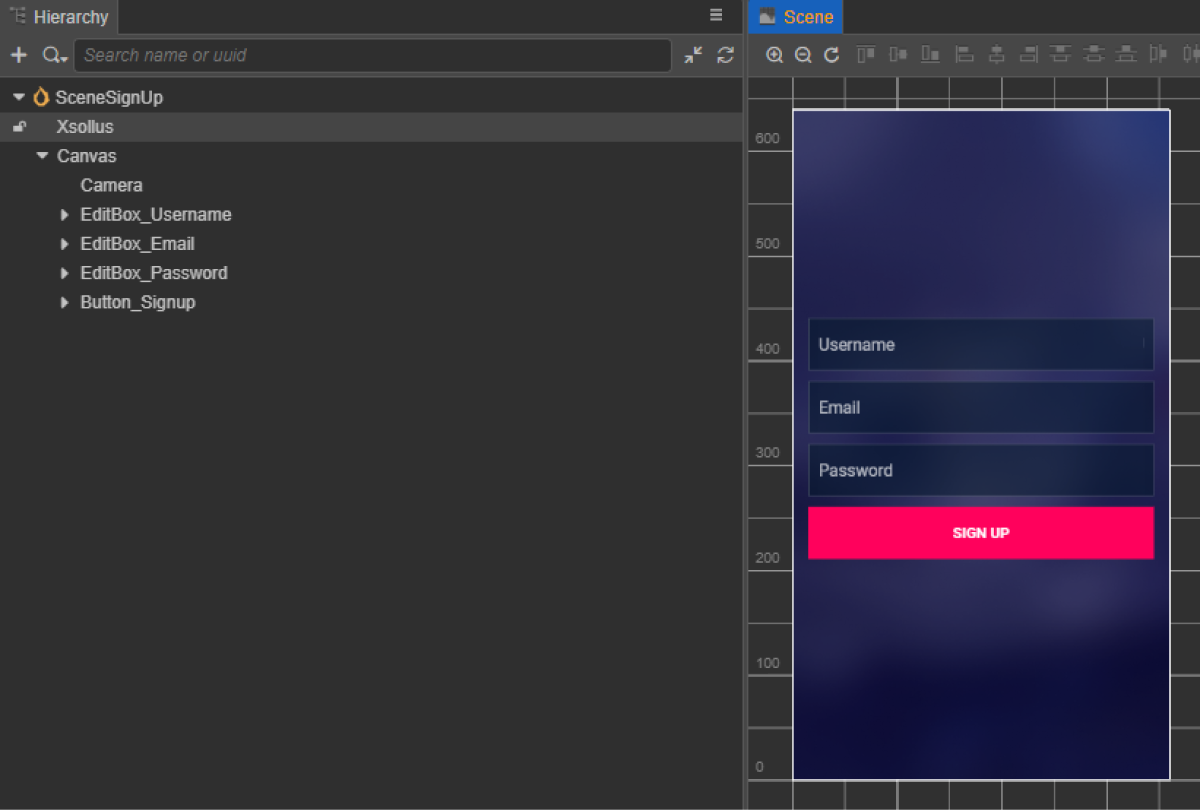
Create page interface
Create a scene for a sign-up page and add the following elements:
- username field
- user email address field
- user password field
- sign-up button
Example of a page structure:
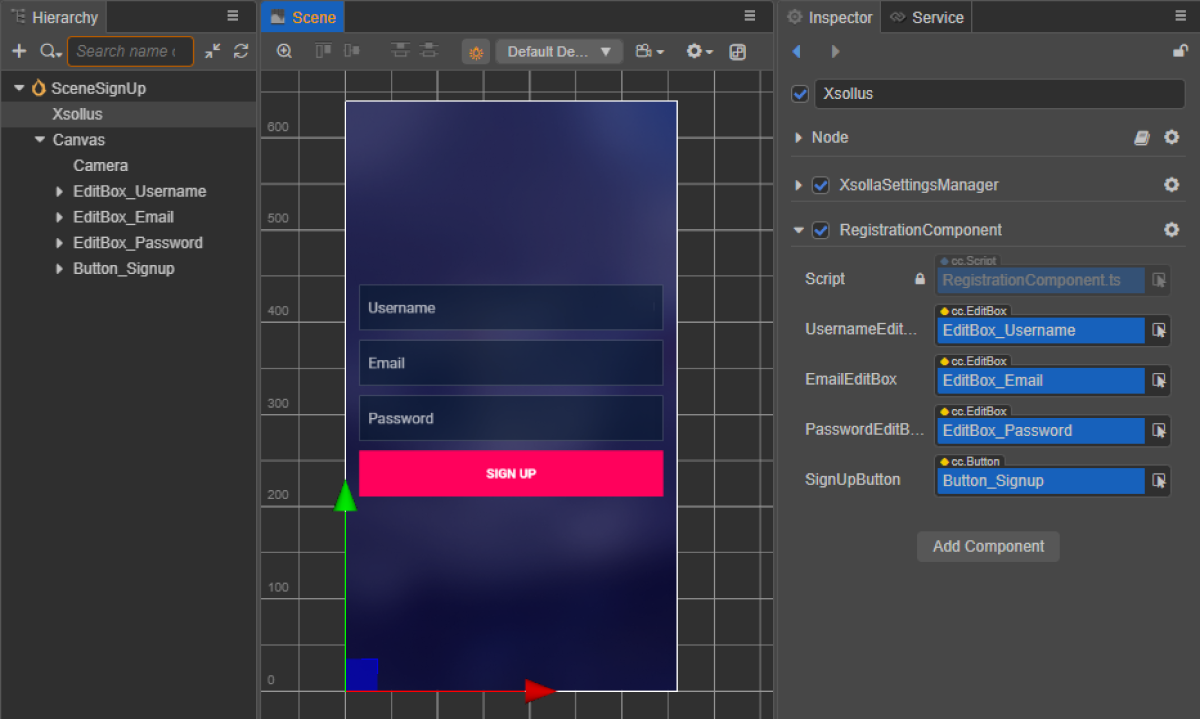
Create registration script component
- Create a RegistrationComponent and add the following properties:
usernameEditBoxemailEditBoxpasswordEditBoxsignUpButton— optional. Used when binding a callback function to the button using code
- Add a method to the
RegistrationComponentclass that is called when clickingSignUpButton, and add the logic to handle the click event, as shown in the script example. - Add the RegistrationComponent to the node on the scene. You can add a new node or use an existing node with the
XsollaSettingsManagercomponent that you added during SDK initialization. - Bind the scene elements to the properties of the
RegistrationComponentas shown in the picture:
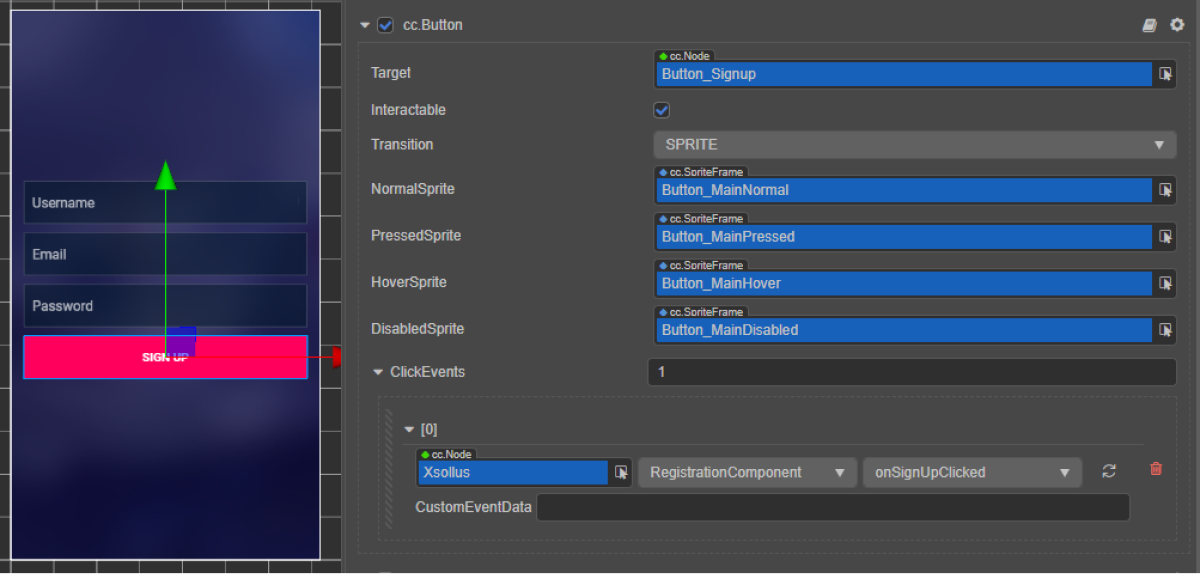
- Bind a callback to the sign-up button in one of the following ways:
- using the
Inspector panel, as shown in the picture below - by inserting the code block below into the page script
- using the
Binding callback using
Binding callback via code:
- typescript
1start() {
2 this.signUpButton.node.on(Button.EventType.CLICK, this.onSignUpClicked, this);
3 }
In the script’s examples, the onComplete and onError methods call the standard console.log method. In case of an error, the error code and description are passed in the error parameter.
You can add other actions like opening a page with a resend request for a sign-up email or opening a login page if sign-up is successful.
- typescript
 1import { _decorator, Button, Component, EditBox } from 'cc';
 2import { XsollaAuth } from 'db://xsolla-commerce-sdk/scripts/api/XsollaAuth';
 3const { ccclass, property } = _decorator;
 4
 5
 6@ccclass('RegistrationComponent')
 7export class RegistrationComponent extends Component {
 8
 9    @property(EditBox)
10    usernameEditBox: EditBox;
11
12    @property(EditBox)
13    emailEditBox: EditBox;
14
15    @property(EditBox)
16    passwordEditBox: EditBox;
17
18    @property(Button)
19    signUpButton: Button;
20
21    start() {
22        this.signUpButton.node.on(Button.EventType.CLICK, this.onSignUpClicked, this);
23    }
24
25    onSignUpClicked() {
26        XsollaAuth.registerNewUser(this.usernameEditBox.string, this.passwordEditBox.string, this.emailEditBox.string, 'xsollatest', null, null, token => {
27            if(token != null) {
28                console.log(`Successful login. Token - ${token.access_token}`);
29            }
30            else {
31                console.log('Thank you! We have sent you a confirmation email');
32            }
33        }, err => {
34            console.log(err);
35        });
36    }
37}
Set up sign-up confirmation email
After successful sign-up, a user receives a sign-up confirmation email to a specified address. You can customize emails sent to users in Publisher Account.
If you are developing a mobile application, set up deep links to return a user to an application after they confirm sign-up.
Implement sign-up confirmation email resend request
This tutorial describes the implementation of the following logic:

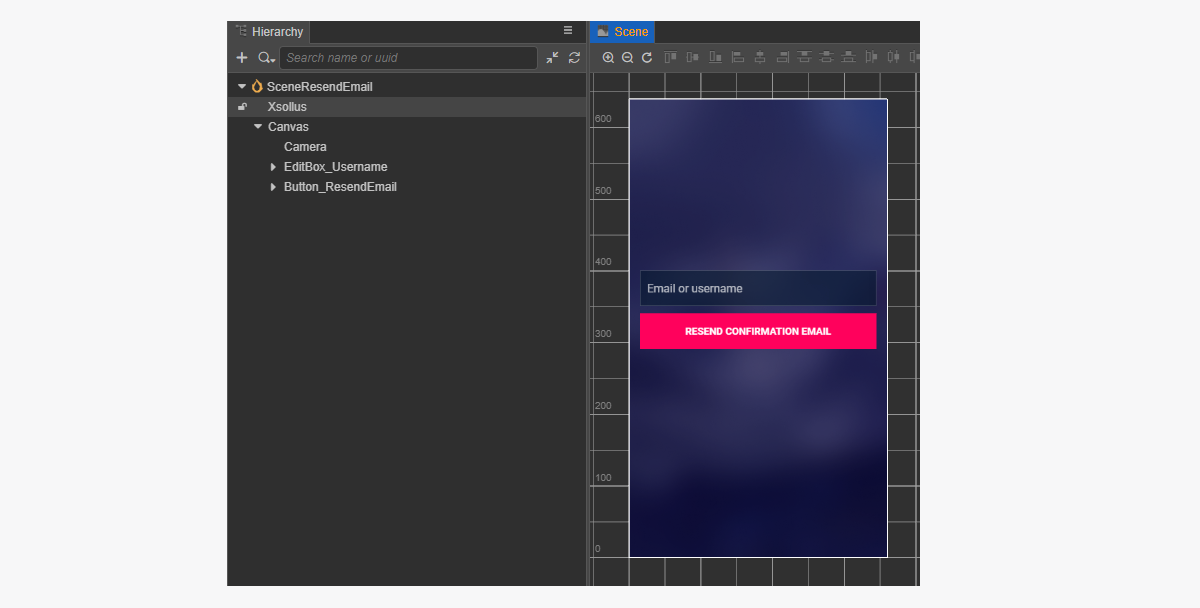
Create page interface
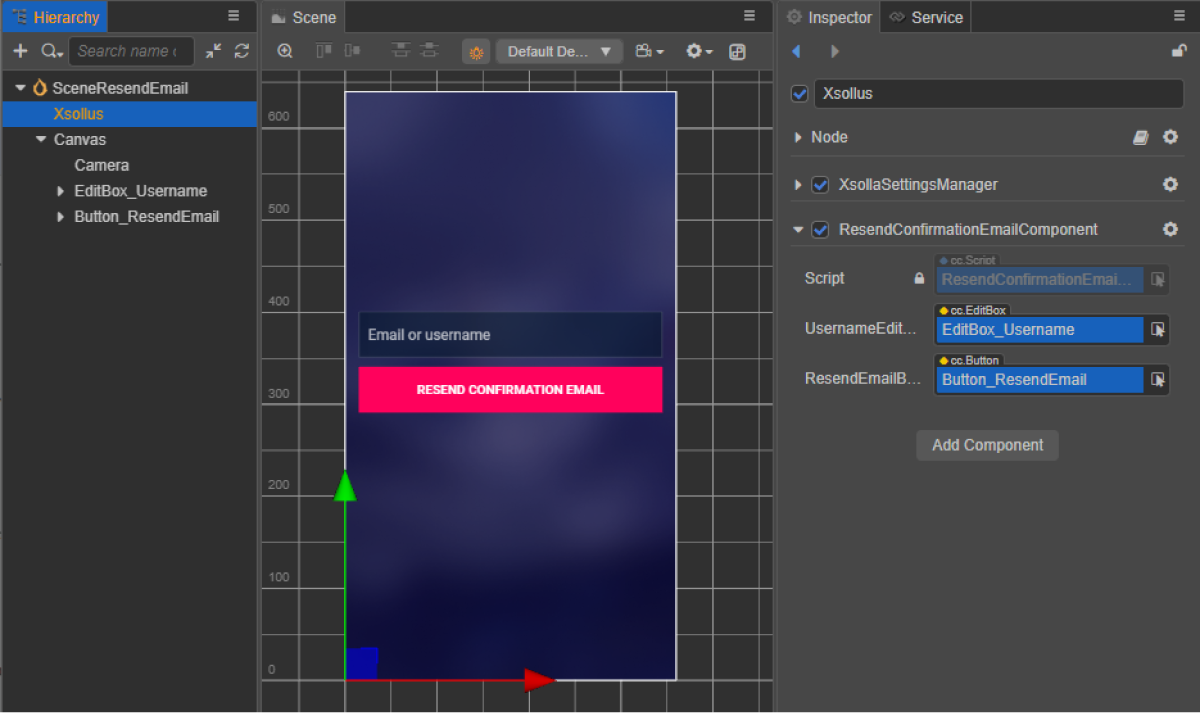
Create a scene for a page with a request to resend a confirmation email and add the following elements:
- username/email field
- resend email button
Example of a page structure:
Create resend email script component
- Create a ResendConfirmationEmailComponent and add the following properties:
usernameTextBoxresendEmailButton— optional. Used when binding a callback function to the button using code
- Add a method to the
ResendConfirmationEmailComponentclass that is called when clickingResendEmail, and add the logic to handle the click event, as shown in the script example. - Add the ResendConfirmationEmailComponent to the node on the scene. You can add a new node or use an existing node with the
XsollaSettingsManagercomponent that you added during SDK initialization. - Bind the scene elements to the properties of the
ResendConfirmationEmailComponentas shown in the picture:
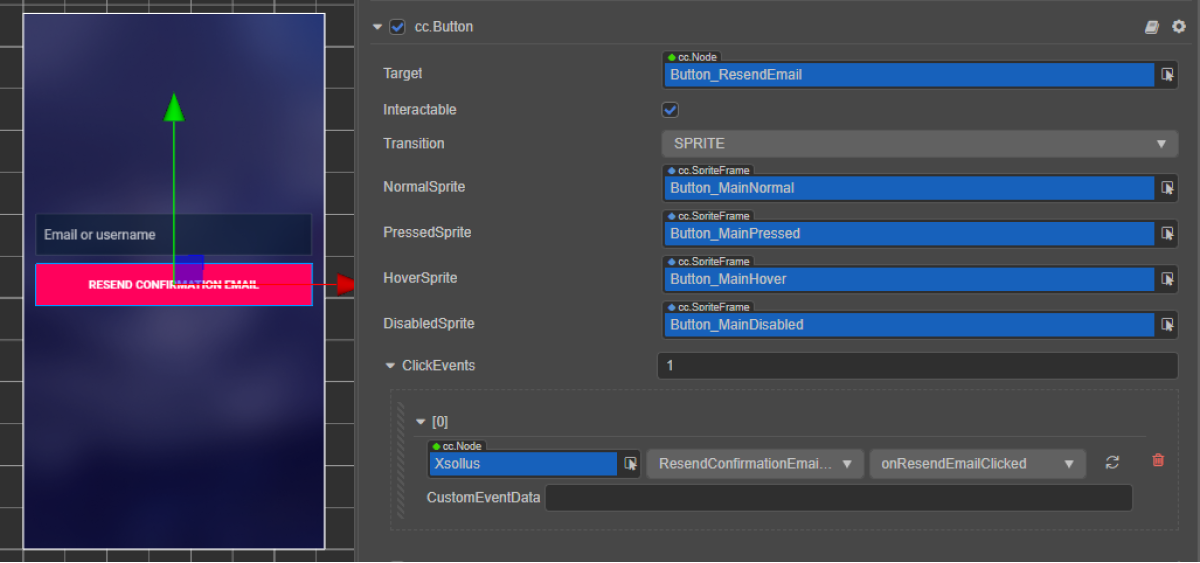
- Bind a callback to the sign-up confirmation email request button in one of the following ways:
- using the
Inspector panel, as shown in the picture below - by inserting the code block below into the script of the page with a request to resend a confirmation email
- using the
Binding callback using
Binding callback via code:
- typescript
1start() {
2	this.resendEmailButton.node.on(Button.EventType.CLICK, this.onResendEmailClicked, this);
3  }
If the request is successful, the user receives a sign-up confirmation email to the email address specified during sign-up.
In the script’s examples, the onComplete and onError methods call the standard console.log method. You can add other actions.
In case of an error, the error code and description are passed in the error parameter.
- typescript
 1import { _decorator, Button, Component, EditBox } from 'cc';
 2import { XsollaAuth } from 'db://xsolla-commerce-sdk/scripts/api/XsollaAuth';
 3const { ccclass, property } = _decorator;
 4
 5
 6@ccclass('ResendConfirmationEmailComponent')
 7export class ResendConfirmationEmailComponent extends Component {
 8
 9    @property(EditBox)
10    usernameEditBox: EditBox;
11
12    @property(Button)
13    resendEmailButton: Button;
14
15    start() {
16        this.resendEmailButton.node.on(Button.EventType.CLICK, this.onResendEmailClicked, this);
17    }
18
19    onResendEmailClicked() {
20        XsollaAuth.resendAccountConfirmationEmail(this.usernameEditBox.string, 'xsollatest', null, () => {
21            console.log('A verification link has been successfully sent to your email');
22        }, err => {
23            console.log(err);
24        });
25    }
26}
Implement user login
This tutorial describes the implementation of the following logic:

Create page interface
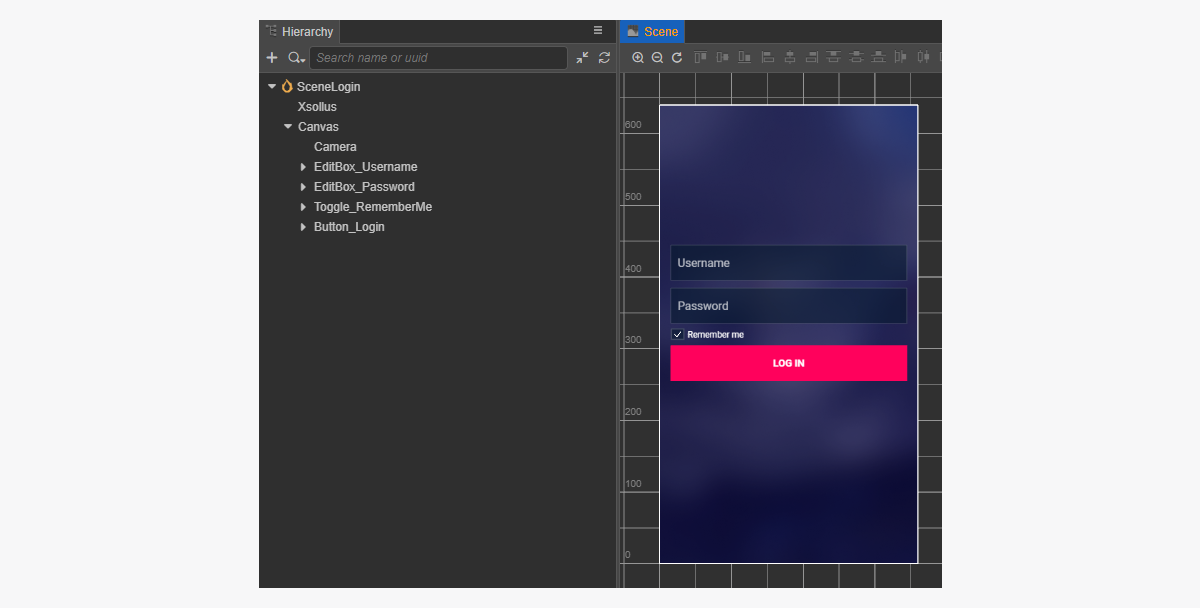
Create a scene for a login page and add the following elements:
- username field
- password field
- remember me toggle
- login button
Example of a page structure:
Create login script component
- Create a LoginComponent and add the following properties:
usernameEditBoxpasswordEditBoxremeberMeToggleloginButton— optional. Used when binding a callback function to the button using code
- Add a method to the
LoginComponentclass that is called when clickingLoginButton, and add the logic to handle the click event, as shown in the script example. - Add the LoginComponent to the node on the scene. You can add a new node or use an existing node with the
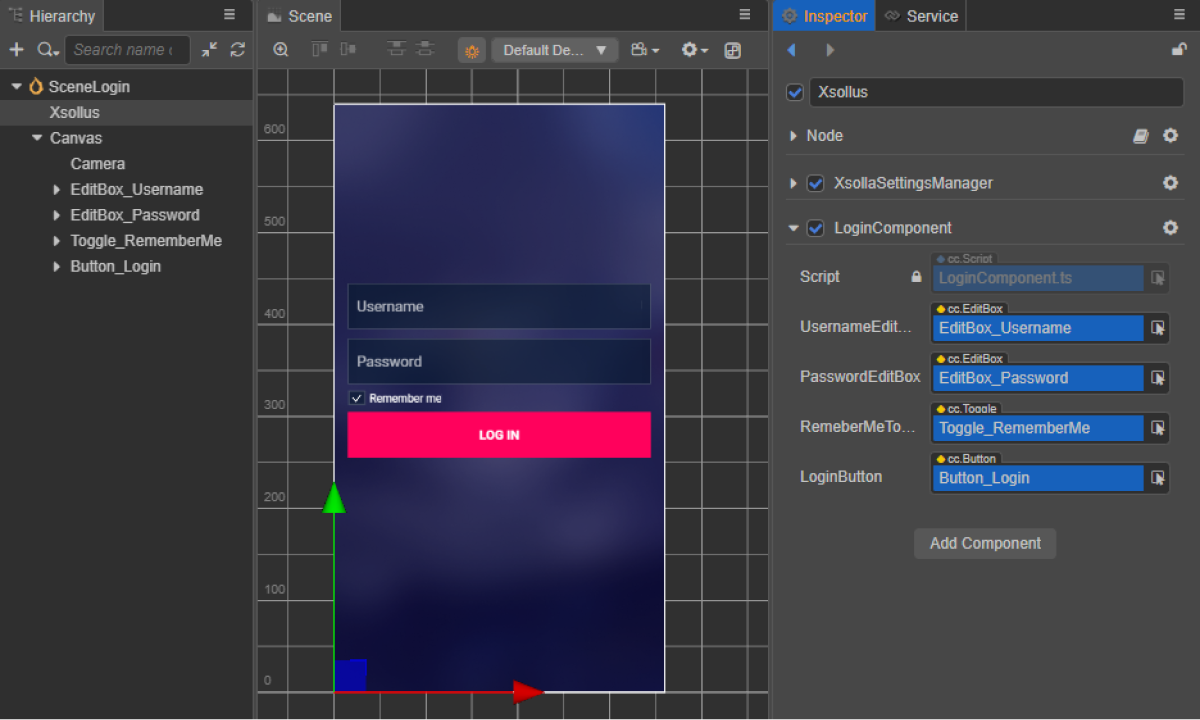
XsollaSettingsManagercomponent that you added during SDK initialization. - Bind the scene elements to the properties of the
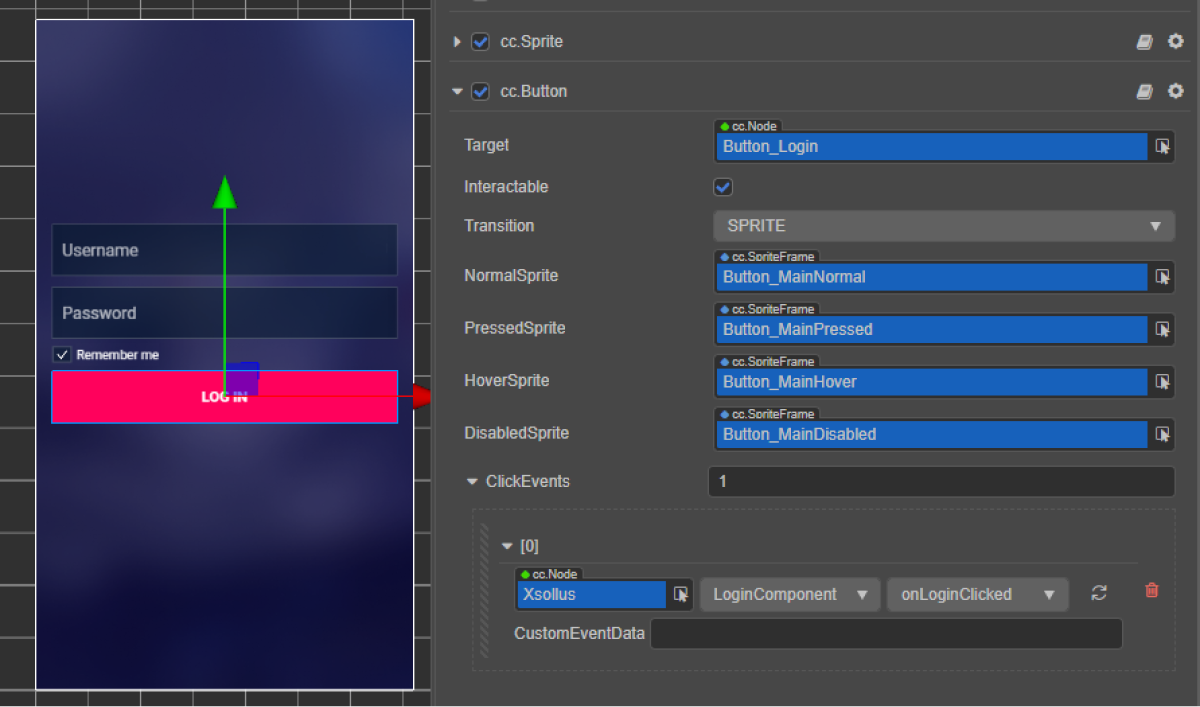
LoginComponentas shown in the picture:
- Bind a callback to the login button in one of the following ways:
- using the
Inspector panel, as shown in the picture below - by inserting the code block below into the page script
- using the
Binding callback using
Binding callback via code:
- typescript
1start() {
2	 this.loginButton.node.on(Button.EventType.CLICK, this.onLoginClicked, this);
3  }
In the script’s examples, the onComplete and onError methods call the standard console.log method. You can add other actions.
In case of an error, the error code and description are passed in the error parameter.
- typescript
 1import { _decorator, Button, Component, EditBox, Toggle } from 'cc';
 2import { XsollaAuth } from 'db://xsolla-commerce-sdk/scripts/api/XsollaAuth';
 3const { ccclass, property } = _decorator;
 4
 5
 6@ccclass('LoginComponent')
 7export class LoginComponent extends Component {
 8
 9    @property(EditBox)
10    usernameEditBox: EditBox;
11
12    @property(EditBox)
13    passwordEditBox: EditBox;
14
15    @property(Toggle)
16    remeberMeToggle: Toggle;
17
18    @property(Button)
19    loginButton: Button;
20
21    start() {
22        this.loginButton.node.on(Button.EventType.CLICK, this.onLoginClicked, this);
23    }
24
25    onLoginClicked() {
26        XsollaAuth.authByUsernameAndPassword(this.usernameEditBox.string, this.passwordEditBox.string, this.remeberMeToggle.isChecked, token => {
27            console.log(`Successful login. Token - ${token.access_token}`);
28        }, err => {
29            console.log(err);
30        });
31    }
32}
Implement password reset
This tutorial describes the implementation of the following logic:

Create page interface
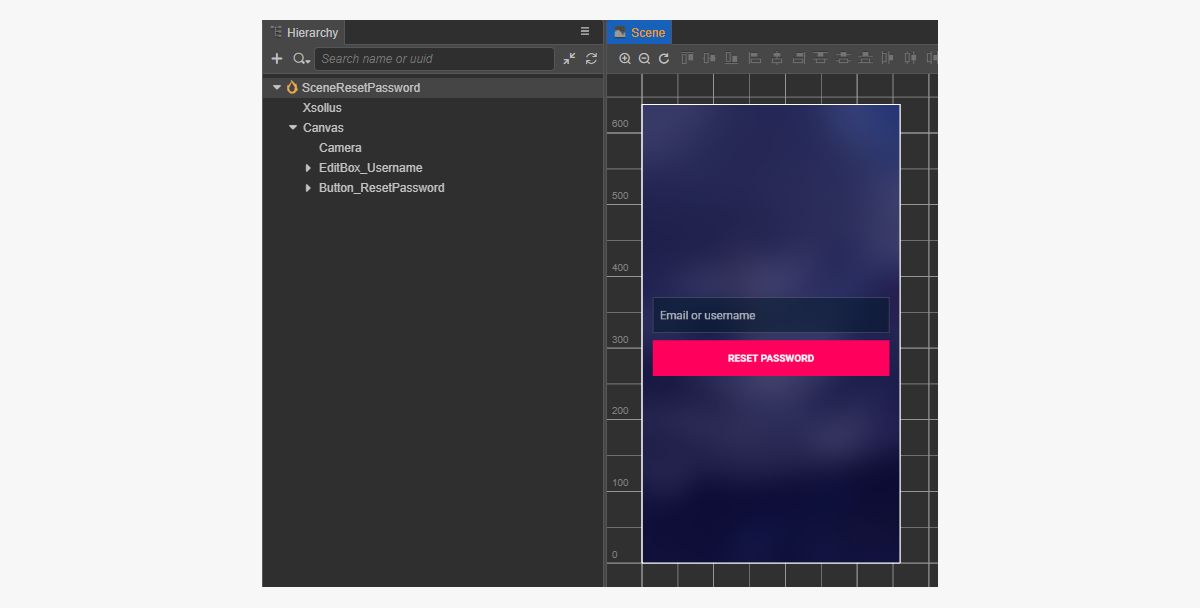
Create a scene for a reset password page and add the following:
- username field
- reset password button
Example of a page structure:
Create reset password script component
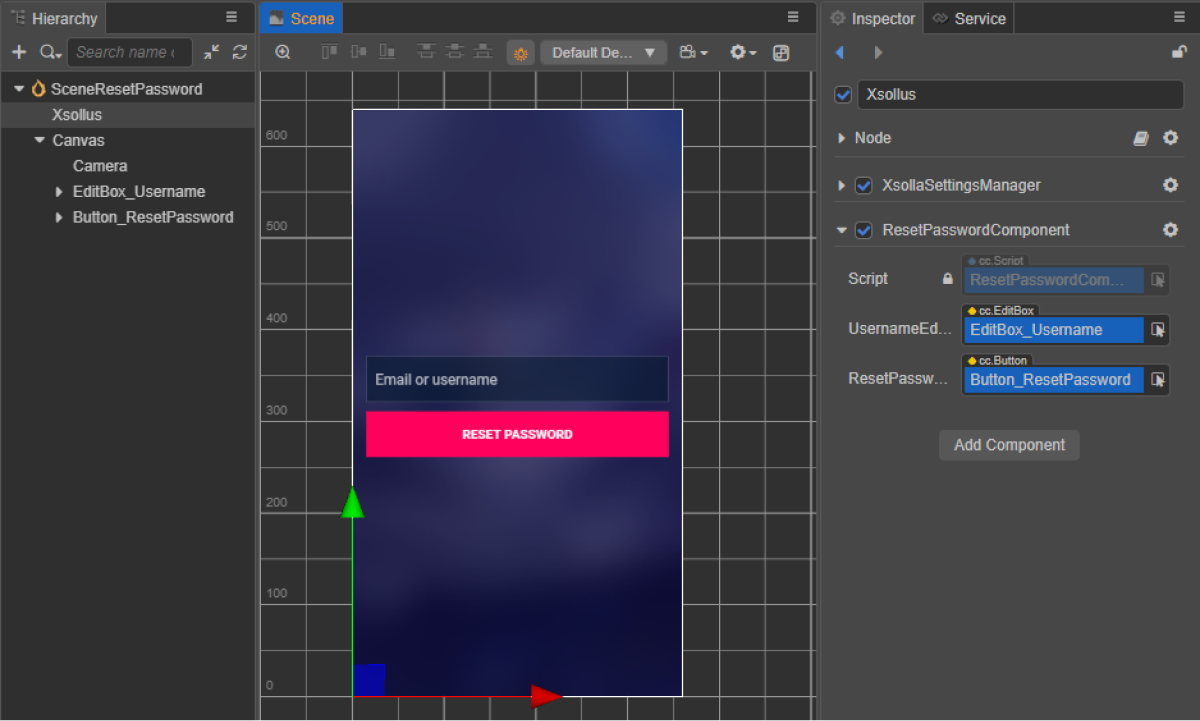
- Create a ResetPasswordComponent and add the following properties:
usernameEditBoxresetPasswordButton— optional. Used when binding a callback function to the button using code
- Add a method to the
ResetPasswordComponentclass that is called when clickingResetPassword, and add the logic to handle the click event, as shown in the script example. - Add the ResetPasswordComponent to the node on the scene. You can add a new node or use an existing node with the
XsollaSettingsManagercomponent that you added during SDK initialization. - Bind the scene elements to the properties of the
ResetPasswordComponentas shown in the picture:
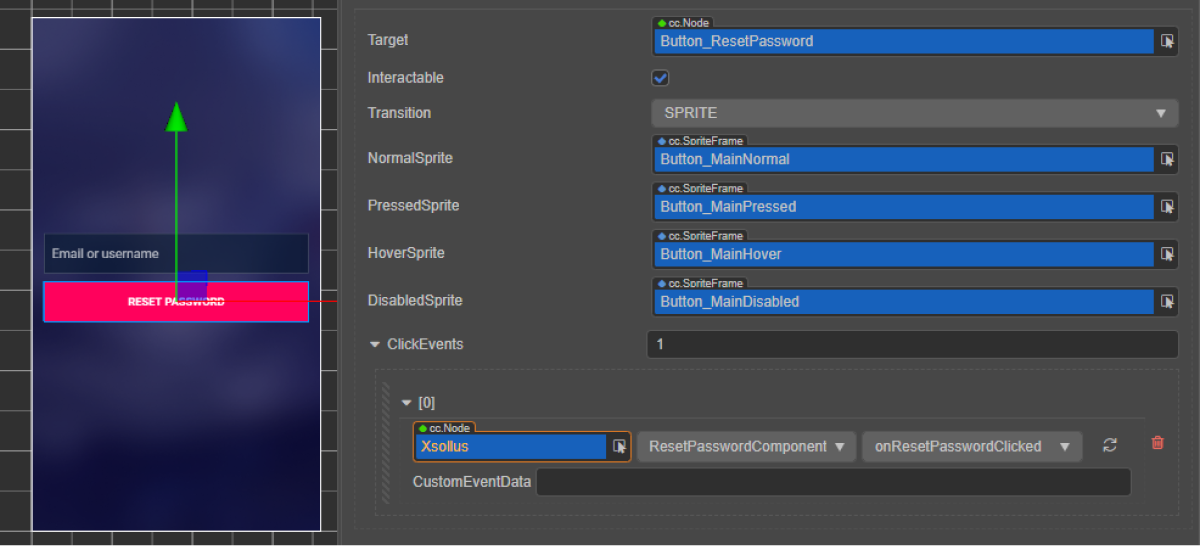
- Bind a callback to the password reset button in one of the following ways:
- using the
Inspector panel, as shown in the picture below - by inserting the code block below into the page script
- using the
Binding callback using
Binding callback via code:
- typescript
1start() {
2        this.resetPasswordButton.node.on(Button.EventType.CLICK, this.onResetPasswordClicked, this);
3    }
In the script’s examples, the onComplete and onError methods call the standard console.log method. You can add other actions.
In case of an error, the error code and description are passed in the error parameter.
- typescript
 1import { _decorator, Button, Component, EditBox } from 'cc';
 2import { XsollaAuth } from 'db://xsolla-commerce-sdk/scripts/api/XsollaAuth';
 3const { ccclass, property } = _decorator;
 4
 5
 6@ccclass('ResetPasswordComponent')
 7export class ResetPasswordComponent extends Component {
 8
 9    @property(EditBox)
10    usernameEditBox: EditBox;
11
12    @property(Button)
13    resetPasswordButton: Button;
14
15    start() {
16        this.resetPasswordButton.node.on(Button.EventType.CLICK, this.onResetPasswordClicked, this);
17    }
18
19    onResetPasswordClicked() {
20        XsollaAuth.resetPassword(this.usernameEditBox.string, null, () => {
21            console.log('Follow the instructions we sent to your email');
22        }, err => {
23            console.log(err);
24        });
25    }
26}
Social login
This guide shows how you can use SDK methods to implement user sign-up and login via their social network account.
Unlike for user authentication via username/user email address and password, you don’t have to implement separate logics for user sign-up. If the user’s first login is via a social network, a new account is created automatically.
If you have implemented social login in your application as an alternative authentication method, the social network account automatically links to an existing user account if the following conditions are met:
- A user who signed up with username/email address and password logged into your application via a social network account.
- A social network returns an email address.
- User email address in a social network is the same as the email address used for sign-up in your application.
This tutorial describes the implementation of the following logic:

The examples show how to set up user login via a Facebook account. You can set up all social networks in the same way.
The examples provide a basic introduction to the SDK methods. Applications usually require more complex interfaces and logic.
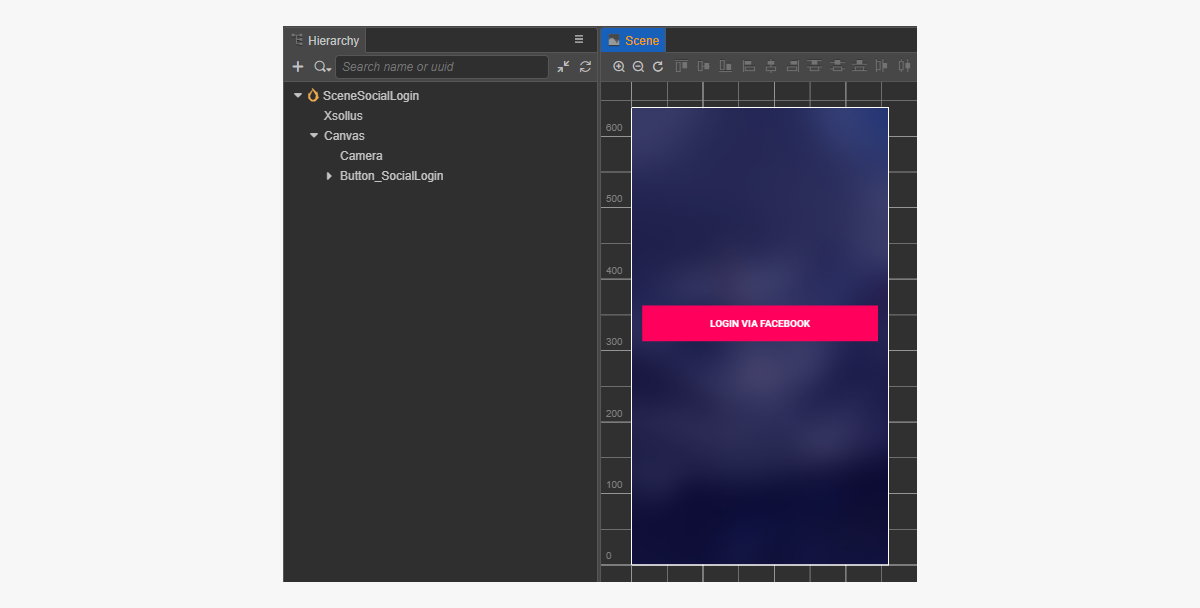
Create page interface
Create a scene for a social login page and add the social login button to it.
Example of a page structure:
Create social login script component
- Create a SocialLoginComponent. To bind callback function to social login button using code, add the
socialLoginButtonproperty. - Add a method to the
SocialLoginComponentclass that is called when clickingSocialLogin, and add the logic to handle the click event, as shown in the script example.
- Add the SocialLoginComponent to the node on the scene. You can add a new node or use an existing node with the
XsollaSettingsManagercomponent that you added during SDK initialization. - Bind the
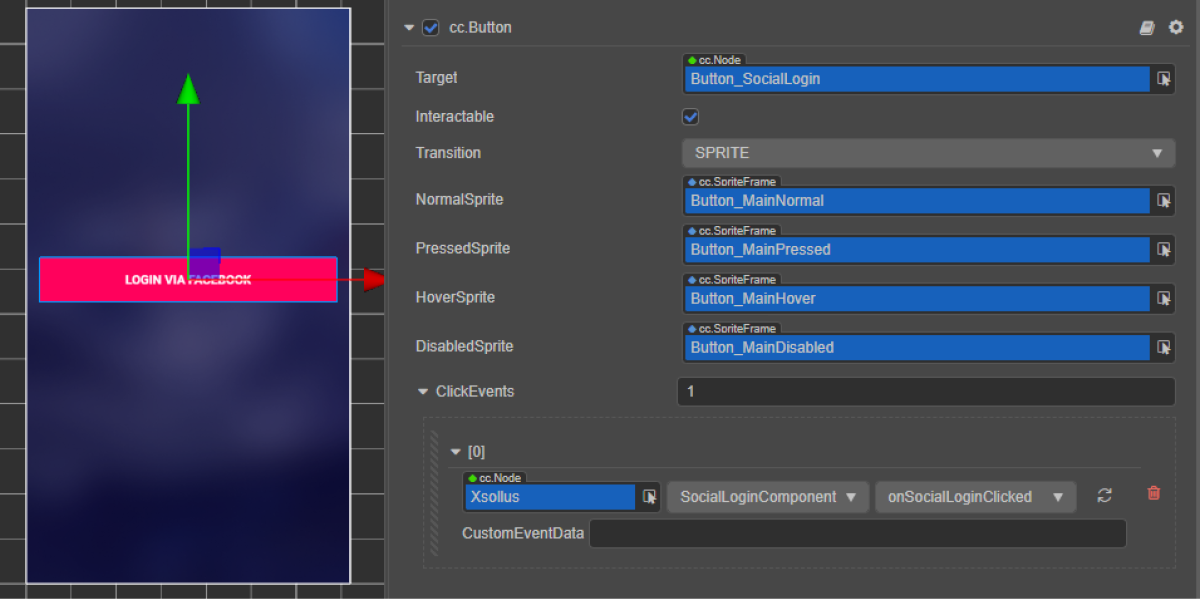
SocialLoginbutton to thesocialLoginButtonproperty of theSocialLoginComponentas shown in the picture:

- Bind a callback to the social login button in one of the following ways:
- using the
Inspector panel, as shown in the picture below - by inserting the code block below into the page script
- using the
Binding callback using
Binding callback via code:
- typescript
1start() {
2        this.socialLoginButton.node.on(Button.EventType.CLICK, this.onSocialLoginClicked, this);
3}
In the script’s examples, the onComplete, onCanceled and onError methods call the standard console.log method. In case of an error, the error code and description are passed in the error parameter.
You can add other actions like opening a page with a resend request for a sign-up email or opening a login page if sign-up is successful.
- typescript
 1import { _decorator, Button, Component } from 'cc';
 2import { Token, XsollaAuth } from '../../api/XsollaAuth';
 3const { ccclass, property } = _decorator;
 4
 5
 6namespace authorization {
 7
 8    @ccclass('SocialLoginComponent')
 9    export class SocialLoginComponent extends Component {
10
11        @property(Button)
12        socialLoginButton: Button;
13
14
15        start() {
16            this.socialLoginButton.node.on(Button.EventType.CLICK, this.onSocialLoginClicked, this);
17        }
18
19
20        onSocialLoginClicked() {
21            XsollaAuth.authSocial('facebook', (token: Token) => {
22                console.log(`Successful social authentication. Token - ${token.access_token}`);
23            }, () => {
24                console.log('Social auth was canceled');
25            }, (error:string) => {
26                console.log(error);
27            });
28        }
29    }
30}
Display of items catalog
This tutorial shows how to use the SDK methods to display the following items in an in-game store:
- virtual items
- bundles
- packages of virtual currency
Before you start, configure items in Publisher Account:
- Configure virtual items and groups of virtual items.
- Configure packages of virtual currencies.
- Configure bundles.
This tutorial describes the implementation of the following logic:

The example of every item in a catalog shows:
- name
- description
- price
- image
You can also show other information about the item if this information is stored in an in-game store.
Implement display of virtual items
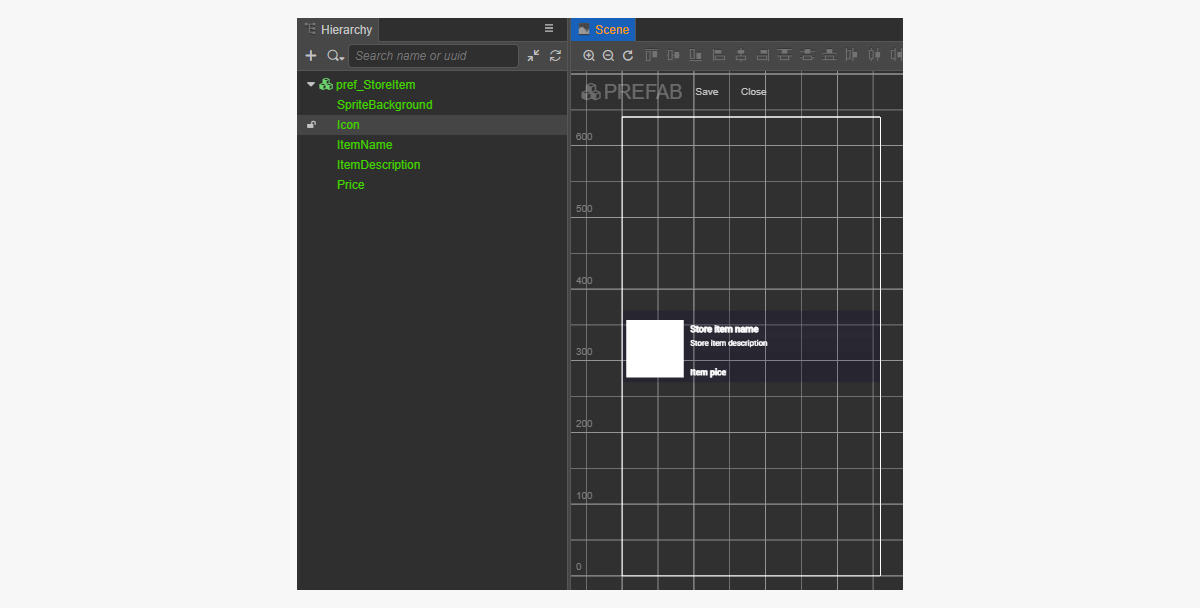
Create item widget
- Create a prefab. To do this, select
Create > Node Prefab from the context menu of the folder. - Open the created prefab.
- Add a
UITransformcomponent to the root of the prefab as shown in the image below and set the content size.
- Add the following UI elements as prefab child objects and configure their visuals:
- widget background image
- item name
- Item description
- item price
- item image
Example of the widget structure:
Create item widget script
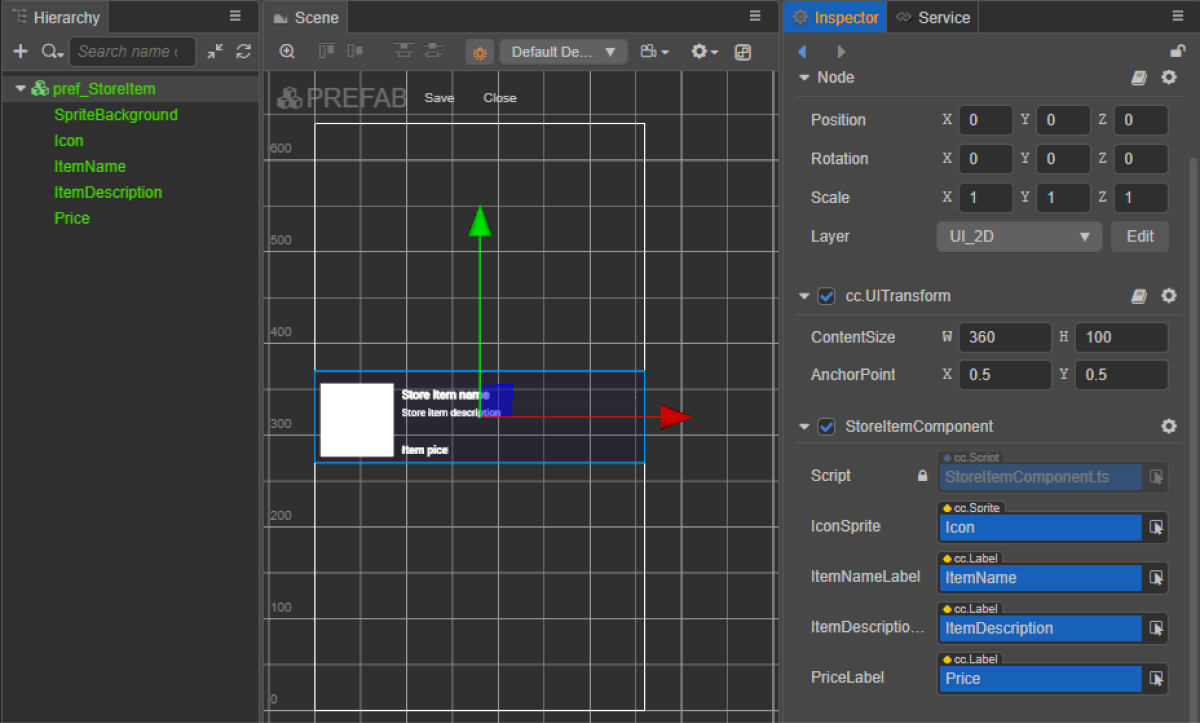
- Create a
StoreItemComponentand add the following properties:iconSpriteitemNameLabelitemDescriptionLabelpriceLabel
- Add an
initmethod and initialization logic to theStoreItemComponentclass as shown in the script example. - Attach the StoreItemComponent component to the root node of the prefab.
- Bind the prefab elements to the properties of the
StoreItemComponentas shown in the picture:
Example of a widget script (StoreItemComponent):
- typescript
 1import { _decorator, assetManager, Component, ImageAsset, Label, Sprite, SpriteFrame, Texture2D } from 'cc';
 2import { StoreItem } from 'db://xsolla-commerce-sdk/scripts/api/XsollaCatalog';
 3const { ccclass, property } = _decorator;
 4
 5
 6@ccclass('StoreItemComponent')
 7export class StoreItemComponent extends Component {
 8
 9    @property(Sprite)
10    iconSprite: Sprite;
11
12    @property(Label)
13    itemNameLabel: Label;
14
15    @property(Label)
16    itemDescriptionLabel: Label;
17
18    @property(Label)
19    priceLabel: Label;
20
21    private _data: StoreItem;
22
23    init(data: StoreItem) {
24
25        this._data = data;
26
27        this.itemNameLabel.string = data.name;
28        this.itemDescriptionLabel.string = data.description;
29
30        if (data.virtual_prices.length > 0) {
31            this.priceLabel.string = `${data.virtual_prices[0].amount.toString()} ${data.virtual_prices[0].name}`;
32        } else {
33            this.priceLabel.string = `${parseFloat(data.price.amount)} ${data.price.currency}`;
34        }
35
36        assetManager.loadRemote<ImageAsset>(data.image_url, (err, imageAsset) => {
37            if(err == null) {
38            const spriteFrame = new SpriteFrame();
39            const texture = new Texture2D();
40            texture.image = imageAsset;
41            spriteFrame.texture = texture;
42            this.iconSprite.spriteFrame = spriteFrame;
43            } else {
44                console.log(`Can’t load image with URL ${data.image_url}`);
45            }
46        });
47    }
48}
Create page interface
Create a scene for an items catalog page and add the ScrollView element to it.
Example of a page structure:
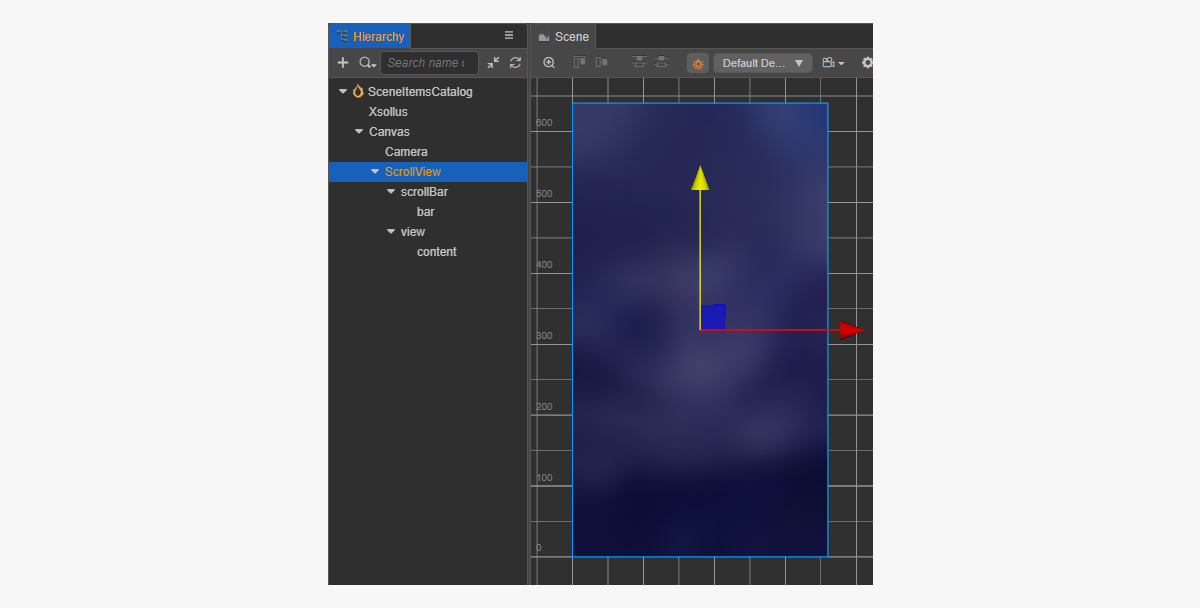
To make the ScrollView match the created StoreItem prefab, set up its size:
- Change the value of the
ContentSizeparameter in theScrollViewnode and the innerviewnode. - Bind the
Layoutcomponent to thecontentnode and set it up. In the example, the following settings are selected:Type == verticalResizeMode == Container
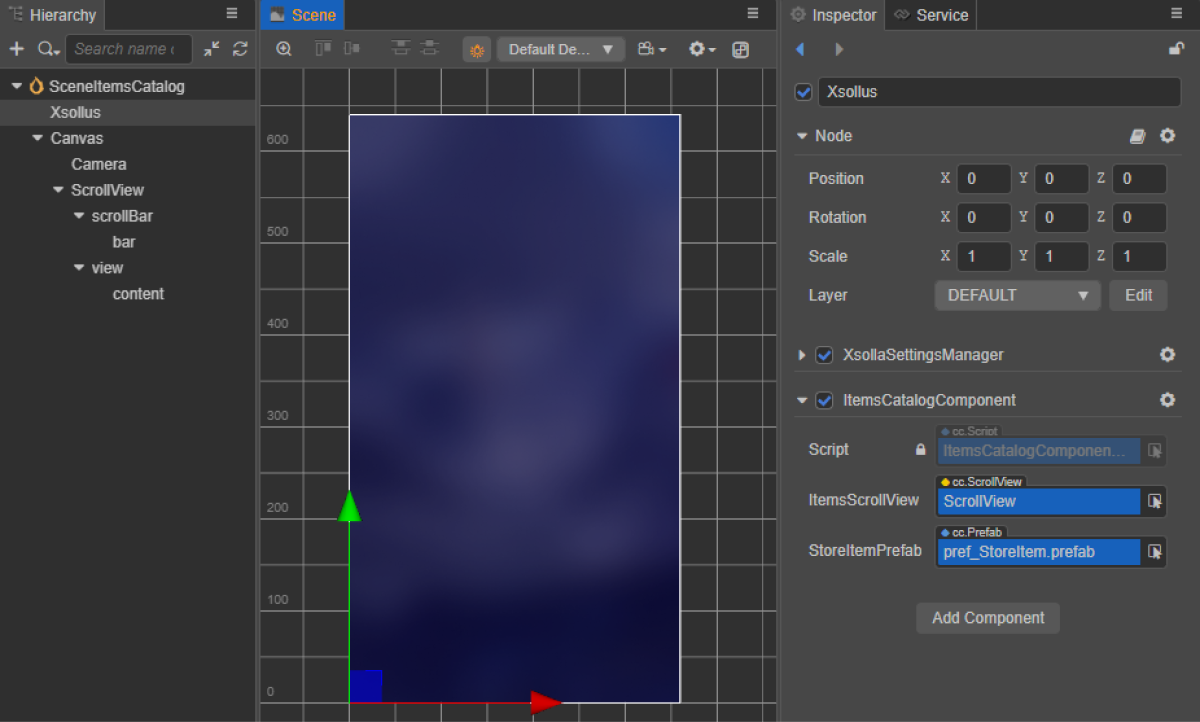
Create items catalog script component
- Create a ItemsCatalogComponent and add the following properties:
itemsScrollViewstoreItemPrefab
- Add the
start life cycle function and initialization logic to theItemsCatalogComponentclass as shown in the script example. - Add the ItemsCatalogComponent to the node on the scene. You can add a new node or use an existing node with the
XsollaSettingsManagercomponent that you added during SDK initialization. - Bind the prefab elements to the properties of the
ItemsCatalogComponentas shown in the picture:
Example of a class script (ItemsCatalogComponent):
- typescript
 1import { _decorator, Component, instantiate, Prefab, ScrollView } from 'cc';
 2import { XsollaCatalog } from 'db://xsolla-commerce-sdk/scripts/api/XsollaCatalog';
 3import { StoreItemComponent } from './StoreItemComponent';
 4const { ccclass, property } = _decorator;
 5
 6
 7@ccclass('ItemsCatalogComponent')
 8export class ItemsCatalogComponent extends Component {
 9
10    @property(ScrollView)
11    itemsScrollView: ScrollView;
12
13    @property(Prefab)
14    storeItemPrefab: Prefab;
15
16    start() {
17        XsollaCatalog.getCatalog(null, null, [], itemsData => {
18            for (let i = 0; i < itemsData.items.length; ++i) {
19                let storeItem = instantiate(this.storeItemPrefab);
20                this.itemsScrollView.content.addChild(storeItem);
21                storeItem.getComponent(StoreItemComponent).init(itemsData.items[i]);
22            }
23        });
24    }
25}
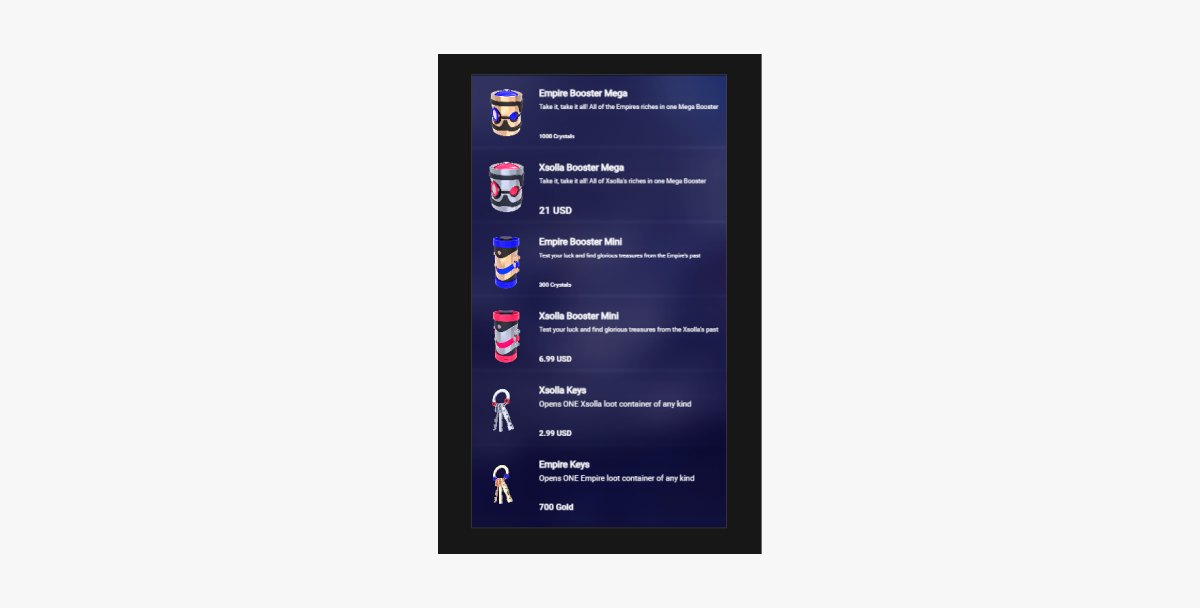
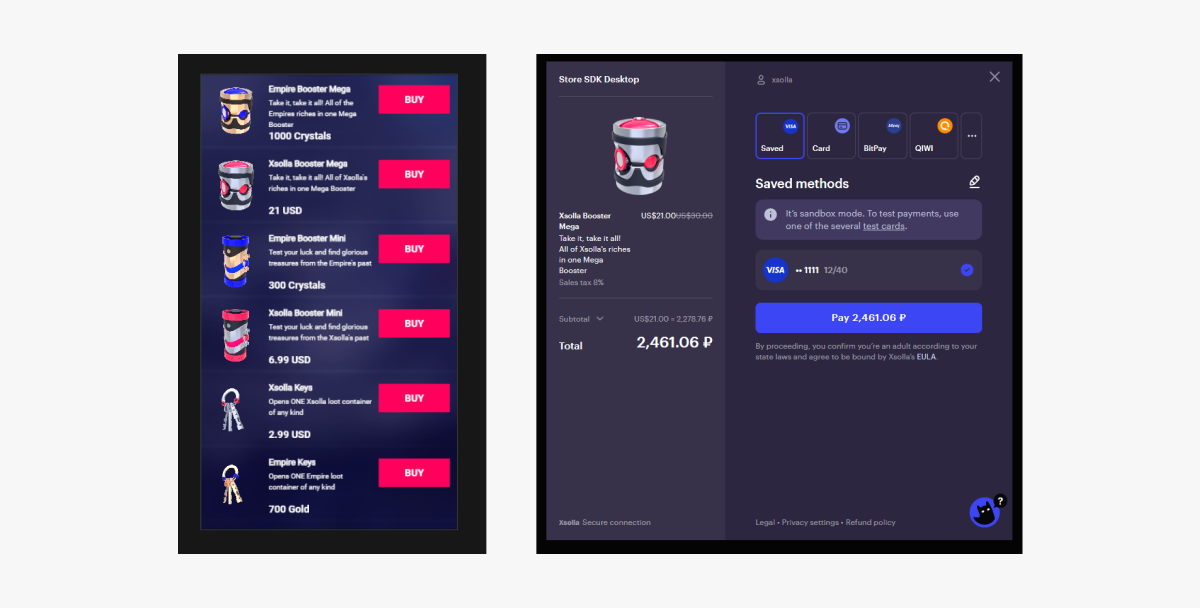
Example of the script’s work result:
Implement display of bundles
Create bundle widget
- Create a prefab. To do this, select
Create > Node Prefab from the context menu of the folder. - Open the created prefab.
- Add a
UITransformcomponent to the root of the prefab as shown in the image below and set the content size.
- Add the following UI elements as prefab child objects and configure their visuals:
- widget background image
- bundle name
- bundle description
- bundle price
- bundle image
- bundle content description (items and their quantity)
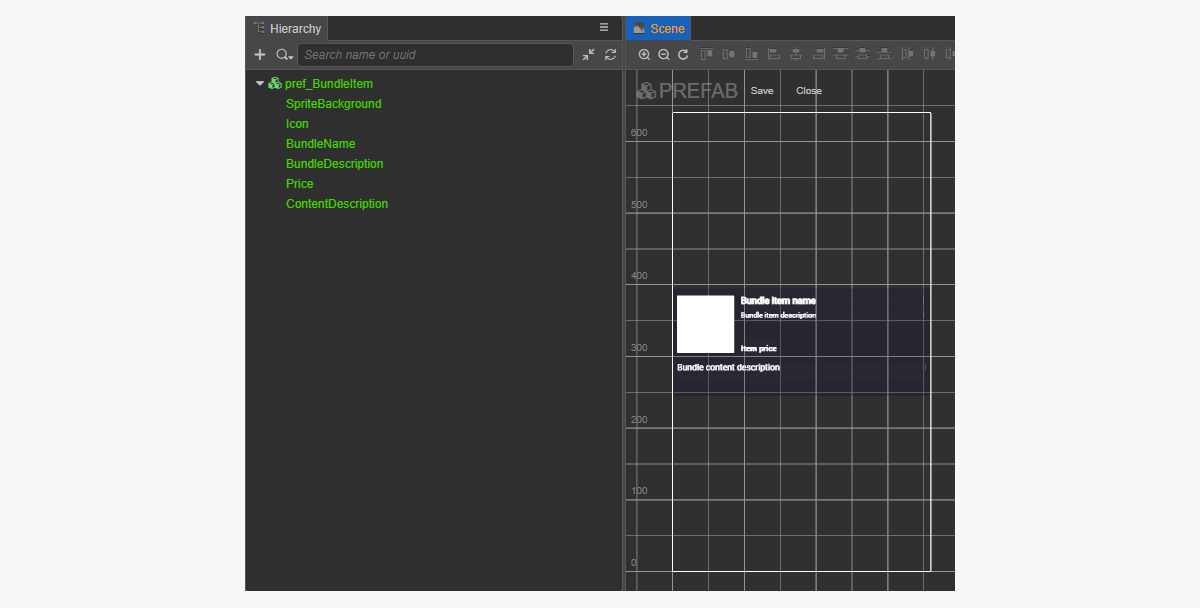
Example of the widget structure:
Create bundle widget script
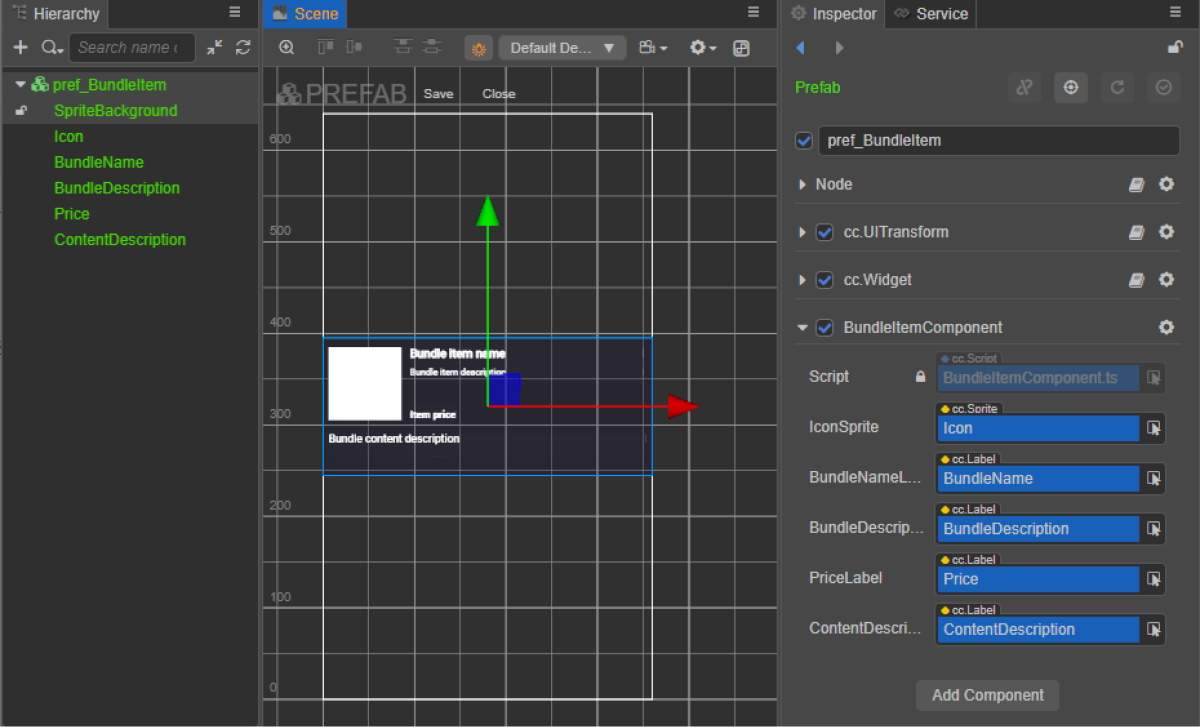
- Create a BundleItemComponent and add the following properties:
iconSpritebundleNameLabelbundleDescriptionLabelpriceLabelcontentDescriptionlabel
- Add an
initmethod and initialization logic to theBundleItemComponentclass as shown in the script example. - Attach the BundleItemComponent to the root node of the prefab.
- Bind the prefab elements to the properties of the
BundleItemComponentas shown in the picture:
Example of a widget script (BundleItemComponent):
- typescript
 1import { _decorator, assetManager, Component, ImageAsset, Label, Sprite, SpriteFrame, Texture2D } from 'cc';
 2import { StoreBundle } from 'db://xsolla-commerce-sdk/scripts/api/XsollaCatalog';
 3const { ccclass, property } = _decorator;
 4
 5
 6@ccclass('BundleItemComponent')
 7export class BundleItemComponent extends Component {
 8
 9    @property(Sprite)
10    iconSprite: Sprite;
11
12    @property(Label)
13    bundleNameLabel: Label;
14
15    @property(Label)
16    bundleDescriptionLabel: Label;
17
18    @property(Label)
19    priceLabel: Label;
20
21    @property(Label)
22    contentDescriptionLabel: Label;
23
24    init(data: StoreBundle) {
25
26        this.bundleNameLabel.string = data.name;
27        this.bundleDescriptionLabel.string = data.description;
28
29        if (data.virtual_prices.length > 0) {
30            this.priceLabel.string = `${data.virtual_prices[0].amount.toString()} ${data.virtual_prices[0].name}`;
31        } else {
32            this.priceLabel.string = `${parseFloat(data.price.amount)} ${data.price.currency}`;
33        }
34
35        assetManager.loadRemote<ImageAsset>(data.image_url, (err, imageAsset) => {
36            if(err == null) {
37            const spriteFrame = new SpriteFrame();
38            const texture = new Texture2D();
39            texture.image = imageAsset;
40            spriteFrame.texture = texture;
41            this.iconSprite.spriteFrame = spriteFrame;
42            } else {
43                console.log(`Can’t load image with URL ${data.image_url}`);
44            }
45        });
46
47        this.contentDescriptionLabel.string = `This bundle includes ${data.content.length} items: `;
48        var bandles = data.content.map(bundle => bundle.name).join(', ');
49        this.contentDescriptionLabel.string += bandles;
50    }
51}
Create page interface
Create a scene for a bundle catalog page and add the ScrollView element to it.
Example of a page structure:
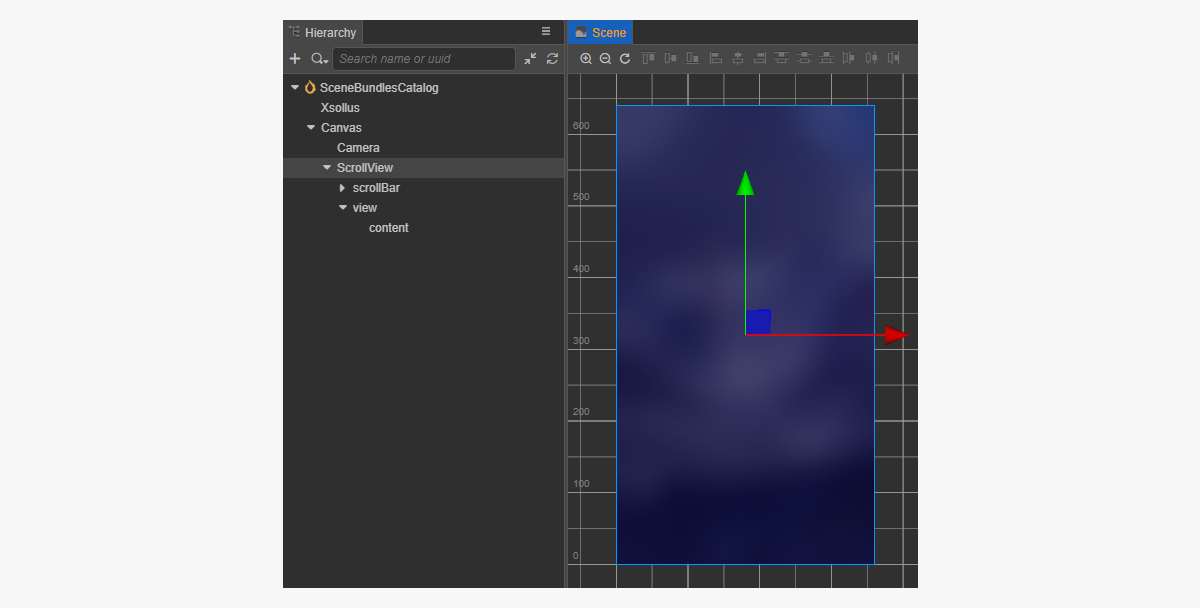
To make the ScrollView match the created BundleItem prefab, set up its size:
- Change the value of the
ContentSizeparameter in theScrollViewnode and the innerviewnode. - Bind the
Layoutcomponent to thecontentnode and set it up. In the example, the following settings are selected:Type == verticalResizeMode == Container
Create bundles catalog script component
- Create a BundlesCatalogComponent and add the following properties:
itemsScrollViewbundleItemPrefab
- Add the
start life cycle function and initialization logic to theBundlesCatalogComponentclass as shown in the script example. - Add the BundlesCatalogComponent to the node on the scene. You can add a new node or use an existing node with the
XsollaSettingsManagercomponent that you added during SDK initialization. - Bind the prefab elements to the properties of the
BundlesCatalogComponentas shown in the picture:

Example of a class script (BundlesCatalogComponent):
- typescript
 1import { _decorator, Component, instantiate, Prefab, ScrollView } from 'cc';
 2import { XsollaCatalog } from 'db://xsolla-commerce-sdk/scripts/api/XsollaCatalog';
 3import { BundleItemComponent } from './BundleItemComponent';
 4const { ccclass, property } = _decorator;
 5
 6
 7@ccclass('BundlesCatalogComponent')
 8export class BundlesCatalogComponent extends Component {
 9
10    @property(ScrollView)
11    itemsScrollView: ScrollView;
12
13    @property(Prefab)
14    bundleItemPrefab: Prefab;
15
16    start() {
17        XsollaCatalog.getBundleList(null, null, [], itemsData => {
18        for (let i = 0; i < itemsData.items.length; ++i) {
19                let bundleItem = instantiate(this.bundleItemPrefab);
20                this.itemsScrollView.content.addChild(bundleItem);
21                bundleItem.getComponent(BundleItemComponent).init(itemsData.items[i]);
22            }
23        });
24    }
25}
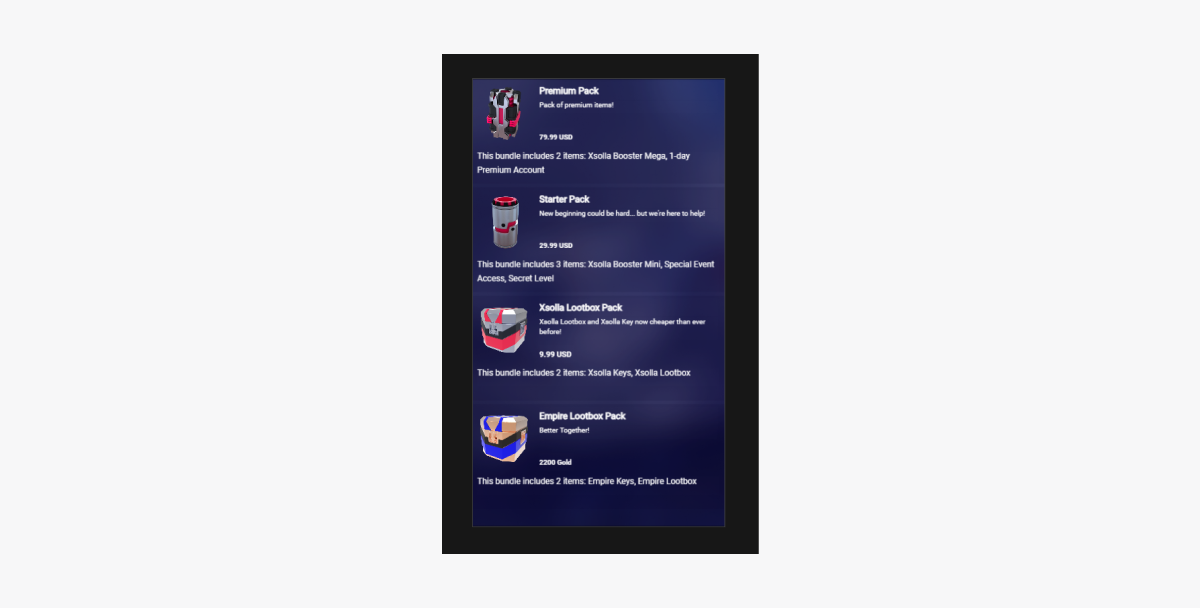
Example of the script’s work result:
Implement display of virtual currency packages catalog
Create widget for virtual currency package
- Create a prefab. To do this, select
Create > Node Prefab from the context menu of the folder. - Open the created prefab.
- Add a
UITransformcomponent to the root of the prefab as shown in the image below and set the content size.
- Add the following UI elements as prefab child objects and configure their visuals:
- widget background image
- currency name
- currency description
- currency price
- currency image
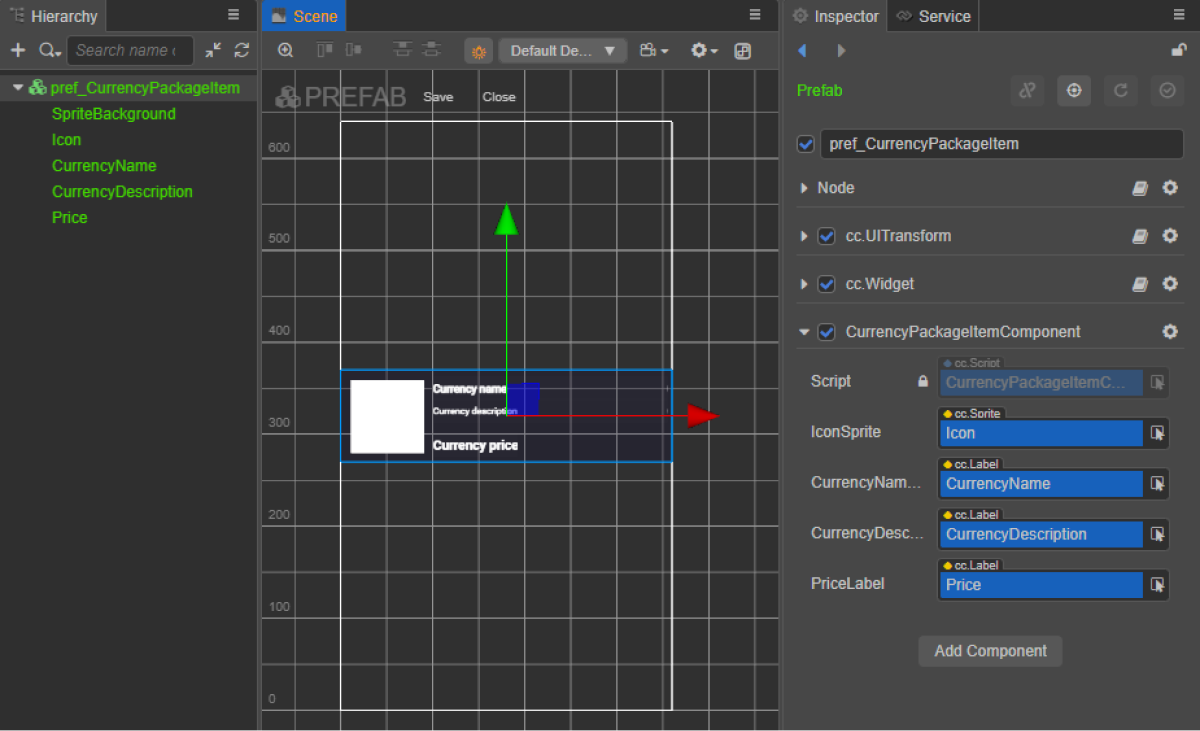
Example of the widget structure:
Create widget script for virtual currency package
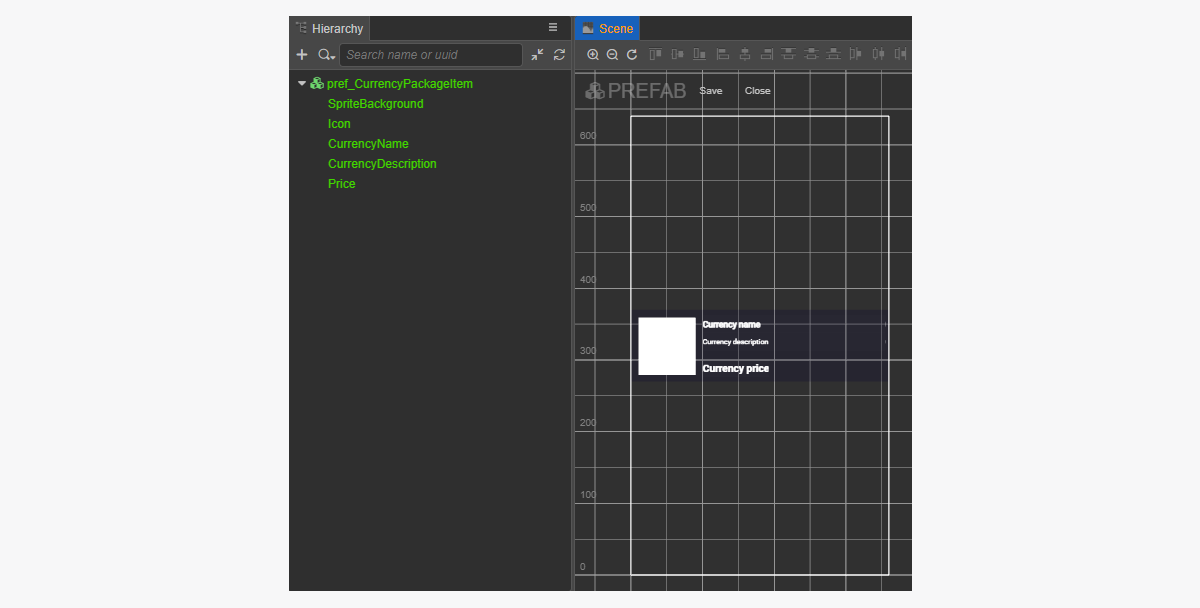
- Create a CurrencyPackageItemComponent and add the following properties:
iconSpritecurrencyNameLabelcurrencyDescriptionLabelpriceLabel
- Add an
initmethod and initialization logic to theCurrencyPackageItemComponentclass as shown in the script example. - Attach the CurrencyPackageItemComponent component to the root node of the prefab.
- Bind the prefab elements to the properties of the
CurrencyPackageItemComponentas shown in the picture:
Example of a widget script (CurrencyPackageItemComponent):
- typescript
 1import { _decorator, assetManager, Component, ImageAsset, Label, Sprite, SpriteFrame, Texture2D } from 'cc';
 2import { VirtualCurrencyPackage } from 'db://xsolla-commerce-sdk/scripts/api/XsollaCatalog';
 3const { ccclass, property } = _decorator;
 4
 5
 6@ccclass('CurrencyPackageItemComponent')
 7export class CurrencyPackageItemComponent extends Component {
 8
 9    @property(Sprite)
10    iconSprite: Sprite;
11
12    @property(Label)
13    currencyNameLabel: Label;
14
15    @property(Label)
16    currencyDescriptionLabel: Label;
17
18    @property(Label)
19    priceLabel: Label;
20
21    init(data: VirtualCurrencyPackage) {
22
23        this.currencyNameLabel.string = data.name;
24        this.currencyDescriptionLabel.string = data.description;
25
26        if (data.virtual_prices.length > 0) {
27            this.priceLabel.string = `${data.virtual_prices[0].amount.toString()} ${data.virtual_prices[0].name}`;
28        } else {
29            this.priceLabel.string = `${parseFloat(data.price.amount)} ${data.price.currency}`;
30        }
31
32        assetManager.loadRemote<ImageAsset>(data.image_url, (err, imageAsset) => {
33            if(err == null) {
34            const spriteFrame = new SpriteFrame();
35            const texture = new Texture2D();
36            texture.image = imageAsset;
37            spriteFrame.texture = texture;
38            this.iconSprite.spriteFrame = spriteFrame;
39            } else {
40                console.log(`Can’t load image with URL ${data.image_url}`);
41            }
42        });
43    }
44}
Create page interface
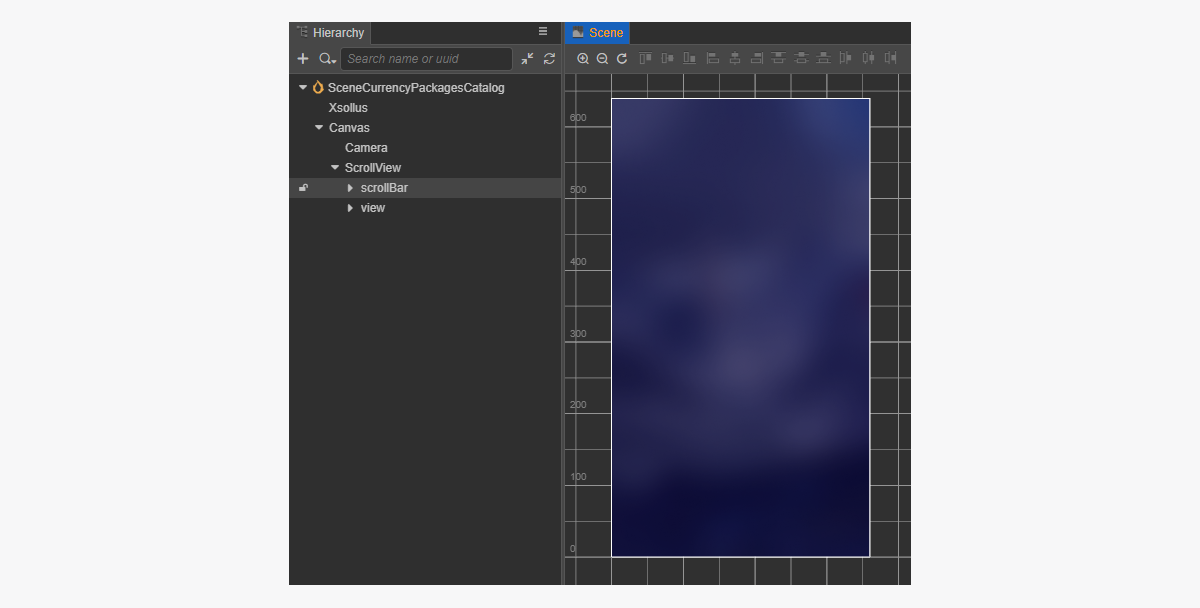
Create a scene for a virtual currency package catalog page and add the ScrollView element to it.
Example of a page structure:
To make the ScrollView match the created CurrencyPackageItem prefab, set up its size:
- Change the value of the
ContentSizeparameter in theScrollViewnode and the innerviewnode. - Bind the
Layoutcomponent to thecontentnode and set it up. In the example, the following settings are selected:Type == verticalResizeMode == Container
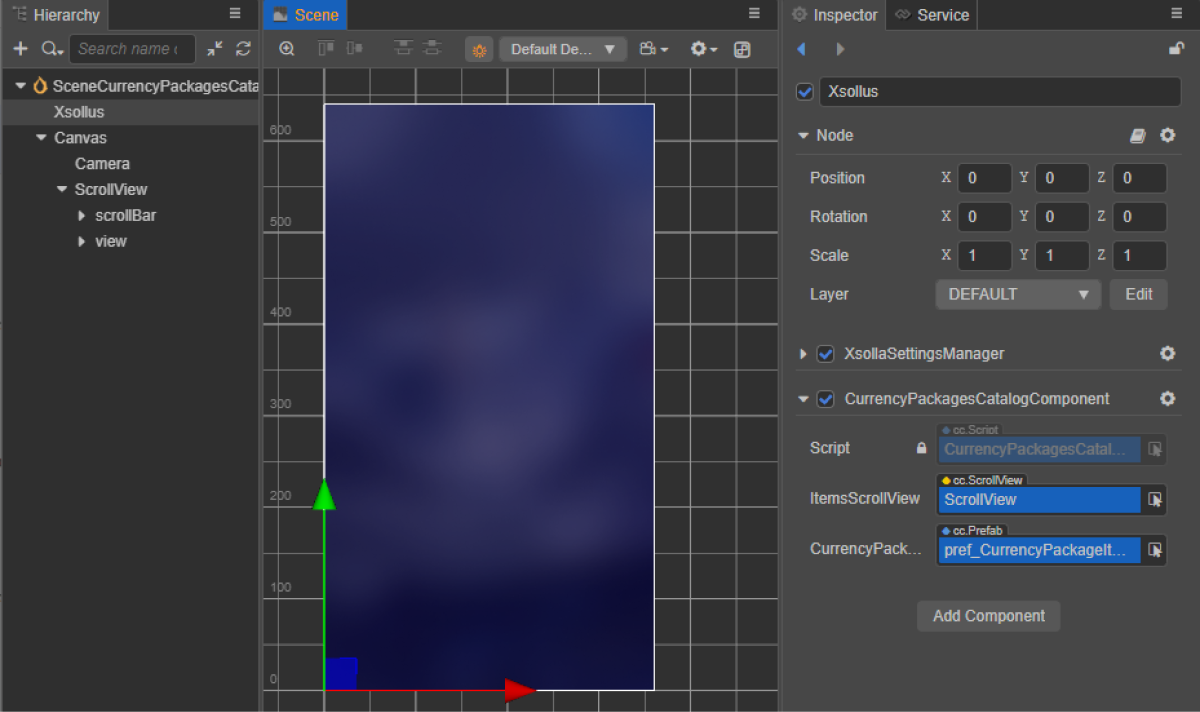
Create currency packages catalog script component
- Create a
CurrencyPackagesCatalogComponentand add the following properties:itemsScrollViewcurrencyPackageItemPrefab
- Add the
start life cycle function and initialization logic to theCurrencyPackagesCatalogComponentclass as shown in the script example. - Add the CurrencyPackagesCatalogComponent to the node on the scene. You can add a new node or use an existing node with the
XsollaSettingsManagercomponent that you added during SDK initialization. - Bind the prefab elements to the properties of the
CurrencyPackagesCatalogComponentas shown in the picture:
Example of a class script (CurrencyPackagesCatalogComponent):
 1import { _decorator, Component, instantiate, Prefab, ScrollView } from 'cc';
 2import { XsollaCatalog } from 'db://xsolla-commerce-sdk/scripts/api/XsollaCatalog';
 3import { CurrencyPackageItemComponent } from './CurrencyPackageItemComponent';
 4const { ccclass, property } = _decorator;
 5
 6
 7@ccclass('CurrencyPackagesCatalogComponent')
 8export class CurrencyPackagesCatalogComponent extends Component {
 9
10    @property(ScrollView)
11    itemsScrollView: ScrollView;
12
13    @property(Prefab)
14    currencyPackageItemPrefab: Prefab;
15
16    start() {
17        XsollaCatalog.getVirtualCurrencyPackages(null, null, [], itemsData => {
18        for (let i = 0; i < itemsData.items.length; ++i) {
19                let currencyPackageItem = instantiate(this.currencyPackageItemPrefab);
20                this.itemsScrollView.content.addChild(currencyPackageItem);
21                currencyPackageItem.getComponent(CurrencyPackageItemComponent).init(itemsData.items[i]);
22            }
23        });
24    }
25}
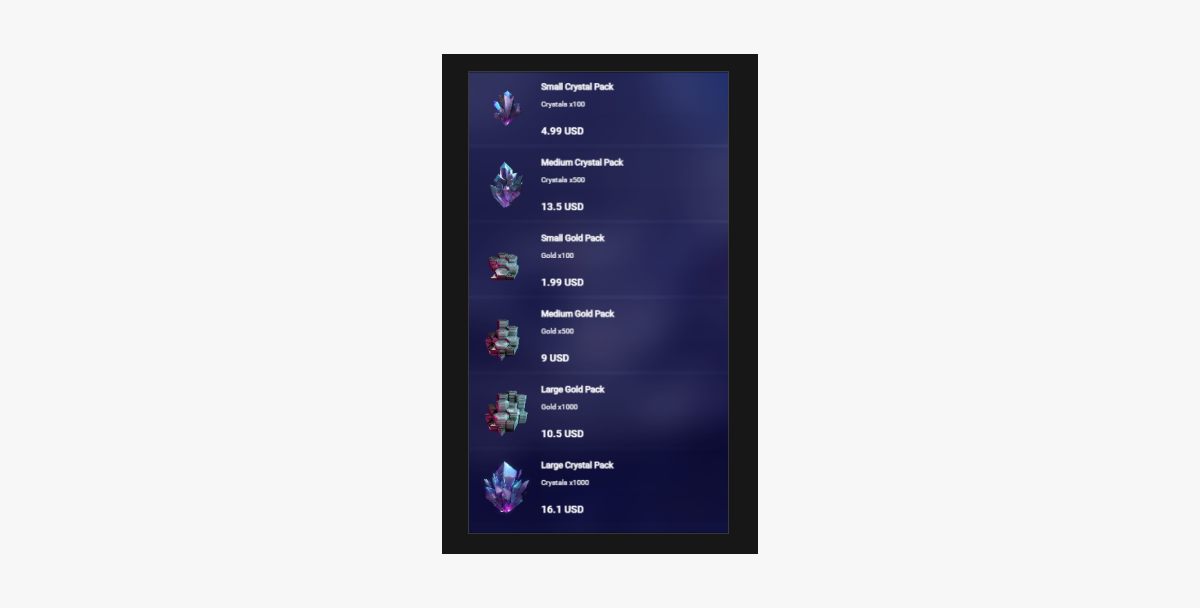
Example of the script’s work result:
Sell virtual items for real currency
This section explains how to use the SDK methods to implement selling items for real currency using virtual items.
Before you start, implement a display of virtual items in a catalog. In the following example, we describe how to implement purchasing of virtual items. Configuration for other item types is similar.
This tutorial describes the implementation of the following logic:

In the script example to login we use the credentials of a demo account (username: xsolla, password: xsolla). This account is only available for the demo project.
The script sample doesn’t contain implementation of the page-by-page display of items in the catalog (pagination). Use the offset and limit parameters of the getCatalog SDK method to implement pagination. The maximum number of items on a page is 50. If the catalog has more than 50 items, pagination is necessary.
Complete item widget
Add a buy button to the item widget and configure its visuals.
RC_StoreItemComponent.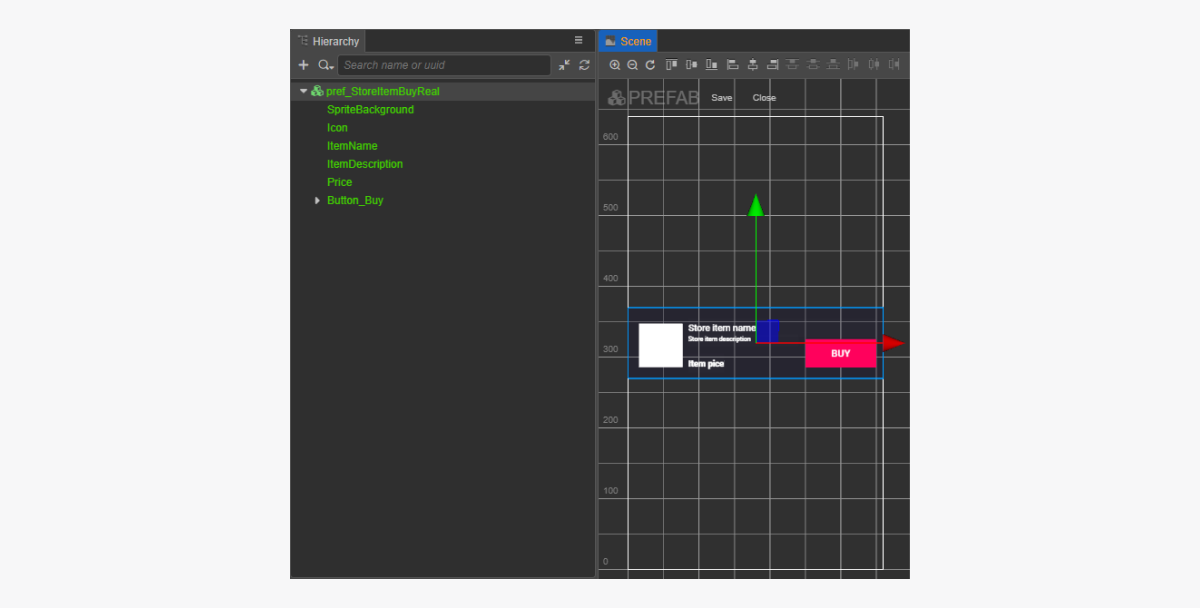
Complete item widget script
- To bind a callback function to buy button using code, add the
buyButtonproperty to theRC_StoreItemComponent. - Add a method to the
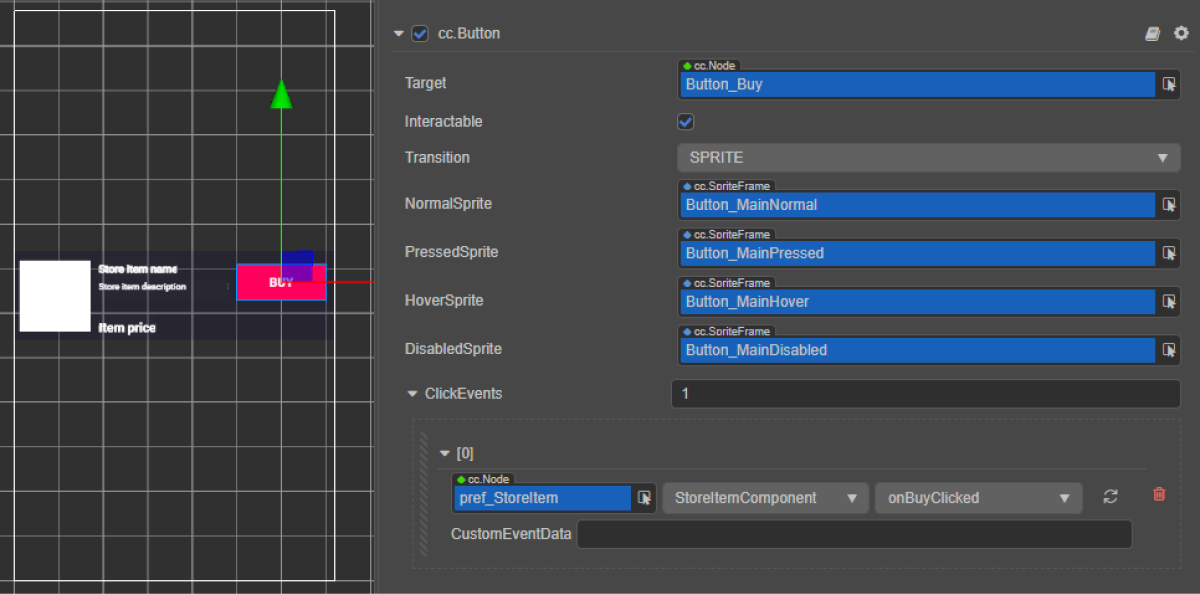
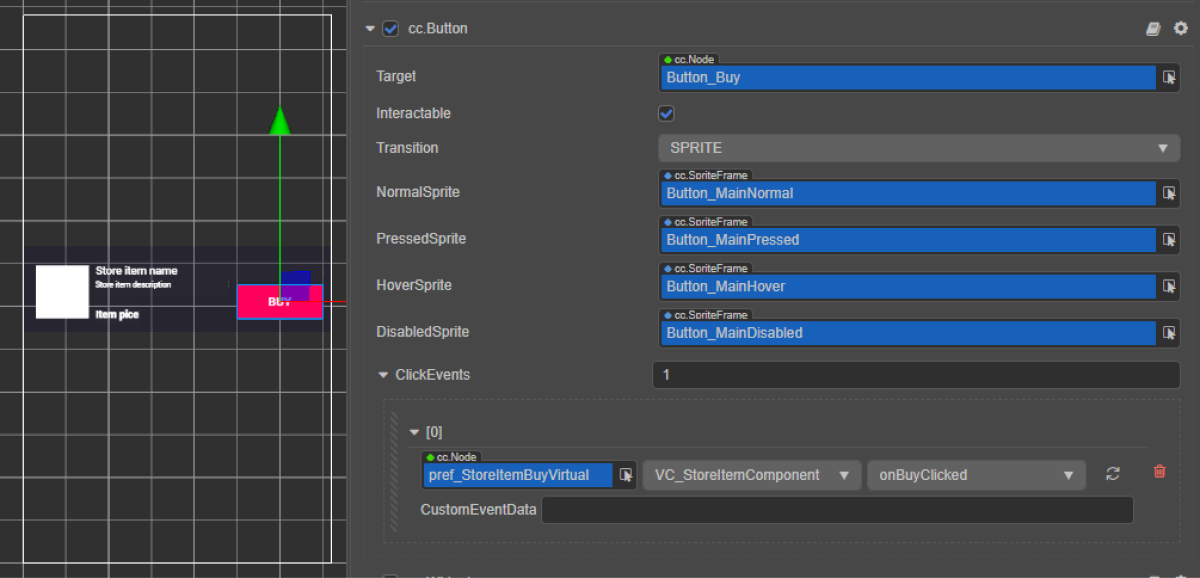
RC_StoreItemComponentclass that is called when clickingBuyButton, and add the logic to handle the click event, as shown in the script example. - Bind a callback to the buy button in one of the following ways:
- using the
Inspector panel, as shown in the picture below - by inserting the code block below into the page script
- using the
Binding callback using
Binding callback via code:
- typescript
1start() {
2	this.buyButton.node.on(Button.EventType.CLICK, this.onBuyClicked, this);
3  }
Example of a widget script (RC_StoreItemComponent):
- typescript
 1import { _decorator, assetManager, Button, Component, ImageAsset, Label, Sprite, SpriteFrame, Texture2D } from 'cc';
 2import { StoreItem, XsollaCatalog } from '../../api/XsollaCatalog';
 3import { TokenStorage } from '../../common/TokenStorage';
 4import { OrderTracker } from '../../common/OrderTracker';
 5import { XsollaPayments } from '../../api/XsollaPayments';
 6const { ccclass, property } = _decorator;
 7
 8
 9export namespace sellForRealMoneyItem {
10
11
12    @ccclass('RC_StoreItemComponent')
13    export class RC_StoreItemComponent extends Component {
14
15
16        @property(Sprite)
17        iconSprite: Sprite;
18
19
20        @property(Label)
21        itemNameLabel: Label;
22
23
24        @property(Label)
25        itemDescriptionLabel: Label;
26
27
28        @property(Label)
29        priceLabel: Label;
30
31
32        @property(Button)
33        buyButton: Button;
34
35
36        private _data: StoreItem;
37
38
39        start() {
40            this.buyButton.node.on(Button.EventType.CLICK, this.onBuyClicked, this);
41        }
42
43
44        init(data: StoreItem) {
45
46            this._data = data;
47
48
49            this.itemNameLabel.string = data.name;
50            this.itemDescriptionLabel.string = data.description;
51
52            if (data.virtual_prices.length > 0) {
53                this.priceLabel.string = `${data.virtual_prices[0].amount.toString()} ${data.virtual_prices[0].name}`;
54            } else {
55                this.priceLabel.string = `${parseFloat(data.price.amount)} ${data.price.currency}`;
56            }
57
58
59            assetManager.loadRemote<ImageAsset>(data.image_url, (err, imageAsset) => {
60                if(err == null) {
61                const spriteFrame = new SpriteFrame();
62                const texture = new Texture2D();
63                texture.image = imageAsset;
64                spriteFrame.texture = texture;
65                this.iconSprite.spriteFrame = spriteFrame;
66                } else {
67                    console.log(`Cant load image with url ${data.image_url}`);
68                }
69            });
70        }
71
72
73        onBuyClicked() {
74            XsollaCatalog.fetchPaymentToken(TokenStorage.getToken().access_token, this._data.sku, 1, undefined, undefined, undefined, undefined, undefined, result => {
75                OrderTracker.checkPendingOrder(result.token, result.orderId, () => {
76                    console.log('success purchase!');
77                }, error => {
78                    console.log(`Order checking failed - Status code: ${error.status}, Error code: ${error.code}, Error message: ${error.description}`);
79                });
80                XsollaPayments.openPurchaseUI(result.token);
81            }, error => {
82                console.log(error.description);
83            });
84        }
85    }
86}
Complete items catalog script component
RC_ItemsCatalogComponent.Add the logic for getting a valid authorization token to the start method of the RC_ItemsCatalogComponent class, as shown in the script example.
Example of a class script (RC_ItemsCatalogComponent):
- typescript
 1import { _decorator, Component, instantiate, Prefab, ScrollView } from 'cc';
 2import { XsollaCatalog } from 'db://xsolla-commerce-sdk/scripts/api/XsollaCatalog';
 3import { RC_StoreItemComponent } from './RC_StoreItemComponent';
 4import { XsollaAuth } from 'db://xsolla-commerce-sdk/scripts/api/XsollaAuth';
 5import { TokenStorage } from 'db://xsolla-commerce-sdk/scripts/common/TokenStorage';
 6const { ccclass, property } = _decorator;
 7
 8
 9
10
11@ccclass('RC_ItemsCatalogComponent')
12export class RC_ItemsCatalogComponent extends Component {
13
14    @property(ScrollView)
15    itemsScrollView: ScrollView;
16
17
18    @property(Prefab)
19    storeItemPrefab: Prefab;
20
21
22    start() {
23        XsollaAuth.authByUsernameAndPassword('xsolla', 'xsolla', false, token => {
24            TokenStorage.saveToken(token, false);
25            XsollaCatalog.getCatalog(null, null, [], itemsData => {
26                for (let i = 0; i < itemsData.items.length; ++i) {
27                        let storeItem = instantiate(this.storeItemPrefab);
28                        this.itemsScrollView.content.addChild(storeItem);
29                        storeItem.getComponent(RC_StoreItemComponent).init(itemsData.items[i]);
30                    }
31                });
32        });
33    }
34}
Example of the script’s work result:
Sell virtual items for virtual currency
This section explains how to use the SDK methods to implement selling items for virtual currency using virtual items.
Before you start, implement a display of virtual items in a catalog. In the following example, we describe how to implement purchasing of virtual items. Configuration for other item types is similar.
This tutorial describes the implementation of the following logic:

In the script example to login we use the credentials of a demo account (username: xsolla, password: xsolla). This account is only available for the demo project.
The script sample doesn’t contain implementation of the page-by-page display of items in the catalog (pagination). Use the offset and limit parameters of the getCatalog SDK method to implement pagination. The maximum number of items on a page is 50. If the catalog has more than 50 items, pagination is necessary.
Complete item widget
Add a buy button to the item widget and configure its visuals.
VC_StoreItemComponent.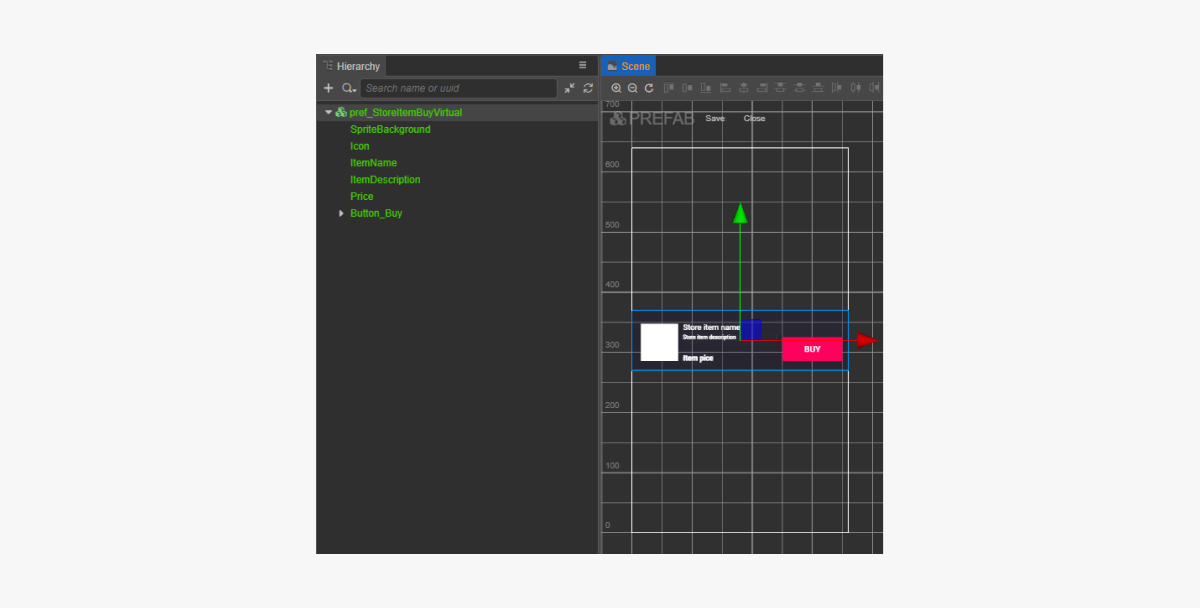
Complete item widget script
- To bind a callback function to buy button using code, add the
buyButtonproperty to theVC_StoreItemComponent. - Add a method to the
VC_StoreItemComponentclass that is called when clickingBuyButton, and add the logic to handle the click event, as shown in the script example. - Bind a callback to the buy button in one of the following ways:
- using the
Inspector panel, as shown in the picture below - by inserting the code block below into the page script
- using the
Binding callback using
Binding callback via code:
- typescript
1start() {
2	this.buyButton.node.on(Button.EventType.CLICK, this.onBuyClicked, this);
3  }
Example of a widget script (VC_StoreItemComponent):
- typescript
 1import { _decorator, assetManager, Button, Component, ImageAsset, Label, Sprite, SpriteFrame, Texture2D } from 'cc';
 2import { StoreItem, XsollaCatalog } from 'db://xsolla-commerce-sdk/scripts/api/XsollaCatalog';
 3import { TokenStorage } from 'db://xsolla-commerce-sdk/scripts/common/TokenStorage';
 4import { OrderTracker } from 'db://xsolla-commerce-sdk/scripts/common/OrderTracker';
 5const { ccclass, property } = _decorator;
 6
 7
 8@ccclass('VC_StoreItemComponent')
 9export class VC_StoreItemComponent extends Component {
10
11    @property(Sprite)
12    iconSprite: Sprite;
13
14    @property(Label)
15    itemNameLabel: Label;
16
17    @property(Label)
18    itemDescriptionLabel: Label;
19
20    @property(Label)
21    priceLabel: Label;
22
23    @property(Button)
24    buyButton: Button;
25
26    private _data: StoreItem;
27
28    start() {
29        this.buyButton.node.on(Button.EventType.CLICK, this.onBuyClicked, this);
30    }
31
32    init(data: StoreItem) {
33
34        this._data = data;
35
36        this.itemNameLabel.string = data.name;
37        this.itemDescriptionLabel.string = data.description;
38
39        if (data.virtual_prices.length > 0) {
40            this.priceLabel.string = `${data.virtual_prices[0].amount.toString()} ${data.virtual_prices[0].name}`;
41        } else {
42            this.priceLabel.string = `${parseFloat(data.price.amount)} ${data.price.currency}`;
43        }
44
45        assetManager.loadRemote<ImageAsset>(data.image_url, (err, imageAsset) => {
46            if(err == null) {
47            const spriteFrame = new SpriteFrame();
48            const texture = new Texture2D();
49            texture.image = imageAsset;
50            spriteFrame.texture = texture;
51            this.iconSprite.spriteFrame = spriteFrame;
52            } else {
53                console.log(`Can’t load image with URL ${data.image_url}`);
54            }
55        });
56    }
57
58    onBuyClicked() {
59        XsollaCatalog.purchaseItemForVirtualCurrency(TokenStorage.getToken().access_token, this._data.sku, this._data.virtual_prices[0].sku, orderId => {
60            OrderTracker.checkPendingOrder(TokenStorage.getToken().access_token, orderId, () => {
61                console.log('success purchase!');
62            }, error => {
63                console.log(`Order checking failed - Status code: ${error.status}, Error code: ${error.code}, Error message: ${error.description}`);
64            });
65        }, error => {
66            console.log(error.description);
67        });
68    }
69}
Complete items catalog script component
VC_ItemsCatalogComponent.Add the logic for getting a valid authorization token to the start method of the VC_ItemsCatalogComponent class, as shown in the script example.
Example of a class script (VC_ItemsCatalogComponent):
- typescript
 1import { _decorator, Component, instantiate, Prefab, ScrollView } from 'cc';
 2import { XsollaCatalog } from 'db://xsolla-commerce-sdk/scripts/api/XsollaCatalog';
 3import { VC_StoreItemComponent } from './VC_StoreItemComponent';
 4import { XsollaAuth } from 'db://xsolla-commerce-sdk/scripts/api/XsollaAuth';
 5import { TokenStorage } from 'db://xsolla-commerce-sdk/scripts/common/TokenStorage';
 6const { ccclass, property } = _decorator;
 7
 8
 9@ccclass('VC_ItemsCatalogComponent')
10export class VC_ItemsCatalogComponent extends Component {
11
12    @property(ScrollView)
13    itemsScrollView: ScrollView;
14
15    @property(Prefab)
16    storeItemPrefab: Prefab;
17
18    start() {
19        XsollaAuth.authByUsernameAndPassword('xsolla', 'xsolla', false, token => {
20            TokenStorage.saveToken(token, false);
21            XsollaCatalog.getCatalog(null, null, [], itemsData => {
22                for (let i = 0; i < itemsData.items.length; ++i) {
23                        let storeItem = instantiate(this.storeItemPrefab);
24                        this.itemsScrollView.content.addChild(storeItem);
25                        storeItem.getComponent(VC_StoreItemComponent).init(itemsData.items[i]);
26                    }
27                });
28        });
29    }
30}
Example of the script’s work result:

Display of virtual currency balance
This tutorial shows how to use the SDK methods to display the balance of virtual currency in your app.
Create widget for display of balance
- Create a prefab. To do this, select
Create > Node Prefab from the context menu of the folder. - Open the created prefab.
- Add a
UITransformcomponent to the root of the prefab as shown in the image below and set the content size.
- Add the following UI elements as prefab child objects and configure their visuals:
- widget background image
- currency name
- currency quantity
- currency image
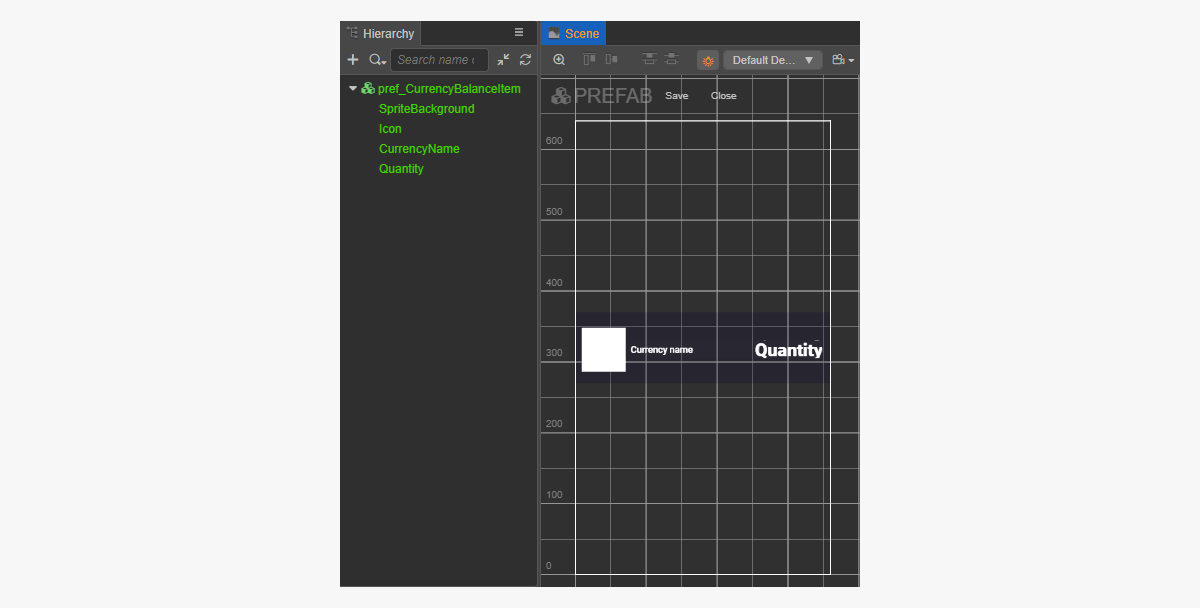
Example of the widget structure:
Create widget script to show balance
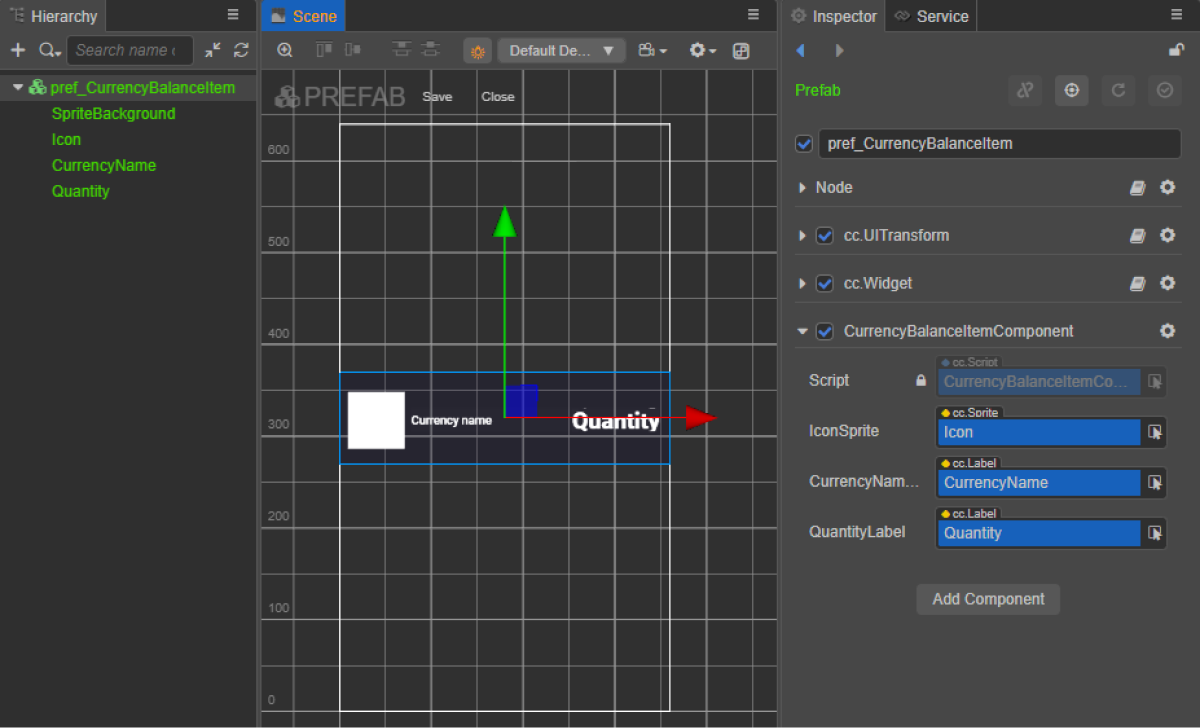
- Create a CurrencyBalanceItemComponent and add the following properties:
iconSpritecurrencyNameLabelquantityLabel
- Add an
initmethod and initialization logic to theCurrencyBalanceItemComponentclass as shown in the script example. - Attach the CurrencyBalanceItemComponent component to the root node of the prefab.
- Bind the prefab elements to the properties of the
CurrencyBalanceItemComponentas shown in the picture:
Example of a widget script (CurrencyBalanceItemComponent):
- typescript
 1import { _decorator, assetManager, Component, ImageAsset, Label, Sprite, SpriteFrame, Texture2D } from 'cc';
 2import { VirtualCurrencyBalance } from 'db://xsolla-commerce-sdk/scripts/api/XsollaInventory';
 3const { ccclass, property } = _decorator;
 4
 5
 6@ccclass('CurrencyBalanceItemComponent')
 7export class CurrencyBalanceItemComponent extends Component {
 8
 9    @property(Sprite)
10    iconSprite: Sprite;
11
12    @property(Label)
13    currencyNameLabel: Label;
14
15    @property(Label)
16    quantityLabel: Label;
17
18    init(data: VirtualCurrencyBalance) {
19
20        this.currencyNameLabel.string = data.name;
21        this.quantityLabel.string = data.amount.toString();
22
23        assetManager.loadRemote<ImageAsset>(data.image_url, (err, imageAsset) => {
24            if(err == null) {
25            const spriteFrame = new SpriteFrame();
26            const texture = new Texture2D();
27            texture.image = imageAsset;
28            spriteFrame.texture = texture;
29            this.iconSprite.spriteFrame = spriteFrame;
30            } else {
31                console.log(`Can’t load image with URL ${data.image_url}`);
32            }
33        });
34    }
35}
Create page interface
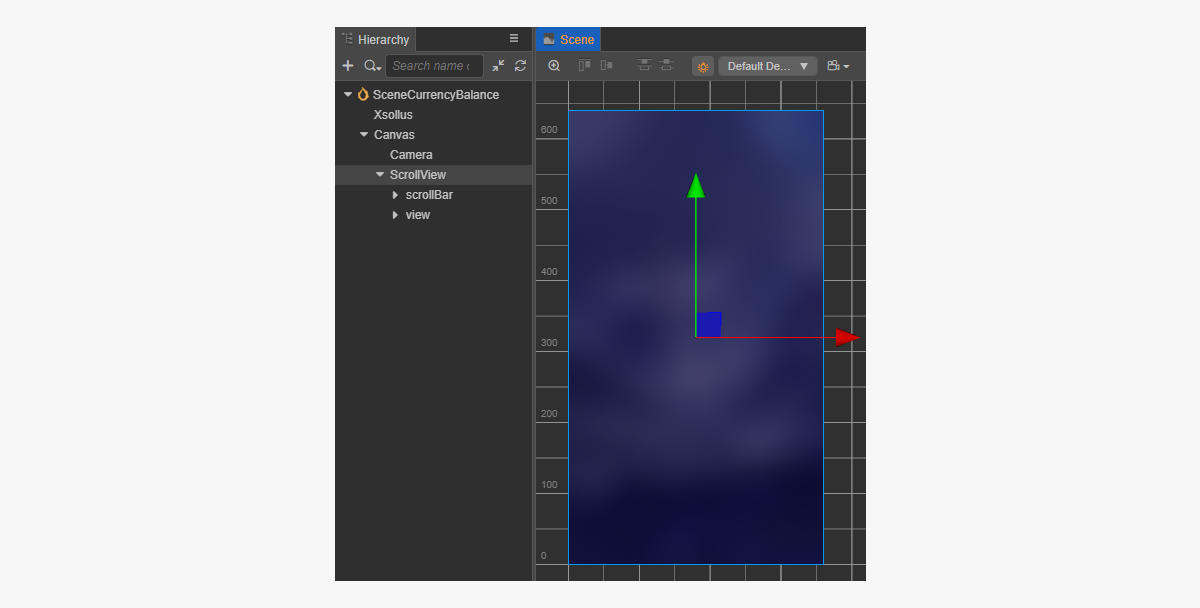
Create a scene for a virtual currency balance page and add the ScrollView element to it.
Example of a page structure:
To make the ScrollView match the created CurrencyBalanceItem prefab, set up its size:
- Change the value of the
ContentSizeparameter in theScrollViewnode and the innerviewnode. - Bind the
Layoutcomponent to thecontentnode and set it up. In the example, the following settings are selected:Type == verticalResizeMode == Container
Create currency balance script component
- Create a CurrencyBalanceComponent and add the following properties:
itemsScrollViewcurrencyBalanceItemPrefab
- Add the
start life cycle function and initialization logic to theCurrencyBalanceComponentclass as shown in the script example. - Add the
CurrencyBalanceComponent to the node on the scene. You can add a new node or use an existing node with theXsollaSettingsManagercomponent that you added during SDK initialization. - Bind the prefab elements to the properties of the
CurrencyBalanceItemComponentas shown in the picture:
xsolla, password: xsolla). This account is only available for the demo project.- typescript
 1import { _decorator, Component, instantiate, Prefab, ScrollView } from 'cc';
 2import { XsollaAuth } from 'db://xsolla-commerce-sdk/scripts/api/XsollaAuth';
 3import { XsollaInventory } from 'db://xsolla-commerce-sdk/scripts/api/XsollaInventory';
 4import { CurrencyBalanceItemComponent } from './CurrencyBalanceItemComponent';
 5const { ccclass, property } = _decorator;
 6
 7
 8@ccclass('CurrencyBalanceComponent')
 9export class CurrencyBalanceComponent extends Component {
10
11    @property(ScrollView)
12    itemsList: ScrollView;
13
14    @property(Prefab)
15    currencyBalanceItemPrefab: Prefab;
16
17    start() {
18        XsollaAuth.authByUsernameAndPassword('xsolla', 'xsolla', false, token => {
19            XsollaInventory.getVirtualCurrencyBalance(token.access_token, null, itemsData => {
20                for (let i = 0; i < itemsData.items.length; ++i) {
21                        let currencyBalanceItem = instantiate(this.currencyBalanceItemPrefab);
22                        this.itemsList.content.addChild(currencyBalanceItem);
23                             currencyBalanceItem.getComponent(CurrencyBalanceItemComponent).init(itemsData.items[i]);
24                    }
25                });
26        });
27
28    }
29}
Example of the script’s work result:

Display of items in inventory
This tutorial shows how to use the SDK methods to display items in the user inventory.
Create item widget
- Create a prefab. To do this, select
Create > Node Prefab from the context menu of the folder. - Open the created prefab.
- Add a
UITransformcomponent to the root of the prefab as shown in the image below and set the content size.
- Add the following UI elements as prefab child objects and configure their visuals:
- widget background image
- inventory item name
- inventory item description
- item quantity
- item image
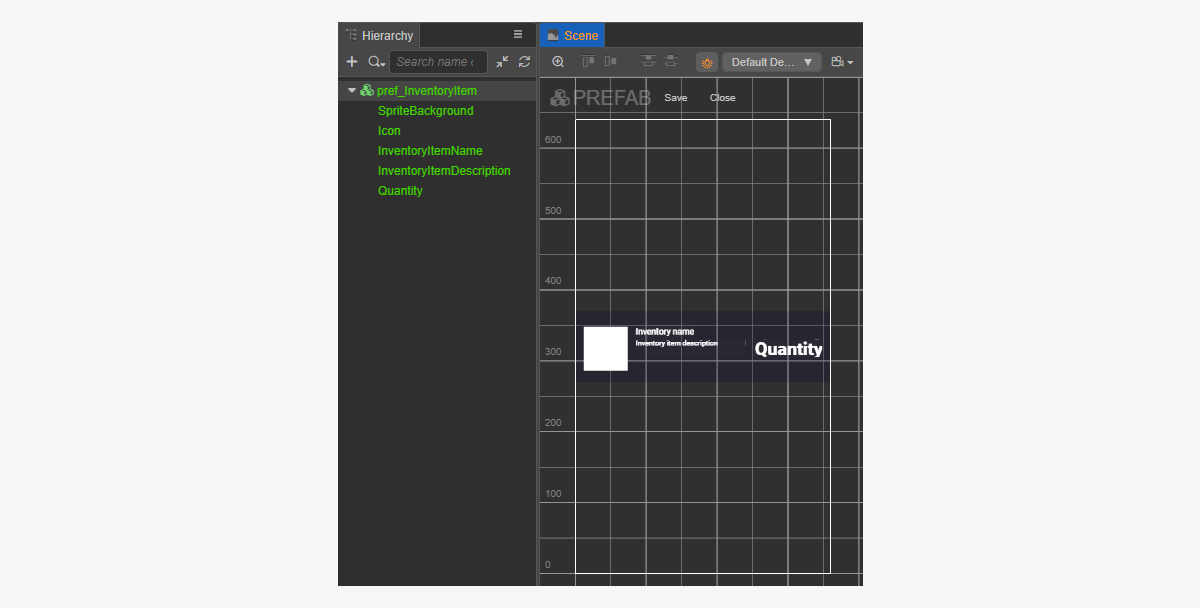
Example of the widget structure:
Create item widget script
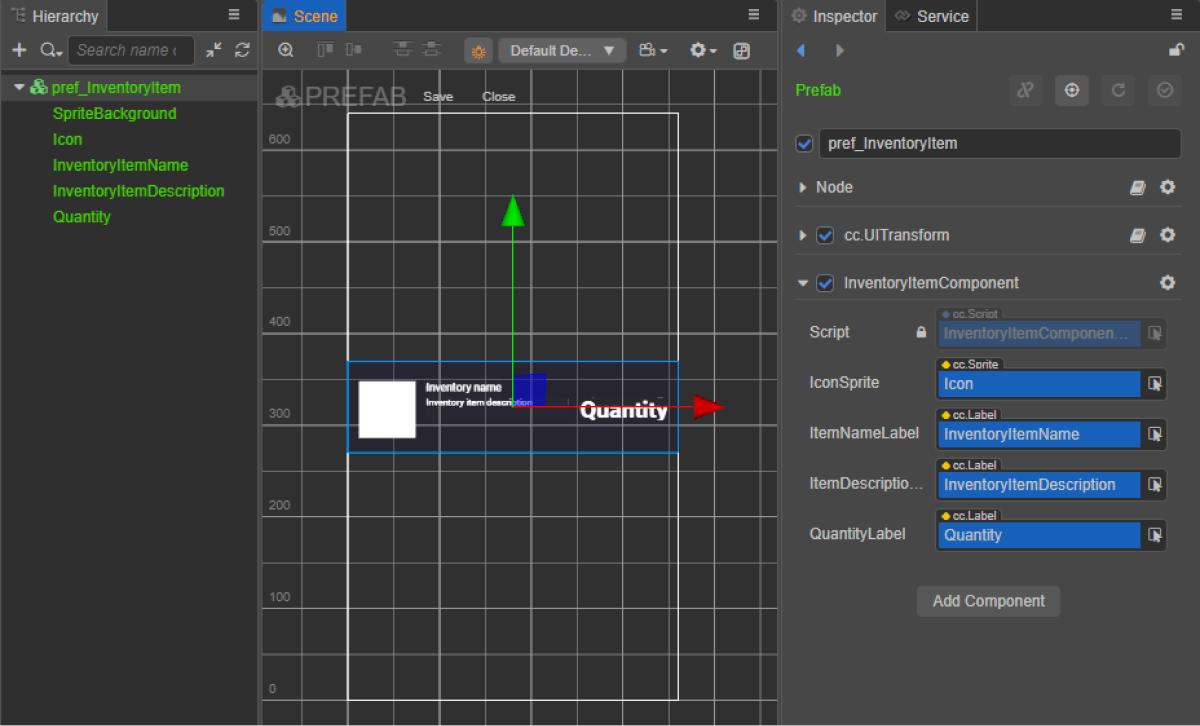
- Create an InventoryItemComponent and add the following properties:
iconSpriteitemNameLabelitemDescriptionLabelquantityLabel
- Add an
initmethod and initialization logic to theInventoryItemComponentclass as shown in the script example. - Attach the InventoryItemComponent component to the root node of the prefab.
- Bind the prefab elements to the properties of the
InventoryItemComponentas shown in the picture:
Example of a widget script (InventoryItemComponent):
- typescript
 1import { _decorator, assetManager, Component, ImageAsset, Label, Sprite, SpriteFrame, Texture2D } from 'cc';
 2import { InventoryItem } from 'db://xsolla-commerce-sdk/scripts/api/XsollaInventory';
 3const { ccclass, property } = _decorator;
 4
 5@ccclass('InventoryItemComponent')
 6export class InventoryItemComponent extends Component {
 7
 8    @property(Sprite)
 9    iconSprite: Sprite;
10
11    @property(Label)
12    itemNameLabel: Label;
13
14    @property(Label)
15    itemDescriptionLabel: Label;
16
17    @property(Label)
18    quantityLabel: Label;
19
20    init(data: InventoryItem) {
21
22        this.itemNameLabel.string = data.name;
23        this.itemDescriptionLabel.string = data.description;
24        this.quantityLabel.string = data.quantity.toString();
25
26        assetManager.loadRemote<ImageAsset>(data.image_url, (err, imageAsset) => {
27            if(err == null) {
28            const spriteFrame = new SpriteFrame();
29            const texture = new Texture2D();
30            texture.image = imageAsset;
31            spriteFrame.texture = texture;
32            this.iconSprite.spriteFrame = spriteFrame;
33            } else {
34                console.log(`Can’t load image with URL ${data.image_url}`);
35            }
36        });
37    }
38}
Create page interface
Create a scene for an inventory page and add the ScrollView element to it.
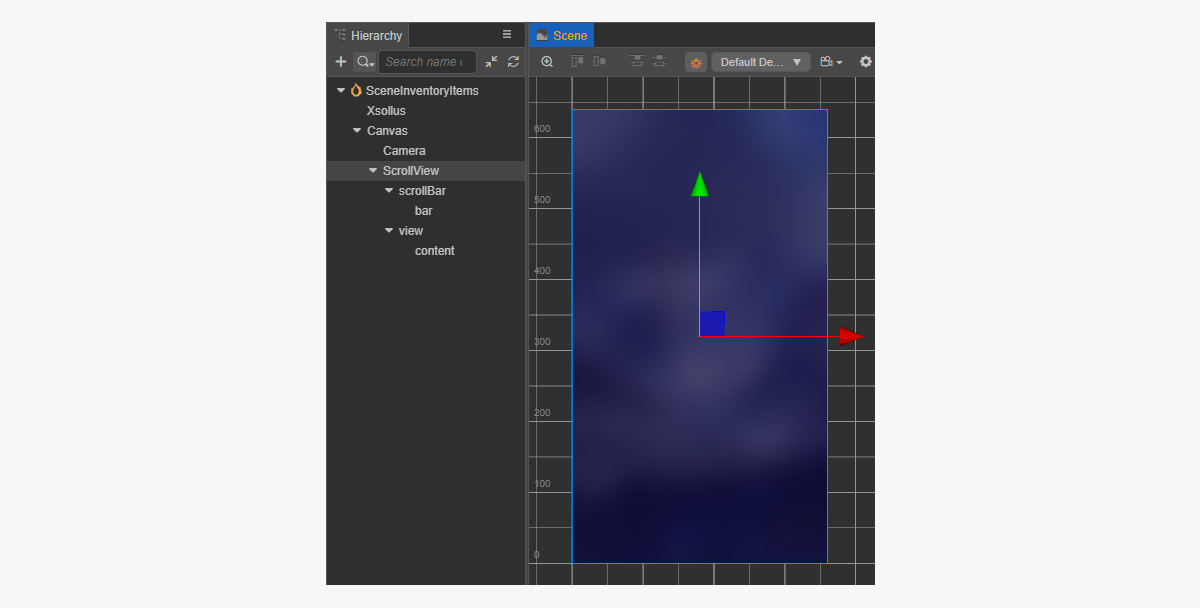
Example of a page structure:
To make the ScrollView match the created InventoryItem prefab, set up its size:
- Change the value of the
ContentSizeparameter in theScrollViewnode and the innerviewnode. - Bind the
Layoutcomponent to thecontentnode and set it up. In the example, the following settings are selected:Type == verticalResizeMode == Container
Create inventory page script component
- Create a InventoryItemsComponent and add the following properties:
itemsScrollViewinventoryItemPrefab
- Add the
start life cycle function and initialization logic to theInventoryItemsComponentas shown in the script example. - Add the InventoryItemsComponent to the node on the scene. You can add a new node or use an existing node with the
XsollaSettingsManagercomponent that you added during SDK initialization. - Bind the prefab elements to the properties of the
InventoryItemsComponentas shown in the picture:
xsolla, password: xsolla). This account is only available for the demo project.- typescript
 1import { _decorator, Component, instantiate, Prefab, ScrollView } from 'cc';
 2import { XsollaAuth } from 'db://xsolla-commerce-sdk/scripts/api/XsollaAuth';
 3import { XsollaInventory } from 'db://xsolla-commerce-sdk/scripts/api/XsollaInventory';
 4import { InventoryItemComponent } from './InventoryItemComponent';
 5const { ccclass, property } = _decorator;
 6
 7
 8@ccclass('InventoryItemsComponent')
 9export class InventoryItemsComponent extends Component {
10
11    @property(ScrollView)
12    itemsScrollView: ScrollView;
13
14    @property(Prefab)
15    inventoryItemPrefab: Prefab;
16
17    start() {
18        XsollaAuth.authByUsernameAndPassword('xsolla', 'xsolla', false, token => {
19            XsollaInventory.getInventory(token.access_token, null, itemsData => {
20                for (let i = 0; i < itemsData.items.length; ++i) {
21                        let inventoryItem = instantiate(this.inventoryItemPrefab);
22                        this.itemsScrollView.content.addChild(inventoryItem);
23                        inventoryItem.getComponent(InventoryItemComponent).init(itemsData.items[i]);
24                    }
25                });
26        });
27
28    }
29}
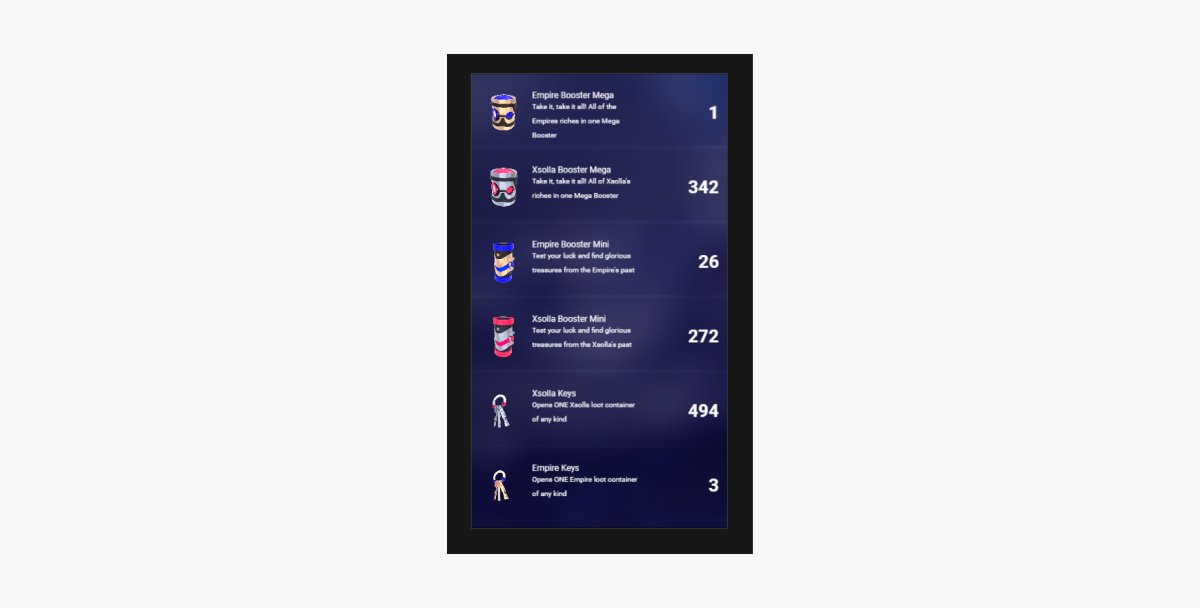
Example of the script’s work result:
Found a typo or other text error? Select the text and press Ctrl+Enter.
