
アプリケーション側でSDKを統合する
- ログインシステム、インゲームストアなど、アプリケーションのページのインターフェイスをデザインします。
- SDKメソッドを使って、ユーザー認証、ストア表示、購入などのロジックをアプリケーションに実装できます。
<xsollaExtention>/assets/scripts/samplesディレクトリにあります。ユーザー名/メールアドレスとパスワードによるユーザーの新規登録とログイン
この説明では、SDKのメソッドを使用して実装する方法を示します:
ユーザーの認証は、ユーザー名またはメールアドレスで行うことができます。以下の例では、ユーザー名でユーザーを認証し、メールアドレスは登録の確認やパスワードのリセットに使用します。
ユーザー登録を実装する
このチュートリアルでは、以下のロジックの実装について説明します:

ページのインターフェースを作成する
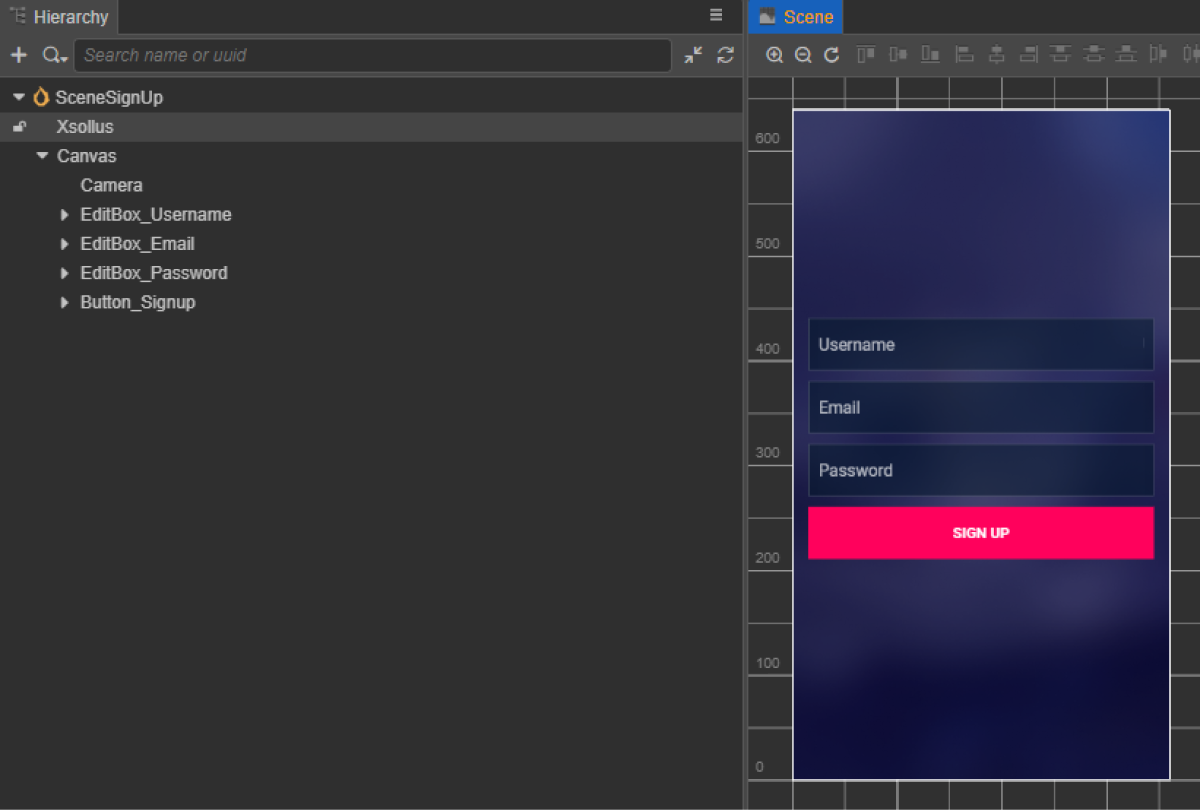
新規登録ページのシーンを作り、そこに以下の要素を追加します:
- ユーザー名フィールド
- ユーザーEメールアドレスフィールド
- ユーザーパスワードフィールド
- 新規登録ボタン
ページ構造の例:
登録スクリプトコンポーネントを作成する
- RegistrationComponentを作成し、次のプロパティを追加します:
usernameEditBoxemailEditBoxpasswordEditBoxsignUpButton— 任意。コードを使用してコールバック関数をボタンにバインドするときに使用されます
- スクリプトの例に示すように、
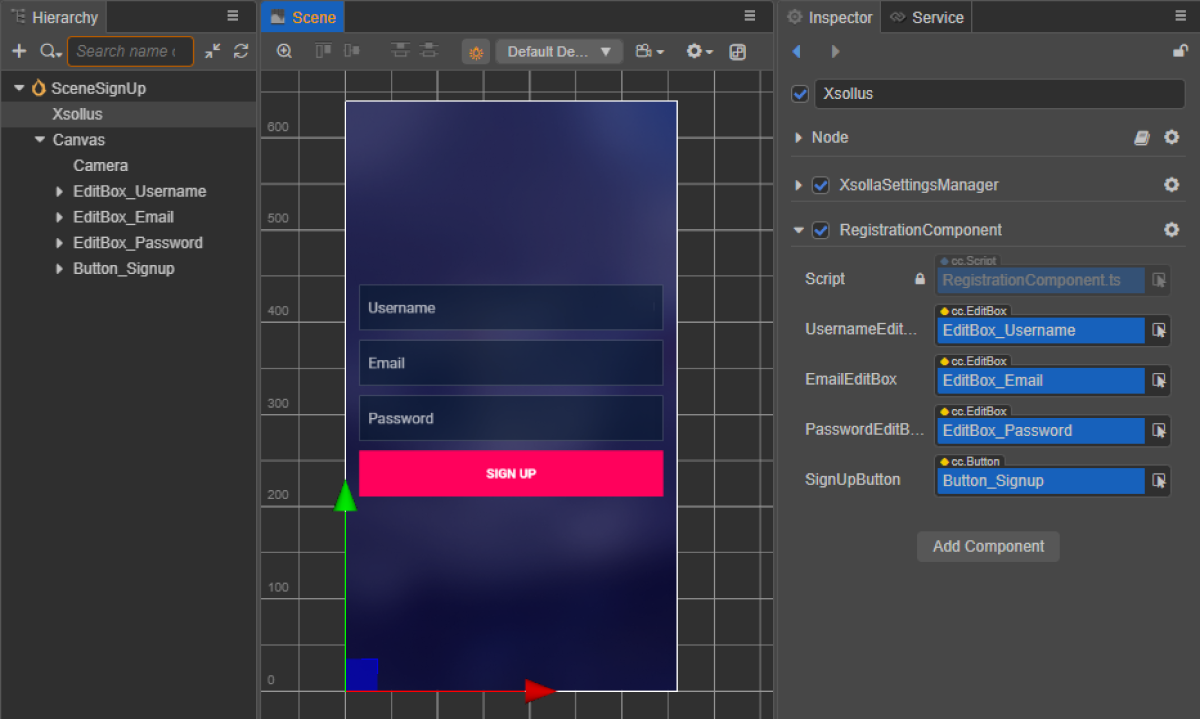
SignUpButtonをクリックしたときに呼び出されるメソッドをRegistrationComponentクラスに追加し、クリックイベントを処理するロジックを追加します。 - RegistrationComponentをシーン上のノードに追加します。新しいノードを追加することも、SDK初期化中に追加した
XsollaSettingsManagerコンポーネントで既存のノードを使用することもできます。 - 図に示すように、シーン要素を
RegistrationComponentのプロパティにバインドします:
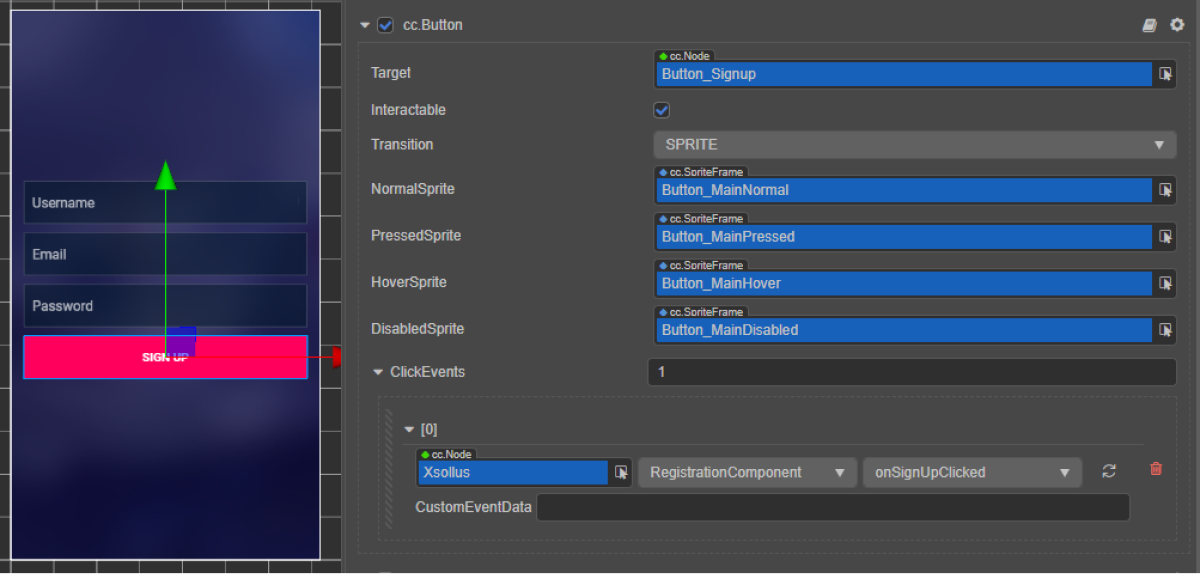
- 以下のいずれかの方法で、新規登録ボタンにコールバックをバインドします:
- 下の図に示すように、
Inspector パネルを使用します。 - 以下のコードブロックをページスクリプトに挿入する。
- 下の図に示すように、
コード経由でコールバックをバインドします:
- typescript
1start() {
2 this.signUpButton.node.on(Button.EventType.CLICK, this.onSignUpClicked, this);
3 }
スクリプトの例では、onCompleteとonErrorメソッドは標準のconsole.logメソッドを呼び出します。エラーが発生した場合、エラーコードと説明がerrorパラメータで渡されます。
登録メールの再送リクエストのページを開いたり、登録が成功した場合にログインページを開くなど、他のアクションを追加することができます。
- typescript
 1import { _decorator, Button, Component, EditBox } from 'cc';
 2import { XsollaAuth } from 'db://xsolla-commerce-sdk/scripts/api/XsollaAuth';
 3const { ccclass, property } = _decorator;
 4
 5
 6@ccclass('RegistrationComponent')
 7export class RegistrationComponent extends Component {
 8
 9    @property(EditBox)
10    usernameEditBox: EditBox;
11
12    @property(EditBox)
13    emailEditBox: EditBox;
14
15    @property(EditBox)
16    passwordEditBox: EditBox;
17
18    @property(Button)
19    signUpButton: Button;
20
21    start() {
22        this.signUpButton.node.on(Button.EventType.CLICK, this.onSignUpClicked, this);
23    }
24
25    onSignUpClicked() {
26        XsollaAuth.registerNewUser(this.usernameEditBox.string, this.passwordEditBox.string, this.emailEditBox.string, 'xsollatest', null, null, token => {
27            if(token != null) {
28                console.log(`Successful login. Token - ${token.access_token}`);
29            }
30            else {
31                console.log('Thank you! We have sent you a confirmation email');
32            }
33        }, err => {
34            console.log(err);
35        });
36    }
37}
登録の確認メールを設定する
登録に成功すると、ユーザーは指定したアドレスに登録確認メールを受け取ります。パブリッシャーアカウントで、ユーザーに送られるメールはカスタマイズできます。
モバイルアプリケーションを開発している場合、ユーザーが登録を確認した後、アプリケーションに戻るためのディープリンクをセットアップします。
登録確認メールの再送依頼を実装する
このチュートリアルでは、以下のロジックの実装について説明します:

ページのインターフェースを作成する
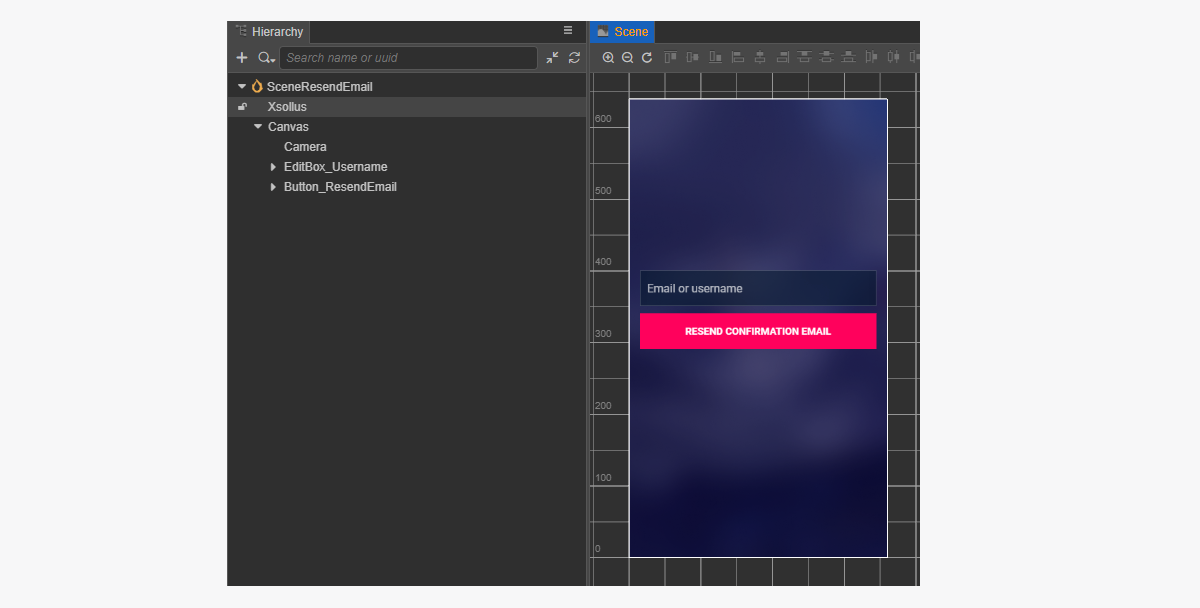
確認メールの再送信依頼があるページのシーンを作り、そこに以下の要素を追加します:
- ユーザー名/メールアドレスフィールド
- メール再送信ボタン
ページ構造の例:
メール再送スクリプトコンポーネントを作成する
- ResendConfirmationEmailComponentを作成し、次のプロパティを追加します:
usernameTextBoxresendEmailButton— 任意。コードを使用してコールバック関数をボタンにバインドするときに使用されます
- スクリプトの例に示すように、
ResendEmailをクリックしたときに呼び出されるメソッドをResendConfirmationEmailComponentクラスに追加し、クリックイベントを処理するロジックを追加します。 - ResendConfirmationEmailComponentをシーン上のノードに追加します。新しいノードを追加することも、SDK初期化中に追加した
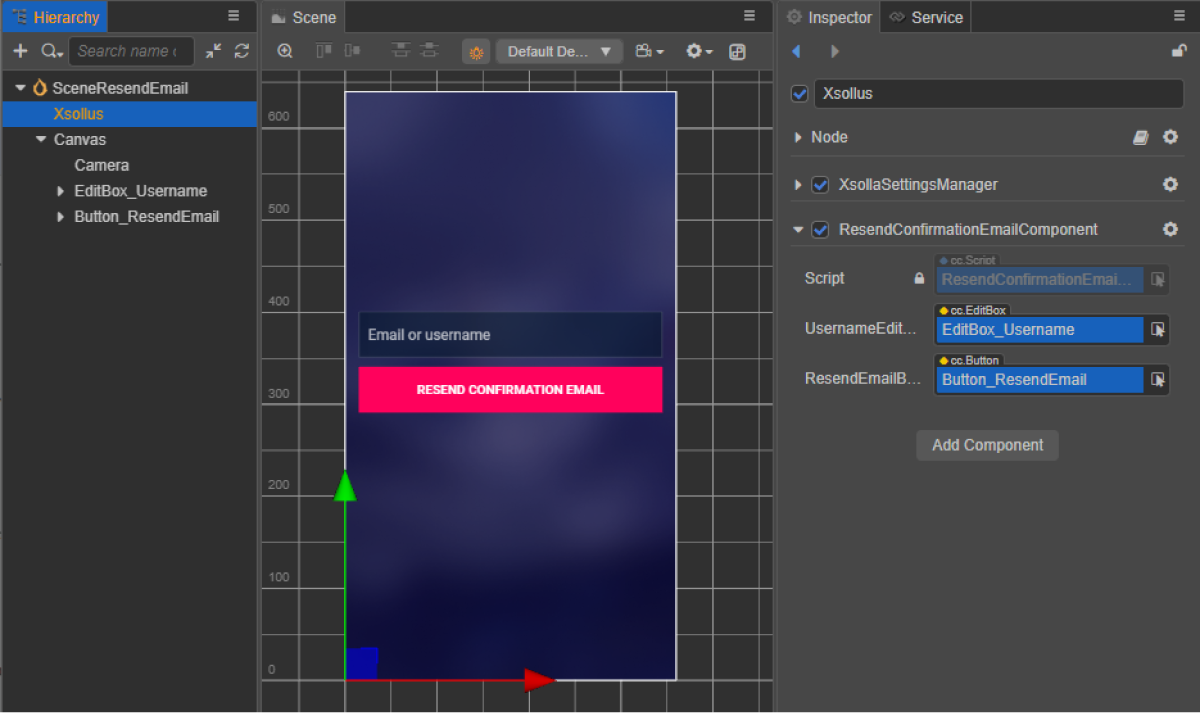
XsollaSettingsManagerコンポーネントで既存のノードを使用することもできます。 - 図に示すように、シーン要素を
ResendConfirmationEmailComponentのプロパティにバインドします:
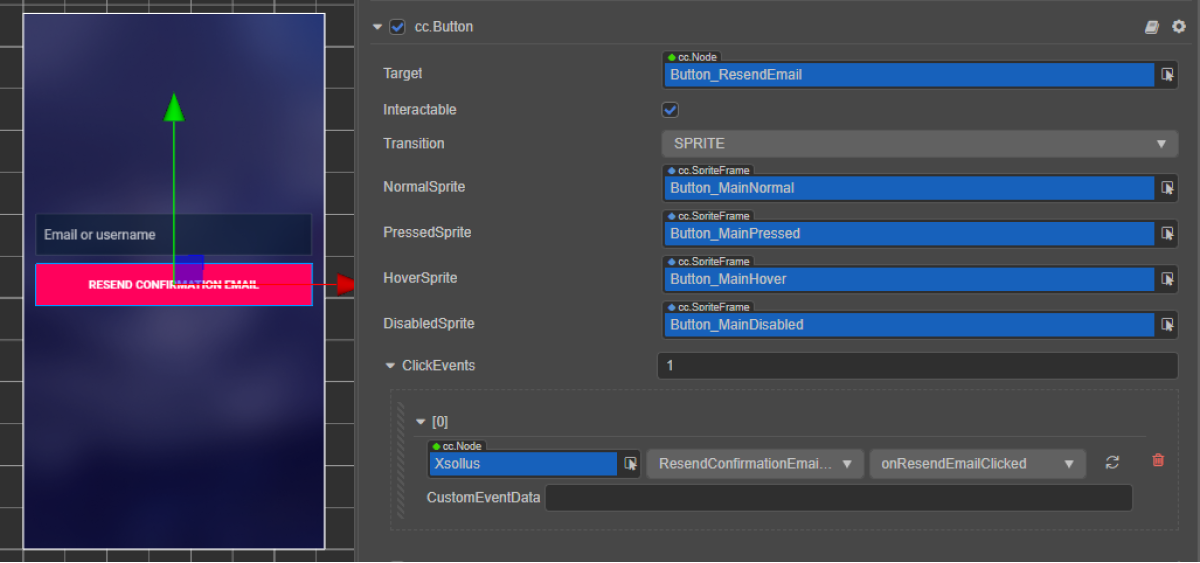
- 以下のいずれかの方法でコールバックを新規登録確認メールのリクエストボタンにバインドします:
- 下の図に示すように、
Inspector パネルを使用する - 以下のコードブロックを、確認メールを再送するリクエストとともにページのスクリプトに挿入する
- 下の図に示すように、
コード経由でコールバックをバインドします:
- typescript
1start() {
2	this.resendEmailButton.node.on(Button.EventType.CLICK, this.onResendEmailClicked, this);
3  }
リクエストが成功した場合、ユーザーは登録時に指定したメールアドレスに登録確認メールを受け取ります。
スクリプトの例では、onCompleteとonErrorメソッドは標準のconsole.logメソッドを呼び出します。他のアクションを追加することができます。
エラーが発生した場合、エラーコードと説明がerrorパラメータで渡されます。
- typescript
 1import { _decorator, Button, Component, EditBox } from 'cc';
 2import { XsollaAuth } from 'db://xsolla-commerce-sdk/scripts/api/XsollaAuth';
 3const { ccclass, property } = _decorator;
 4
 5
 6@ccclass('ResendConfirmationEmailComponent')
 7export class ResendConfirmationEmailComponent extends Component {
 8
 9    @property(EditBox)
10    usernameEditBox: EditBox;
11
12    @property(Button)
13    resendEmailButton: Button;
14
15    start() {
16        this.resendEmailButton.node.on(Button.EventType.CLICK, this.onResendEmailClicked, this);
17    }
18
19    onResendEmailClicked() {
20        XsollaAuth.resendAccountConfirmationEmail(this.usernameEditBox.string, 'xsollatest', null, () => {
21            console.log('A verification link has been successfully sent to your email');
22        }, err => {
23            console.log(err);
24        });
25    }
26}
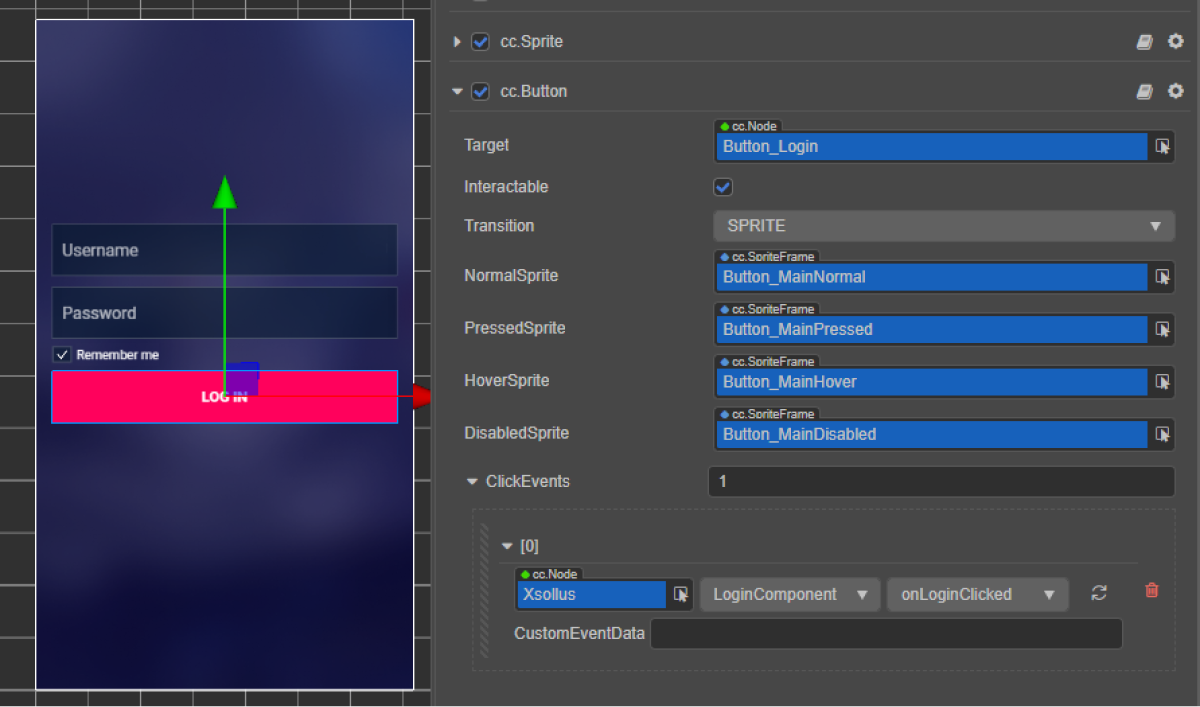
ユーザーログインを実装する
このチュートリアルでは、以下のロジックの実装について説明します:

ページのインターフェースを作成する
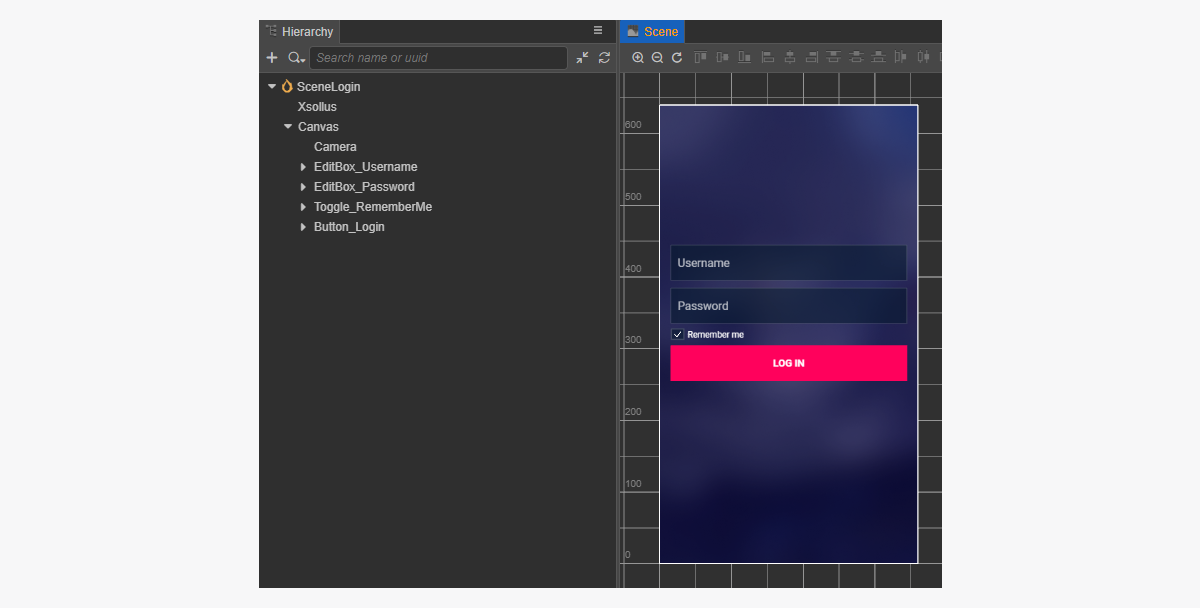
ログインページのシーンを作成し、そこに以下の要素を追加します:
- ユーザー名フィールド
- パスワードフィールド
- ログイン状態を保存するトグル
- ログインボタン
ページ構造の例:
ログインスクリプトコンポーネントを作成する
- LoginComponentを作成し、次のプロパティを追加します:
usernameEditBoxpasswordEditBoxremeberMeToggleloginButton— 任意。コードを使用してコールバック関数をボタンにバインドするときに使用されます
- スクリプトの例に示すように、
LoginButtonをクリックしたときに呼び出されるメソッドをLoginComponentクラスに追加し、クリックイベントを処理するロジックを追加します。 - LoginComponentをシーン上のノードに追加します。新しいノードを追加することも、SDK初期化中に追加した
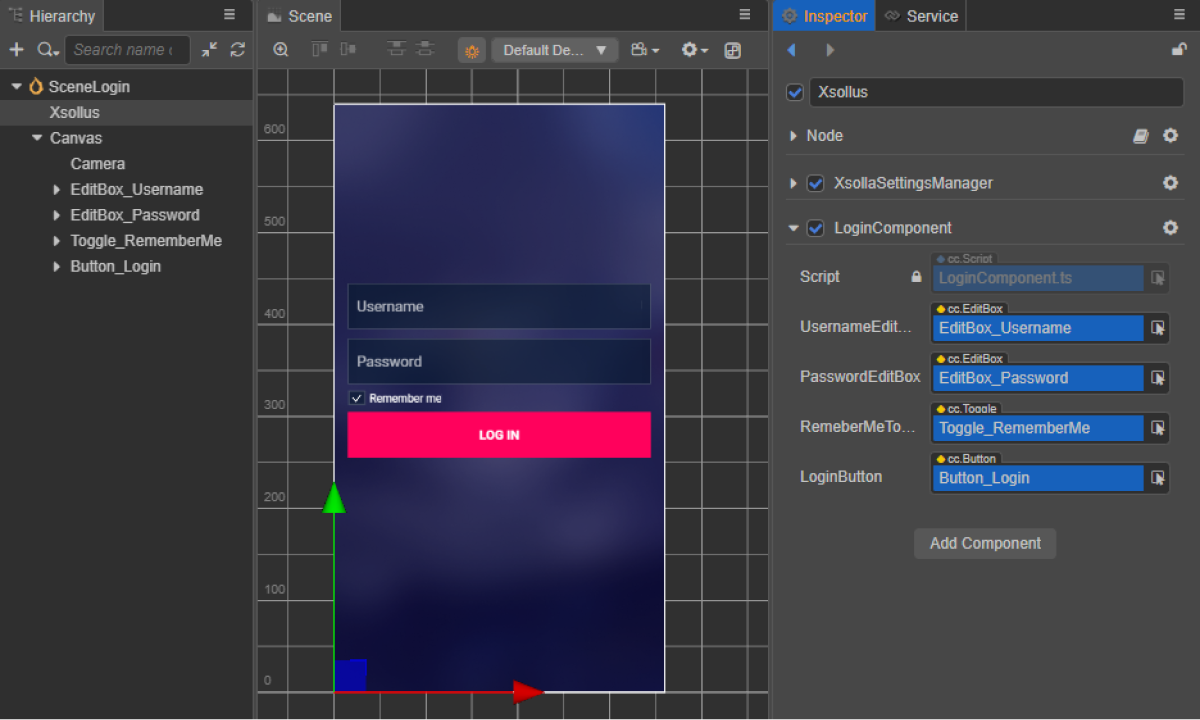
XsollaSettingsManagerコンポーネントで既存のノードを使用することもできます。 - 図に示すように、シーン要素を
LoginComponentのプロパティにバインドします:
- 以下のいずれかの方法でコールバックをログインボタンにバインドします:
- 下の図に示すように、
Inspector パネルを使用します。 - 以下のコードブロックをページスクリプトに挿入する。
- 下の図に示すように、
コード経由でコールバックをバインドします:
- typescript
1start() {
2	 this.loginButton.node.on(Button.EventType.CLICK, this.onLoginClicked, this);
3  }
スクリプトの例では、onCompleteとonErrorメソッドは標準のconsole.logメソッドを呼び出します。他のアクションを追加することができます。
エラーが発生した場合、エラーコードと説明がerrorパラメータで渡されます。
- typescript
 1import { _decorator, Button, Component, EditBox, Toggle } from 'cc';
 2import { XsollaAuth } from 'db://xsolla-commerce-sdk/scripts/api/XsollaAuth';
 3const { ccclass, property } = _decorator;
 4
 5
 6@ccclass('LoginComponent')
 7export class LoginComponent extends Component {
 8
 9    @property(EditBox)
10    usernameEditBox: EditBox;
11
12    @property(EditBox)
13    passwordEditBox: EditBox;
14
15    @property(Toggle)
16    remeberMeToggle: Toggle;
17
18    @property(Button)
19    loginButton: Button;
20
21    start() {
22        this.loginButton.node.on(Button.EventType.CLICK, this.onLoginClicked, this);
23    }
24
25    onLoginClicked() {
26        XsollaAuth.authByUsernameAndPassword(this.usernameEditBox.string, this.passwordEditBox.string, this.remeberMeToggle.isChecked, token => {
27            console.log(`Successful login. Token - ${token.access_token}`);
28        }, err => {
29            console.log(err);
30        });
31    }
32}
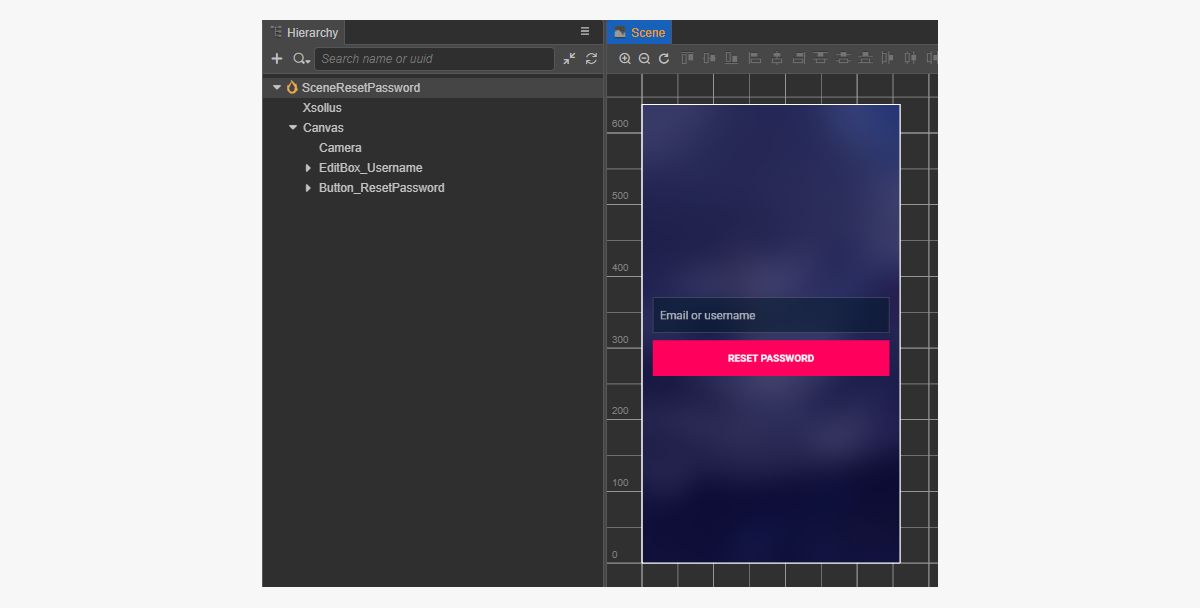
パスワードリセットを実装する
このチュートリアルでは、以下のロジックの実装について説明します:

ページのインターフェースを作成する
パスワードのリセットページのシーンを作成し、以下を追加します:
- ユーザー名フィールド
- パスワードリセットボタン
ページ構造の例:
パスワードリセットスクリプトコンポーネントを作成する
- ResetPasswordComponentを作成し、次のプロパティを追加します:
usernameEditBoxresetPasswordButton— 任意。コードを使用してコールバック関数をボタンにバインドするときに使用されます
- スクリプトの例に示すように、
ResetPasswordをクリックしたときに呼び出されるメソッドをResetPasswordComponentクラスに追加し、クリックイベントを処理するロジックを追加します。 - ResetPasswordComponentをシーン上のノードに追加します。新しいノードを追加することも、SDK初期化中に追加した
XsollaSettingsManagerコンポーネントで既存のノードを使用することもできます。 - 図に示すように、シーン要素を
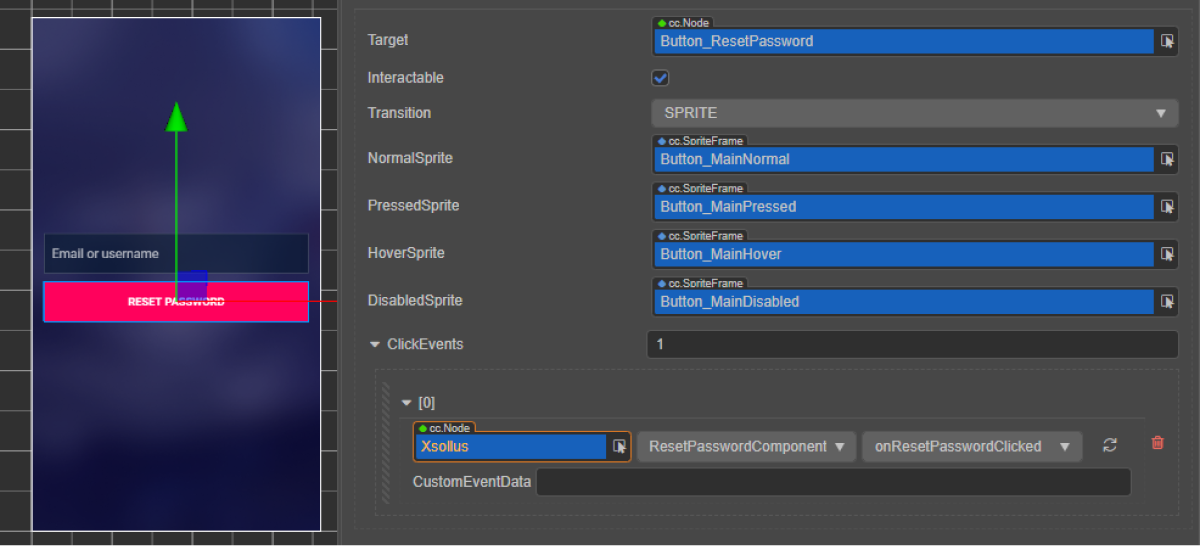
ResetPasswordComponentのプロパティにバインドします:
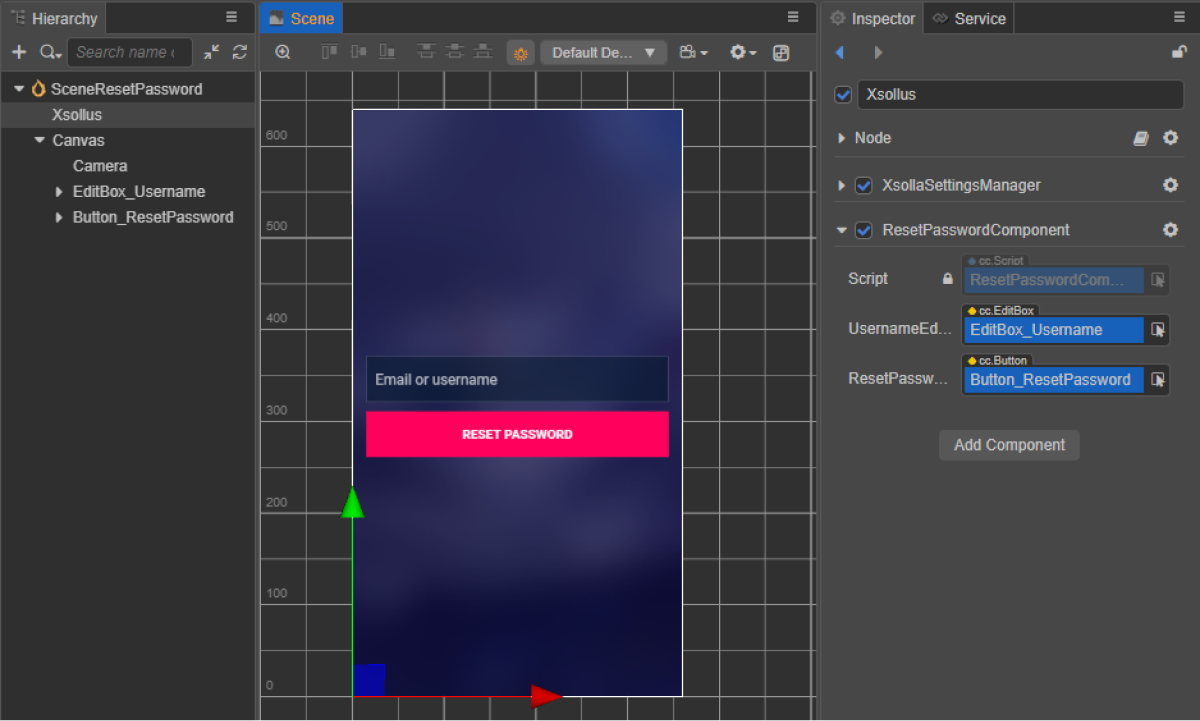
- 以下のいずれかの方法でコールバックをパスワードリセットボタンにバインドします:
- 下の図に示すように、
Inspector パネルを使用します。 - 以下のコードブロックをページスクリプトに挿入する。
- 下の図に示すように、
コード経由でコールバックをバインドします:
- typescript
1start() {
2        this.resetPasswordButton.node.on(Button.EventType.CLICK, this.onResetPasswordClicked, this);
3    }
スクリプトの例では、onCompleteとonErrorメソッドは標準のconsole.logメソッドを呼び出します。他のアクションを追加することができます。
エラーが発生した場合、エラーコードと説明がerrorパラメータで渡されます。
- typescript
 1import { _decorator, Button, Component, EditBox } from 'cc';
 2import { XsollaAuth } from 'db://xsolla-commerce-sdk/scripts/api/XsollaAuth';
 3const { ccclass, property } = _decorator;
 4
 5
 6@ccclass('ResetPasswordComponent')
 7export class ResetPasswordComponent extends Component {
 8
 9    @property(EditBox)
10    usernameEditBox: EditBox;
11
12    @property(Button)
13    resetPasswordButton: Button;
14
15    start() {
16        this.resetPasswordButton.node.on(Button.EventType.CLICK, this.onResetPasswordClicked, this);
17    }
18
19    onResetPasswordClicked() {
20        XsollaAuth.resetPassword(this.usernameEditBox.string, null, () => {
21            console.log('Follow the instructions we sent to your email');
22        }, err => {
23            console.log(err);
24        });
25    }
26}
ソーシャルログイン
このガイドでは、SDKメソッドを使用して、ユーザーのサインアップとソーシャルネットワークアカウントによるログインを実装する方法を紹介します。
ユーザー名/ユーザーのメールアドレスとパスワードによるユーザー認証とは異なり、ユーザーのサインアップのために別のロジックを実装する必要はありません。ユーザーの初回ログインがソーシャルネットワーク経由の場合、新しいアカウントが自動的に作成されます。
別の認証方法としてアプリケーションにソーシャルログインを実装している場合、以下の条件を満たすと、ソーシャルネットワークアカウントは既存のユーザーアカウントに自動的にリンクします。
- ユーザー名/メールアドレスとパスワードでサインアップしたユーザーが、ソーシャルネットワークアカウントを介してアプリケーションにログインしました。
- ソーシャルネットワークでは、メールアドレスを返します。
- ソーシャルネットワークでのユーザーのメールアドレスは、アプリケーションで登録に使用したメールアドレスと同じです。
このチュートリアルでは、以下のロジックの実装について説明します:

この例では、Facebookアカウントによるユーザーログインを設定しています。すべてのソーシャルネットワークを同じ方法で設定できます。
この例では、SDKメソッドの基本的な概要を提供します。アプリケーションは通常、より複雑なインターフェースとロジックを必要とします。
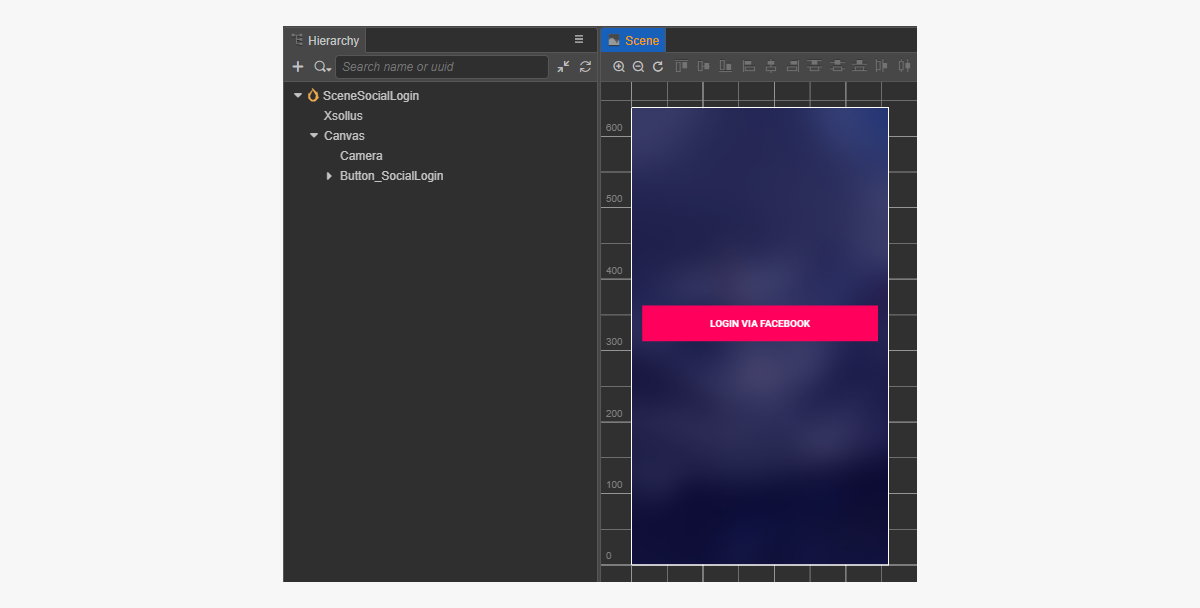
ページのインターフェースを作成する
ソーシャルログインページのシーンを作成し、それにソーシャルログインボタンを追加します。
ページ構造の例:
ソーシャルログインスクリプトコンポーネントを作成する
- SocialLoginComponentを作成します。コードを使用してソーシャルログインボタンにコールバック関数をバインドするには、
socialLoginButton属性を追加します。 - スクリプトの例に示すように、
SocialLoginをクリックしたときに呼び出されるメソッドをSocialLoginComponentクラスに追加し、クリックイベントを処理するロジックを追加します。
- SocialLoginComponentをシーン上のノードに追加します。SDK初期化で追加した
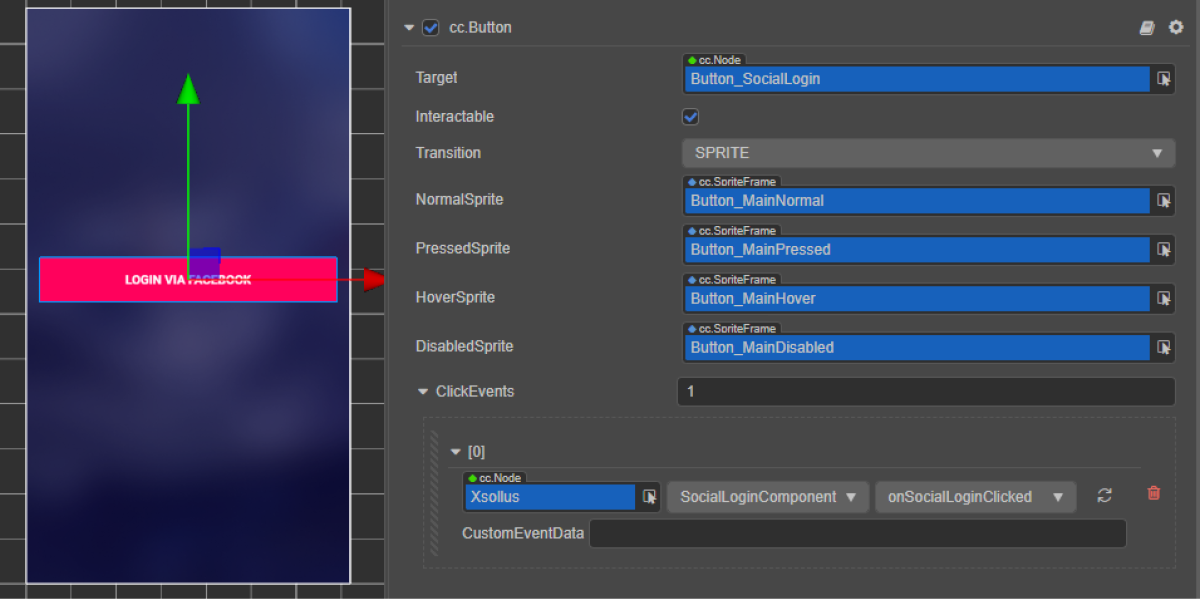
XsollaSettingsManagerコンポーネントを使用して、新しいノードを追加するか、既存のノードを使用することができます。 - 図に示すように、
SocialLoginボタンをSocialLoginComponentのsocialLoginButton属性にバインドします。

- 以下のいずれかの方法で、ソーシャルログインボタンにコールバックをバインドします:
- 下の図に示すように、
Inspector パネルを使用します。 - 以下のコードブロックをページスクリプトに挿入する。
- 下の図に示すように、
コード経由でコールバックをバインドします:
- typescript
1start() {
2        this.socialLoginButton.node.on(Button.EventType.CLICK, this.onSocialLoginClicked, this);
3}
スクリプトの例では、onComplete、onCanceled及びonErrorメソッドは標準のconsole.logメソッドを呼び出します。エラーが発生した場合、エラーコードと説明がerrorパラメータで渡されます。
登録メールの再送リクエストのページを開いたり、登録が成功した場合にログインページを開くなど、他のアクションを追加することができます。
- typescript
 1import { _decorator, Button, Component } from 'cc';
 2import { Token, XsollaAuth } from '../../api/XsollaAuth';
 3const { ccclass, property } = _decorator;
 4
 5
 6namespace authorization {
 7
 8    @ccclass('SocialLoginComponent')
 9    export class SocialLoginComponent extends Component {
10
11        @property(Button)
12        socialLoginButton: Button;
13
14
15        start() {
16            this.socialLoginButton.node.on(Button.EventType.CLICK, this.onSocialLoginClicked, this);
17        }
18
19
20        onSocialLoginClicked() {
21            XsollaAuth.authSocial('facebook', (token: Token) => {
22                console.log(`Successful social authentication. Token - ${token.access_token}`);
23            }, () => {
24                console.log('Social auth was canceled');
25            }, (error:string) => {
26                console.log(error);
27            });
28        }
29    }
30}
アイテムカタログの表示
このチュートリアルでは、SDKメソッドを使って、インゲームストアに以下のアイテムを表示する方法を紹介します:
- 仮想アイテム
- バンドル
- 仮想通貨のパッケージ
始める前に、パブリッシャーアカウントのアイテムを構成します:
このチュートリアルでは、以下のロジックの実装について説明します:

カタログ内のすべてのアイテムの例は次のとおり:
- 名称
- 説明
- 価格
- 画像
また、アイテムに関する他の情報がインゲームストアに保存されている場合は、その情報を表示することもできます。
仮想アイテムの表示を実装する
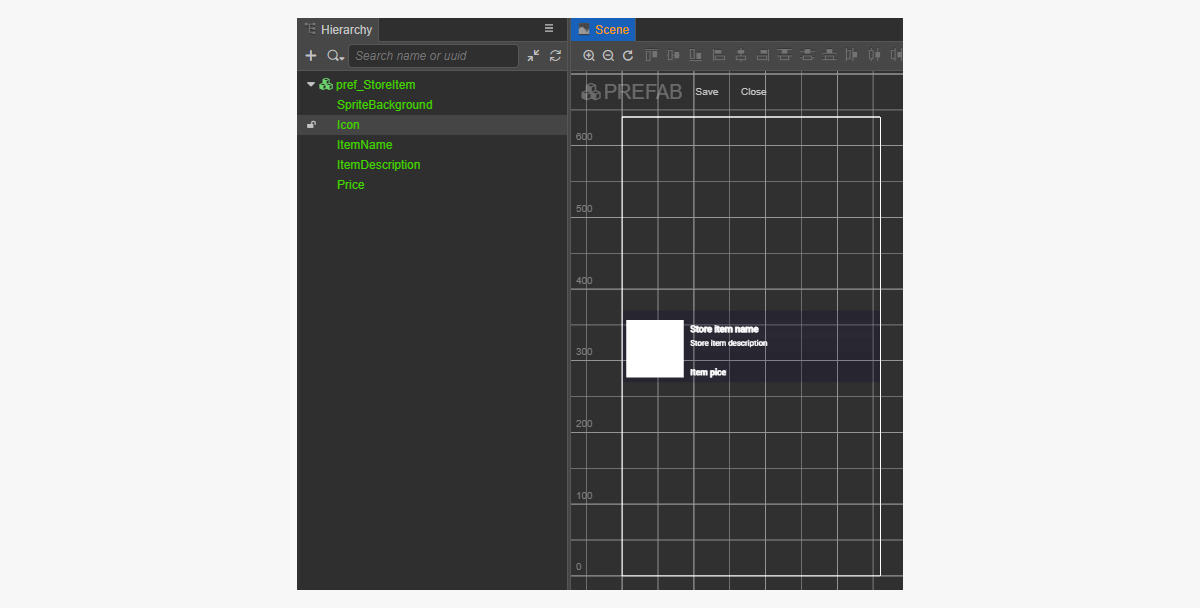
アイテムウィジェットを作成する
- プレハブを作成します。これを行うには、フォルダーのコンテキストメニューから
Create > Node Prefab を選択します。 - 作成したプレハブを開きます。
- 以下の画像に示すように、
UITransformコンポーネントをプレハブのルートに追加し、コンテンツサイズを設定します。
- 以下のUI要素をプレハブ子オブジェクトとして追加し、視覚化を構成します:
- ウィジェットの背景画像
- アイテム名
- アイテム説明
- アイテム価格
- アイテムイメージ
ウィジェット構造の例:
アイテムウィジェットスクリプトを作成する
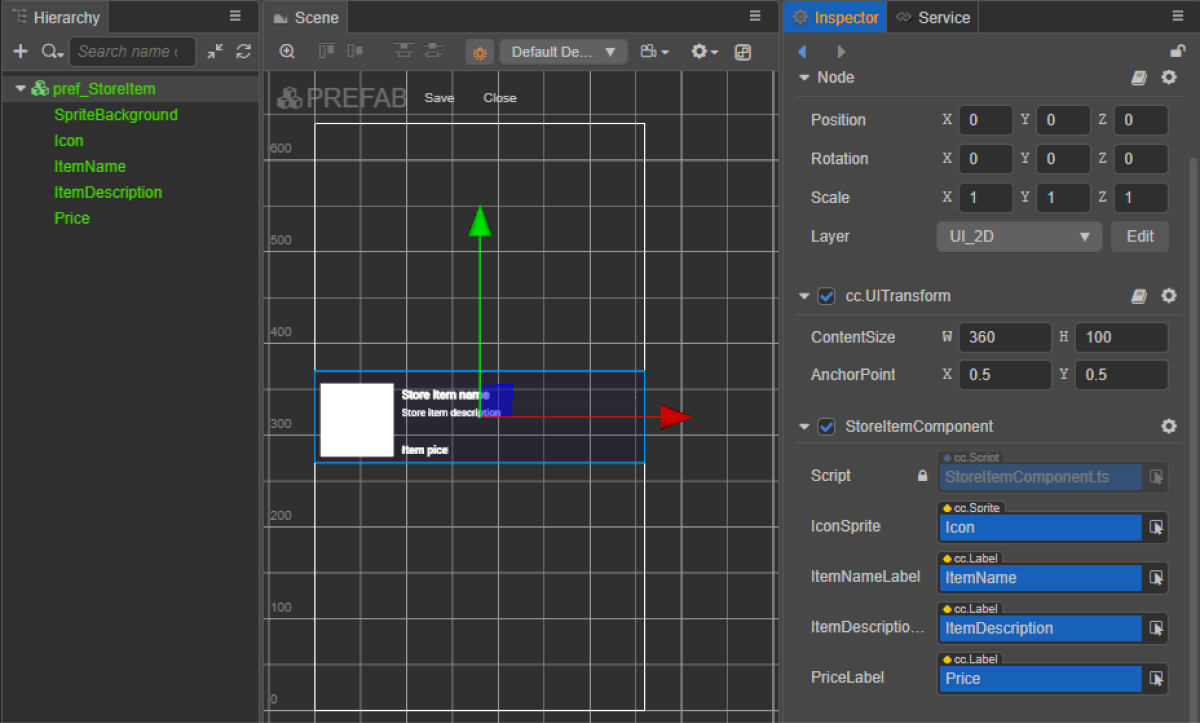
StoreItemComponentを作成し、以下のプロパティを追加します:iconSpriteitemNameLabelitemDescriptionLabelpriceLabel
- スクリプトの例に示すように、
initメソッドと初期化ロジックをStoreItemComponentクラスに追加します。 - StoreItemComponentコンポーネントをプレハブのルートノードにアタッチします。
- 図に示すように、プレハブ要素を
StoreItemComponentのプロパティにバインドします:
ウィジェットスクリプト(StoreItemComponent)の例:
- typescript
 1import { _decorator, assetManager, Component, ImageAsset, Label, Sprite, SpriteFrame, Texture2D } from 'cc';
 2import { StoreItem } from 'db://xsolla-commerce-sdk/scripts/api/XsollaCatalog';
 3const { ccclass, property } = _decorator;
 4
 5
 6@ccclass('StoreItemComponent')
 7export class StoreItemComponent extends Component {
 8
 9    @property(Sprite)
10    iconSprite: Sprite;
11
12    @property(Label)
13    itemNameLabel: Label;
14
15    @property(Label)
16    itemDescriptionLabel: Label;
17
18    @property(Label)
19    priceLabel: Label;
20
21    private _data: StoreItem;
22
23    init(data: StoreItem) {
24
25        this._data = data;
26
27        this.itemNameLabel.string = data.name;
28        this.itemDescriptionLabel.string = data.description;
29
30        if (data.virtual_prices.length > 0) {
31            this.priceLabel.string = `${data.virtual_prices[0].amount.toString()} ${data.virtual_prices[0].name}`;
32        } else {
33            this.priceLabel.string = `${parseFloat(data.price.amount)} ${data.price.currency}`;
34        }
35
36        assetManager.loadRemote<ImageAsset>(data.image_url, (err, imageAsset) => {
37            if(err == null) {
38            const spriteFrame = new SpriteFrame();
39            const texture = new Texture2D();
40            texture.image = imageAsset;
41            spriteFrame.texture = texture;
42            this.iconSprite.spriteFrame = spriteFrame;
43            } else {
44                console.log(`Can’t load image with URL ${data.image_url}`);
45            }
46        });
47    }
48}
ページのインターフェースを作成する
アイテムカタログページのシーンを作成し、それにScrollView要素を追加します。
ページ構造の例:
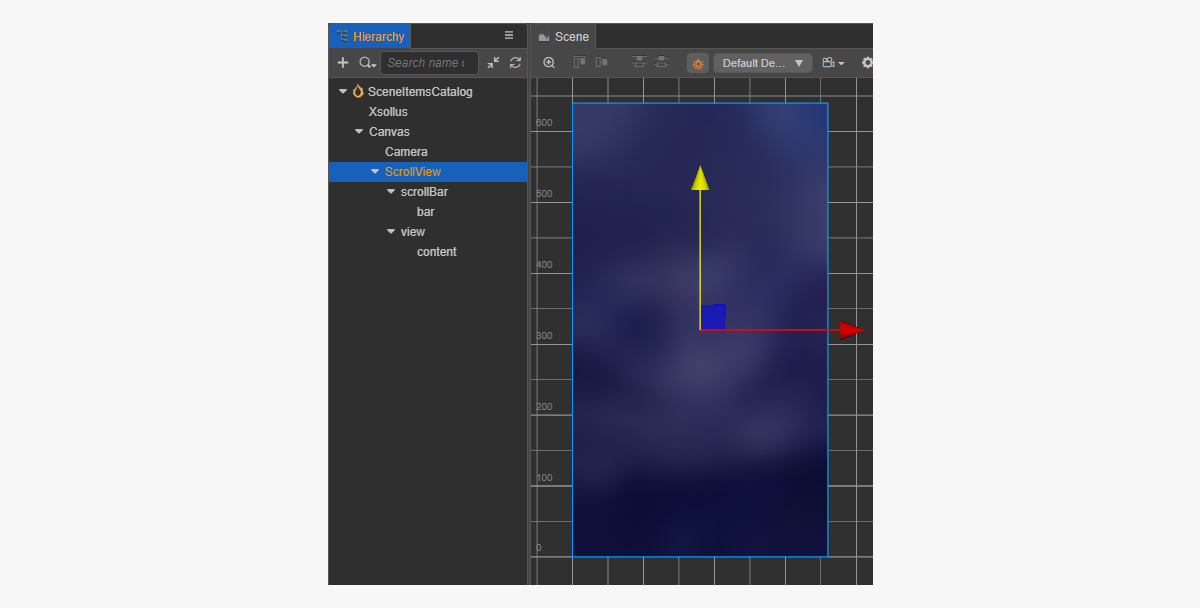
ScrollViewを作成したStoreItemプレハブと一致させるには、そのサイズを設定します:
ScrollViewノードと内部のviewノードのContentSizeパラメータの値を変更します。Layoutコンポーネントをcontentノードにバインドして設定します。この例では、次の設定が選択されています:Type == verticalResizeMode == Container
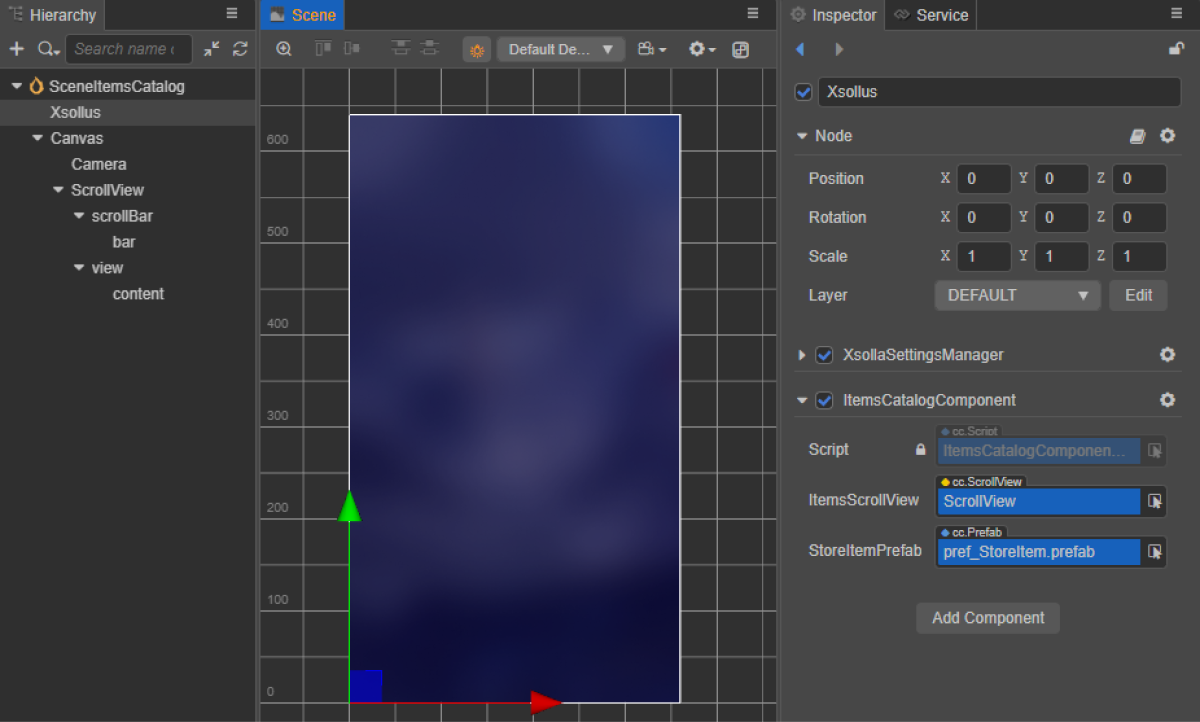
アイテムカタログスクリプトコンポーネントを作成する
- ItemsCatalogComponentを作成し、以下のプロパティを追加します:
itemsScrollViewstoreItemPrefab
- スクリプトの例に示すように、
start ライフサイクル関数と初期化ロジックをItemsCatalogComponentクラスに追加します。 - ItemsCatalogComponentをシーン上のノードに追加します。新しいノードを追加することも、SDK初期化中に追加した
XsollaSettingsManagerコンポーネントで既存のノードを使用することもできます。 - 図に示すように、プレハブ要素を
ItemsCatalogComponentのプロパティにバインドします:
クラススクリプト(ItemsCatalogComponent)の例:
- typescript
 1import { _decorator, Component, instantiate, Prefab, ScrollView } from 'cc';
 2import { XsollaCatalog } from 'db://xsolla-commerce-sdk/scripts/api/XsollaCatalog';
 3import { StoreItemComponent } from './StoreItemComponent';
 4const { ccclass, property } = _decorator;
 5
 6
 7@ccclass('ItemsCatalogComponent')
 8export class ItemsCatalogComponent extends Component {
 9
10    @property(ScrollView)
11    itemsScrollView: ScrollView;
12
13    @property(Prefab)
14    storeItemPrefab: Prefab;
15
16    start() {
17        XsollaCatalog.getCatalog(null, null, [], itemsData => {
18            for (let i = 0; i < itemsData.items.length; ++i) {
19                let storeItem = instantiate(this.storeItemPrefab);
20                this.itemsScrollView.content.addChild(storeItem);
21                storeItem.getComponent(StoreItemComponent).init(itemsData.items[i]);
22            }
23        });
24    }
25}
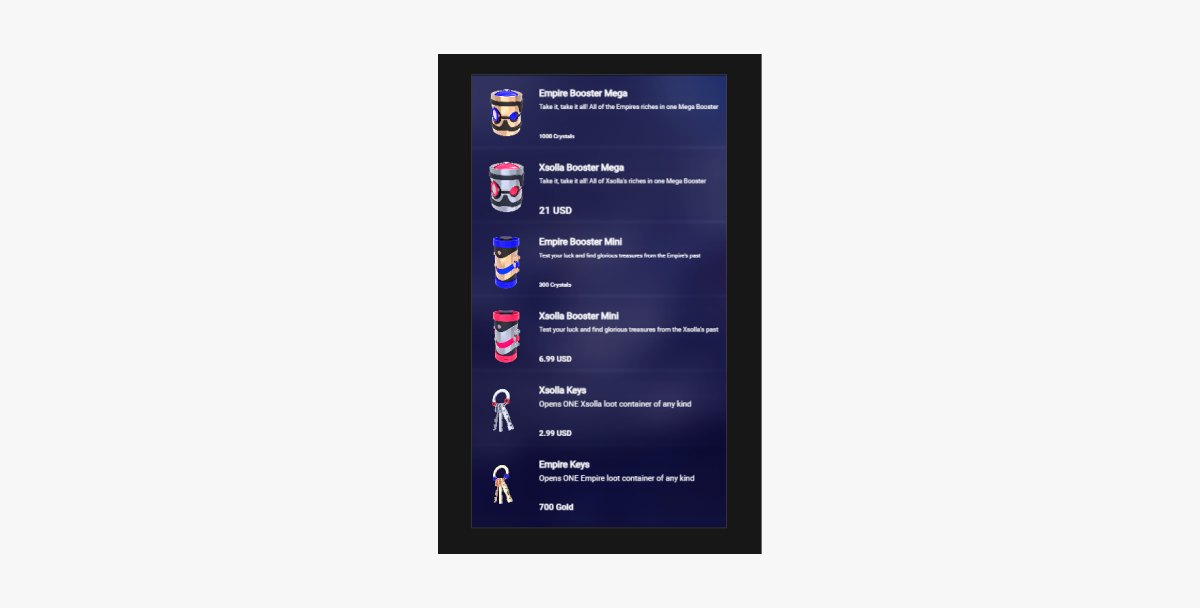
スクリプトの動作結果の例:
バンドルの表示の実装
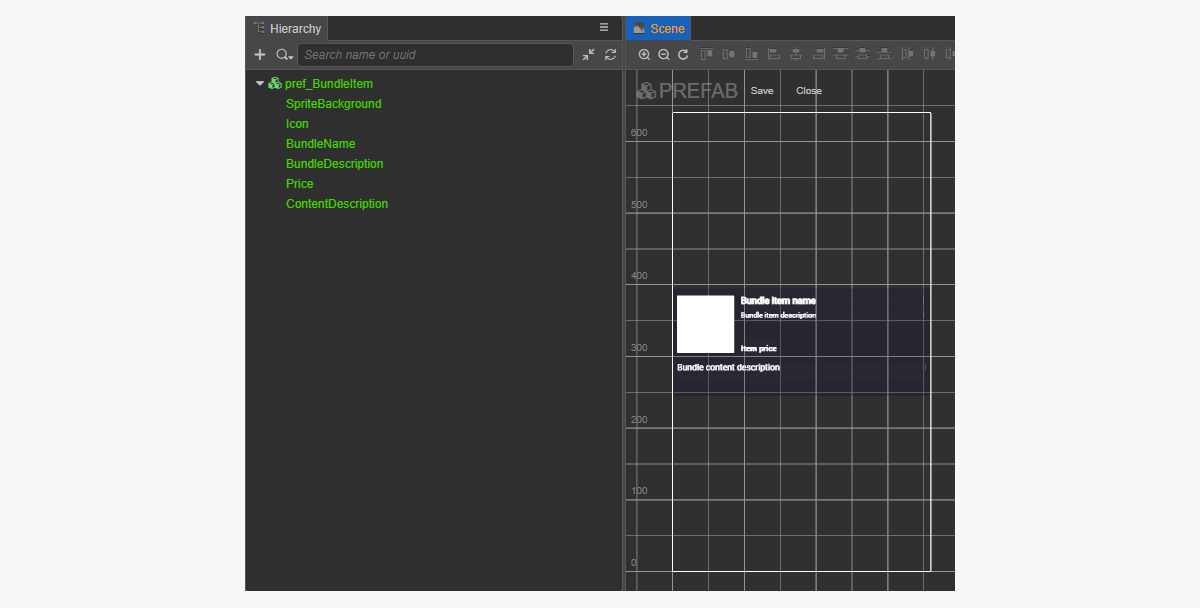
バンドルウィジェットを作成する
- プレハブを作成します。これを行うには、フォルダーのコンテキストメニューから
Create > Node Prefab を選択します。 - 作成したプレハブを開きます。
- 以下の画像に示すように、
UITransformコンポーネントをプレハブのルートに追加し、コンテンツサイズを設定します。
- 以下のUI要素をプレハブ子オブジェクトとして追加し、視覚化を構成します:
- ウィジェットの背景画像
- バンドル名
- バンドルの説明
- バンドル価格
- バンドルイメージ
- バンドルコンテンツの説明(アイテムおよびその数量)
ウィジェット構造の例:
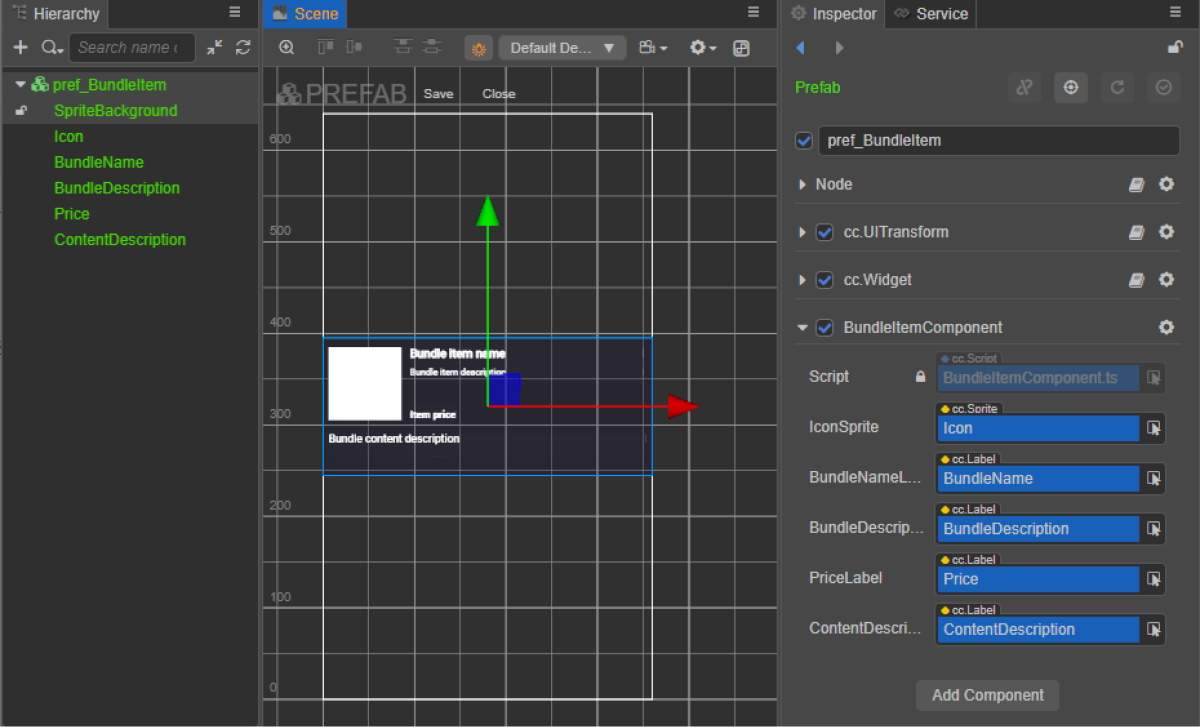
バンドルウィジェットスクリプトを作成する
- BundleItemComponentを作成し、以下のプロパティを追加します:
iconSpritebundleNameLabelbundleDescriptionLabelpriceLabelcontentDescriptionlabel
- スクリプトの例に示すように、
initメソッドと初期化ロジックをBundleItemComponentクラスに追加します。 - BundleItemComponentをプレハブのルートノードにアタッチします。
- 図に示すように、プレハブ要素を
BundleItemComponentのプロパティにバインドします:
ウィジェットスクリプト(BundleItemComponent)の例:
- typescript
 1import { _decorator, assetManager, Component, ImageAsset, Label, Sprite, SpriteFrame, Texture2D } from 'cc';
 2import { StoreBundle } from 'db://xsolla-commerce-sdk/scripts/api/XsollaCatalog';
 3const { ccclass, property } = _decorator;
 4
 5
 6@ccclass('BundleItemComponent')
 7export class BundleItemComponent extends Component {
 8
 9    @property(Sprite)
10    iconSprite: Sprite;
11
12    @property(Label)
13    bundleNameLabel: Label;
14
15    @property(Label)
16    bundleDescriptionLabel: Label;
17
18    @property(Label)
19    priceLabel: Label;
20
21    @property(Label)
22    contentDescriptionLabel: Label;
23
24    init(data: StoreBundle) {
25
26        this.bundleNameLabel.string = data.name;
27        this.bundleDescriptionLabel.string = data.description;
28
29        if (data.virtual_prices.length > 0) {
30            this.priceLabel.string = `${data.virtual_prices[0].amount.toString()} ${data.virtual_prices[0].name}`;
31        } else {
32            this.priceLabel.string = `${parseFloat(data.price.amount)} ${data.price.currency}`;
33        }
34
35        assetManager.loadRemote<ImageAsset>(data.image_url, (err, imageAsset) => {
36            if(err == null) {
37            const spriteFrame = new SpriteFrame();
38            const texture = new Texture2D();
39            texture.image = imageAsset;
40            spriteFrame.texture = texture;
41            this.iconSprite.spriteFrame = spriteFrame;
42            } else {
43                console.log(`Can’t load image with URL ${data.image_url}`);
44            }
45        });
46
47        this.contentDescriptionLabel.string = `This bundle includes ${data.content.length} items: `;
48        var bandles = data.content.map(bundle => bundle.name).join(', ');
49        this.contentDescriptionLabel.string += bandles;
50    }
51}
ページのインターフェースを作成する
バンドルカタログページのシーンを作成し、それにScrollView要素を追加します。
ページ構造の例:
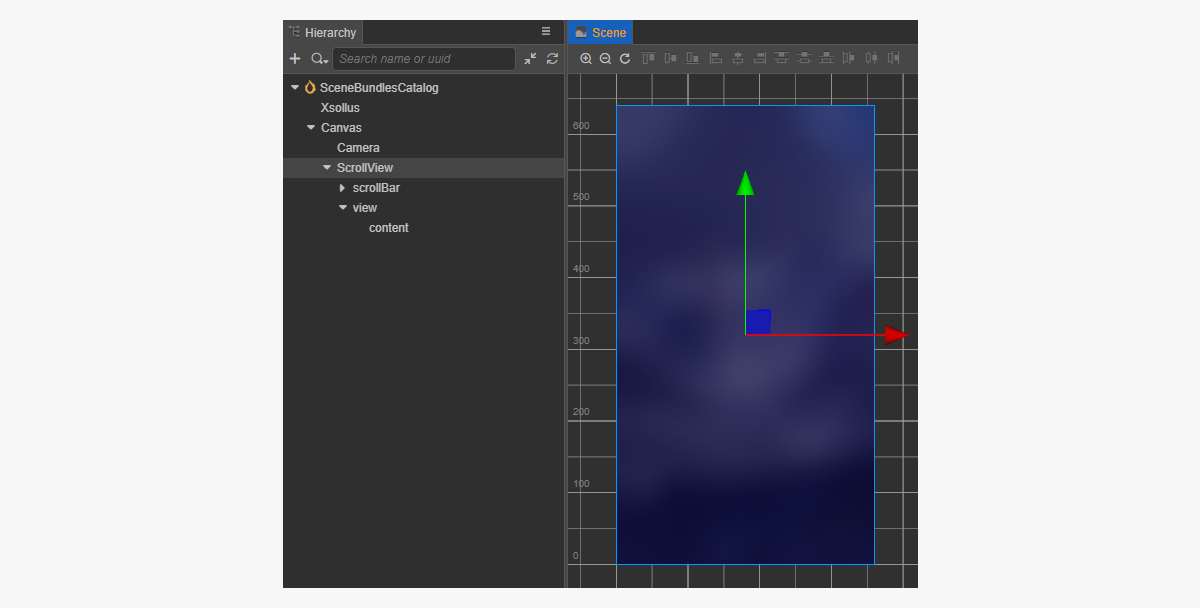
ScrollViewを作成したBundleItemプレハブと一致させるには、そのサイズを設定します:
ScrollViewノードと内部のviewノードのContentSizeパラメータの値を変更します。Layoutコンポーネントをcontentノードにバインドして設定します。この例では、次の設定が選択されています:Type == verticalResizeMode == Container
バンドルカタログスクリプトコンポーネントを作成する
- BundlesCatalogComponentを作成し、以下のプロパティを追加します:
itemsScrollViewbundleItemPrefab
- スクリプトの例に示すように、
start ライフサイクル関数と初期化ロジックをBundlesCatalogComponentクラスに追加します。 - BundlesCatalogComponentをシーン上のノードに追加します。新しいノードを追加することも、SDK初期化中に追加した
XsollaSettingsManagerコンポーネントで既存のノードを使用することもできます。 - 図に示すように、プレハブ要素を
BundlesCatalogComponentのプロパティにバインドします:

クラススクリプト(BundlesCatalogComponent)の例:
- typescript
 1import { _decorator, Component, instantiate, Prefab, ScrollView } from 'cc';
 2import { XsollaCatalog } from 'db://xsolla-commerce-sdk/scripts/api/XsollaCatalog';
 3import { BundleItemComponent } from './BundleItemComponent';
 4const { ccclass, property } = _decorator;
 5
 6
 7@ccclass('BundlesCatalogComponent')
 8export class BundlesCatalogComponent extends Component {
 9
10    @property(ScrollView)
11    itemsScrollView: ScrollView;
12
13    @property(Prefab)
14    bundleItemPrefab: Prefab;
15
16    start() {
17        XsollaCatalog.getBundleList(null, null, [], itemsData => {
18        for (let i = 0; i < itemsData.items.length; ++i) {
19                let bundleItem = instantiate(this.bundleItemPrefab);
20                this.itemsScrollView.content.addChild(bundleItem);
21                bundleItem.getComponent(BundleItemComponent).init(itemsData.items[i]);
22            }
23        });
24    }
25}
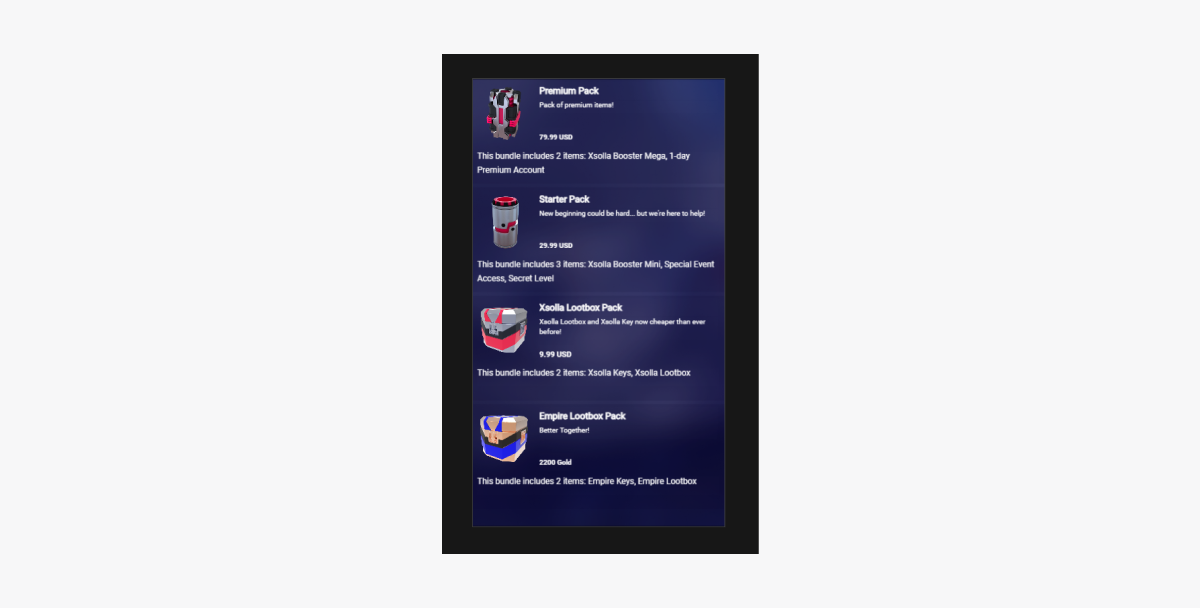
スクリプトの動作結果の例:
仮想通貨パッケージカタログの表示を実装する
仮想通貨パッケージのウィジェットを作成する
- プレハブを作成します。これを行うには、フォルダーのコンテキストメニューから
Create > Node Prefab を選択します。 - 作成したプレハブを開きます。
- 以下の画像に示すように、
UITransformコンポーネントをプレハブのルートに追加し、コンテンツサイズを設定します。
- 以下のUI要素をプレハブ子オブジェクトとして追加し、視覚化を構成します:
- ウィジェットの背景画像
- 通貨名
- 通貨説明
- 通貨価格
- 通貨イメージ
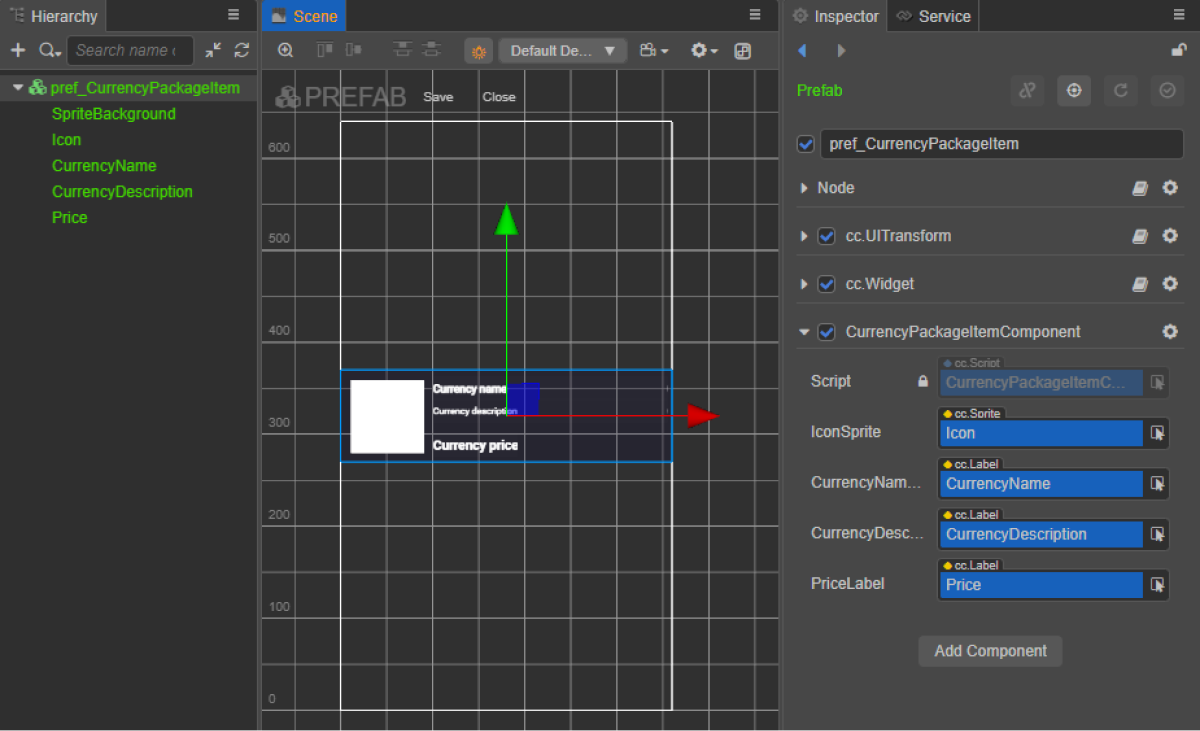
ウィジェット構造の例:
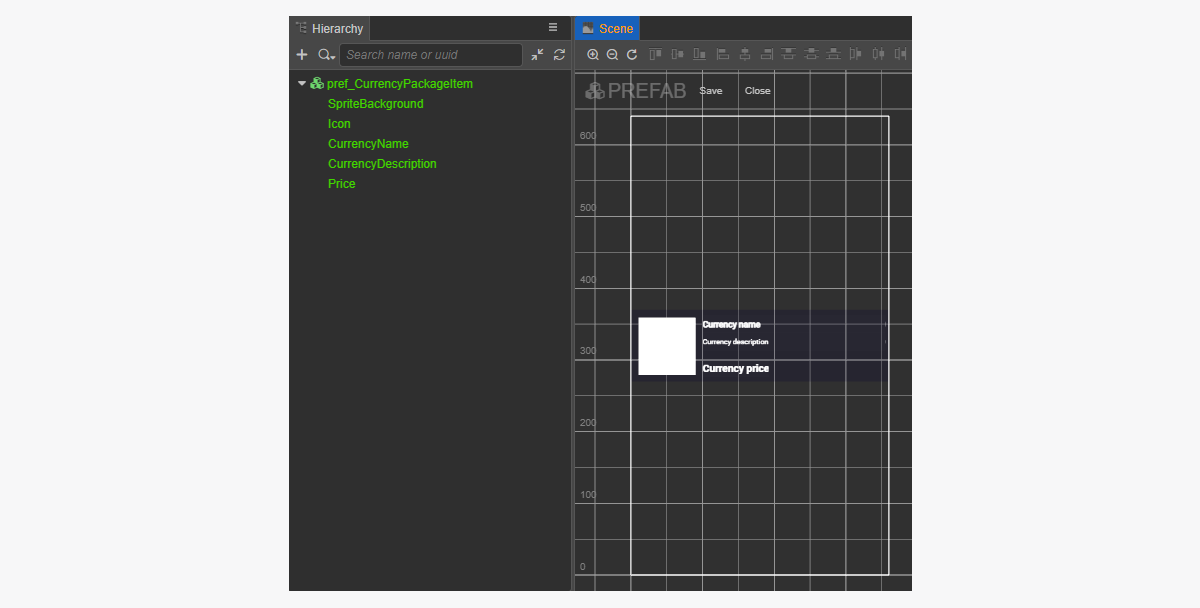
仮想通貨パッケージ用ウィジェットスクリプトを作成する
- CurrencyPackageItemComponentを作成し、以下のプロパティを追加します:
iconSpritecurrencyNameLabelcurrencyDescriptionLabelpriceLabel
- スクリプトの例に示すように、
initメソッドと初期化ロジックをCurrencyPackageItemComponentクラスに追加します。 - CurrencyPackageItemComponentコンポーネントをプレハブのルートノードにアタッチします。
- 図に示すように、プレハブ要素を
CurrencyPackageItemComponentのプロパティにバインドします:
ウィジェットスクリプト(CurrencyPackageItemComponent)の例:
- typescript
 1import { _decorator, assetManager, Component, ImageAsset, Label, Sprite, SpriteFrame, Texture2D } from 'cc';
 2import { VirtualCurrencyPackage } from 'db://xsolla-commerce-sdk/scripts/api/XsollaCatalog';
 3const { ccclass, property } = _decorator;
 4
 5
 6@ccclass('CurrencyPackageItemComponent')
 7export class CurrencyPackageItemComponent extends Component {
 8
 9    @property(Sprite)
10    iconSprite: Sprite;
11
12    @property(Label)
13    currencyNameLabel: Label;
14
15    @property(Label)
16    currencyDescriptionLabel: Label;
17
18    @property(Label)
19    priceLabel: Label;
20
21    init(data: VirtualCurrencyPackage) {
22
23        this.currencyNameLabel.string = data.name;
24        this.currencyDescriptionLabel.string = data.description;
25
26        if (data.virtual_prices.length > 0) {
27            this.priceLabel.string = `${data.virtual_prices[0].amount.toString()} ${data.virtual_prices[0].name}`;
28        } else {
29            this.priceLabel.string = `${parseFloat(data.price.amount)} ${data.price.currency}`;
30        }
31
32        assetManager.loadRemote<ImageAsset>(data.image_url, (err, imageAsset) => {
33            if(err == null) {
34            const spriteFrame = new SpriteFrame();
35            const texture = new Texture2D();
36            texture.image = imageAsset;
37            spriteFrame.texture = texture;
38            this.iconSprite.spriteFrame = spriteFrame;
39            } else {
40                console.log(`Can’t load image with URL ${data.image_url}`);
41            }
42        });
43    }
44}
ページのインターフェースを作成する
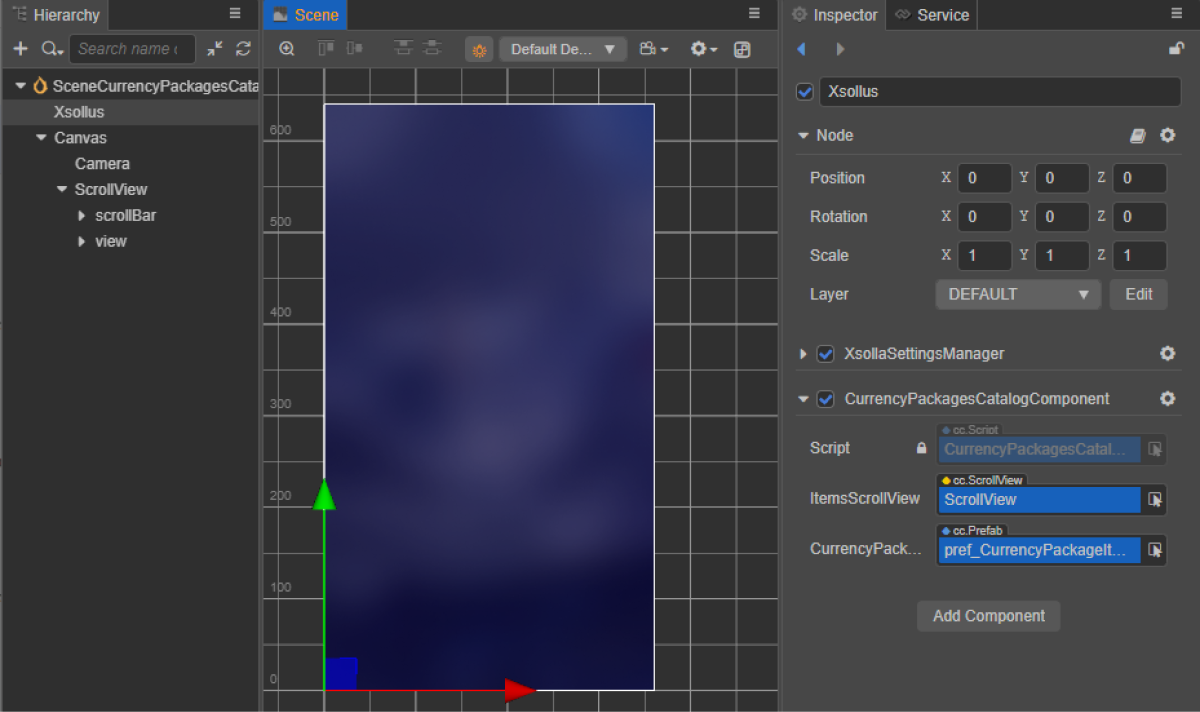
仮想通貨パッケージカタログページのシーンを作成し、それにScrollView要素を追加します。
ページ構造の例:
ScrollViewを作成したCurrencyPackageItemプレハブと一致させるには、そのサイズを設定します:
ScrollViewノードと内部のviewノードのContentSizeパラメータの値を変更します。Layoutコンポーネントをcontentノードにバインドして設定します。この例では、次の設定が選択されています:Type == verticalResizeMode == Container
通貨パッケージカタログスクリプトコンポーネントを作成する
CurrencyPackagesCatalogComponentを作成し、以下のプロパティを追加します:itemsScrollViewcurrencyPackageItemPrefab
- スクリプトの例に示すように、
start ライフサイクル関数と初期化ロジックをCurrencyPackagesCatalogComponentクラスに追加します。 - CurrencyPackagesCatalogComponentをシーン上のノードに追加します。新しいノードを追加することも、SDK初期化中に追加した
XsollaSettingsManagerコンポーネントで既存のノードを使用することもできます。 - 図に示すように、プレハブ要素を
CurrencyPackagesCatalogComponentのプロパティにバインドします:
クラススクリプト(CurrencyPackagesCatalogComponent)の例:
 1import { _decorator, Component, instantiate, Prefab, ScrollView } from 'cc';
 2import { XsollaCatalog } from 'db://xsolla-commerce-sdk/scripts/api/XsollaCatalog';
 3import { CurrencyPackageItemComponent } from './CurrencyPackageItemComponent';
 4const { ccclass, property } = _decorator;
 5
 6
 7@ccclass('CurrencyPackagesCatalogComponent')
 8export class CurrencyPackagesCatalogComponent extends Component {
 9
10    @property(ScrollView)
11    itemsScrollView: ScrollView;
12
13    @property(Prefab)
14    currencyPackageItemPrefab: Prefab;
15
16    start() {
17        XsollaCatalog.getVirtualCurrencyPackages(null, null, [], itemsData => {
18        for (let i = 0; i < itemsData.items.length; ++i) {
19                let currencyPackageItem = instantiate(this.currencyPackageItemPrefab);
20                this.itemsScrollView.content.addChild(currencyPackageItem);
21                currencyPackageItem.getComponent(CurrencyPackageItemComponent).init(itemsData.items[i]);
22            }
23        });
24    }
25}
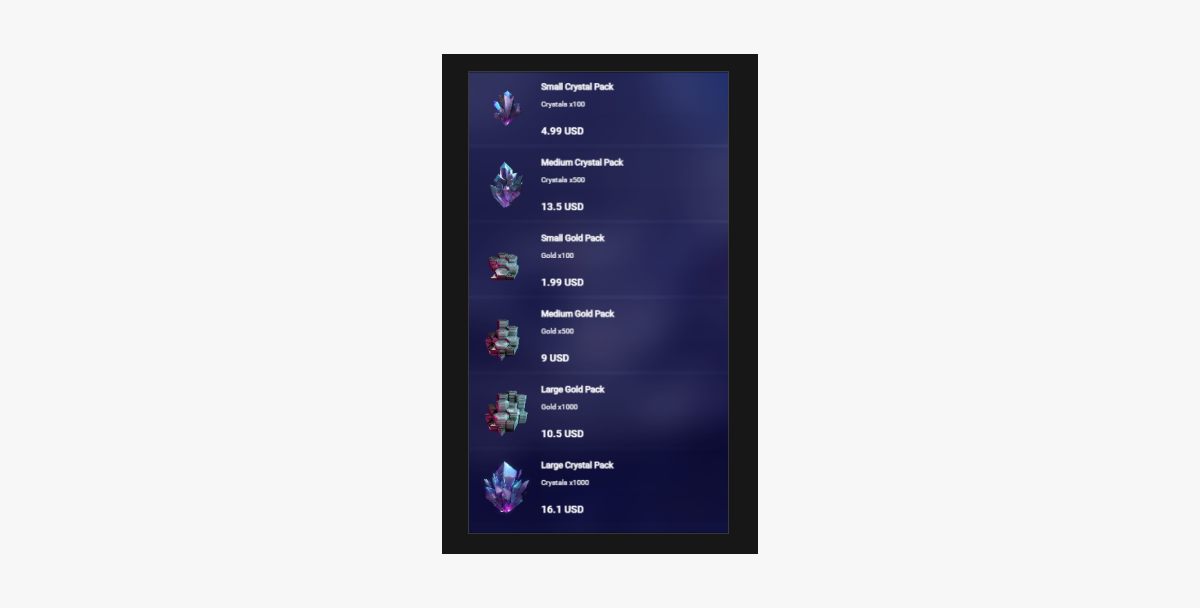
スクリプトの動作結果の例:
仮想アイテムを実際通貨で販売する
ここでは、SDKメソッドを使用して、仮想アイテムを使用した実際通貨のアイテム販売を実装する方法について説明します。
始める前に、カタログに仮想アイテムの表示を実装します。以下の例では、仮想アイテムの購入を実装する方法を説明します。他のアイテムタイプの設定も同様です。
このチュートリアルでは、以下のロジックの実装について説明します:

ログインするスクリプトの例では、デモアカウントの認証情報を使用します(ユーザー名:xsolla、パスワード:xsolla)。このアカウントはデモプロジェクトでのみ使用できます。
スクリプトサンプルには、カタログのアイテムをページごとに表示する(ページネーション)実装は含まれていません。getCatalog SDKメソッドのoffsetおよびlimitパラメータを使用してページネーションを実装します。1 ページのアイテムの最大数は50です。カタログに50を超えるアイテムがある場合は、ページネーションが必要です。
アイテムウィジェットを完成する
アイテムウィジェットに購入ボタンを追加し、その視覚化を構成します。
RC_StoreItemComponentに変更されています。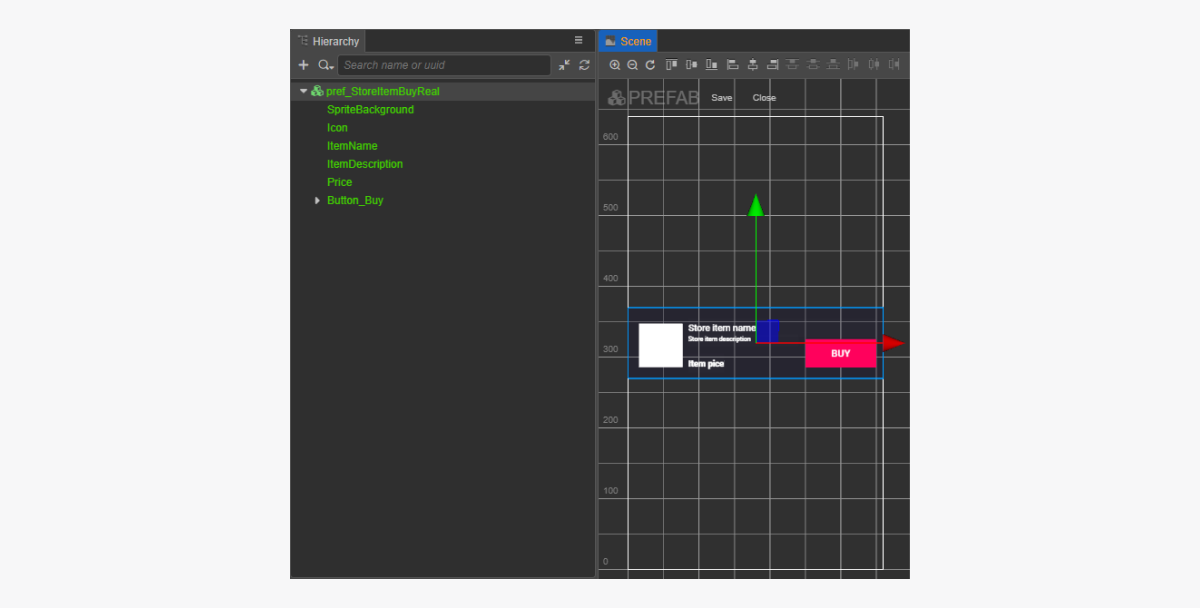
アイテムウィジェットスクリプトを完成する
- コードを使用してコールバック関数を購入ボタンにバインドするには、
buyButtonプロパティをRC_StoreItemComponentに追加します。 - メソッドを
BuyButtonをクリックしたときに呼び出されるRC_StoreItemComponentクラスを追加し、スクリプトの例に示すように、クリックイベントを処理するロジックを追加します。 - 以下のいずれかの方法でコールバックを購入ボタンにバインドします:
- 下の図に示すように、
Inspector パネルを使用する。 - 以下のコードブロックをページスクリプトに挿入する。
- 下の図に示すように、
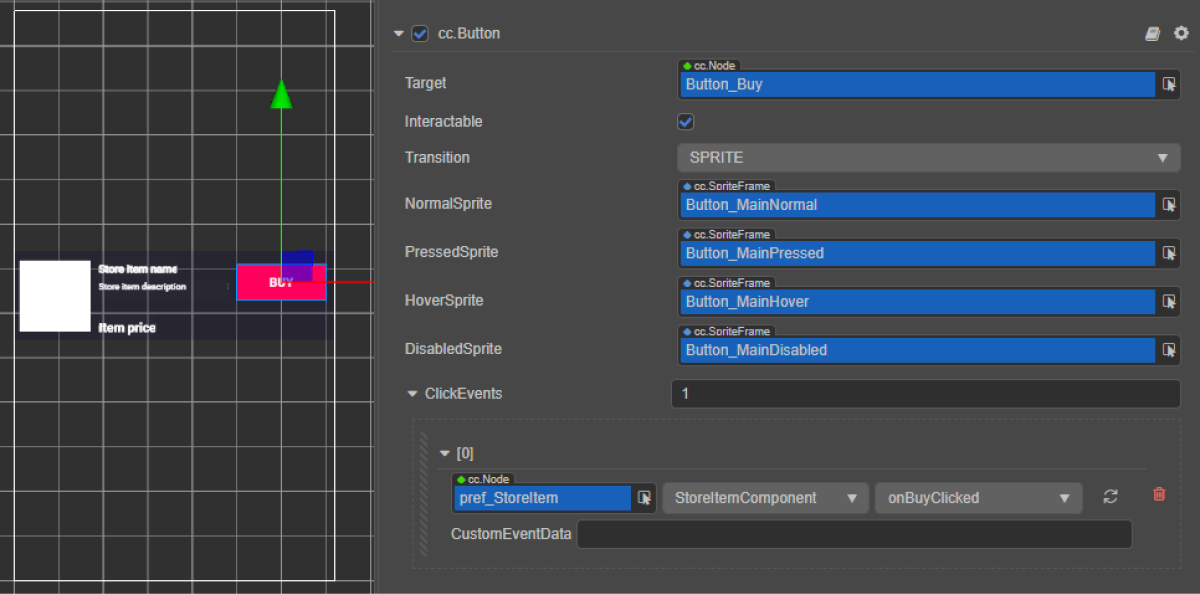
コード経由でコールバックをバインドします:
- typescript
1start() {
2	this.buyButton.node.on(Button.EventType.CLICK, this.onBuyClicked, this);
3  }
ウィジェットスクリプト(RC_StoreItemComponent)の例:
- typescript
 1import { _decorator, assetManager, Button, Component, ImageAsset, Label, Sprite, SpriteFrame, Texture2D } from 'cc';
 2import { StoreItem, XsollaCatalog } from '../../api/XsollaCatalog';
 3import { TokenStorage } from '../../common/TokenStorage';
 4import { OrderTracker } from '../../common/OrderTracker';
 5import { XsollaPayments } from '../../api/XsollaPayments';
 6const { ccclass, property } = _decorator;
 7
 8
 9export namespace sellForRealMoneyItem {
10
11
12    @ccclass('RC_StoreItemComponent')
13    export class RC_StoreItemComponent extends Component {
14
15
16        @property(Sprite)
17        iconSprite: Sprite;
18
19
20        @property(Label)
21        itemNameLabel: Label;
22
23
24        @property(Label)
25        itemDescriptionLabel: Label;
26
27
28        @property(Label)
29        priceLabel: Label;
30
31
32        @property(Button)
33        buyButton: Button;
34
35
36        private _data: StoreItem;
37
38
39        start() {
40            this.buyButton.node.on(Button.EventType.CLICK, this.onBuyClicked, this);
41        }
42
43
44        init(data: StoreItem) {
45
46            this._data = data;
47
48
49            this.itemNameLabel.string = data.name;
50            this.itemDescriptionLabel.string = data.description;
51
52            if (data.virtual_prices.length > 0) {
53                this.priceLabel.string = `${data.virtual_prices[0].amount.toString()} ${data.virtual_prices[0].name}`;
54            } else {
55                this.priceLabel.string = `${parseFloat(data.price.amount)} ${data.price.currency}`;
56            }
57
58
59            assetManager.loadRemote<ImageAsset>(data.image_url, (err, imageAsset) => {
60                if(err == null) {
61                const spriteFrame = new SpriteFrame();
62                const texture = new Texture2D();
63                texture.image = imageAsset;
64                spriteFrame.texture = texture;
65                this.iconSprite.spriteFrame = spriteFrame;
66                } else {
67                    console.log(`Cant load image with url ${data.image_url}`);
68                }
69            });
70        }
71
72
73        onBuyClicked() {
74            XsollaCatalog.fetchPaymentToken(TokenStorage.getToken().access_token, this._data.sku, 1, undefined, undefined, undefined, undefined, undefined, result => {
75                OrderTracker.checkPendingOrder(result.token, result.orderId, () => {
76                    console.log('success purchase!');
77                }, error => {
78                    console.log(`Order checking failed - Status code: ${error.status}, Error code: ${error.code}, Error message: ${error.description}`);
79                });
80                XsollaPayments.openPurchaseUI(result.token);
81            }, error => {
82                console.log(error.description);
83            });
84        }
85    }
86}
アイテムカタログスクリプトコンポーネントを完了する
RC_ItemsCatalogComponentに変更されています。スクリプトの例に示すように、有効な認可トークンを取得するためのロジックをRC_ItemsCatalogComponentクラスのstartメソッドに追加します。
クラススクリプト(RC_ItemsCatalogComponent)の例:
- typescript
 1import { _decorator, Component, instantiate, Prefab, ScrollView } from 'cc';
 2import { XsollaCatalog } from 'db://xsolla-commerce-sdk/scripts/api/XsollaCatalog';
 3import { RC_StoreItemComponent } from './RC_StoreItemComponent';
 4import { XsollaAuth } from 'db://xsolla-commerce-sdk/scripts/api/XsollaAuth';
 5import { TokenStorage } from 'db://xsolla-commerce-sdk/scripts/common/TokenStorage';
 6const { ccclass, property } = _decorator;
 7
 8
 9
10
11@ccclass('RC_ItemsCatalogComponent')
12export class RC_ItemsCatalogComponent extends Component {
13
14    @property(ScrollView)
15    itemsScrollView: ScrollView;
16
17
18    @property(Prefab)
19    storeItemPrefab: Prefab;
20
21
22    start() {
23        XsollaAuth.authByUsernameAndPassword('xsolla', 'xsolla', false, token => {
24            TokenStorage.saveToken(token, false);
25            XsollaCatalog.getCatalog(null, null, [], itemsData => {
26                for (let i = 0; i < itemsData.items.length; ++i) {
27                        let storeItem = instantiate(this.storeItemPrefab);
28                        this.itemsScrollView.content.addChild(storeItem);
29                        storeItem.getComponent(RC_StoreItemComponent).init(itemsData.items[i]);
30                    }
31                });
32        });
33    }
34}
スクリプトの動作結果の例:
仮想アイテムを仮想通貨で販売する
ここでは、SDKメソッドを使用して、仮想アイテムを使用した仮想通貨のアイテム販売を実装する方法について説明します。
始める前に、カタログに仮想アイテムを表示する機能を実装します。以下の例では、仮想アイテムの購入を実装する方法を説明します。他のアイテムタイプの設定も同様です。
このチュートリアルでは、以下のロジックの実装について説明します:

ログインするスクリプトの例では、デモアカウントの認証情報を使用します(ユーザー名:xsolla、パスワード:xsolla)。このアカウントはデモプロジェクトでのみ使用できます。
スクリプトサンプルには、カタログのアイテムをページごとに表示する(ページネーション)実装は含まれていません。getCatalog SDKメソッドのoffsetおよびlimitパラメータを使用してページネーションを実装します。1ページのアイテムの最大数は50です。カタログに50を超えるアイテムがある場合は、ページネーションが必要です。
アイテムウィジェットを完成する
アイテムウィジェットに購入ボタンを追加し、その視覚化を構成します。
VC_StoreItemComponentに変更されています。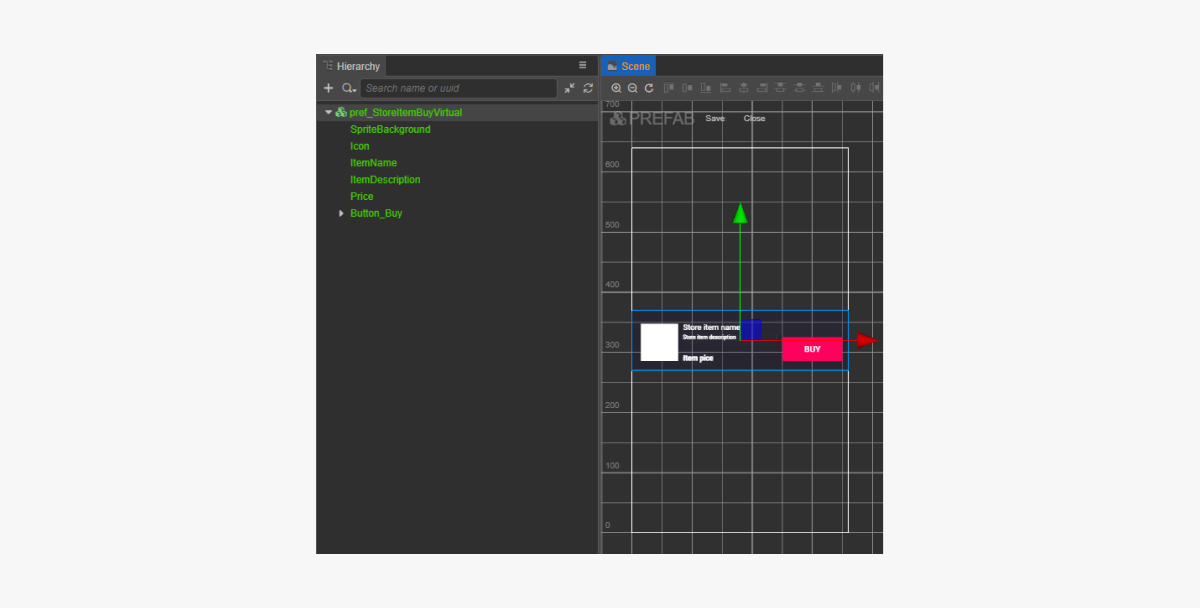
アイテムウィジェットスクリプトを完成する
- コードを使用してコールバック関数を購入ボタンにバインドするには、
buyButtonプロパティをVC_StoreItemComponentに追加します。 - メソッドを
BuyButtonをクリックしたときに呼び出されるVC_StoreItemComponentクラスを追加し、スクリプトの例に示すように、クリックイベントを処理するロジックを追加します。 - 以下のいずれかの方法でコールバックを購入ボタンにバインドします:
- 下の図に示すように、
Inspector パネルを使用する。 - 以下のコードブロックをページスクリプトに挿入する。
- 下の図に示すように、
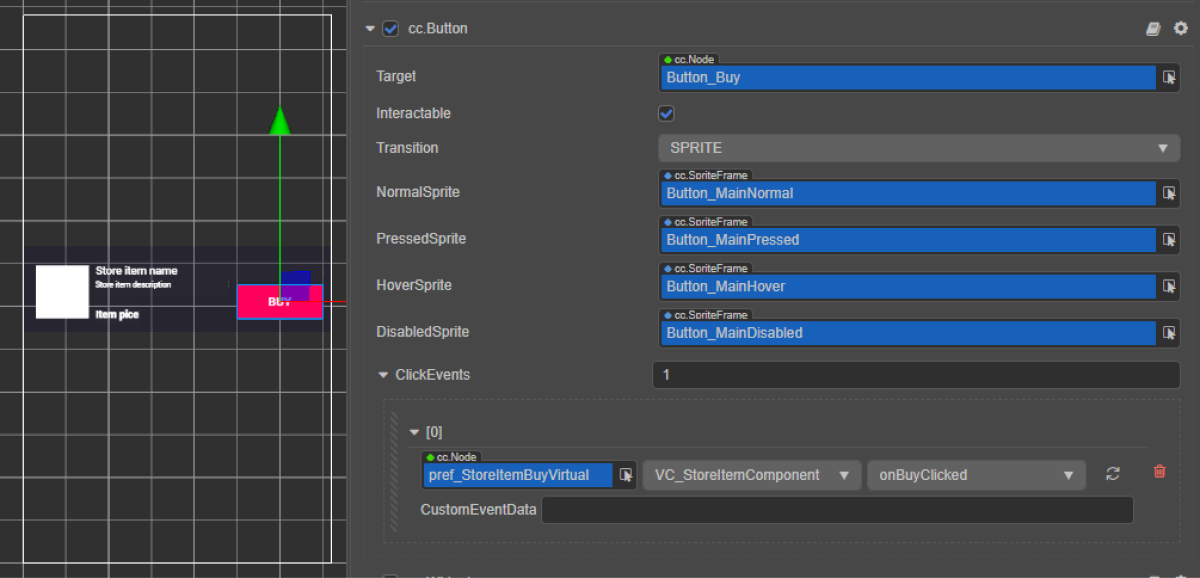
コード経由でコールバックをバインドします:
- typescript
1start() {
2	this.buyButton.node.on(Button.EventType.CLICK, this.onBuyClicked, this);
3  }
ウィジェットスクリプト(VC_StoreItemComponent)の例:
- typescript
 1import { _decorator, assetManager, Button, Component, ImageAsset, Label, Sprite, SpriteFrame, Texture2D } from 'cc';
 2import { StoreItem, XsollaCatalog } from 'db://xsolla-commerce-sdk/scripts/api/XsollaCatalog';
 3import { TokenStorage } from 'db://xsolla-commerce-sdk/scripts/common/TokenStorage';
 4import { OrderTracker } from 'db://xsolla-commerce-sdk/scripts/common/OrderTracker';
 5const { ccclass, property } = _decorator;
 6
 7
 8@ccclass('VC_StoreItemComponent')
 9export class VC_StoreItemComponent extends Component {
10
11    @property(Sprite)
12    iconSprite: Sprite;
13
14    @property(Label)
15    itemNameLabel: Label;
16
17    @property(Label)
18    itemDescriptionLabel: Label;
19
20    @property(Label)
21    priceLabel: Label;
22
23    @property(Button)
24    buyButton: Button;
25
26    private _data: StoreItem;
27
28    start() {
29        this.buyButton.node.on(Button.EventType.CLICK, this.onBuyClicked, this);
30    }
31
32    init(data: StoreItem) {
33
34        this._data = data;
35
36        this.itemNameLabel.string = data.name;
37        this.itemDescriptionLabel.string = data.description;
38
39        if (data.virtual_prices.length > 0) {
40            this.priceLabel.string = `${data.virtual_prices[0].amount.toString()} ${data.virtual_prices[0].name}`;
41        } else {
42            this.priceLabel.string = `${parseFloat(data.price.amount)} ${data.price.currency}`;
43        }
44
45        assetManager.loadRemote<ImageAsset>(data.image_url, (err, imageAsset) => {
46            if(err == null) {
47            const spriteFrame = new SpriteFrame();
48            const texture = new Texture2D();
49            texture.image = imageAsset;
50            spriteFrame.texture = texture;
51            this.iconSprite.spriteFrame = spriteFrame;
52            } else {
53                console.log(`Can’t load image with URL ${data.image_url}`);
54            }
55        });
56    }
57
58    onBuyClicked() {
59        XsollaCatalog.purchaseItemForVirtualCurrency(TokenStorage.getToken().access_token, this._data.sku, this._data.virtual_prices[0].sku, orderId => {
60            OrderTracker.checkPendingOrder(TokenStorage.getToken().access_token, orderId, () => {
61                console.log('success purchase!');
62            }, error => {
63                console.log(`Order checking failed - Status code: ${error.status}, Error code: ${error.code}, Error message: ${error.description}`);
64            });
65        }, error => {
66            console.log(error.description);
67        });
68    }
69}
アイテムカタログスクリプトコンポーネントを完了する
VC_ItemsCatalogComponentに変更されています。スクリプトの例に示すように、有効な認可トークンを取得するためのロジックをVC_ItemsCatalogComponentクラスのstartメソッドに追加します。
クラススクリプト(VC_ItemsCatalogComponent)の例:
- typescript
 1import { _decorator, Component, instantiate, Prefab, ScrollView } from 'cc';
 2import { XsollaCatalog } from 'db://xsolla-commerce-sdk/scripts/api/XsollaCatalog';
 3import { VC_StoreItemComponent } from './VC_StoreItemComponent';
 4import { XsollaAuth } from 'db://xsolla-commerce-sdk/scripts/api/XsollaAuth';
 5import { TokenStorage } from 'db://xsolla-commerce-sdk/scripts/common/TokenStorage';
 6const { ccclass, property } = _decorator;
 7
 8
 9@ccclass('VC_ItemsCatalogComponent')
10export class VC_ItemsCatalogComponent extends Component {
11
12    @property(ScrollView)
13    itemsScrollView: ScrollView;
14
15    @property(Prefab)
16    storeItemPrefab: Prefab;
17
18    start() {
19        XsollaAuth.authByUsernameAndPassword('xsolla', 'xsolla', false, token => {
20            TokenStorage.saveToken(token, false);
21            XsollaCatalog.getCatalog(null, null, [], itemsData => {
22                for (let i = 0; i < itemsData.items.length; ++i) {
23                        let storeItem = instantiate(this.storeItemPrefab);
24                        this.itemsScrollView.content.addChild(storeItem);
25                        storeItem.getComponent(VC_StoreItemComponent).init(itemsData.items[i]);
26                    }
27                });
28        });
29    }
30}
スクリプトの動作結果の例:

仮想通貨残高の表示
このチュートリアルでは、SDKメソッドを使って、アプリ内で仮想通貨の残高を表示する方法を紹介します。
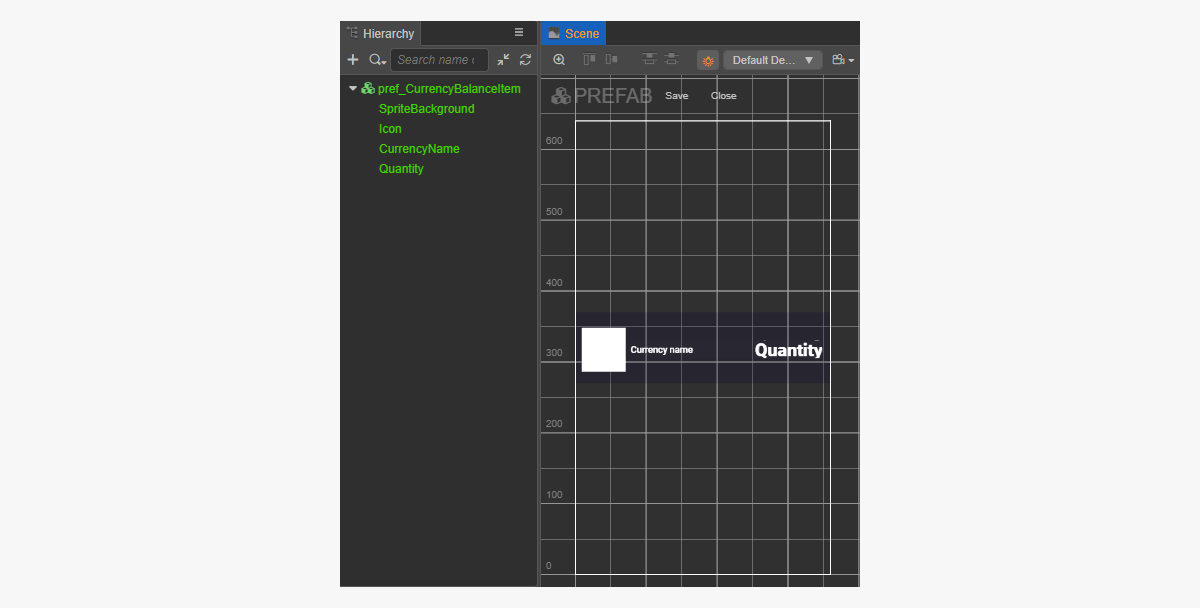
残高表示用のウィジェットを作成する
- プレハブを作成します。これを行うには、フォルダーのコンテキストメニューから
Create > Node Prefab を選択します。 - 作成したプレハブを開きます。
- 以下の画像に示すように、
UITransformコンポーネントをプレハブのルートに追加し、コンテンツサイズを設定します。
- 以下のUI要素をプレハブ子オブジェクトとして追加し、視覚化を構成します:
- ウィジェットの背景画像
- 通貨名
- 通貨数量
- 通貨イメージ
ウィジェット構造の例:
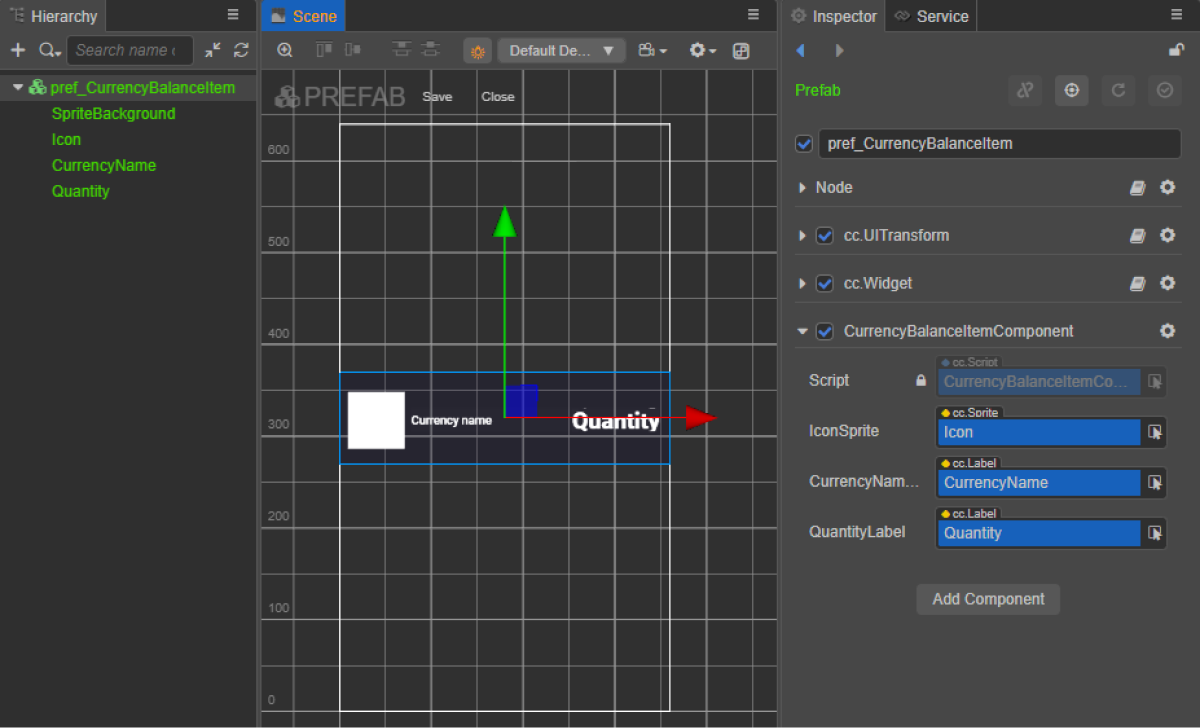
残高表示のためのウィジェットスクリプトを作成する
- CurrencyBalanceItemComponentを作成し、以下のプロパティを追加します:
iconSpritecurrencyNameLabelquantityLabel
- スクリプトの例に示すように、
initメソッドと初期化ロジックをCurrencyBalanceItemComponentクラスに追加します。 - CurrencyBalanceItemComponentコンポーネントをプレハブのルートノードにアタッチします。
- 図に示すように、プレハブ要素を
CurrencyBalanceItemComponentのプロパティにバインドします:
ウィジェットスクリプト(CurrencyBalanceItemComponent)の例:
- typescript
 1import { _decorator, assetManager, Component, ImageAsset, Label, Sprite, SpriteFrame, Texture2D } from 'cc';
 2import { VirtualCurrencyBalance } from 'db://xsolla-commerce-sdk/scripts/api/XsollaInventory';
 3const { ccclass, property } = _decorator;
 4
 5
 6@ccclass('CurrencyBalanceItemComponent')
 7export class CurrencyBalanceItemComponent extends Component {
 8
 9    @property(Sprite)
10    iconSprite: Sprite;
11
12    @property(Label)
13    currencyNameLabel: Label;
14
15    @property(Label)
16    quantityLabel: Label;
17
18    init(data: VirtualCurrencyBalance) {
19
20        this.currencyNameLabel.string = data.name;
21        this.quantityLabel.string = data.amount.toString();
22
23        assetManager.loadRemote<ImageAsset>(data.image_url, (err, imageAsset) => {
24            if(err == null) {
25            const spriteFrame = new SpriteFrame();
26            const texture = new Texture2D();
27            texture.image = imageAsset;
28            spriteFrame.texture = texture;
29            this.iconSprite.spriteFrame = spriteFrame;
30            } else {
31                console.log(`Can’t load image with URL ${data.image_url}`);
32            }
33        });
34    }
35}
ページのインターフェースを作成する
仮想通貨残高ページのシーンを作成し、それにScrollView要素を追加します。
ページ構造の例:
ScrollViewを作成したCurrencyBalanceItemプレハブと一致させるには、そのサイズを設定します:
ScrollViewノードと内部のviewノードのContentSizeパラメータの値を変更します。Layoutコンポーネントをcontentノードにバインドして設定します。この例では、次の設定が選択されています:Type == verticalResizeMode == Container
通貨残高スクリプトコンポーネントを作成する
- CurrencyBalanceComponentを作成し、以下のプロパティを追加します:
itemsScrollViewcurrencyBalanceItemPrefab
- スクリプトの例に示すように、
start ライフサイクル関数と初期化ロジックをCurrencyBalanceComponentクラスに追加します。 CurrencyBalanceComponent をシーン上のノードに追加します。新しいノードを追加することも、SDK初期化中に追加したXsollaSettingsManagerコンポーネントで既存のノードを使用することもできます。- 図に示すように、プレハブ要素を
CurrencyBalanceItemComponentのプロパティにバインドします:
xsolla、パスワード:xsolla)。このアカウントはデモプロジェクトでのみ使用できます。- typescript
 1import { _decorator, Component, instantiate, Prefab, ScrollView } from 'cc';
 2import { XsollaAuth } from 'db://xsolla-commerce-sdk/scripts/api/XsollaAuth';
 3import { XsollaInventory } from 'db://xsolla-commerce-sdk/scripts/api/XsollaInventory';
 4import { CurrencyBalanceItemComponent } from './CurrencyBalanceItemComponent';
 5const { ccclass, property } = _decorator;
 6
 7
 8@ccclass('CurrencyBalanceComponent')
 9export class CurrencyBalanceComponent extends Component {
10
11    @property(ScrollView)
12    itemsList: ScrollView;
13
14    @property(Prefab)
15    currencyBalanceItemPrefab: Prefab;
16
17    start() {
18        XsollaAuth.authByUsernameAndPassword('xsolla', 'xsolla', false, token => {
19            XsollaInventory.getVirtualCurrencyBalance(token.access_token, null, itemsData => {
20                for (let i = 0; i < itemsData.items.length; ++i) {
21                        let currencyBalanceItem = instantiate(this.currencyBalanceItemPrefab);
22                        this.itemsList.content.addChild(currencyBalanceItem);
23                             currencyBalanceItem.getComponent(CurrencyBalanceItemComponent).init(itemsData.items[i]);
24                    }
25                });
26        });
27
28    }
29}
スクリプトの動作結果の例:

インベントリでアイテムの表示
このチュートリアルでは、SDKのメソッドを使ってユーザーのインベントリにアイテムを表示する方法を紹介します。
アイテムウィジェットを作成する
- プレハブを作成します。これを行うには、フォルダーのコンテキストメニューから
Create > Node Prefab を選択します。 - 作成したプレハブを開きます。
- 以下の画像に示すように、
UITransformコンポーネントをプレハブのルートに追加し、コンテンツサイズを設定します。
- 以下のUI要素をプレハブ子オブジェクトとして追加し、視覚化を構成します:
- ウィジェットの背景画像
- インベントリアイテム名
- インベントリアイテム説明
- アイテム数量
- アイテムイメージ
ウィジェット構造の例:
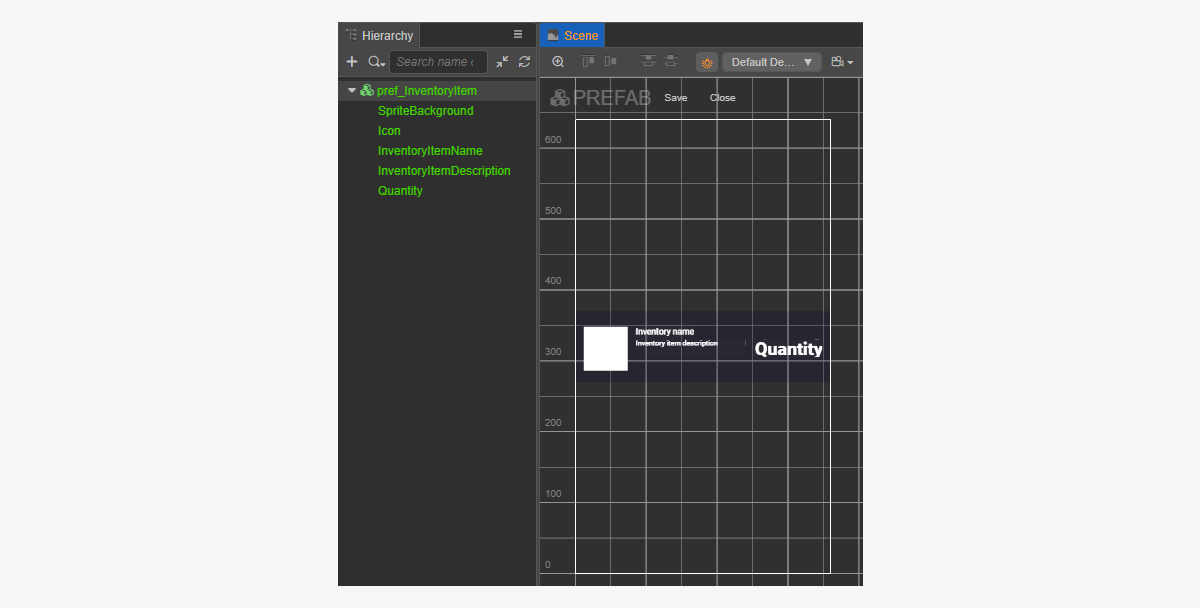
アイテムウィジェットスクリプトを作成する
- InventoryItemComponentを作成し、以下のプロパティを追加します:
iconSpriteitemNameLabelitemDescriptionLabelquantityLabel
- スクリプトの例に示すように、
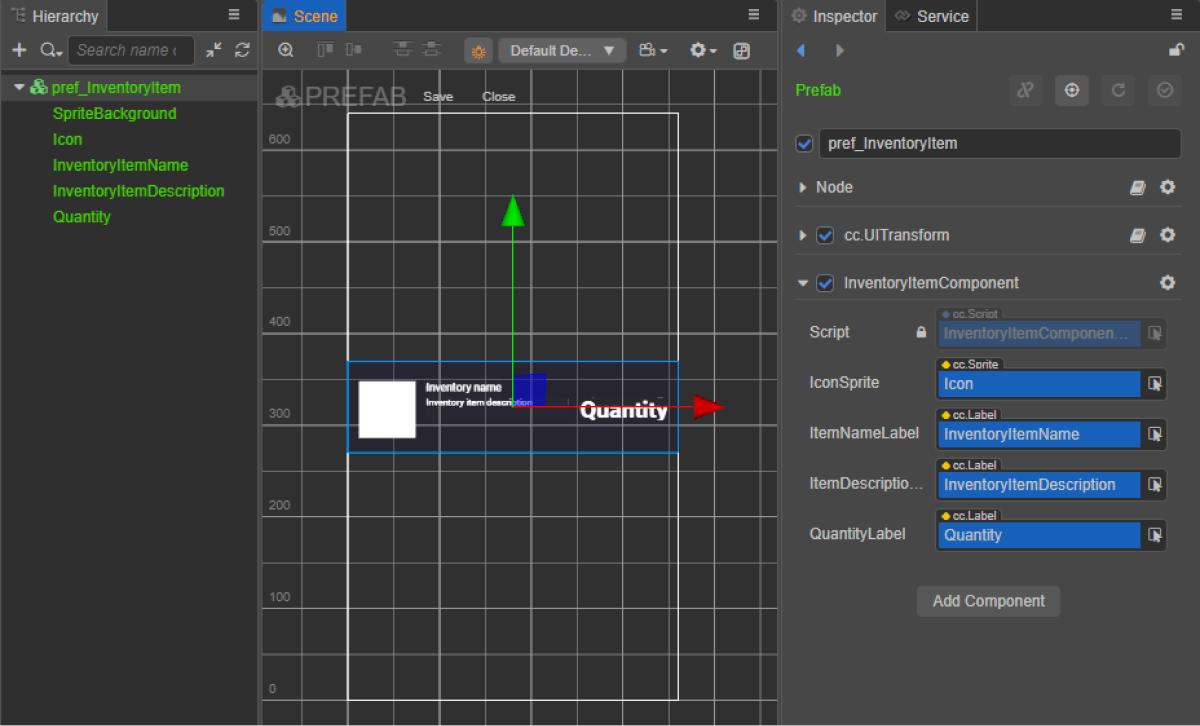
initメソッドと初期化ロジックをInventoryItemComponentクラスに追加します。 - InventoryItemComponentコンポーネントをプレハブのルートノードにアタッチします。
- 図に示すように、プレハブ要素を
InventoryItemComponentのプロパティにバインドします:
ウィジェットスクリプト(InventoryItemComponent)の例:
- typescript
 1import { _decorator, assetManager, Component, ImageAsset, Label, Sprite, SpriteFrame, Texture2D } from 'cc';
 2import { InventoryItem } from 'db://xsolla-commerce-sdk/scripts/api/XsollaInventory';
 3const { ccclass, property } = _decorator;
 4
 5@ccclass('InventoryItemComponent')
 6export class InventoryItemComponent extends Component {
 7
 8    @property(Sprite)
 9    iconSprite: Sprite;
10
11    @property(Label)
12    itemNameLabel: Label;
13
14    @property(Label)
15    itemDescriptionLabel: Label;
16
17    @property(Label)
18    quantityLabel: Label;
19
20    init(data: InventoryItem) {
21
22        this.itemNameLabel.string = data.name;
23        this.itemDescriptionLabel.string = data.description;
24        this.quantityLabel.string = data.quantity.toString();
25
26        assetManager.loadRemote<ImageAsset>(data.image_url, (err, imageAsset) => {
27            if(err == null) {
28            const spriteFrame = new SpriteFrame();
29            const texture = new Texture2D();
30            texture.image = imageAsset;
31            spriteFrame.texture = texture;
32            this.iconSprite.spriteFrame = spriteFrame;
33            } else {
34                console.log(`Can’t load image with URL ${data.image_url}`);
35            }
36        });
37    }
38}
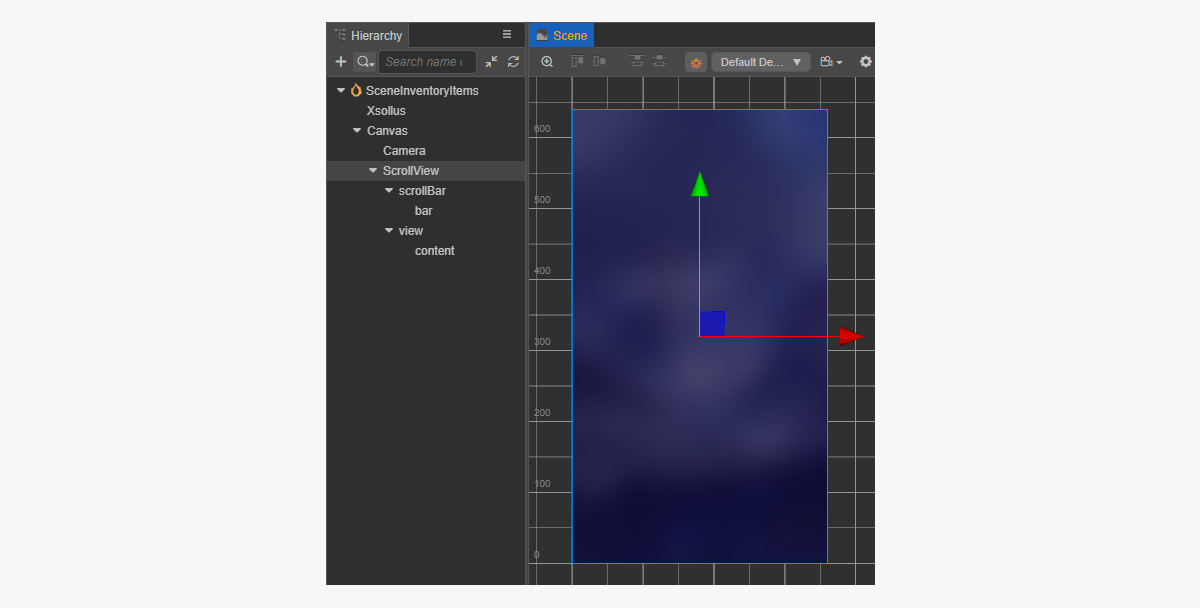
ページのインターフェースを作成する
インベントリページのシーンを作成し、それに ScrollView要素を追加します。
ページ構造の例:
ScrollViewを作成したInventoryItemプレハブと一致させるには、そのサイズを設定します:
ScrollViewノードと内部のviewノードのContentSizeパラメータの値を変更します。Layoutコンポーネントをcontentノードにバインドして設定します。この例では、次の設定が選択されています:Type == verticalResizeMode == Container
インベントリーページスクリプトコンポーネントを作成する
- InventoryItemsComponentを作成し、以下のプロパティを追加します:
itemsScrollViewinventoryItemPrefab
- スクリプトの例に示すように、
start ライフサイクル関数と初期化ロジックをInventoryItemsComponentクラスに追加します。 - InventoryItemsComponentをシーン上のノードに追加します。新しいノードを追加することも、SDK初期化中に追加した
XsollaSettingsManagerコンポーネントで既存のノードを使用することもできます。 - 図に示すように、プレハブ要素を
InventoryItemsComponentのプロパティにバインドします:
xsolla、パスワード:xsolla)。このアカウントはデモプロジェクトでのみ使用できます。- typescript
 1import { _decorator, Component, instantiate, Prefab, ScrollView } from 'cc';
 2import { XsollaAuth } from 'db://xsolla-commerce-sdk/scripts/api/XsollaAuth';
 3import { XsollaInventory } from 'db://xsolla-commerce-sdk/scripts/api/XsollaInventory';
 4import { InventoryItemComponent } from './InventoryItemComponent';
 5const { ccclass, property } = _decorator;
 6
 7
 8@ccclass('InventoryItemsComponent')
 9export class InventoryItemsComponent extends Component {
10
11    @property(ScrollView)
12    itemsScrollView: ScrollView;
13
14    @property(Prefab)
15    inventoryItemPrefab: Prefab;
16
17    start() {
18        XsollaAuth.authByUsernameAndPassword('xsolla', 'xsolla', false, token => {
19            XsollaInventory.getInventory(token.access_token, null, itemsData => {
20                for (let i = 0; i < itemsData.items.length; ++i) {
21                        let inventoryItem = instantiate(this.inventoryItemPrefab);
22                        this.itemsScrollView.content.addChild(inventoryItem);
23                        inventoryItem.getComponent(InventoryItemComponent).init(itemsData.items[i]);
24                    }
25                });
26        });
27
28    }
29}
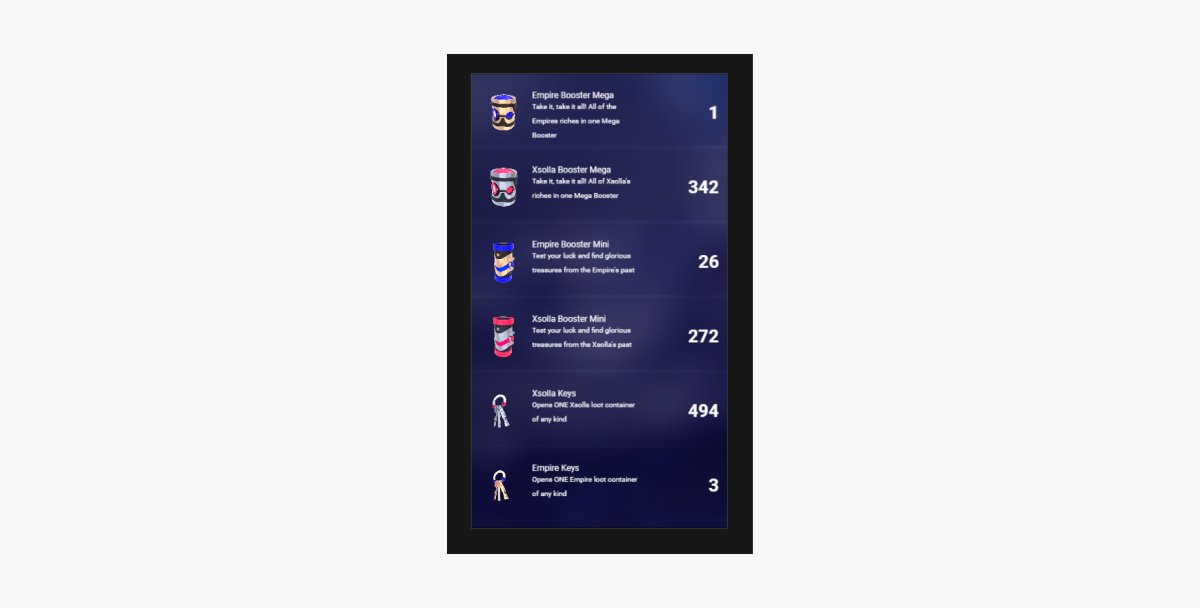
スクリプトの動作結果の例:
誤字脱字などのテキストエラーを見つけましたか? テキストを選択し、Ctrl+Enterを押します。
