
Xsolla servers integration
With this type of integration, the following tasks are performed on the Xsolla side:
- catalog storage and management
- price management
- storing data on regional prices
- regional restrictions management
- inventory management
- management of promotional campaigns
- user authentication
- user access management
- transaction processing
You don’t need to configure your own server side for these tasks.
Integration flow
To integrate with Xsolla servers using the Game Commerce asset:
- Install the asset.
- Set up the project in your Publisher Account.
- Set up Login or implement your own authorization system using the Pay Station access token.
- Set up the Virtual Currency module (optional).
- Set up the Virtual Items module.
- Set up your Unity project.
After the integration is complete, test the payment process.
Install asset
- Download Unity.
- Pick a personal or professional Unity license based on your preferences.
- Create a new Unity project.
- Download the asset.
- Unzip the package.
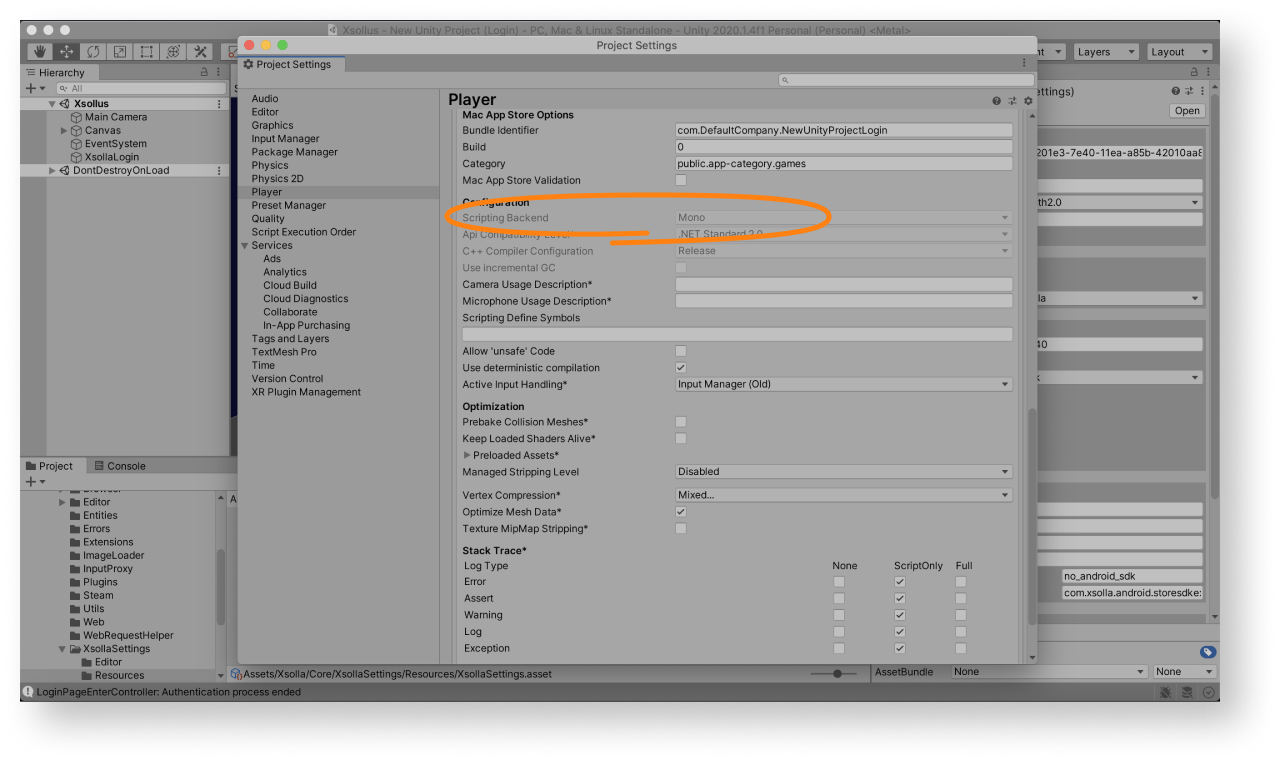
- In the Unity editor, go to
Assets > Import Package > Custom Package in the main menu and select the asset. - Make sure that the Mono compiler is used for creating a game build (for standalone builds only). To do this:
- Click
Edit > Project Settings in the main menu. - Go to the
Other Settings > Configuration section. - Make sure that
Mono is chosen in theScripting Backend field.
- Click
After installing the asset, launch the
For the demo scene, a project in Publisher Account is preset and an in-game store is fully configured.
Default values for the
| Key | Value |
|---|---|
| Login ID | 026201e3-7e40-11ea-a85b-42010aa80004 |
| Project ID | 77640 |
You can use the demo scene in two ways:
- as an example
- as an initial version of the login system, inventory, and in-game store in order to get a quick result and expand its capabilities if necessary
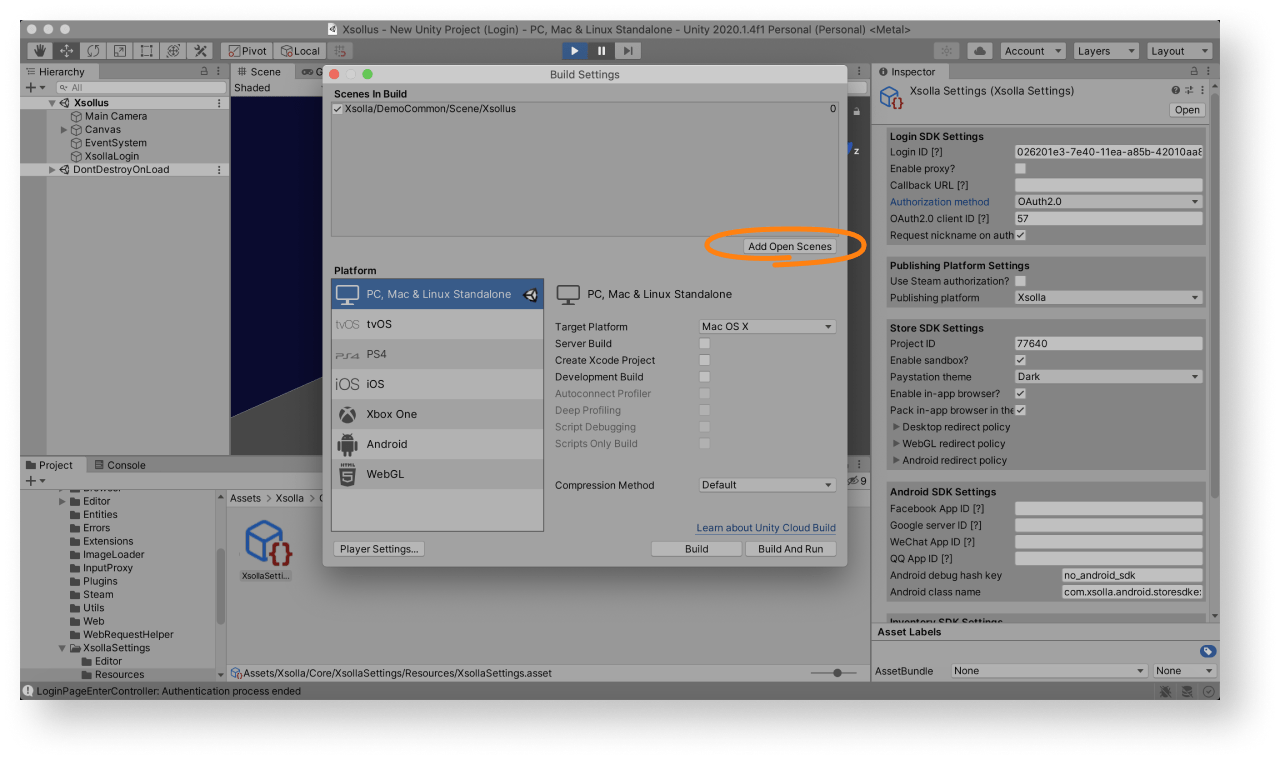
To use the demo scene or its parts in your application, add it in build settings:
- Go to
Assets > Xsolla > DemoCommon > Scene and launch theXsollus scene. - Open
File > Build settings and clickAdd Open Scenes .
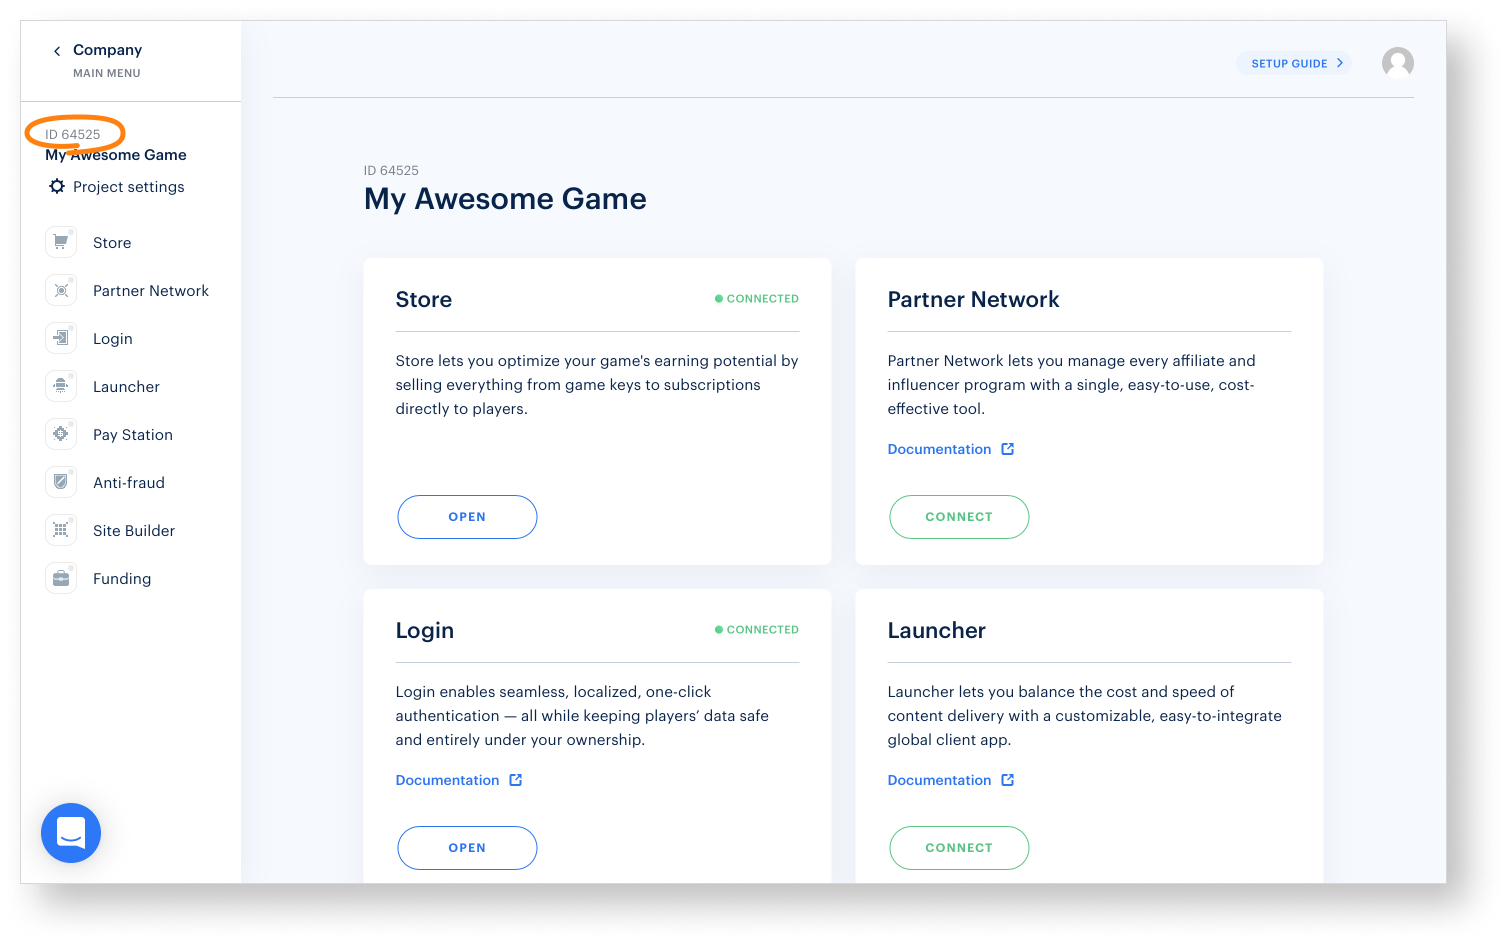
Create project in Publisher Account
- Sign up to Publisher Account.
- Configure your project:
- To fill in the game data automatically, provide the Link to your game on any platform. As a result, the image of the game, its name, and description will be added to the project settings.
- To fill in the game data manually, click I don’t have a link, set up manually and specify:
- project languages (English is set by default)
- project name for all specified languages
- game website (optional)
- Click Create project.
During the integration process, you will need the project ID. Can be found in Publisher Account beside the name of your project.
Set up basic Login project
- Open your project in Publisher Account.
- Click Connect in the Login pane or select Login in the side menu.
- Click Create Login project.
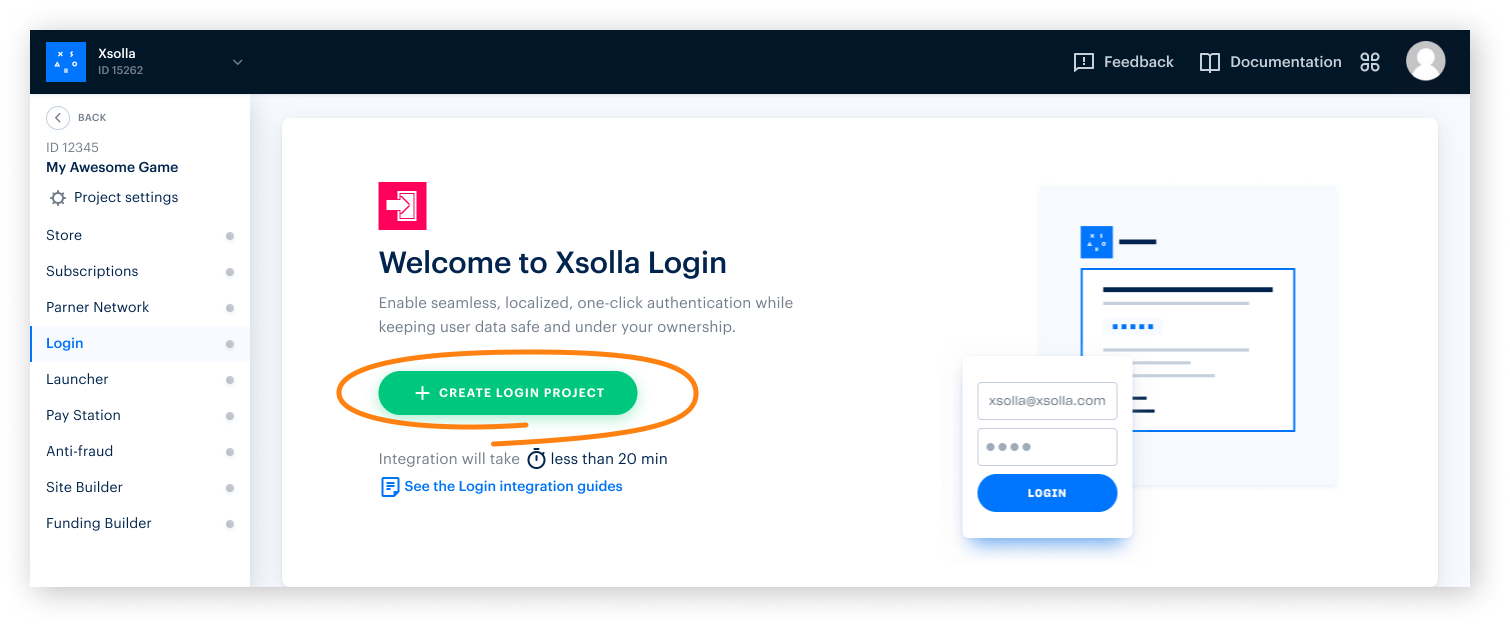
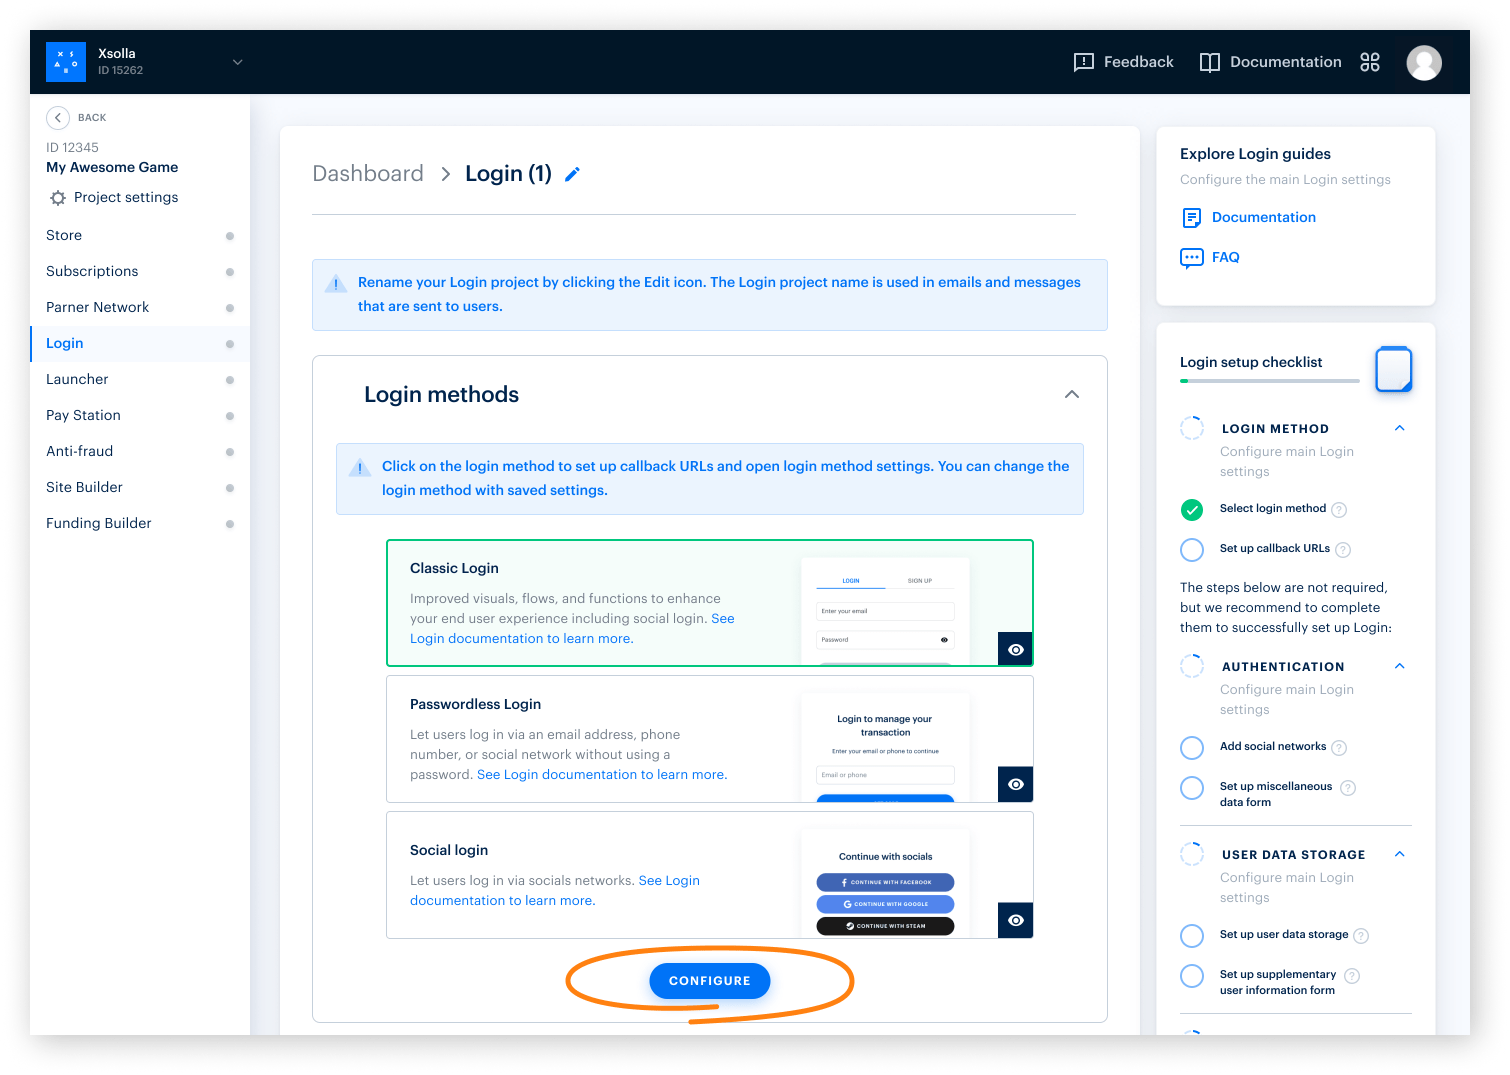
- Select Standard Login project and click Create and set up. Wait until your new Login project is created. Then you will see the project settings navigation page.
- In the Login methods block on the navigation page, select the method that suits your game best and click Configure.
- The Login product offers three options for your games:
- Classic login
Users log into the game by providing their username and password. In addition, users can log in using one of their social networks. - Passwordless login
Users log into the game using one-time codes or links sent to their email address or phone number. Login via social networks is also supported. - Social login
Users enter the game only through social networks.
- Classic login
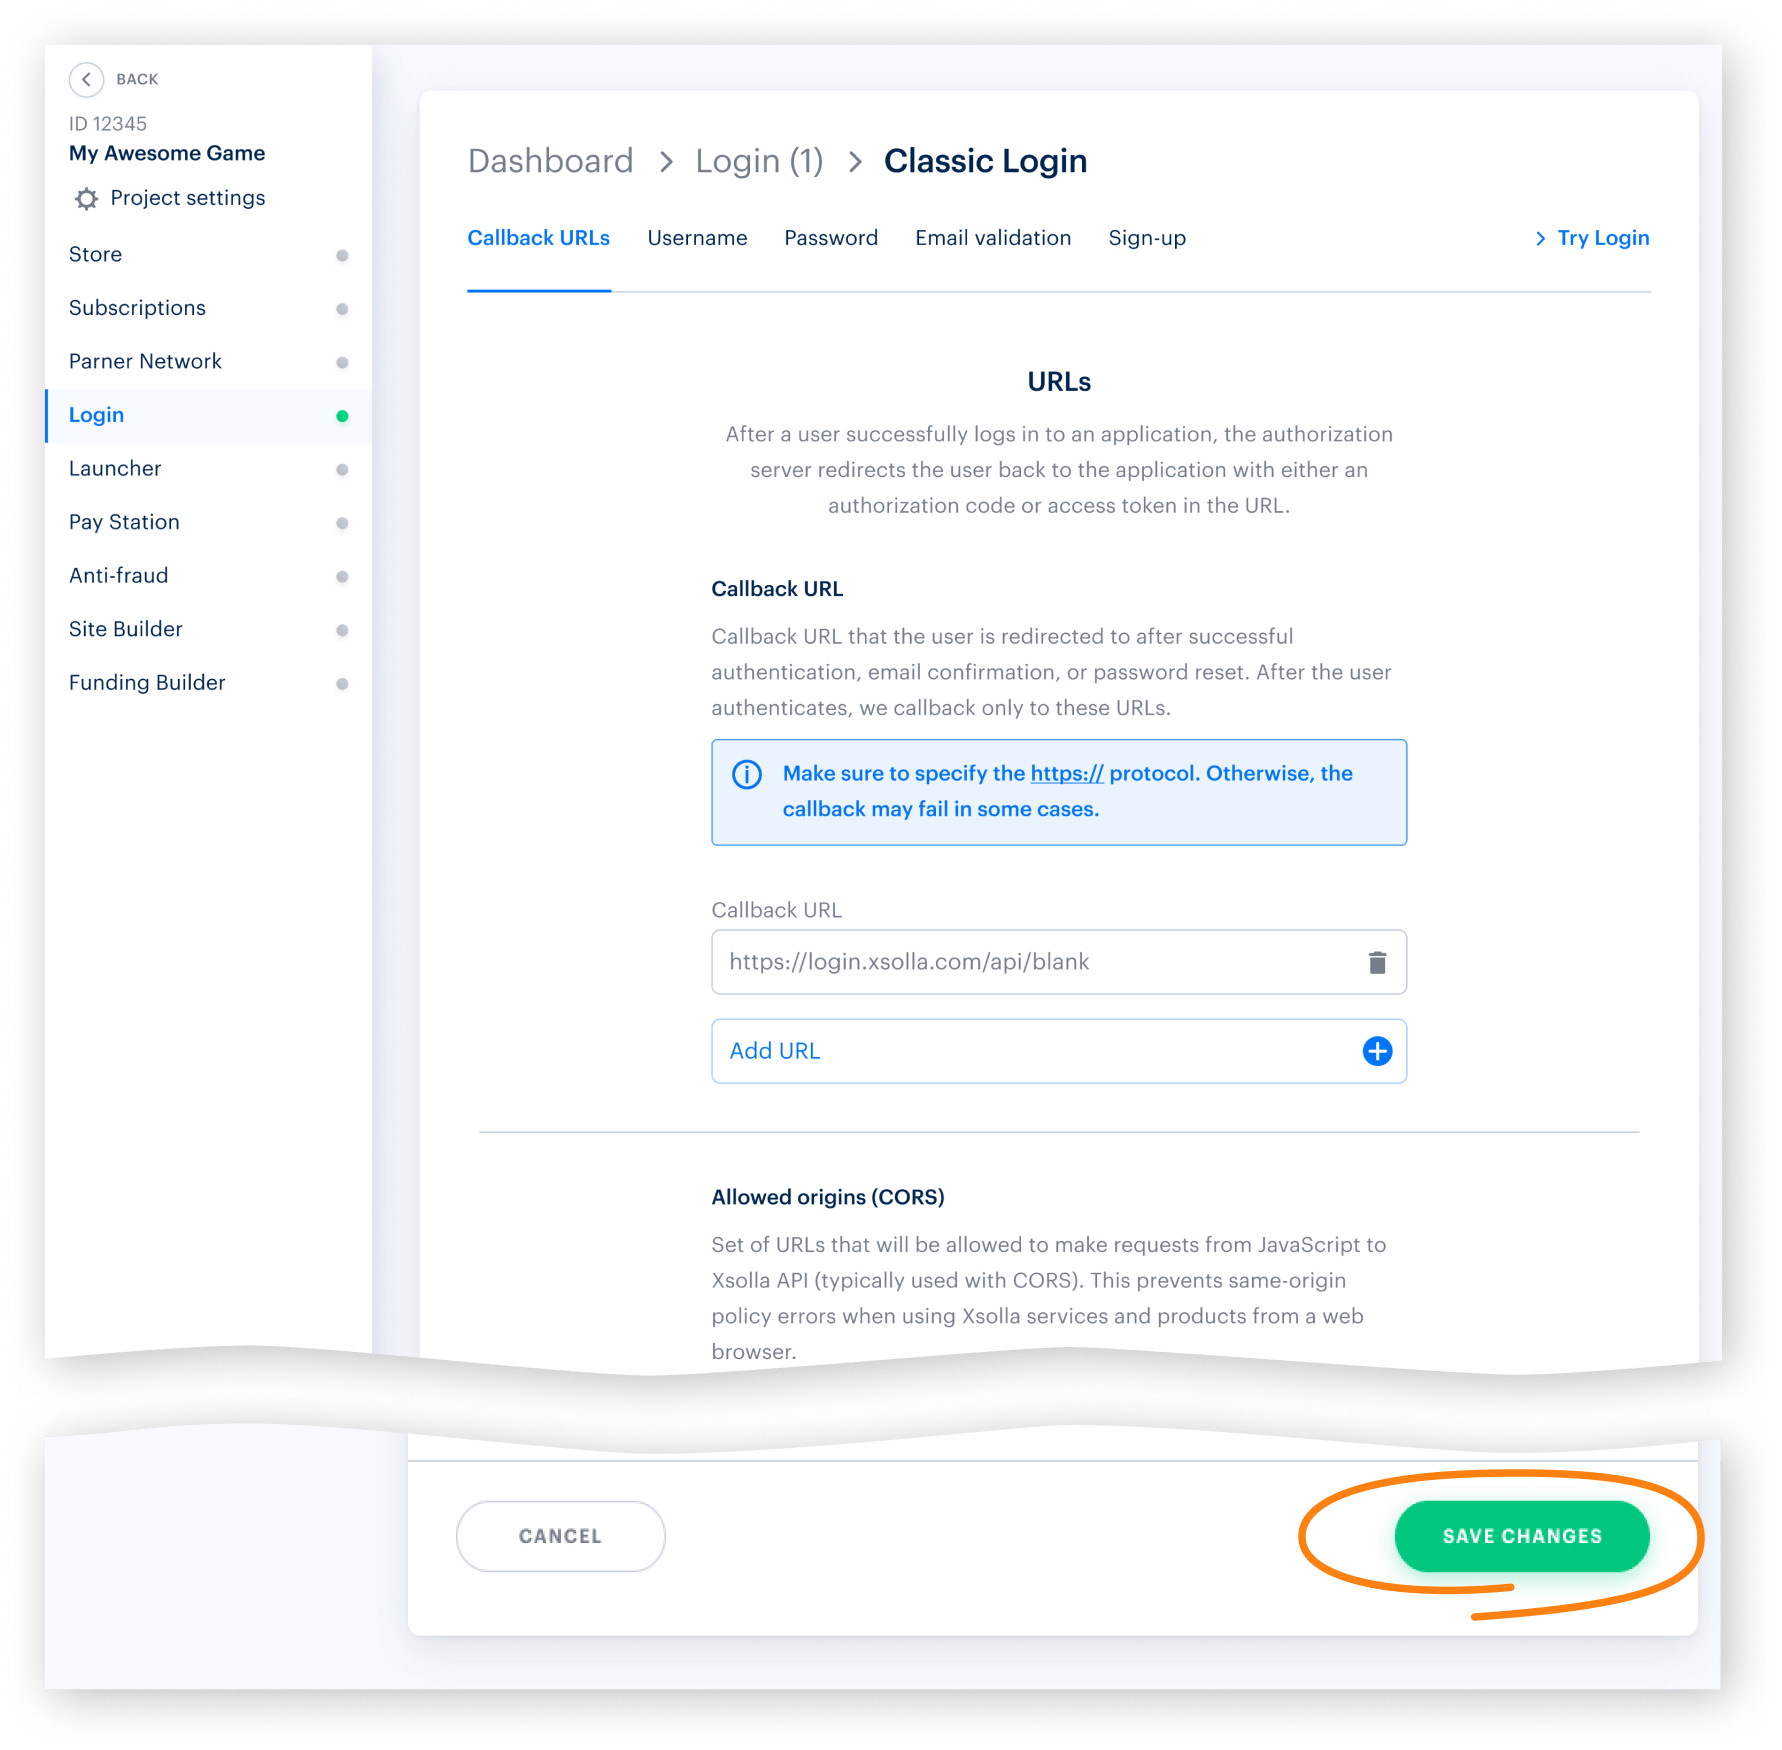
- In the top settings block on the navigation page, click Callback URLs and set the following parameters:
- Callback URL — the URL or path in the application to which users are redirected after they have successfully authenticated, confirmed their email, or reset their password. You can specify multiple valid URLs.
- Error callback URL — the URL or path in the application to which users are redirected in case of an authentication error. If no value is specified, the Callback URL value will be used.
- Click Save changes.
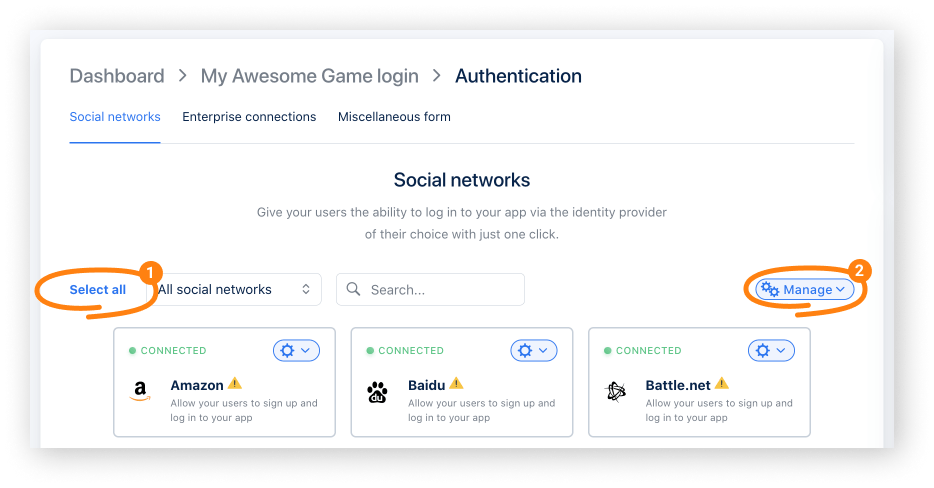
- Set up a social login (optional):
- Click the name of your Login project in breadcrumb navigation to return to the navigation page.
- Go to the Authentication block and select the Social login section.
- Connect social networks that users will be able to use to sign up and log into the application:
- To connect the desired social network, click the ⚙ icon and select Connect.
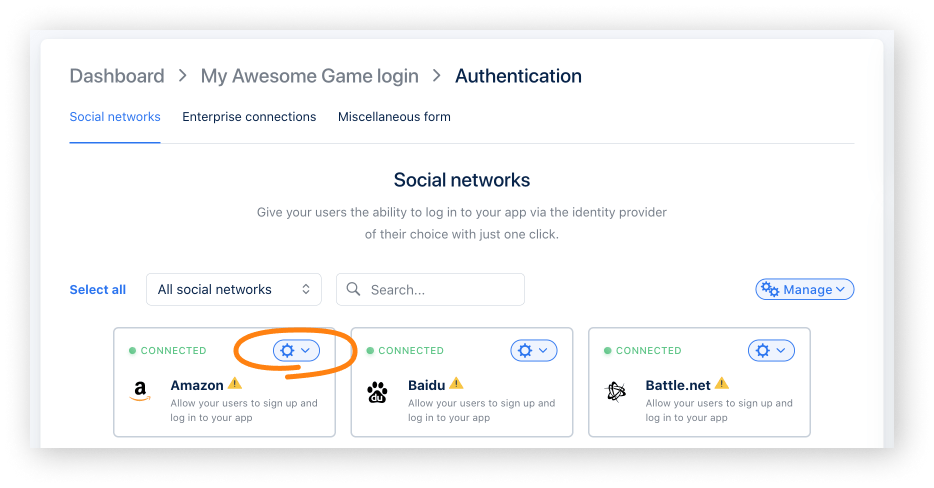
- To connect several social networks at once, select the required panes (their borders will turn green). Then, from the Manage drop-down menu, select Connect.
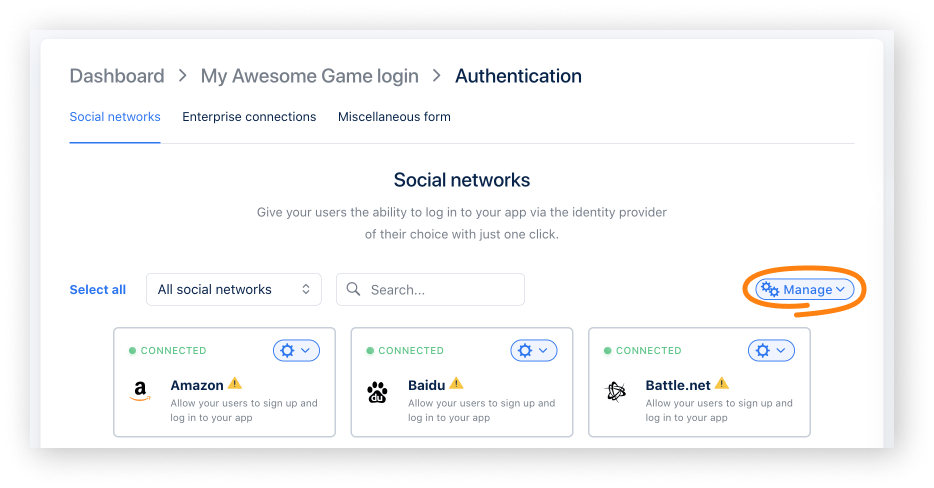
- To connect all available social networks at once, click Select all. Then, from the Manage drop-down menu, select Connect.
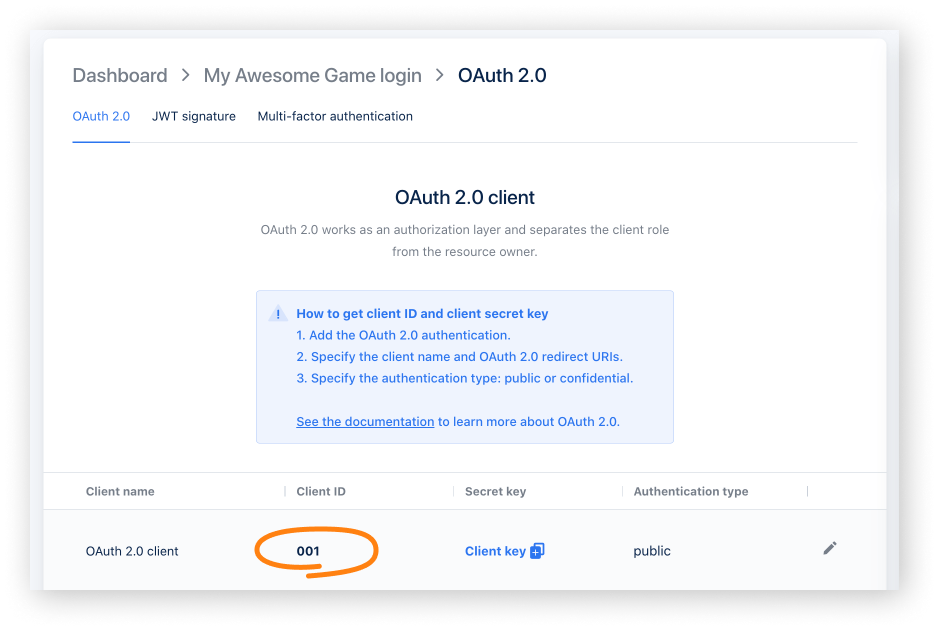
- Set up OAuth 2.0 authentication:
- Click the name of your Login project in breadcrumb navigation to return to the navigation page.
- Go to the Security block and select the OAuth 2.0 section.
- Click Add OAuth 2.0.
- Specify OAuth 2.0 redirect URIs and click Connect.
- Copy and save the Client ID.
- Change the user data storage (optional). By default, user data is stored and processed on the Xsolla’s side. If you want to connect PlayFab, Firebase, or your own custom storage, follow the instructions: Connect user data storage.
During the integration process, you will need the following parameters:
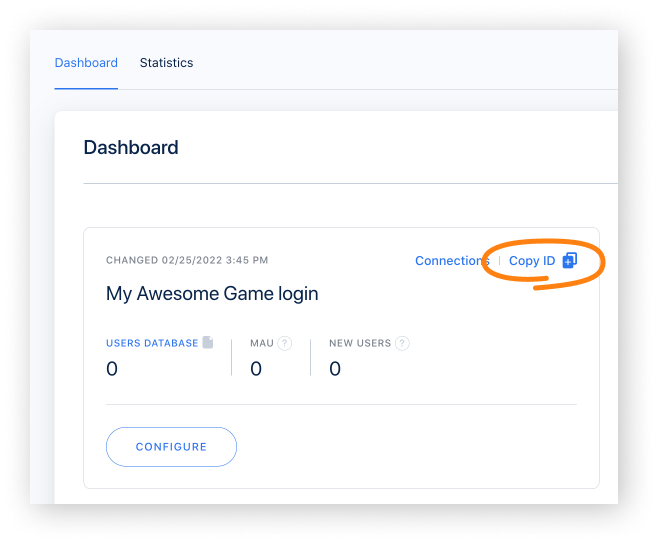
- Login ID. To get it, open Publisher Account, go to the Login > Dashboard section, and click Copy ID beside the name of the Login project.
- Client ID. It can be found in Publisher Account in the Login > your Login project > Security > OAuth 2.0 section.
Set up Virtual Currency module
- Open your project in Publisher Account.
- Click Connect in the Store pane. You can go to the In-Game Store settings from any section of Publisher Account by clicking the Store in the side menu.
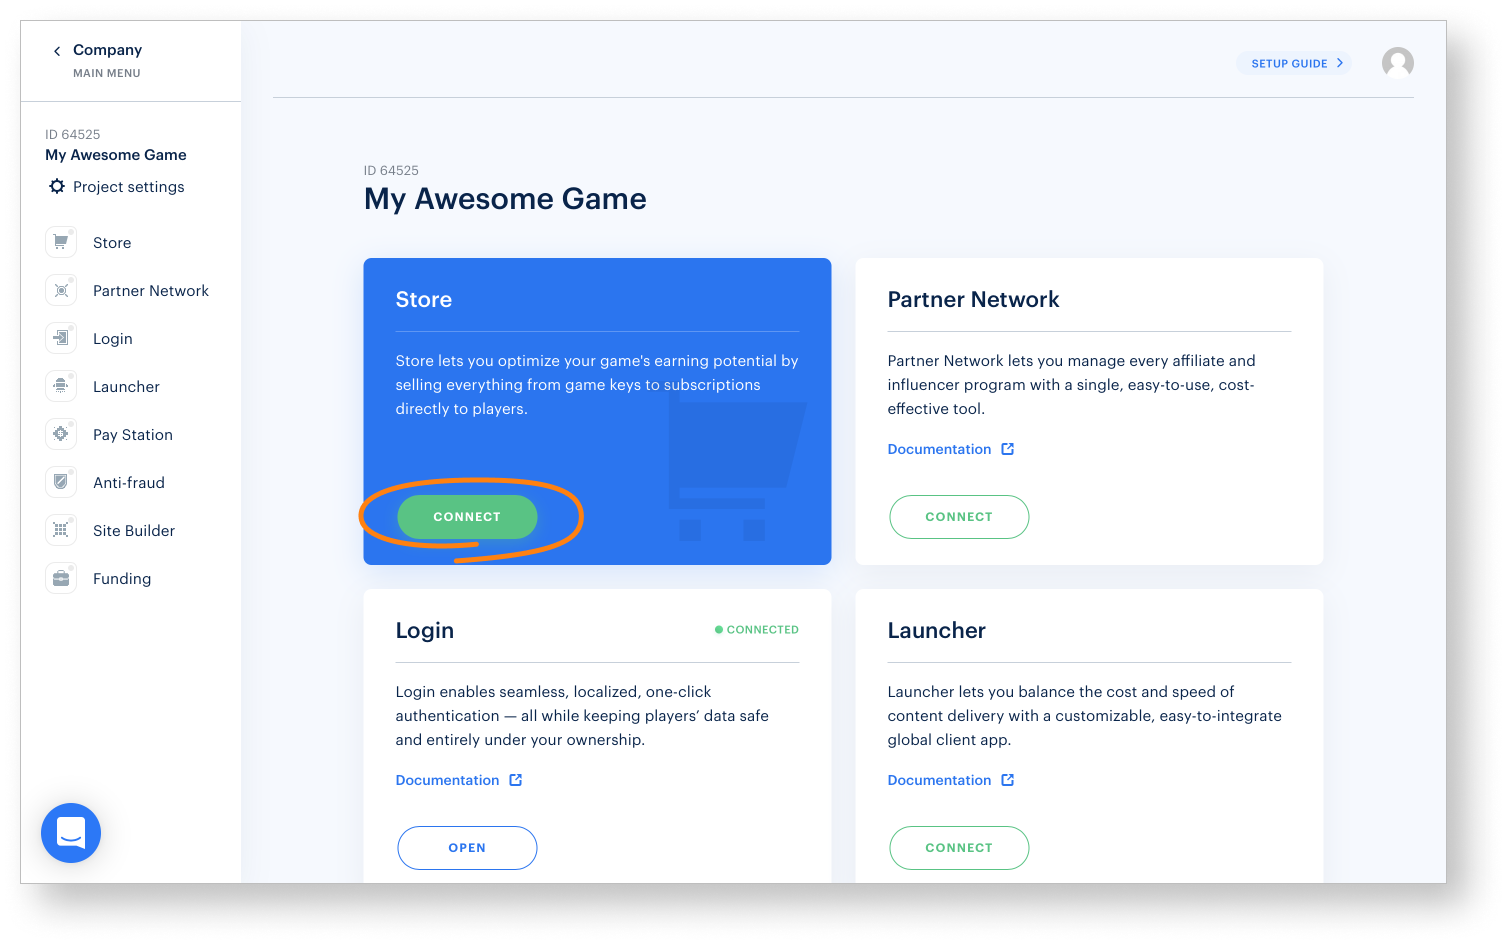
- Click Connect in the Virtual Currency pane.

- Create virtual currency:
- Click Create virtual currency.
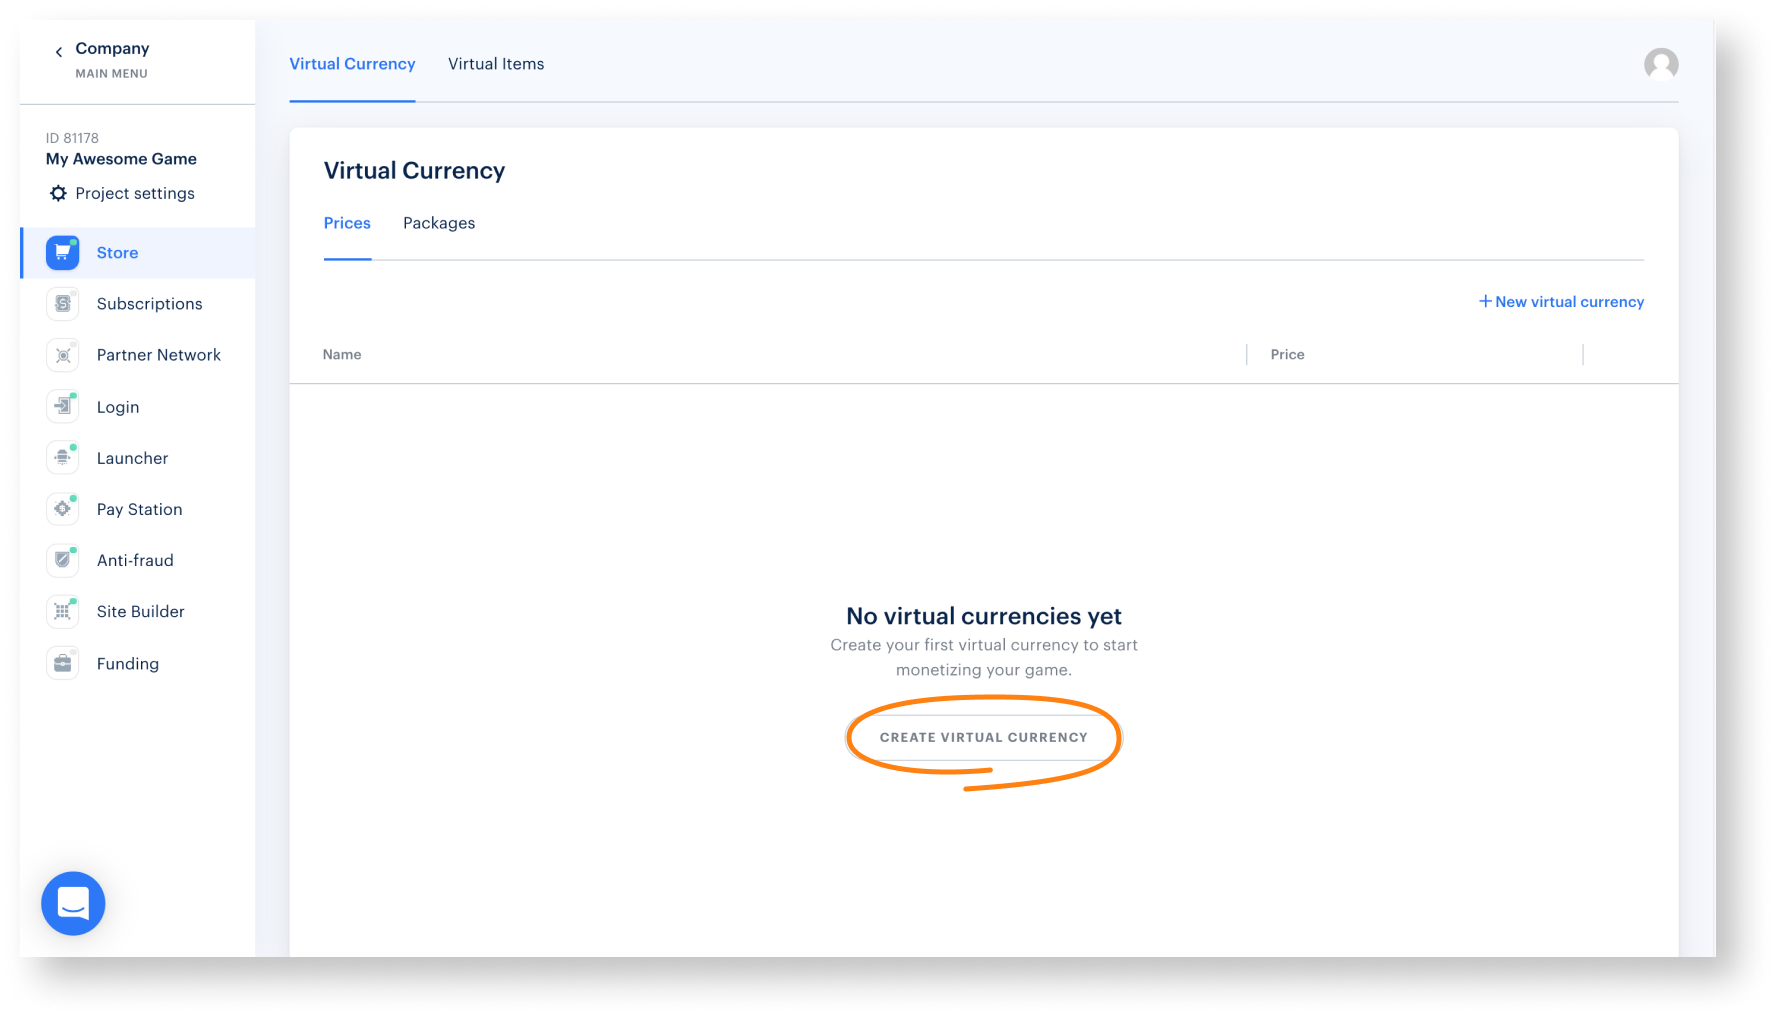
- Specify the following information:
- SKU
- currency name
- price of one unit of virtual currency
- default currency
- features of hard virtual currency (optional)
- image (optional)
- Click Create currency.
- Specify the following information:

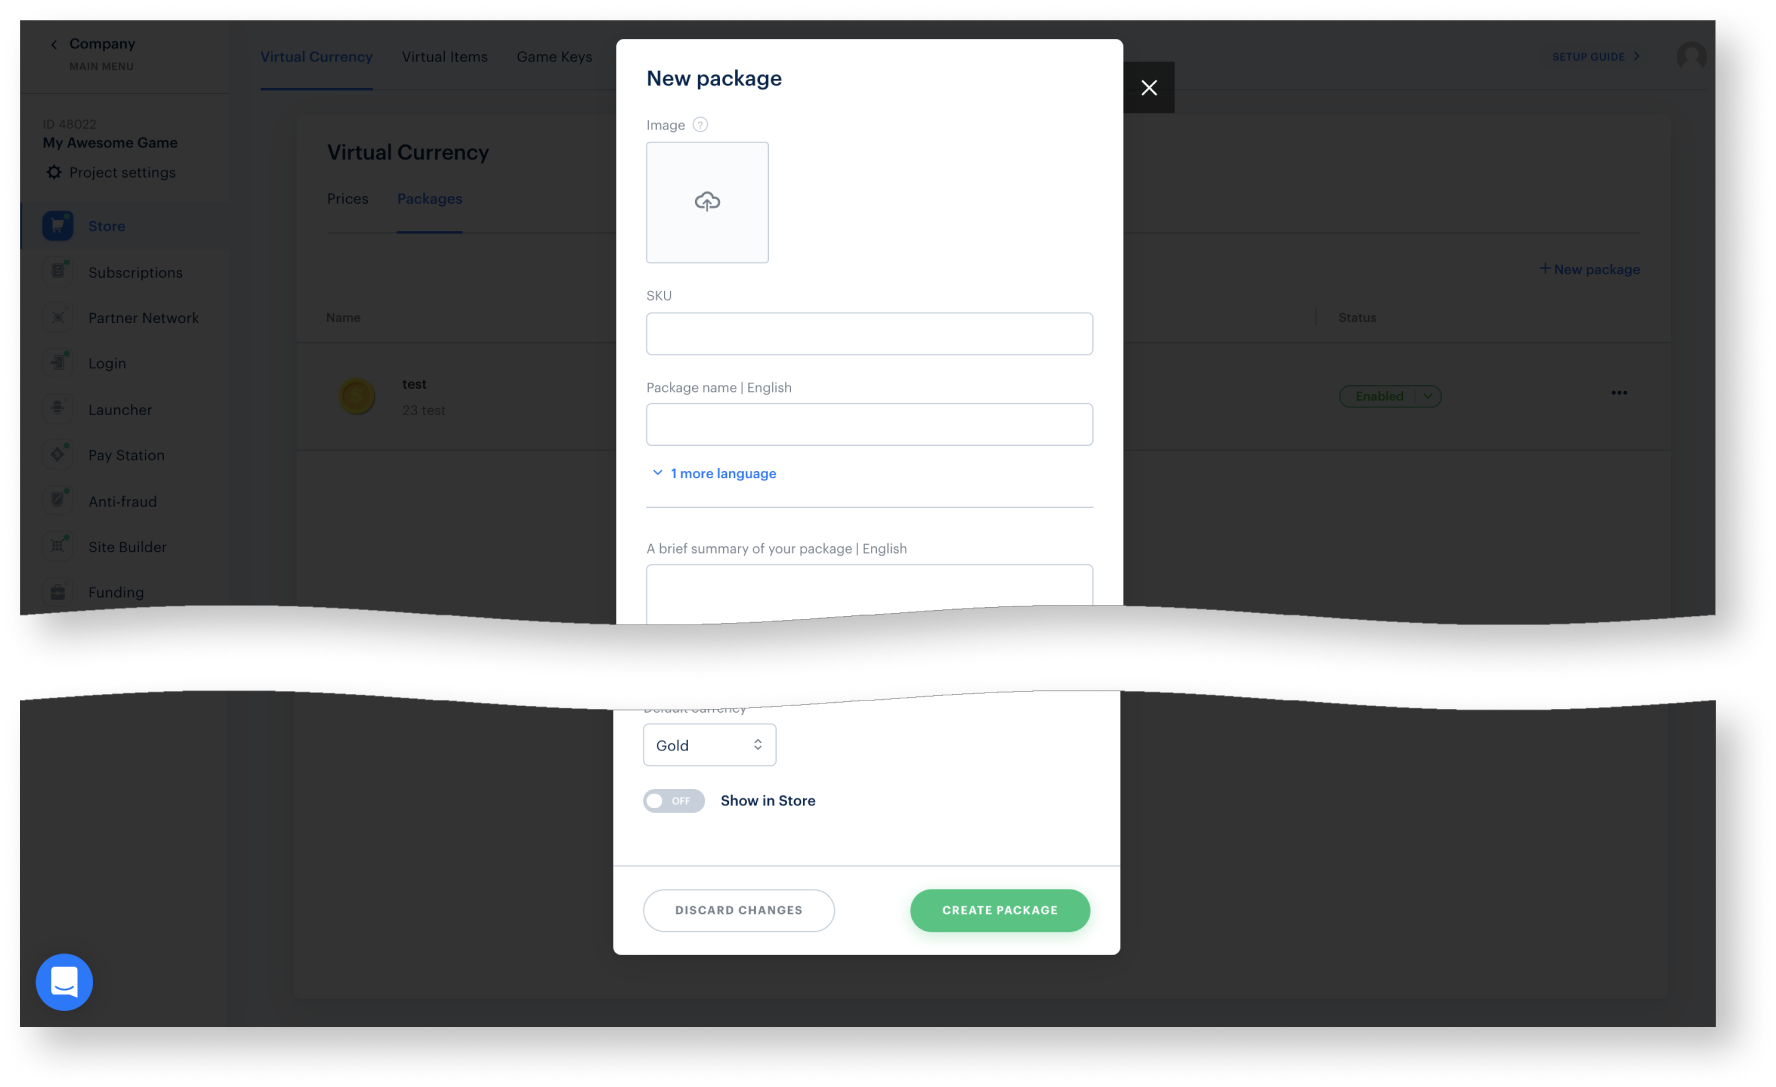
- Create packages of virtual currency:
- Go to Packages.
- Click Create package.
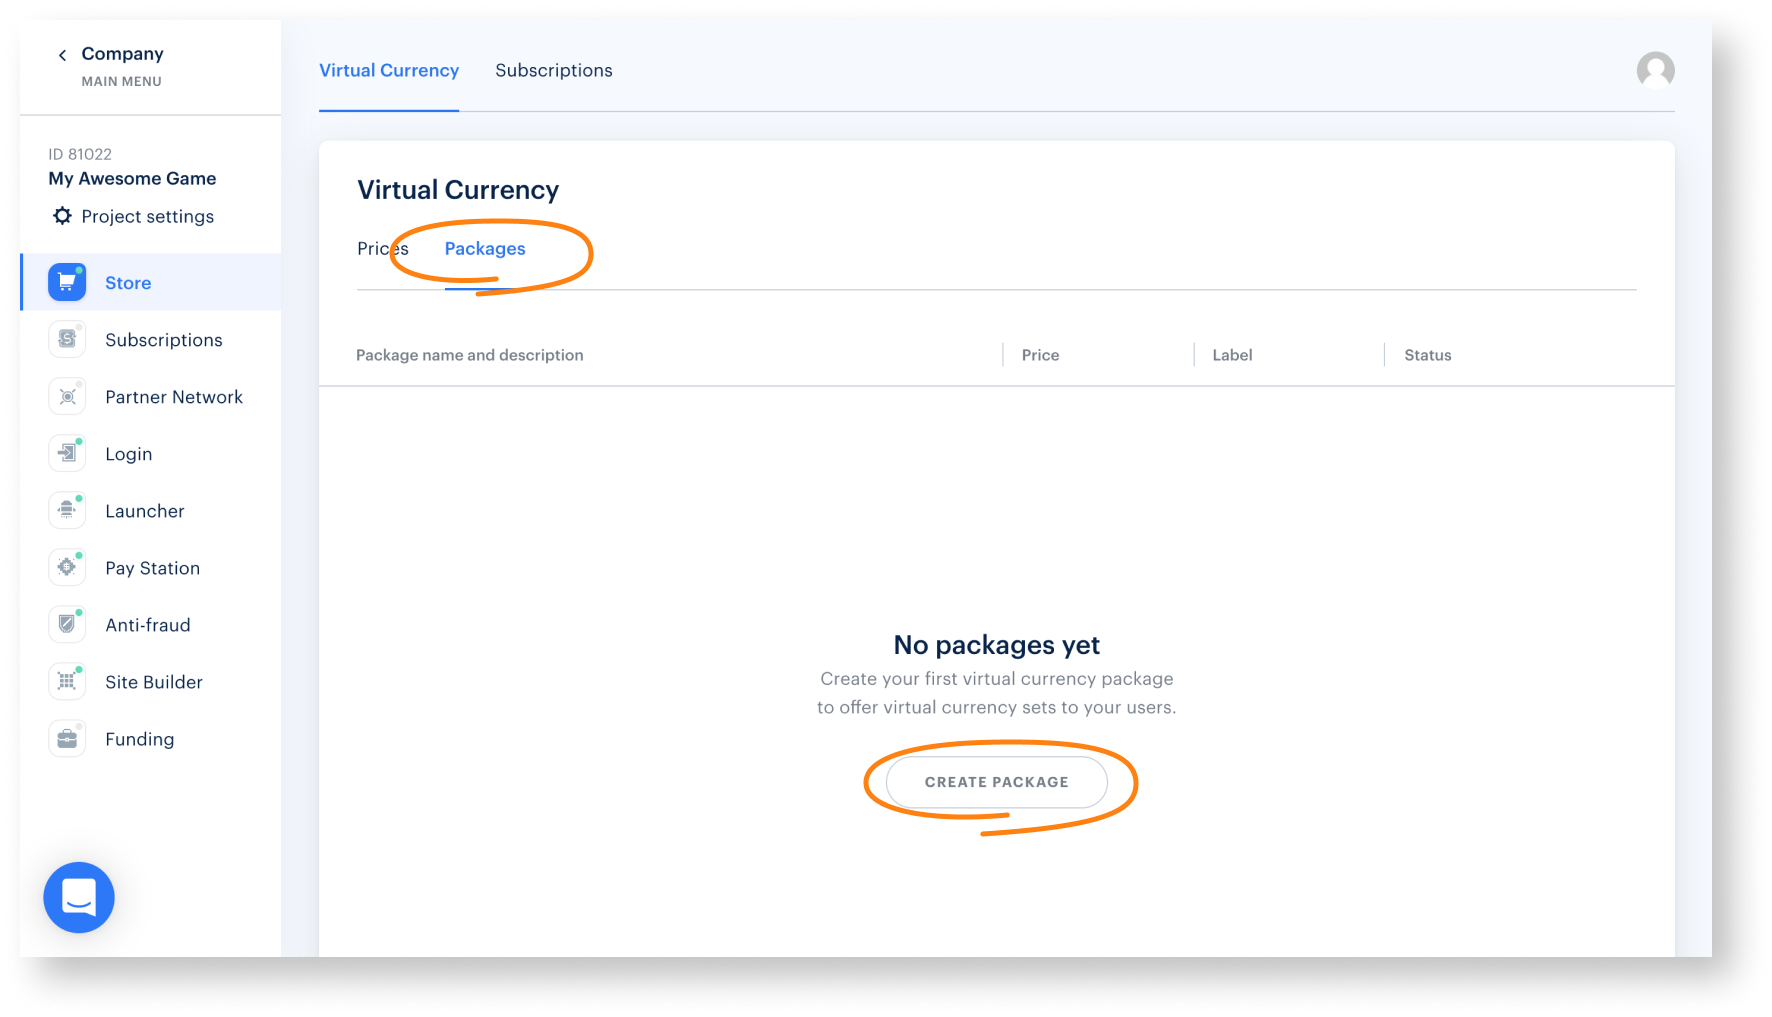
- Specify the following information:
- SKU
- package name
- short description
- virtual currency
- quantity of currency units in a package
- price
- default currency
- image (optional)
- Specify the following information:
- Set the Show in Store toggle to On.
- Click Create package.
ConsumeInventoryItem SDK method.Set up Virtual Items module
- Consumable item — an item in the inventory that can be accrued or purchased repeatedly and decreases in its number once used. The item stock can be replenished. Example: grenades and bullets to attack the opponents, first aid kits, etc.
- Nonconsumable — an item in the inventory that can be accrued or purchased only once and doesn’t disappear from the inventory. Example: access to a location, status, etc.
- Nonrenewing subscription — a nonconsumable item that is available for a limited period of time and doesn’t disappear from the inventory when it expires. For example, premium access or season access. For more details, see Shop Builder documentation.
- Open your project in Publisher Account.
- Click Connect in the Store pane. You can go to the In-Game Store settings from any section of Publisher Account by clicking the Store in the side menu.
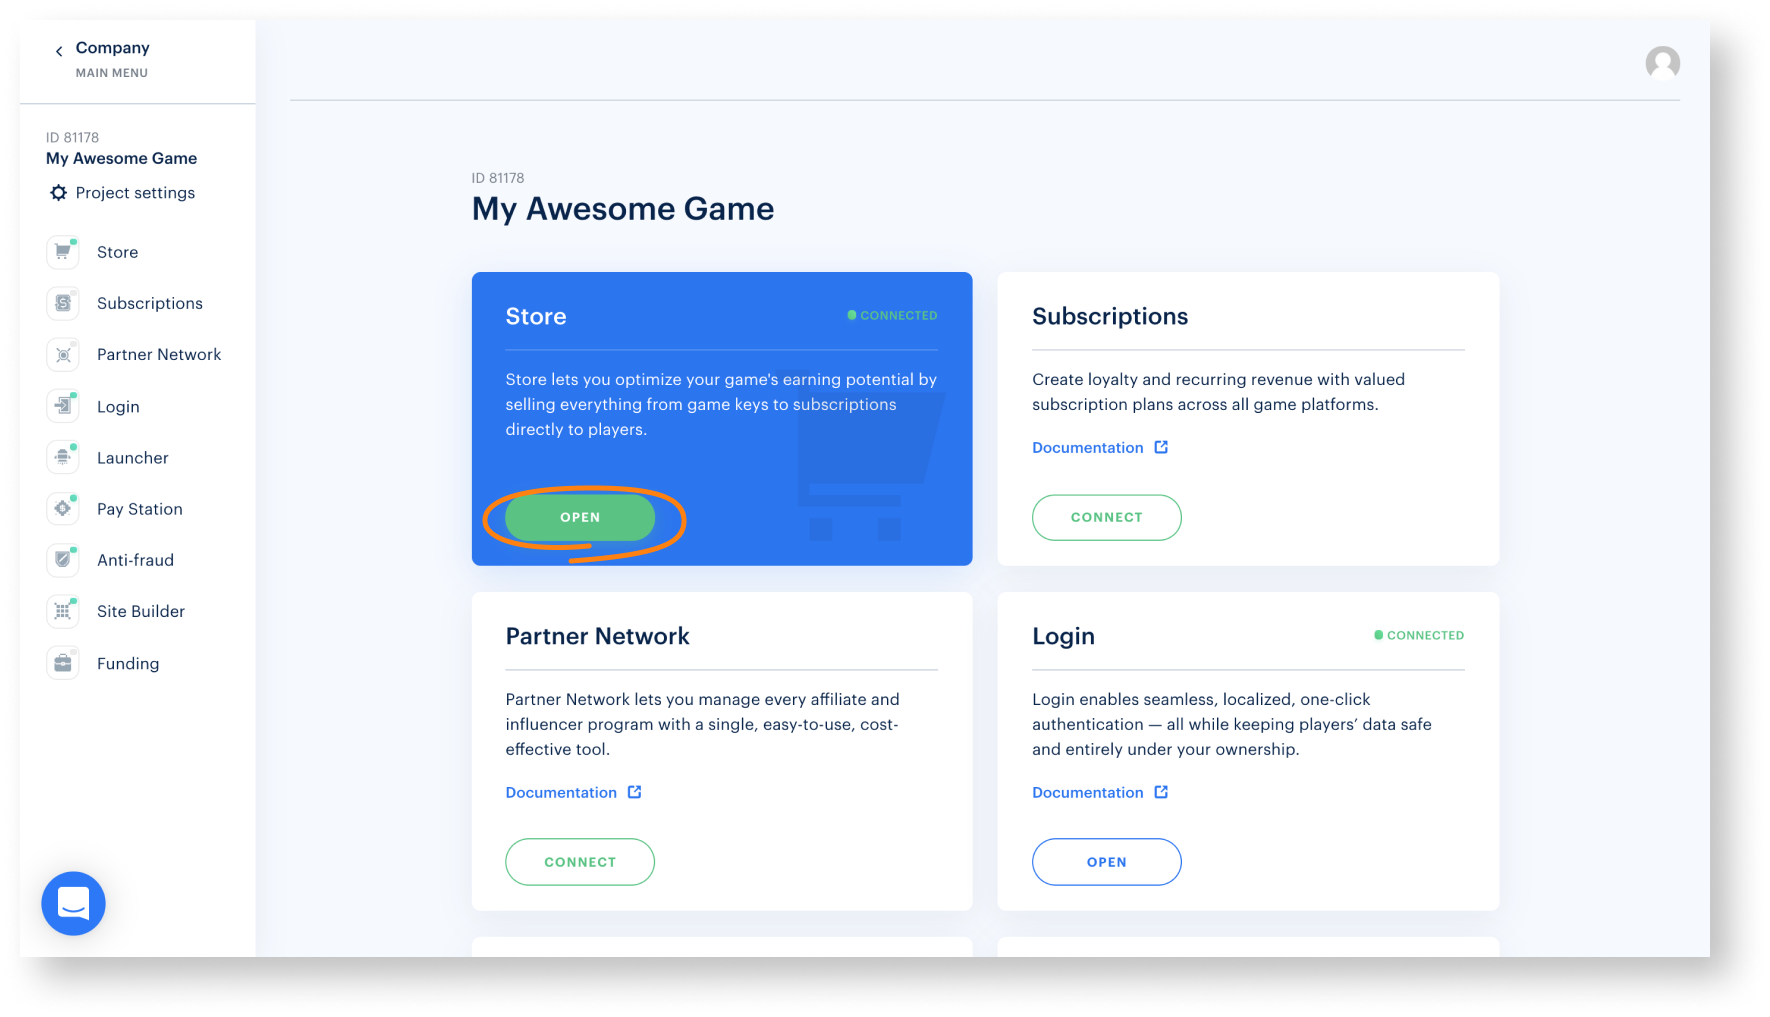
- Click Connect in the Virtual Items pane.

- Click Create a group.

- Specify Group code and Group name.
- Set the Show group in Store toggle to On.
- Click Create group.

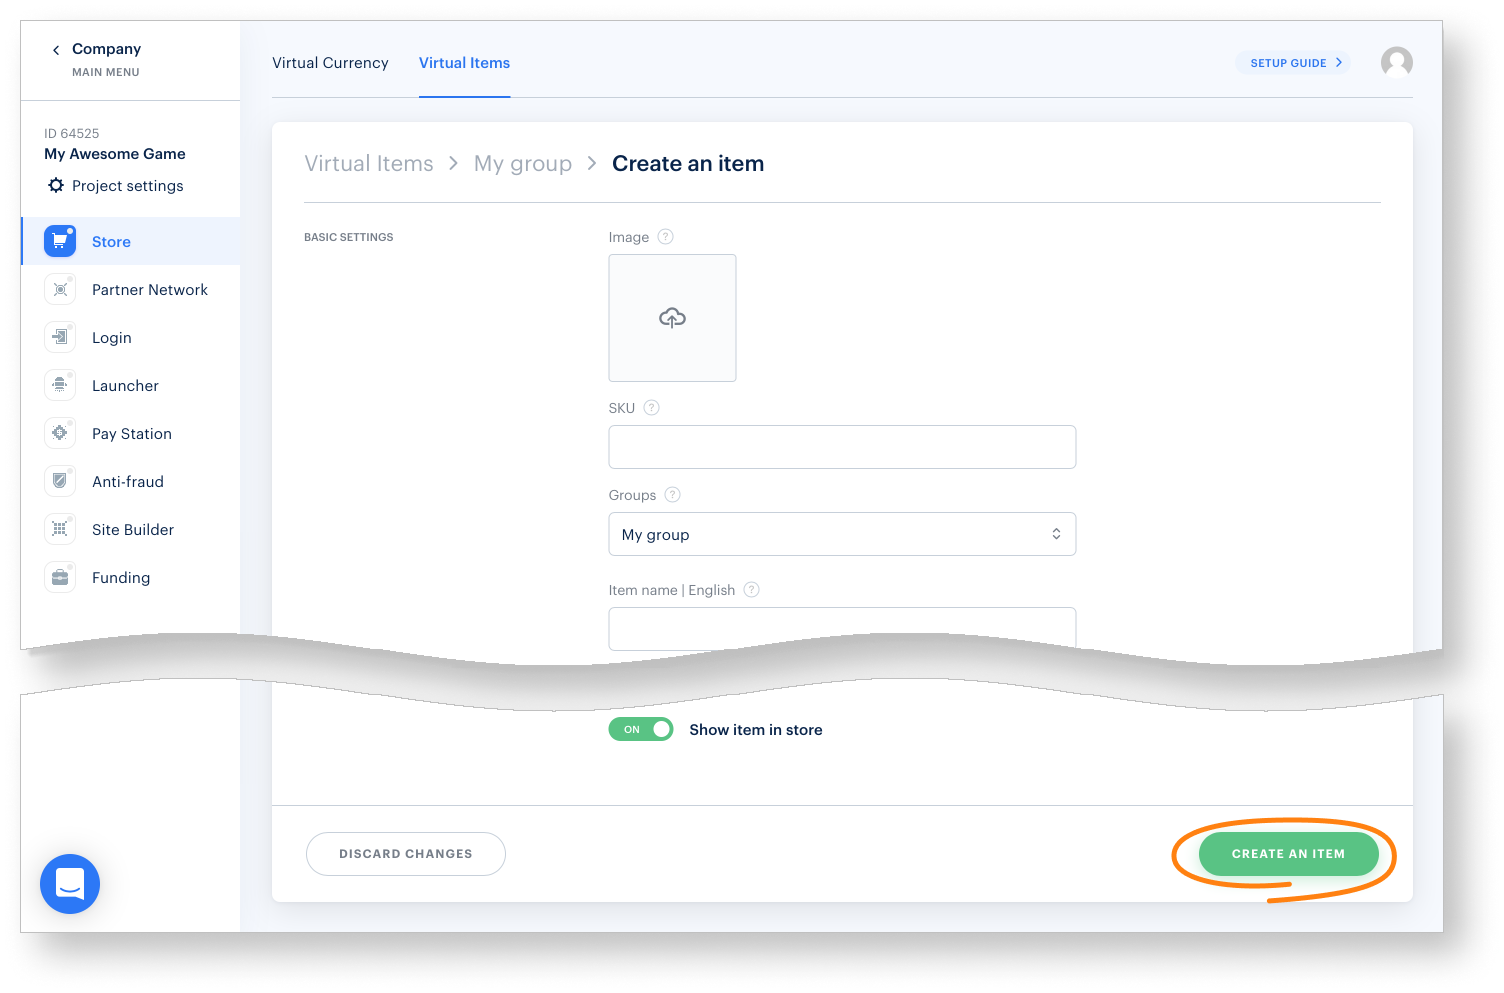
- Create items:
- Specify the following info for each of them:
- one or more groups that the item should belong to
- SKU
- name and a short description
- prices in real and virtual currencies
- image (optional)
- Specify the following info for each of them:
- In the Item property field of the Preferences section, select one of the following properties depending on the type of item:
- consumable
- nonconsumable
- nonrenewing subscription
- Click Create an item.
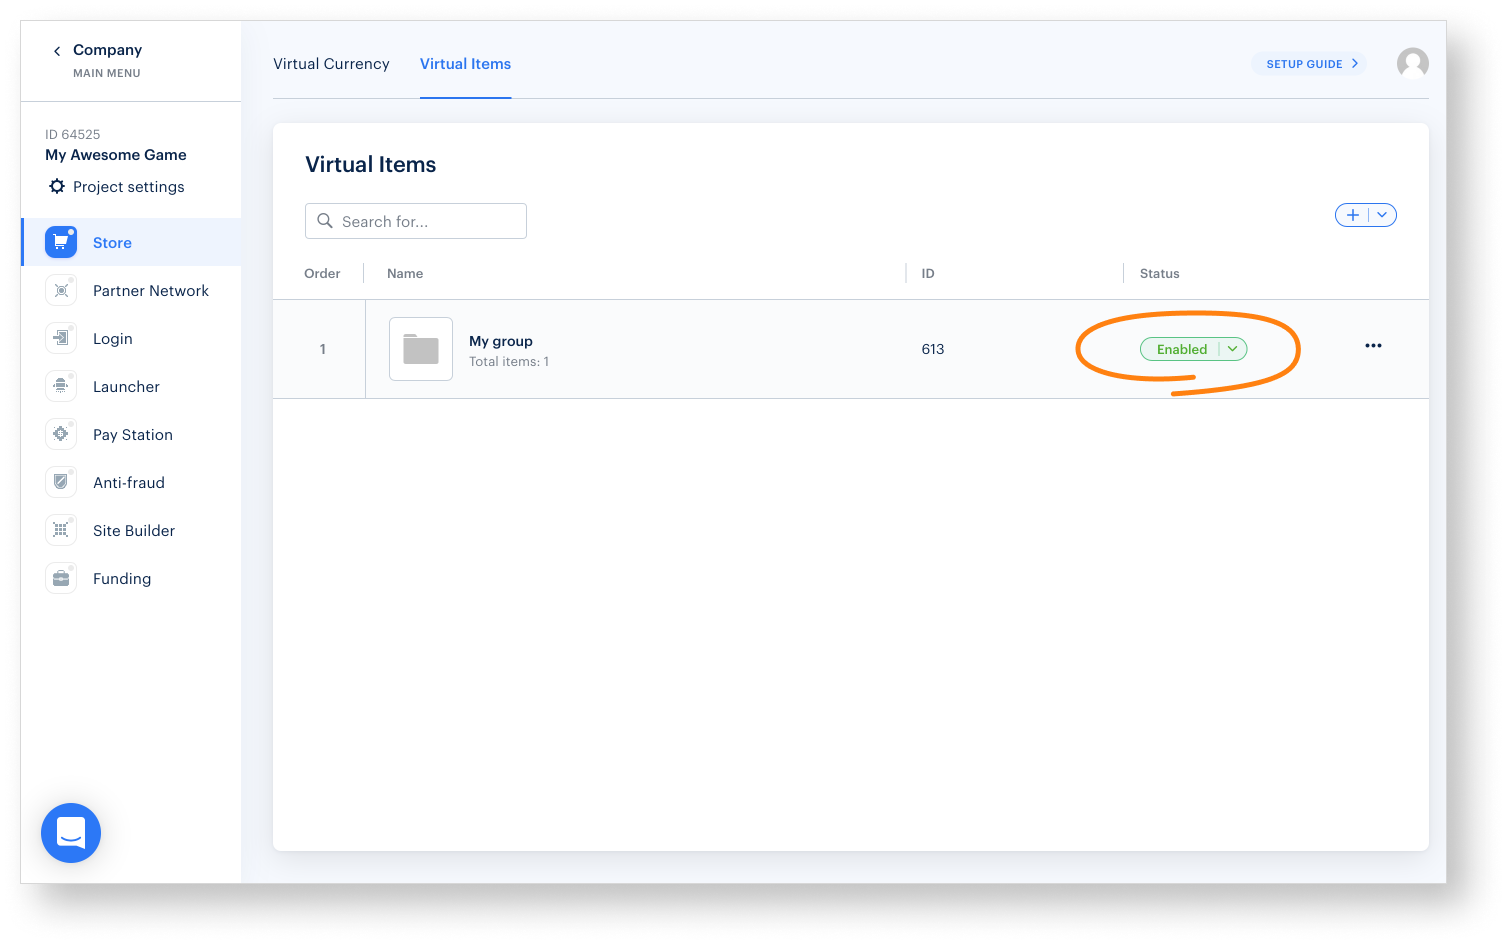
- Make sure that the group status is Enabled.
Set up Unity project
- Open your Unity project.
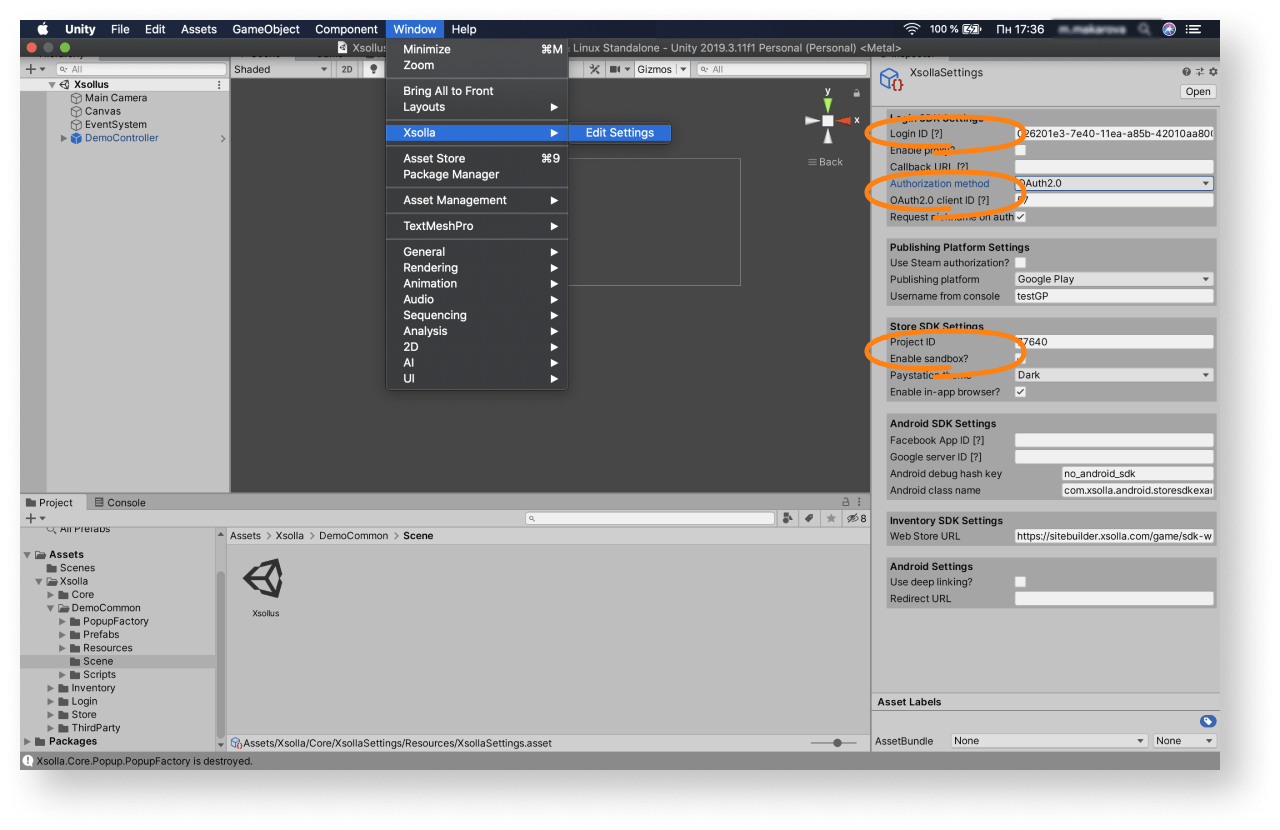
- Click
Window > Xsolla > Edit Settings in the main menu. - Specify project parameters in the
Inspector panel:- In the
Login ID field, specify the Login ID from Publisher Account.
- In the
- In the
Project ID field, specify the Project ID from Publisher Account. - To enable sandbox mode, check the
Enable sandbox? box. - In the
Authorization method field, selectOAuth2.0 . - In the
OAuth2.0 client ID field, specify Client ID received when setting up OAuth 2.0 in Publisher Account.
- In the
As a result, your project in Publisher Account will be connected to the demo scene.
- Launch the demo scene
Assets > Xsolla > DemoCommon > Scene > Xsollus and make sure that the authorization and other functions are working correctly. - Design an interface for the login system, in-game store, and other pages for your application.
- Set up event handling according to your application logic using SDK methods. Follow the step-by-step tutorials to get started with basic SDK features.
Test payment process
After successfully configuring the asset, test the payment process. By default, all payments are made in sandbox mode for any users. Use a test bank card to simulate a successful payment process.
Test the payment process by making real payments:
- Make sure that you have signed a contract with Xsolla.
- In your Unity project, uncheck the
Enable sandbox? box in theInspector panel.
Continue reading
Found a typo or other text error? Select the text and press Ctrl+Enter.
