
Set up catalog and subscription plans
Virtual currency is virtual money that is used for purchasing and selling in-game items. Depending on its purpose, a virtual currency affects the game economy balance or is connected to the monetization of the app. You can also create hard currency — a virtual currency that is linked to the platform of purchase and can be purchased only for real money.
You can sell the virtual currency in predefined amounts. For a package, you can define a special price that doesn’t equal the amount of virtual currency in it.
See the Virtual currency section to learn more about virtual currency.
To set up virtual currency via Publisher Account:
- In your project in Publisher Account, go to the Items catalog > All items section.
- Click Add and select Virtual currency from the drop-down list.

- Specify the following parameters:
- Image (optional).
- SKU.
- Virtual currency name.
- To configure how virtual currency is displayed in the store, select the appropriate status.

- To set a price, click Set up prices and specify the price in real currency. If needed, configure regional prices.
- Configure attributes using one of the following methods (optional):
- Check the settings and click Create currency.
- In your project in Publisher Account, go to the Items catalog > All items section.
- Click Add and select Virtual currency package from the drop-down list.

- Specify the following parameters:
- Image (optional).
- SKU.
- One or several groups the package should belong to.
- Name.
- Description (optional).
- To configure how virtual currency is displayed in the store, select the appropriate status.

- Specify the virtual currency included in the package and its amount.
- Set prices or create a free item in the Paid or free field:
- To create a free package, select Free package.
- To set a price, select Paid package and specify the price in real currency. If needed, configure regional prices.
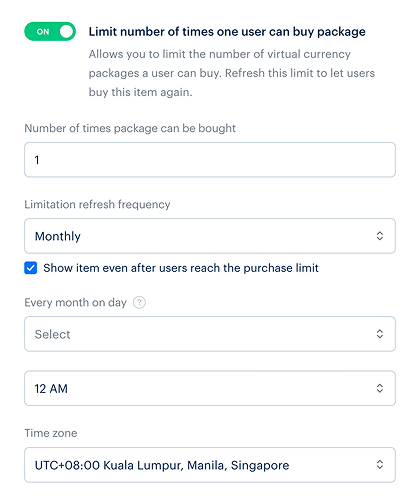
- To limit the number of packages available for purchase, turn on the Limit number of times one user can buy package toggle and enter the desired quantity.
- To configure how often the limit resets:
- From the drop-down list, select a period:
- Daily.
- Weekly.
- Monthly.
- Custom interval – this is calculated starting from the package’s display start date.
- No regular refresh.
- From the drop-down list, select a period:
- Set up the reset schedule based on the selected period.
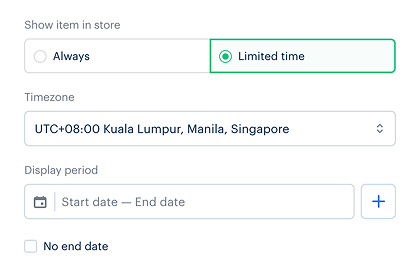
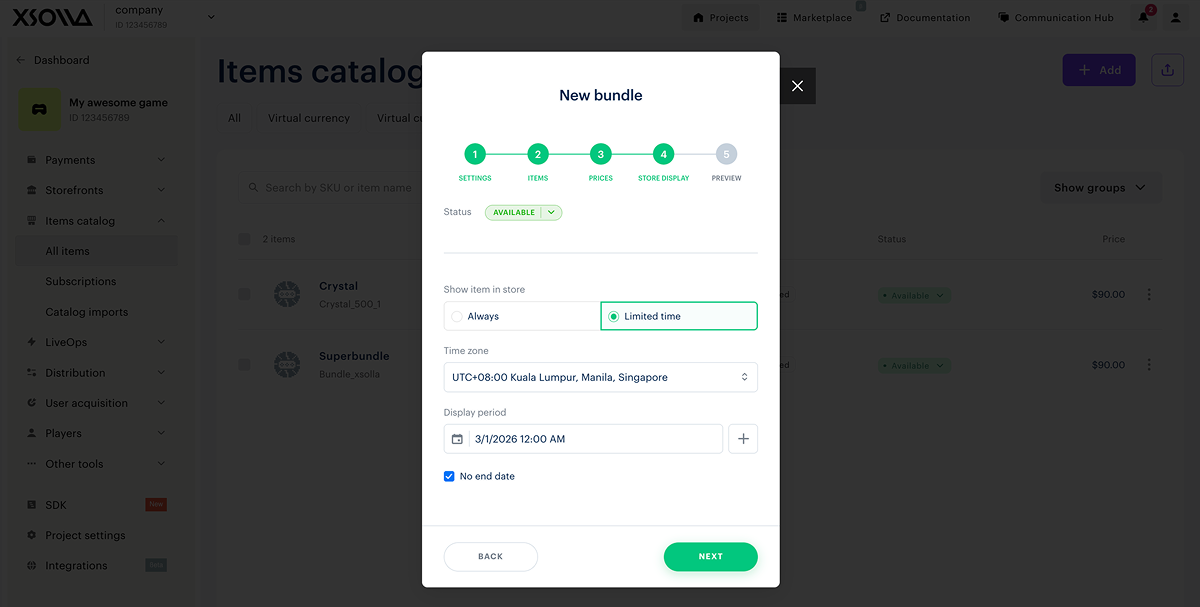
- Configure a time limit for displaying a package (optional):
- In the Show item in store field, select Limited time.
- Specify the time zone and the beginning and the end of the period.
- If you don’t want to indicate the end of the item display period, check the No end date box.
- Configure attributes using one of the following methods (optional):
- Check the settings and click Create package.
Virtual items are the in-game content that you can sell for real and virtual currency.
See the Virtual items section to learn more about virtual items.
- In your project in Publisher Account, go to the Items catalog > All items section.
- Click Add and select Virtual item from the drop-down list.

- Specify the following parameters:
- Image (optional).
- SKU.
- One or several groups the item should belong to.
- Name.
- Description (optional).
- To configure how the virtual item is displayed in the store, select the appropriate status.

- Set prices or create a free item in the Paid or free field:
- To create a free item, select Free item.
- To set a price, select Paid item and specify the price in real currency. If needed, configure regional prices.
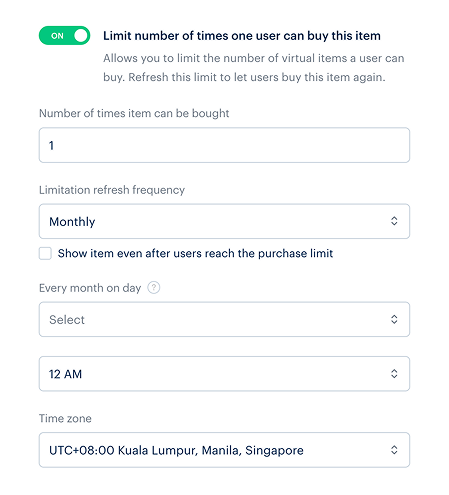
- To limit the number of items available for purchase, turn on the Limit number of times one user can buy this item toggle and enter the desired quantity.
- To configure how often the limit resets:
- From the drop-down list, select a period:
- Daily.
- Weekly.
- Monthly.
- Custom interval – this is calculated starting from the item’s display start date.
- No regular refresh.
- From the drop-down list, select a period:
- Set up the reset schedule based on the selected period.
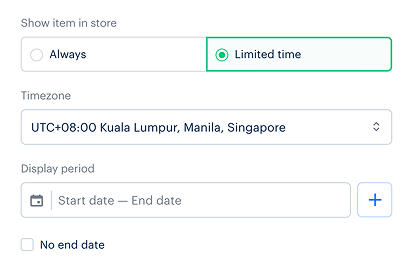
- Configure a time limit for displaying the item (optional):
- In the Show item in store field, select Limited time.
- Specify the time zone and the beginning and the end of the period.
- If you don’t want to indicate the end of the item display period, check the No end date box.
- Configure attributes using one of the following methods (optional):
- Check the settings and click Create item.
Bundle is a set of several items that are sold as a single unit. You can add items of different types to a bundle:
- Virtual currency.
- Package of virtual currency.
- Virtual items including time-limited items.
- Bundles.
See the Bundles section to learn more about bundles.
To create a bundle:
- In your project in Publisher Account, go to the Items catalog > All items section.
- Click Add and select Bundle from the drop-down list.

- Specify the following parameters:
- Image (optional).
- SKU.
- One or several groups the bundle should belong to.
- Name.
- Description (optional).

- Configure bundle attributes (optional) using one of the following methods:
- Click Next.
- If partner-side personalization is enabled, you can choose between a standard and a dynamic bundle type. Dynamic bundles allow you to skip item creation in Xsolla and instead return bundle contents generated by your server when the catalog is requested. If partner-side personalization is disabled, the bundle type selector is not displayed, and a standard bundle is created automatically.
- Add items to the bundle:
- Select the item type.
- Specify one or more item SKUs to be included in the bundle.
- Set the quantity for each SKU.

- Click Next.
- Set the bundle price in the Paid or Free field:
- To create a free bundle, select Free bundle.
- To set a price, select Paid bundle and specify the price in real or virtual currency. You can’t create a bundle with a price of zero. If needed, configure regional prices.
- To limit the number of bundles available for purchase, turn on the Limit bundle purchases per user toggle and enter the desired quantity.
- To configure how often the limit resets:
- From the drop-down list, select a period:
- Daily.
- Weekly.
- Monthly.
- Custom interval — this is calculated starting from the bundle’s display start date.
- No regular refresh.
- Set up the reset schedule based on the selected period.
- From the drop-down list, select a period:
- Click Next.
- Configure how the bundle is displayed in the store:
- Choose the status.
- Set a display time limit for the bundle (optional): specify the time zone and the beginning and the end of the period. If you don’t want to indicate the end of the bundle display period, check the No end date box.
- Click Next.
- Check the settings and click Save.
You can set up subscription plans via Publisher Account or with the Create plan API call.
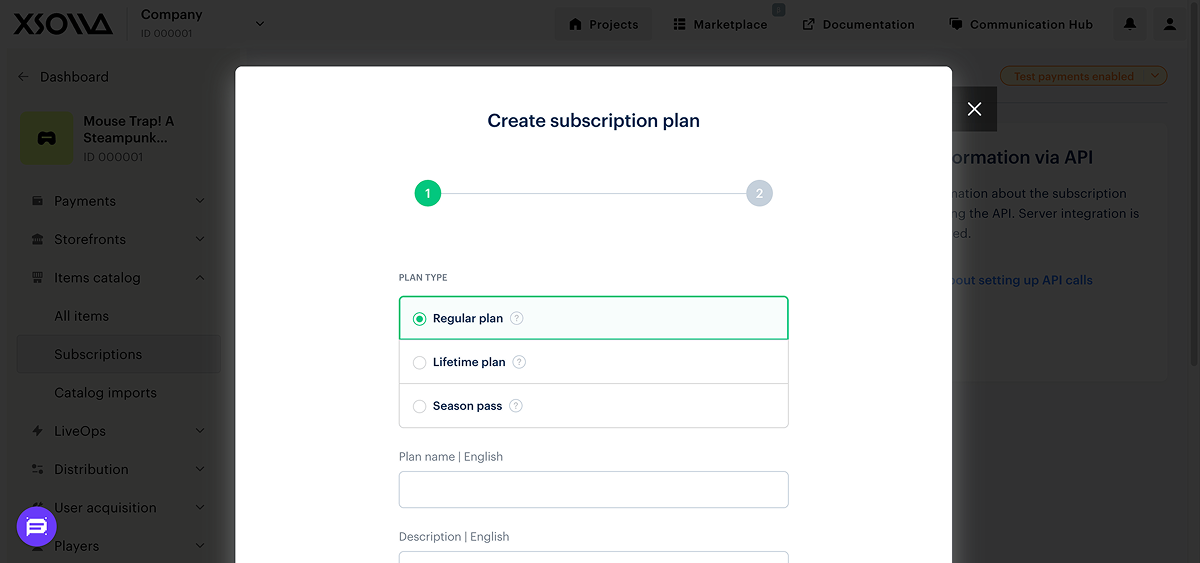
To set up a plan via Publisher Account:
- Go to the Items catalog > Subscriptions section.
- On the Subscription plan tab, click Create subscription plan.

- Choose and set up the plan type:
- Regular plan with regular payments.
- Lifetime plan with a one-time payment and an unlimited period of validity.
- Season pass with a one-time payment and a limited period of validity.
- Open a payment UI with a specific plan.
- Identify the plan in alerts.
- Identify the plan in a transactional report.
Set up regular plan
- Specify:
- Plan name.
- Description (optional): This plan description is displayed in the payment UI when users are purchasing a subscription.
- Click Next.
- Choose one of the subscription fee options:
- Regular: the amount of each payment is specified manually.
- Including setup fee: the amount of each payment as well as the amount of the setup fee are specified manually. Use this setting if you want to charge the subscriber for cover additional costs such as connecting a license, setting up a system, training a user, or providing a consultation The first payment in this case will include a setup fee, the remaining payments will be equal to the amount of the regular payment.
- Associated with the first payment: the amount of each payment is equal to the first payment. The subscription cost and currency type are passed in the
purchase.checkout.amountandpurchase.checkout.currencyparameters when opening the payment UI. Use this option if you want to manage pricing on your side and set individual prices for specific users.
- Associated with the first payment: the amount of each payment is equal to the first payment. The subscription cost and currency type are passed in the
- Whether you choose a regular subscription fee or with setup fee, you can set up different subscription prices for different currencies. To do this:
- In the Currency and Price field, select the required currency and specify the value of the subscription price. For a subscription with setup fee, also enter the value of the setup fee in the corresponding field.

- Click + to add prices in other currencies.

- Specify the default currency.

- Configure the billing cycle:
- Specify the frequency of the payment.
- Specify the number of days in the trial period where the subscription can be used without a payment. Set the value to
0to create a plan that does not have a trial period.

- Specify parameters for a one-time payment. With this type of subscription renewal, users make payments via a payment link sent by email.
- Expiration reminder: Specify the number of days before the subscription expiration date when the user will receive a reminder. If the value is set to
6or higher, the user receives an extra reminder one day before the expiration date. Set the value to0if you don’t want to send any reminders. - Grace period: The number of days users can continue using their subscription after its expiration date, and have the option to renew it. Set the value to
0to create a plan that does not have a grace period.
- Expiration reminder: Specify the number of days before the subscription expiration date when the user will receive a reminder. If the value is set to

- Specify the parameters for an automatic payment: with this type of subscription renewal, payments are made automatically using the saved billing information without any user interaction.
- Subscription expiration reminder.
- The number of retries after the first unsuccessful attempt to charge for the subscription. The system will retry once a day.

- Click Next.
- Click Create.
Set up lifetime plan
- Specify:
- Plan name.
- Description (optional): This plan description is displayed in the payment UI when users are purchasing a subscription.
- Click Next.
- Choose one of the subscription fee options:
- Regular: the amount of each payment is specified manually.
- Associated with the first payment: the amount of each payment is equal to the first payment made by the user. The subscription cost and currency type are passed in the
purchase.checkout.amountandpurchase.checkout.currencyparameters when opening the payment UI. Use this option if you want to manage pricing on your side and be able to set the individual price for a specific user.
- In the Refund period field, set the number of days when the user can unsubscribe and refund the payment.
- Whether you choose a regular subscription fee, you can set up different subscription prices for different currencies. To do this:
- In the Currency and Price field, select the required currency and specify the value of the subscription price.
- Click + to add prices in other currencies.
- Specify the default currency.
- Click Next.
- Click Create.
Set up season pass
- Specify:
- Plan name.
- Season pass validity period.
- Description (optional): This plan description is displayed in the payment UI when users are purchasing a subscription.
- Click Next.
- Choose one of the subscription fee options:
- Regular: the amount of each payment is specified manually.
- Associated with the first payment: the amount of each payment is equal to the first payment made by the user. The subscription cost and currency type are passed in the
purchase.checkout.amountandpurchase.checkout.currencyparameters when opening the payment UI. Use this option if you want to manage pricing on your side and be able to set the individual price for a specific user.
- In the Refund period field, set the number of days when the user can unsubscribe and refund the payment.
- Whether you choose a regular subscription fee, you can set up different subscription prices for different currencies. To do this:
- In the Currency and Price field, select the required currency and specify the value of the subscription price.
- Click + to add prices in other currencies.
- Specify the default currency.
- Click Next.
- Click Create.
Found a typo or other text error? Select the text and press Ctrl+Enter.
