Unity用SDK / アプリケーション側でSDKを統合する
  ドキュメントに戻る

Unity用SDK

アプリケーション側でSDKを統合する

  1. ログインシステム、インゲームストアなど、アプリケーションのページのインターフェイスをデザインします。
  2. SDKメソッドを使って、ユーザー認証、ストア表示、購入などのロジックをアプリケーションに実装できます。
お知らせ
Unityに関する説明に従って独自のソリューションを作成することもできますし、デモシーンをテンプレートとして使用することもできます。デモシーンのUIを自分のアプリケーションに合わせるには、UIビルダーを使います。
基本的なSDK機能の使用を開始するには、次のステップバイステップのチュートリアルに従ってください:使用されるスクリプトは、SDKのAssets/Xsolla/Samplesディレクトリにあります。

ユーザー名/メールとパスワードによるユーザーログイン

この説明では、SDKのメソッドを使用して実装する方法を示します:

  • ユーザー登録
  • 登録確認メールの再送依頼
  • ユーザーログイン
  • ユーザーパスワードリセット

ユーザーの認証は、ユーザー名またはメールアドレスで行うことができます。以下の例では、ユーザー名でユーザーを認証し、メールアドレスは登録の確認やパスワードのリセットに使用します。

お知らせ
ログインウィジェットをサイト(ウェブストアなど)で使用する場合は、サイトとアプリケーションで同じユーザー認証方法を実装していることを確認してください。デフォルトでは、ウィジェットは認証に電子メールアドレスを使用します。ユーザー名によるユーザーログインを設定するには、カスタマーサクセスマネージャーまでお問い合わせるか、csm@xsolla.comに電子メールを送信してください。
例題の論理とインターフェースは、お客様のアプリケーションでの使用よりも複雑ではありません。認証システムの実装方法は、デモプロジェクトで紹介されています。

ユーザー登録を実装する

このチュートリアルでは、以下のロジックの実装について説明します:

ページのインターフェースを作成する

登録ページのシーンを作り、そこに以下の要素を追加します:

  • ユーザー名欄
  • ユーザーEメールアドレス欄
  • ユーザーパスワード欄
  • 登録ボタン

次の図は、ページ構成の例です。

ページコントローラーを作成する

  1. MonoBehaviour基底クラスを継承したスクリプトRegistrationPageを作成します。
  2. ページインターフェース要素の変数を宣言し、Inspectorパネルでその値を設定します。
  3. スクリプトの例に示すように、新規登録ボタンをクリックする処理をするロジックを追加します。
お知らせ

スクリプトの例では、OnSuccessOnErrorメソッドは標準のDebug.Logメソッドを呼び出します。エラーが発生した場合、エラーコードと説明がerrorパラメータで渡されます。

登録メールの再送リクエストのページを開いたり、登録が成功した場合にログインページを開くなど、他のアクションを追加することができます。

登録ページのスクリプトの例:
Copy
Full screen
Small screen
using UnityEngine;
using UnityEngine.UI;
using Xsolla.Auth;
using Xsolla.Core;

namespace Xsolla.Samples.Authorization
{
	public class RegistrationPage : MonoBehaviour
	{
		// Declaration of variables for UI elements
		public InputField UsernameInput;
		public InputField EmailInputField;
		public InputField PasswordInputField;
		public Button RegisterButton;

		private void Start()
		{
			// Handling the button click
			RegisterButton.onClick.AddListener(() =>
			{
				// Get the username, email and password from input fields
				var username = UsernameInput.text;
				var email = EmailInputField.text;
				var password = PasswordInputField.text;

				// Call the user registration method
				// Pass credentials and callback functions for success and error cases
				XsollaAuth.Register(username, password, email, OnSuccess, OnError);
			});
		}

		private void OnSuccess(LoginLink loginLink)
		{
			Debug.Log("Registration successful");
			// Add actions taken in case of success
		}

		private void OnError(Error error)
		{
			Debug.LogError($"Registration failed. Error: {error.errorMessage}");
			// Add actions taken in case of error
		}
	}
}

登録の確認メールを設定する

登録に成功すると、ユーザーは指定したアドレスに登録確認メールを受け取ります。アドミンページで、ユーザーに送られるメールはカスタマイズできます。

Androidアプリケーションを開発している場合、ユーザーが登録を確認した後、アプリケーションに戻るためのディープリンクをセットアップします。

お知らせ
お客様のセキュリティ基準で許可されている場合は、電子メールアドレスによる登録確認を無効にすることができます。無効にするには、カスタマーサクセスマネージャーに連絡するか、csm@xsolla.comまでご連絡ください。

登録確認メールの再送依頼を実装する

このチュートリアルでは、以下のロジックの実装について説明します:

ページのインターフェースを作成する

確認メールの再送信依頼があるページのシーンを作り、そこに以下の要素を追加します:

  • ユーザー名/メールアドレス欄
  • メール再送信ボタン

次の図は、ページ構成の一例です。

ページコントローラーを作成する

  1. MonoBehaviour基底クラスを継承したスクリプトResendConfirmationEmailを作成します。
  2. ページインターフェース要素の変数を宣言し、Inspectorパネルでその値を設定します。
  3. スクリプトの例に示すように、メール再送信ボタンをクリックする処理をするロジックを追加します。

メール再送ページのスクリプト例:

Copy
Full screen
Small screen
using UnityEngine;
using UnityEngine.UI;
using Xsolla.Auth;
using Xsolla.Core;

namespace Xsolla.Samples.Authorization
{
	public class ResendConfirmationEmailPage : MonoBehaviour
	{
		// Declaration of variables for UI elements
		public InputField UsernameInput;
		public Button ResendEmailButton;

		private void Start()
		{
			// Handling the button click
			ResendEmailButton.onClick.AddListener(() =>
			{
				// Get the username from the input field
				var username = UsernameInput.text;

				// Call the resend confirmation email method
				// Pass the username and callback functions for success and error cases
				XsollaAuth.ResendConfirmationLink(username, OnSuccess, OnError);
			});
		}

		private void OnSuccess()
		{
			Debug.Log("Resend confirmation email successful");
			// Add actions taken in case of success
		}

		private void OnError(Error error)
		{
			Debug.LogError($"Resend confirmation email failed. Error: {error.errorMessage}");
			// Add actions taken in case of error
		}
	}
}

リクエストが成功した場合、ユーザーは登録時に指定したメールアドレスに登録確認メールを受け取ります。

ユーザーログインを実装する

このチュートリアルでは、以下のロジックの実装について説明します:

ページのインターフェースを作成する

ログインページのシーンを作成し、そこに以下の要素を追加します:

  • ユーザー名欄
  • パスワード欄
  • ログイン状態を保存するチェックボックス
  • ログインボタン

次の図は、ページ構成の一例です。

ページコントローラーを作成する

  1. MonoBehaviour基底クラスを継承したスクリプトAutorizationPageを作成します。
  2. ページインターフェース要素の変数を宣言し、Inspectorパネルでその値を設定します。
  3. スクリプトの例に示すように、ログインボタンをクリックする処理をするロジックを追加します。

ログインページのスクリプトの例:

Copy
Full screen
Small screen
using UnityEngine;
using UnityEngine.UI;
using Xsolla.Auth;
using Xsolla.Core;

namespace Xsolla.Samples.Authorization
{
	public class AuthorizationPage : MonoBehaviour
	{
		// Declaration of variables for UI elements
		public InputField UsernameInput;
		public InputField PasswordInputField;
		public Button SignInButton;

		private void Start()
		{
			// Handling the button click
			SignInButton.onClick.AddListener(() =>
			{
				// Get the username and password from input fields
				var username = UsernameInput.text;
				var password = PasswordInputField.text;

				// Call the user authorization method
				// Pass credentials and callback functions for success and error cases
				XsollaAuth.SignIn(username, password, OnSuccess, OnError);
			});
		}

		private void OnSuccess()
		{
			Debug.Log("Authorization successful");
			// Add actions taken in case of success
		}

		private void OnError(Error error)
		{
			Debug.LogError($"Authorization failed. Error: {error.errorMessage}");
			// Add actions taken in case of error
		}
	}
}

パスワードリセットを実装する

このチュートリアルでは、以下のロジックの実装について説明します:

ページのインターフェースを作成する

パスワードリセットページのシーンを作成し、以下の要素をページに追加します:

  • ユーザー名/メールアドレス欄
  • パスワードリセットボタン

次の図は、ページ構成の一例です。

ページコントローラーを作成する

  1. MonoBehaviour基底クラスを継承したスクリプトResetPasswordPageを作成します。
  2. ページインターフェース要素の変数を宣言し、Inspectorパネルでその値を設定します。
  3. スクリプトの例に示すように、パスワードリセットボタンをクリックする処理を行うロジックを追加します。

パスワードリセットページのスクリプトの例:

Copy
Full screen
Small screen
using UnityEngine;
using UnityEngine.UI;
using Xsolla.Auth;
using Xsolla.Core;

namespace Xsolla.Samples.Authorization
{
	public class ResetPasswordPage : MonoBehaviour
	{
		// Declaration of variables for UI elements
		public InputField UsernameInput;
		public Button ResetPasswordButton;

		private void Start()
		{
			// Handling the button click
			ResetPasswordButton.onClick.AddListener(() =>
			{
				// Get the username from the input field
				var username = UsernameInput.text;

				// Call the password reset method
				// Pass the username and callback functions for success and error cases
				XsollaAuth.ResetPassword(username, OnSuccess, OnError);
			});
		}

		private void OnSuccess()
		{
			Debug.Log("Password reset successful");
			// Add actions taken in case of success
		}

		private void OnError(Error error)
		{
			Debug.LogError($"Password reset failed. Error: {error.errorMessage}");
			// Add actions taken in case of error
		}
	}
}

パスワード再設定のリクエストに成功すると、ユーザーにパスワード再設定用のリンクが記載されたメールが送信されます。アドミンページ> ログインプロジェクト > セキュリティ > OAuth 2.0 > OAuth 2.0リダイレクトURIで、認証に成功した後、メールによる確認、またはパスワードのリセット後に、ユーザーがリダイレクトされるURLアドレスまたはパスを設定することができます。

ソーシャルログイン

このガイドでは、SDKメソッドを使用して、ユーザーのサインアップとソーシャルネットワークアカウントによるログインを実装する方法を紹介します。

ユーザー名/ユーザーのメールアドレスとパスワードによるユーザー認証とは異なり、ユーザーのサインアップのために別のロジックを実装する必要はありません。ユーザーの初回ログインがソーシャルネットワーク経由の場合、新しいアカウントが自動的に作成されます。

別の認証方法としてアプリケーションにソーシャルログインを実装している場合、以下の条件を満たすと、ソーシャルネットワークアカウントは既存のユーザーアカウントに自動的にリンクします。

  • ユーザー名/メールアドレスとパスワードでサインアップしたユーザーが、ソーシャルネットワークアカウントを介してアプリケーションにログインしました。
  • ソーシャルネットワークでは、メールアドレスを返します。
  • ソーシャルネットワークでのユーザーのメールアドレスは、アプリケーションで登録に使用したメールアドレスと同じです。
お知らせ
ソーシャルネットワークアカウントの手動リンクを実装できます。ユーザーがソーシャルネットワークアカウントを自分のアカウントにリンクできるページを、アプリケーションに追加します。ページコントローラで、LinkSocialProvider SDKメソッドを使用します。
このチュートリアルでは、以下のロジックの実装について説明します:

この例では、Facebookアカウントによるユーザーログインを設定しています。すべてのソーシャルネットワークを同じ方法で設定できます。

例題の論理とインターフェースは、お客様のアプリケーションでの使用よりも複雑ではありません。認証システムの実装方法は、デモプロジェクトで紹介されています。

ページのインターフェースを作成する

ログインページのシーンを作成し、そこにソーシャルログインボタンを追加します。次の図は、ページ構成の例です。

ページコントローラーを作成する

  1. MonoBehaviour基底クラスを継承したスクリプトSocialAuthorizationPageを作成します。
  2. アプリケーションログインページインターフェース要素の変数を宣言し、Inspectorパネルでその値を設定します。
  3. スクリプトの例に示すように、ログインボタンをクリックする処理をするロジックを追加します。
お知らせ

スクリプトの例では、OnSuccessOnErrorメソッドは標準のDebug.Logメソッドを呼び出します。他のアクションを追加することができます。

エラーが発生した場合、エラーコードと説明がerrorパラメータで渡されます。

ログインページのスクリプトの例:
Copy
Full screen
Small screen
using UnityEngine;
using UnityEngine.UI;
using Xsolla.Auth;
using Xsolla.Core;

namespace Xsolla.Samples.Authorization
{
	public class SocialAuthorizationPage : MonoBehaviour
	{
		// Declaration of variables for SocialProvider and signIn button
		public SocialProvider SocialProvider = SocialProvider.Facebook;
		public Button SignInButton;

		private void Start()
		{
			// Handling the button click
			SignInButton.onClick.AddListener(() =>
			{
				// Call the social authorization method
				// Pass the social network provider and callback functions for success, error and cancel cases
				XsollaAuth.AuthViaSocialNetwork(SocialProvider, OnSuccess, OnError, OnCancel);
			});
		}

		private void OnSuccess()
		{
			Debug.Log("Social authorization successful");
			// Add actions taken in case of success
		}

		private void OnError(Error error)
		{
			Debug.LogError($"Social authorization failed. Error: {error.errorMessage}");
			// Add actions taken in case of error
		}

		private void OnCancel()
		{
			Debug.Log("Social authorization cancelled by user.");
			// Add actions taken in case the user canceles authorization
		}
	}
}

アイテムカタログの表示

このチュートリアルでは、SDKメソッドを使って、インゲームストアに以下のアイテムを表示する方法を紹介します:

  • 仮想アイテム
  • 仮想アイテムのグループ
  • バンドル
  • 仮想通貨のパッケージ

始める前に、アドミンページの項目を設定します:

  1. バーチャルアイテムとバーチャルアイテムのグループを設定します
  2. 仮想通貨のパッケージを設定します
  3. バンドルを設定します

このチュートリアルでは、以下のロジックの実装について説明します:

例のロジックとインターフェイスは、アプリケーションよりも複雑ではありません。インゲームストアの実装オプションで可能なアイテムカタログについては、デモプロジェクトで説明しています。

お知らせ

カタログ内のすべてのアイテムの例は次のとおり:

  • アイテム名
  • アイテム説明
  • アイテム価格
  • 画像

また、アイテムに関する他の情報がインゲームストアに保存されている場合は、その情報を表示することもできます。

仮想アイテムの表示を実装する

アイテムウィジェットを作成する

  1. 空のゲームオブジェクトを作成します。これを行うには、メインメニューに移動し、GameObject > Create Emptyを選択します。
  2. プレハブで作成したゲームオブジェクトをHierarchyパネルからProjectパネルにドラッグして変換します。
  3. 作成したプレハブを選択し、Inspectorパネルで、Open Prefabをクリックします。
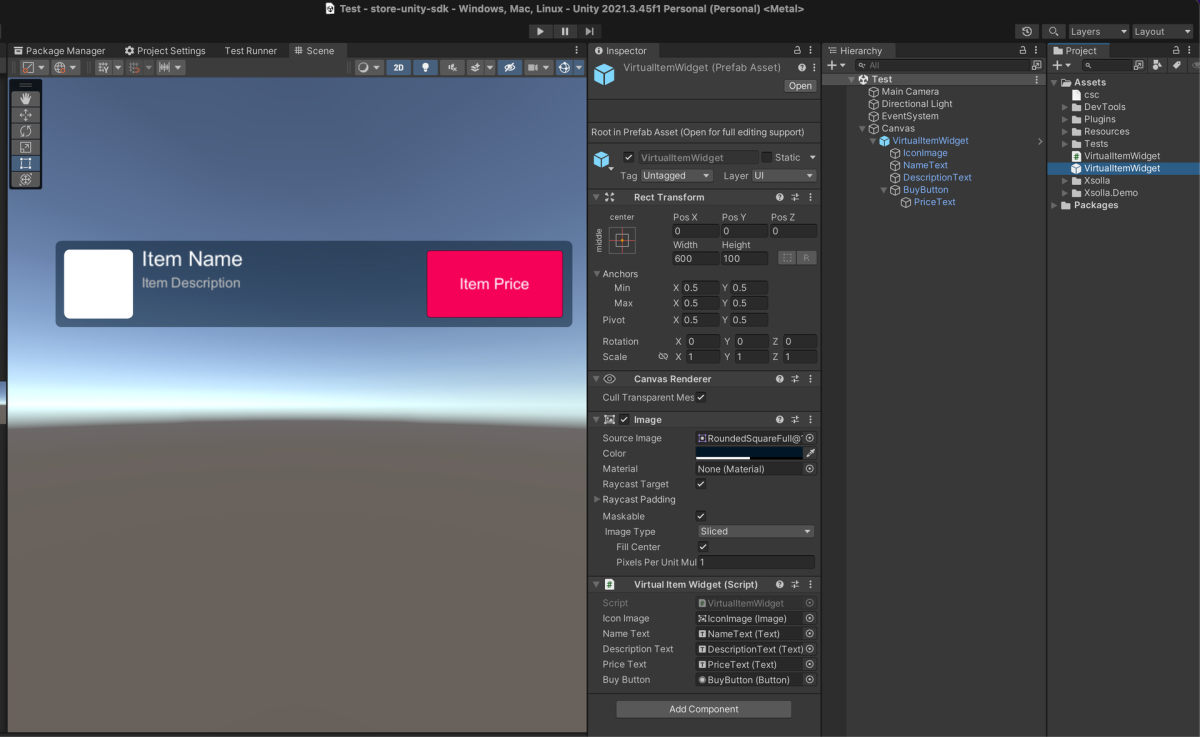
  4. 以下のUI要素をプレハブの子オブジェクトとして追加し、そのビジュアルを設定します:
    • アイテムの背景画像
    • アイテム名
    • アイテムの説明
    • アイテムの価格
    • アイテムの画像

次の図は、ウィジェットの構造の一例です。

アイテムウィジェットスクリプトを作成する

  1. MonoBehaviourのベースクラスを継承したVirtualItemWidgetスクリプトを作成します。
  2. アイテムウィジェットのインターフェイス要素のための変数を宣言し、Inspectorパネルでその値を設定します。

ウィジェットスクリプトの例:

Copy
Full screen
Small screen
using UnityEngine;
using UnityEngine.UI;

namespace Xsolla.Samples.DisplayCatalog
{
	public class VirtualItemWidget : MonoBehaviour
	{
		// Declaration of variables for UI elements
		public Text NameText;
		public Text DescriptionText;
		public Text PriceText;
		public Image IconImage;
	}
}

アイテムのリストを表示するページを作成する

  1. シーン上で、空のゲームオブジェクトを作成します。これを行うには、メインメニューでGameObject > Create Emptyを選択します。
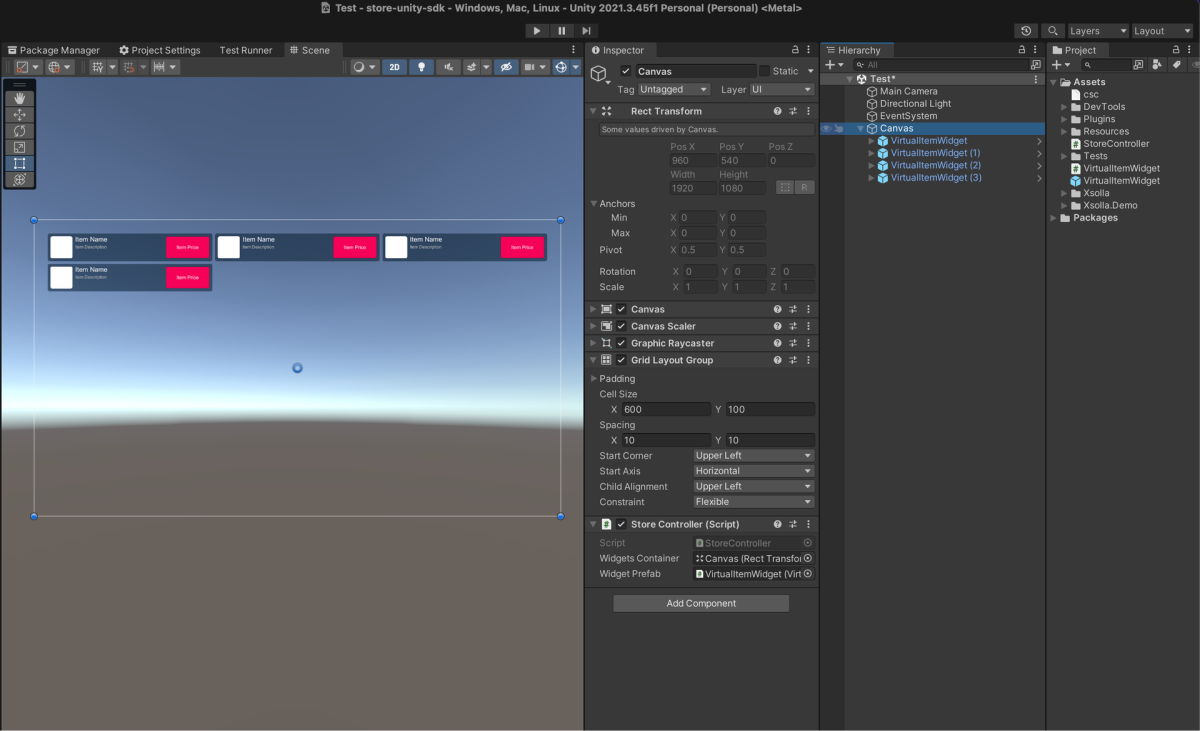
  2. 以下のUI要素をプレハブの子オブジェクトとして追加し、そのビジュアルを設定します:
    • ページの背景画像
    • アイテムウィジェットの表示エリア

次の図は、ページ構成の一例です。

ページコントローラーを作成する

  1. MonoBehaviourのベースクラスを継承したVirtualItemsPageスクリプトを作成します。
  2. 以下の変数を宣言します:
    • WidgetsContainer — ウィジェットのコンテナ
    • WidgetPrefab — アイテムウィジェットのプレハブ

  1. ページゲームオブジェクトにスクリプトを添付します:
    1. Hierarchyパネルでオブジェクトを選択します。
    2. Inspectorパネルで、Add ComponentをクリックしてVirtualItemsPageスクリプトを選択します。
  2. Inspectorパネルで変数の値を設定します。

  1. スクリプトの例に示すように、ログインロジックとアイテムのリストを取得するためのロジックを追加します。
お知らせ

ログインするスクリプトの例では、デモアカウントの資格情報を使用します(ユーザー名:xsolla、パスワード:xsolla)。

スクリプトサンプルには、カタログのアイテムをページごとに表示する(ページネーション)実装は含まれていません。GetCatalog SDKメソッドのoffsetおよびlimitパラメータを使用してページネーションを実装します。1 ページのアイテムの最大数は50です。カタログに50を超えるアイテムがある場合は、ページネーションが必要です。

ページコントローラースクリプトの例:
Copy
Full screen
Small screen
using System.Linq;
using UnityEngine;
using Xsolla.Auth;
using Xsolla.Catalog;
using Xsolla.Core;

namespace Xsolla.Samples.DisplayCatalog
{
	public class VirtualItemsPage : MonoBehaviour
	{
		// Declaration of variables for widget's container and prefab
		public Transform WidgetsContainer;
		public GameObject WidgetPrefab;

		private void Start()
		{
			// Starting the authentication process
			// Pass the credentials and callback functions for success and error cases
			// The credentials (username and password) are hard-coded for simplicity
			XsollaAuth.SignIn("xsolla", "xsolla", OnAuthenticationSuccess, OnError);
		}

		private void OnAuthenticationSuccess()
		{
			// Starting the items request from the store after successful authentication
			XsollaCatalog.GetCatalog(OnItemsRequestSuccess, OnError);
		}

		private void OnItemsRequestSuccess(StoreItems storeItems)
		{
			// Iterating the items collection
			foreach (var storeItem in storeItems.items)
			{
				// Instantiating the widget prefab as child of the container
				var widgetGo = Instantiate(WidgetPrefab, WidgetsContainer, false);
				var widget = widgetGo.GetComponent<VirtualItemWidget>();

				// Assigning the values for UI elements
				widget.NameText.text = storeItem.name;
				widget.DescriptionText.text = storeItem.description;

				// The item can be purchased for real money or virtual currency
				// Checking the price type and assigning the values for appropriate UI elements
				if (storeItem.price != null)
				{
					var realMoneyPrice = storeItem.price;
					widget.PriceText.text = $"{realMoneyPrice.amount} {realMoneyPrice.currency}";
				}
				else if (storeItem.virtual_prices != null)
				{
					var virtualCurrencyPrice = storeItem.virtual_prices.First(x => x.is_default);
					widget.PriceText.text = $"{virtualCurrencyPrice.name}: {virtualCurrencyPrice.amount}";
				}

				// Loading the item image and assigning it to the UI element
				ImageLoader.LoadSprite(storeItem.image_url, sprite => widget.IconImage.sprite = sprite);
			}
		}

		private void OnError(Error error)
		{
			Debug.LogError($"Error: {error.errorMessage}");
			// Add actions taken in case of error
		}
	}
}

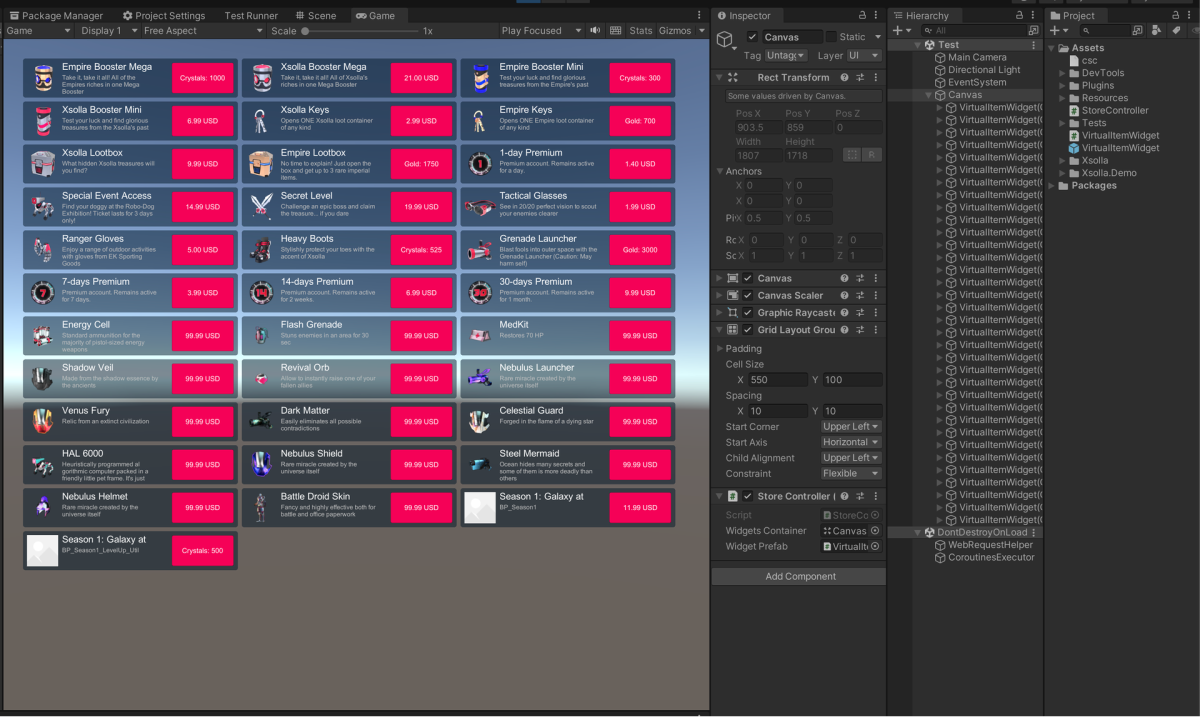
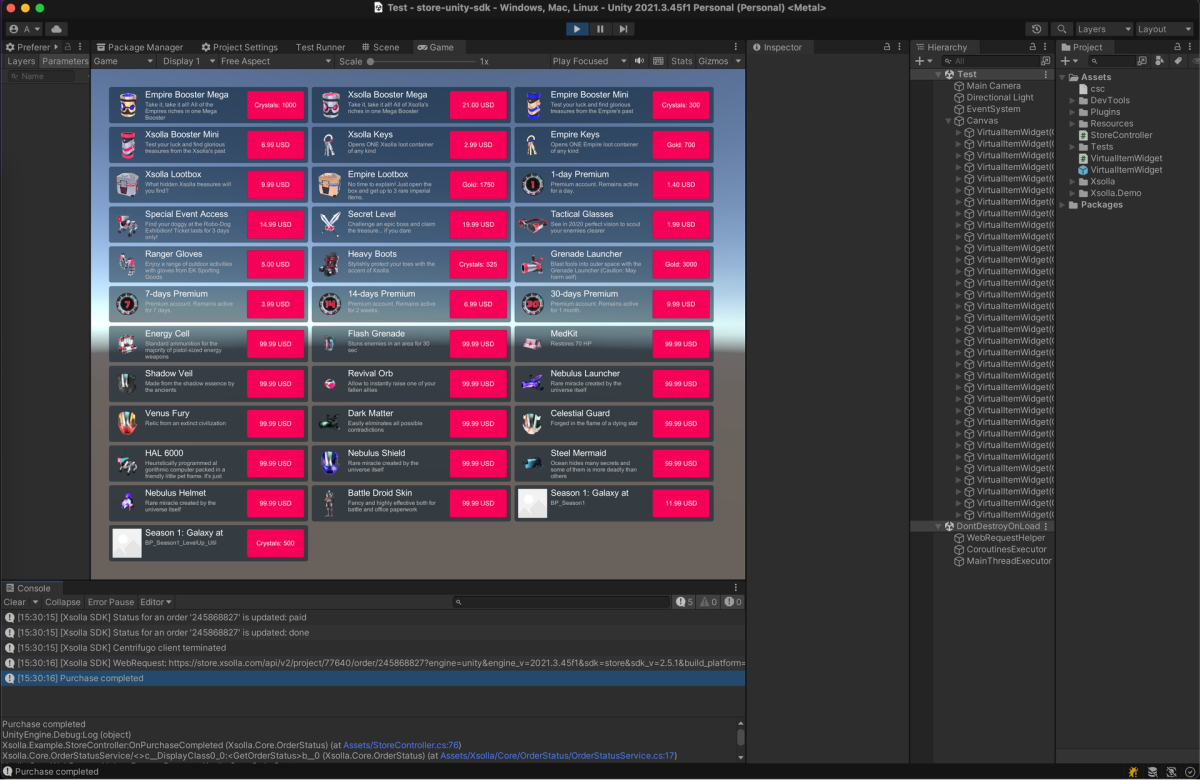
次の写真は、スクリプトの作業の結果です。

仮想アイテムグループの表示を実装する

アイテムウィジェットを作成する

  1. 空のゲームオブジェクトを作成します。これを行うには、メインメニューに移動し、GameObject > Create Emptyを選択します。
  2. プレハブで作成したゲームオブジェクトをHierarchyパネルからProjectパネルにドラッグして変換します。
  3. 作成したプレハブを選択し、Inspectorパネルで、Open Prefabをクリックします。
  4. 以下のUI要素をプレハブの子オブジェクトとして追加し、そのビジュアルを設定します:
    • アイテムの背景画像
    • アイテム名
    • アイテムの説明
    • アイテムの価格
    • アイテムの画像

次の図は、ウィジェットの構造の一例です。

アイテムウィジェットスクリプトを作成する

  1. MonoBehaviourのベースクラスを継承したVirtualItemWidgetスクリプトを作成します。
  2. アイテムウィジェットのインターフェイス要素のための変数を宣言し、Inspectorパネルでその値を設定します。

ウィジェットスクリプトの例:

Copy
Full screen
Small screen
using UnityEngine;
using UnityEngine.UI;

namespace Xsolla.Samples.DisplayCatalog
{
	public class VirtualItemWidget : MonoBehaviour
	{
		// Declaration of variables for UI elements
		public Text NameText;
		public Text DescriptionText;
		public Text PriceText;
		public Image IconImage;
	}
}

アイテムのグループを開くボタンのウィジェットを作成する

  1. 空のゲームオブジェクトを作成します。これを行うには、メインメニューでGameObject > Create Emptyを選択します。
  2. 作成したゲームオブジェクトをHierarchyパネルからProjectパネルにドラッグしてプレハブに変換します。
  3. 作成したプレハブを選択し、InspectorパネルでOpen Prefabをクリックします。
  4. アイテムのグループをプレハブの子オブジェクトとして表示するボタンを追加し、そのビジュアルを設定します。

次の図は、ウィジェットの構造の一例です。

アイテムのグループを開くボタンのスクリプトを作成する

  1. MonoBehaviourベースクラスから継承したVirtualItemGroupButtonスクリプトを作成します。
  2. アイテムのグループを開くボタンの変数を宣言し、Inspectorパネルに変数の値を設定します。
  3. プレハブのルートオブジェクトにスクリプトを追加します:
    1. Hierarchyパネルでオブジェクトを選択します。
    2. Inspectorパネルで、Add Componentをクリックし、VirtualItemGroupButtonスクリプトを選択します。

ウィジェットスクリプトの例:

Copy
Full screen
Small screen
using UnityEngine;
using UnityEngine.UI;

namespace Xsolla.Samples.DisplayCatalog
{
	public class VirtualItemGroupButton : MonoBehaviour
	{
		// Declaration of variables for UI elements
		public Text NameText;
		public Button Button;
	}
}

アイテムのリストを表示するページを作成する

  1. シーン上で、空のゲームオブジェクトを作成します。これを行うには、メインメニューでGameObject > Create Emptyを選択します。
  2. 以下のUI要素をプレハブの子オブジェクトとして追加し、そのビジュアルを設定します:
    • ページの背景画像
    • アイテムグループボタン表示エリア
    • アイテムウェジットボタン表示エリア

次の図は、ページ構成の一例です。

ページコントローラーを作成する

  1. MonoBehaviourベースクラスから継承したVirtualItemsByGroupsPageスクリプトを作成します。
  2. 以下の変数を宣言します:
    • GroupButtonsContainer — グループボタンのコンテナ
    • GroupButtonPrefab — ボタンプレハブ
    • ItemWidgetsContainer — アイテムウィジェットのコンテナ
    • WidgetPrefab — アイテムウィジェットプレハブ

  1. ページゲームオブジェクトにスクリプトをアタッチします:
    1. Hierarchyパネルでオブジェクトを選択します。
    2. Inspectorパネルで、Add Componentをクリックして、VirtualItemsByGroupsPageスクリプトを選択します。
  2. Inspectorパネルで変数の値を設定します。
  3. スクリプトの例に示すように、ログインロジックとアイテムのリストを取得するロジックを追加します。
お知らせ

ログインするスクリプトの例では、デモアカウントの資格情報を使用します(ユーザー名:xsolla、パスワード:xsolla)。

スクリプトサンプルには、カタログのアイテムをページごとに表示する(ページネーション)実装は含まれていません。GetCatalog SDKメソッドのoffsetおよびlimitパラメータを使用してページネーションを実装します。1 ページのアイテムの最大数は50です。カタログに50を超えるアイテムがある場合は、ページネーションが必要です。

ページコントローラースクリプトの例:
Copy
Full screen
Small screen
using System.Collections.Generic;
using System.Linq;
using UnityEngine;
using Xsolla.Auth;
using Xsolla.Catalog;
using Xsolla.Core;

namespace Xsolla.Samples.DisplayCatalog
{
	public class VirtualItemsByGroupsPage : MonoBehaviour
	{
		// Declaration of variables for widget's container and prefab
		public Transform GroupButtonsContainer;
		public GameObject GroupButtonPrefab;
		public Transform ItemWidgetsContainer;
		public GameObject ItemWidgetPrefab;

		private void Start()
		{
			// Starting the authentication process
			// Pass the credentials and callback functions for success and error cases
			// The credentials (username and password) are hard-coded for simplicity
			XsollaAuth.SignIn("xsolla", "xsolla", OnAuthenticationSuccess, OnError);
		}

		private void OnAuthenticationSuccess()
		{
			// Starting the items request from the store after successful authentication
			// Pass the callback functions for success and error cases
			XsollaCatalog.GetCatalog(OnItemsRequestSuccess, OnError);
		}

		private void OnItemsRequestSuccess(StoreItems storeItems)
		{
			// Selecting the group’s name from items and order them alphabetically
			var groupNames = storeItems.items
				.SelectMany(x => x.groups)
				.GroupBy(x => x.name)
				.Select(x => x.First())
				.OrderBy(x => x.name)
				.Select(x => x.name)
				.ToList();

			// Add group name for catalog category with all items regardless of group affiliation
			groupNames.Insert(0, "All");

			// Iterating the group names collection
			foreach (var groupName in groupNames)
			{
				// Instantiating the button prefab as child of the container
				var buttonGo = Instantiate(GroupButtonPrefab, GroupButtonsContainer, false);
				var groupButton = buttonGo.GetComponent<VirtualItemGroupButton>();

				// Assigning the values for UI elements
				groupButton.NameText.text = groupName;

				// Adding listener for button click event
				groupButton.Button.onClick.AddListener(() => OnGroupSelected(groupName, storeItems));
			}

			// Calling method for redraw page
			OnGroupSelected("All", storeItems);
		}

		private void OnGroupSelected(string groupName, StoreItems storeItems)
		{
			// Clear container
			DeleteAllChildren(ItemWidgetsContainer);

			// Declaring variable for items to be displayed on the page
			IEnumerable<StoreItem> itemsForDisplay;
			if (groupName == "All")
			{
				itemsForDisplay = storeItems.items;
			}
			else
			{
				itemsForDisplay = storeItems.items.Where(item => item.groups.Any(group => group.name == groupName));
			}

			// Iterating the items collection and assigning values for appropriate UI elements
			foreach (var storeItem in itemsForDisplay)
			{
				// Instantiating the widget prefab as child of the container
				var widgetGo = Instantiate(ItemWidgetPrefab, ItemWidgetsContainer, false);
				var widget = widgetGo.GetComponent<VirtualItemWidget>();

				// Assigning the values for UI elements
				widget.NameText.text = storeItem.name;
				widget.DescriptionText.text = storeItem.description;

				// The item can be purchased for real money or virtual currency
				// Checking the price type and assigning the appropriate value for price text
				if (storeItem.price != null)
				{
					var realMoneyPrice = storeItem.price;
					widget.PriceText.text = $"{realMoneyPrice.amount} {realMoneyPrice.currency}";
				}
				else if (storeItem.virtual_prices != null)
				{
					var virtualCurrencyPrice = storeItem.virtual_prices.First(x => x.is_default);
					widget.PriceText.text = $"{virtualCurrencyPrice.name}: {virtualCurrencyPrice.amount}";
				}

				// Loading the image for item icon and assigning it to the UI element
				ImageLoader.LoadSprite(storeItem.image_url, sprite => widget.IconImage.sprite = sprite);
			}
		}

		private void OnError(Error error)
		{
			Debug.LogError($"Error: {error.errorMessage}");
			//  Add actions taken in case of error
		}

		// Utility method to delete all children of a container
		private static void DeleteAllChildren(Transform parent)
		{
			var childList = parent.Cast<Transform>().ToList();
			foreach (var childTransform in childList)
			{
				Destroy(childTransform.gameObject);
			}
		}
	}
}

次の写真は、スクリプトの作業の結果です。

バンドルの表示を実装する

バンドルウィジェットを作成する

  1. 空のゲームオブジェクトを作成します。これを行うには、メインメニューに移動し、GameObject > Create Emptyを選択します。
  2. プレハブで作成したゲームオブジェクトをHierarchyパネルからProjectパネルにドラッグして変換します。
  3. 作成したプレハブを選択し、Inspectorパネルで、Open Prefabをクリックします。
  4. 以下のUI要素をプレハブの子オブジェクトとして追加し、そのビジュアルを設定します:

    • ウィジェットの背景画像
    • バンドル名
    • バンドル説明
    • バンドル価格
    • バンドルコンテンツの説明(アイテムとその数量)
    • バンドル画像

次の図は、ウィジェットの構造の一例です。

ウィジェットスクリプトを作成する

  1. MonoBehaviourのベースクラスを継承したBundleWidgetスクリプトを作成します。
  2. アイテムウィジェットのインターフェイス要素のための変数を宣言し、Inspectorパネルでその値を設定します。

ウィジェットスクリプトの例:

Copy
Full screen
Small screen
using UnityEngine;
using UnityEngine.UI;

namespace Xsolla.Samples.DisplayCatalog
{
	public class BundleWidget : MonoBehaviour
	{
		// Declaration of variables for UI elements
		public Text NameText;
		public Text DescriptionText;
		public Text PriceText;
		public Text ContentText;
		public Image IconImage;
	}
}

バンドルを表示するページを作成する

  1. シーン上で、空のゲームオブジェクトを作成します。これを行うには、メインメニューでGameObject > Create Emptyを選択します。
  2. 以下のUI要素をプレハブの子オブジェクトとして追加し、そのビジュアルを設定します:
    • ページの背景画像
    • バンドルウィジェットの表示エリア

次の図は、ページ構成の一例です。

ページコントローラーを作成する

  1. MonoBehaviourベースクラスを継承したBundlesPageスクリプトを作成します。
  2. 以下の変数を宣言します:
    • WidgetsContainer — バンドルウィジェットのコンテナ
    • WidgetPrefab — バンドルウィジェットプレハブ

  1. ページゲームオブジェクトにスクリプトをアタッチします:
    1. Hierarchyパネルでオブジェクトを選択します。
    2. Inspectorパネルで、Add ComponentをクリックしてBundlesPageスクリプトを選択します。

  1. Inspectorパネルで変数の値を設定します。
  2. スクリプトの例に示すように、ログインロジックとアイテムのリストを取得するためのロジックを追加します。
お知らせ

ログインするスクリプトの例では、デモアカウントの資格情報を使用します(ユーザー名:xsolla、パスワード:xsolla)。

スクリプトサンプルには、カタログのアイテムをページごとに表示する(ページネーション)実装は含まれていません。GetCatalog SDKメソッドのoffsetおよびlimitパラメータを使用してページネーションを実装します。1 ページのアイテムの最大数は50です。カタログに50を超えるアイテムがある場合は、ページネーションが必要です。

ページコントローラースクリプトの例:
Copy
Full screen
Small screen
using System.Linq;
using UnityEngine;
using Xsolla.Auth;
using Xsolla.Catalog;
using Xsolla.Core;

namespace Xsolla.Samples.DisplayCatalog
{
	public class BundlesPage : MonoBehaviour
	{
		// Declaration of variables for widget's container and prefab
		public Transform WidgetsContainer;
		public GameObject WidgetPrefab;

		private void Start()
		{
			// Starting the authentication process
			// Pass the credentials and callback functions for success and error cases
			// The credentials (username and password) are hard-coded for simplicity
			XsollaAuth.SignIn("xsolla", "xsolla", OnAuthenticationSuccess, OnError);
		}

		private void OnAuthenticationSuccess()
		{
			// Starting the bundle request from the store after successful authentication
			// Pass the callback functions for success and error cases
			XsollaCatalog.GetBundles(OnBundlesRequestSuccess, OnError);
		}

		private void OnBundlesRequestSuccess(BundleItems bundleItems)
		{
			// Iterating the bundles collection
			foreach (var bundleItem in bundleItems.items)
			{
				// Instantiating the widget prefab as child of the container
				var widgetGo = Instantiate(WidgetPrefab, WidgetsContainer, false);
				var widget = widgetGo.GetComponent<BundleWidget>();

				// Assigning the values for UI elements
				widget.NameText.text = bundleItem.name;
				widget.DescriptionText.text = bundleItem.description;

				// Creating the string with bundle content and assigning it to the UI element
				var bundleContent = bundleItem.content.Select(x => $"{x.name} x {x.quantity}");
				widget.ContentText.text = string.Join("\n", bundleContent);

				// The bundle can be purchased for real money or virtual currency
				// Checking the price type and assigning the values for appropriate UI elements
				if (bundleItem.price != null)
				{
					var realMoneyPrice = bundleItem.price;
					widget.PriceText.text = $"{realMoneyPrice.amount} {realMoneyPrice.currency}";
				}
				else if (bundleItem.virtual_prices != null)
				{
					var virtualCurrencyPrice = bundleItem.virtual_prices.First(x => x.is_default);
					widget.PriceText.text = $"{virtualCurrencyPrice.name}: {virtualCurrencyPrice.amount}";
				}

				// Loading the bundle image and assigning it to the UI element
				ImageLoader.LoadSprite(bundleItem.image_url, sprite => widget.IconImage.sprite = sprite);
			}
		}

		private void OnError(Error error)
		{
			Debug.LogError($"Error: {error.errorMessage}");
			// Add actions taken in case of error
		}
	}
}

次の写真は、スクリプトの作業の結果です。

仮想通貨パッケージの表示を実装する

仮想通貨パッケージのウィジェットを作成する

  1. 空のゲームオブジェクトを作成します。これを行うには、メインメニューに移動し、GameObject > Create Emptyを選択します。
  2. プレハブで作成したゲームオブジェクトをHierarchyパネルからProjectパネルにドラッグして変換します。
  3. 作成したプレハブを選択し、Inspectorパネルで、Open Prefabをクリックします。
  4. 以下のUI要素をプレハブの子オブジェクトとして追加し、そのビジュアルを設定します:

    • ウィジェットの背景画像
    • パッケージ名
    • パッケージ説明
    • パッケージ価格
    • パッケージ画像

次の図は、ウィジェットの構造の一例です。

ウィジェットスクリプトを作成する

  1. MonoBehaviourのベースクラスを継承したVirtualCurrencyPackageWidgetスクリプトを作成します。
  2. アイテムウィジェットのインターフェイス要素のための変数を宣言し、Inspectorパネルでその値を設定します。

ウィジェットスクリプトの例:

Copy
Full screen
Small screen
using UnityEngine;
using UnityEngine.UI;

namespace Xsolla.Samples.DisplayCatalog
{
	public class VirtualCurrencyPackageWidget : MonoBehaviour
	{
		// Declaration of variables for UI elements
		public Text NameText;
		public Text DescriptionText;
		public Text PriceText;
		public Image IconImage;
	}
}

仮想通貨パッケージのリストを表示するページを作成する

  1. シーン上で、空のゲームオブジェクトを作成します。これを行うには、メインメニューでGameObject > Create Emptyを選択します。
  2. 以下のUI要素をプレハブの子オブジェクトとして追加し、そのビジュアルを設定します:
    • ページの背景画像
    • 仮想通貨パッケージウィジェットの表示エリア

次の図は、ページ構成の一例です。

ページコントローラーを作成する

  1. MonoBehaviourベースクラスを継承したVirtualCurrencyPackagesPageスクリプトを作成します。
  2. 以下の変数を宣言します:
    • WidgetsContainer — ウィジェットのコンテナ
    • WidgetPrefab — 仮想通貨パッケージプレハブ

  1. ページゲームオブジェクトにスクリプトをアタッチします:
    1. Hierarchyパネルでオブジェクトを選択します。
    2. Inspectorパネルで、Add Componentをクリックして、VirtualCurrencyPackagesPageスクリプトを選択します。
  2. Inspectorパネルで変数の値を設定します。
  3. スクリプトの例に示すように、ログインロジックと仮想通貨パッケージのリストを取得するロジックを追加します。
お知らせ

ログインするスクリプトの例では、デモアカウントの資格情報を使用します(ユーザー名:xsolla、パスワード:xsolla)。

スクリプトサンプルには、カタログのアイテムをページごとに表示する(ページネーション)実装は含まれていません。GetCatalog SDKメソッドのoffsetおよびlimitパラメータを使用してページネーションを実装します。1 ページのアイテムの最大数は50です。カタログに50を超えるアイテムがある場合は、ページネーションが必要です。

ページコントローラースクリプトの例:
Copy
Full screen
Small screen
using System.Linq;
using UnityEngine;
using Xsolla.Auth;
using Xsolla.Catalog;
using Xsolla.Core;

namespace Xsolla.Samples.DisplayCatalog
{
	public class VirtualCurrencyPackagesPage : MonoBehaviour
	{
		// Declaration of variables for widget's container and prefab
		public Transform WidgetsContainer;
		public GameObject WidgetPrefab;

		private void Start()
		{
			// Starting the authentication process
			// Pass the credentials and callback functions for success and error cases
			// The credentials (username and password) are hard-coded for simplicity
			XsollaAuth.SignIn("xsolla", "xsolla", OnAuthenticationSuccess, OnError);
		}

		private void OnAuthenticationSuccess()
		{
			// After successful authentication starting the request for packages from store
			// Pass the callback functions for success and error cases
			XsollaCatalog.GetVirtualCurrencyPackagesList(OnPackagesRequestSuccess, OnError);
		}

		private void OnPackagesRequestSuccess(VirtualCurrencyPackages packageItems)
		{
			// Iterating the virtual currency packages collection
			foreach (var packageItem in packageItems.items)
			{
				// Instantiating the widget prefab as child of the container
				var widgetGo = Instantiate(WidgetPrefab, WidgetsContainer, false);
				var widget = widgetGo.GetComponent<VirtualCurrencyPackageWidget>();

				// Assigning the values for UI elements
				widget.NameText.text = packageItem.name;
				widget.DescriptionText.text = packageItem.description;

				// The package can be purchased for real money or virtual currency
				// Checking the price type and assigning the values for appropriate UI elements
				if (packageItem.price != null)
				{
					var realMoneyPrice = packageItem.price;
					widget.PriceText.text = $"{realMoneyPrice.amount} {realMoneyPrice.currency}";
				}
				else if (packageItem.virtual_prices != null)
				{
					var virtualCurrencyPrice = packageItem.virtual_prices.First(x => x.is_default);
					widget.PriceText.text = $"{virtualCurrencyPrice.name}: {virtualCurrencyPrice.amount}";
				}

				// Loading the package image and assigning it to the UI element
				ImageLoader.LoadSprite(packageItem.image_url, sprite => widget.IconImage.sprite = sprite);
			}
		}

		private void OnError(Error error)
		{
			Debug.LogError($"Error: {error.errorMessage}");
			// Add actions taken in case of error
		}
	}
}

次の写真は、スクリプトの作業の結果です。

仮想アイテムを実際通貨で販売する

ここでは、SDKメソッドを使用して、仮想アイテムを使用した実際通貨のアイテム販売を実装する方法について説明します。

始める前に、カタログに仮想アイテムを表示する機能を実装します。以下の例では、仮想アイテムの購入を実装する方法を説明します。他のアイテムタイプの設定も同様です。

このチュートリアルでは、以下のロジックの実装について説明します:

例題のロジックとインターフェイスは、あなたのアプリケーションに比べてそれほど複雑ではありません。実際通貨でアイテムを販売し、アイテムのカタログを表示するための実装オプションの可能性については、デモプロジェクトで説明しています。

アイテムウィジェットを完成する

アイテムウィジェットに購入ボタンを追加し、そのビジュアルを構成します。

次の図は、ウィジェットの構造の一例です。

アイテムウィジェットスクリプトを完成する

  1. VirtualItemWidgetスクリプトを開きます。
  2. 購入ボタン用の変数を宣言し、Inspectorパネルでその値を設定します。

ウィジェットスクリプトの例:

Copy
Full screen
Small screen
using UnityEngine;
using UnityEngine.UI;

namespace Xsolla.Samples.SellForRealMoney
{
	public class VirtualItemWidget : MonoBehaviour
	{
		// Declaration of variables for UI elements
		public Text NameText;
		public Text DescriptionText;
		public Text PriceText;
		public Image IconImage;
		public Button BuyButton;
	}
}

アイテムのリストを表示するページコントローラーを完成する

  1. VirtualItemsPageスクリプトを開きます。
  2. スクリプトの例に示すように、仮想アイテム購入ボタンのクリックを処理するためのロジックを追加します。
お知らせ

スクリプトの例では、アイテムの購入が成功した場合にDebug.Logベースメソッドを呼び出しています。インベントリ表示などの他のアクションも追加できます。

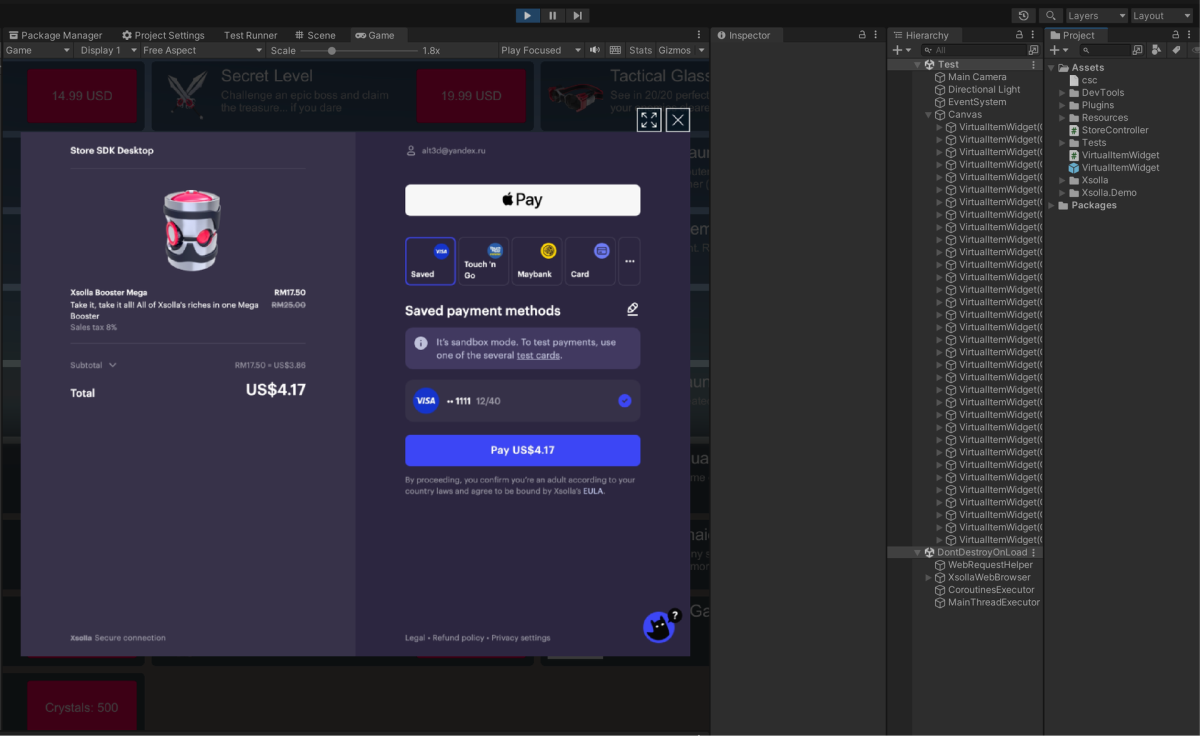
デフォルトでは、決済ページは内ビルドインブラウザで開きます。外部ブラウザで開くには、Unity編集器のメインメニューにあるWindow > Xsolla > Edit Settingsに移動し、InspectorパネルのEnable in-app browser?ボックスのチェックを外します。Androidアプリケーションで外部ブラウザを使用する場合は、ユーザーが支払いを行った後にアプリにリダイレクトするように、ディープリンクを設定することをお勧めします。

ページのスクリプトの例:
Copy
Full screen
Small screen
using UnityEngine;
using Xsolla.Auth;
using Xsolla.Catalog;
using Xsolla.Core;

namespace Xsolla.Samples.SellForRealMoney
{
	public class VirtualItemsPage : MonoBehaviour
	{
		// Declaration of variables for widget's container and prefab
		public Transform WidgetsContainer;
		public GameObject WidgetPrefab;

		private void Start()
		{
			// Starting the authentication process
			// Pass the credentials and callback functions for success and error cases
			// The credentials (username and password) are hard-coded for simplicity
			XsollaAuth.SignIn("xsolla", "xsolla", OnAuthenticationSuccess, OnError);
		}

		private void OnAuthenticationSuccess()
		{
			// Starting the items request from the store after successful authentication
			// Pass the callback functions for success and error cases
			XsollaCatalog.GetCatalog(OnItemsRequestSuccess, OnError);
		}

		private void OnItemsRequestSuccess(StoreItems storeItems)
		{
			// Iterating the items collection
			foreach (var storeItem in storeItems.items)
			{
				// Skipping items without prices in real money
				if (storeItem.price == null)
					continue;

				// Instantiating the widget prefab as child of the container
				var widgetGo = Instantiate(WidgetPrefab, WidgetsContainer, false);
				var widget = widgetGo.GetComponent<VirtualItemWidget>();

				// Assigning the values for UI elements
				widget.NameText.text = storeItem.name;
				widget.DescriptionText.text = storeItem.description;

				// Assigning the price and currency values for UI elements
				var price = storeItem.price;
				widget.PriceText.text = $"{price.amount} {price.currency}";

				// Loading the item image and assigning it to the UI element
				ImageLoader.LoadSprite(storeItem.image_url, sprite => widget.IconImage.sprite = sprite);

				// Assigning the click listener for the buy button
				widget.BuyButton.onClick.AddListener(() =>
				{
					// Starting the purchase process
					// Pass the item SKU and callback functions for success and error cases
					XsollaCatalog.Purchase(storeItem.sku, OnPurchaseSuccess, OnError);
				});
			}
		}

		private void OnPurchaseSuccess(OrderStatus status)
		{
			Debug.Log("Purchase successful");
			// Add actions taken in case of success
		}

		private void OnError(Error error)
		{
			Debug.LogError($"Error: {error.errorMessage}");
			// Add actions taken in case of error
		}
	}
}

仮想アイテムを仮想通貨で販売する

ここでは、SDKメソッドを使用して、仮想アイテムを使用した仮想通貨のアイテム販売を実装する方法について説明します。

始める前に、カタログに仮想アイテムを表示する機能を実装します。以下の例では、仮想アイテムの購入を実装する方法を説明します。他のアイテムタイプの設定も同様です。

このチュートリアルでは、以下のロジックの実装について説明します:

例題のロジックとインターフェイスは、あなたのアプリケーションに比べてそれほど複雑ではありません。仮想通貨でアイテムを販売し、アイテムのカタログを表示するための実装オプションの可能性については、デモプロジェクトで説明しています。

アイテムウィジェットを完成する

アイテムウィジェットに購入ボタンを追加し、そのビジュアルを構成します。

次の図は、ウィジェットの構造の一例です。

アイテムウィジェットスクリプトを完成する

  1. VirtualItemWidgetスクリプトを開きます。
  2. 購入ボタン用の変数を宣言し、Inspectorパネルでその値を設定します。

ウィジェットスクリプトの例:

Copy
Full screen
Small screen
using UnityEngine;
using UnityEngine.UI;

namespace Xsolla.Samples.SellForVirtualCurrency
{
	public class VirtualItemWidget : MonoBehaviour
	{
		// Declaration of variables for UI elements
		public Text NameText;
		public Text DescriptionText;
		public Text PriceText;
		public Image IconImage;
		public Button BuyButton;
	}
}

アイテムのリストを表示するページコントローラーを完成する

  1. VirtualItemsPageスクリプトを開きます。
  2. スクリプトの例に示すように、仮想アイテム購入ボタンのクリックを処理するためのロジックを追加します。
お知らせ

スクリプトの例では、アイテムの購入が成功した場合にDebug.Logベースメソッドを呼び出しています。インベントリの表示仮想通貨の残高変更など、他のアクションを追加することができます。

購入したアイテムをインベントリに追加するロジックを実装する必要はなく、自動的に行われます。

ページのスクリプトの例:
Copy
Full screen
Small screen
using System.Linq;
using UnityEngine;
using Xsolla.Auth;
using Xsolla.Catalog;
using Xsolla.Core;

namespace Xsolla.Samples.SellForVirtualCurrency
{
	public class VirtualItemsPage : MonoBehaviour
	{
		// Declaration of variables for containers and widget prefabs
		public Transform WidgetsContainer;
		public GameObject WidgetPrefab;

		private void Start()
		{
			// Starting the authentication process
			// Pass the credentials and callback functions for success and error cases
			// The credentials (username and password) are hard-coded for simplicity
			XsollaAuth.SignIn("xsolla", "xsolla", OnAuthenticationSuccess, OnError);
		}

		private void OnAuthenticationSuccess()
		{
			// After successful authentication starting the request for catalog from store
			// Pass the callback functions for success and error cases
			XsollaCatalog.GetCatalog(OnItemsRequestSuccess, OnError);
		}

		private void OnItemsRequestSuccess(StoreItems storeItems)
		{
			// Iterating the items collection
			foreach (var storeItem in storeItems.items)
			{
				// Skipping items without prices in virtual currency
				if (storeItem.virtual_prices.Length == 0)
					continue;

				// Instantiating the widget prefab as child of the container
				var widgetGo = Instantiate(WidgetPrefab, WidgetsContainer, false);
				var widget = widgetGo.GetComponent<VirtualItemWidget>();

				// Assigning the values for UI elements
				widget.NameText.text = storeItem.name;
				widget.DescriptionText.text = storeItem.description;

				// Assigning the price and currency values for UI elements
				// The first price is used for the sake of simplicity
				var price = storeItem.virtual_prices.First(x => x.is_default);
				widget.PriceText.text = $"{price.name}: {price.amount}";

				// Loading the item image and assigning it to the UI element
				ImageLoader.LoadSprite(storeItem.image_url, sprite => widget.IconImage.sprite = sprite);

				// Assigning the click listener for the buy button
				widget.BuyButton.onClick.AddListener(() =>
				{
					// Starting the purchase process
					// Pass the item SKU, the price virtual currency SKU and callback functions for success and error cases
					XsollaCatalog.PurchaseForVirtualCurrency(storeItem.sku, price.sku, OnPurchaseSuccess, OnError);
				});
			}
		}

		private void OnPurchaseSuccess(OrderStatus status)
		{
			Debug.Log("Purchase successful");
			// Add actions taken in case of success
		}

		private void OnError(Error error)
		{
			Debug.LogError($"Error: {error.errorMessage}");
			// Add actions taken in case of error
		}
	}
}

仮想通貨残高の表示

このチュートリアルでは、SDKメソッドを使って、アプリ内で仮想通貨の残高を表示する方法を紹介します。

例のロジックとインターフェイスは、アプリケーションよりも複雑ではありません。インゲームストアの実装オプションで可能なアイテムカタログについては、デモプロジェクトで説明しています。

残高表示用ウィジェットの作成

  1. 空のゲームオブジェクトを作成します。これを行うには、メインメニューに移動し、GameObject > Create Emptyを選択します。
  2. プレハブで作成したゲームオブジェクトをHierarchyパネルからProjectパネルにドラッグして変換します。
  3. 作成したプレハブを選択し、Inspectorパネルで、Open Prefabをクリックします。
  4. 以下のUI要素をプレハブの子オブジェクトとして追加し、そのビジュアルを設定します:
    • ウィジェットの背景画像
    • 仮想通貨名
    • 仮想通貨の数量
    • 仮想通貨の画像

次の図は、ウィジェットの構造の一例です。

残高表示のためのウィジェットスクリプトを作成する

  1. MonoBehaviourのベースクラスを継承したVirtualCurrencyWidgetスクリプトを作成します。
  2. アイテムウィジェットのインターフェイス要素のための変数を宣言し、Inspectorパネルでその値を設定します。

ウィジェットスクリプトの例:

Copy
Full screen
Small screen
using UnityEngine;
using UnityEngine.UI;

namespace Xsolla.Samples.DisplayVirtualCurrencyBalance
{
	public class VirtualCurrencyWidget : MonoBehaviour
	{
		// Declaration of variables for UI elements
		public Text NameText;
		public Text AmountText;
		public Image IconImage;
	}
}

仮想通貨の一覧ページを作成する

  1. シーン上で、空のゲームオブジェクトを作成します。これを行うには、メインメニューでGameObject > Create Emptyを選択します。
  2. 以下のUI要素をプレハブの子オブジェクトとして追加し、そのビジュアルを設定します:
    • ページの背景画像
    • ウィジェットの表示エリア

次の図は、ページ構成の一例です。

仮想通貨のリストを表示するページのコントローラを作成する

  1. MonoBehaviourのベースクラスを継承したVirtualCurrenciesPageスクリプトを作成します。
  2. 以下の変数を宣言します:
    • WidgetsContainer — ウィジェットのコンテナ
    • WidgetPrefab — 残高表示ウィジェットのプレハブ

  1. ページゲームオブジェクトにスクリプトをアタッチします:
    1. Hierarchyパネルでオブジェクトを選択します。
    2. Inspectorパネルで、Add ComponentをクリックしてVirtualCurrenciesPageスクリプトを選択します。

  1. Inspectorパネルで変数の値を設定します。
  2. スクリプト例に示すように、ログインロジックと仮想通貨のリストを取得するロジックを追加します。
お知らせ
ログインするスクリプトの例では、デモアカウントの資格情報を使用します(ユーザー名:xsolla、パスワード:xsolla)。
ページコントローラースクリプトの例:
Copy
Full screen
Small screen
using UnityEngine;
using Xsolla.Auth;
using Xsolla.Core;
using Xsolla.Inventory;

namespace Xsolla.Samples.DisplayVirtualCurrencyBalance
{
	public class VirtualCurrenciesPage : MonoBehaviour
	{
		// Declaration of variables for widget's container and prefab
		public Transform WidgetsContainer;
		public GameObject WidgetPrefab;

		private void Start()
		{
			// Starting the authentication process
			// Pass the credentials and callback functions for success and error cases
			// The credentials (username and password) are hard-coded for simplicity
			XsollaAuth.SignIn("xsolla", "xsolla", OnAuthenticationSuccess, OnError);
		}

		private void OnAuthenticationSuccess()
		{
			// Starting the virtual currencies request from the store after successful authentication
			// Pass the callback functions for success and error cases
			XsollaInventory.GetVirtualCurrencyBalance(OnBalanceRequestSuccess, OnError);
		}

		private void OnBalanceRequestSuccess(VirtualCurrencyBalances balance)
		{
			// Iterating the virtual currency balances collection
			foreach (var balanceItem in balance.items)
			{
				// Instantiating the widget prefab as child of the container
				var widgetGo = Instantiate(WidgetPrefab, WidgetsContainer, false);
				var widget = widgetGo.GetComponent<VirtualCurrencyWidget>();

				// Assigning the values for UI elements
				widget.NameText.text = balanceItem.name;
				widget.AmountText.text = balanceItem.amount.ToString();

				ImageLoader.LoadSprite(balanceItem.image_url, sprite => widget.IconImage.sprite = sprite);
			}
		}

		private void OnError(Error error)
		{
			Debug.LogError($"Error: {error.errorMessage}");
			// Add actions taken in case of error
		}
	}
}

次の写真は、スクリプトの作業の結果です。

インベントリでアイテムの表示

このチュートリアルでは、SDKのメソッドを使ってユーザーのインベントリにアイテムを表示する方法を紹介します。

例題の論理とインターフェースは、お客様のアプリケーションでの使用よりも複雑ではありません。イベントリの実装方法は、デモプロジェクトで紹介されています。

アイテムウィジェットを作成する

  1. 空のゲームオブジェクトを作成します。これを行うには、メインメニューに移動し、GameObject > Create Emptyを選択します。
  2. プレハブで作成したゲームオブジェクトをHierarchyパネルからProjectパネルにドラッグして変換します。
  3. 作成したプレハブを選択し、Inspectorパネルで、Open Prefabをクリックします。
  4. 以下のUI要素をプレハブの子オブジェクトとして追加し、そのビジュアルを設定します:
    • アイテムの背景画像
    • アイテム名
    • アイテムの説明
    • アイテムの量
    • アイテムの画像

次の図は、ウィジェットの構造の一例です。

アイテムウィジェットスクリプトを作成する

  1. MonoBehaviourのベースクラスを継承したInventoryItemWidgetスクリプトを作成します。
  2. アイテムウィジェットのインターフェイス要素のための変数を宣言し、Inspectorパネルでその値を設定します。

ウィジェットスクリプトの例:

Copy
Full screen
Small screen
using UnityEngine;
using UnityEngine.UI;

namespace Xsolla.Samples.DisplayItemsInInventory
{
	public class InventoryItemWidget : MonoBehaviour
	{
		// Declaration of variables for UI elements
		public Text NameText;
		public Text DescriptionText;
		public Text QuantityText;
		public Image IconImage;
	}
}

インベントリを表示するページを作成する

  1. シーン上で、空のゲームオブジェクトを作成します。これを行うには、メインメニューでGameObject > Create Emptyを選択します。
  2. 以下のUI要素をプレハブの子オブジェクトとして追加し、そのビジュアルを設定します:
    • ページの背景画像
    • アイテムウィジェットの表示エリア

次の図は、ページ構成の一例です。

ページコントローラーを作成する

  1. MonoBehaviourのベースクラスを継承したInventoryItemsPageスクリプトを作成します。
  2. 以下の変数を宣言します:
    • WidgetsContainer — アイテムウィジェットのコンテナ
    • WidgetPrefab — アイテムウィジェットのプレハブ

  1. ページゲームオブジェクトにスクリプトをアタッチします:
    1. Hierarchyパネルでオブジェクトを選択します。
    2. Inspectorパネルで、Add ComponentをクリックしてInventoryItemsPageスクリプトを選択します。

  1. Inspectorパネルで変数の値を設定します。
  2. ログイン ロジックと、インベントリ内のアイテムのリストを取得するためのロジックを追加します。
お知らせ
ログインするスクリプトの例では、デモアカウントの資格情報を使用します(ユーザー名:xsolla、パスワード:xsolla)。
ページコントローラースクリプトの例:
Copy
Full screen
Small screen
using UnityEngine;
using Xsolla.Auth;
using Xsolla.Core;
using Xsolla.Inventory;

namespace Xsolla.Samples.DisplayItemsInInventory
{
	public class InventoryItemsPage : MonoBehaviour
	{
		// Declaration of variables for widget's container and prefab
		public Transform WidgetsContainer;
		public GameObject WidgetPrefab;

		private void Start()
		{
			// Starting the authentication process
			// Pass the credentials and callback functions for success and error cases
			// The credentials (username and password) are hard-coded for simplicity
			XsollaAuth.SignIn("xsolla", "xsolla", OnAuthenticationSuccess, OnError);
		}

		private void OnAuthenticationSuccess()
		{
			// Starting the items request from the store after successful authentication
			// Pass the callback functions for success and error cases
			XsollaInventory.GetInventoryItems(OnItemsRequestSuccess, OnError);
		}

		private void OnItemsRequestSuccess(InventoryItems inventoryItems)
		{
			// Iterating the items collection
			foreach (var inventoryItem in inventoryItems.items)
			{
				// Skipping virtual currency items
				if (inventoryItem.VirtualItemType == VirtualItemType.VirtualCurrency)
					continue;

				// Instantiating the widget prefab as child of the container
				var widgetGo = Instantiate(WidgetPrefab, WidgetsContainer, false);
				var widget = widgetGo.GetComponent<InventoryItemWidget>();

				// Assigning the values for UI elements
				widget.NameText.text = inventoryItem.name;
				widget.DescriptionText.text = inventoryItem.description;
				widget.QuantityText.text = inventoryItem.quantity.ToString();

				// Loading the item image and assigning it to the UI element
				ImageLoader.LoadSprite(inventoryItem.image_url, sprite => widget.IconImage.sprite = sprite);
			}
		}

		private void OnError(Error error)
		{
			Debug.LogError($"Error: {error.errorMessage}");
			// Add actions taken in case of error
		}
	}
}

次の写真は、スクリプトの作業の結果です。

進捗状況
ご意見ありがとうございました!

お役立ちリンク

最終更新日: 2023年10月10日

誤字脱字などのテキストエラーを見つけましたか? テキストを選択し、Ctrl+Enterを押します。

内容
問題を報告する
当社は常にコンテンツを見直しています。お客様のご意見は改善に役立ちます。
フォローアップ用のメールをご提供してください
ご意見ありがとうございました!